Domains
When you host your application with Kinsta, you’ll need to add and point your domain to us to deliver your application to visitors.
Your Domains list shows which domains can be used to access your application. The primary domain is the main domain you want your visitors to arrive through.
Every custom domain you add automatically includes a free SSL certificate. The temporary kinsta.app domains are automatically covered by the wildcard certificate of kinsta.app domain. (*.kinsta.app). You can also add a custom SSL certificate.
Determine if a Domain Is Cloudflare or Non-Cloudflare
Users with active Cloudflare accounts require a different setup than those who do not have an active Cloudflare account to maintain compatibility between Cloudflare zones (their Cloudflare account and our free Cloudflare integration).
- If you know your domain is already connected to Cloudflare through your own active Cloudflare account, then it is considered a “Cloudflare domain.” To add your domain, refer to Add a Cloudflare Domain.
- If you know your domain has no connection to Cloudflare (proxy or DNS), then it is considered a “non-Cloudflare domain.” To add your domain, refer to Add a Non-Cloudflare Domain.
When you add your domain in MyKinsta, our system helps guide you through the process and identifies whether or not your domain is a Cloudflare or non-Cloudflare domain.
If you want to check the domain yourself, you can use a tool like Whois.com or whatsmydns.net to view the name servers. Or, you can use the command line interface (CLI) with the following command (replacing example.com with your domain name):
dig +nssearch example.comIf the name servers end with cloudflare.com (e.g. sasha.ns.cloudflare.com), your domain is a Cloudflare domain. If the name servers end with anything else, your domain is a non-Cloudflare domain.
Note: There is one exception to the above, though it isn’t common. If you have a Cloudflare account and you set up custom name servers, they can end with something other than cloudflare.com.
Add a Cloudflare Domain
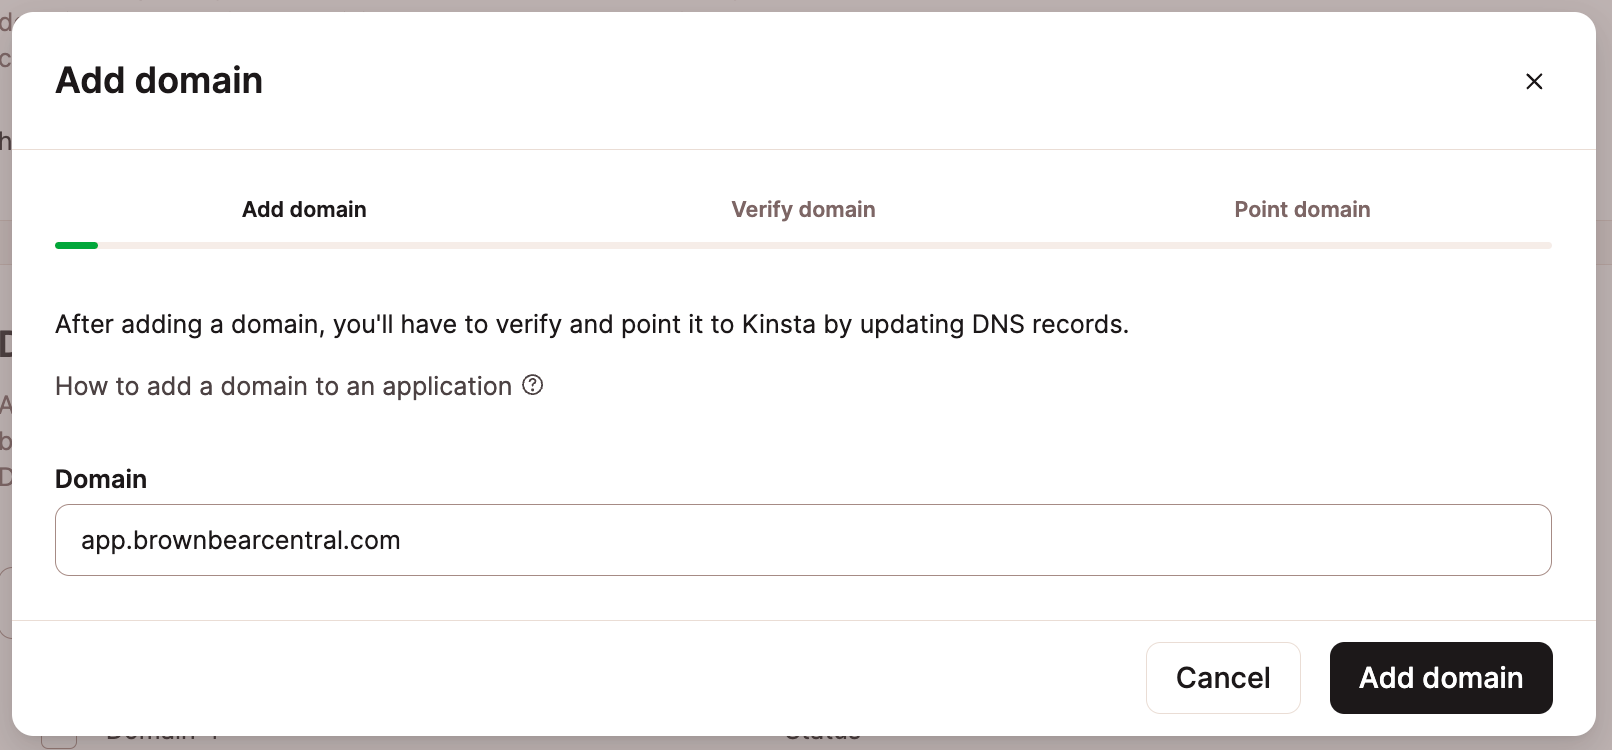
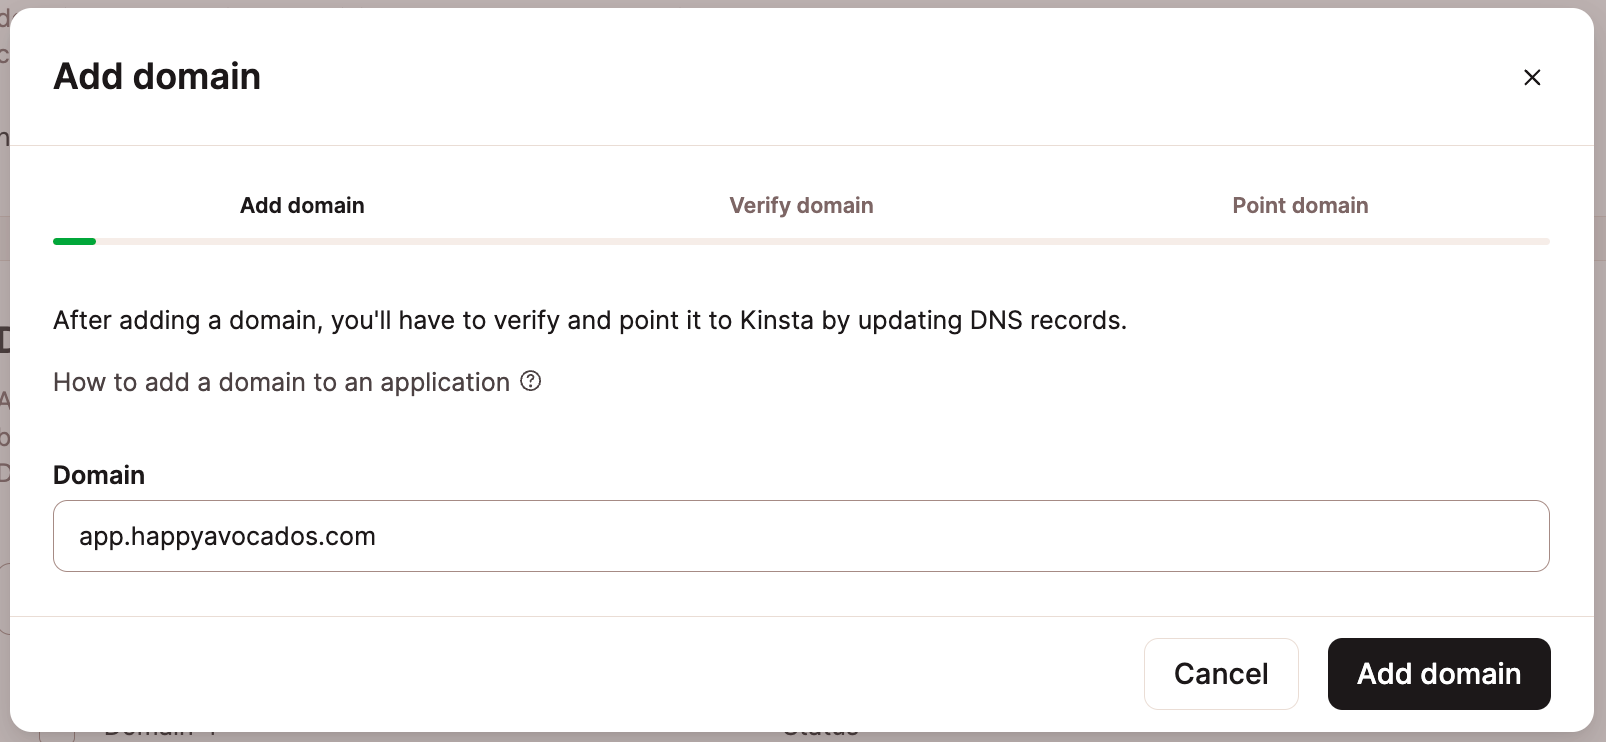
Add Domain
In MyKinsta, go to Applications > appname > Domains.
Click Add domain, enter your domain name, and click Add domain.
Verify Domain
Verifying your Cloudflare domain is a two-phase process. You’ll need to add a TXT record for the initial domain verification, followed by two more TXT records to complete the verification.
Phase One TXT Record
Add the first TXT record shown to your domain’s DNS records at Cloudflare. Back in MyKinsta, click OK, I’ve done it.
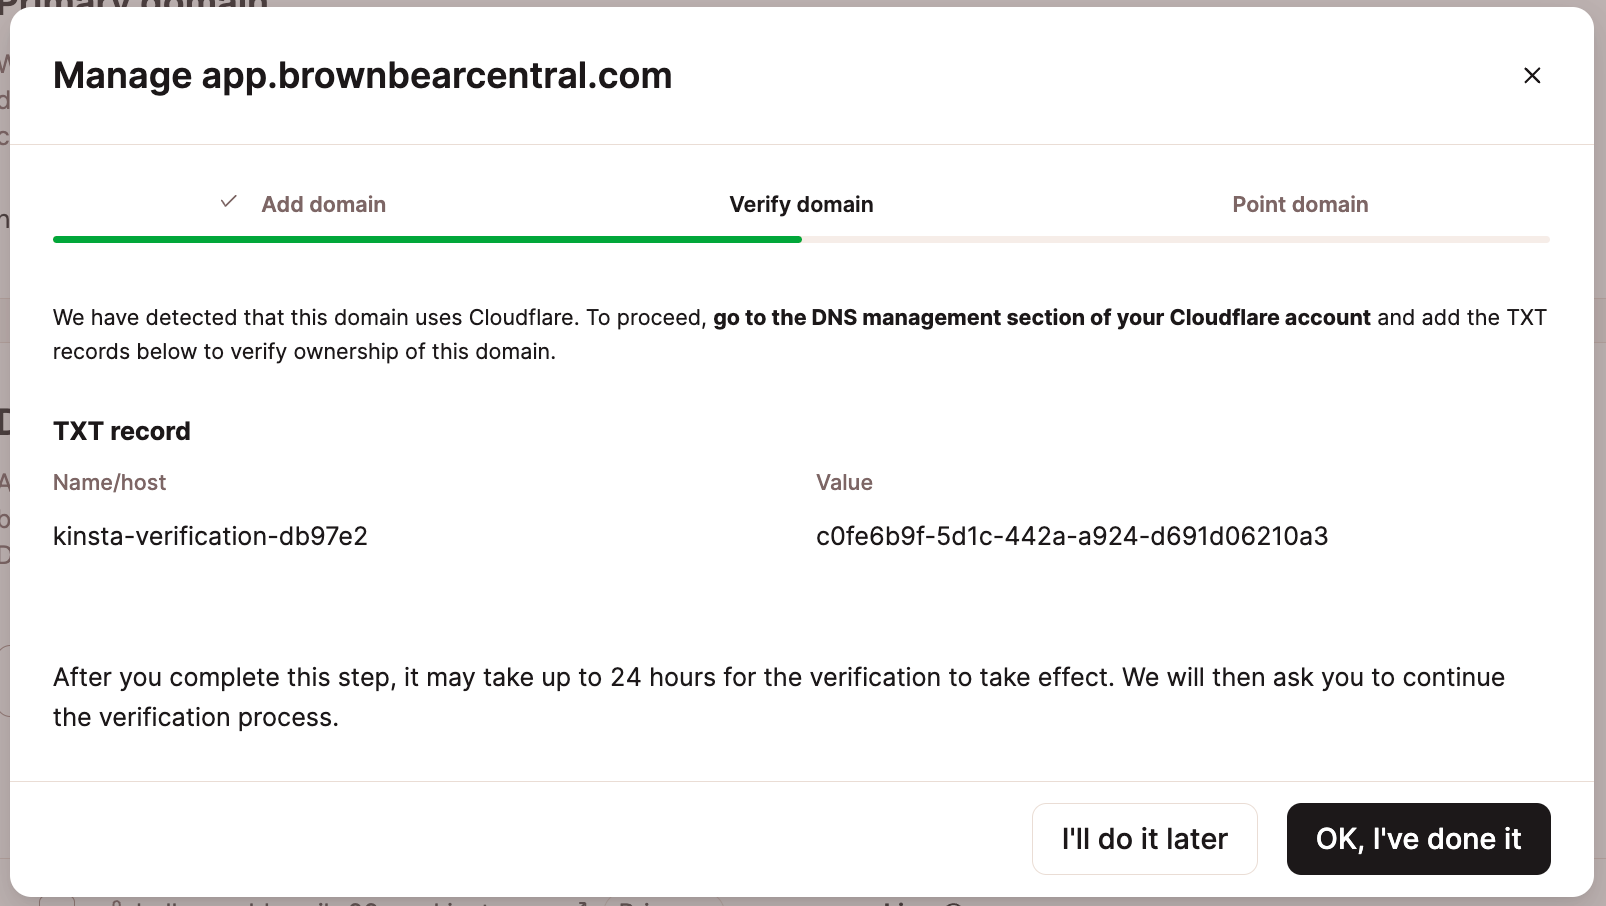
Once DNS propagates (usually within 5-10 minutes for Cloudflare DNS records), the next two TXT records are shown.
Phase Two TXT Records
Add both TXT records to your domain’s DNS records at Cloudflare.
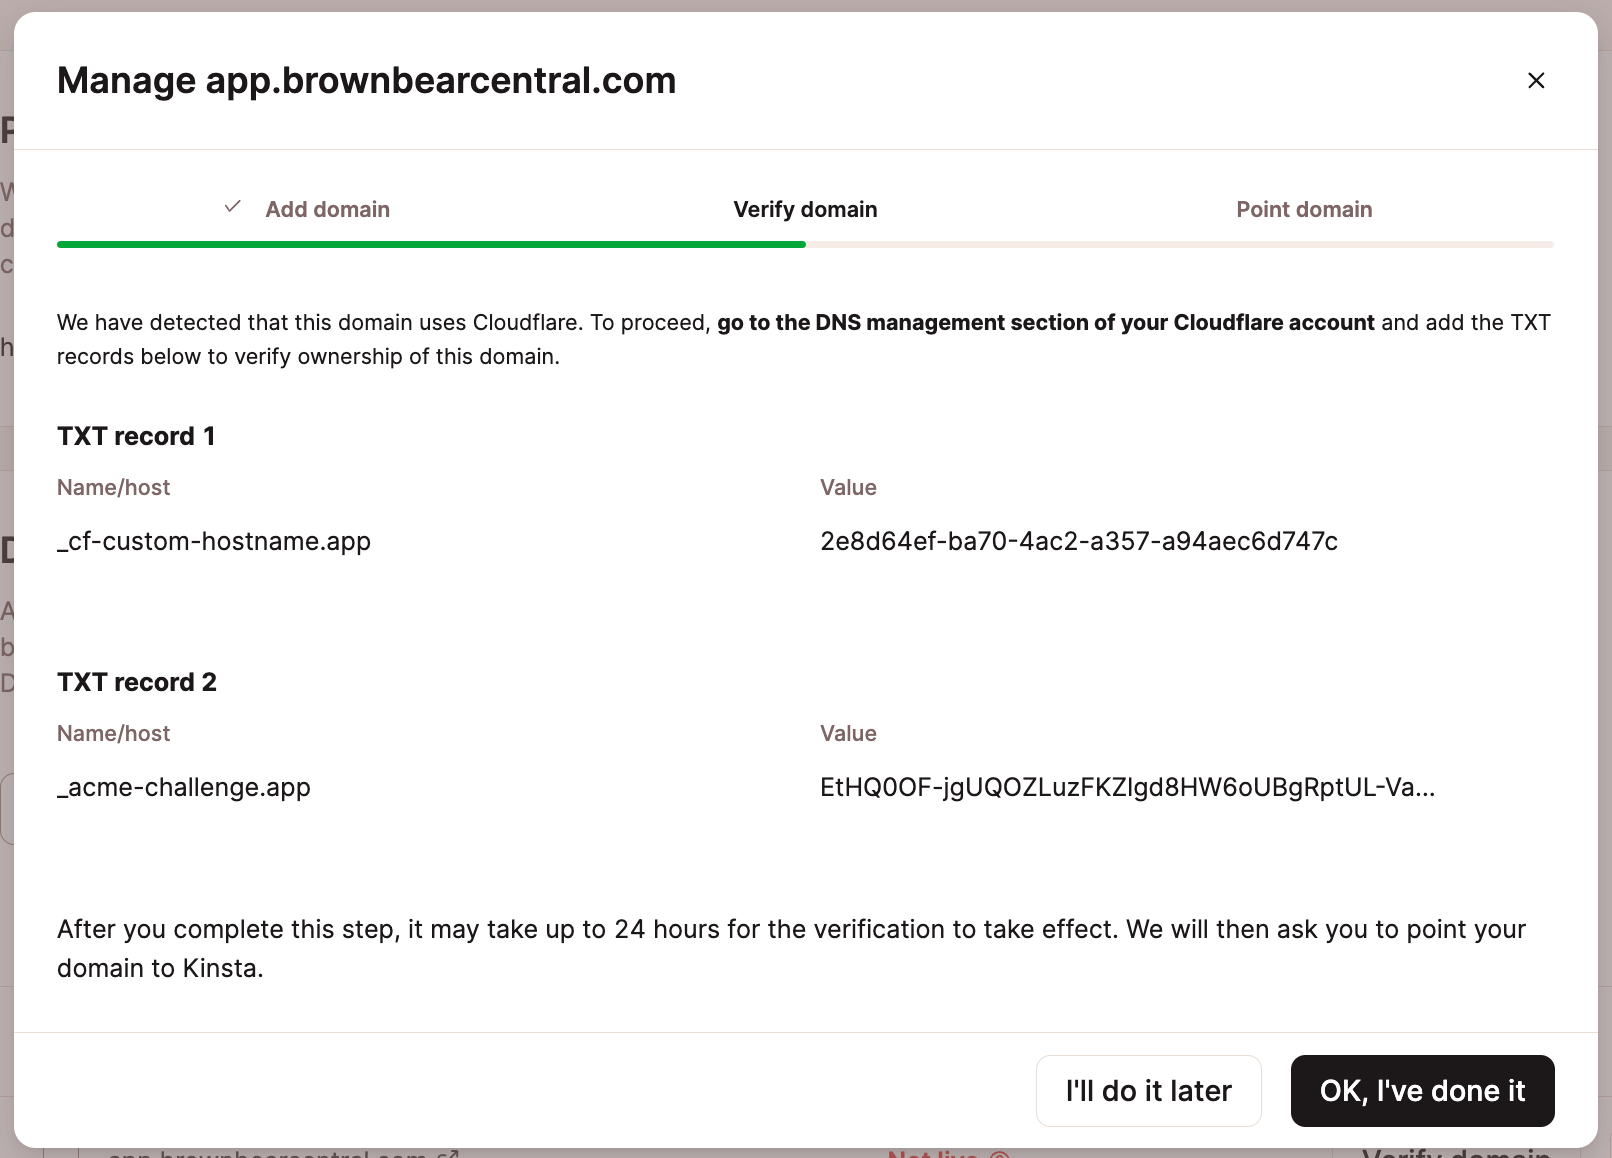
Back in MyKinsta, allow another 5-10 minutes for DNS to propagate.
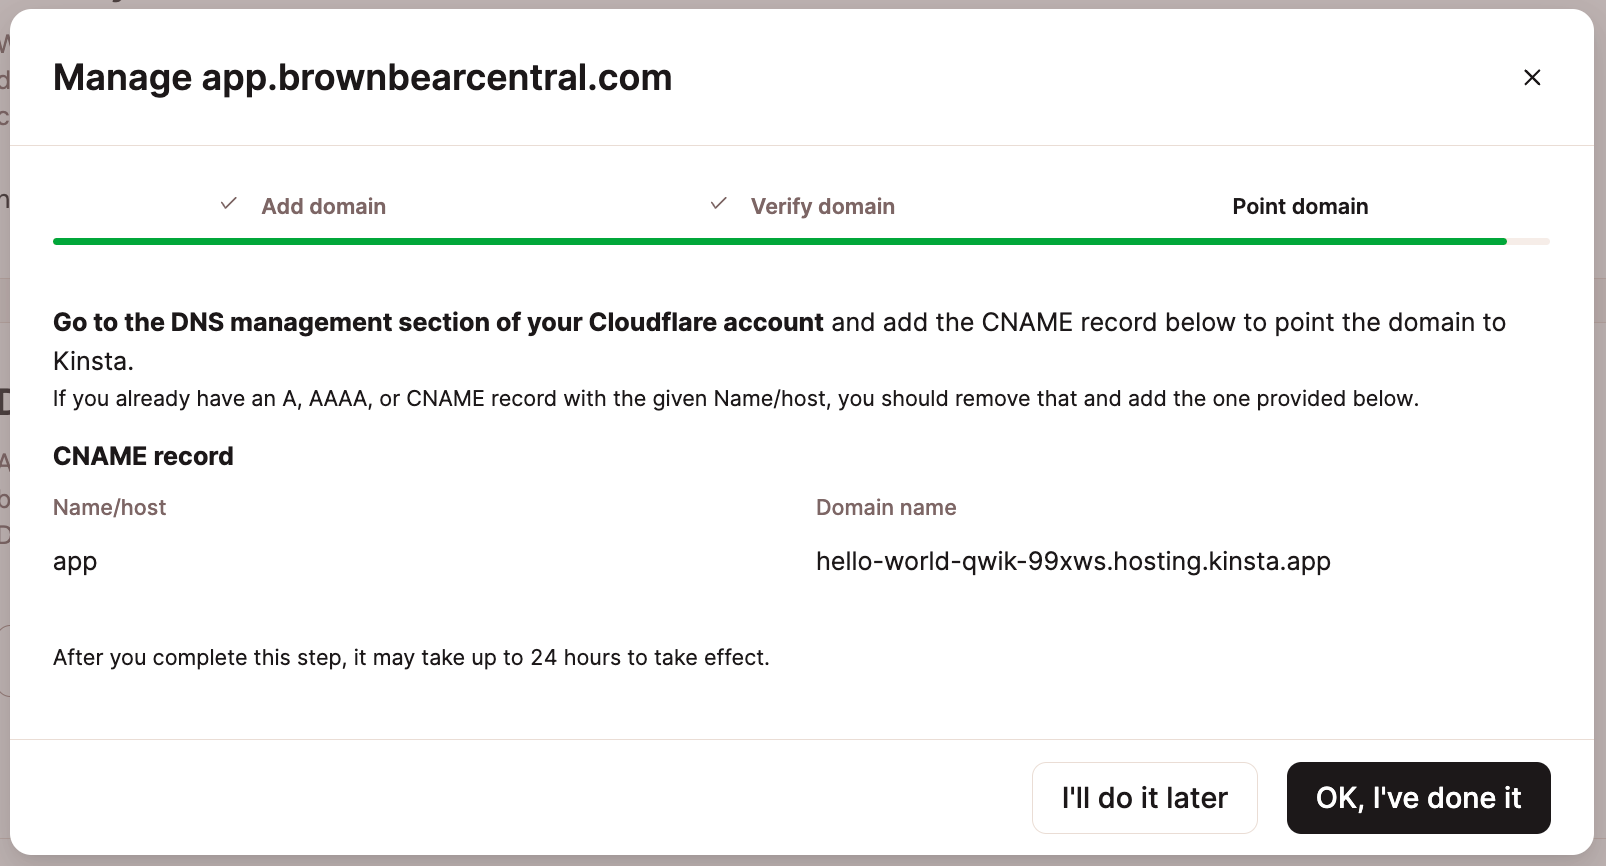
Point Domain
When your domain is successfully verified, you can point the domain. This shows where to point your domain’s CNAME record.
Point Root Domain
At Cloudflare, remove any existing A, AAAA, or CNAME records and add the CNAME record (Name/host @) shown.
Once you’ve added the CNAME record, in MyKinsta, click OK, I’ve done it. Once DNS propagates for the CNAME record, you’ll see a checkmark next to your root domain in MyKinsta. This indicates that the root domain has been pointed to Kinsta correctly.
Point WWW Domain
In addition to the CNAME record for your root domain, we also recommend you point the www version of your domain to Kinsta (if you haven’t already). You’ll need to add the www version of the domain to MyKinsta and repeat the steps to verify and point the subdomain.
Existing DNS Zone Record at Cloudflare
When adding and pointing a domain to your Application in MyKinsta, under certain circumstances, you may see a warning that the domain has an existing zone record at Cloudflare, and continuing may cause your site to go offline.
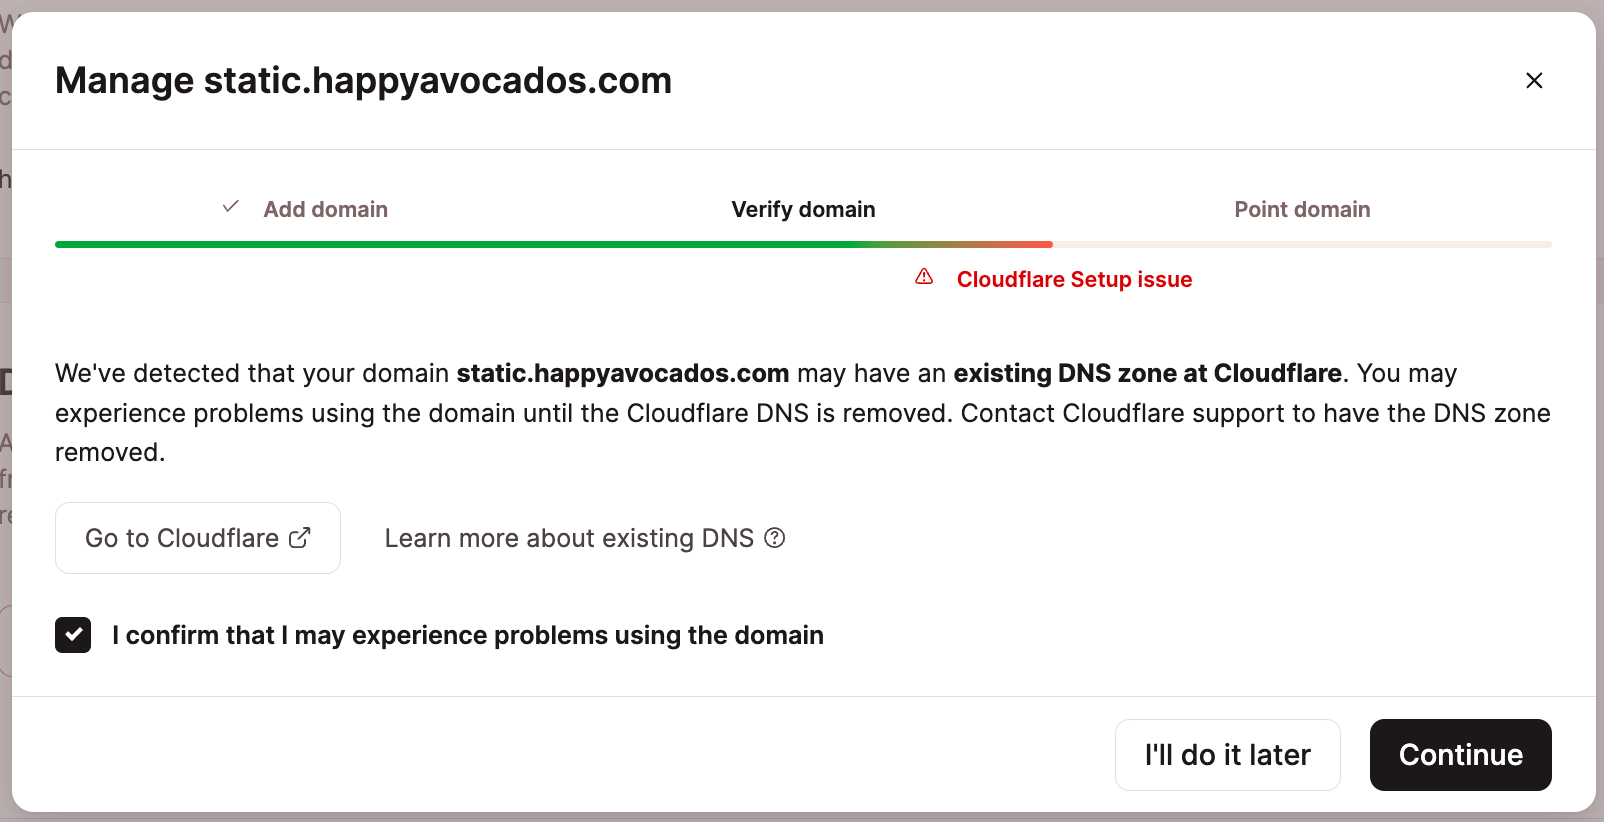
If you’re sure that you do not need to remove the existing zone record at Cloudflare, you can choose to continue without removing it.
If you do need to remove the existing zone record at Cloudflare, this is the message you can send to them, replacing YOURDOMAIN.com with your actual domain name.
Hi,
I am writing to you about the domain YOURDOMAIN.com.
My host, Kinsta, has detected an old, unused Cloudflare DNS zone for my domain. Would you please remove it from your system?
I confirm that I have access to DNS for the domain and am willing to add a TXT record to prove domain ownership. Please send the TXT record you would like me to use.
Thanks!
If you’re not sure whether or not you need to remove the existing zone record, contact our Support Team, and we will review your setup and let you know how to proceed.
Add a Non-Cloudflare Domain
Add Domain
In MyKinsta, go to Applications > appname > Domains.
Click Add domain, enter your domain name, and click Add domain.
Verify Domain
You need to verify ownership of your domain in order to use Kinsta’s free Cloudflare integration. To verify a new domain, you need to add two TXT records to your domain’s DNS. Your DNS provider is where your domain’s name servers are pointed to. This may be your domain’s registrar but could be another DNS provider.
If you’re using Kinsta’s DNS, go to DNS in MyKinsta and add the new TXT records.
If you’re using a different DNS provider, log in to your DNS provider’s management panel and add the new TXT records.

Once you’ve added the TXT records at your DNS provider, in MyKinsta, click OK, I’ve Done It.
Depending on your DNS provider, the TXT records may take up to 24 hours to propagate.
Point Domain
When your domain is successfully verified, you can point the domain. This shows the Site IP address for your domain’s A record.
For more detailed information on updating DNS at some popular registrars and DNS managers, check out these articles:
- How to Add A Record with GoDaddy
- How to Add an A Record and CNAME at Bluehost
- How to Add A Record with Namecheap
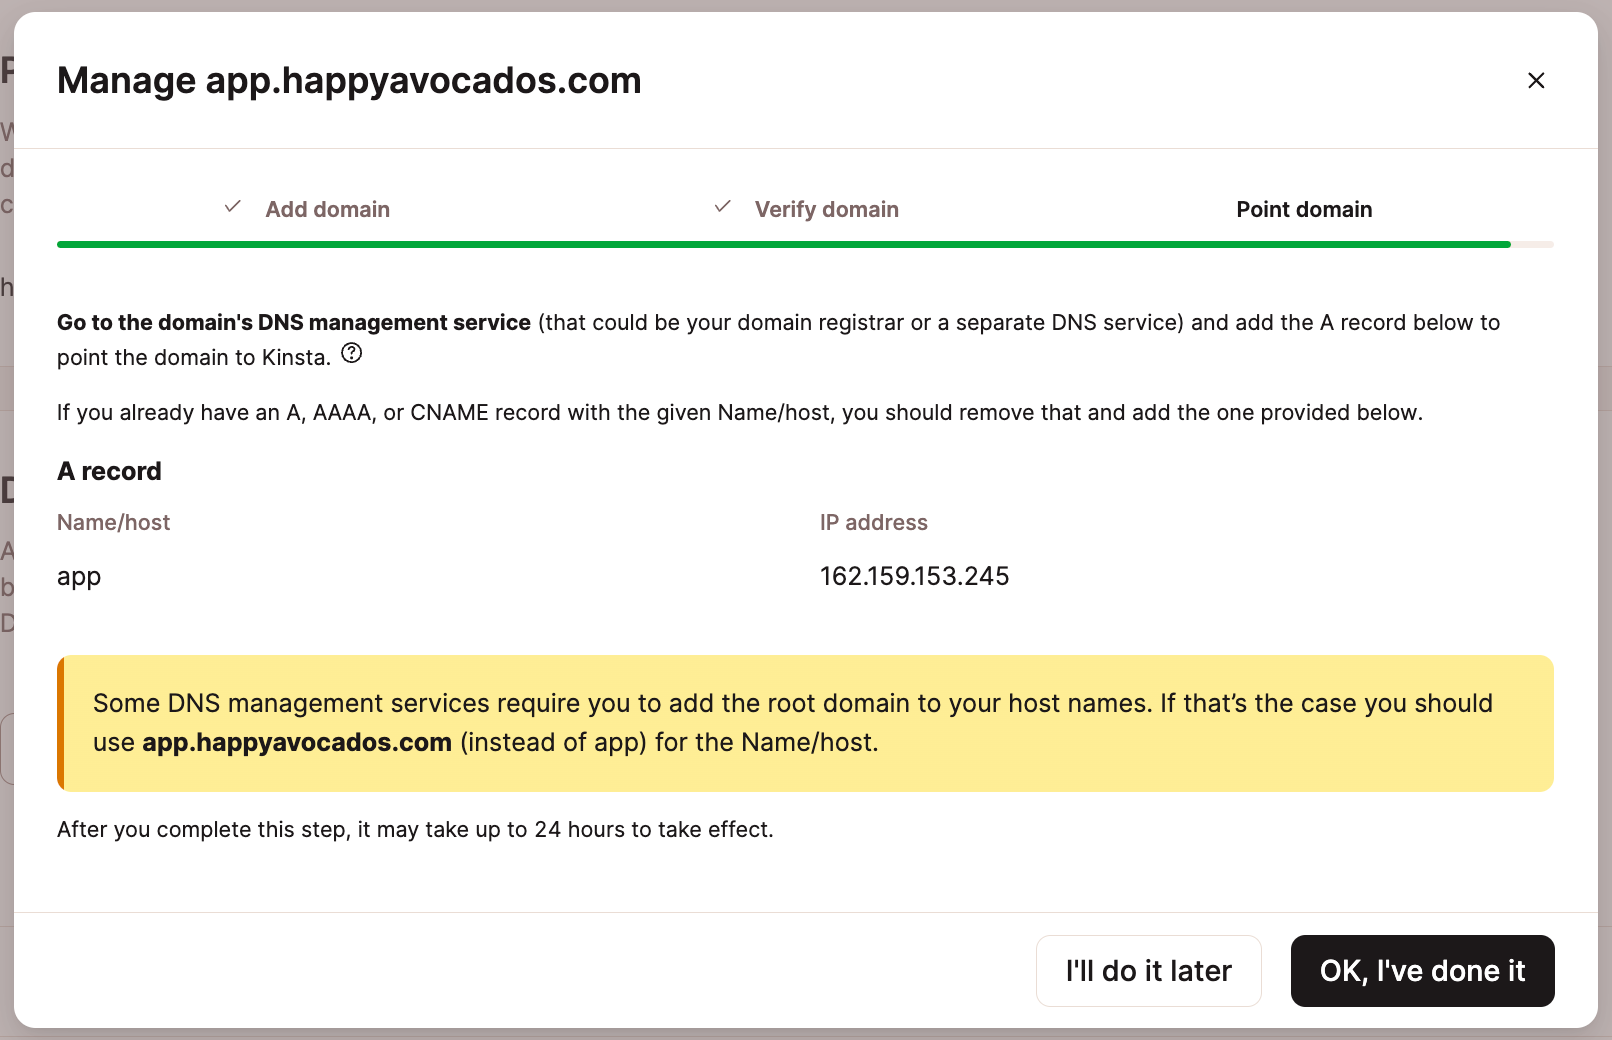
Point Root Domain
At your DNS provider, remove any existing A, AAAA, or CNAME records and add a new A record pointing to your Site IP Address. To point your root domain, leave the Hostname field blank. To point a subdomain, specify your subdomain in the Hostname field.
Once you’ve added the A record at your DNS provider, in MyKinsta, click OK, I’ve done it.
Point WWW Domain
In addition to the A record for your root domain, we also recommend you point the www version of your domain to Kinsta (if you haven’t already). You’ll need to add the www version of the domain to MyKinsta and repeat the steps to verify and point the www subdomain.
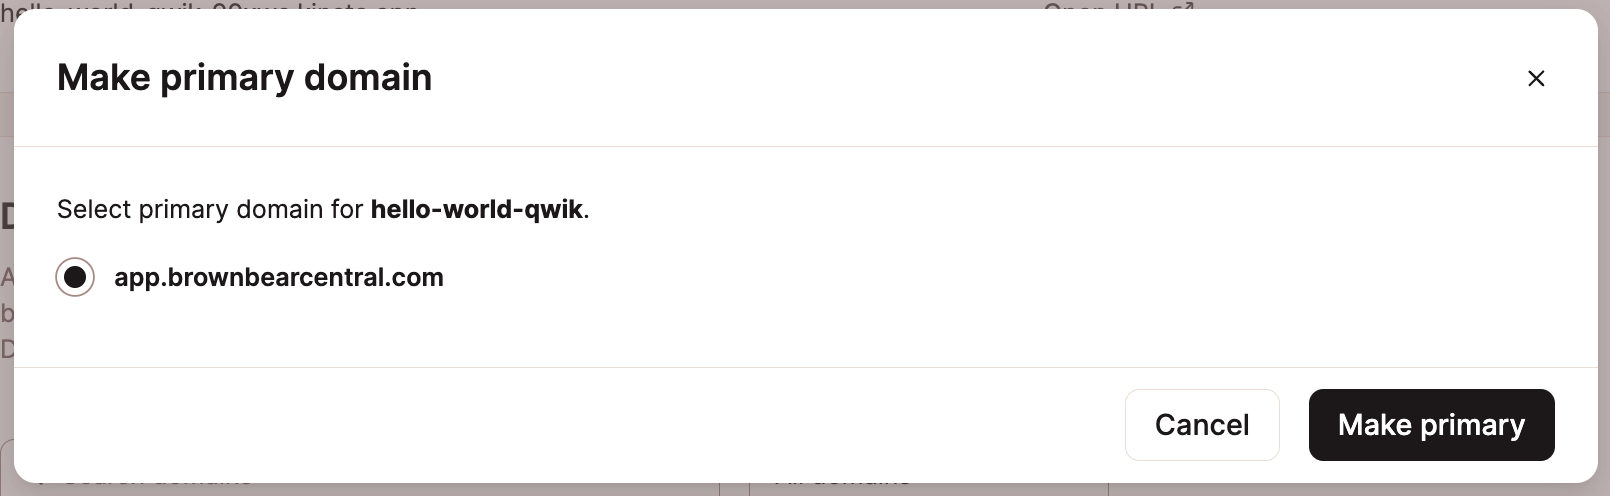
Change Your Primary Domain
In the domains list, locate the domain you want to be the primary domain, click the kebab (three-dot) menu and Make primary domain. Verify the correct domain is selected and click Make primary.
Troubleshooting the Fix Domain Error
During the domain verification process, if a Fix domain error button appears next to the domain, this means a CAA record conflict is occurring.
A CAA record is an optional DNS record that lets you specify which certificate authorities (CAs) are allowed to issue SSL certificates for your domain. If a domain has no CAA records, any CA can generate an SSL certificate for it if requested. If a domain has a CAA record, only the CA(s) specified in the CA record can generate an SSL certificate for the domain.
To resolve this error, click the Fix domain error button and update the CAA record as indicated in the modal/pop-up. Alternatively, if you do not need a CAA record on your domain, you can remove the CAA record.