User Management
With our multi-user feature, you can create and manage a team, giving them access to various aspects of your WordPress websites, applications, databases, or static sites. We offer a number of roles to allow you to fine-tune user access. This article explains the various capabilities you can give to your users.
User Roles
Company Ownership Role
There is a special role called the Company Owner. A Company Owner is always also a Company Administrator. There can only be one Company Owner per company.
A Company Owner is the only user in a company who can request an account closure or transfer company ownership (to a Company Administrator in the same account). Apart from that, they are exactly like Company Administrators in day-to-day use.
Company Roles
When inviting or modifying a user, the first choice is to give the user Company access or Service access. Service-level users only have access to specific WordPress sites, applications, databases, or static sites you assign to them, while company users see company-level details. There are 3 company-level user roles to choose from, with various levels of access based on their role.
All user roles have access to Kinsta’s Support team, but we can only assist with sites your user role can access. If you only have Static Site Hosting with Kinsta, this is a free service, and therefore 24/7 live chat is not available. We do have detailed Static Site Hosting documentation, and you can also connect with developers and knowledgeable community members in the Kinsta Community forum. This forum is where you can ask questions and discuss all things static site hosting, including website deployment, static site generators, and more. Whether you’re curious about choosing the right style of a static site, troubleshooting issues, or optimizing performance, our community is here to assist you.
Company Administrator
Company Administrators have the highest level of access. They have complete control of all company data and full access to all services, including DNS in MyKinsta and migration requests. Only give Company Administrator access to users whom you trust.
Company Developer
A Company Developer has access to manage all services and DNS in MyKinsta and can manage service-level users. While a Company Developer can view the list of company users (including email addresses and roles), they cannot make any changes to company-level users.
Company Developers can delete WordPress sites that do not have a Premium Staging Environment add-on. They do not see billing details, company settings, or migration requests. The following actions are billing events a company developer does not have access to:
- Cancel or change a WordPress plan.
- Access Referrals.
- Request a site migration.
- Approve or initiate a site or DNS transfer.
- Request a paid malware cleanup.
- Add or remove a premium staging environment.
- Add, suspend, or remove applications or databases.
- Change the build resources for an application.
- Change the pod size or the number of instances for an application process.
- Change the database size.
- Add or remove an add-on.
If you want a Company Developer to access any of the above features, you must increase their access level to Company Administrator.
Company Billing
A Company Billing user is a special role that only sees billing details and company settings. They can see invoices, enable automatic invoice emails, and modify company details like name and address. They do not have access to any websites, applications, databases, or migrations in any way.
Service Roles
Service-level users can access a specific site, application, or database they are given access to. Service-level users may have access to more than one service, for example, 2 WordPress sites and an application or 2 applications and a database, etc.
WordPress Site Administrator
WordPress Site Administrators have complete access to a site, control of all environments, and access to update DNS records linked to that site. The only actions they are not permitted to do are removing a site from a company’s account, submitting or managing migration requests, or creating and deleting Premium Staging Environments. Note that a single user may be a WordPress Site Administrator for multiple sites.
WordPress Site Developer
WordPress Site Developers have access to the staging environments for the site(s) they are given access to. They only have control over the staging environments and can perform most actions apart from removing the staging environment or pushing it to live. Note that a single user may be a WordPress Site Developer for multiple sites.
WordPress Site Developers do not have access to company-level or live environment analytics, user management, migrations, DNS in MyKinsta, or the company-level activity log in MyKinsta. They cannot create or delete Premium Staging Environments.
Static Site Administrator
Static Site Administrators have complete access to the site they are given access to, with the exception of removing the static site. A single user can be a Static Site Administrator for multiple sites.
Application Administrator
Application Administrators have complete access to the application they are given access to, with the exception of removing the application. A single user can be an Application Administrator for multiple applications.
Database Administrator
Database Administrators have complete access to the database they are given access to, with the exception of removing the database. A single user can be a Database Administrator for multiple databases.
MyKinsta User Roles and Permissions Chart
The following chart provides more specific details about the capabilities each user role has.
| Capability | Company Owner | Company Administrator | Company Developer | Company Billing | Service-level Administrator | WordPress Site Developer |
|---|---|---|---|---|---|---|
| Access billing details or change plan | Yes | Yes | No | Yes | No | No |
| Access referrals | Yes | Yes | No | Yes | No | No |
| Cancel WordPress plan | Yes | No | No | No | No | No |
| Access company analytics | Yes | Yes | Yes | No | No | No |
| Manage all sites, applications, or databases | Yes | Yes | Yes | No | No | No |
| Manage 1 site, application, or database | Yes | Yes | Yes | No | Yes | No |
| Install or remove a paid add-on | Yes | Yes | No | Yes* | No | No |
| Approve inbound WordPress site transfer | Yes | Yes | No | No | No | No |
| Initiate inbound WordPress site/DNS transfer | Yes | Yes | No | No | No | No |
| Request WordPress paid malware cleanup** | Yes | Yes | No | No | No | No |
| Request a WordPress site data center change | Yes | Yes | Yes | No | Yes | No |
| Request a WordPress site migration | Yes | Yes | No | No | No | No |
| Manage WordPress site labels | Yes | Yes | Yes | No | Yes | No |
| Request 2FA be disabled for other users in a company*** | Yes | No | No | No | No | No |
| DNS in MyKinsta | Yes | Yes | Yes | No | Yes***** | No |
| Add or delete WordPress site/live environment | Yes | Yes | Yes**** | No | No | No |
| Add, suspend, or delete application or database | Yes | Yes | No | No | No | No |
| Access live WordPress environment | Yes | Yes | Yes | No | Yes | No****** |
| Access site, application, or database analytics | Yes | Yes | Yes | No | Yes | No |
| Access or Add Standard Staging Environment | Yes | Yes | Yes | No | Yes | Yes |
| Delete or Replace Existing Standard Staging Environment | Yes | Yes | Yes | No | Yes | No |
| Add or delete Premium Staging Environment | Yes | Yes | No | No | No | No |
| Access Premium Staging Environment | Yes | Yes | Yes | No | Yes | Yes |
| Access any staging environment analytics | Yes | Yes | Yes | No | Yes | Yes |
| Push any staging to live | Yes | Yes | Yes | No | Yes | No |
| Push any staging to another staging | Yes | Yes | Yes | No | Yes | Yes |
| Request persistent storage backup restoration | Yes | Yes | No | No | No | No |
*Can add a disk space add-on but cannot manage hourly or external backups; those are managed at the site level.
**If the malware cleanup is free, any user can request it.
***Can request this if the user is only in one company.
****Can delete a live environment if no Premium Staging Environment is attached to it.
*****Can update DNS records if the WordPress site they have access to is linked to a DNS zone.
******When you create a staging environment the database and STFP/SSH credentials are the same as the live environment. If you generate a new password this password is the same for all environments. If you clone an environment when you create a staging environment, the WP admin credentials are the same as the cloned environment.
Invite a User
With our multi-user feature, you can create and manage a team, giving them access to various aspects of your websites, applications, or databases. On the Company Users page, you can invite users to your company or services.
Note: You can also invite a user to a service (but not your company) on the service-level Manage users page.
To invite a user to your company, follow the steps below:
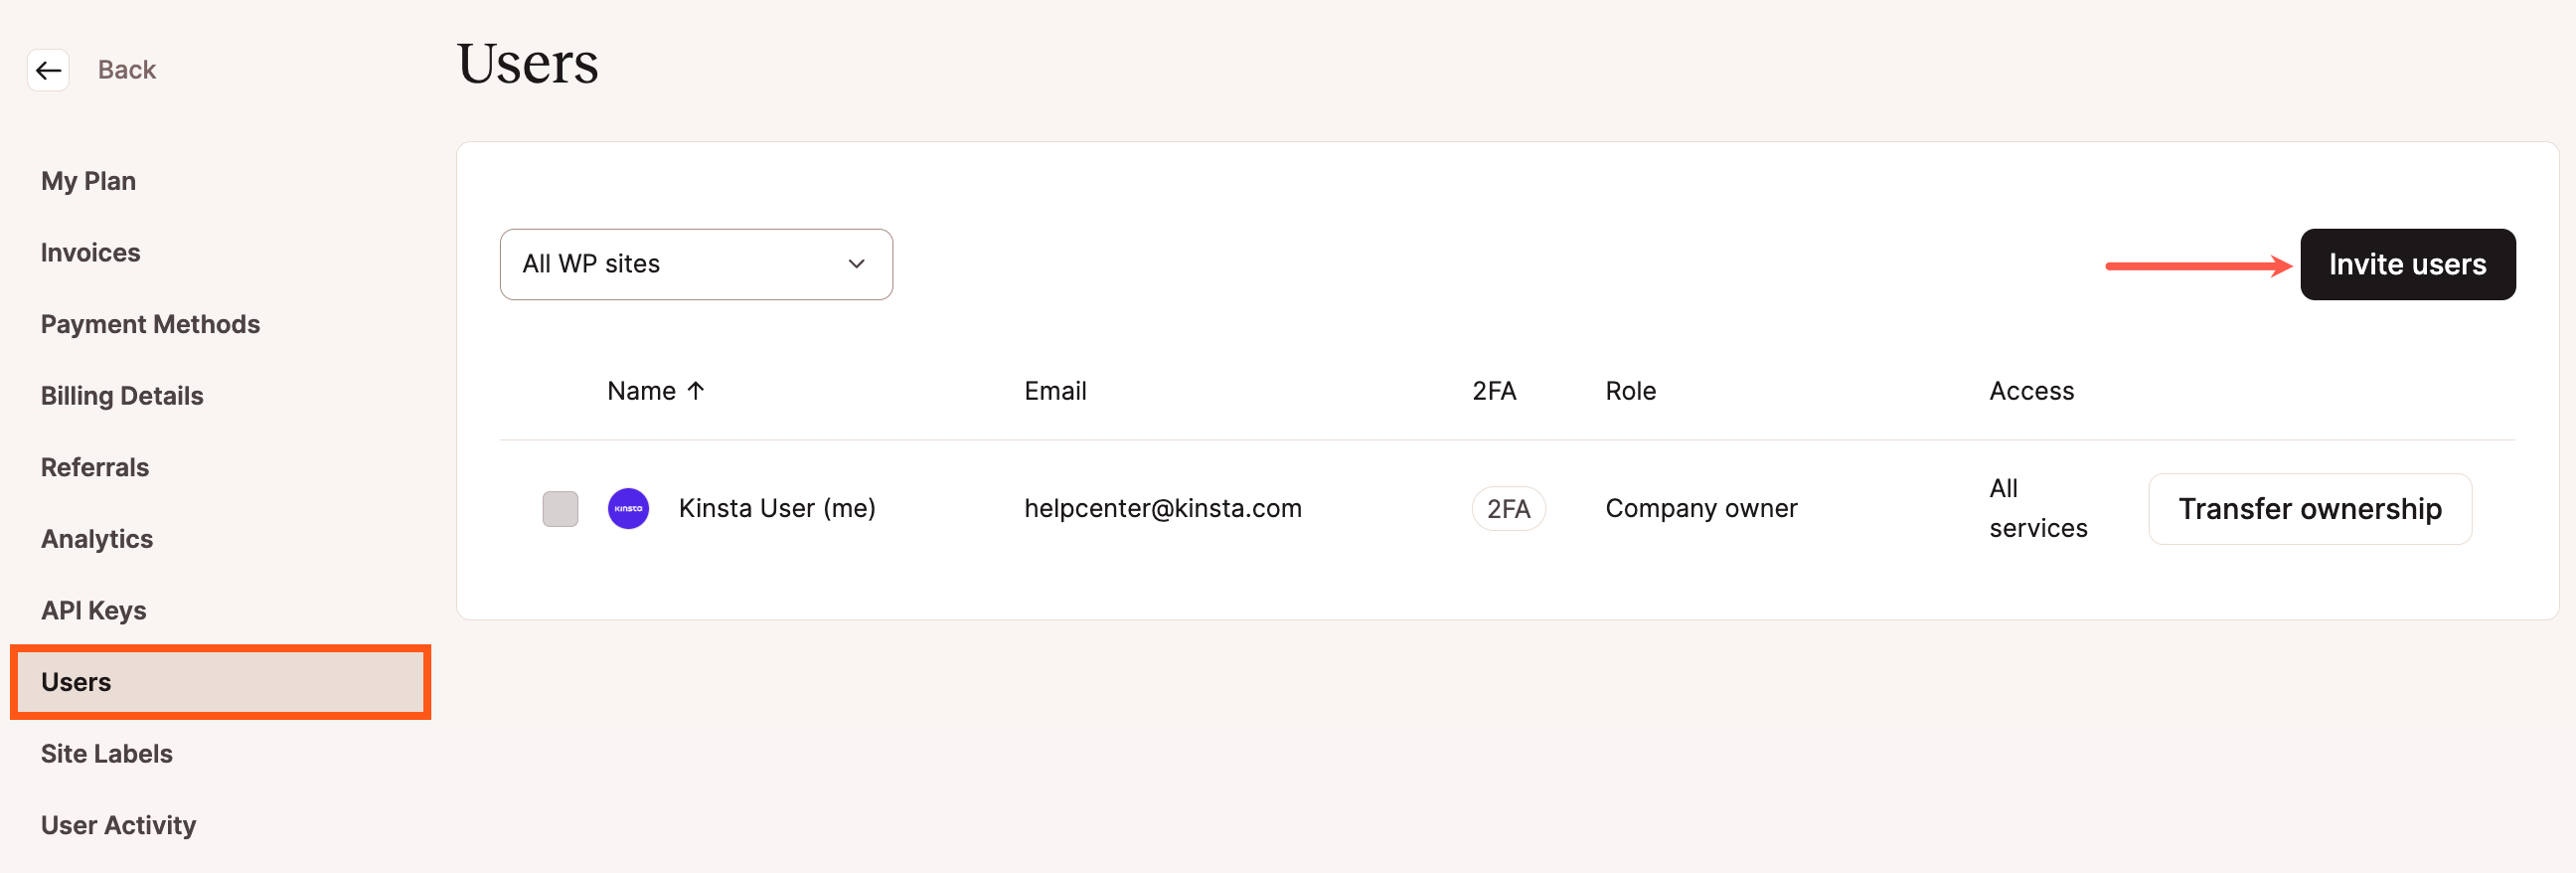
- Log in to MyKinsta.
- Click your name in the upper right corner and Company settings in the dropdown.
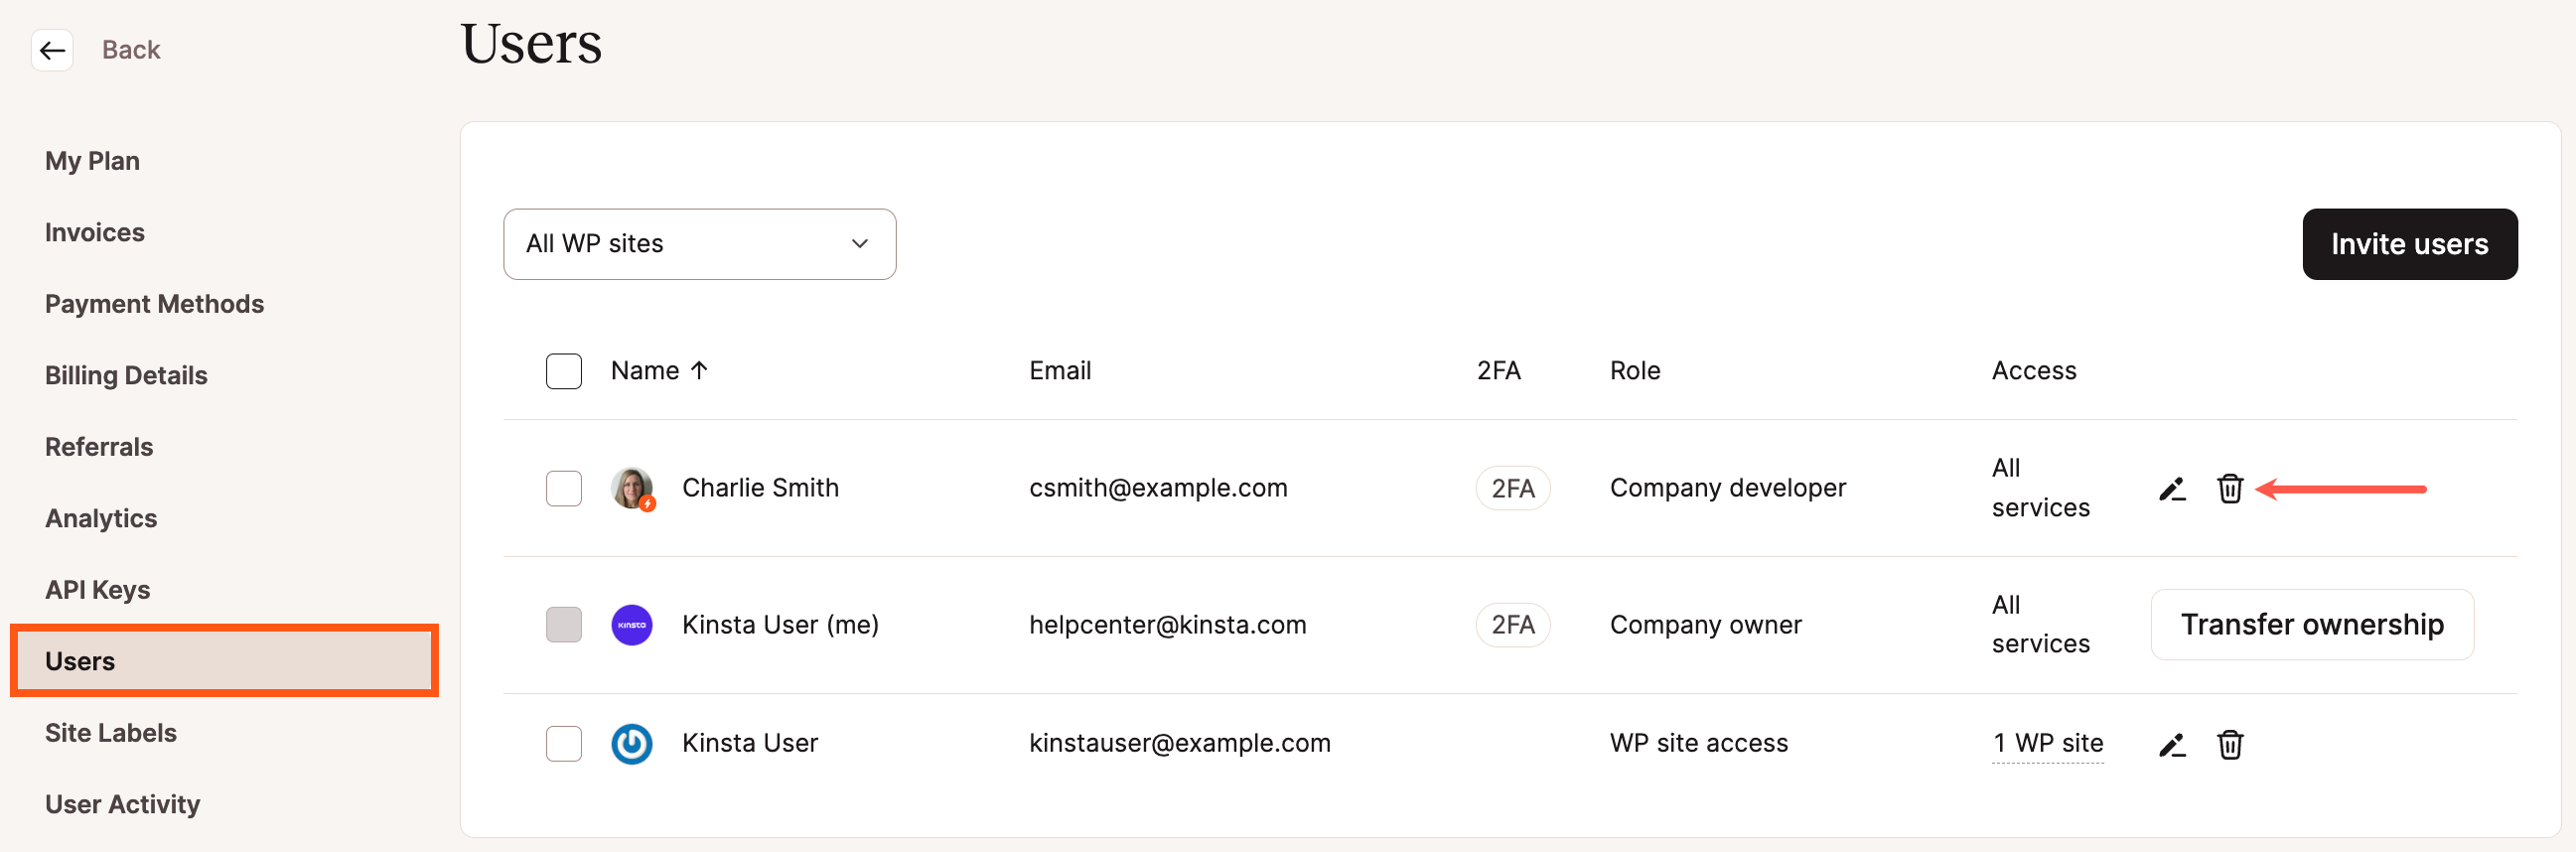
- Click on Users in the left sidebar to access the Company Users page.
- Click on the Invite users button in the upper right corner.
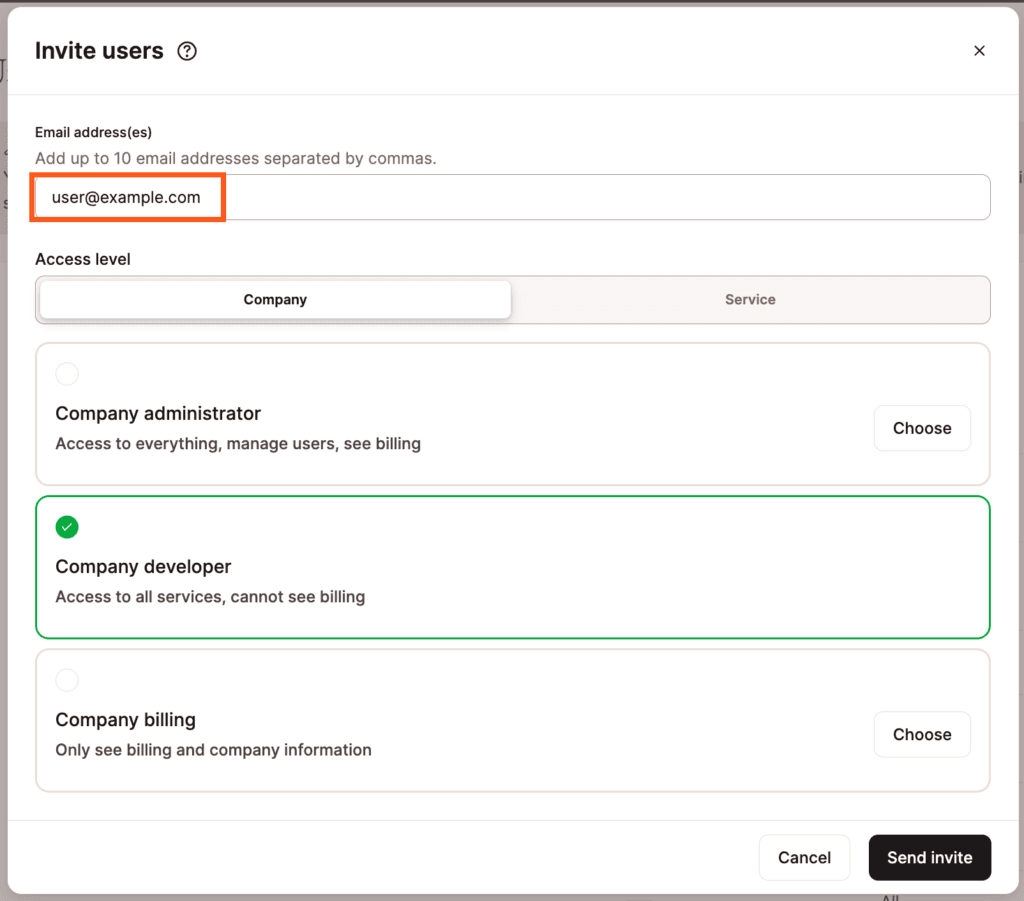
Invite users to your company in MyKinsta. - In the pop-up/modal window that appears, enter the email address of the user you’d like to invite. You can invite up to 10 users by separating their email addresses with commas in the email field.
- Select Company to choose between Company Administrator, Company Developer, or Company Billing.
User invite details with company access. - If you only want to grant access to a particular service, select Service, choose the service you want the user to have access to, and either type the name of the service or select it from the list.
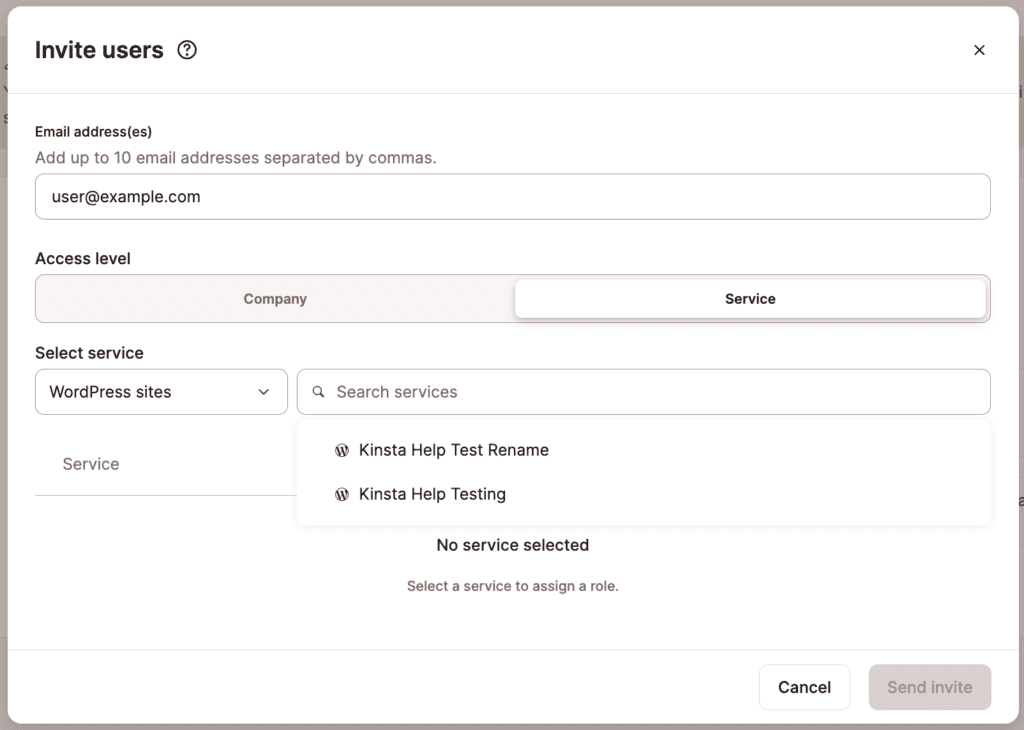
Choose the service you want to grant the user access to. - If you choose a WordPress site, you also need to select the user role (WordPress Site Developer or WordPress Site administrator) for each site.
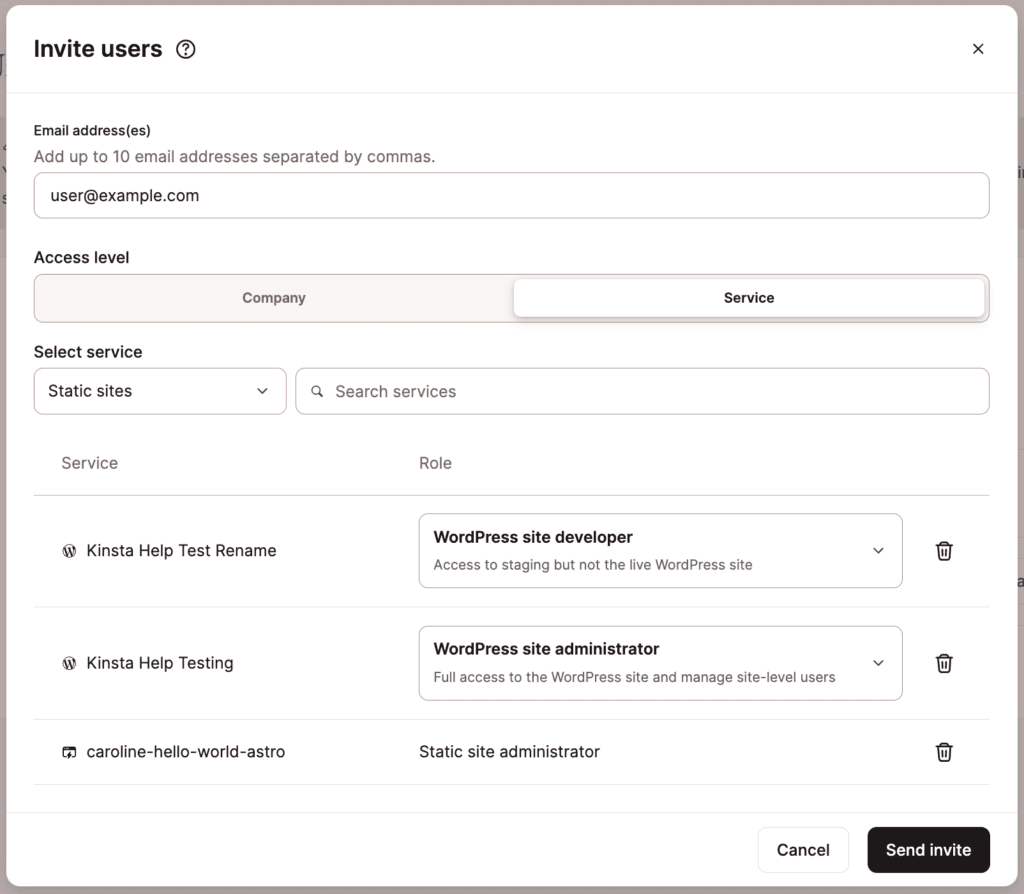
Choose the services and user role you want the user to have access to. - Click Send invite to invite the users to your service.
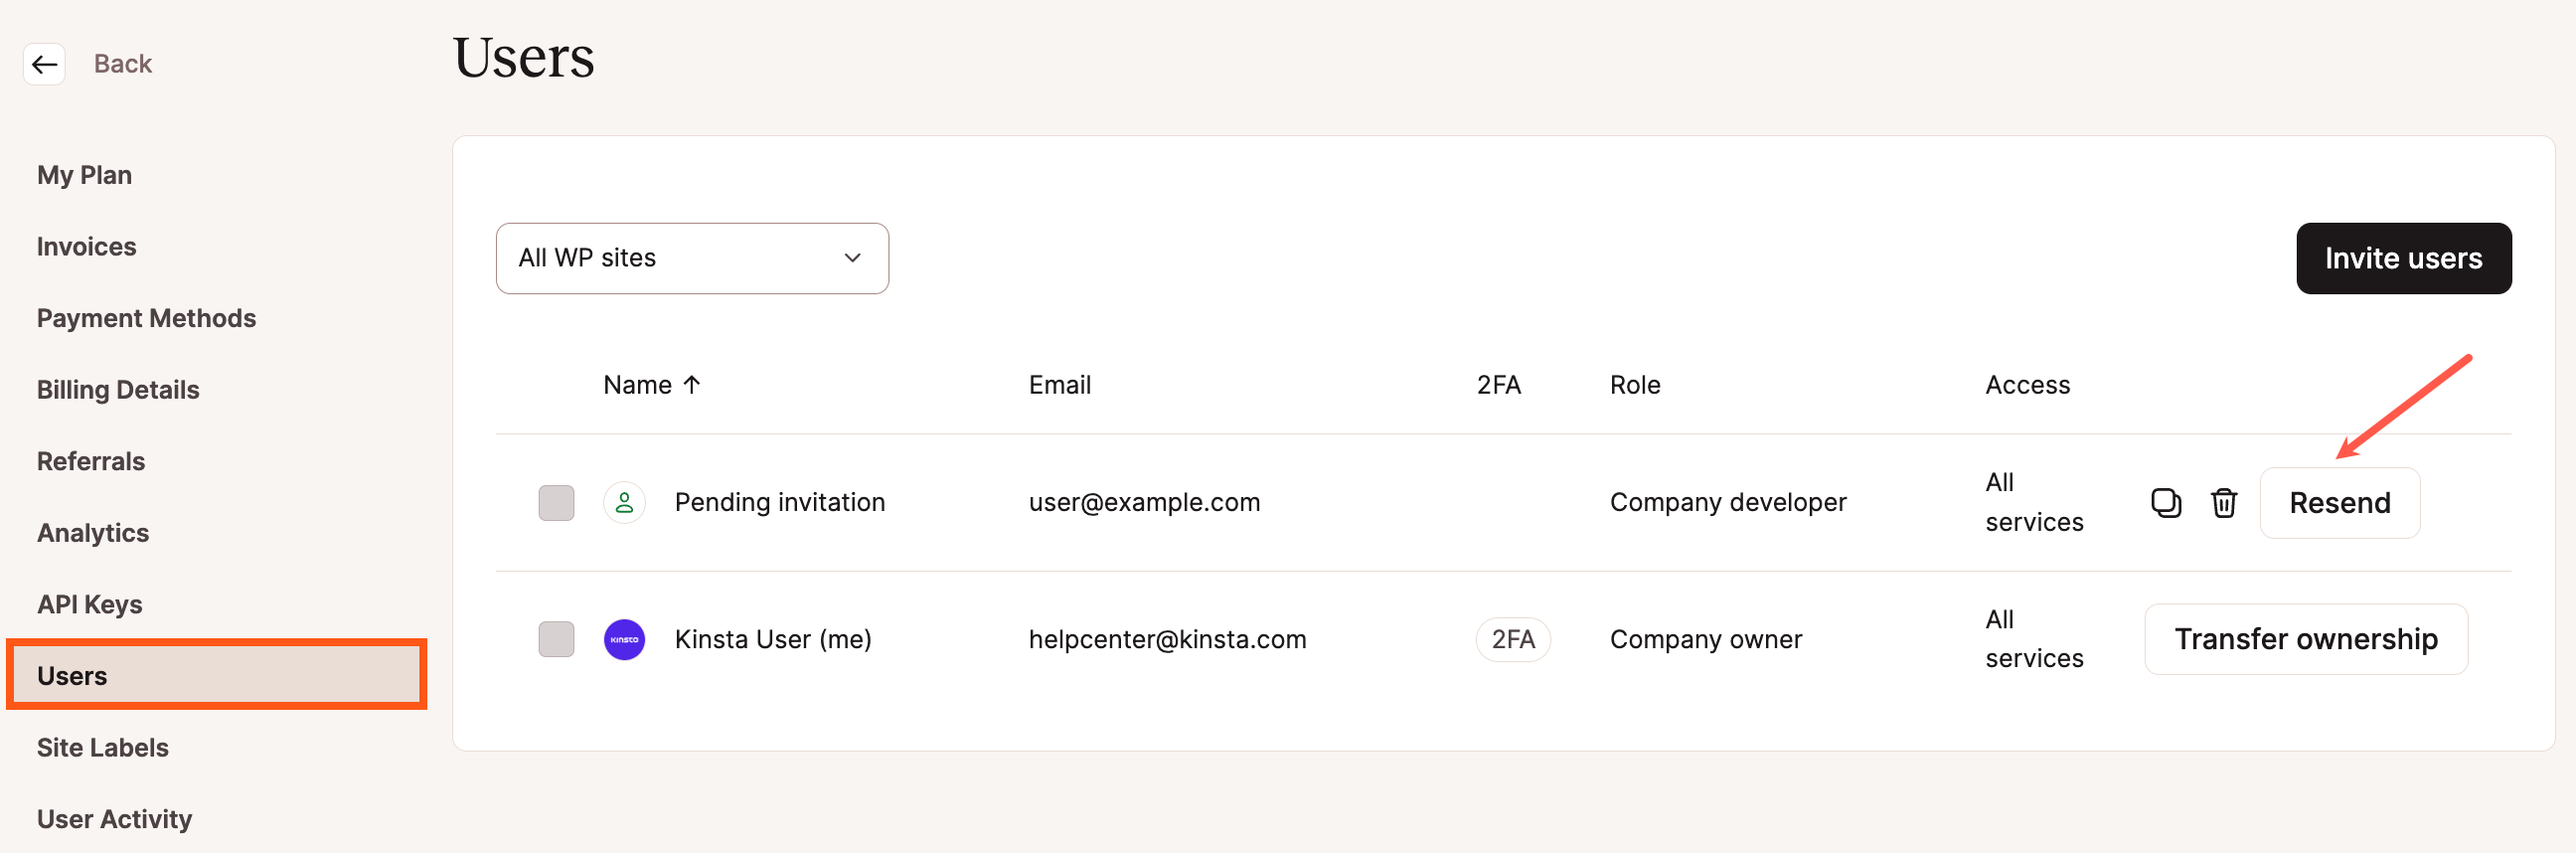
Resend a User Invitation
If you need to send the invitation to a user again, you can use the Resend button next to the pending invitation. If you need to delete the pending invitation, click the Delete (trash can) icon at the end of the row.
Add Users to a Service
We offer a number of user roles in MyKinsta so you can fine-tune user access to your site, application, or database. You can invite existing users to a particular service from Company > Users or the service-level Manage Users page.
Add Users from the Company Users Page
If you previously added users to your company in MyKinsta and later want to change their access to one or more services at the same time without editing each user individually, you can do this on the Company Users page.
Select the users you’d like to change with the checkboxes on the left-hand side of the table. Once you do that, context-sensitive buttons will appear on the top right side of the table, where you can click the Add to Service button.

In the modal/pop-up that appears, choose the service you want the user to have access to, and either type the name of the service or select it from the list.
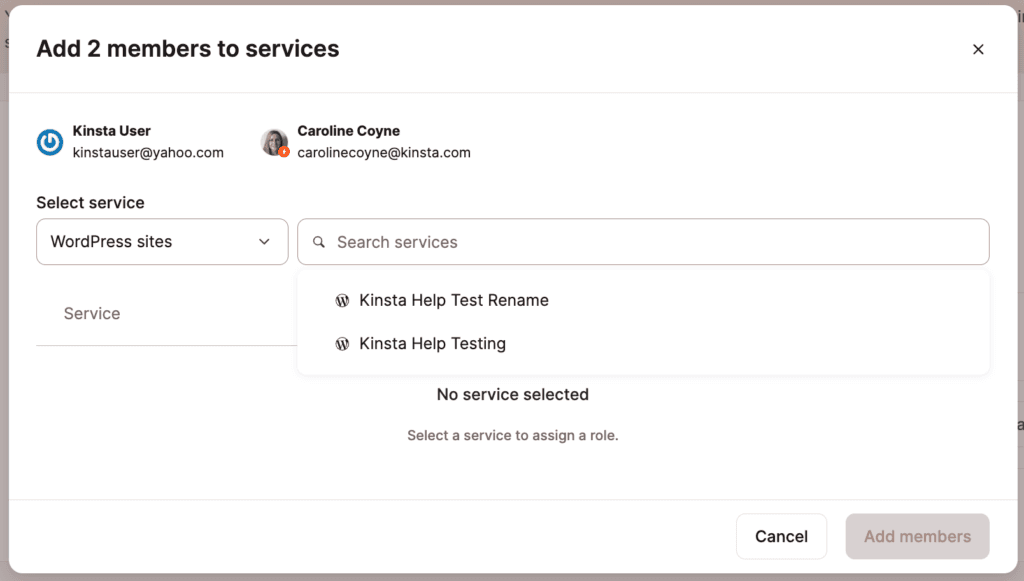
If you choose a WordPress site, you also need to select the user role (WordPress Site Developer or WordPress Site administrator) for each site. Selected users will receive the same role for that specific site.
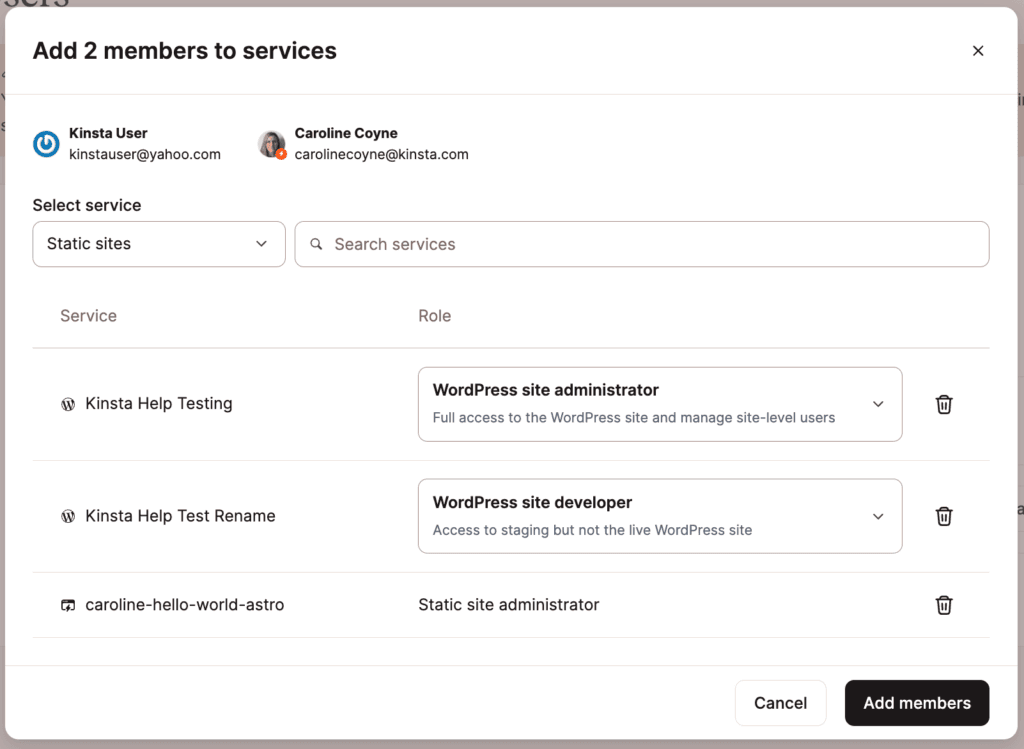
Once you’re happy with the setup, click the Add members button to finalize.
Invite Users from the Service Users Page
To invite a user to a service from the Manage Users page, follow the steps below:
- Log in to MyKinsta and go to the required service Applications/Databases/WordPress Sites/Static Sites.
- Select the required application/database/site > Manage users > Invite users.
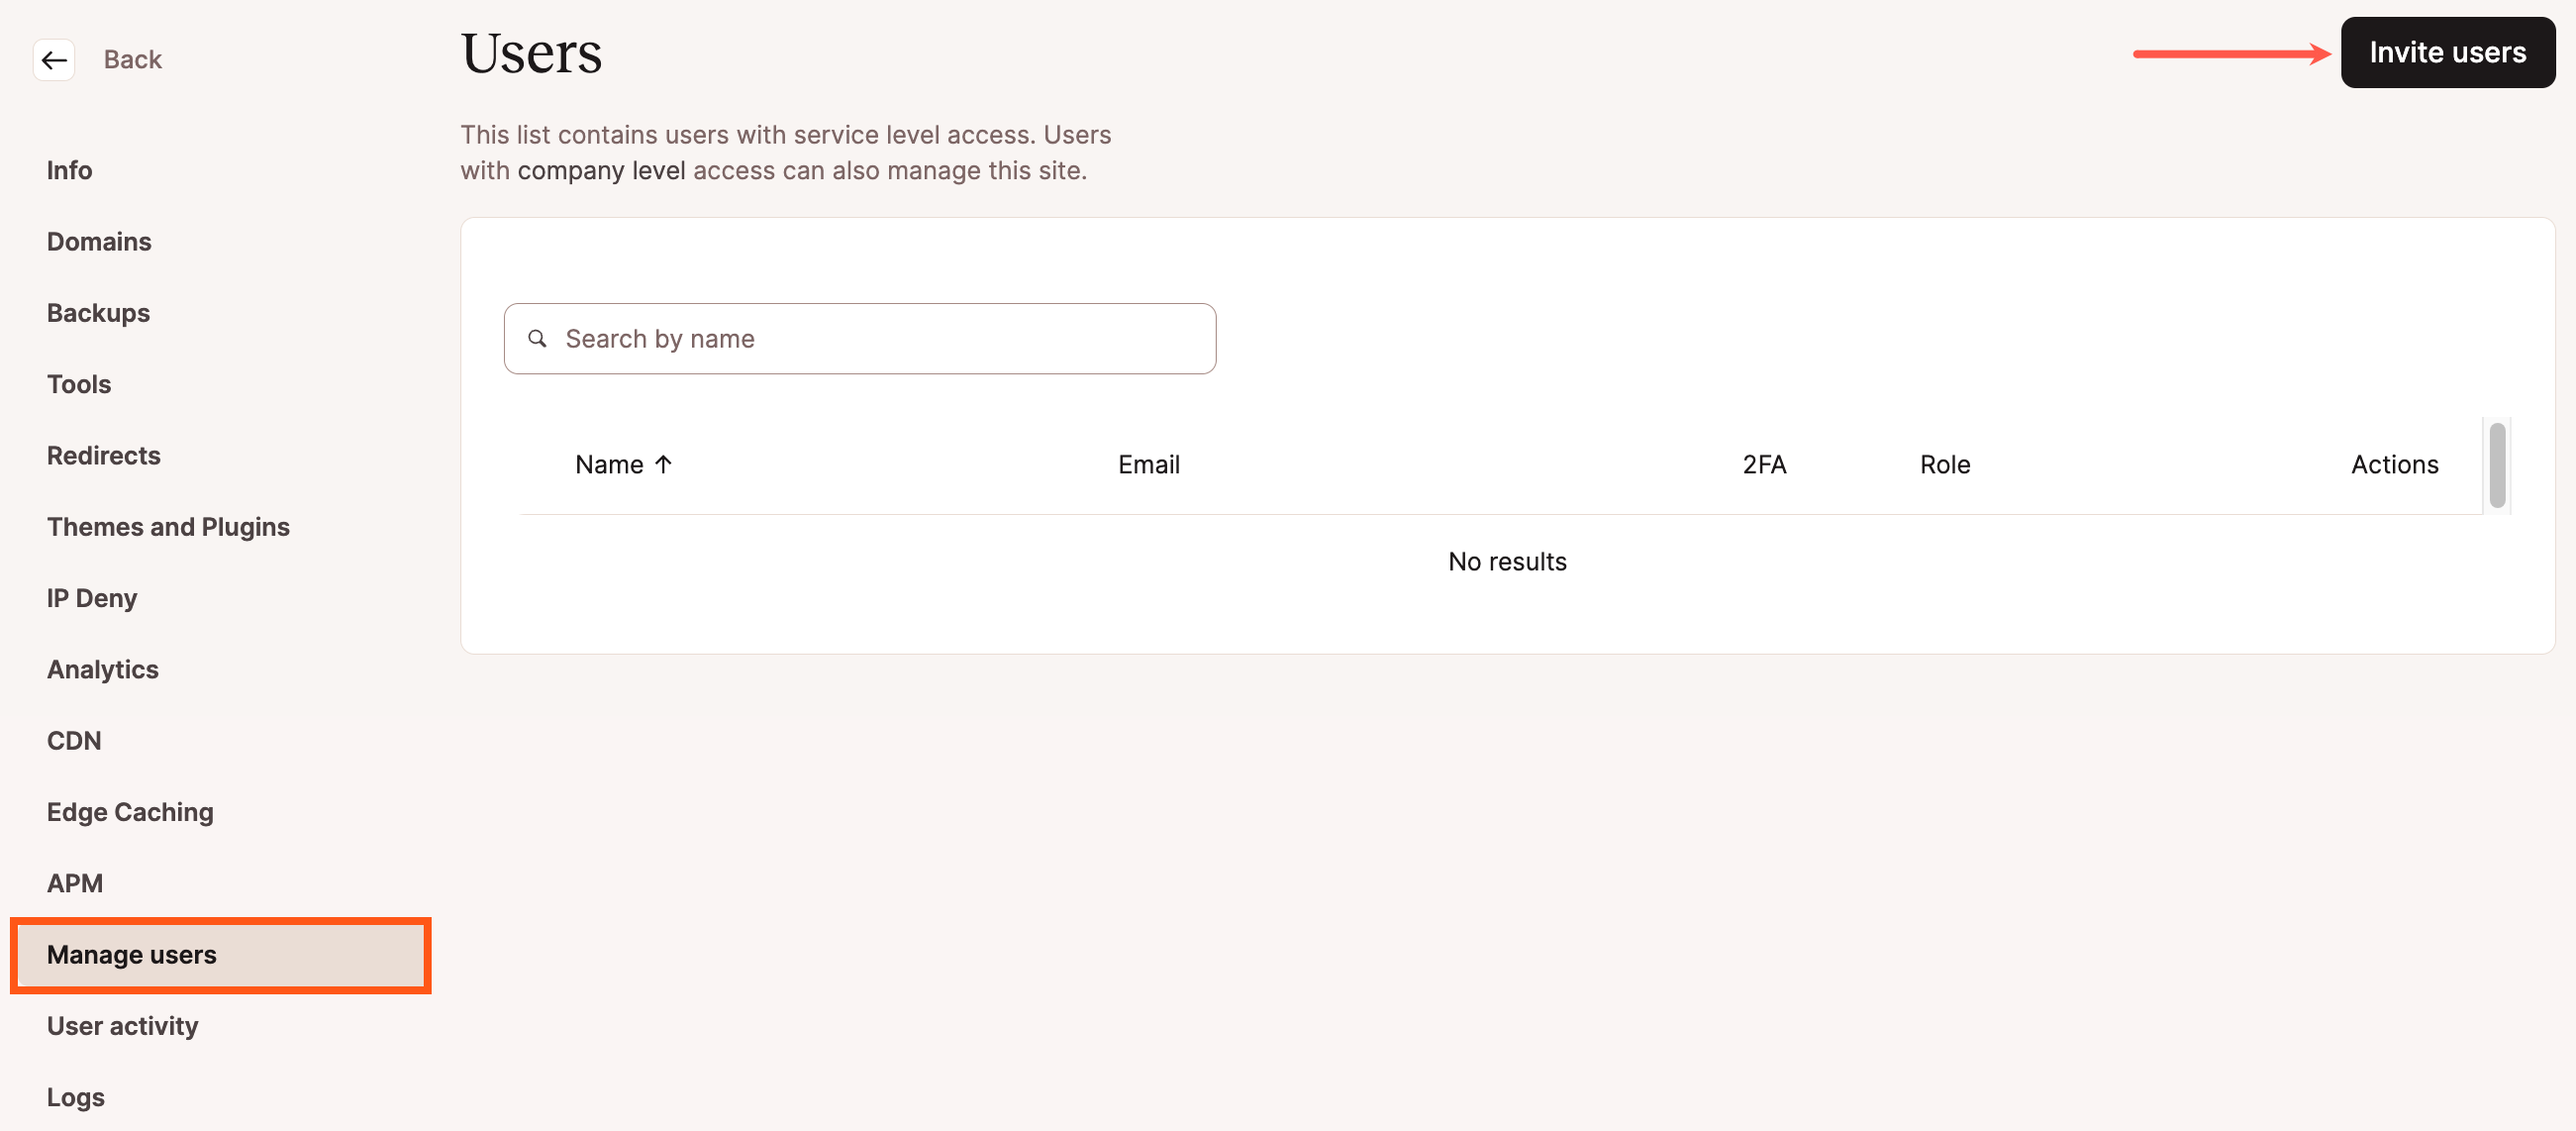
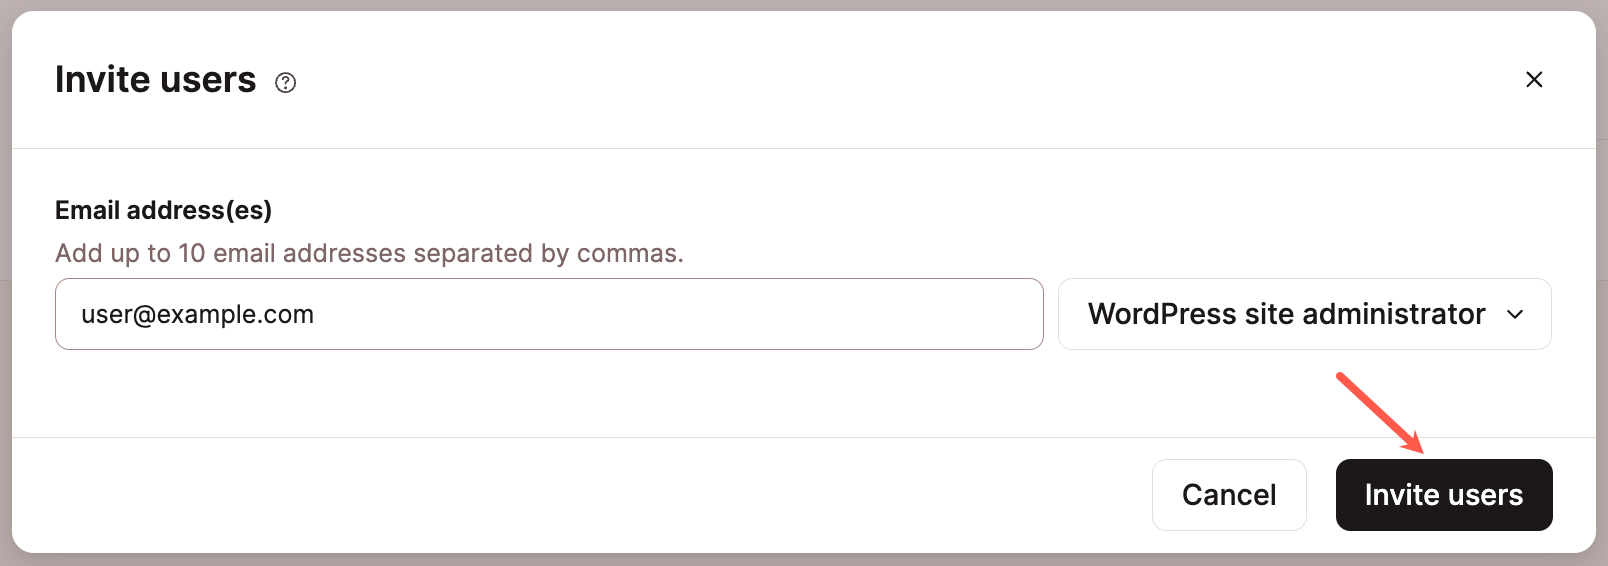
Invite users to a service in MyKinsta. - In the pop-up/modal window that appears, enter the email address of the user you’d like to invite. You can invite up to 10 users by separating their email addresses with commas in the email field. For WordPress sites, select WordPress Site Administrator or WordPress Site Developer in the dropdown menu.
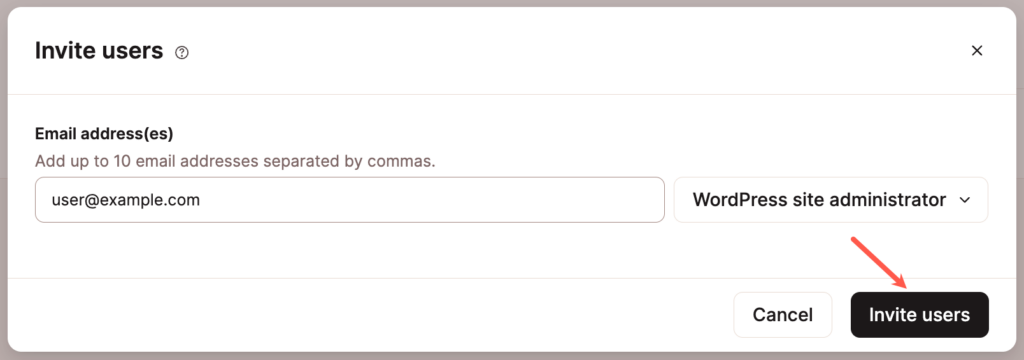
Invite a user to your WordPress site in MyKinsta. - Click Invite users.
- If you need to send the invitation to a user again, you can use the Resend (reload) icon next to the pending invitation.
- If you need to delete the pending invitation, click the Delete (trash can) icon near the end of the row to delete it.
- To copy the invite link, click the copy icon at the end of the row.
Remove a User From a Company
If you want to remove a user from your company, you can manage your company users in MyKinsta.
Remove a Single User From a Company
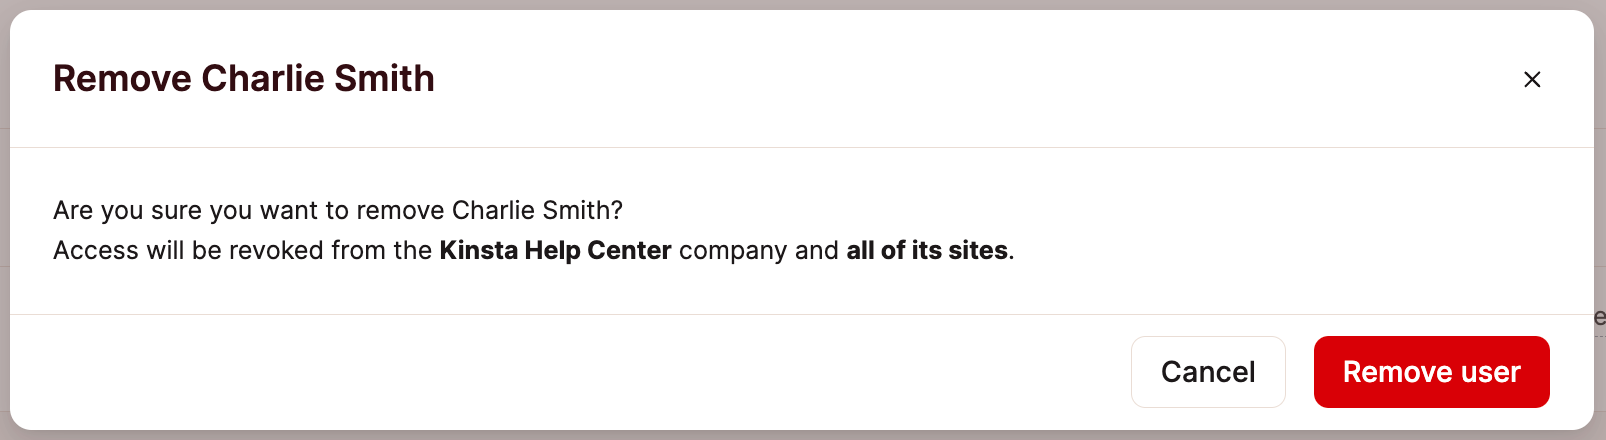
Log in to MyKinsta, and click on your name in the upper-right corner. Select Company settings from the dropdown menu. Then select Users in the left-side menu. Click the trash (delete/remove) icon on the right side of that user’s row.
Once you click the button, a confirmation modal/pop-up will appear. Click the red Remove member button to acknowledge the removal of that user.
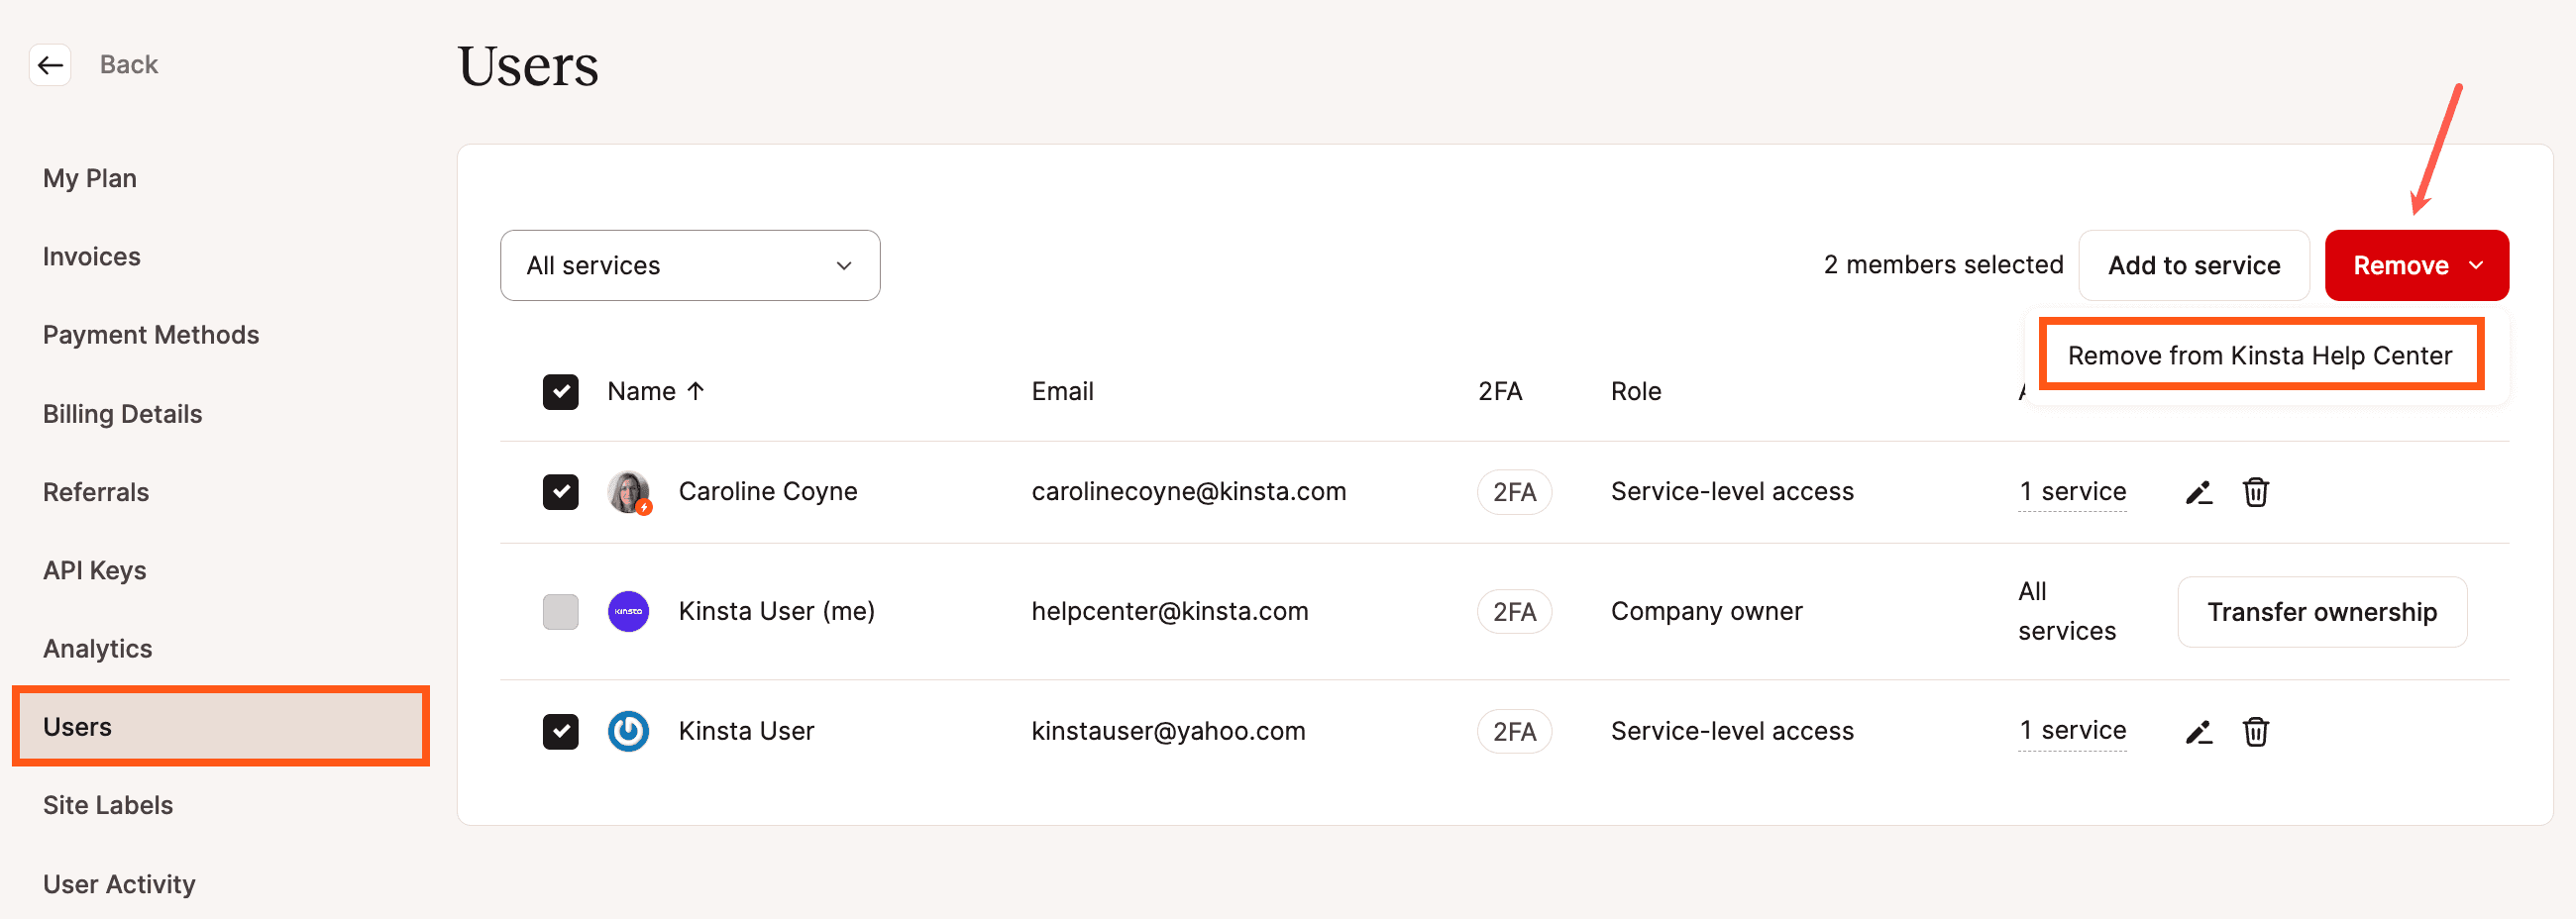
Remove Multiple Users From a Company
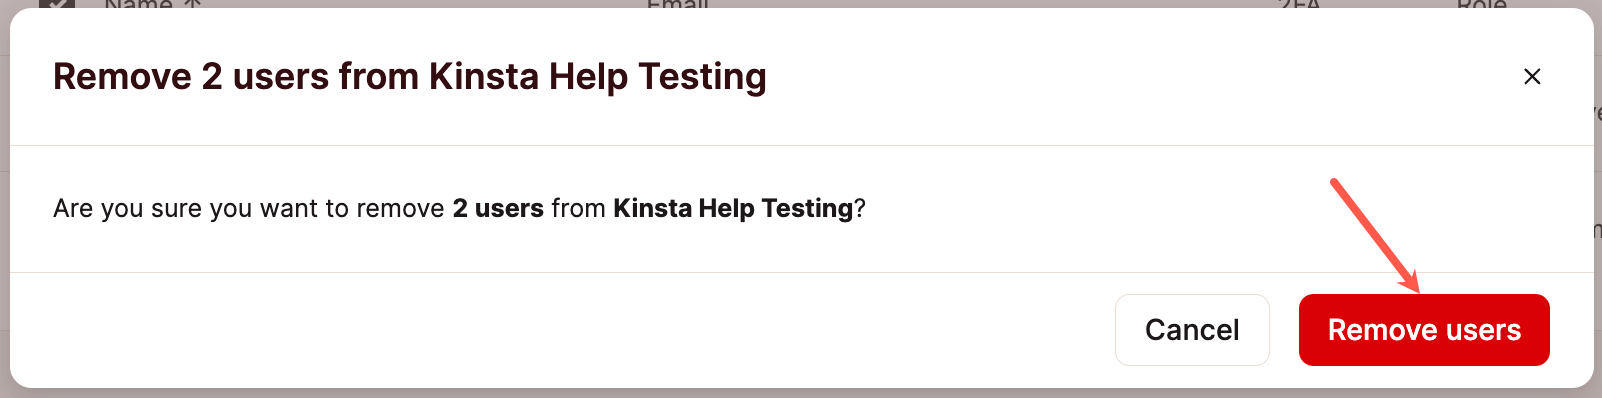
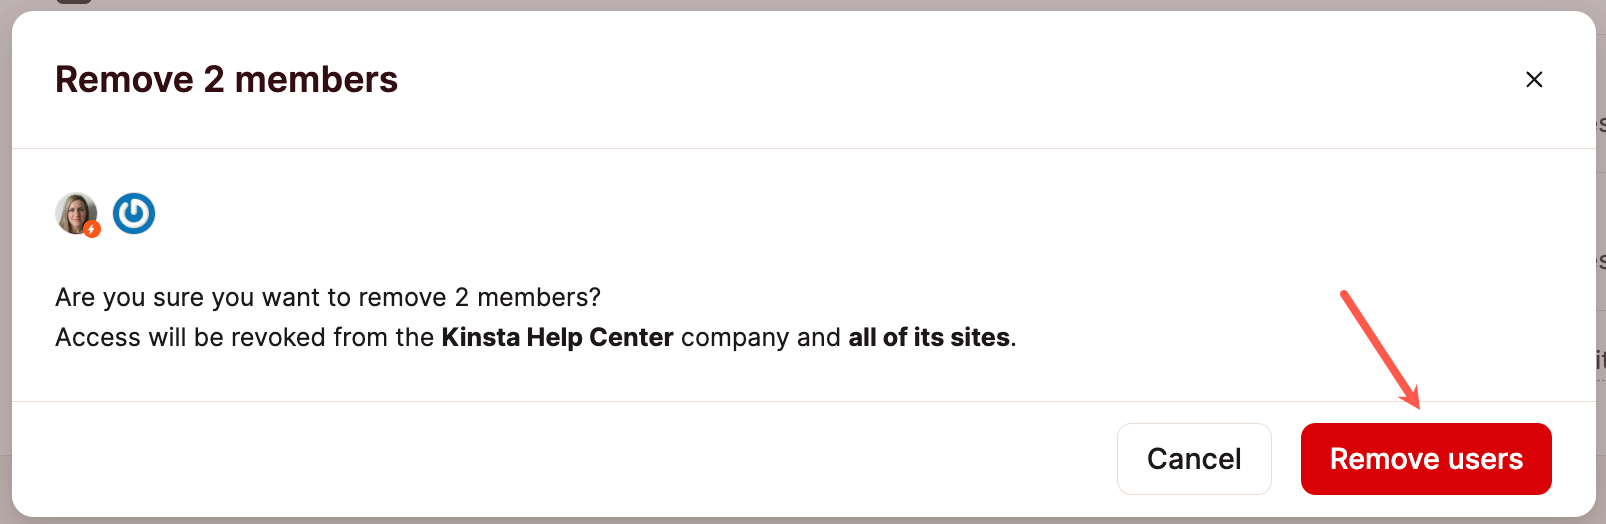
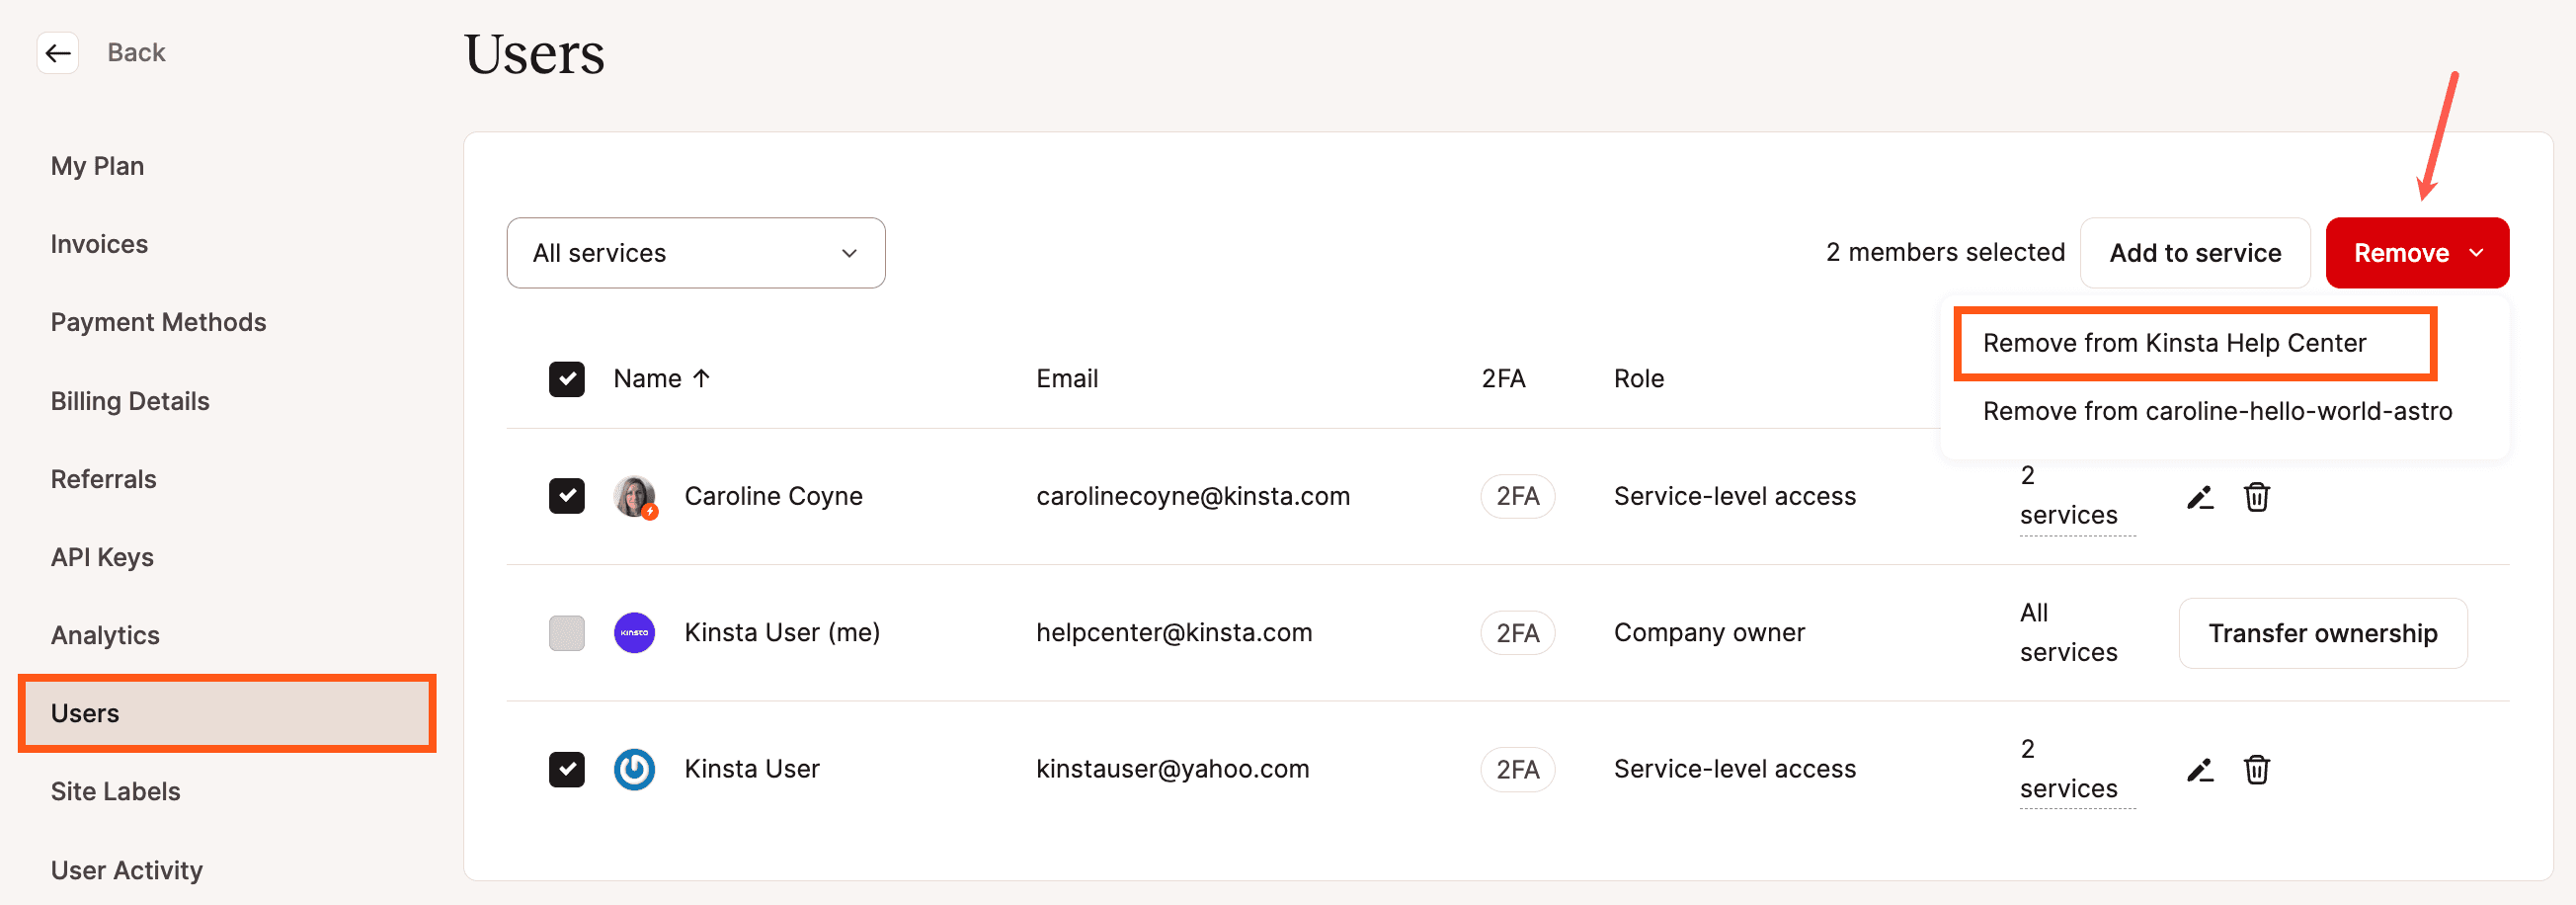
You can remove multiple users from your company at the same time. Use the checkbox to the left of each user to select the desired users. When multiple users are selected, context-sensitive buttons appear near the top of the table. Click on the Remove button and click Remove from [company name] in the dropdown menu that appears.
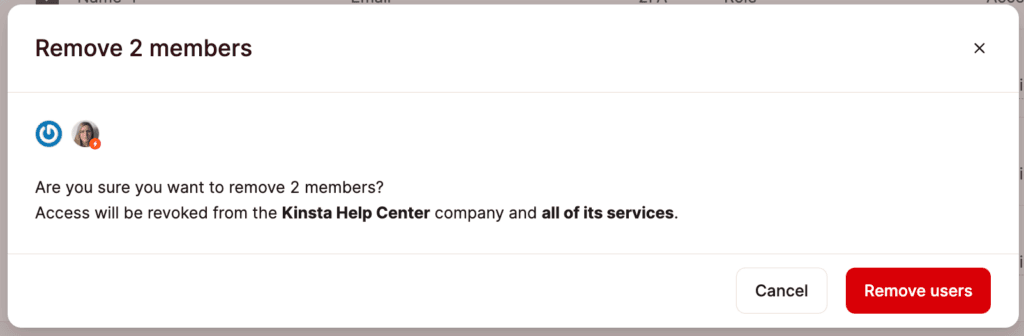
In the confirmation modal/pop-up that appears, click Remove users to finalize the removal.
Remove Yourself From a Company or Service
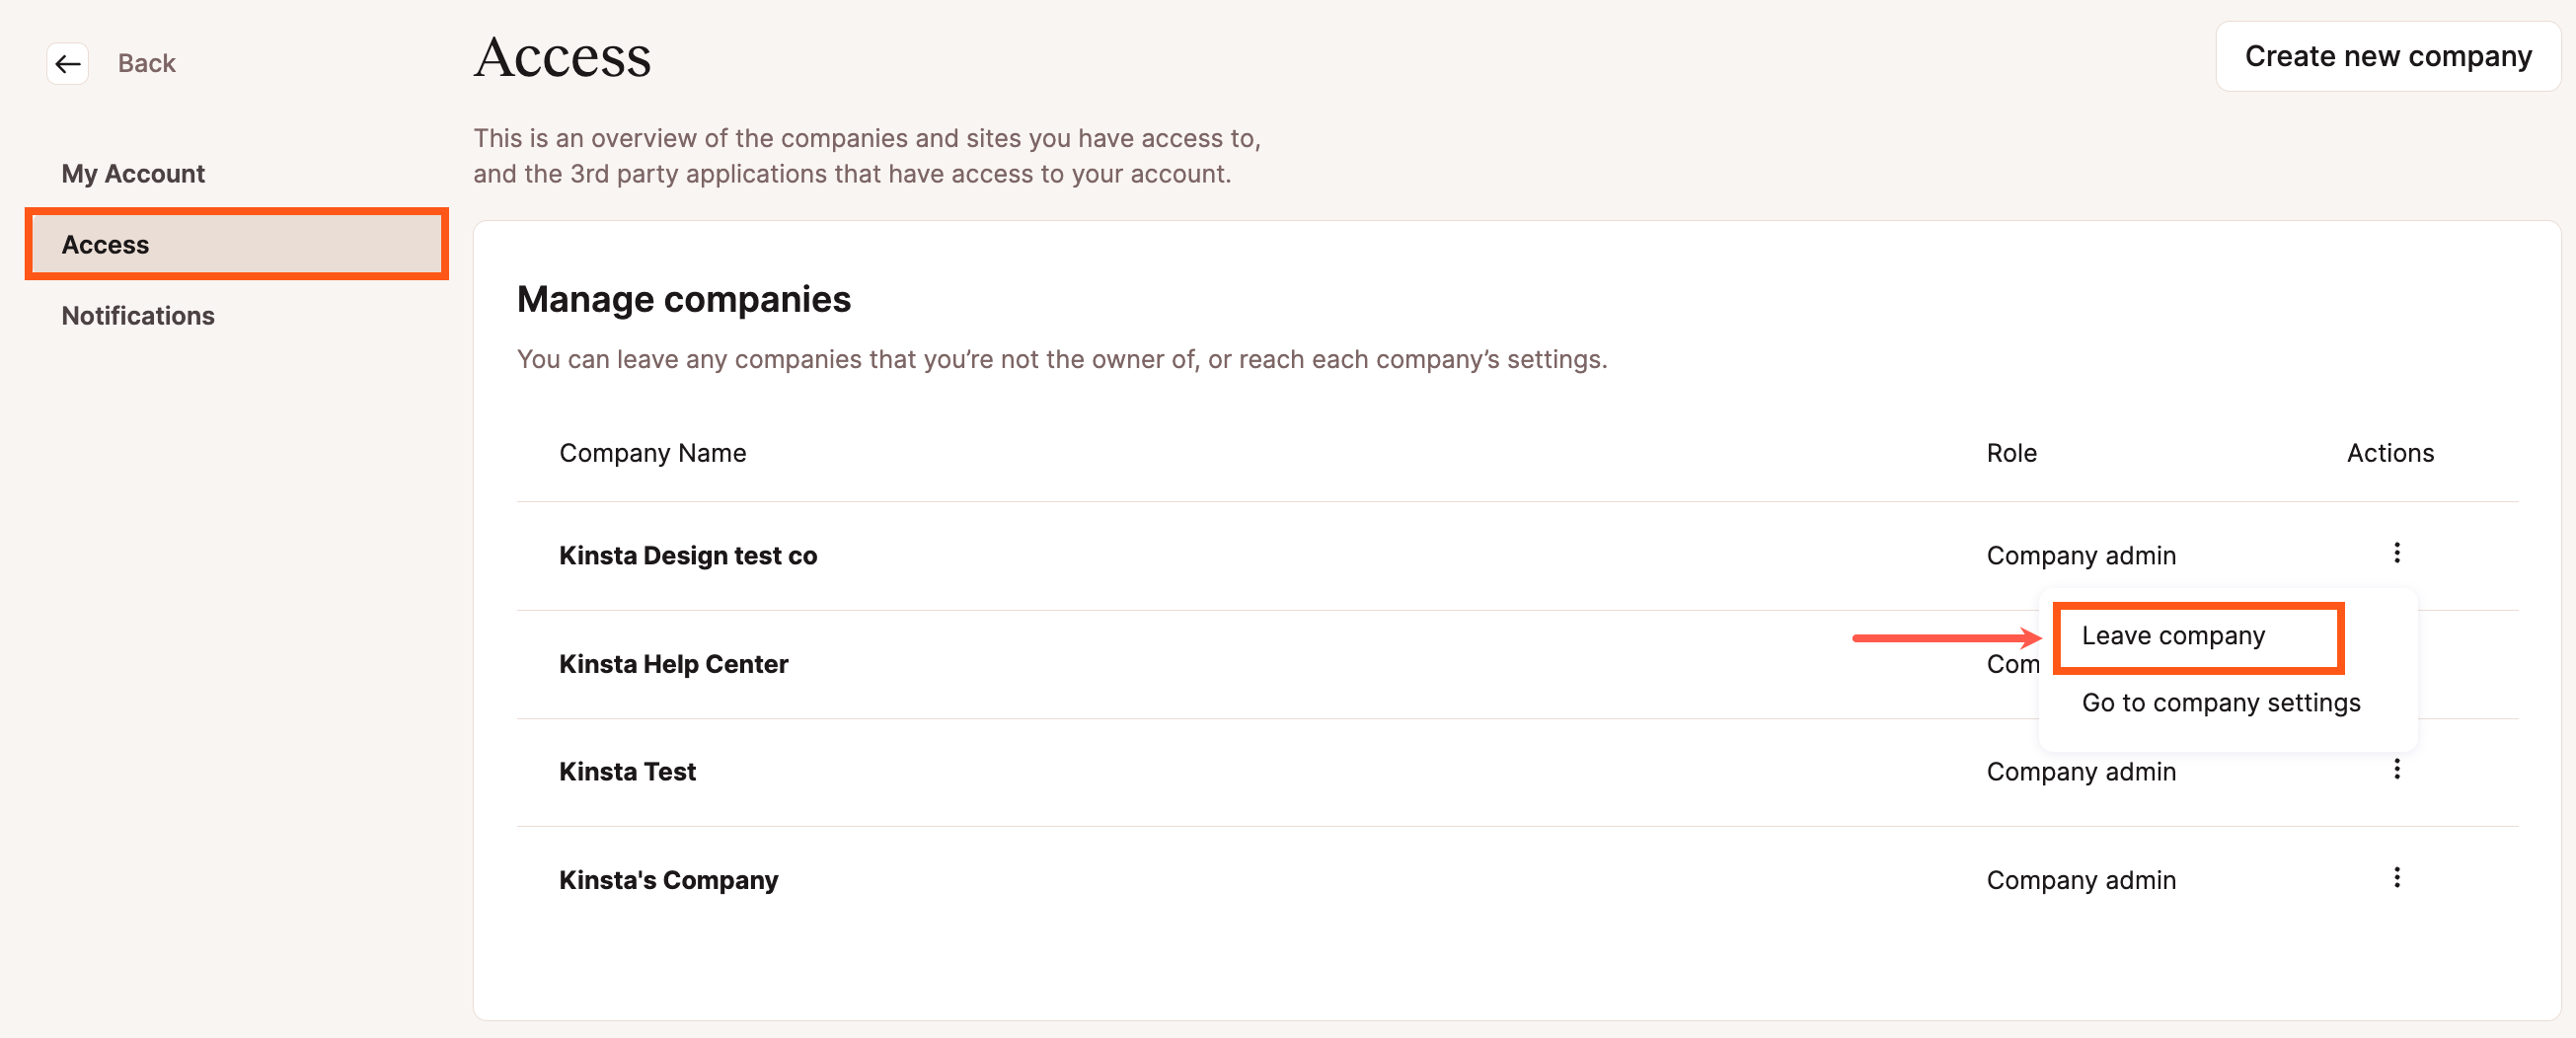
If you are not the Company Owner, you can remove yourself from a company or service in your MyKinsta User Settings. Click on your name in the upper-right corner and select User settings from the dropdown menu.

Click on Access in the left-side menu. Here you’ll see the companies and services you have access to. Click the kebab (three-dot) menu for the service or company you wish to leave and select Leave company.
Remove a User From a Service
You can remove users from a service from either the service-level Manage Users page or the company-level Users page.
Remove a User from the Company Users Page
To remove a user from a service on the Company User Management page, log in to MyKinsta and click your name in the upper-right corner. Select Company settings from the dropdown menu.
Click on Users on the left-hand side. On the right side of the user’s row, click on the Edit (pencil) icon.

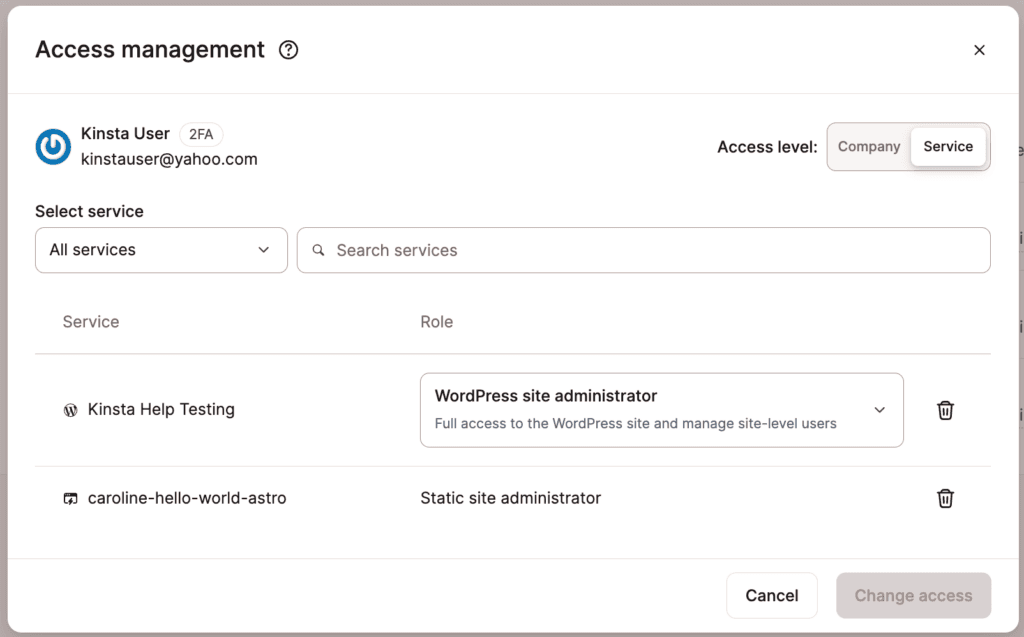
In the Access management modal/pop-up that appears, a list of services the user has access to is shown, along with their access level. Click on the Delete (trash can) icon next to the service to remove the user from that service, and click Change access.
You can also remove multiple users from a service at the same time.
Note: If you want to only see users with access to a particular service, use the filter above the Name column to filter the list by service.
Using the checkbox to the left of each user name, select the users you wish to remove. Click on the Remove button that appears near the top-right side of the table and select Remove from service name.
In the modal/pop-up that appears, click Remove users to finalize the removal.
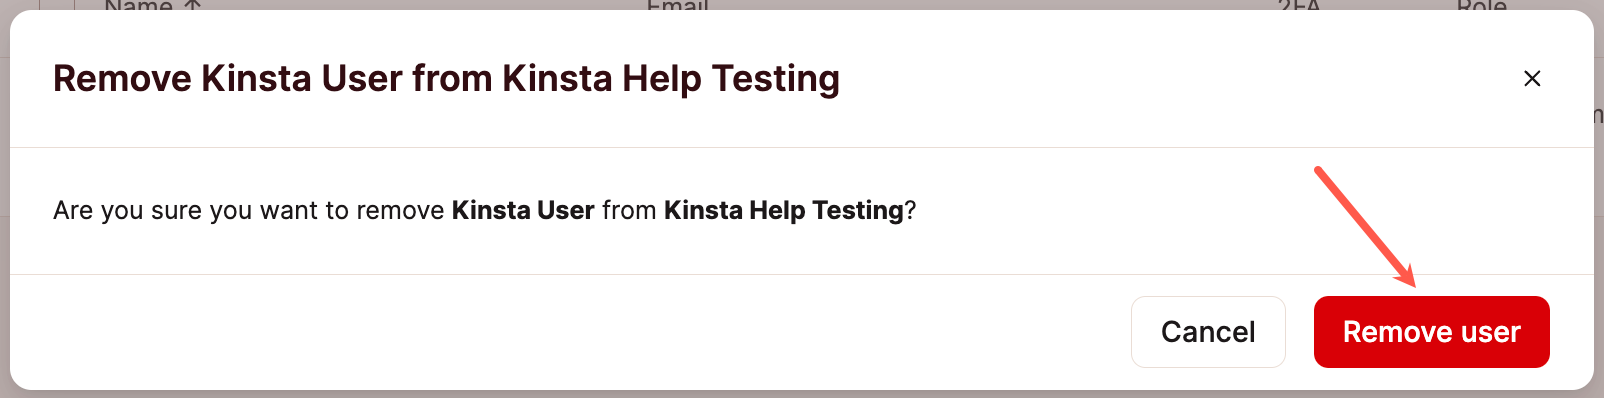
Remove a User from the Service Users Page
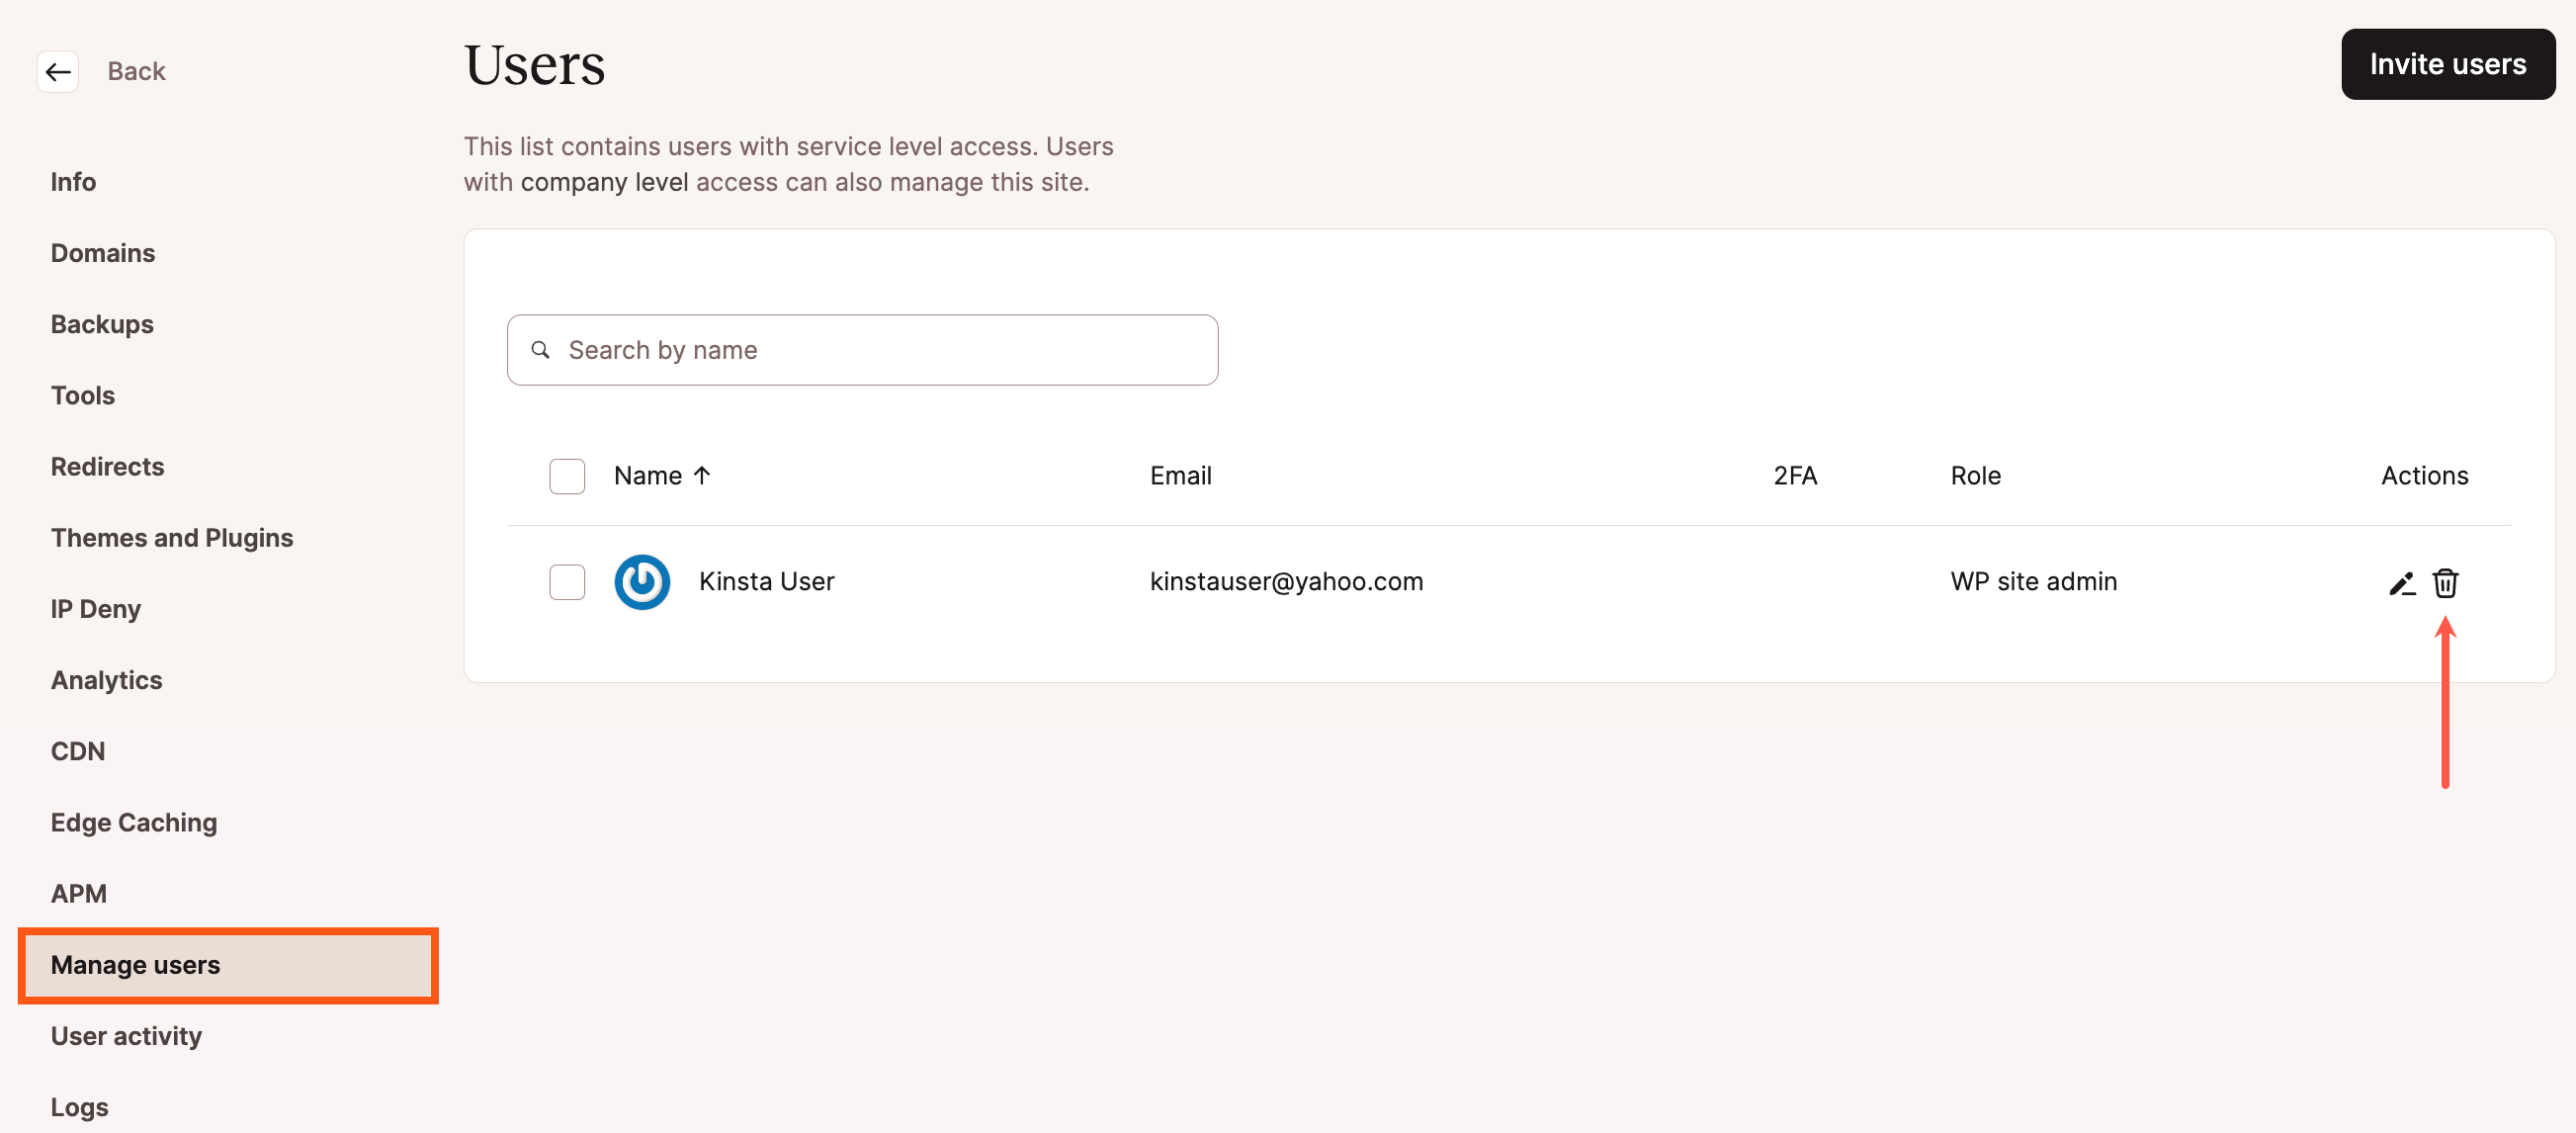
To remove a user from a service on the Manage Users page, log in to MyKinsta and the required service Applications/Databases/WordPress Sites/Static Sites. Select the required application/database/site > Manage users, and click the Delete (trash can) icon.
In the modal/pop-up that appears, click the Remove user button to confirm removing the user.
You can also remove multiple users from a service at the same time. Using the checkbox to the left of each user name, select the users you wish to remove. Click the Remove users button.
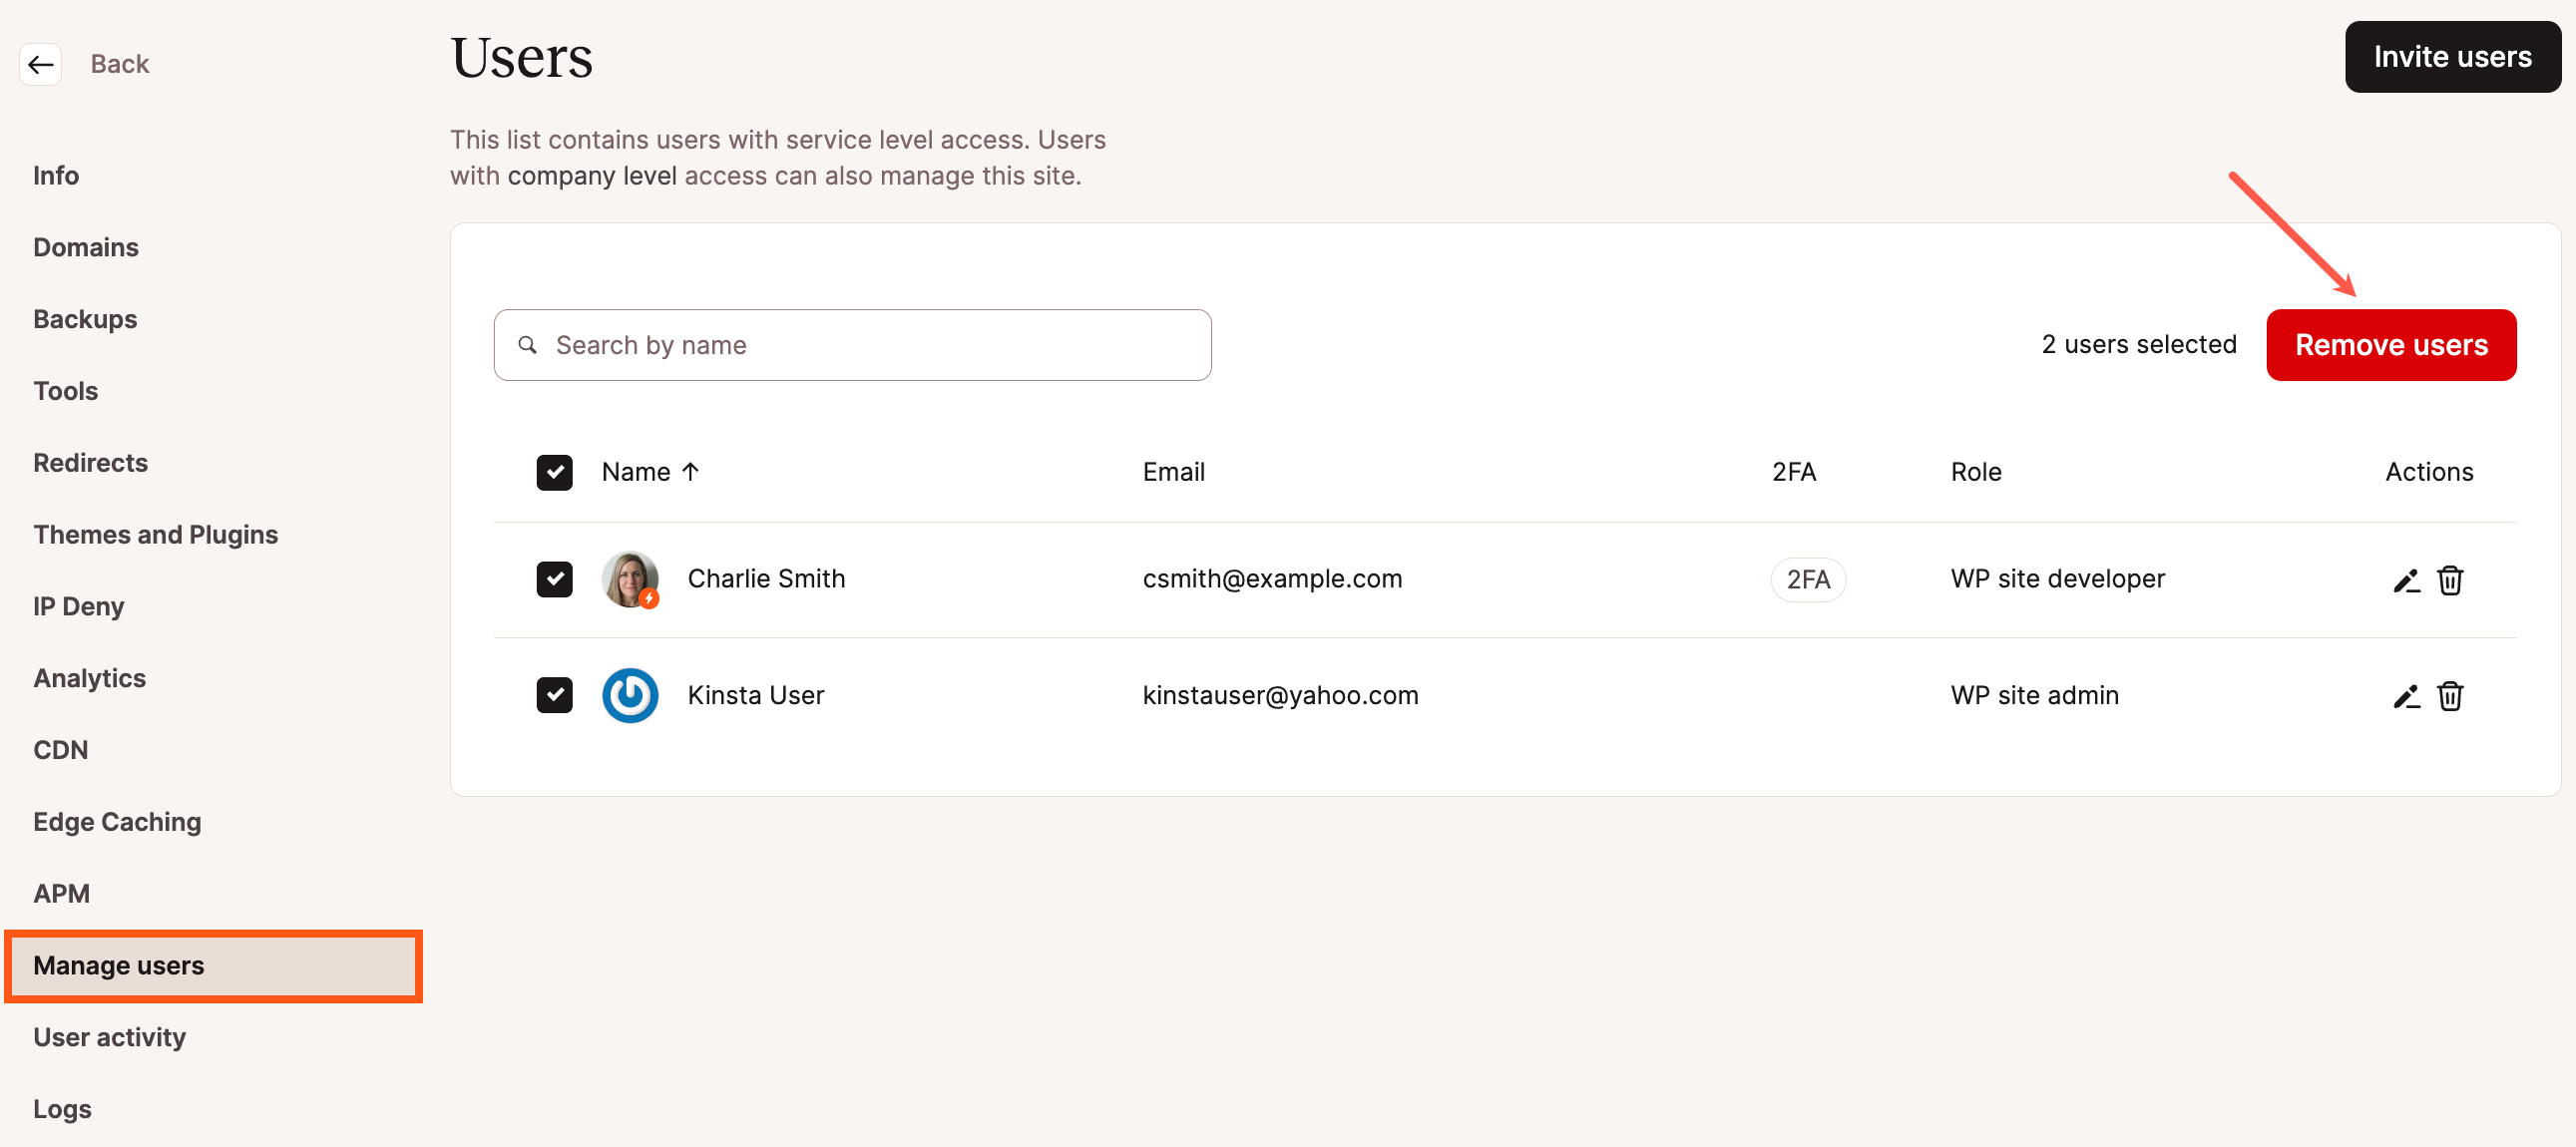
In the modal/pop-up that appears, click the Remove users button to confirm removing the users.