Imperva CDN
Imperva’s Content Delivery Network is the current generation of what was formerly known as Incapsula CDN, which stood on its own as a separate company until it was fully acquired by Imperva and became a product line there in 2014. Once you’ve launched your site at Kinsta, if you would like to use Imperva’s CDN instead of Kinsta’s CDN, this guide shows you how.
How to Install and Configure Imperva
If you don’t already have an Imperva account, you can sign up for a free trial to get started.
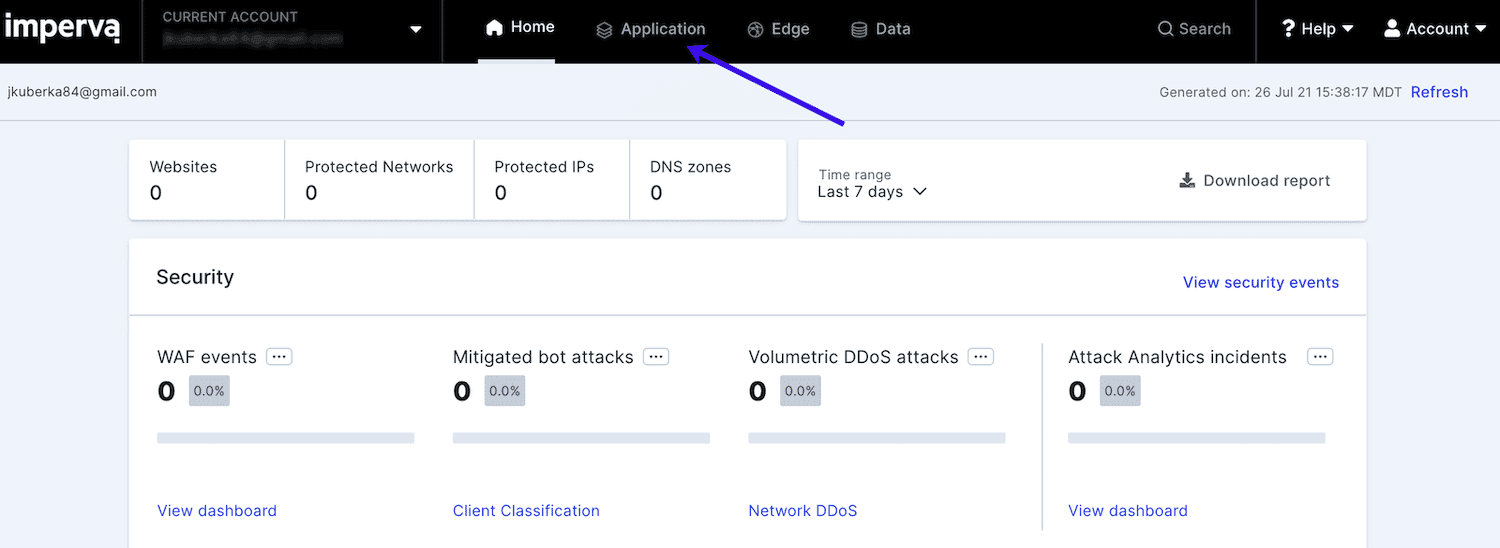
Step 1 – Go to the Imperva Application
Log into your Imperva Cloud Security Console and go to the Application tab.
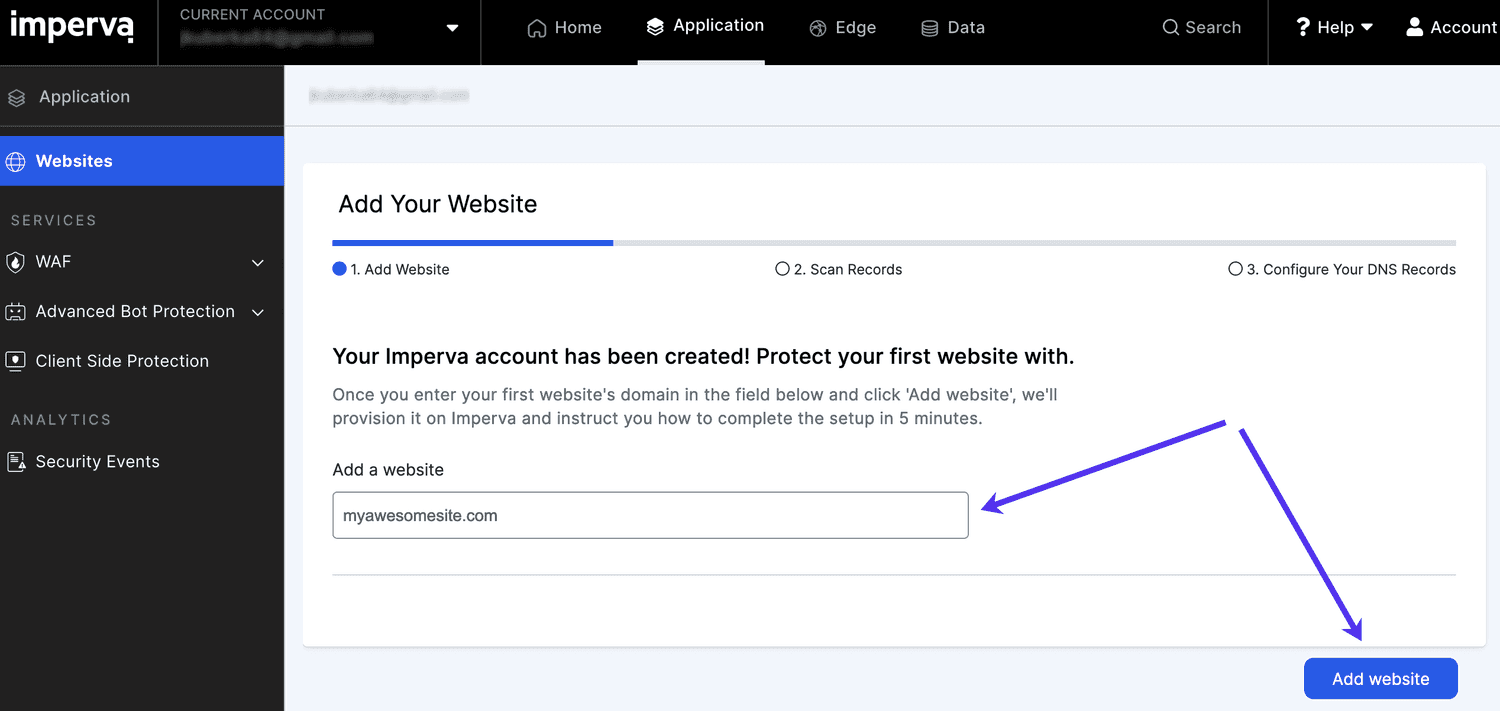
Step 2 – Add Your Website
Under Add Your Website enter your site’s domain name in the Add a website field. Be sure to enter the one visitors will use to reach your site (www or non-www, or even a subdomain if that’s what your site uses) and click the Add website button.
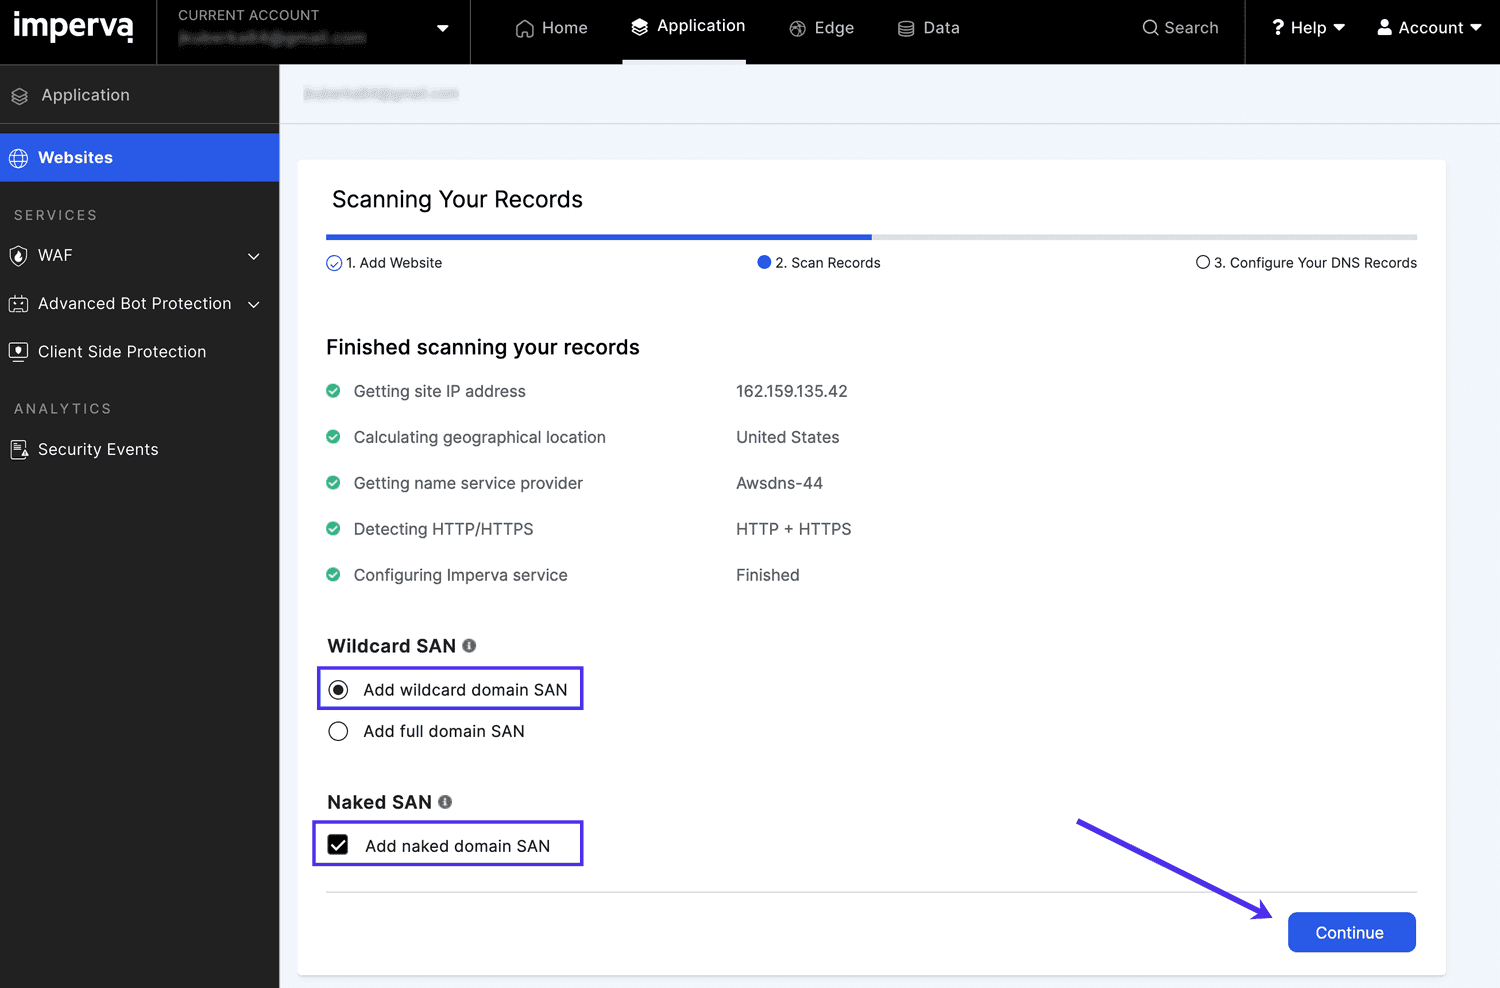
Step 3 – Add SAN
This will kick off a scan of your domain’s DNS records. Once that’s complete, you’ll see your current DNS records and options for the Imperva SSL certificate. In most cases, you’ll want to select both Add wildcard domain SAN and Add naked domain SAN, especially if your site uses the www prefix. An exception will be if the site you’re adding uses a subdomain. In that case, you would want to only select the Add full domain SAN option and uncheck Add naked domain SAN. Once you’ve made your selections, click the Continue button in the lower right corner.
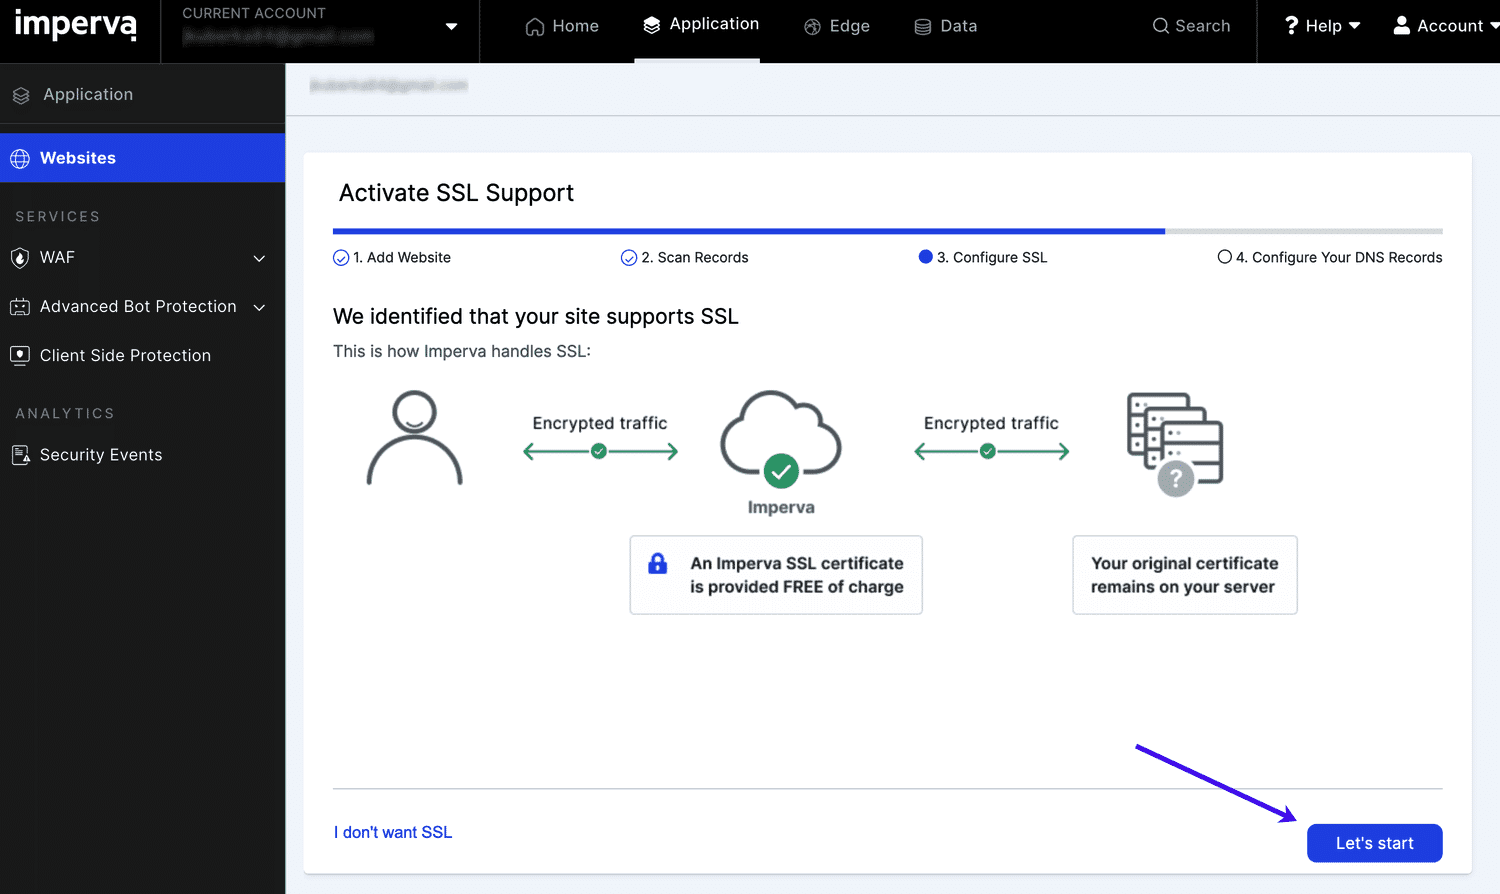
Step 4 – Activate SSL
After a few minutes, you’ll see the Configure SSL step. Click on the Let’s start button in the lower right corner to activate SSL.
Step 5 – Verify Ownership
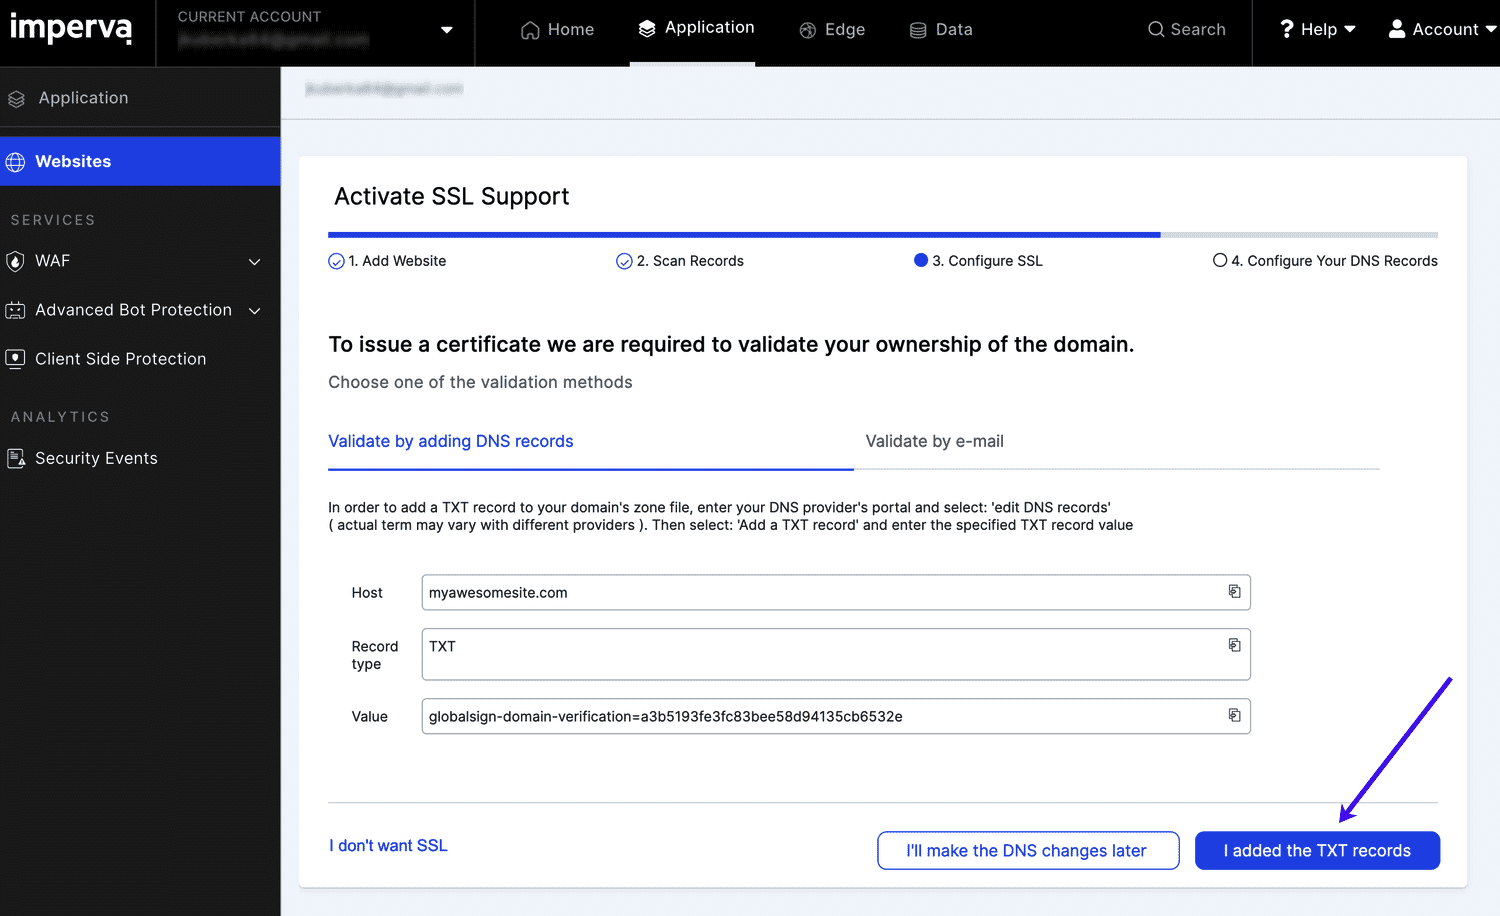
The next screen shows you a TXT record to add to your domain in order to verify ownership so SSL can be installed.
How to Verify Domain Ownership
There are two methods for you to verify ownership of your domain and successfully proceed with installing an SSL certificate. You can:
- Verify via email
- Verify via DNS (TXT Record) — Recommended
While you could use email, the process is limited to certain email addresses only. That’s why we strongly recommend the DNS method, and that’s what we’ll cover here. Click the copy (clipboard) icon to copy the value field that starts with globalsign-domain-verification= so you can add it to your DNS records for verification (see the next step).

Step 6 – Add TXT Record
To add the TXT record, log into where you manage your domain’s DNS. For this example, we’ll show you how to add this TXT record in Kinsta’s DNS. If you have a different DNS provider (could be your registrar or other DNS hosting, depending on where you’ve pointed your domain’s nameservers), the steps may be a little different.
- Click on DNS in the left sidebar navigation in MyKinsta.
- Click on the domain you want to add a DNS record to.
- Click the Add a DNS record button.
- Click on the TXT tab and add the value you copied from Imperva to the Content value. Leave the Hostname blank unless you’re adding this to a subdomain, in which case you’d add the subdomain to the Hostname field. Click the Add DNS record button to save your new TXT record.
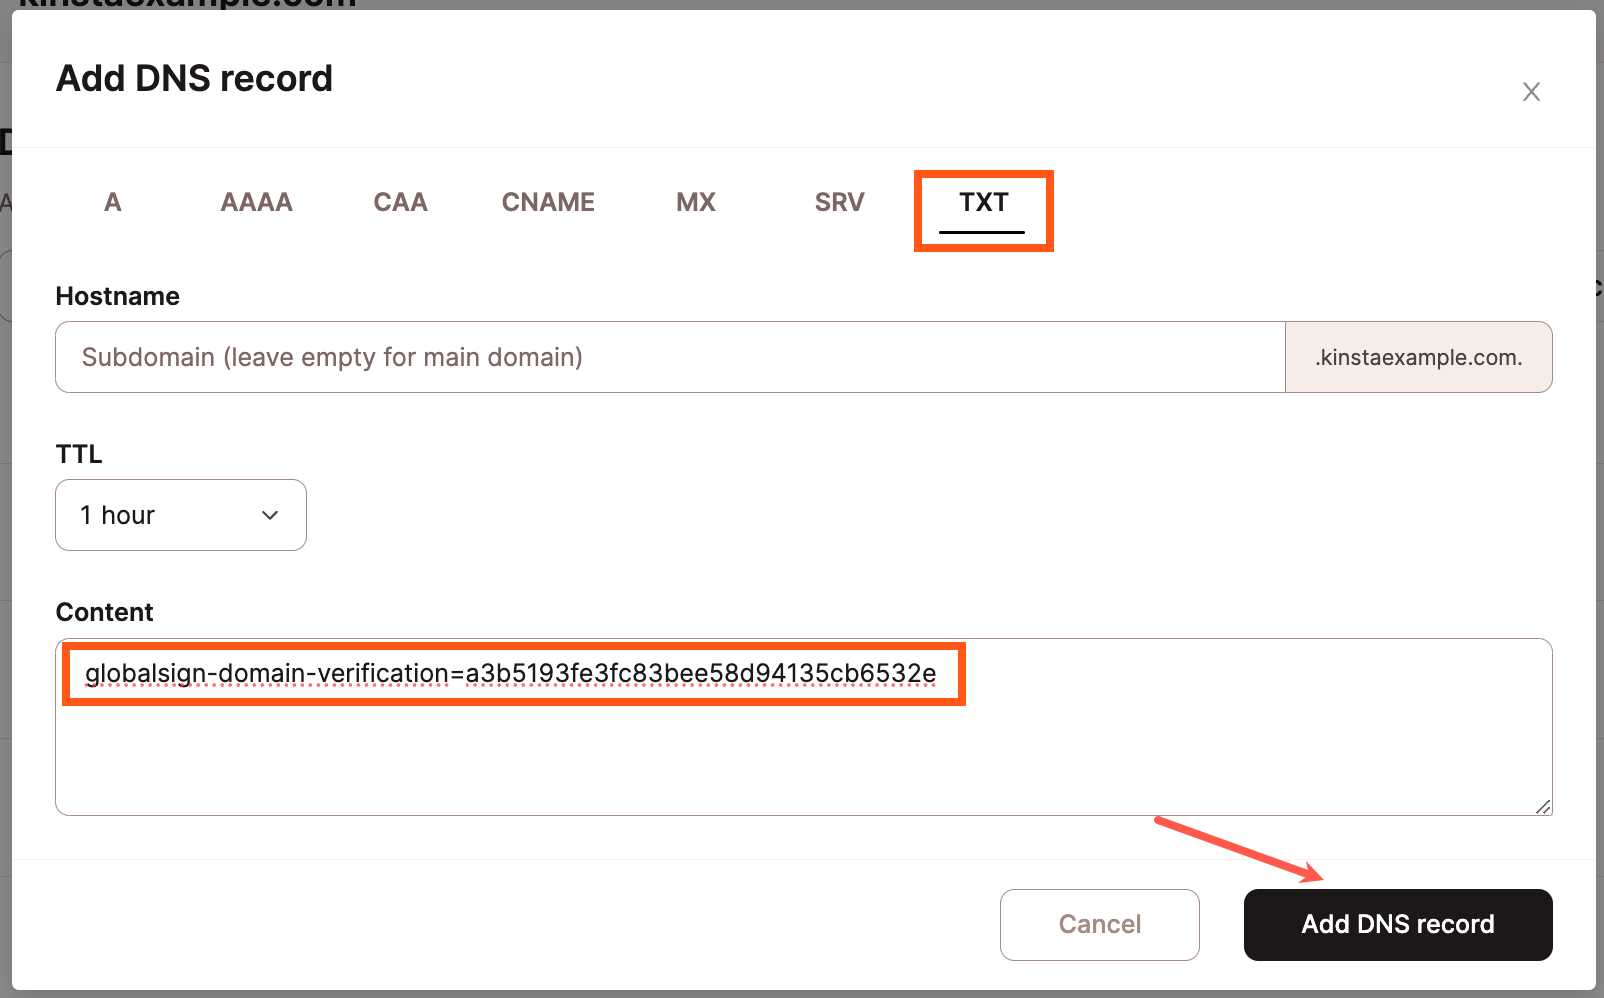
Note: It may take up to 1 hour for your new DNS record to propagate.
Step 7 – Start Validation
After DNS has propagated, you can click the I added the TXT records button in Imperva to start the validation.
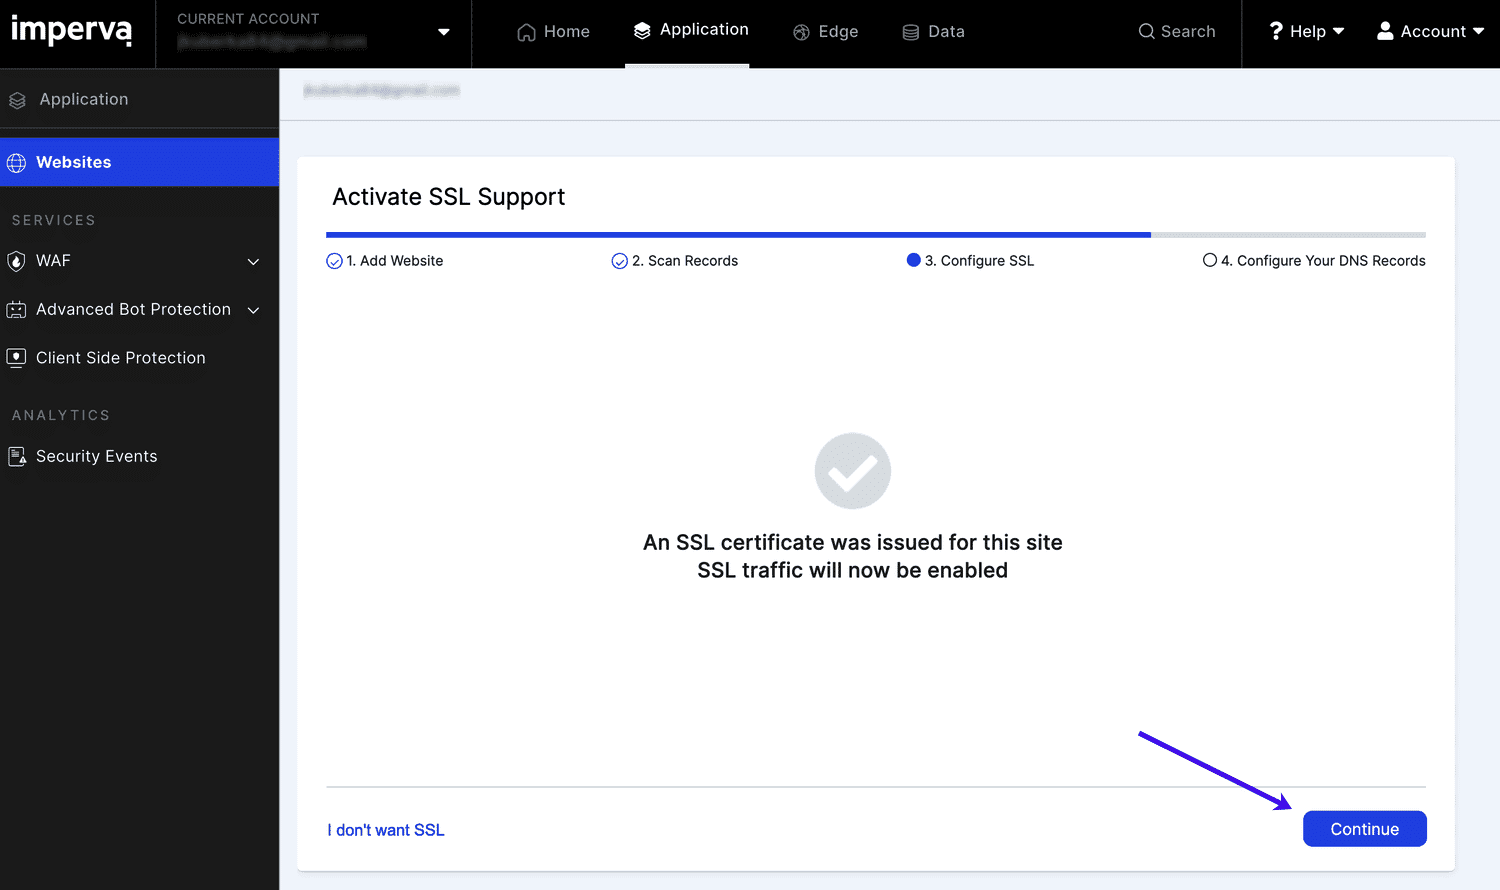
Once that’s complete, you’ll see the notification that an SSL certificate was issued and SSL traffic is enabled. Click the Continue button in the lower right corner to move on to the next step.
Step 8 – Point DNS
With SSL installed and enabled, you’ll see information on pointing DNS. Copy both of the A records and the CNAME shown in step 4 in your Imperva console.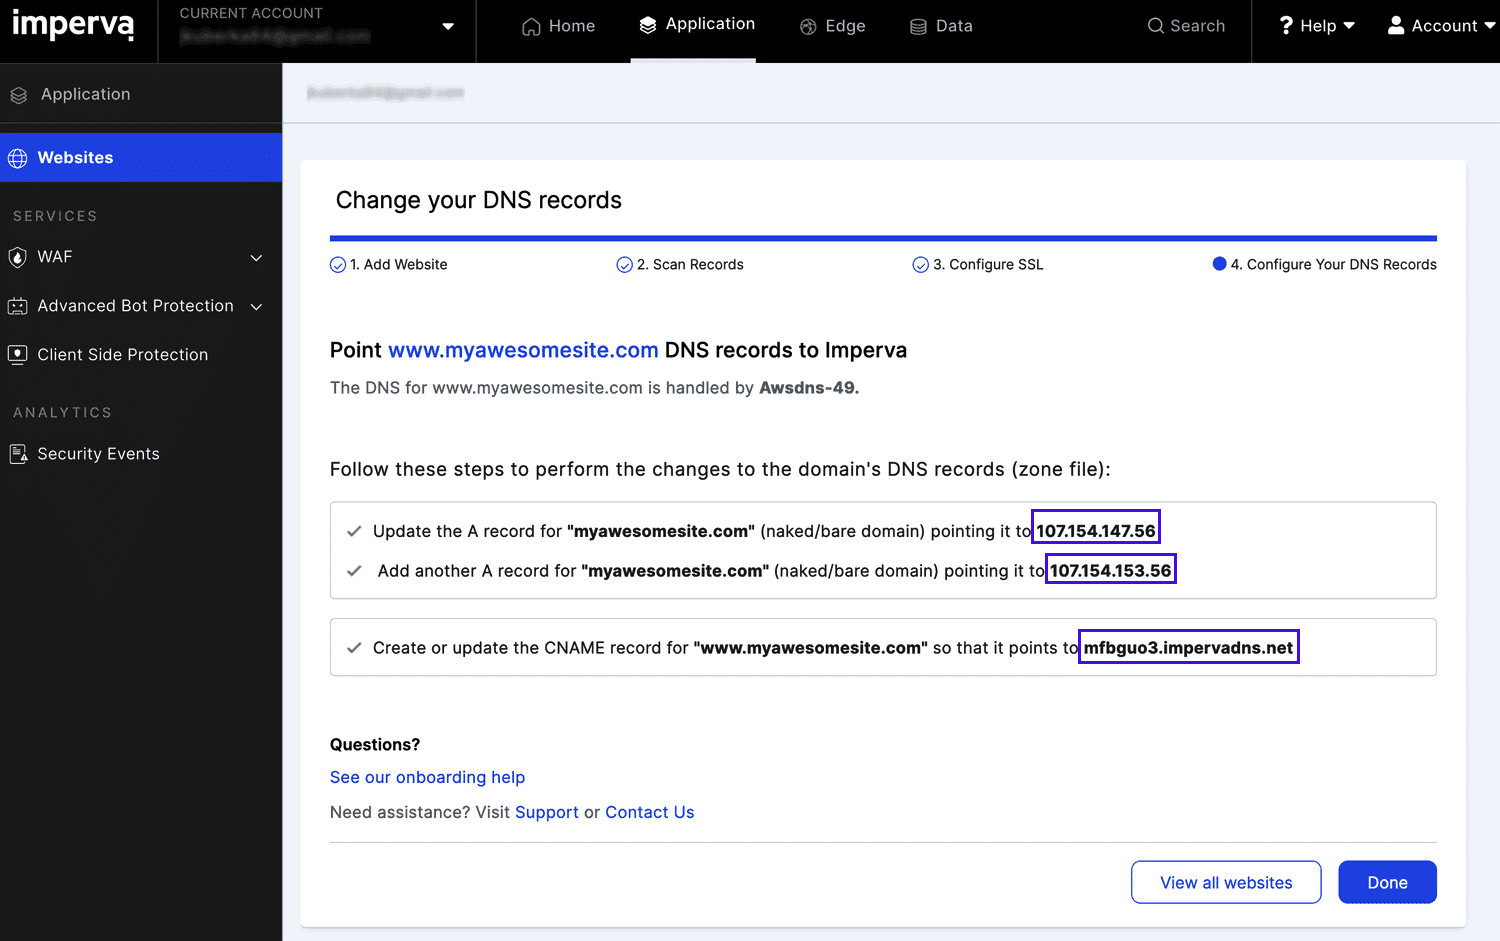
Step 9 – Point Your Site
Next, you’ll need to point your site to Imperva. Once again, we’ll be showing you how to do this in Kinsta’s DNS. These steps may vary depending on your DNS provider.
- If you aren’t already in DNS in MyKinsta, click on DNS in the left sidebar navigation.
- Click on the domain you want to add a DNS record to.
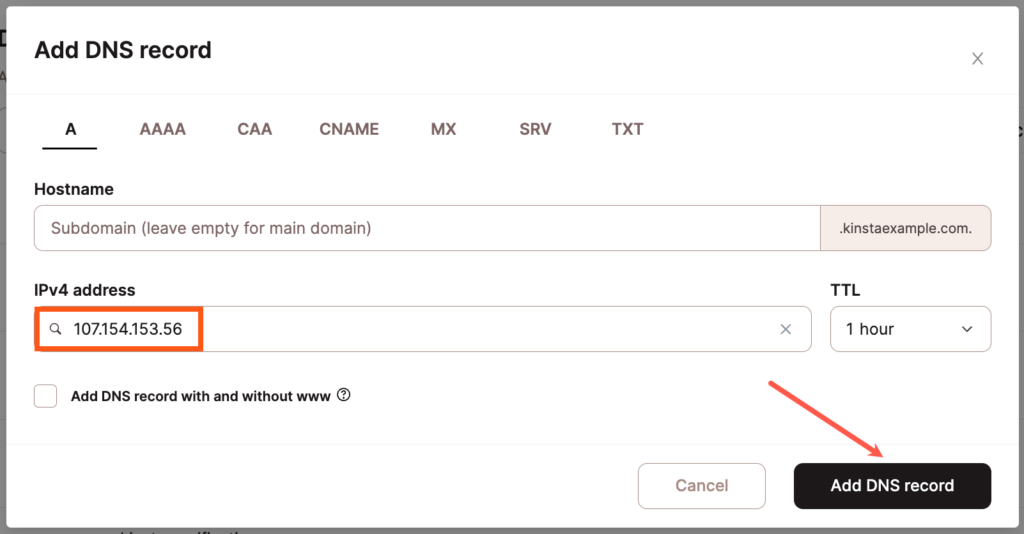
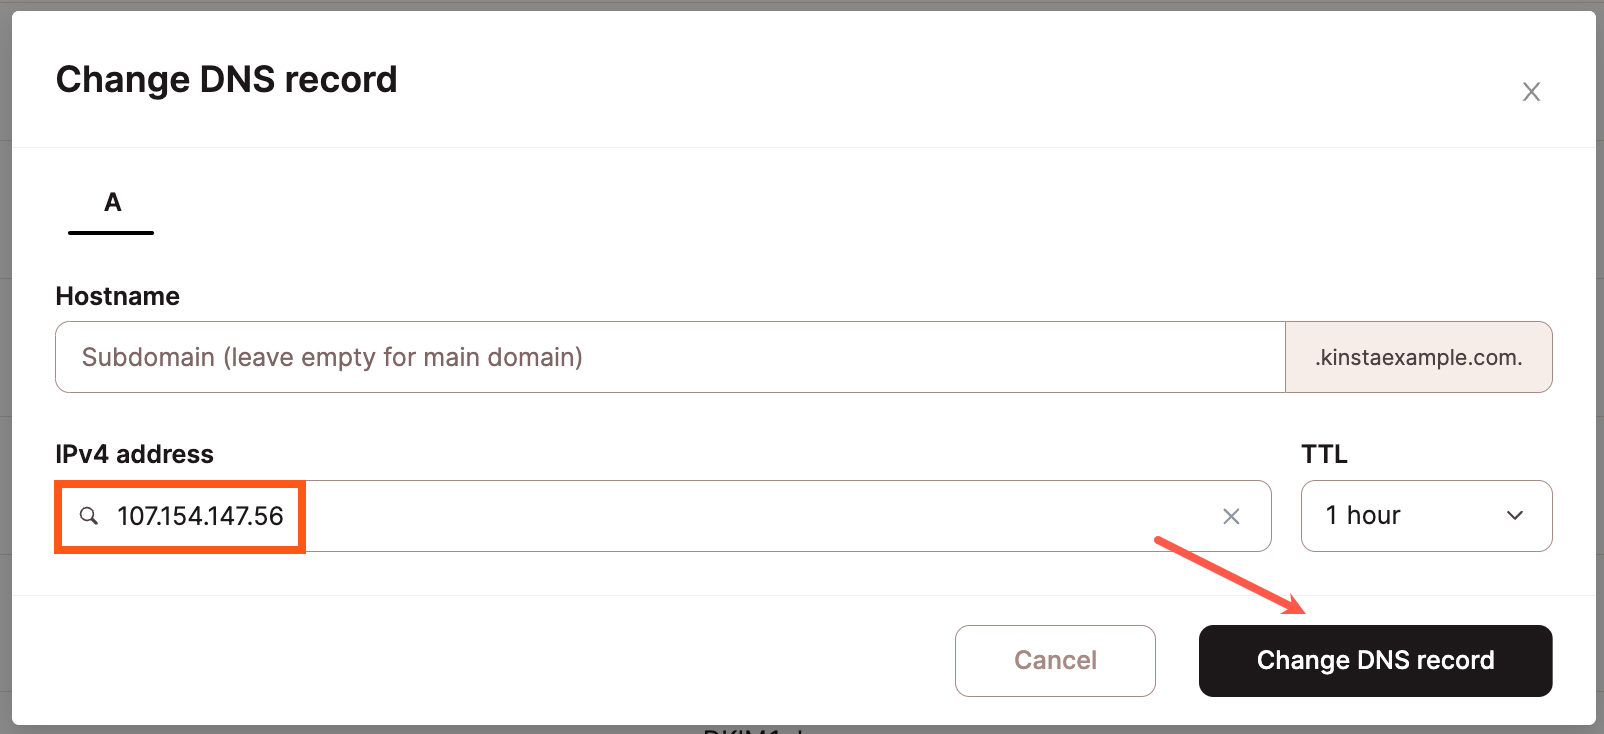
- If you already have an existing A record for your domain, click the Edit (pencil) icon to update this to the first IP address shown at Imperva. Otherwise, click the Add a DNS record button.
- Leave the Hostname blank unless you’re adding the A record to a subdomain (add the subdomain as Hostname in that case)
- IPv4 Address: The first IP address shown in your Imperva console.
- Click the Change DNS record button (updating a DNS record) or Add DNS record button (adding a new DNS record) to save your DNS record.

Change your A record to point to Imperva. 
Add an A record to point to Imperva.
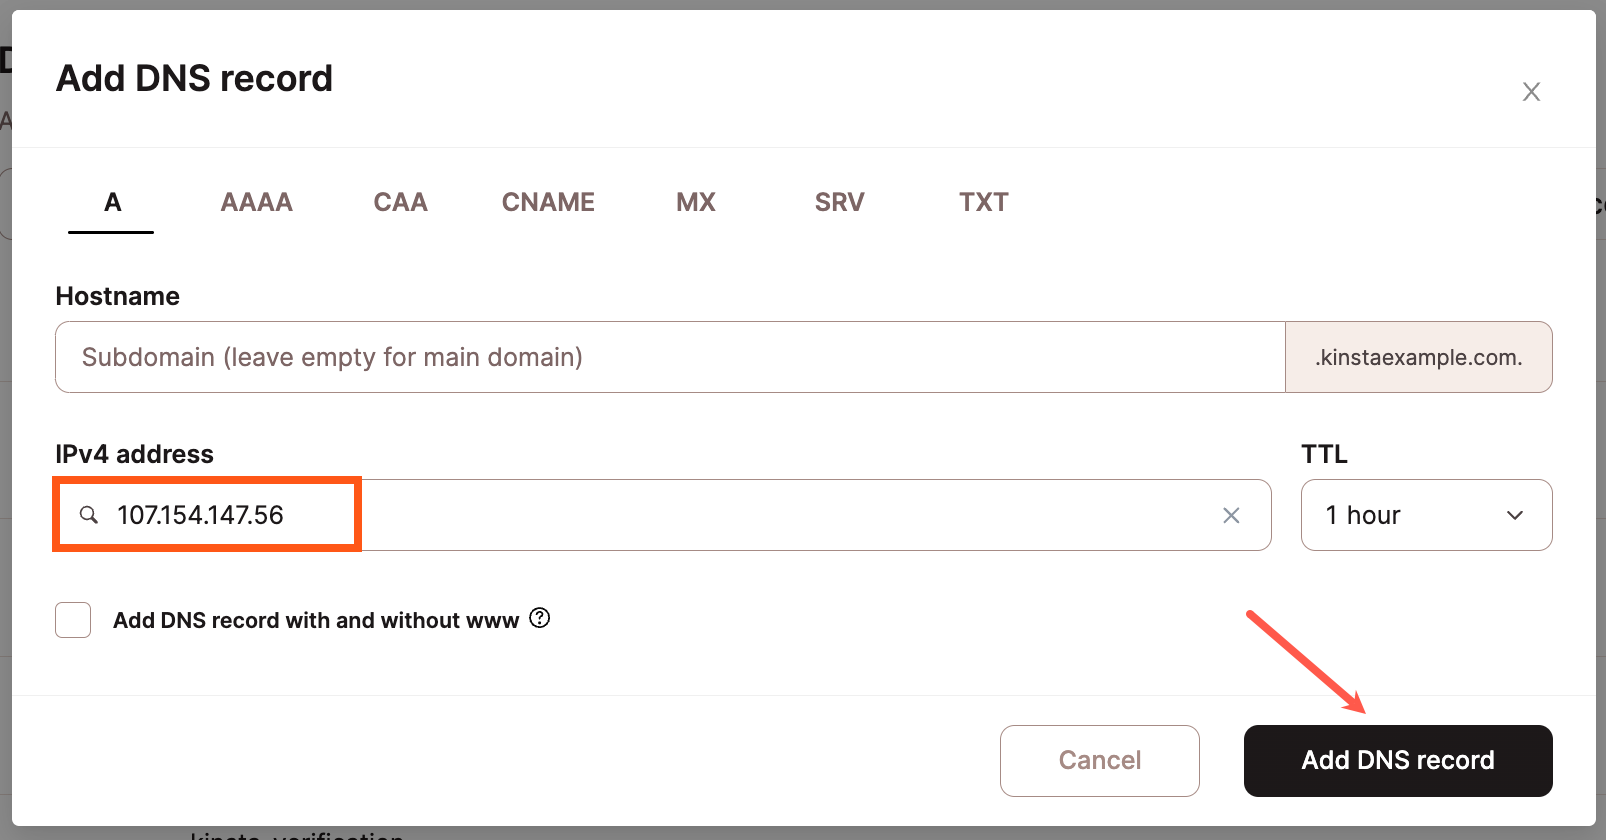
- Click the Add a DNS record button again and add an A record for the second IP address from Imperva.
- Leave the Hostname blank unless you’re adding the A record to a subdomain (add the subdomain as Hostname in that case)
- IPv4 Address: The second IP address shown in your Imperva console.
- Click the Add DNS record button to save your DNS record.
Add an A second record to point to Imperva.
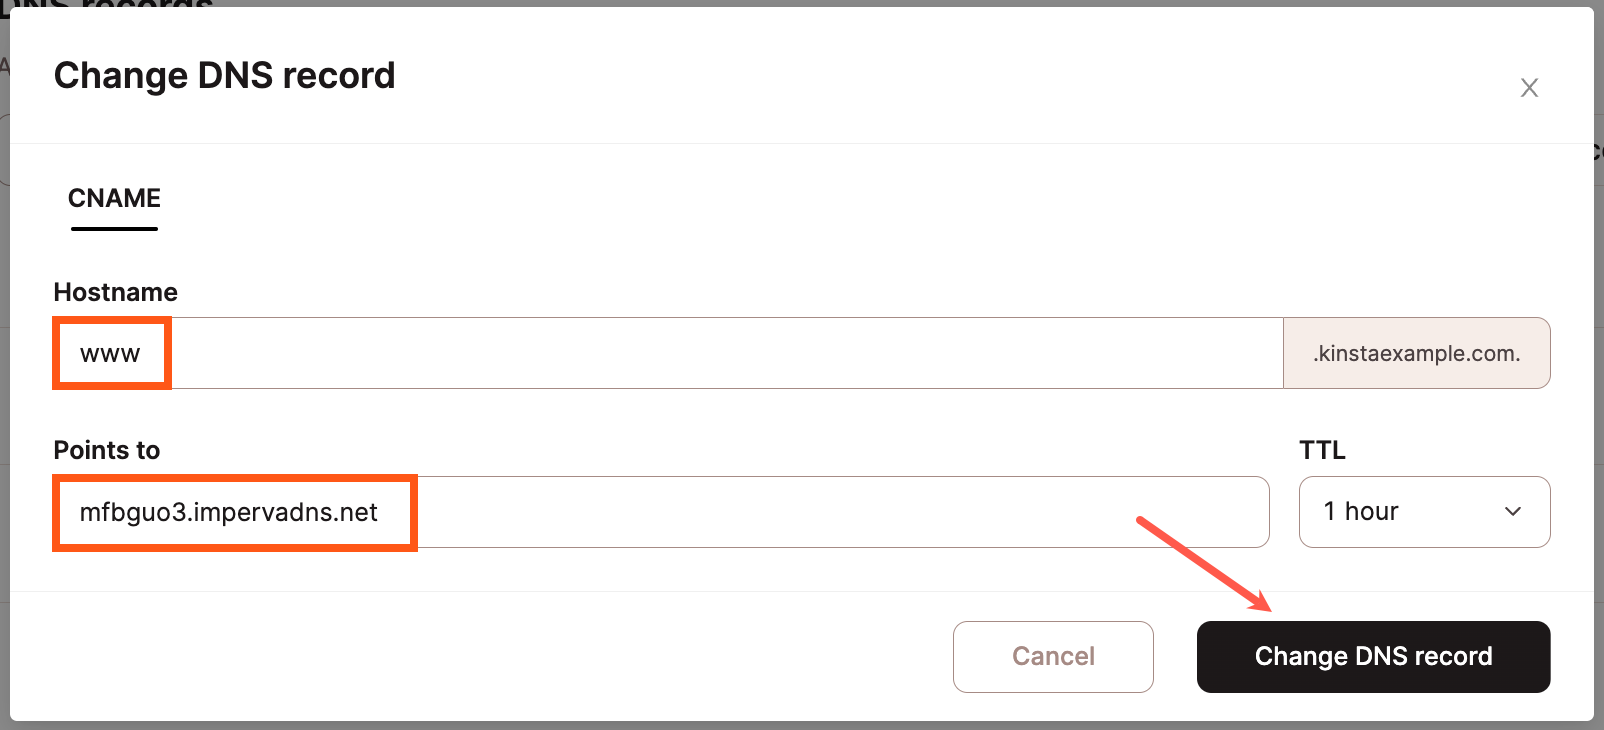
- If you already have an existing CNAME record for the www hostname, click the Edit (pencil) icon to update it. Otherwise, click the Add a DNS record button and select the CNAME tab.
- Hostname: www
- Points to: The hostname to point www to as shown in your Imperva console.
- Click the Change DNS record button (updating a DNS record) or Add DNS record button (adding a new DNS record) to save your DNS record.

Edit your www CNAME record to point to Imperva. 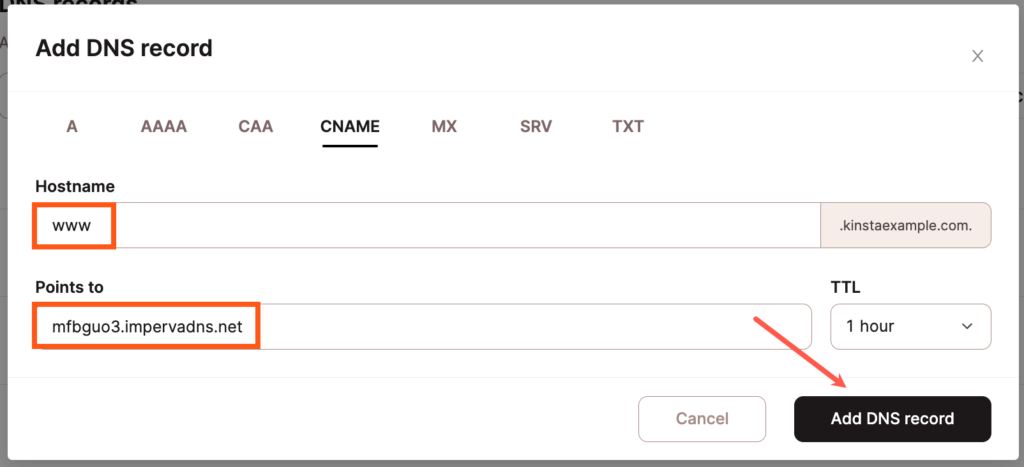
Add a www CNAME record to point to Imperva.


Note: It may take up to 1 hour for your DNS records to propagate.
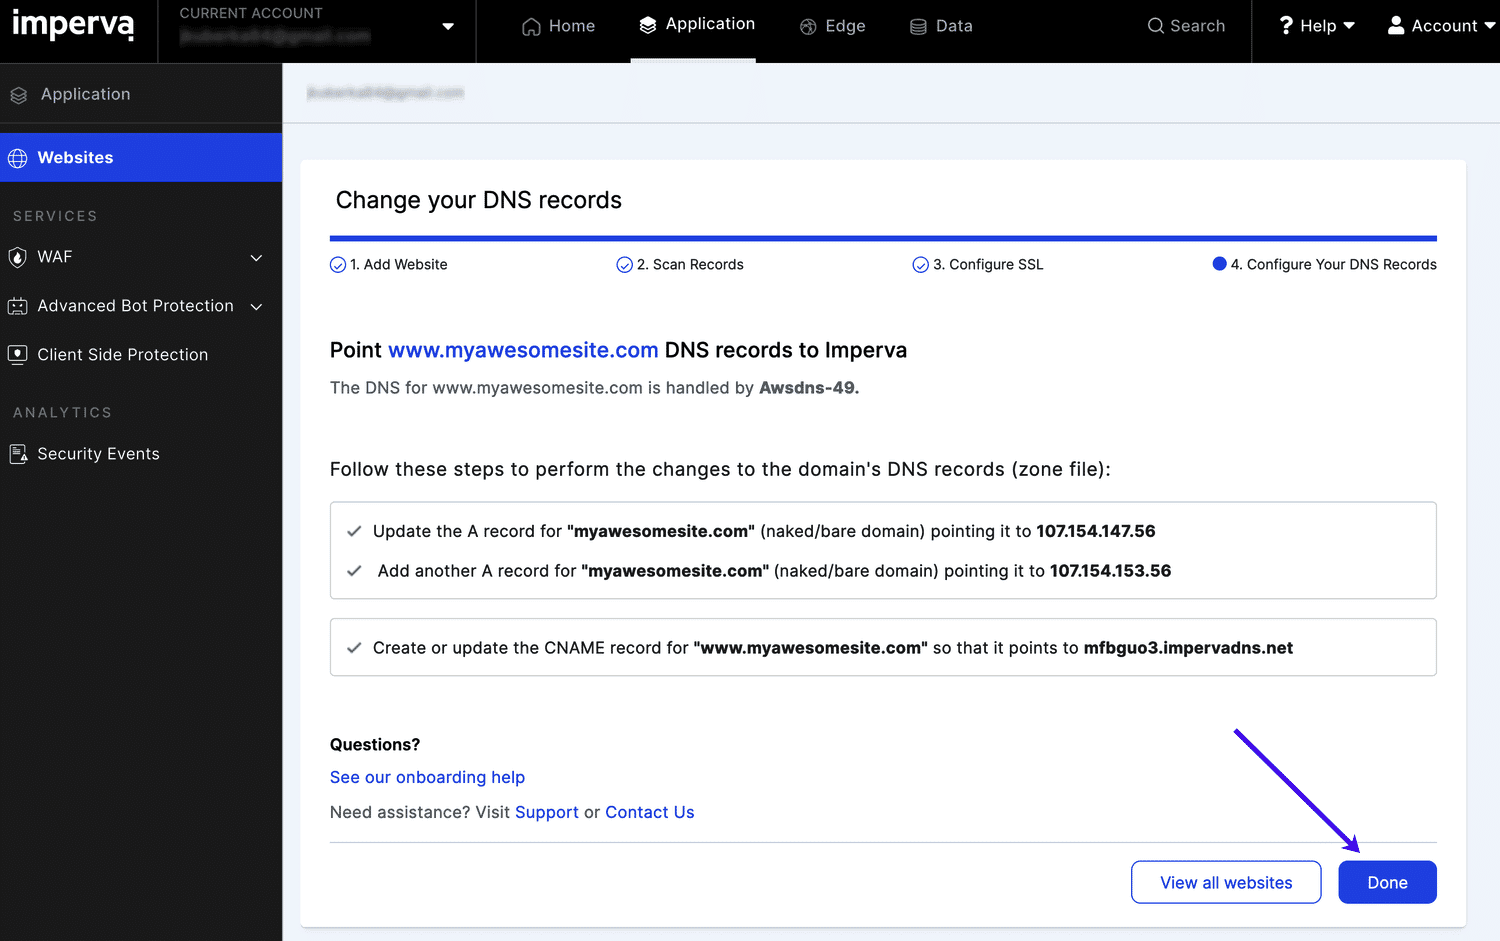
Step 10 – Complete Onboarding
Once DNS propagates, back in your Imperva console, click the Done button in the lower right corner to complete the initial onboarding steps.
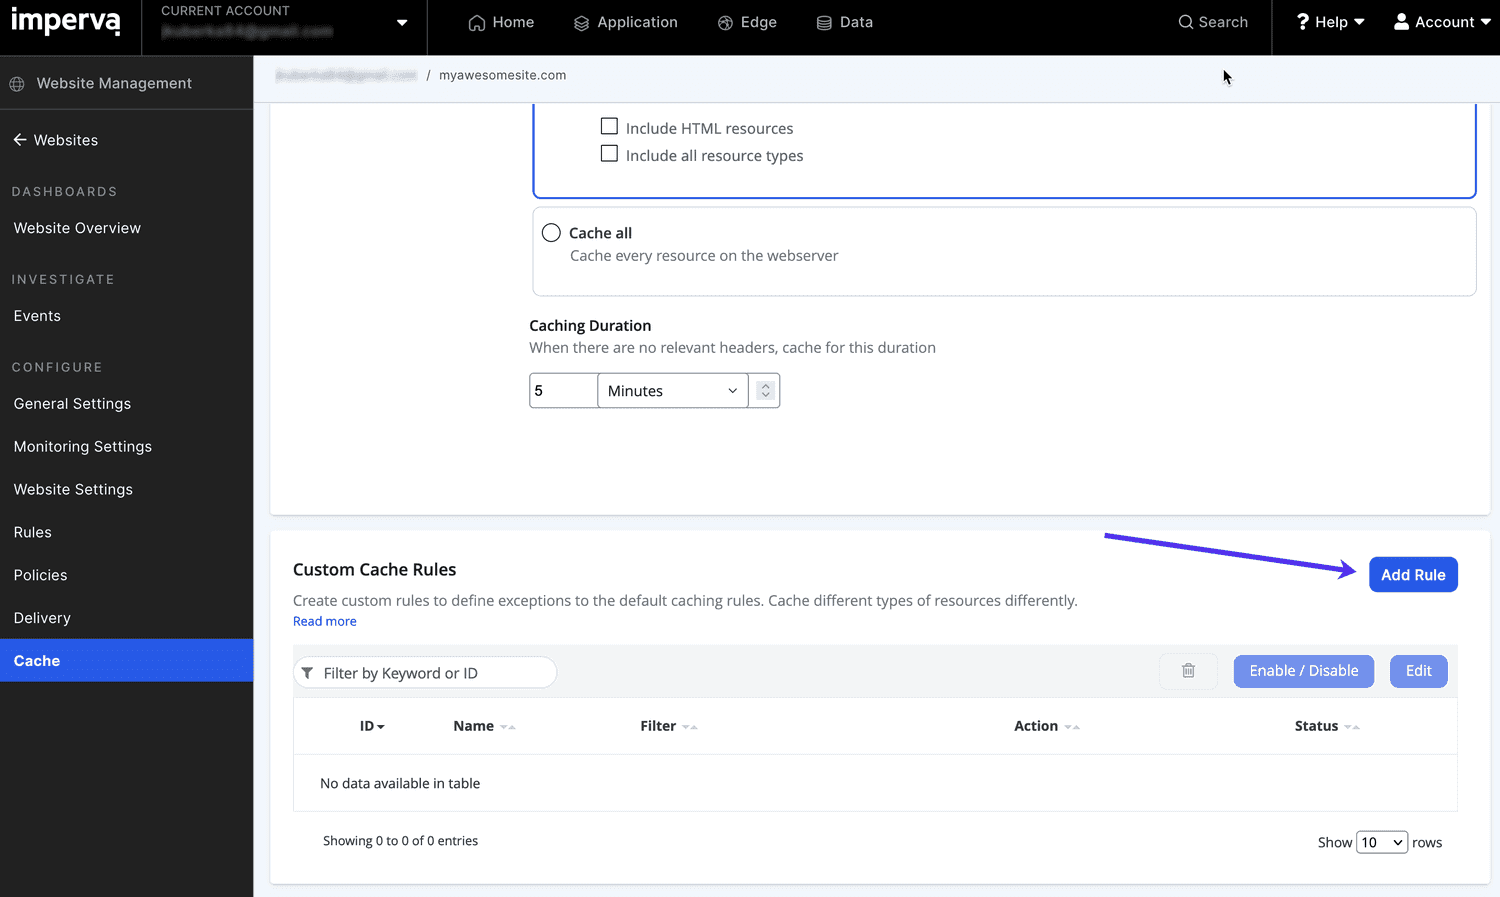
Step 11 – Create a Custom Cache Rule
Now that DNS is pointed and onboarding is complete, you’ll be taken to the Website Settings screen. The last step is to create a Custom Cache Rule to prevent caching of pages that contain certain WordPress cookies. This prevents unintentional caching of dynamic data.
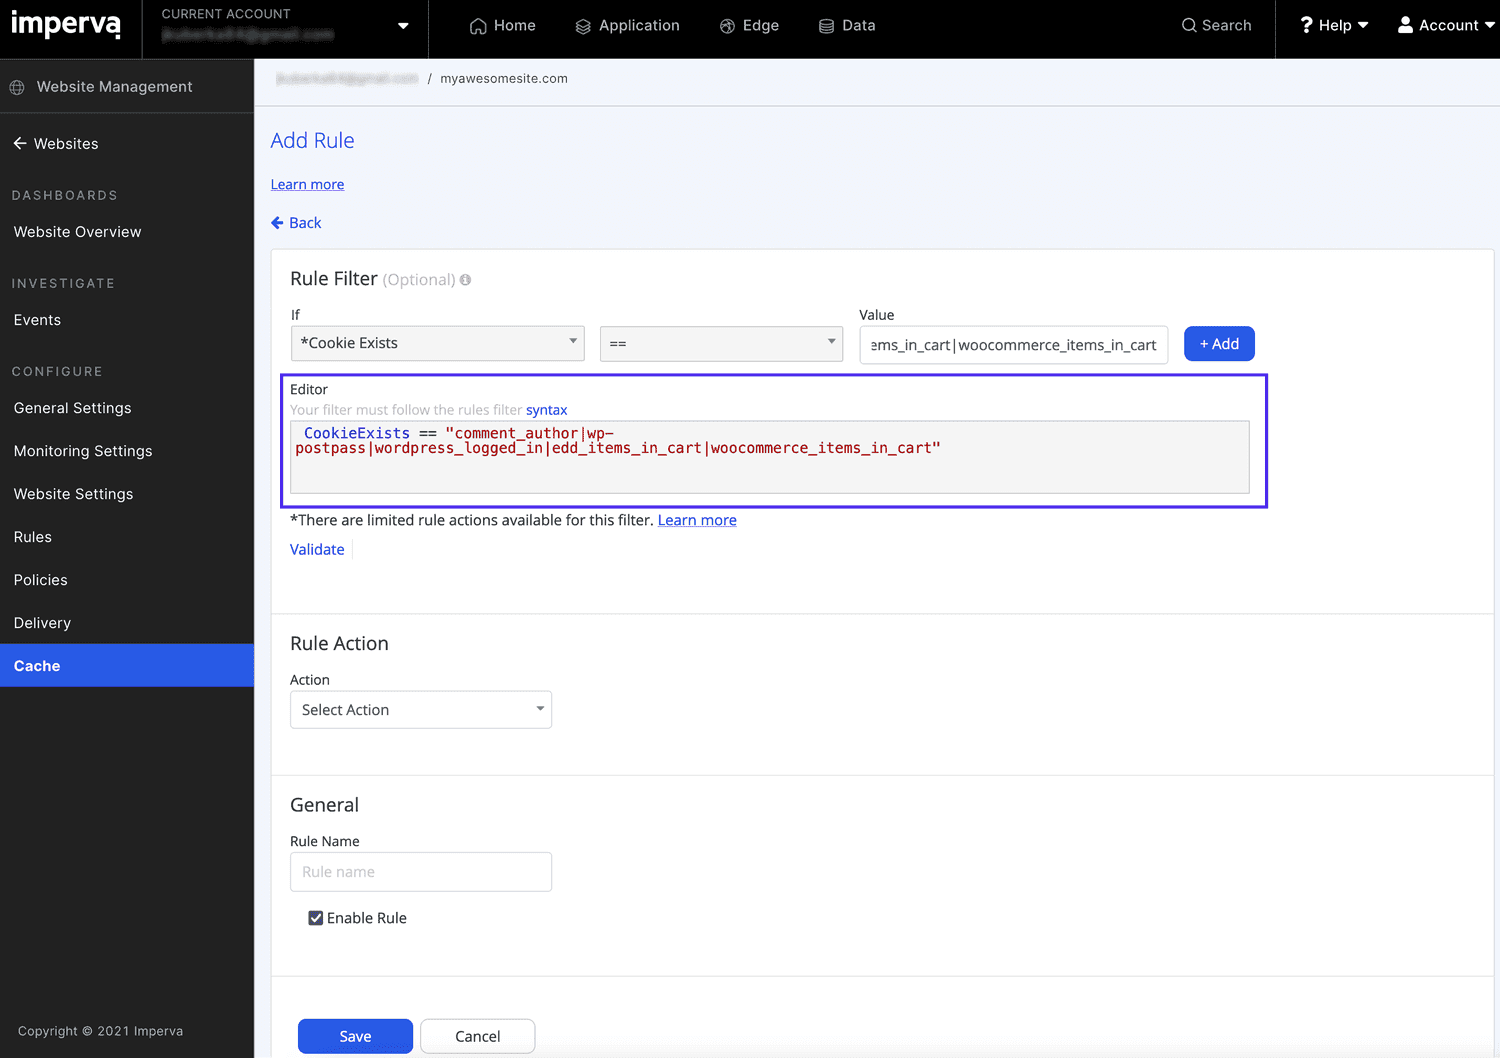
- In the left sidebar, go to Cache (under Configure) and scroll down until you see the Custom Cache Rules section. Click on the Add Rule button.
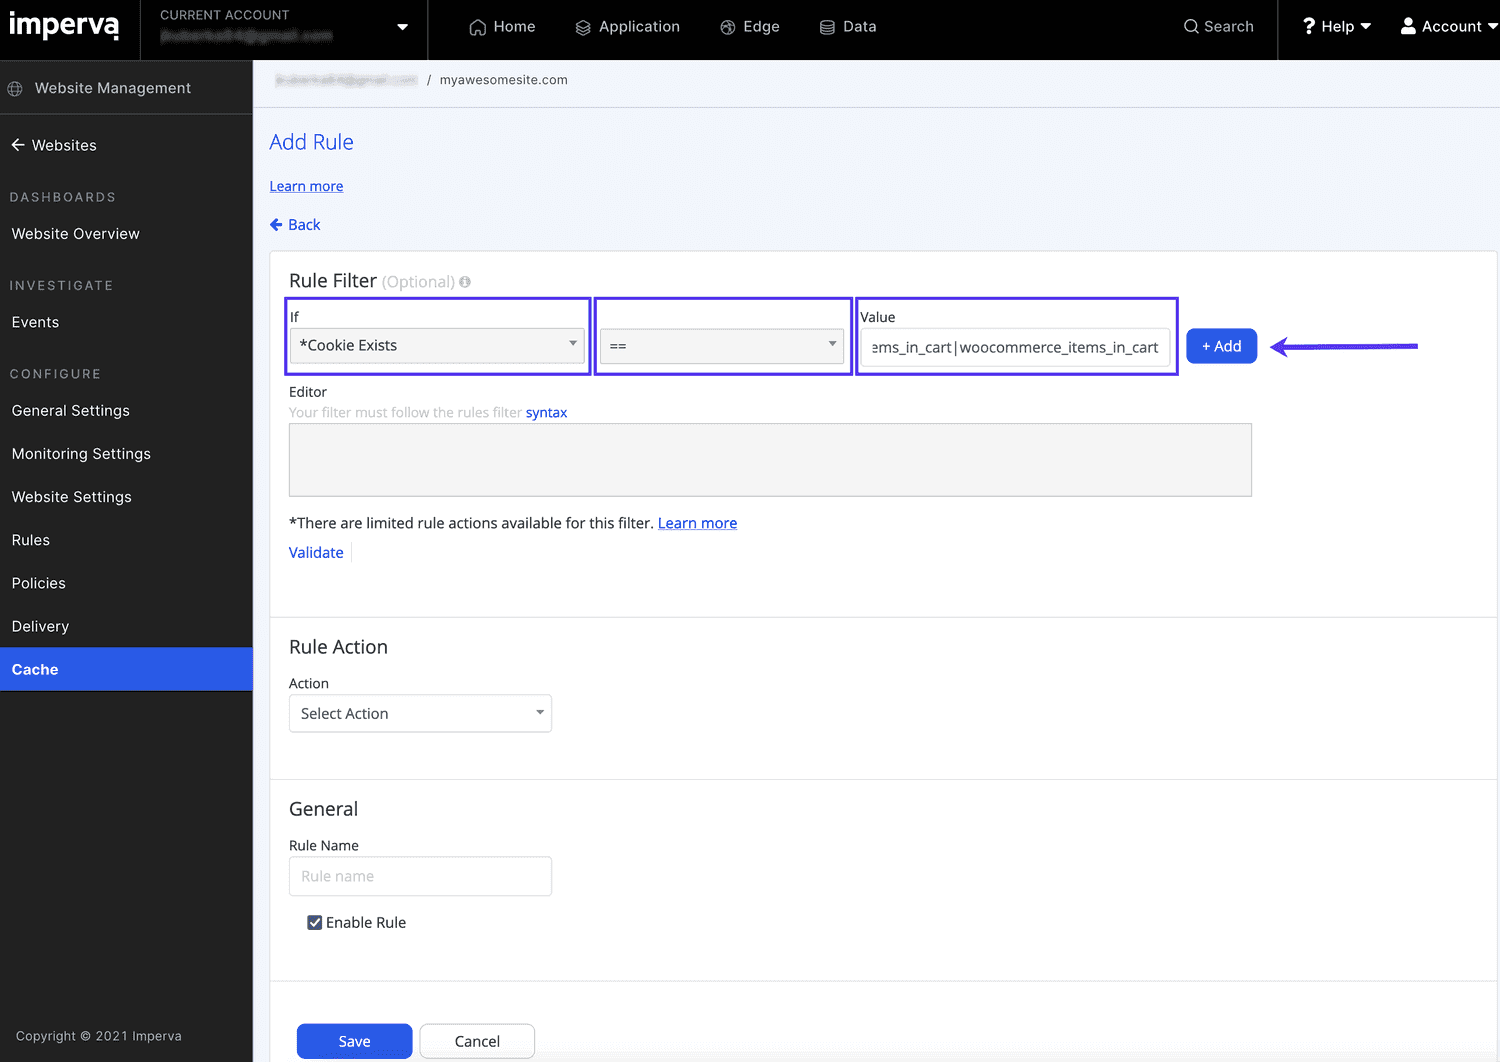
Add a custom rule in Impeva cache settings. - Set the following rule filters and click the Add button:
- if: *Cookie Exists
- ==
- Value: comment_author|wp-postpass|wordpress_logged_in|edd_items_in_cart|woocommerce_items_in_cart
Set the filter for your custom cache rule.
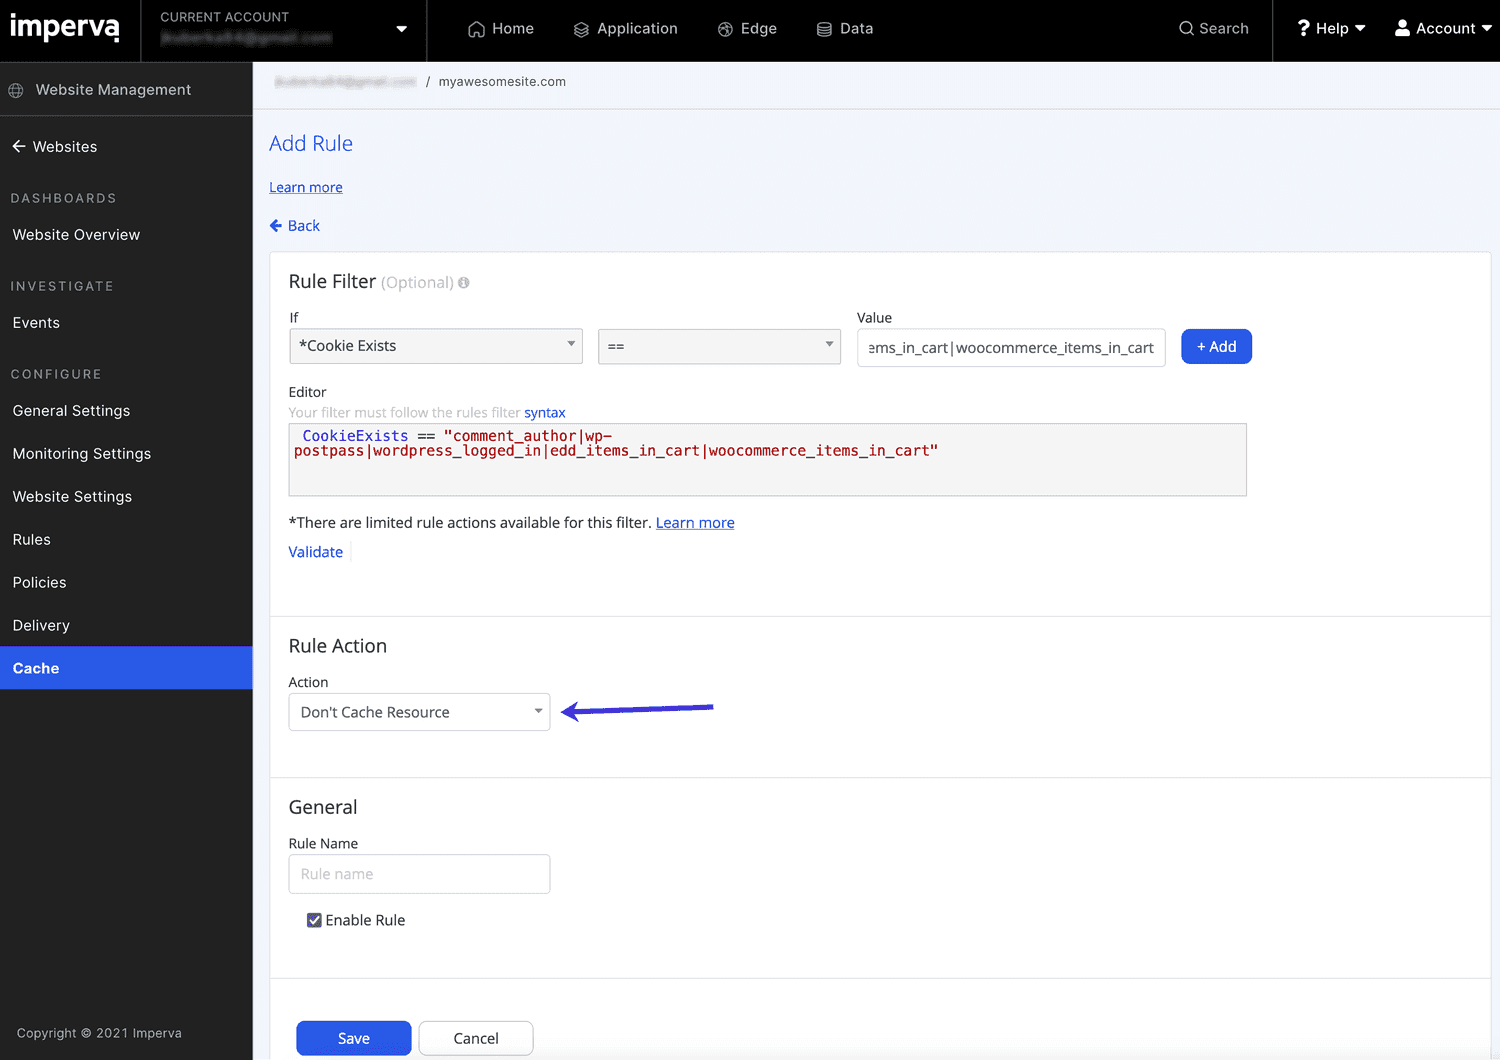
- In the Editor window, you’ll see your new custom cache rule has been added.
New custom cache rule in the cache rule editor. - Under the Ruler Filter section, set the Rule Action to Don’t Cache Resource.
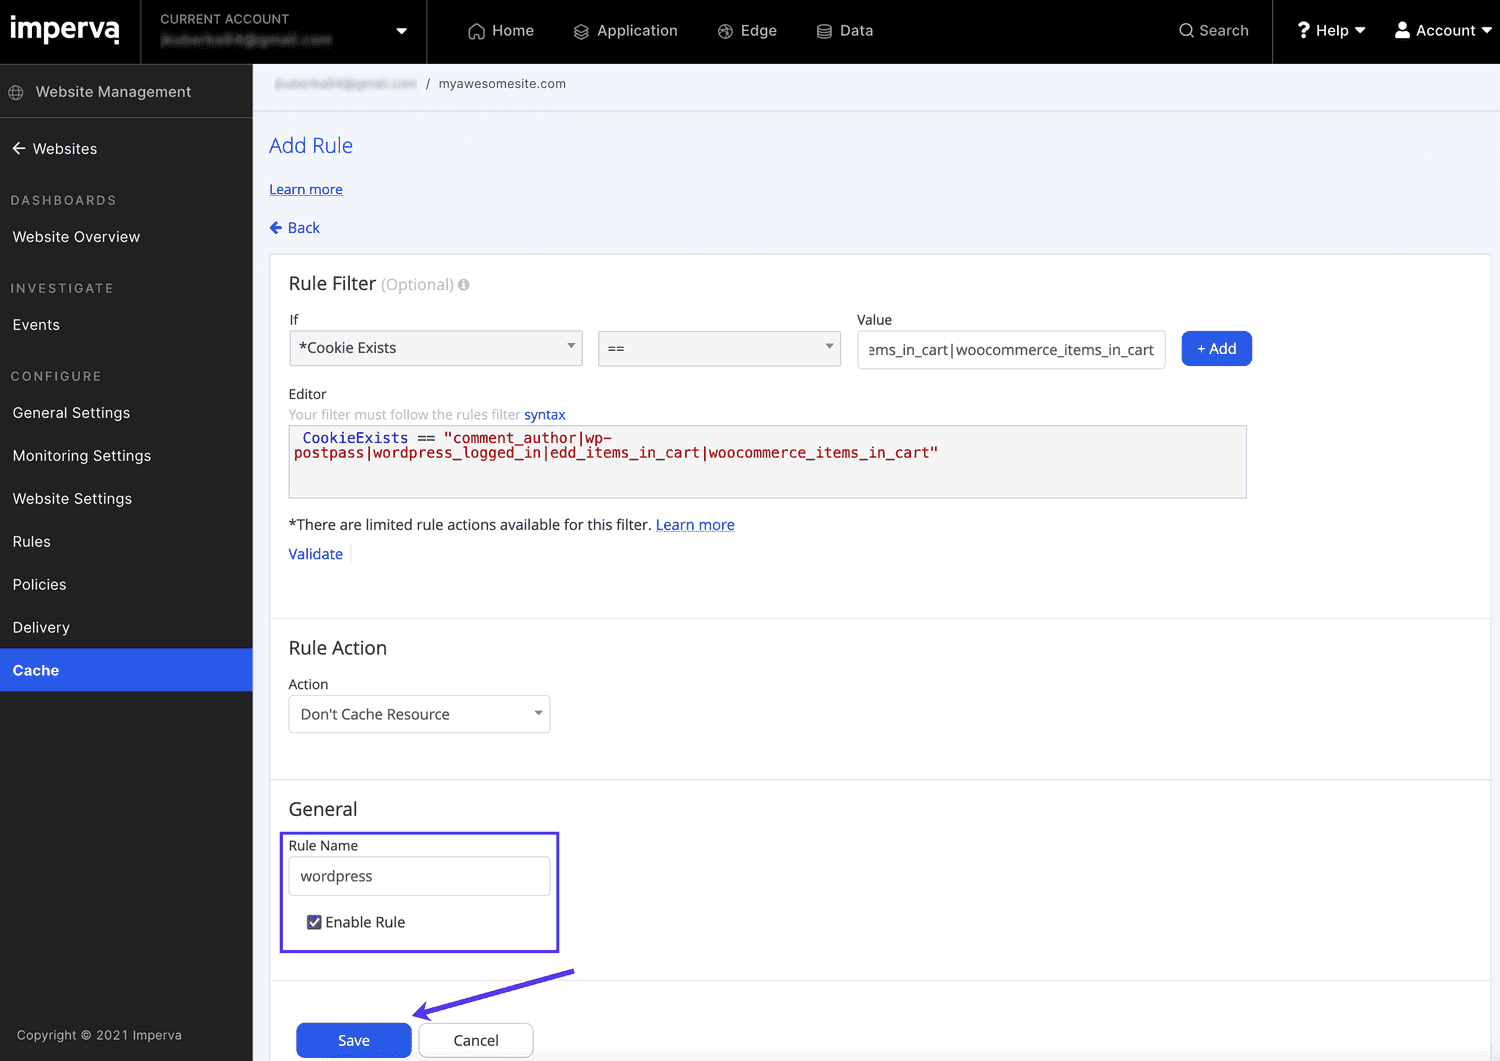
Set the Rule Action to Don’t Cache Resource. - Under General, add your Rule Name (e.g. wordpress) and click the Save button.
Name your new custom cache rule and save it. - Back on the Cache Settings page, you’ll see your custom rule has been added and enabled.
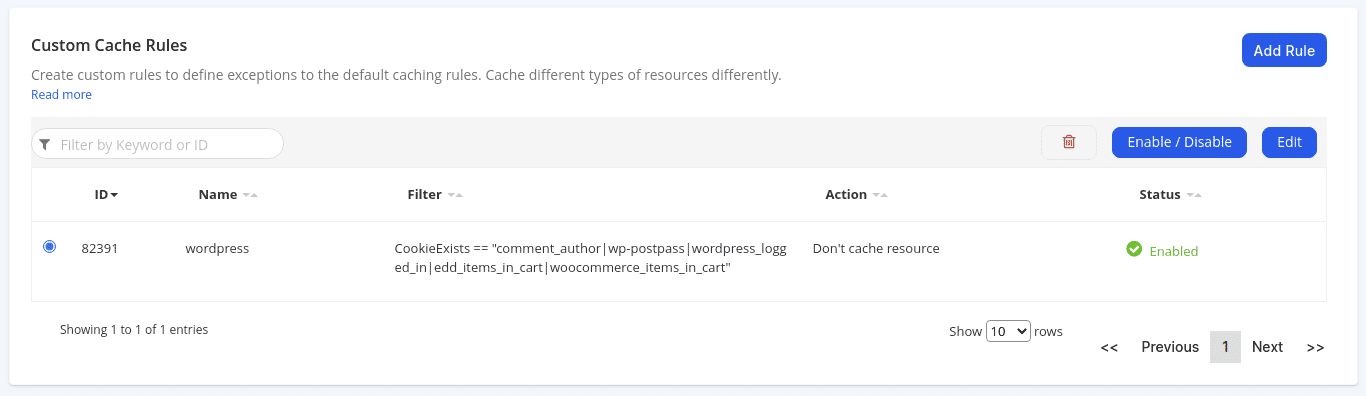
New custom cache rule saved and enabled.
Now your site is set up and configured at Imperva. If you run into any issues, check out some common issues and solutions in the next section.
Troubleshoot Common Imperva Issues
Now that you have Imperva set up with your Kinsta hosted site, what happens if something doesn’t work the way you expect it to? With an additional CDN layer, there are a few things to try when troubleshooting. We’ve covered the most common ones below.
Changes Aren’t Showing Up on Your Site
Serving your site through Imperva adds an additional layer of caching that will need to be cleared anytime you need to clear the cache. If you’re having trouble seeing changes on your site or a plugin isn’t behaving as expected after installing or reinstalling, be sure you clear cache at all layers, including:
- Plugins (if applicable)
- Themes (if applicable)
- Site/server cache at Kinsta (from either MyKinsta or the Kinsta MU plugin)
- Caching at Imperva
- Browser cache
Potential Cache Conflicts
A couple of important notes to keep in mind if you enable caching at Imperva:
- Imperva caching may interfere with IP Geolocation redirections set at Kinsta.
- Including HTML resources in your Imperva cache could lead to exposure of personal information tied to your site visitors or customers.
IP Address Blocked by False Positive
If false positives occur with DDoS protection, bot detection, and/or WAF enabled at Imperva, you or site visitors may be inadvertently blocked from your site. To see where the IP is being blocked and fix the issue, you’ll need to first check with Imperva’s support team and see if the block is occurring there. If the block isn’t at Imperva, you’ll then need to reach out to our Support team at Kinsta.
Plugin or Theme Issues
Some of Imperva’s default rules may interfere with some plugins or themes. If a plugin or theme appears to be broken or not working as expected, try disabling the Imperva WAF while debugging.
Advanced Settings and Compatibility
Now that we’ve covered the configuration and some common troubleshooting tips, there are a few more important aspects to keep in mind when your site is using both Imperva CDN and Kinsta’s Cloudflare integration.
Web Protection — DDoS Settings
Automatic mode is set as default, and Imperva will turn DDoS mitigation rules on when traffic to your site exceeds the threshold. The default threshold is 1,000 requests per second, which can be adjusted in Advanced DDoS Settings.
HTTP to HTTPS Redirection
Redirecting from HTTP to HTTPS is recommended and can be set in Imperva by going to Content and Network Optimization > Delivery Settings > Redirection.
Login Protect
If your WordPress login page or directories are password protected at Kinsta, do not enable this feature in Imperva. You can use one or the other but cannot have both enabled at the same time.
Summary
If you have any trouble with Imperva on your site, our Support team is happy to check into and resolve any server-side issues. For any troubleshooting of the Imperva side of things, you’ll need to work with their support team or your developer to resolve those. To stay up to date with the latest on our Cloudflare integration (and new content every week), be sure to subscribe to our newsletter.