There are few situations more alarming than being locked out of your own WordPress admin dashboard. If you’ve encountered a message reading “Sorry, you are not allowed to access this page” when trying to log in, you know the feeling first hand.
Fortunately, there are several solutions at your disposal for troubleshooting this error. With a little patience, you can clear up the mistake and get back to managing your WordPress site in no time.
In this post, we’ll dig into the “Sorry, you are not allowed to access this page” error and what causes it to occur. Then we’ll walk you through the many potential solutions to help you find the one that addresses your specific situation.
Let’s jump right in!
Understanding the “Sorry, You Are Not Allowed to Access This Page” Error
Although we’re referring to it as an “error” for the purposes of this post, the “Sorry, you are not allowed to access this page” message in WordPress is meant to be a helpful security measure.
Ultimately, seeing this notification simply means there’s a permissions setting that’s blocking you from a certain area.
This becomes a problem when you’re locked out of a part of your site that you should have permission to enter which, as an Administrator, is anywhere on the backend. When this situation arises, it is often following a recent update to a theme, plugin, or WordPress core.
You may see the “Sorry, you are not allowed to access this page” message for a variety of reasons. It might be that WordPress doesn’t recognize you as an Administrator. In other situations, the information contained in your site’s core code or in a theme or plugin may not match what’s in your database.
Additional causes include incorrect information in your wp-config.php file or a site that’s running an outdated version of PHP. Whatever the source, this error may prevent you from accessing the entire admin area or just a portion of it.
Since it’s likely that you will not be able to access key settings via the dashboard, you’ll need to use File Transfer Protocol (FTP) or phpMyAdmin to resolve this issue. Make sure to back up your site and brush up on using these platforms before you dive into the troubleshooting process.
The most frustrating thing about encountering the “Sorry, you are not allowed to access this page” notification is that it can be hard to pin down which of its causes are at play. Fortunately, there are many solutions you can test out to find the root of the problem.
How to Fix the “Sorry, You Are Not Allowed to Access This Page” Error in WordPress (11 Potential Solutions)
Due to its many possible causes, the “Sorry, you are not allowed to access this page” error takes quite a bit of patience to resolve. This long list of solutions may be intimidating but it also covers a variety of situations to help you find the right one for your site.
1. Restore a Previous Version of Your Site
The simplest and often the fastest way to get back into your WordPress dashboard is to restore your site to an earlier version. A recent change, such as an update, might be the cause of the error you’re seeing. Undoing your latest modification should enable you to access your site again.
Kinsta clients have it easy in this regard. You can restore a WordPress backup in your hosting account with a single click:

The drawback to this solution is that you may lose your recent changes and will have to find a way to accomplish your goals without causing the same error again.
For this reason, you may want to restore your backup to a staging site instead. You can then test different modifications to determine what caused the problem. After uncovering the root of the issue, you can undo the troublesome change to regain access to your site.
2. Disable All of Your Plugins
A specific change that may be causing the “Sorry, you are not allowed to access this page” message on your site is the recent addition or upgrade of a plugin. If you suspect that this is the case, your best course of action is to disable your plugins one by one.
In the event that you disable a plugin and the message goes away, you’ve found the source of the problem. You can then troubleshoot the issue with that plugin (or do without it, if it’s not crucial to your site’s functionality).
Of course, if you’re locked out of your dashboard entirely, this process gets a little tricky. You’ll need to access your site using SFTP via a client such as FileZilla. Once you’ve done so, navigate to wp-content and find the sub-directory labeled plugins:
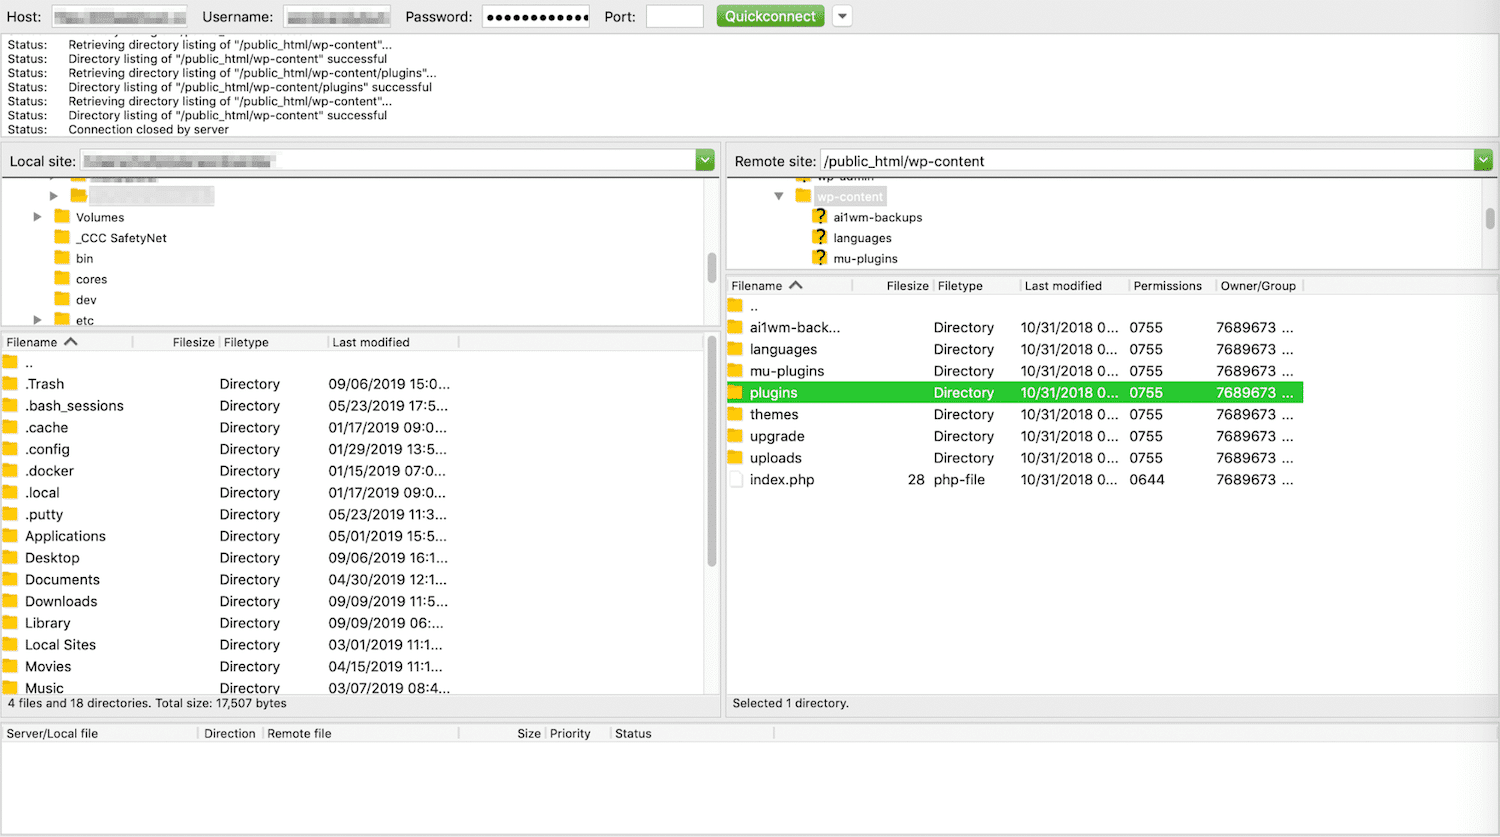
Enter this folder, and then rename your most recently-added plugin to something like “plugin-name_old”. Go back to your site and check to see if the error is resolved. If not, change the plugin’s name back and repeat the process with the next one.
3. Activate a Default Theme
Yet another potential cause of this error is that you’ve recently updated or installed a theme. Your best bet for resolving this problem is to activate a default WordPress theme such as Twenty Twenty or Twenty Nineteen.
To do so without access to your admin area, you’ll need to use FTP again. Connect to your server with FileZilla and then navigate to wp-content > themes:
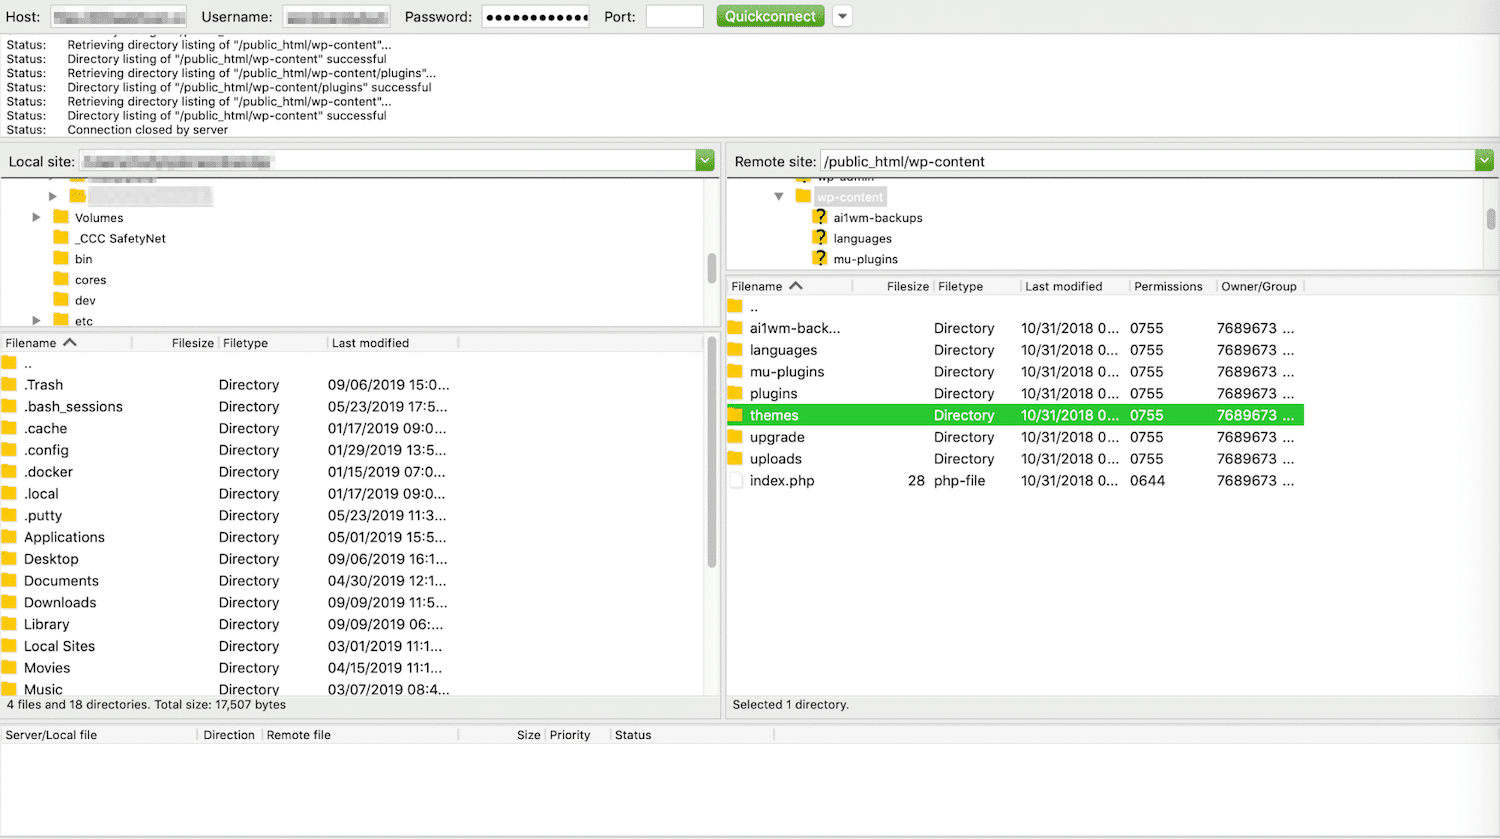
The rest of the process is fairly similar to the one described above for disabling your plugins.
Rename the folder for your active theme, and then return to your site and log in. You should see a notification telling you that the active theme is broken, and a default theme has been reactivated.
Then you can troubleshoot the theme. Your site should at least be accessible, albeit with the wrong theme activated.
4. Make Sure You’re an Administrator
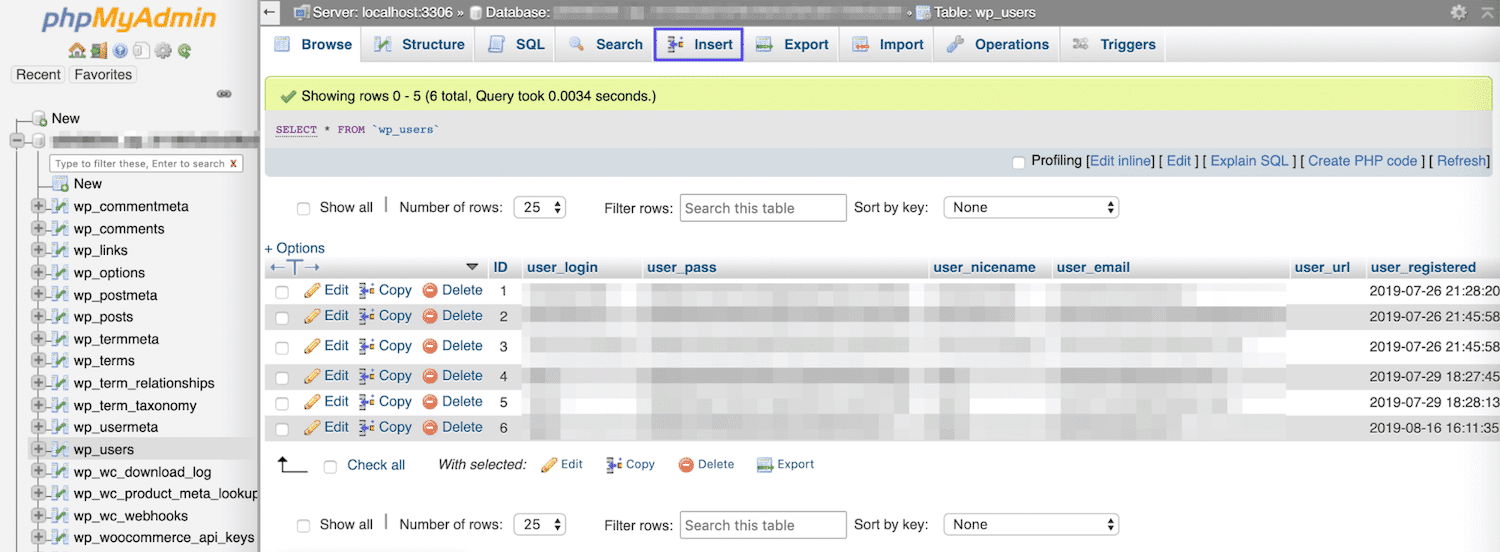
Another possibility is that your user role has been inadvertently changed and you are no longer listed as an Administrator. This is a common problem with multisite installations. To determine if this is the case, you’ll need to access phpMyAdmin and look for the wp_users table:
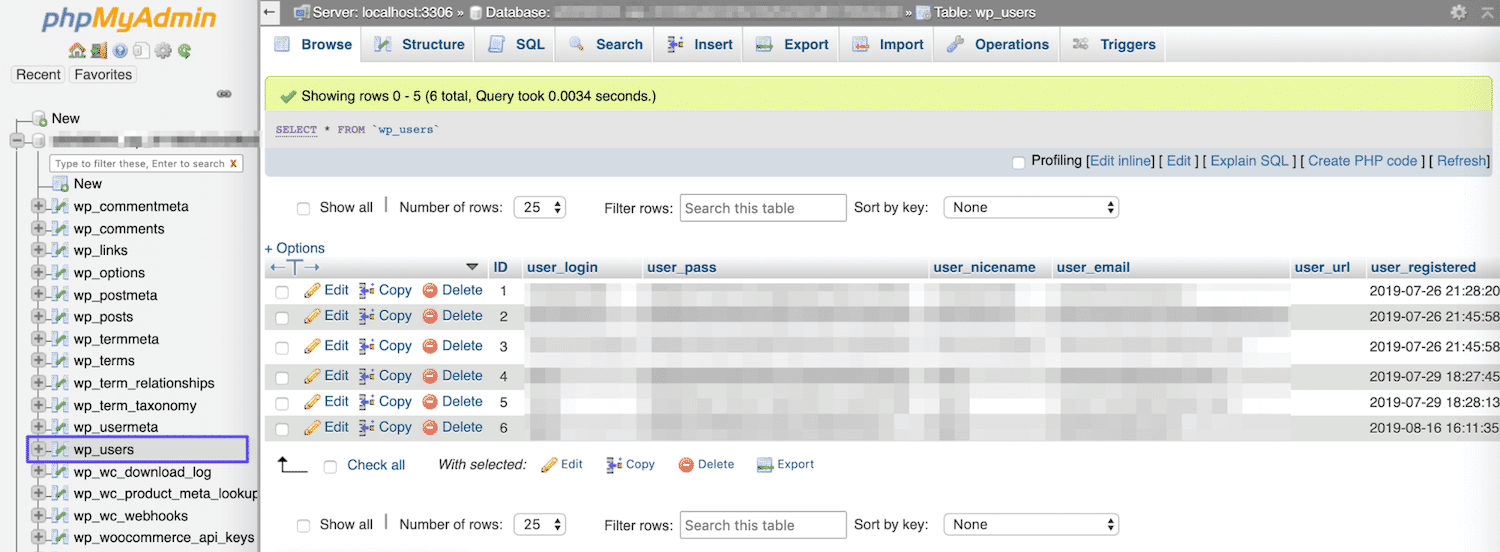
Find your username and note your ID. Then, navigate to the wp_usermeta table and find the wp_capabilties row:
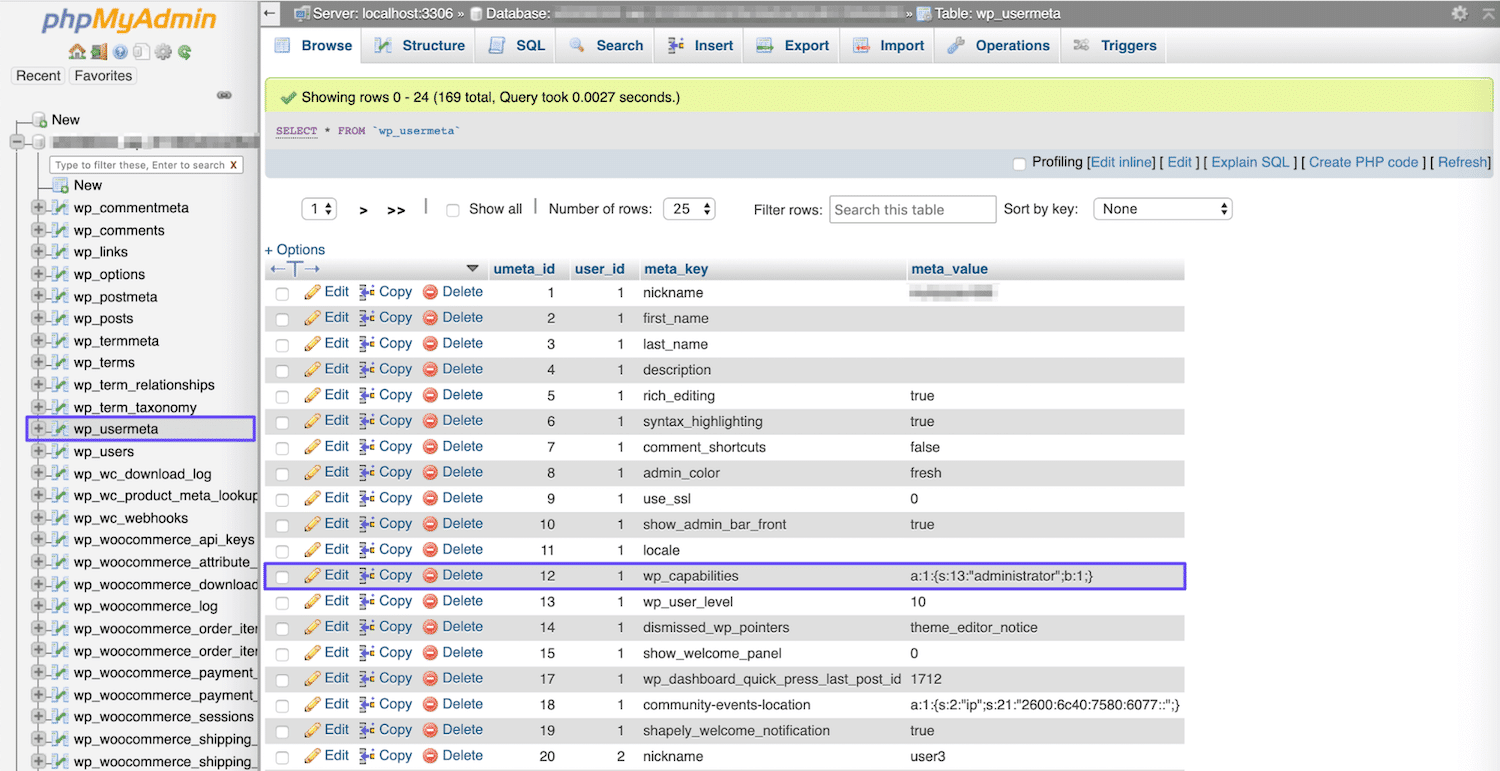
If you have Administrator privileges, the meta_value in this row will read:
a:1:{s:13:"administrator";s:1:"1";}
If your wp_usermeta table says something else, you can click on the Edit link and change it. Alternatively, you can also create an entirely new Administrator account from phpMyAdmin. To take this route, return to the wp_users table and click on the Insert tab at the top of the table:
Then, fill in the fields with your new user information. Once you’re done, click on the Go button and your new user should appear in the table. Next, you’ll need to make a note of the ID for this account and head back to the wp_usermeta table.
Click on Insert again, and fill in the resulting fields with the following information:
- Unmeta_id: Leave this field blank; it will be filled in automatically for you.
- User_id: Use the ID from the WP Users table.
- Meta_key: Set this value as “wp_capabilities”.
- Meta_value: Add the line mentioned above.
You should now be able to use your new credentials to log in to your WordPress admin area. Delete your old account or change its user role back to Administrator from the dashboard and delete the new one instead.
5. Check Your Error Log to Pinpoint the Cause
A smart way to streamline troubleshooting any problem on your site is to check your server’s error log. This may indicate plugin or theme compatibility issues, database errors, or problems with your site’s files that are causing the “Sorry, you are not allowed to access this page” message to appear.
How you view your server’s error log will vary depending on who your hosting provider is. For Kinsta customers, this process is as simple as logging into your MyKinsta dashboard. There, select the site that’s experiencing problems and navigate to Logs:
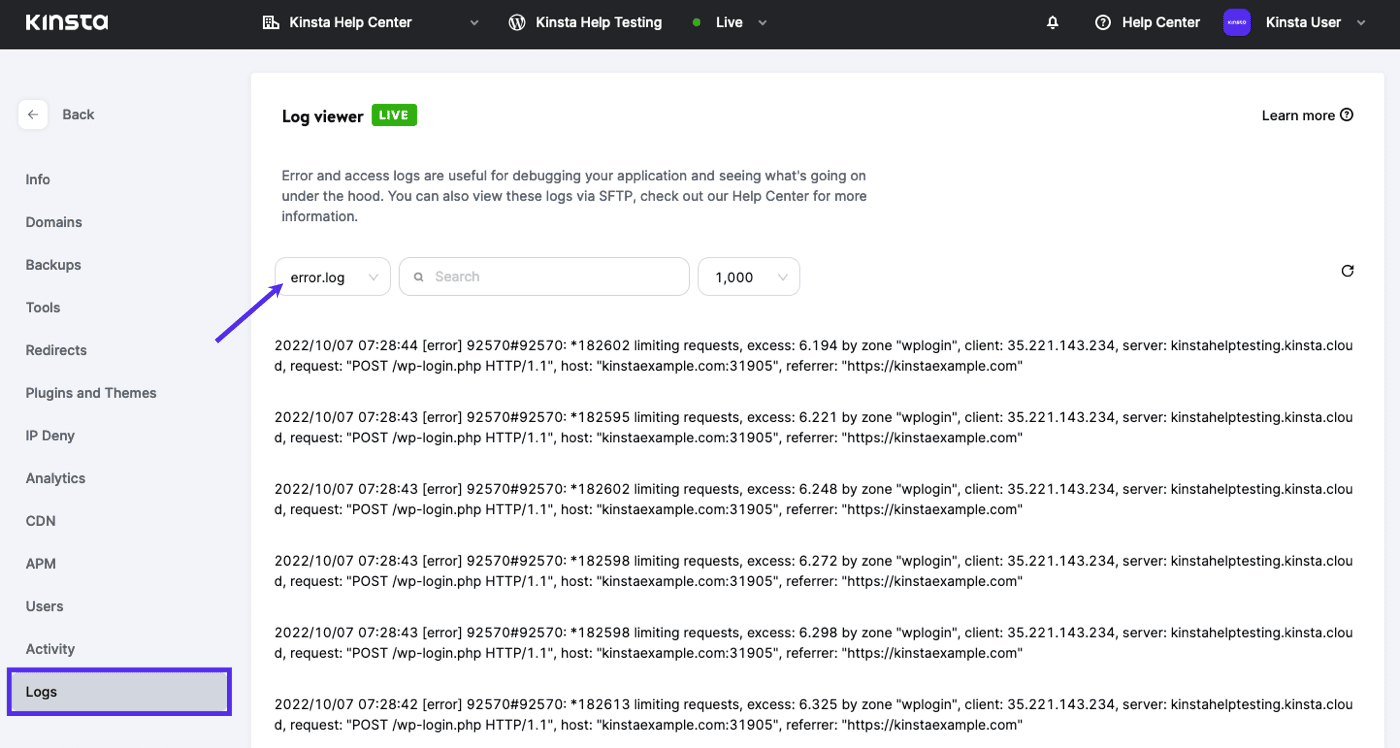
Choose error.log from the drop-down menu. If you see one of the causes of the alert in your log, then you can go about fixing it. Otherwise, you’ll need to try another solution on this list.
6. Ensure That Your Database Prefix Is Correct
Every MySQL database has a prefix. If this one listed in your website’s files doesn’t match the one listed in phpMyAdmin, then you may see the “Sorry, you are not allowed to access this page” message.
This can occur when migrating your site, including if you’ve used a local staging site for development and are now moving to a live server. To check for discrepancies, you’ll need to access your wp-config.php file.
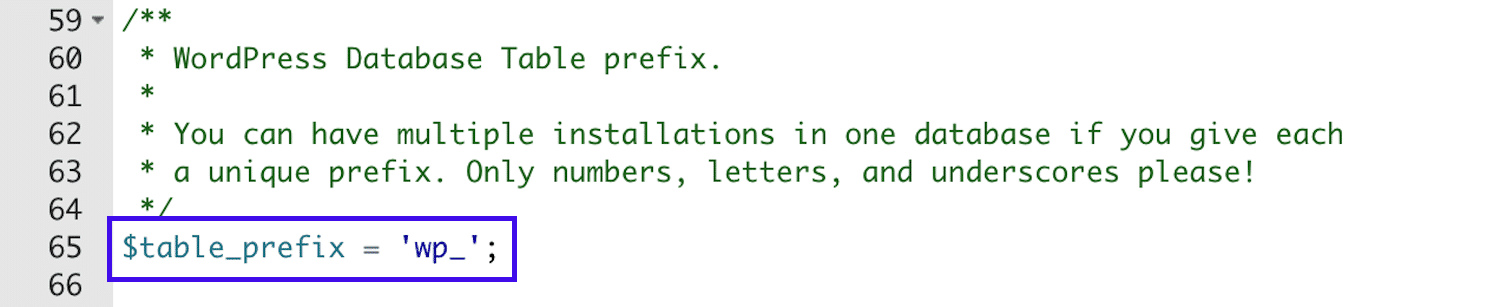
You can do this via SFTP as we’ve described in previous solutions. Once you’re in your wp-config.php file, you should look for your database’s prefix (the default is “wp_”):
Then, log in to phpMyAdmin and look at the prefixes for your database’s tables. They should match the ones listed in your wp-config.php file, like in the image below:
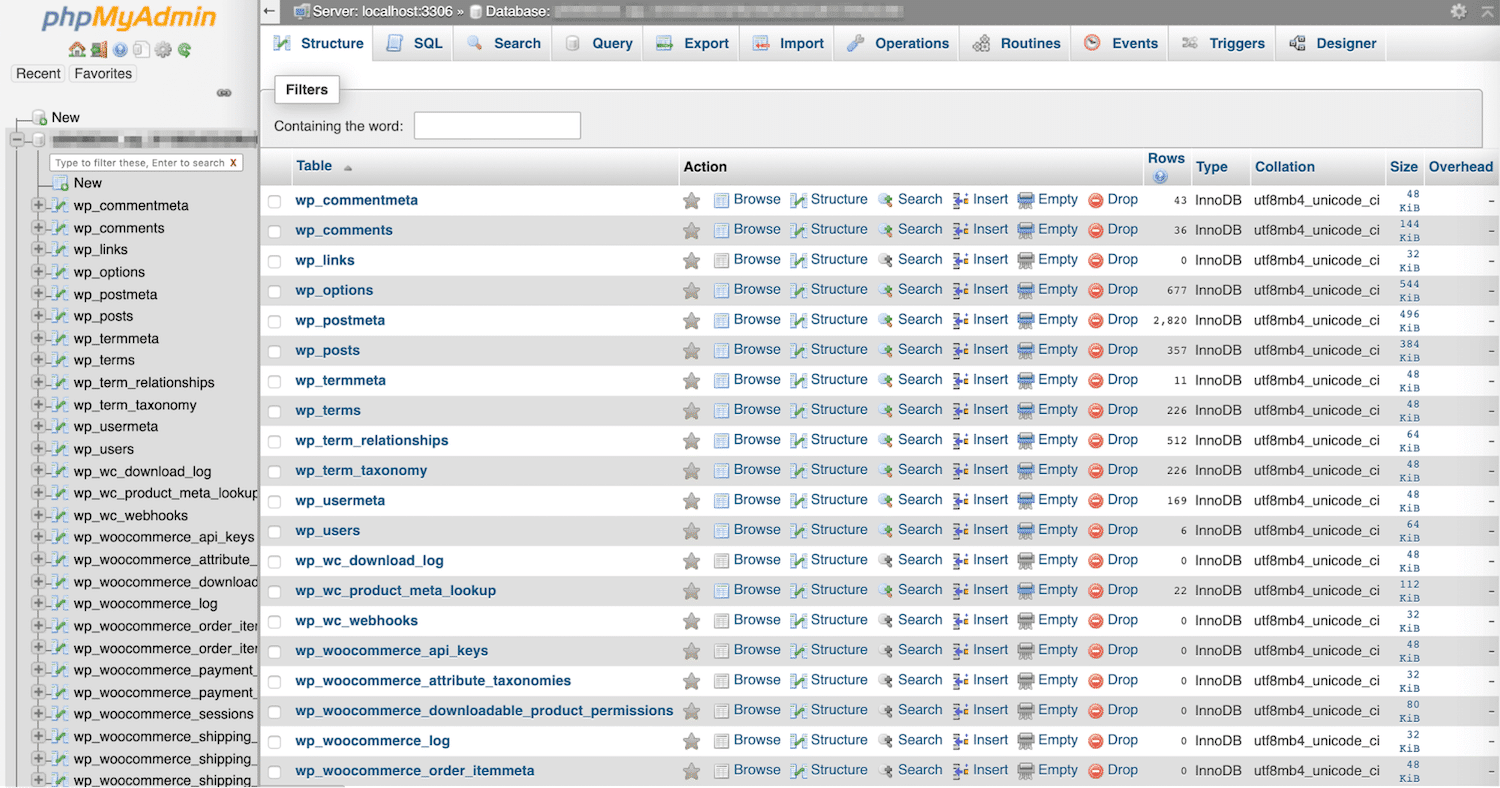
If they don’t match the prefix in your wp-config.php file, then you’ll need to edit it so that they do.
7. Look for Changes in Your wp-config.php File
On a similar note, you should also look for any changes to your WordPress configuration file. This is especially true if you were editing this file shortly before you received the “Sorry, you are not allowed to access this page” message or if you suspect that your WordPress site has been hacked.
You can access your wp-config.php file using SFTP and look for anything that seems amiss. However, this process is much easier if you have some kind of file integrity monitoring or change detection feature in place.
8. Upgrade to the Latest Version of PHP
If your WordPress site is running an outdated version of PHP, this could be the source of your troubles. With that said, even if upgrading PHP doesn’t solve this issue for you, it should improve your site’s overall security and performance.
Before you start the upgrade process, create a backup of your site. You can do this manually or from your MyKinsta dashboard, even if you’re locked out of your admin area. Once you’ve saved your backup, you’ll want to test to see whether your account is compatible with the latest version of PHP. One way to do this is with a WordPress staging site.
Assuming that all goes well, you can run the update. Kinsta customers can easily do so by logging into the MyKinsta dashboard and navigating to the relevant site. Then go to Tools > PHP Engine > Modify, and select the newest version from the drop-down menu:

If you’re with another provider, you may be able to follow a similar process via your own control panel. It’s recommended that you contact your web host for more information.
9. Evaluate Your File Permissions
It’s also possible that your site’s file permissions have been tampered with. In this case, WordPress may consider you unauthorized to view certain areas of your site, even if you’re still listed as an Administrator.
To check your site’s file permissions, you’ll need to use SFTP to access your server. Once you’re logged in, enter the public_html directory and bulk-select wp-admin, wp-content, and wp-includes. Right-click on these folders and choose File Permissions:
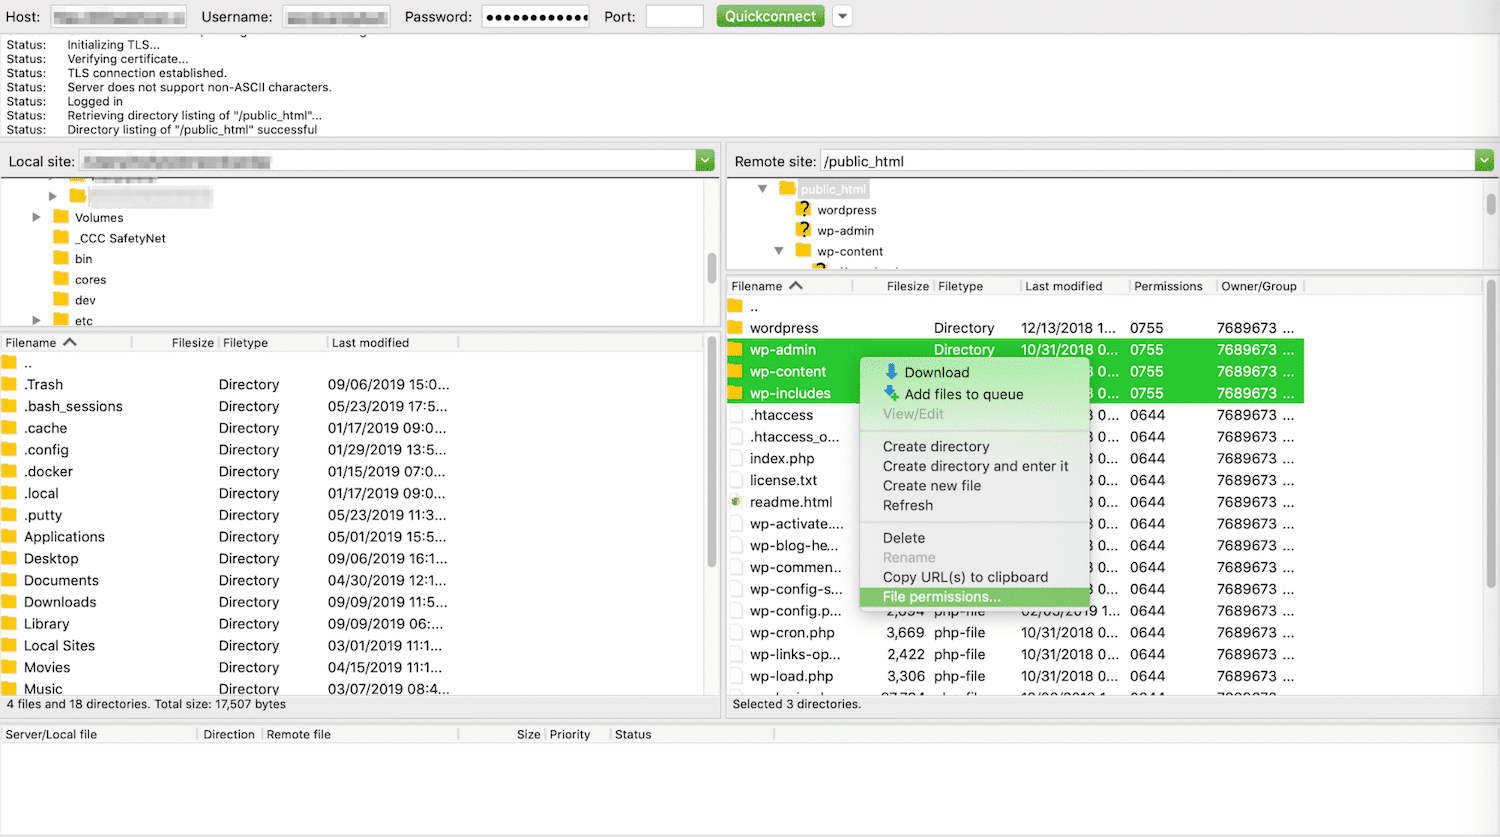
In the resulting window, make sure the following options are selected:
- The Numeric Value is set to 755.
- Recurse into subdirectories is checked.
- Apply to directories only is selected.
Click on OK when you’re done. Then, highlight all the other files in public_html, right-click on them, and select File Permissions again:
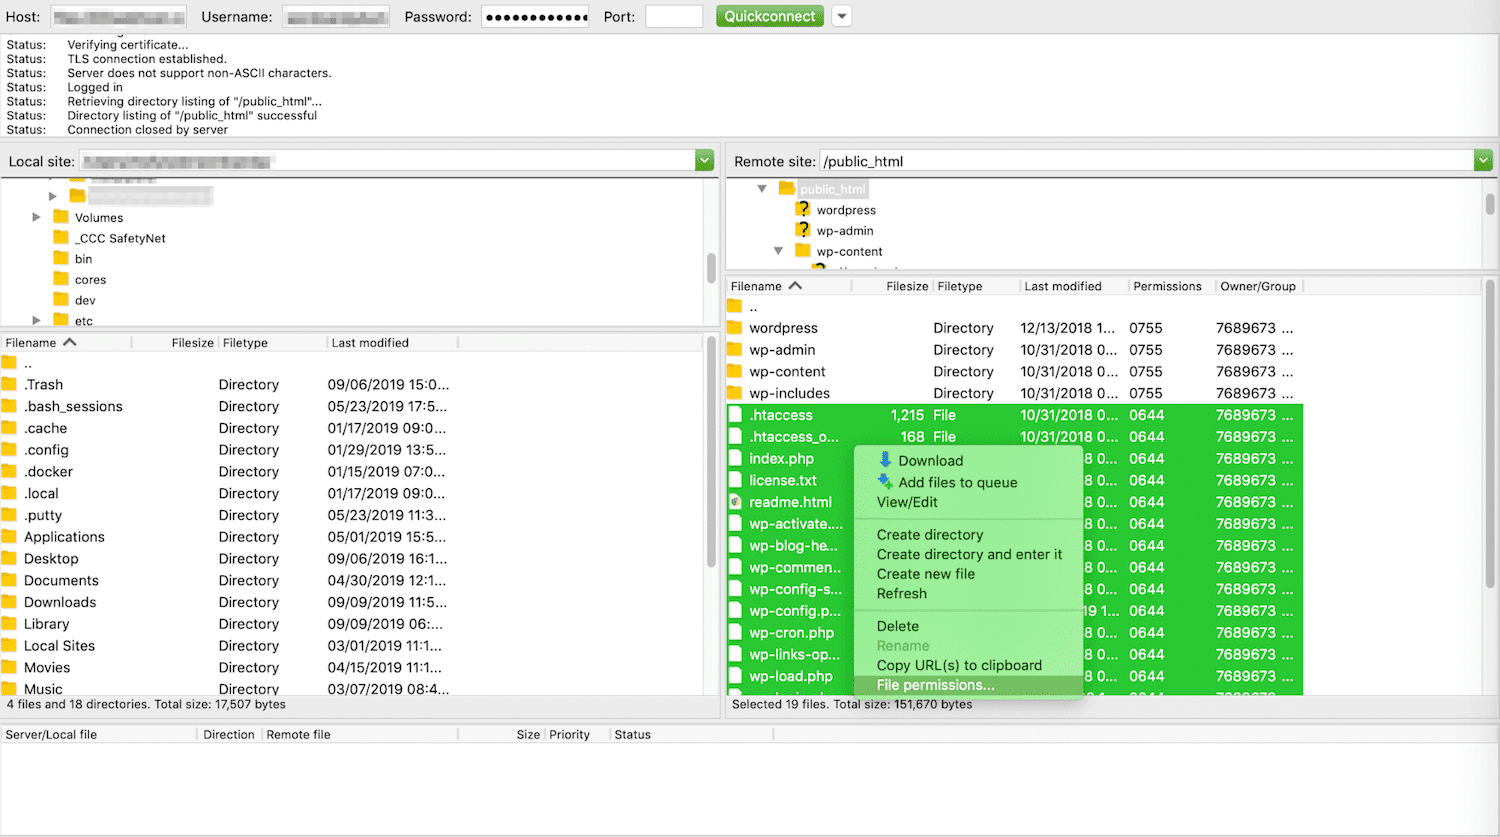
This time, set the options in the permissions window to the following:
- The Numeric Value should be 644.
- Recurse into subdirectories should still be checked.
- Apply to files only should be selected.
Then, return to your site to see if this solves the problem and the “Sorry, you are not allowed to access this page” message is gone.
10. Create a New .htaccess File
If none of the above strategies have worked, you may need to reset your .htaccess file. To do so, launch FTP and navigate to your public_html folder. You should see your .htaccess file there, but if you don’t, follow instructions for showing hidden files in FileZilla.
Next, you’ll need to rename your existing .htaccess file, similar to how we renamed plugin and theme files in earlier solutions. Something recognizable such as .htaccess_original or .htaccess_backup is ideal.
Then, right-click on the file and select Download. Open the file in a text editor and replace its contents with the following:
#BEGIN WordPress

RewriteEngine On

RewriteBase /

RewriteRule ^index\.php$ - [L]

RewriteCond %{REQUEST_FILENAME} !-f

RewriteCOnd %{REQUEST_FILENAME} !-d

RewriteRule . /index.php [L]

#END WordPress
Rename this file .htaccess and upload it to your server. If this file was the source of the “Sorry, you are not allowed to access this page” error, then it should now be fixed.
11. Reset Your WordPress Site
In the worst-case scenario, there may be an installation issue. To fix it, you’ll have to reset your WordPress site. It’s vital that you have a recent backup you can restore after this process is complete, as resetting your site will cause you to lose all posts, pages, and user comments.
There are several methods for doing this, including via your MyKinsta dashboard, using a WordPress plugin, and by using WP-CLI (the WordPress command line). It’s best to save this route as a last resort, so you don’t risk losing your site’s content.
Summary
Being locked out of your admin dashboard in WordPress is nerve-wracking, to say the least. Quickly finding the right solution to the “Sorry, you are not allowed to access this page” error is vital to both your site and your peace of mind.
In this post, we covered a wide range of possible causes and fixes for this issue. Let’s recap them quickly:
- Restore a previous version of your site.
- Disable all of your plugins.
- Activate a default theme.
- Make sure you’re an administrator.
- Check your error log to pinpoint the cause.
- Ensure that your database prefix is correct.
- Look for changes in your wp-config.php file.
- Upgrade to the latest version of php.
- Evaluate your file permissions.
- Create a new .htaccess file.
- Reset your WordPress site.
Happy fixing!