長年にわたり、Gutenbergブロックの開発を習得するには、ReactやNode.jsといった技術への深い理解に加え、複雑なビルド手順やJavaScriptツールの知識が必要でした。しかし、WordPress開発の進化により、現在ではGutenbergブロックを完全にPHPだけで構築・管理できるようになっています。
これは特に、ReactやサーバーサイドJavaScript(JS)の開発を避けたい開発者にとって大きなメリットがあります。学習コストを下げ、開発体験をシンプルにし、不要なフロントエンドスクリプトの負荷を取り除くことで、より高いパフォーマンスを実現できます。
この記事では、これらの新機能を活用し、PHPのみでGutenbergブロックを構築する方法をご紹介します。あわせて、より軽量で高速かつ保守しやすいWordPressサイトの作り方についても理解を深めることができます。
PHPのみで作るブロックとは?
従来、Gutenbergブロックを作成するには、高度なサーバーサイドJavaScriptやReactのコーディングスキルが必要でした。そのため、ReactやNode.jsの知識を持たない従来のWordPress開発者にとっては、ブロックエディターの導入のハードルとなっていました。
しかし現在、その状況は変わりつつあります。Gutenberg 21.8以降では、PHPだけでGutenbergブロックを登録できるようになりました。これにより、サーバーサイドJavaScriptを扱わない開発者にとって、Node.js環境を構築する必要がなくなり、複雑さを回避できます。
PHPのみでのブロック登録では、同じPHPコードを使用して、エディターとフロントエンドの両方でブロックを登録・表示できます。これにより、ハイブリッドテーマや従来のPHP関数、ショートコードを使用しているサイトでも、ブロックエディターの導入と開発がしやすくなります。
さらに詳しく知りたい方は、以下のGitHubのPRも参考になります。
- PHPのみのブロックの登録を可能にするPR:サーバーサイドでの自動ブロック登録を実装し、
auto_ssrサポートをauto_registerへと名称変更 - PHPのみのブロック:PHP登録からすべてのメタデータをクライアントへ渡す:
auto_registerに対応したPHPのみのブロックで、すべてのメタデータをPHP登録からクライアントへ渡せるようにした変更 - PHPのみのブロック:属性からインスペクターコントロールを生成:サーバー側で定義された属性に基づき、UI(Inspector Controls)を自動生成する機能を追加
PHPのみでGutenbergブロックを作成する方法
ブロックがサーバー側のみで登録され、JSファイルを使用せず、かつ新しい auto_register サポートフラグが trueに設定されている場合、エディターは自動的に ServerSideRenderコンポーネントを使用してクライアント側でブロックを登録し、ブロックのプレビューを表示します。つまり、ブロックのコンテンツはエディターとフロントエンドの両方で、PHPコードから直接生成されるようになります。
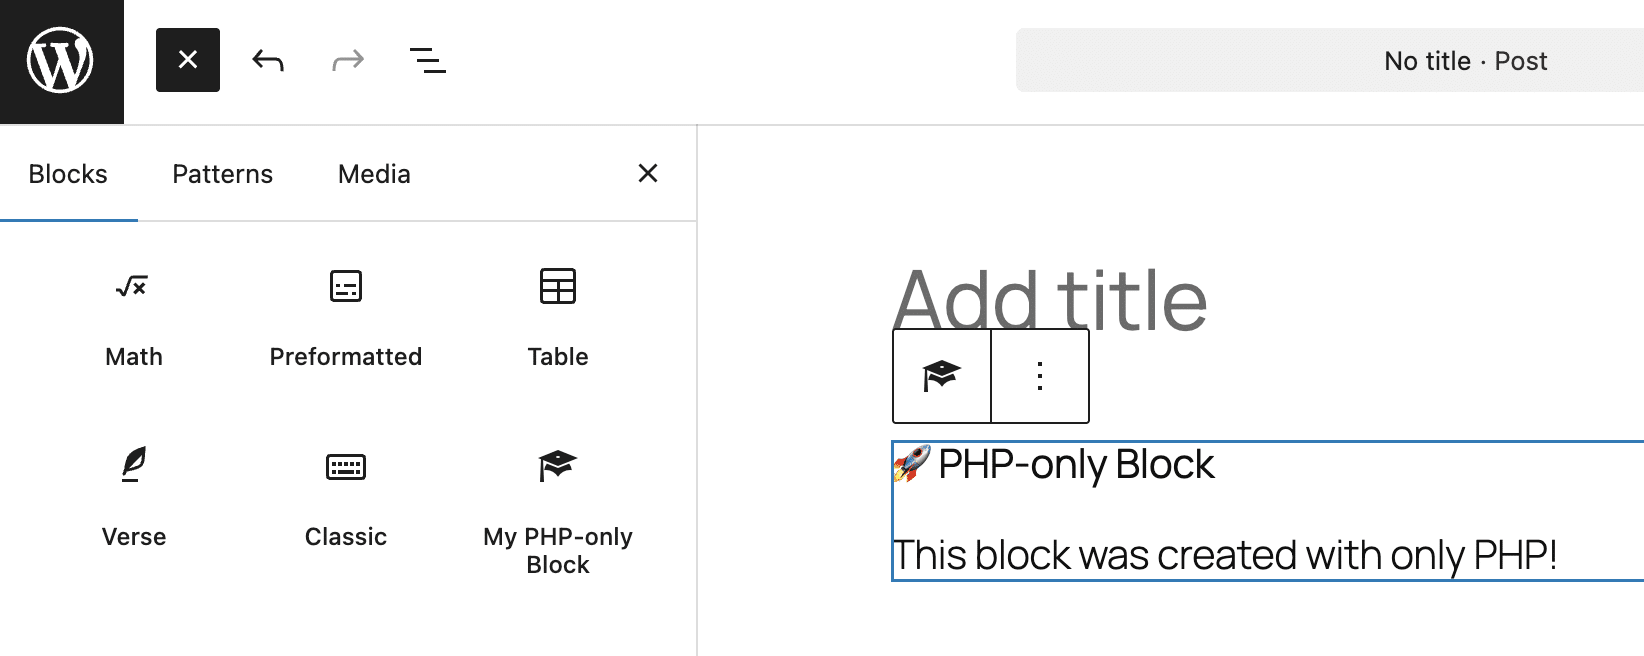
以下はPHPのみの方法でブロックを登録するシンプルなコード例です。
/**
 * Render callback (frontend and editor)
 */
function my_php_only_block_render( $attributes ) {
	return '<div>
		<h3>🚀 PHP-only Block</h3>
		<p>This block was created with only PHP!</p>
	</div>';
}

/**
 * Register the block on the 'init' hook.
 */
add_action( 'init', function() {
	register_block_type( 'my-plugin/php-only-test-block', array(
		'title'           => 'My PHP-only Block',
		'icon'            => 'welcome-learn-more',
		'category'        => 'text',
		'render_callback' => 'my_php_only_block_render',
		'supports'        => array(
			// Automatically registers the block in the Editor JS (previously auto_ssr)
			'auto_register' => true,
		),
	) );
});
このコードは、カスタムプラグインのメインファイルにコピー&ペーストすることで試すことができます。プラグインを有効化すると、ブロックインサーター内に「My PHP-Only Block」が表示されるはずです。
register_block_type関数は、サーバー側でブロックタイプを登録するためのものです。この関数には新たにauto_registerサポートが追加されており、Gutenbergに対してPHPで登録されたメタデータをクライアント側へ渡すよう指示します。
この関数は2つの引数を受け取ります。
- 名前空間を含むブロックタイプの名前。この例では、ブロック名は
my-plugin/php-only-test-block。 - ブロックタイプに関する引数の配列。上記のコードでは、
title、icon、category、render_callback、supportsを設定。なお、PHPのみのブロックタイプでは、supports配列に'auto_register' => trueを含める必要がある。
カスタムブロックタイプの作成を簡素化し、ハイブリッドテーマへの統合を容易にするだけでなく、PHPのみのブロックは従来のPHP関数やショートコードのラッパーとしても利用できます。さらに、PHPのみのブロックを使用することで、カスタム統合やサーバーサイド機能に関する新たな可能性が広がります。
Héctor Priethor氏は以下のように述べています。
純粋なPHPによる登録モデルは、ブロック開発に必要な最低要件を簡素化し、より幅広い開発者が利用できるようにするとともに、高度なJavaScriptに依存しない形でブロックエコシステムの成長を促進します
属性を使用してブロック設定UIを構築する
PR 74102により、ブロック属性の定義からインスペクターコントロールを自動生成できるようになりました。これにより、PHPのみで構築したブロックでも、JavaScriptで登録された通常のGutenbergブロックと同様に、外観や機能を設定できるようになります。
これまでは、Reactでedit.jsファイルを手動で作成し、Reactコンポーネントを使ってさまざまな設定コントロールを定義する必要がありました。
現在では、Gutenbergが属性の定義を読み取り、WordPressエディター内に対応する入力フィールドを自動的に生成します。
この仕組みでは、attributes配列で定義されたデータ型がDataFormのフィールド定義にマッピングされます。
'type' => 'string':テキストフィールドを生成'type' => 'number':数値フィールドを生成'type' => 'integer':整数フィールドを生成'type' => 'boolean':チェックボックスを生成type' => 'string'と'enum' => array()の組み合わせ:セレクトフィールドを生成
ただし、使用できるコントロールの種類は限られています。RichText、RangeControl、ToggleControlなどの特定のコントロールが必要な場合は、引き続きJS/Reactによる実装を選択する必要があります。
とはいえ、この機能追加には大きな利点があります。参入のハードルがさらに下がり、シンプルな編集オプションを持つカスタムブロックを作成するために、ReactやWebpack、NPMを学ぶ必要がなくなります。
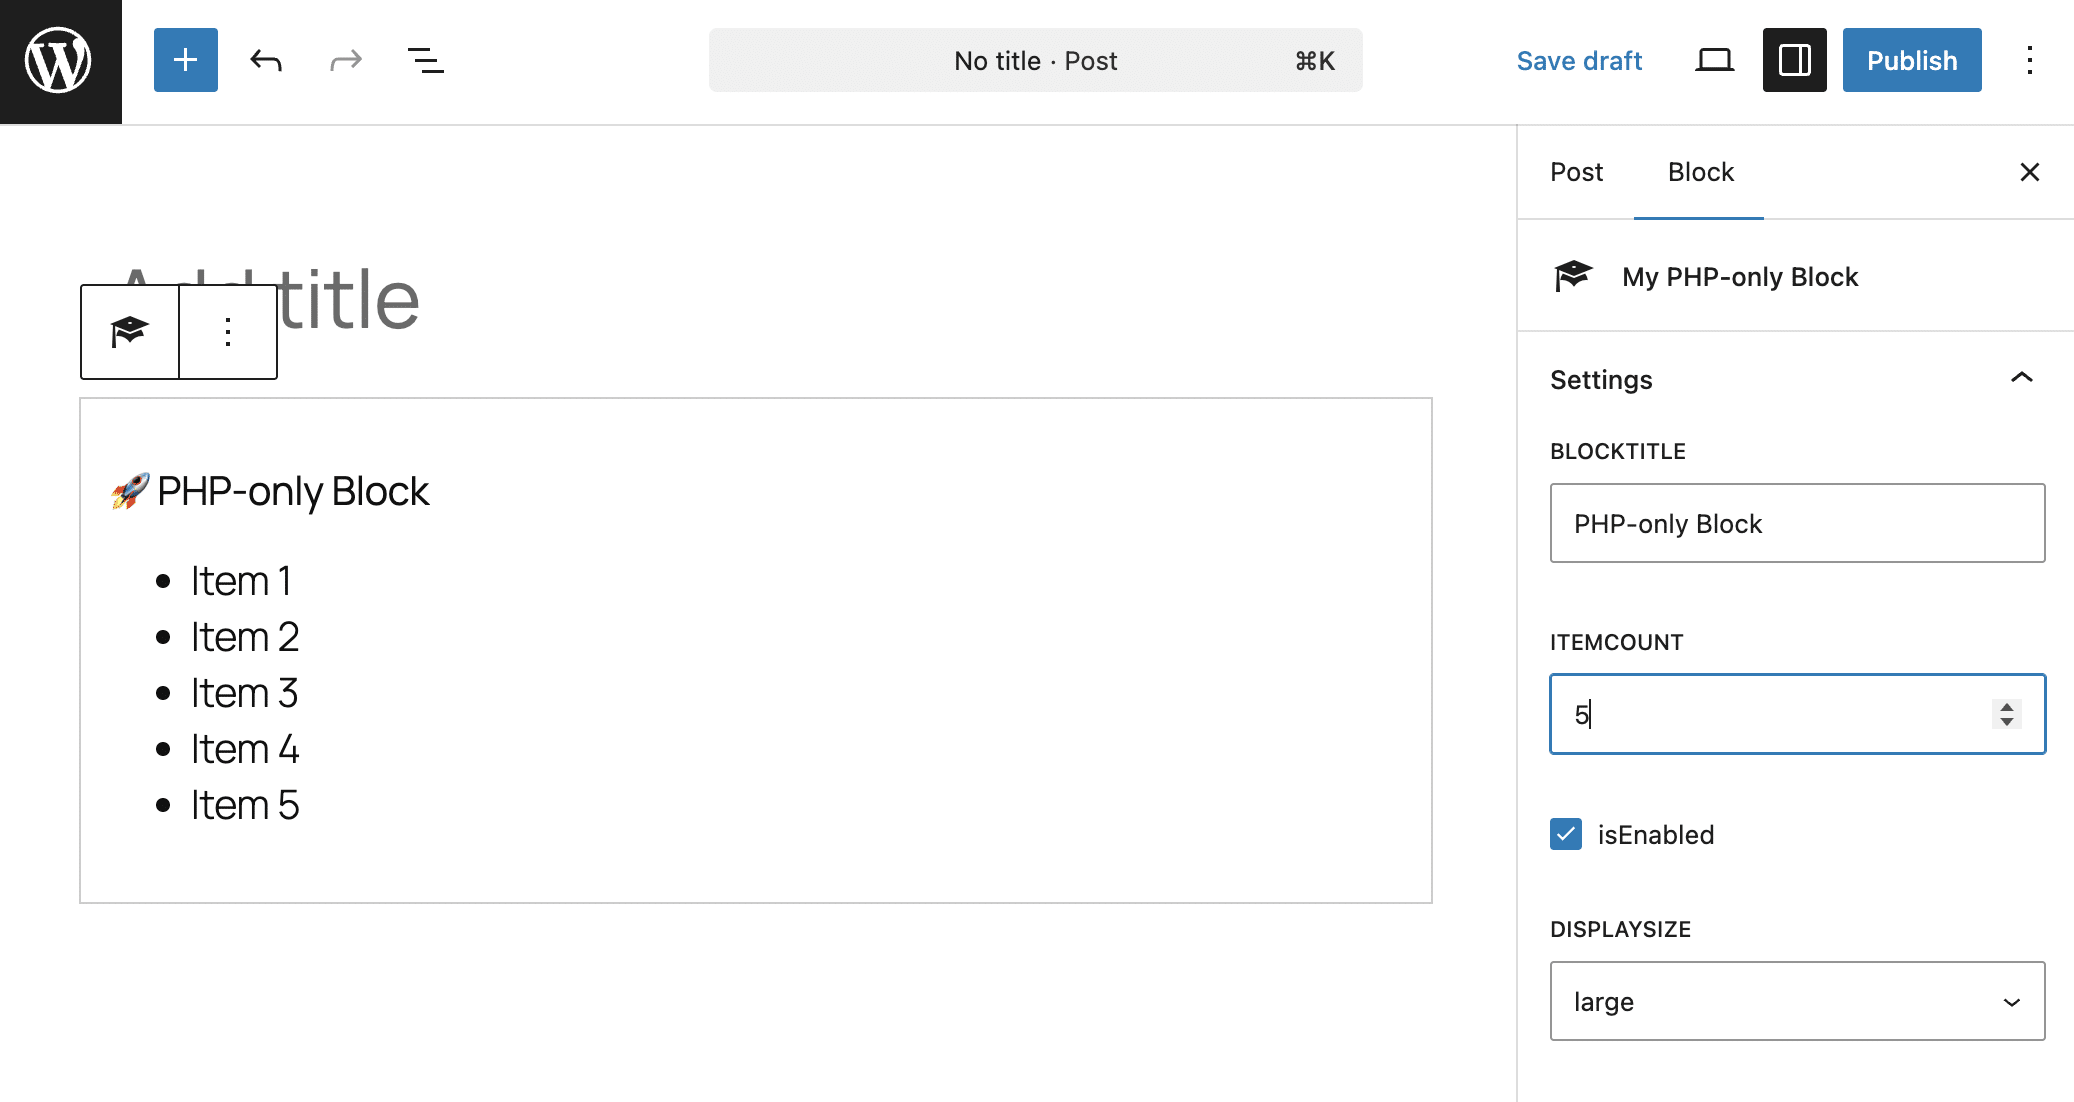
以下の例では、前のセクションで紹介したサンプルブロックにいくつかの属性を追加して拡張します。
/**
 * 1. Define the block's HTML output.
 */
function my_php_only_block_render( $attributes ) {
	// Extract attributes
	$title   = esc_html( $attributes['blockTitle'] );
	$count   = intval( $attributes['itemCount'] );
	$enabled = $attributes['isEnabled']; // Boolean from the ToggleControl
	$size    = esc_attr( $attributes['displaySize'] );

	// Start building the output
	$output = sprintf( '<div class="my-php-block" style="font-size: %s; border: 1px solid #ccc; padding: 15px;">',
		$size === 'large' ? '20px' : ($size === 'small' ? '12px' : '16px')
	);

	$output .= sprintf( '<h3>🚀 %s</h3>', $title );

	// If the toggle is ON, show the list. If OFF, show a fallback message.
	if ( $enabled ) {
		$output .= '<ul>';
		for ( $i = 1; $i <= $count; $i++ ) {
			$output .= sprintf( '<li>Item %d</li>', $i );
		}
		$output .= '</ul>';
	} else {
		$output .= '<p><em>The list is currently disabled.</em></p>';
	}

	$output .= '</div>';
	return $output;
}

/**
 * 2. Register the block on 'init'.
 */
add_action( 'init', function() {
	register_block_type( 'my-plugin/php-only-test-block', array(
		'title'           => 'My PHP-only Block',
		'icon'            => 'welcome-learn-more',
		'category'        => 'text',
		'render_callback' => 'my_php_only_block_render',

		// Attributes used to generate the Inspector UI
		'attributes'      => array(
			'blockTitle'  => array(
				'type'    => 'string',
				'default' => 'PHP-only Block',
			),
			'itemCount'   => array(
				'type'    => 'integer',
				'default' => 3,
			),
			'isEnabled'   => array(
				'type'    => 'boolean',
				'default' => true,
			),
			'displaySize' => array(
				'type'    => 'string',
				'enum'    => array( 'small', 'medium', 'large' ),
				'default' => 'medium',
			),
		),

		'supports'        => array(
			'auto_register' => true,
		),
	) );
});
このコードを一見すると、新しいAPIを使用して、すべての設定を含むカスタムブロックをいかに簡単に登録できるかが分かります。属性(attributes)は、ユーザーが入力したデータを保存するだけでなく、UIの構造(スキーマ)を定義するためにも使用されるようになりました。上記のコードでは、以下の処理が行われています。
register_block_type関数は、ブロックタイプmy-plugin/php-only-test-blockを登録- 関数に渡される第2引数は配列で、
title、icon、category、render_callback、attributes、supportsが含まれる attributes配列には、ブロックの属性が定義されています。この例では、blockTitle、itemCount、isEnabled、displaySizeが含まれる'auto_register' => trueにより、サーバー側での自動登録が有効になる
コールバック関数my_php_only_block_renderの処理は以下のとおりです。
- 関数は
$attributes配列から属性値を取得し、それぞれ$title、$count、$enabled、$sizeの各変数に代入 - ブロックのコンテンツを生成
以下は画面上での表示結果です。
PHPのみを使ったブロックの実践例
JavaScriptが依然として必要となるケースも多くありますが、PHPのみのブロックでも、特にブロックプロパティ(block props)と組み合わせることで、すでに多くのことが実現可能です。
以下の例では、get_block_wrapper_attributes()関数を使用します。この関数は、現在レンダリングされているブロックに適用される属性の文字列を生成します。ブロックは、ユーザーが設定した色、ボーダー、シャドウを自動的に受け取り、それらに対応するスタイルをメインコンテナに適用します。これにより、Reactベースのブロックと同様に、Gutenbergの標準機能を使ってブロックをカスタマイズできるようになります。
実際の動作を確認するには、パソコン上にsmart-pricing-widgetフォルダを作成してください。このフォルダ内に、以下のCSSコードを含むstyle.cssファイルを作成します。
/* style.css */
.pricing-card {
	display: flex;
	flex-direction: column;
	align-items: center;
	text-align: center;
	box-sizing: border-box;
}

.pricing-card h3 {
	margin: 0;
	font-size: 1.5rem;
}

.pricing-card .price-value {
	font-size: 3.5rem;
	font-weight: 800;
	margin: 15px 0;
}

.pricing-card ul {
	list-style: none;
	padding: 25px 0;
	margin: 20px 0;
	width: 100%;
	border-top: 1px solid rgba(128,128,128,0.3);
	display: flex;
	flex-direction: column;
	gap: 12px;
}

.pricing-card li {
	display: flex;
	align-items: center;
	justify-content: center;
	gap: 10px;
}

.pricing-card .cta-button {
	margin-top: auto;
	padding: 15px 25px;
	border-radius: 8px;
	text-decoration: none;
	font-weight: bold;
	transition: opacity 0.2s;
}

.pricing-card .cta-button:hover {
	opacity: 0.8;
}

/* Theme Variations */
.pricing-card.theme-light { background-color: #ffffff; color: #000000; }
.pricing-card.theme-light .cta-button { background-color: #21759b; color: #ffffff; }

.pricing-card.theme-dark { background-color: #1a1a1a; color: #ffffff; }
.pricing-card.theme-dark .cta-button { background-color: #ffffff; color: #1a1a1a; }

.pricing-card.theme-blue { background-color: #21759b; color: #ffffff; }
.pricing-card.theme-blue .cta-button { background-color: #000000; color: #ffffff; }

/* Utility Classes */
.pricing-card .is-full-width {
	width: 100%;
	display: block;
	align-self: stretch;
}
このコードはウィジェットブロック用のシンプルなスタイルシートであるため、ここでは詳しい説明は割愛します。
次に、プラグインのメインファイルを作成し、smart-pricing-widget.phpという名前を付けて、以下のコードを貼り付けてください。
<?php
/**
 * Plugin Name: Smart Pricing Widget
 * Plugin URI:  https://example.com/
 * Description: PHP-only Pricing Table block
 * Version:     1.2.0
 * Author:      Your Name
 * Text Domain: smart-pricing-widget
 */

if ( ! defined( 'ABSPATH' ) ) exit;

/**
 * Render callback
 */
function render_smart_pricing_block( $attributes ) {
	$plan_name = esc_html( $attributes['planName'] );
	$price     = intval( $attributes['price'] );
	$theme     = $attributes['blockTheme'];
	$btn_text  = esc_html( $attributes['buttonText'] );
	$btn_size  = $attributes['buttonSize'];

	$features_raw = $attributes['featuresList'];
	$features_array = array_filter( array_map( 'trim', explode( ',', $features_raw ) ) );

	$wrapper_attributes = wp_kses_data( get_block_wrapper_attributes( array(
		'class' => "pricing-card theme-{$theme}",
	) ) );

	$output = sprintf( '<div %s>', $wrapper_attributes );
	$output .= sprintf( '<h3>%s</h3>', $plan_name );
	$output .= sprintf( '<div class="price-value">€%d</div>', $price );

	if ( ! empty( $features_array ) ) {
		$output .= '<ul>';
		foreach ( $features_array as $feature ) {
			$is_checked = strpos( $feature, '+' ) === 0;
			$clean_text = esc_html( ltrim( $feature, '+- ' ) );
			$icon       = $is_checked ? '✅' : '❌';
			$style      = $is_checked ? '' : 'style="opacity: 0.6;"';

			$output .= sprintf( '<li %s><span>%s</span> %s</li>', $style, $icon, $clean_text );
		}
		$output .= '</ul>';
	}

	$btn_class = 'cta-button' . ( $btn_size === 'full' ? ' is-full-width' : '' );
	$output .= sprintf( '<a href="#" class="%s">%s</a>', esc_attr( $btn_class ), $btn_text );
	$output .= '</div>';

	return $output;
}

/**
 * Register Assets and Block
 */
add_action( 'init', function() {
	// 1. Register the CSS file
	wp_register_style(
		'smart-pricing-style',
		plugins_url( 'style.css', __FILE__ ),
		array(),
		'1.2.0'
	);

	// 2. Register the Block
	register_block_type( 'tutorial/smart-pricing', array(
		'api_version'     => 3,
		'title'           => 'Pricing Card',
		'icon'            => 'cart',
		'category'        => 'widgets',
		'render_callback' => 'render_smart_pricing_block',
		// Link the registered style handle here
		'style'           => 'smart-pricing-style',
		'attributes'      => array(
			'planName'     => array( 'type' => 'string', 'default' => 'Professional' ),
			'price'        => array( 'type' => 'integer', 'default' => 49 ),
			'buttonText'   => array( 'type' => 'string', 'default' => 'Choose Plan' ),
			'buttonSize'   => array( 'type' => 'string', 'enum' => array( 'auto', 'full' ), 'default' => 'auto' ),
			'blockTheme'   => array( 'type' => 'string', 'enum' => array( 'light', 'dark', 'blue' ), 'default' => 'light' ),
			'featuresList' => array( 'type' => 'string', 'default' => "+ Support, + Updates, - Domain" ),
		),
		'supports'        => array(
			'auto_register' => true,
			'color'         => array( 'background' => true, 'text' => true ),
			'spacing'       => array( 'margin' => true, 'padding' => true ),
			'typography'    => array( 'fontSize' => true ),
			'shadow'        => true,
			'__experimentalBorder' => array( 'color' => true, 'radius' => true, 'style' => true, 'width' => true ),
			'border'        => array( 'color' => true, 'radius' => true, 'style' => true, 'width' => true ),
		),
	) );
});このスクリプトには2つの関数が含まれています。register_block_type()関数は、このプラグインの中核となるものです。主な要素は以下のとおりです。
- 第1引数は、名前空間を含むブロック識別子(
tutorial/smart-pricing)。 - 第2引数は引数の配列。上記のコードでは、APIバージョン、title、icon、category、render callback、style、attributes、supportsを設定。
- 配列内のattributesは、ユーザーがコンテンツを追加したりブロックを設定したりする際に使用するコントロールを生成。type要素は、ブロックインスペクターに追加されるコントロールの種類を指定。この例では、テキストフィールド(
'type' => 'string')、整数('type' => 'integer')、およびドロップダウンメニュー('type' => 'string', 'enum' => array())が使用されている。 - supports配列の項目は、ブロックのスタイルをカスタマイズ可能にする機能を追加。前述のとおり、PHPのみのブロックで必須となるのは
auto_registerのみで、これによりカスタム属性のUIが自動生成される。その他にここで指定されているsupportsには、色、余白、タイポグラフィ、影、枠線などがある。
コールバック関数render_smart_pricing_block()は、ブロックのHTMLを生成します。この関数の処理内容は次のとおりです。
- ブロック属性を取得してサニタイズし、その後、フロントエンドとエディターでの表示に使用されるCSSコードを追加。
- ブロック内に表示される機能一覧(
$attributes['featuresList'];)は個別に処理される。現時点では、ブロック設定サイドバーに高度なコントロールを追加することはできないため、機能一覧のようなリストを作成する場合は、シンプルなテキストフィールドのみを使用する必要あり。この例では、製品の特徴をカンマ区切りで手動入力している。 $wrapper_attributes変数には、get_block_wrapper_attributes関数によって提供されるラッパー属性が格納されている。この関数は、コード内で指定されたクラス(pricing-card theme-{$theme})を追加するだけでなく、ユーザーがブロックインスペクターで設定したスタイル(色、枠線、パディング、マージン、影、タイポグラフィ)や標準のブロッククラス(wp-block-tutorial-smart-pricing)も自動的に取得。wp_kses_dataは、文字列内に悪意のあるタグやスクリプト(XSS)が含まれていないことを保証する。- 残りのコードでブロックのコンテンツが生成。
プラグインを有効化し、新規投稿または固定ページを作成してください。ブロックインサーターを開き、「ウィジェット」セクションまでスクロールすると、ショッピングカートのアイコンで表示された「Pricing Card」ブロックが確認できるはずです。
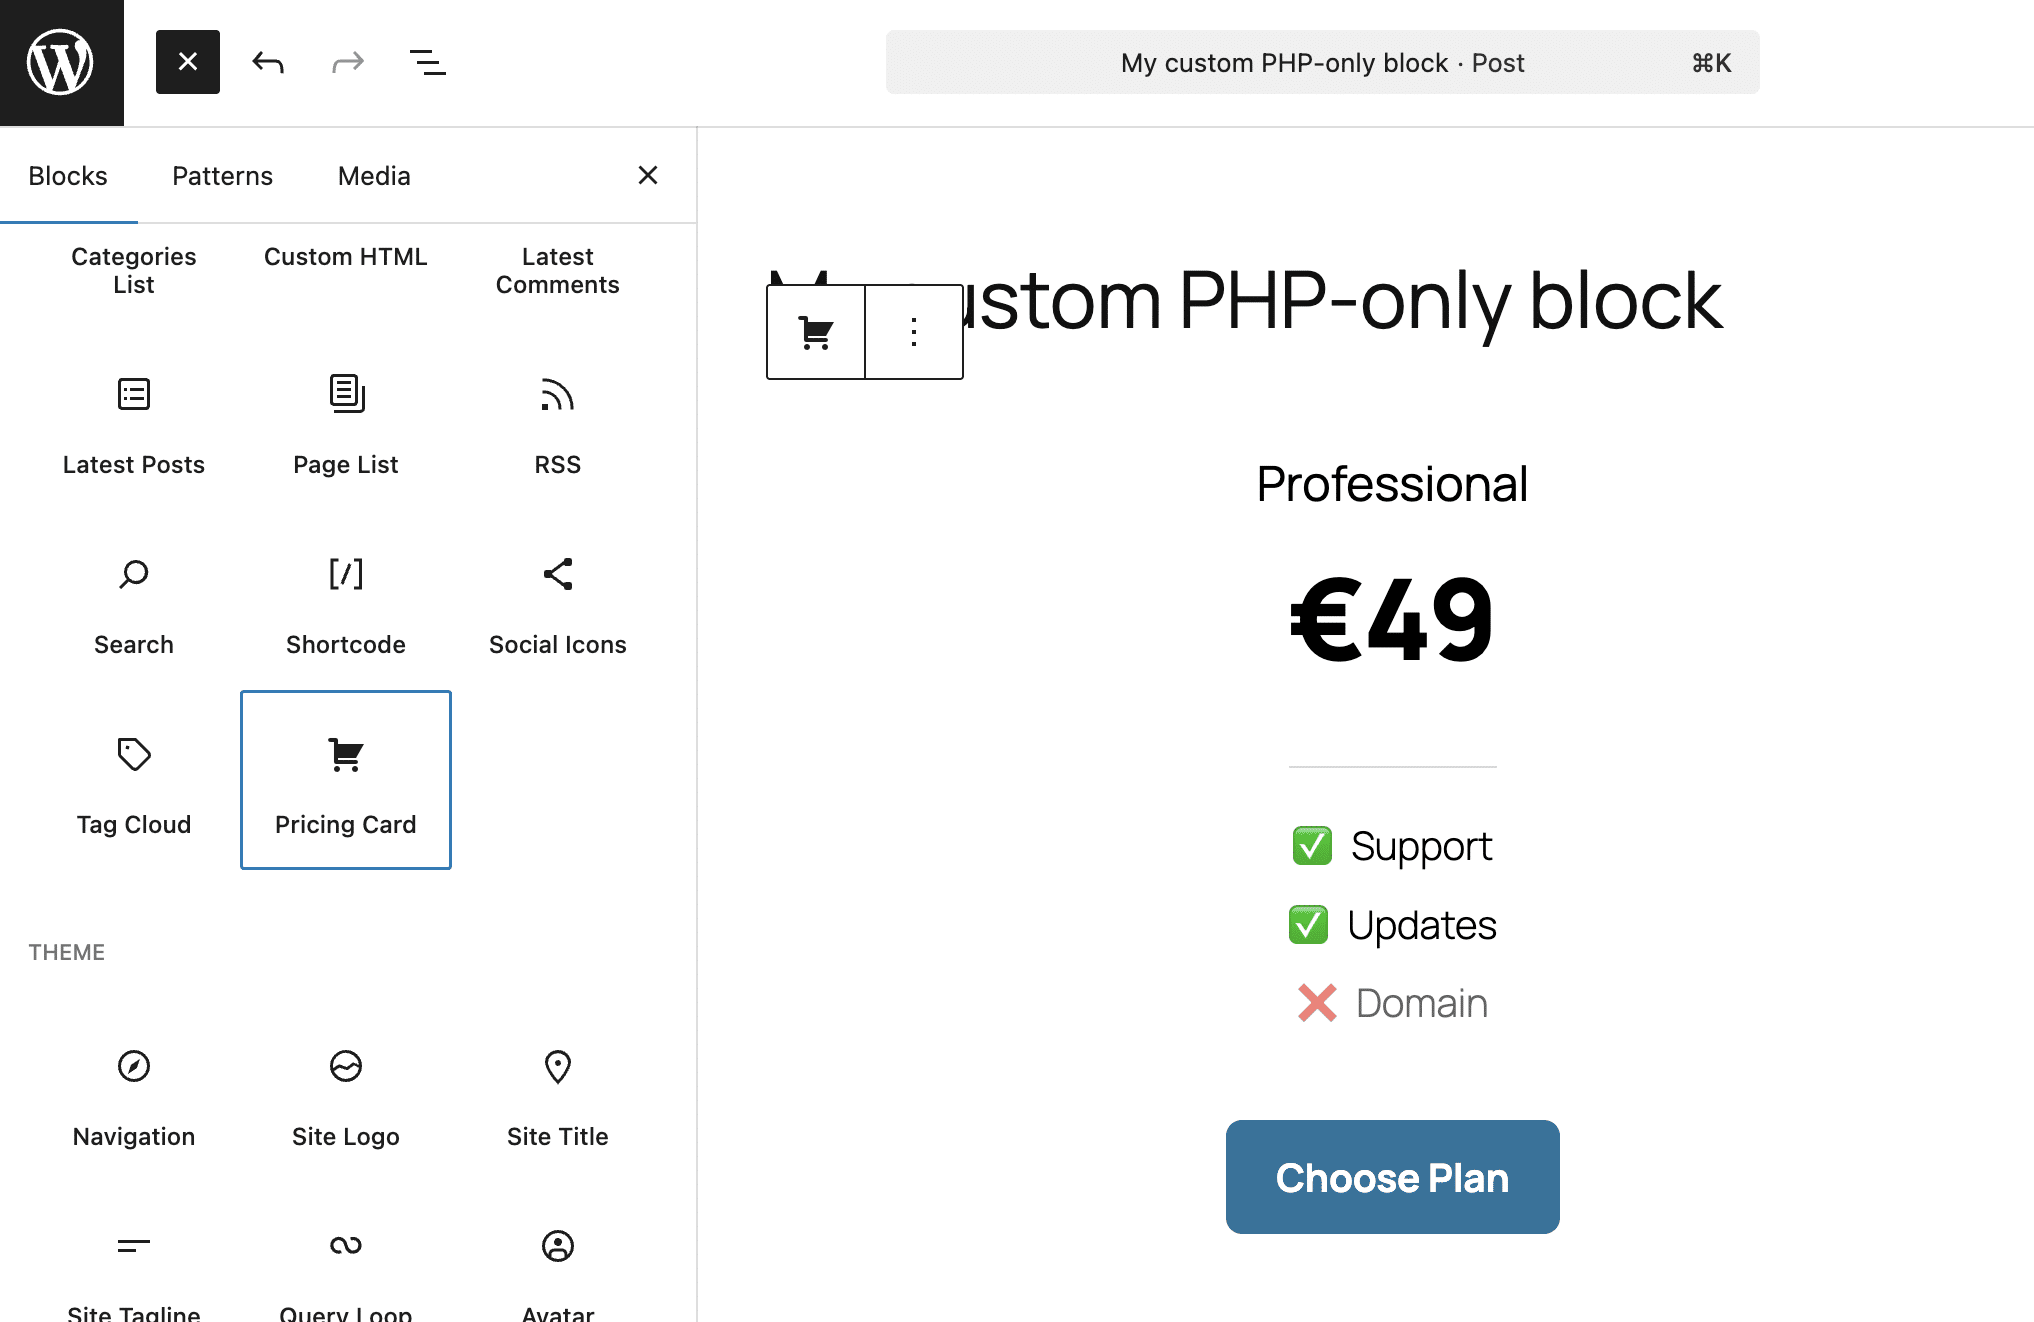
上のスクリーンショットは、デフォルトのライトテーマで表示されたブロックです。
以下はブロックのダークテーマバージョンと、プラグインで設定した各種設定を確認できます。
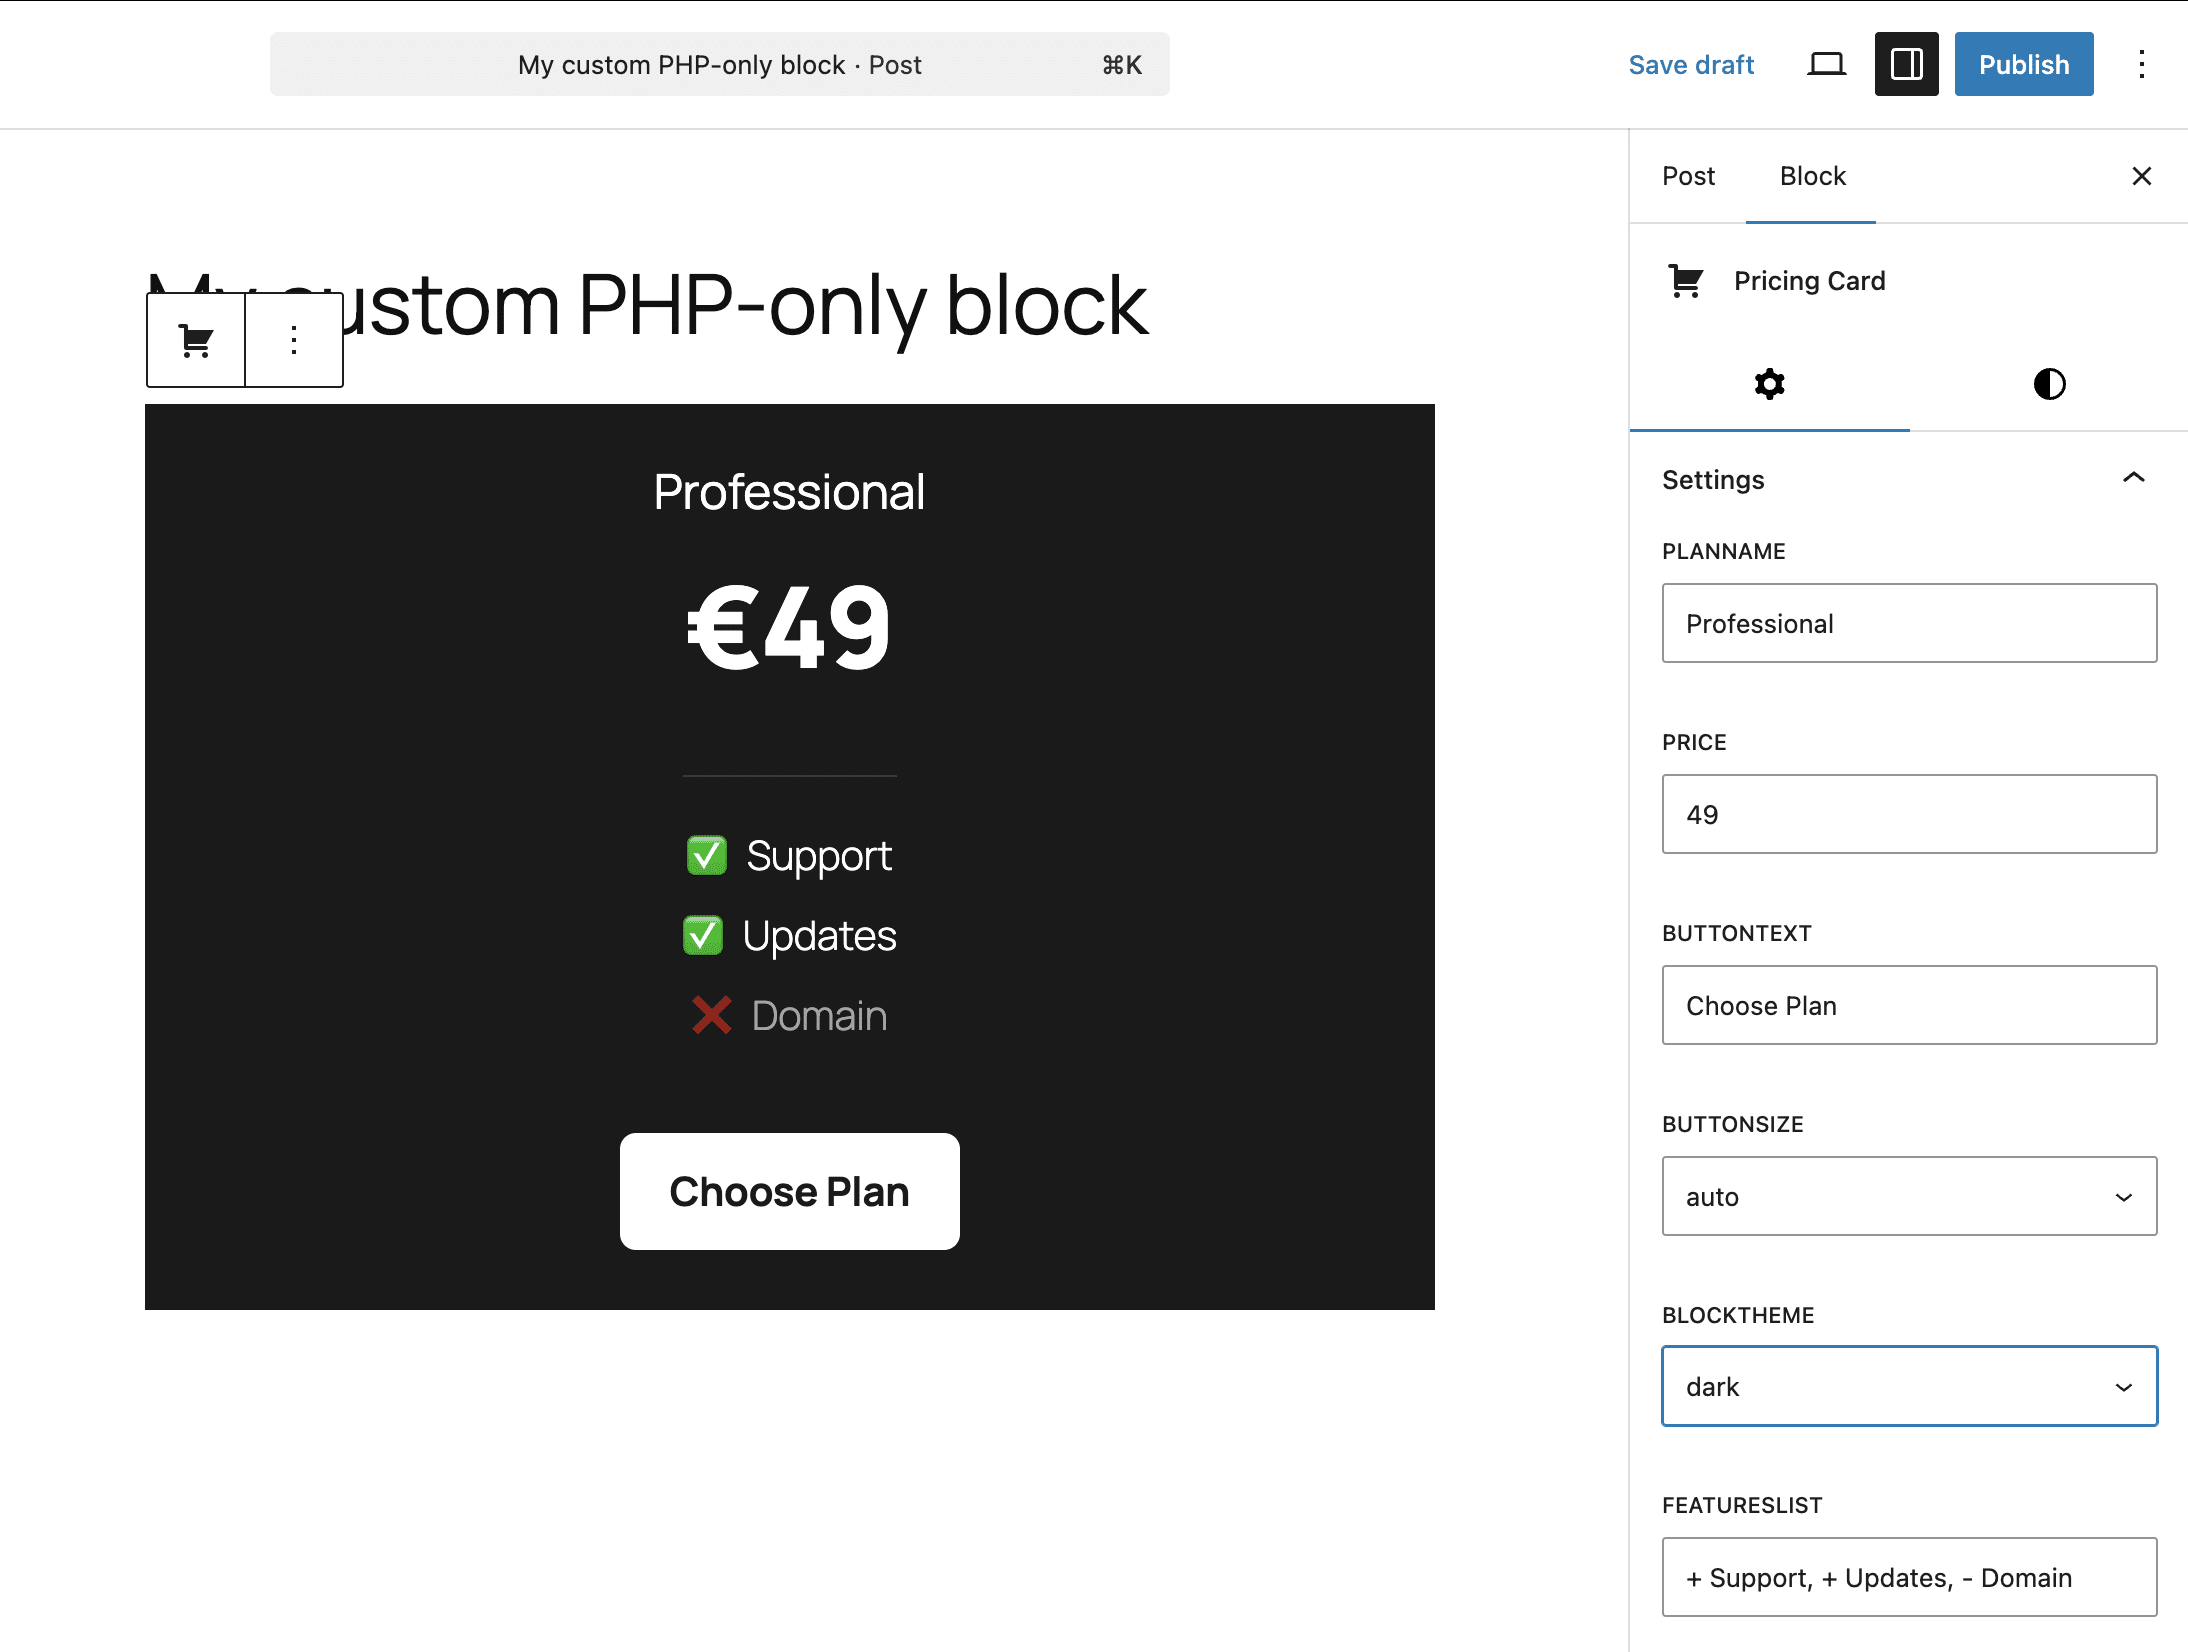
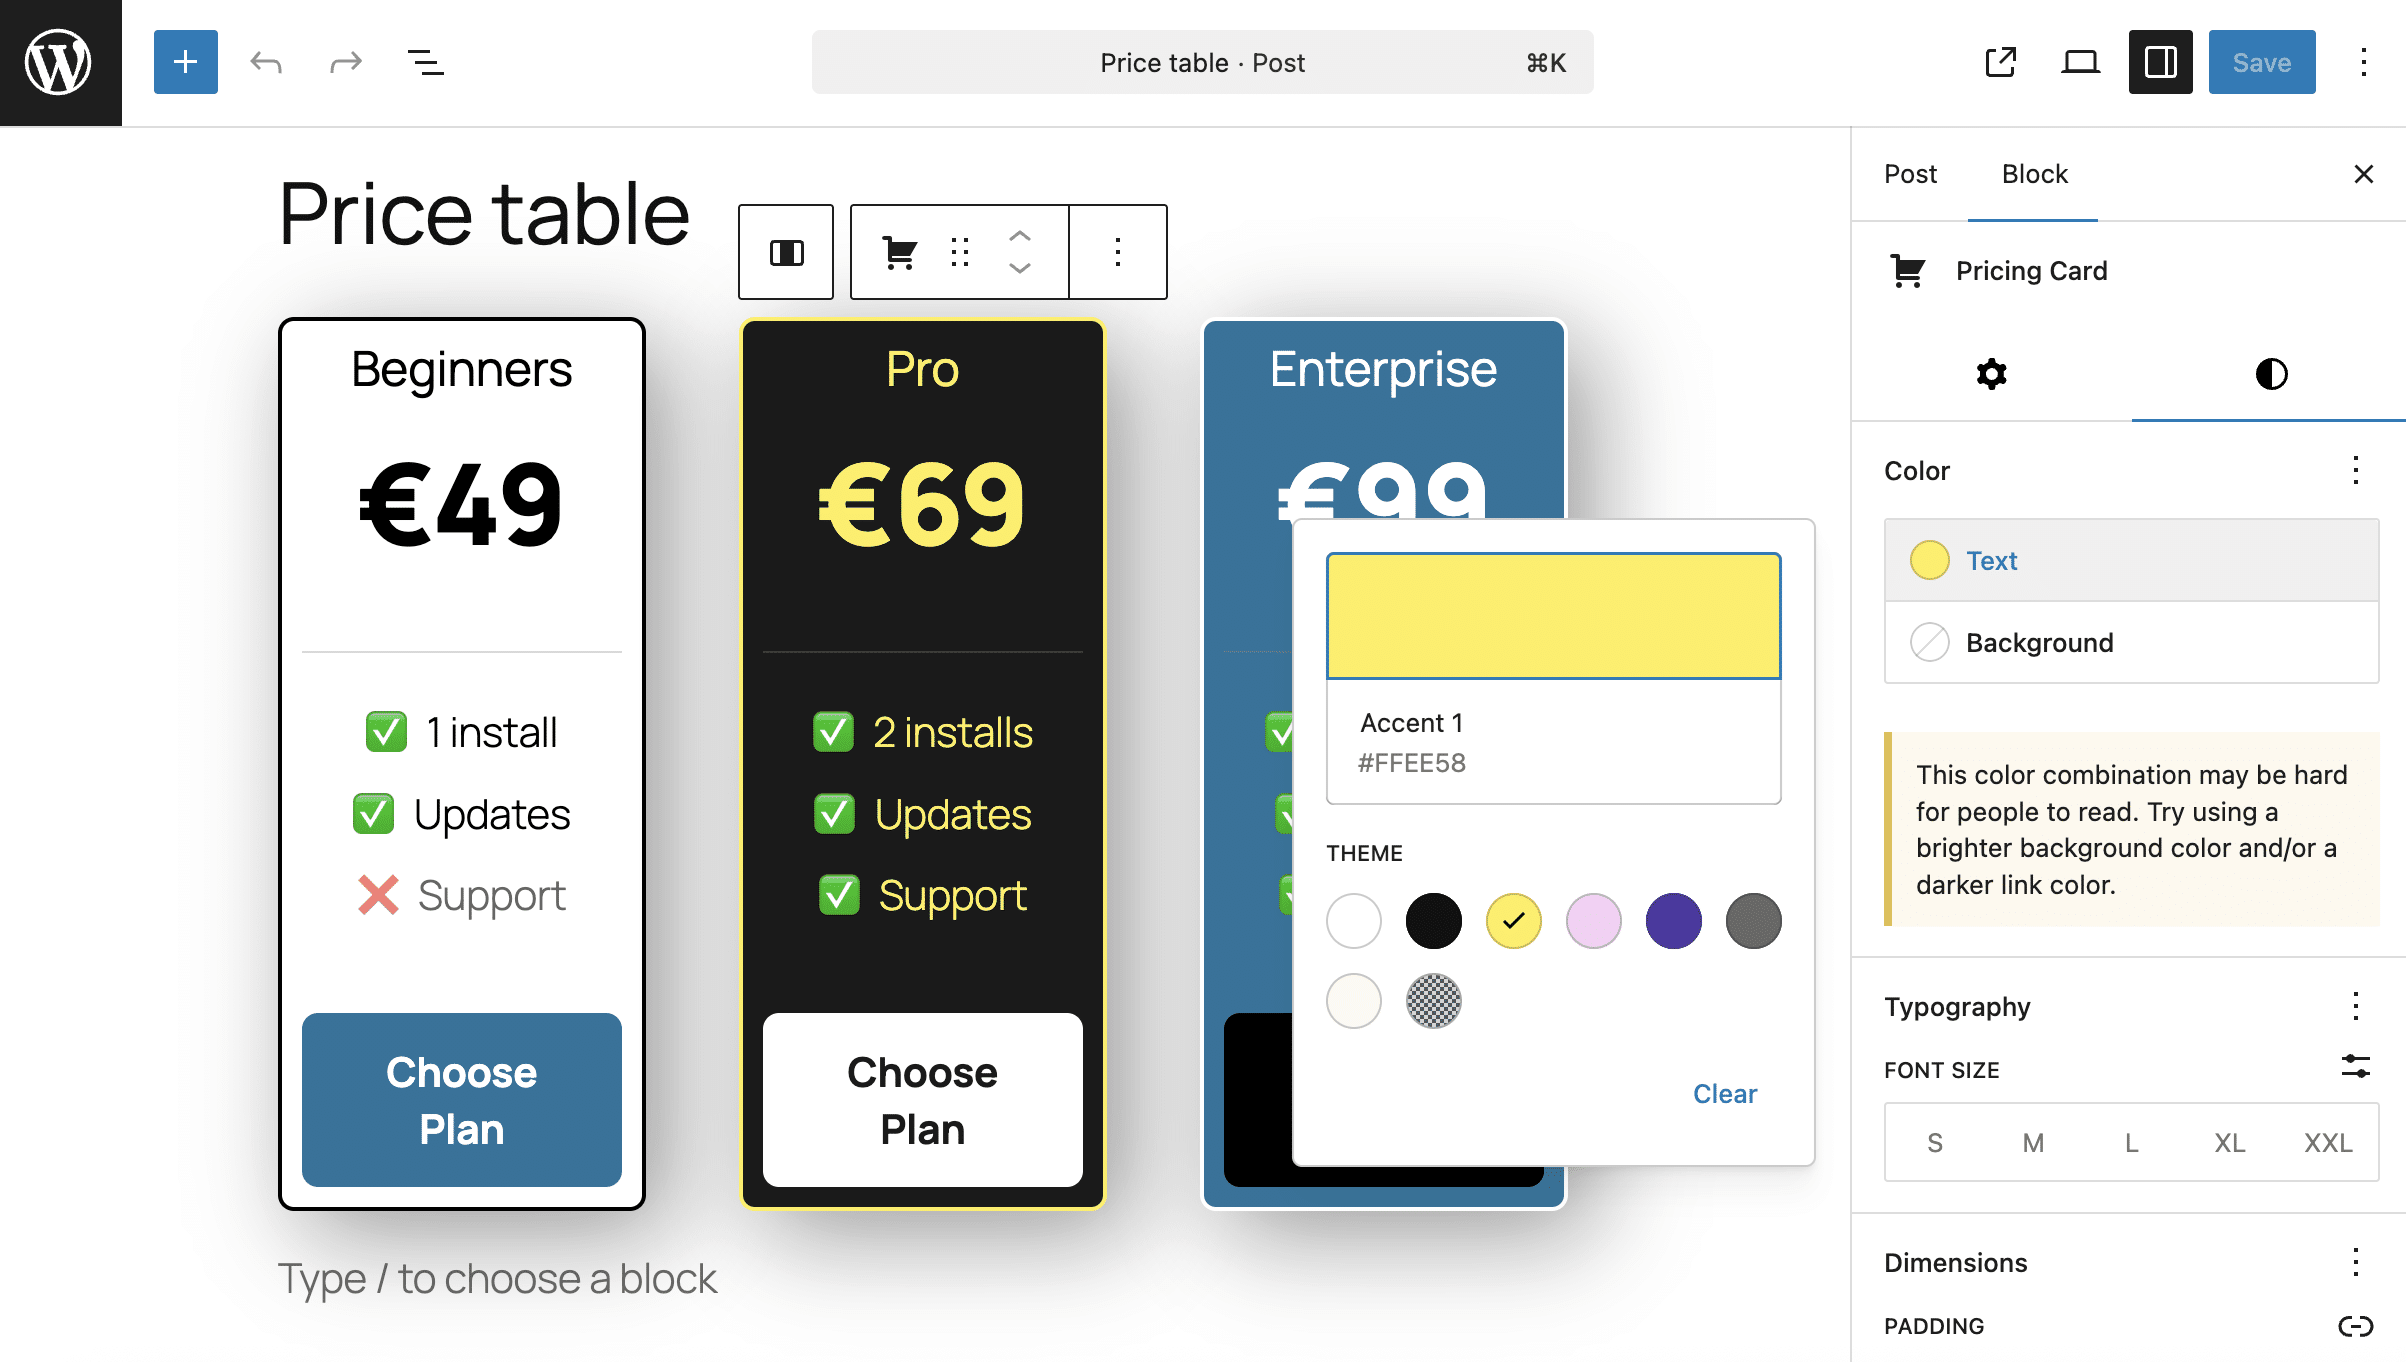
以下のスクリーンショットでは、ブロックサポートによって追加されたスタイル設定を示しています。
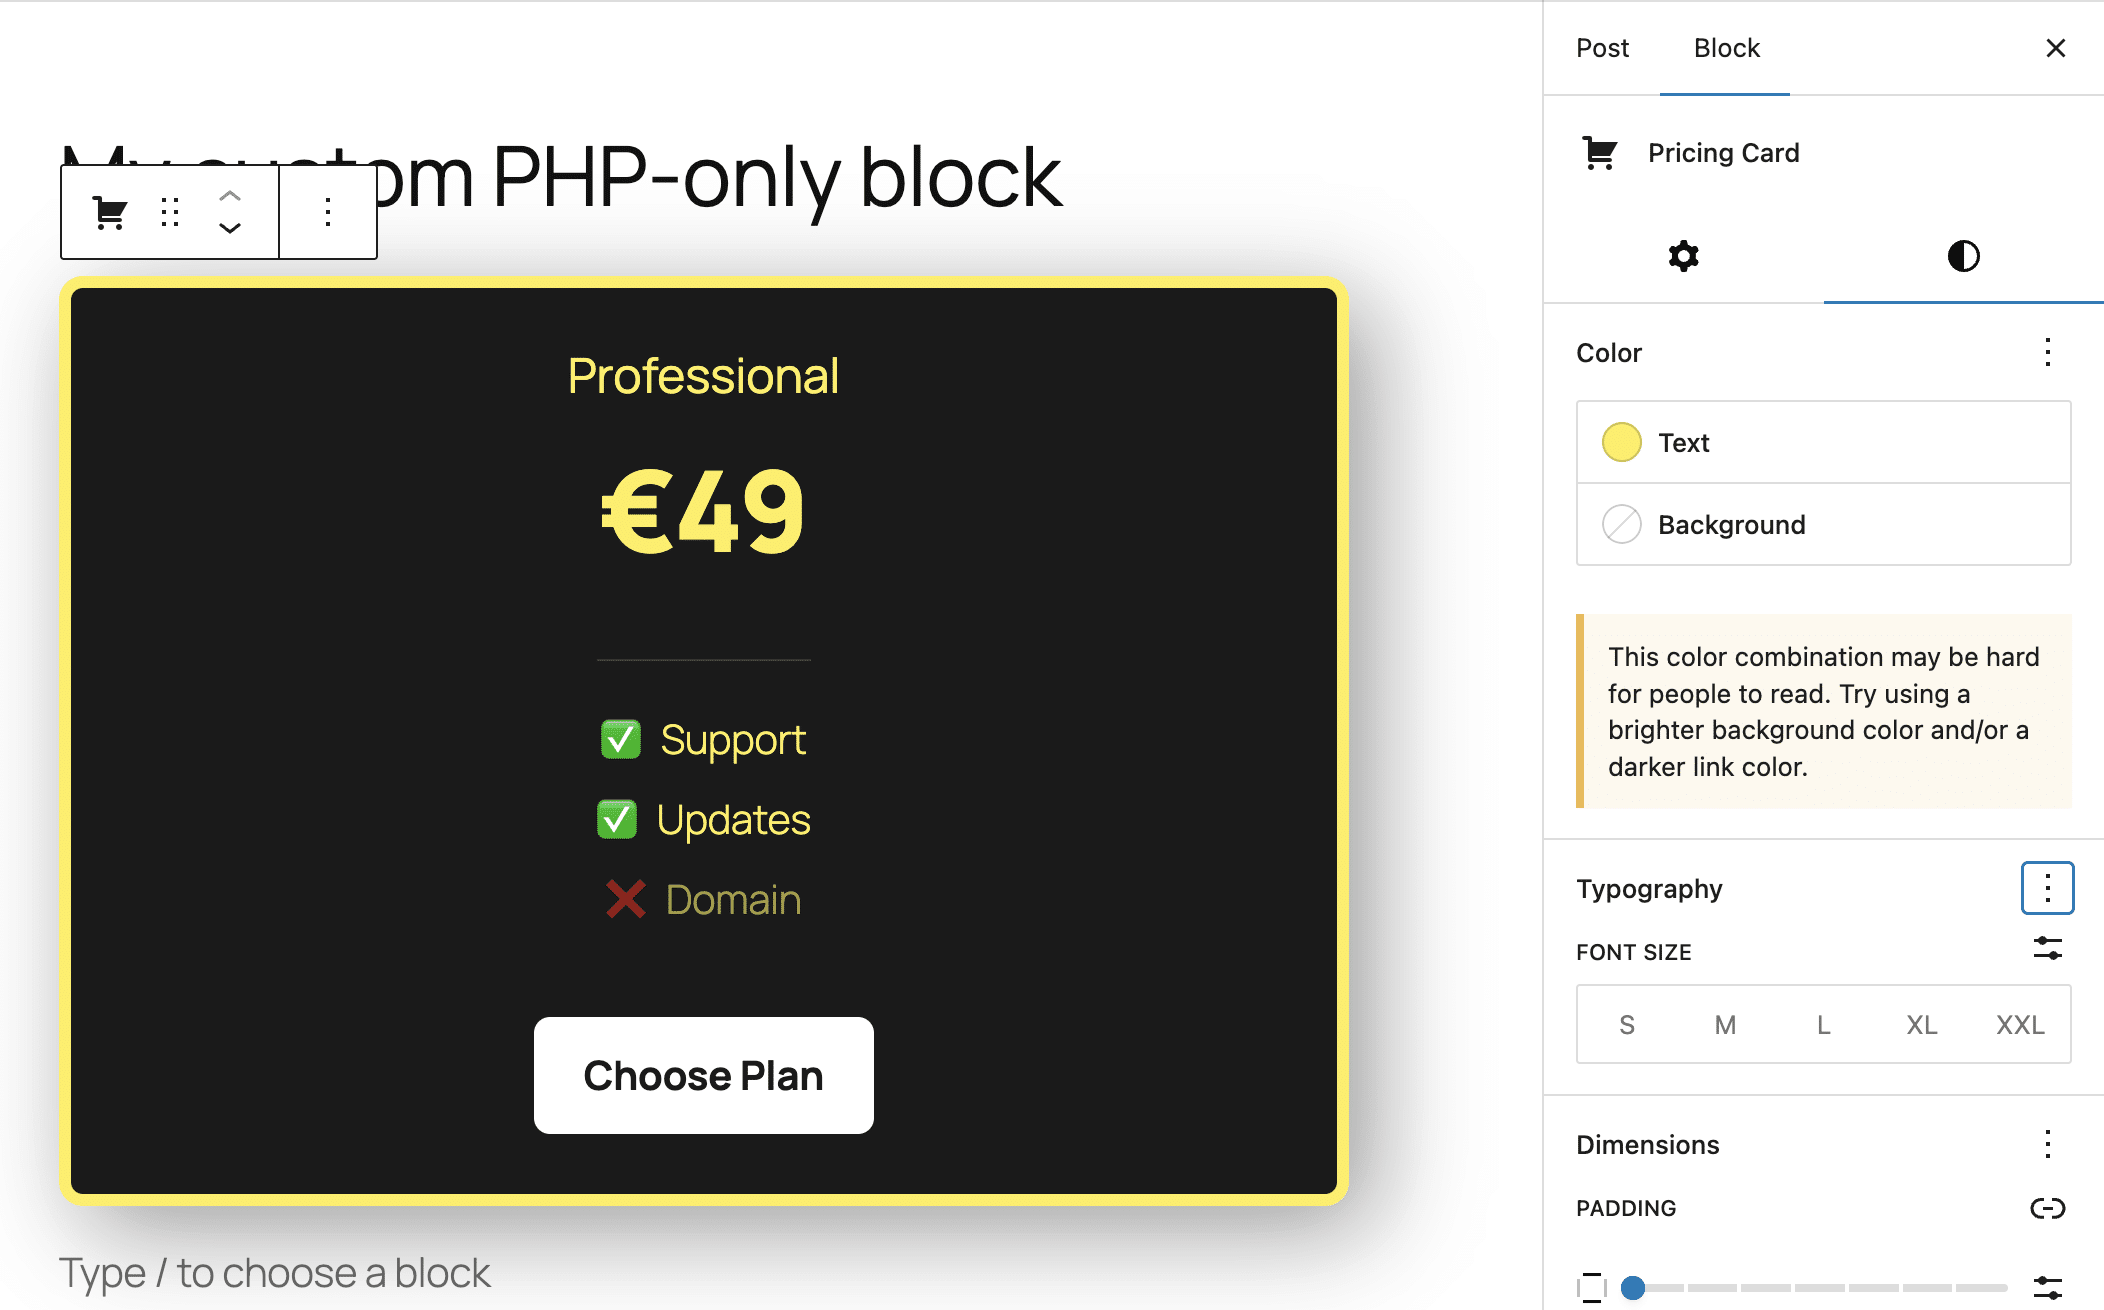
また、supportsで追加したスタイルは、ブロックのテーマスタイルよりも優先される点にも注目してください。これにより、以下のように、ブロックの外観をより柔軟にカスタマイズできるようになります。
PHPのみで既存のショートコードをGutenbergブロックに変換する
PHPブロックの最も直接的な使い方のひとつが、ショートコードのラッパーとして利用することです。Gutenbergでもコンテンツ内でショートコードを使用することはできますが、その場合はショートコードブロックにショートコードを手動で挿入する必要があり、あまり使いやすいとは言えません。
たとえば、次のようなショートコードがあるとします。
function my_custom_alert_shortcode( $atts ) {
$options = shortcode_atts( array(
'type' => 'info',
'message' => 'Default alert message',
), $atts );
$styles = array(
'info' => 'background: #d1ecf1; color: #0c5460; border-color: #bee5eb;',
'warning' => 'background: #fff3cd; color: #856404; border-color: #ffeeba;',
'error' => 'background: #f8d7da; color: #721c24; border-color: #f5c6cb;'
);
$style = $styles[ $options['type'] ] ?? $styles['info'];
return sprintf(
'<div class="sc-alert-box" style="%s padding: 20px; border: 1px solid; border-radius: 6px; margin: 10px 0;">
<strong style="text-transform: uppercase;">%s:</strong> %s
</div>',
esc_attr( $style ),
esc_html( $options['type'] ),
esc_html( $options['message'] )
);
}
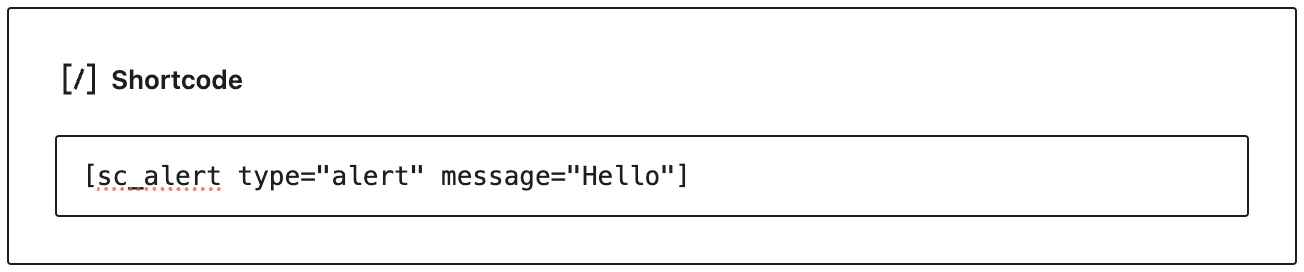
add_shortcode( 'sc_alert', 'my_custom_alert_shortcode' );このコードは、以下のショートコードを使用してコンテンツ内に挿入できるシンプルなボックスを生成します。
[sc_alert type="alert" message="Hello"]Gutenbergでは、以下の画像のように、ショートコードブロックを使用してこのボックスをコンテンツに挿入します。
PHPのみのブロックを使用すると、この状況は大きく変わります。ショートコードをPHPのみのGutenbergブロックでラップし、UIコントロールを使って設定できるようになります。以下は、プラグインに追加するコードです。
/**
* Rendering callback
*/
function render_shortcode_alert_wrapper_block( $attributes ) {
$type = esc_attr( $attributes['alertType'] );
$message = esc_attr( $attributes['alertMessage'] );
$shortcode_string = sprintf( '[sc_alert type="%s" message="%s"]', $type, $message );
$wrapper_attributes = wp_kses_data( get_block_wrapper_attributes( array(
'class' => 'wp-block-shortcode-alert-wrapper',
) ) );
return sprintf(
'<div %s>%s</div>',
$wrapper_attributes,
do_shortcode( $shortcode_string )
);
}
/**
* Register the block type on the server
*/
add_action( 'init', function() {
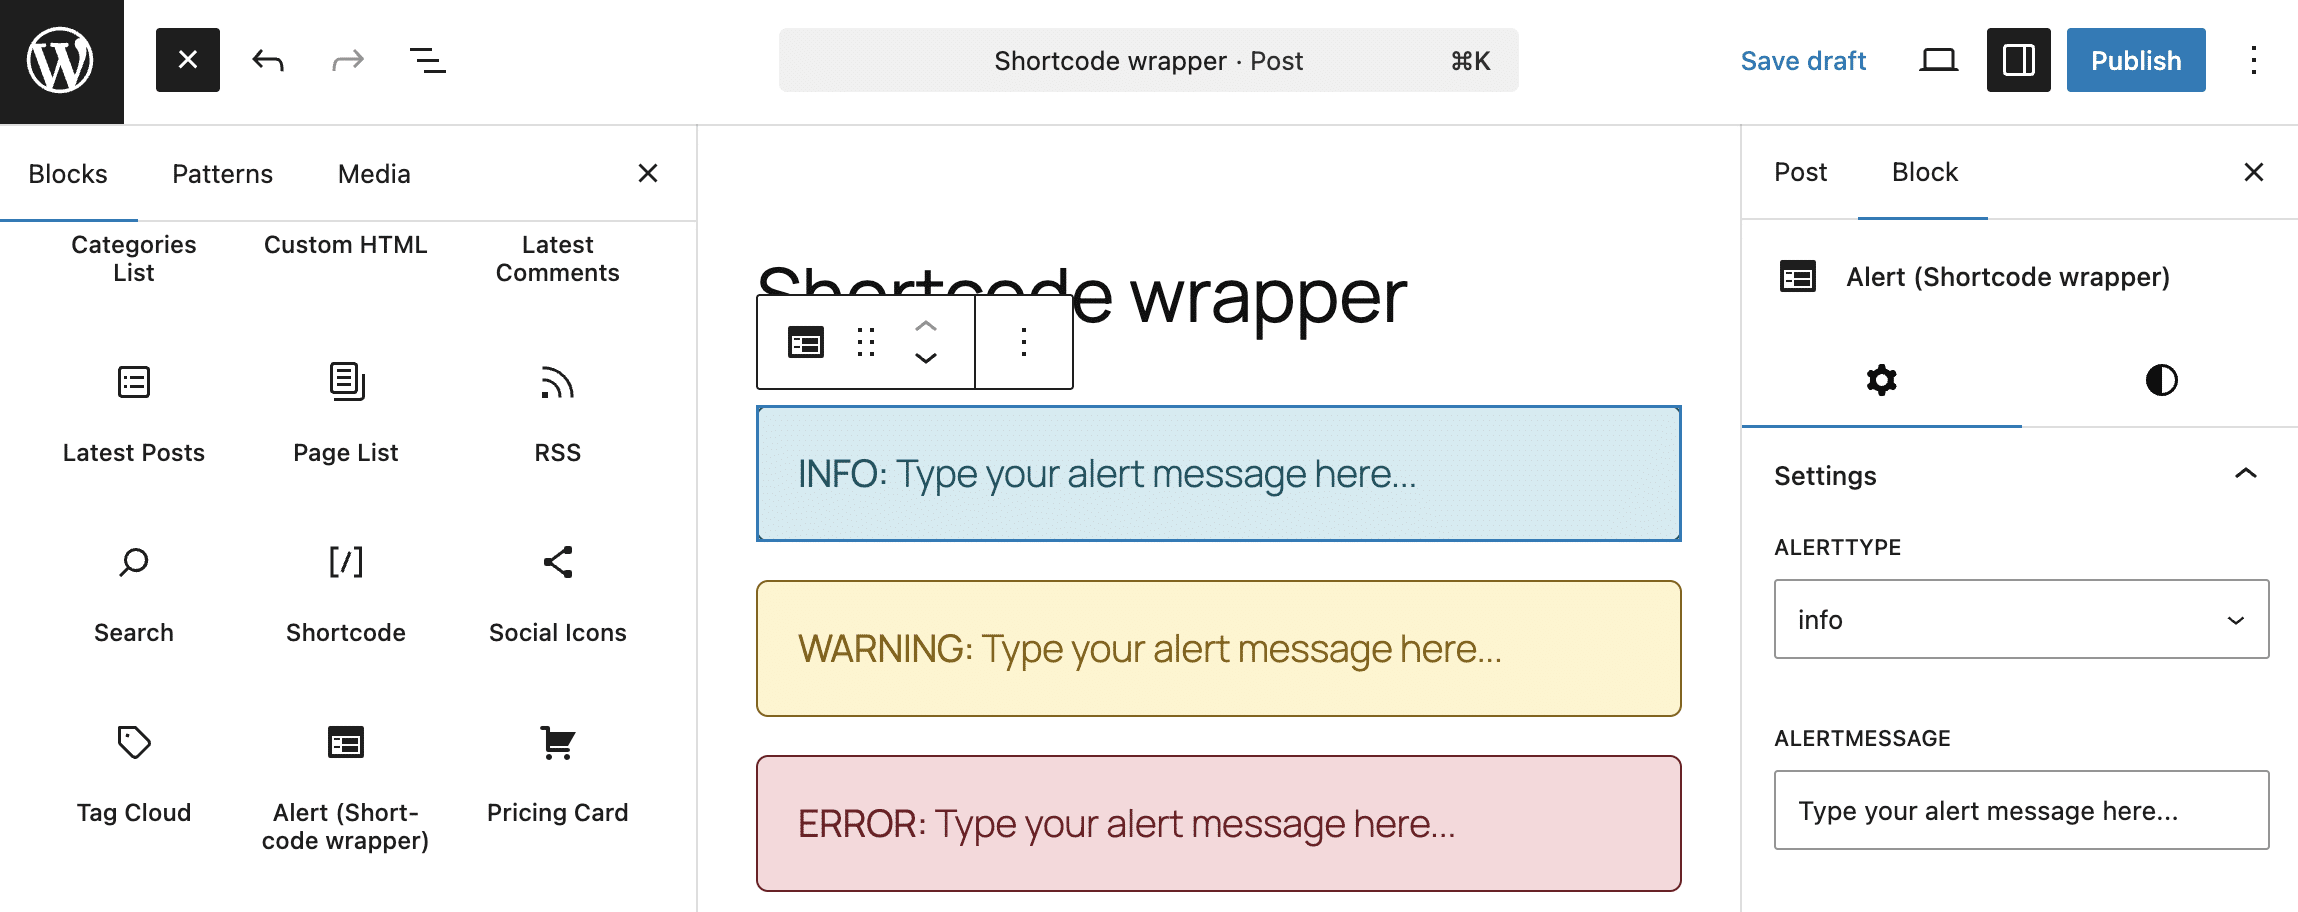
register_block_type( 'tutorial/alert-wrapper', array(
'api_version' => 3,
'title' => 'Alert (Shortcode wrapper)',
'icon' => 'feedback',
'category' => 'widgets',
'render_callback' => 'render_shortcode_alert_wrapper_block',
'attributes' => array(
'alertType' => array(
'type' => 'string',
'enum' => array( 'info', 'warning', 'error' ),
'default' => 'info',
),
'alertMessage' => array(
'type' => 'string',
'default' => 'Type your alert message here...',
),
),
'supports' => array(
'auto_register' => true,
'spacing' => array( 'margin' => true, 'padding' => true ),
'typography' => array( 'fontSize' => true ),
),
) );
});上記のコードは、前のセクションで紹介したコードとよく似ています。ここで異なるのは、レンダリング用のコールバック関数です。
$shortcode_stringには、ショートコード文字列([sc_alert type="%s" message="%s"])が格納される- この関数は、ブロックコンテナのHTMLと、含まれるショートコード(
do_shortcode( $shortcode_string ))を返す
次に、ブロックインサーターを開き、「ウィジェット」内にある「Shortcode wrapper」ブロックを探します。これをコンテンツに挿入し、ブロック設定バーから設定を行います。ブロックはエディターとフロントエンドの両方で同じ見た目で表示されます。
PHPのみのブロック登場によってWordPress開発はどう変わる?
現時点では、純粋なPHPブロックはまだ実験段階にあり、機能も限定的です。Gutenbergには、ブロックパターンやブロックバリエーションといった、ネイティブのGutenbergブロックやJavaScriptで構築されたカスタムブロックと同等の編集機能を提供する、より強力な機能も存在します。それでも、PHPブロックが大きな可能性を発揮する場面は確かにあります。
まず、PHPのみのブロックは、特にサーバーサイドJavaScript開発にあまり馴染みのないWordPress開発者にとって、ブロックエディターの普及を後押しすることが期待されます。
さらに、本記事の例で示したように、カスタム関数やショートコードのラッパーとして最適です。また、外部サービスとの連携も容易に行えるようになります。
今後は、さらなる改善や機能追加に加え、設定コントロールの拡充や既存のGutenbergツールとの統合も進んでいくことが期待されます。少なくとも、PHPのみで作成するブロックによって、Gutenbergのブロック開発は大きく簡素化されています。
Kinstaは、WordPress開発に必要なツールを提供し、複雑な設定や煩雑なメンテナンス作業を不要にすることで、WordPress開発そのものに集中できる環境を実現します。SSH、SFTP、Git統合、自動アップデート、ワンクリックのステージング環境、組み込みのローカル開発ツールなど、さまざまな機能を備えています。まずは初月無料で気軽にお試しください。