Googleで優先する情報源に追加
WordPress 6.9で導入されたAbilities APIは、WordPressコアとプラグインを含むすべてのコンポーネントが、それぞれの機能を人にも機械にも理解しやすい統一された形式で公開できる共通の仕組みを提供します。これにより、WordPressサイトを外部の自動化ツールと標準化された安全な方法で連携できるようになります。
Abilities APIの活用例としては、AIモデルがユーザーの商品購入を案内し、ECサイトにアクセスすることなく購入手続きまで完了できる仕組みが考えられます。また、GitHub Actions上のCI/CDパイプラインで音声ファイルや動画ファイルから抽出したテキストを処理し、WordPressへ送信して公開することも可能です。活用方法は無限大です。
Abilities APIは、エコシステムにおけるWordPressの役割そのものを変える存在です。WordPressは、もはや単なるブログ作成ツールでもCMSでもありません。現在は、外部から制御できる分散型の実行エンジンとして機能し、自律型エージェントにも対応できる、一種のオペレーティングシステムのような存在へと進化しています。
この記事では、Abilities APIについて詳しくご紹介します。
Abilities APIの役割
Abilityとは、WordPressサイト上で利用できる機能を外部から見つけて実行できるようにする仕組みです。AIモデルなどの外部システムや、WordPress内部のコンポーネントが特定の操作を実行するために利用します。
Abilities APIを使うと、以下のような機能を公開できます。
- コンテンツの検索や特定のデータベース操作の実行
- サイト設定の読み取り
- 投稿の作成
- JSON構造をGutenbergブロックへ変換
Abilityを公開すると、特定の機能が他のシステムから利用できる状態になります。これには、まずAbilityを一元管理されたカタログへ登録する必要があります。カタログに登録されることで、WordPressやAIモデルがその機能を見つけ、その役割を理解し、必要に応じて呼び出せるようになります。
デフォルトでは、プラグインの機能は他のシステムから利用できないように分離されていますが、Abilityを登録すると、その機能をエコシステム全体で利用できるサービスとして公開できます。
例えば、プラグインにJSONオブジェクトをGutenbergブロック用の構造化コンテンツへ変換する機能があるとします。この機能をAbilityとして登録すれば、必要な権限を持つ他のツールから同じ処理を実行できるようになります。
先日公開したWordPress AIクライアントに関する解説記事では、プラグインが音声ファイルをAIモデルへ送信し、返されたJSON形式のレスポンスからGutenbergブロックを生成する一連の処理を担っていました。しかし、この機能はそのプラグイン内でしか利用できませんでした。この処理をAbilityとして登録すると、実行部分を切り離すことができ、外部システムは音声ファイルIDを含むJSONオブジェクトを渡すだけで、プラグインの一連の処理を実行できるようになります。
Abilityは、PHPで実装された処理と、その実行をリクエストするシステムとの間で交わされる正式な「契約」のようなものです。この契約には、Abilityが受け取る入力データ、その役割、そして返される出力データのスキーマが定義されます。
Abilityを登録すると、その情報はサイトのAbilityレジストリに追加されます。それ以降、WordPressは安全なゲートウェイとして機能し、認証を確認するとともに、受け取ったデータが契約で定義されたスキーマに適合しているかを検証します。リクエストが契約の内容を満たしている場合にのみ、対応するPHPの処理が実行されます。
Abilityは、どのシステムから呼び出されたかを区別しません。 WordPressが確認するのは、リクエストが適切に認証され、契約で定義された条件を満たしているかどうかだけです。
Abilityを登録すると、プラグインは独自の内部機能を持つ拡張機能から、エコシステム全体に機能を提供するサービスへと変わります。モバイルアプリやMake.com、Zapierなどの自動化ツール、AIエージェント、さらにはMCPプロトコルを利用するサーバーまで、さまざまなシステムが、サイト上の機能を決められた方法で安全に実行できるようになります。
Abilities APIの使い方
Abilities APIには、サイトに登録されているAbilityの取得や実行、Abilityの登録・登録解除などを行うためのさまざまな関数が用意されています。
サイトに登録されているAbilityを操作する
登録済みのAbilityを一覧で取得したり、特定のAbilityオブジェクトを取得したりできます。また、特定のAbilityが登録されているかどうかや、エージェントがそのAbilityを実行する権限を持っているかどうかを確認することも可能です。
サイトに登録されているアビリティの一覧を取得する
wp_get_abilities()関数は、登録されているすべてのAbilityを配列として返します。この関数は、WP-CLIで動作を確認できます。まずSSHでサイトに接続し、以下のコマンドを実行して、wp-config.phpファイルがあるサイトのルートディレクトリへ移動します。
cd /path/to/your/site
ls wp-config.php
続いて、WP-CLIがWordPressサイトを正しく認識していることを確認します。
wp core is-installed
wp option get siteurl
サイトのURLが表示されれば準備完了です。次に以下のコマンドを実行します。
wp eval '$abilities = wp_get_abilities(); foreach ( $abilities as $a ) { echo $a->get_name() . PHP_EOL; }'このコマンドは、ターミナル上でPHPコードを実行し、サイトに登録されているすべてのAbilityの名前を取得して表示します。デフォルトでは、以下のような結果が表示されます。
core/get-site-info
core/get-user-info
core/get-environment-info
より詳細な情報を確認したい場合は、以下のコマンドを実行してください。
wp eval '
$all_abilities = wp_get_abilities();

foreach ( $all_abilities as $ability ) {
	echo "Ability Name: " . esc_html( $ability->get_name() ) . "\n";
	echo "Label: " . esc_html( $ability->get_label() ) . "\n";
	echo "Category: " . esc_html( $ability->get_category() ) . "\n";
	echo "Description: " . esc_html( $ability->get_description() ) . "\n";
	echo "---\n";
}
'このコマンドをWordPress 7.0を新規インストールした環境で実行すると、ターミナルには以下のような結果が表示されます。
Ability Name: core/get-site-info
Label: Get Site Information
Category: site
Description: Returns site information configured in WordPress. By default returns all fields, or optionally a filtered subset.
---
Ability Name: core/get-user-info
Label: Get User Information
Category: user
Description: Returns profile details for the current authenticated user to support personalization, auditing, and access-aware behavior. By default returns all fields, or optionally a filtered subset.
---
Ability Name: core/get-environment-info
Label: Get Environment Info
Category: site
Description: Returns core details about the site's runtime context for diagnostics and compatibility (environment, PHP runtime, database server info, WordPress version). By default returns all fields, or optionally a filtered subset.
---
Abilityオブジェクトを取得する
wp_get_ability()関数は、Ability名を指定して1つのAbilityオブジェクトを取得します。以下のコマンドを実行すると、WP-CLIで動作を確認できます。
wp eval '
$ability = wp_get_ability( "core/get-site-info" );

if ( ! $ability ) {
	echo "Ability not found\n";
	exit( 1 );
}

echo "Name: " . $ability->get_name() . "\n";
echo "Label: " . $ability->get_label() . "\n";
echo "Category: " . $ability->get_category() . "\n";
echo "Description: " . $ability->get_description() . "\n";
echo "nInput Schema:\n";
var_dump( $ability->get_input_schema() );
echo "nOutput Schema:\n";
var_dump( $ability->get_output_schema() );
echo "nMeta:\n";
var_dump( $ability->get_meta() );
'
Abilityがサイトに正しく登録されていれば、ターミナルには以下のような結果が表示されます。
Name: core/get-site-info
Label: Get Site Information
Category: site
Description: Returns site information configured in WordPress. By default returns all fields, or optionally a filtered subset.

Input Schema:
array(4) {
  ["type"]=>
  string(6) "object"
  ["properties"]=>
  array(1) {
	["fields"]=>
	array(3) {
	  ["type"]=>
	  string(5) "array"
	  ["items"]=>
	  array(2) {
		["type"]=>
		string(6) "string"
		["enum"]=>
		array(8) {
		  [0]=>
		  string(4) "name"
		  [1]=>
		  string(11) "description"
		  [2]=>
		  string(3) "url"
		  [3]=>
		  string(5) "wpurl"
		  [4]=>
		  string(11) "admin_email"
		  [5]=>
		  string(7) "charset"
		  [6]=>
		  string(8) "language"
		  [7]=>
		  string(7) "version"
		}
	  }
	  ["description"]=>
	  string(81) "Optional: Limit response to specific fields. If omitted, all fields are returned."
	}
  }
  ["additionalProperties"]=>
  bool(false)
  ["default"]=>
  array(0) {
  }
}

Output Schema:
array(3) {
  ["type"]=>
  string(6) "object"
  ["properties"]=>
  array(8) {
	["name"]=>
	array(3) {
	  ["type"]=>
	  string(6) "string"
	  ["title"]=>
	  string(10) "Site Title"
	  ["description"]=>
	  string(15) "The site title."
	}
	["description"]=>
	array(3) {
	  ["type"]=>
	  string(6) "string"
	  ["title"]=>
	  string(7) "Tagline"
	  ["description"]=>
	  string(17) "The site tagline."
	}
	["url"]=>
	array(3) {
	  ["type"]=>
	  string(6) "string"
	  ["title"]=>
	  string(18) "Site Address (URL)"
	  ["description"]=>
	  string(94) "The public URL where visitors access the site. May differ from the WordPress installation URL."
	}
	["wpurl"]=>
	array(3) {
	  ["type"]=>
	  string(6) "string"
	  ["title"]=>
	  string(23) "WordPress Address (URL)"
	  ["description"]=>
	  string(83) "The URL where WordPress core files are served. May differ from the public site URL."
	}
	["admin_email"]=>
	array(3) {
	  ["type"]=>
	  string(6) "string"
	  ["title"]=>
	  string(28) "Administration Email Address"
	  ["description"]=>
	  string(37) "The site administrator email address."
	}
	["charset"]=>
	array(3) {
	  ["type"]=>
	  string(6) "string"
	  ["title"]=>
	  string(12) "Site Charset"
	  ["description"]=>
	  string(28) "The site character encoding."
	}
	["language"]=>
	array(3) {
	  ["type"]=>
	  string(6) "string"
	  ["title"]=>
	  string(13) "Site Language"
	  ["description"]=>
	  string(42) "The site locale in dash form (e.g. en-US)."
	}
	["version"]=>
	array(3) {
	  ["type"]=>
	  string(6) "string"
	  ["title"]=>
	  string(17) "WordPress Version"
	  ["description"]=>
	  string(48) "The WordPress core version running on this site."
	}
  }
  ["additionalProperties"]=>
  bool(false)
}

Meta:
array(2) {
  ["annotations"]=>
  array(3) {
	["readonly"]=>
	bool(true)
	["destructive"]=>
	bool(false)
	["idempotent"]=>
	bool(true)
  }
  ["show_in_rest"]=>
  bool(true)
}
Abilityが登録されているか確認する
wp_has_ability()関数を使用すると、指定したAbilityが登録されているかどうかを確認できます。WP-CLIでは、以下のように実行します。
wp eval '
if ( wp_has_ability( "core/get-site-info" ) ) {
	echo "✓ core/get-site-info is registered\n";
} else {
	echo "✗ core/get-site-info not found\n";
}
'
Abilityが登録されている場合は、ターミナルに以下のメッセージが表示されます。
✓ core/get-site-info is registeredエージェントの権限を確認する
現在のユーザーがAbilityを実行する権限を持っているかどうかは、$abilityオブジェクトのcheck_permissions()メソッドで確認できます。このメソッドは、true、false、またはWP_Errorオブジェクトを返します。
以下のWP-CLIコマンドを実行して、ターミナルから動作を確認してみましょう。
wp --user=1 eval '
$ability = wp_get_ability( "core/get-site-info" );
if ( $ability ) {
	$has_permissions = $ability->check_permissions();
	if ( true === $has_permissions ) {
		echo "You have permissions to execute this ability.";
	} else {
		if ( is_wp_error( $has_permissions ) ) {
			error_log( "Permissions check failed: " . $has_permissions->get_error_message() );
		}
		echo "You do not have permissions to execute this ability.";
	}
} else {
	echo "Ability not found.";
}
'ここでは--user=1を指定して実行しているため、ターミナルには以下のような結果が表示されます。
You have permissions to execute this ability.Abilityを登録する
では、実際にAbilityを登録してみます。今回は具体的な活用例として、WordPress AIクライアントに関する解説記事で作成したプラグインを拡張します。このプラグインは、音声ファイルをAIモデルへ送信してテキストを抽出し、その内容をもとにGutenbergブロックを生成するものです。
以下、この一連の処理をAbilityとして登録し、必要な権限を持つ外部システムから検出して利用できるようにする方法を見ていきます。
新規Abilityを登録する前に、まずAbilityのカテゴリーを登録する必要があります。
カテゴリーを登録するには、wp_abilities_api_categories_initフック内でwp_register_ability_category()関数を実行します。この関数には、一意のカテゴリースラッグと、引数をまとめた連想配列を渡します。
以下のように登録します。
function aicb_register_ability_category(): void {

	if ( ! function_exists( 'wp_register_ability_category' ) ) {
		return;
	}

	wp_register_ability_category(
		'content-generation',
		array(
			'label'       => 'Content Generation',
			'description' => 'AI-powered content transformation and structuring abilities',
		)
	);
}
add_action( 'wp_abilities_api_categories_init', 'aicb_register_ability_category' );次に、wp_abilities_api_initアクション内でwp_register_ability()関数を実行して、Abilityを登録します。
この関数は、名前空間を含むAbility名と、Abilityの設定を定義する引数の配列という2つの引数を受け取ります。
以下は、AI Content BuilderプラグインでAbilityを登録する例です。
function aicb_register_audio_to_gutenberg_blocks_ability(): void {

	if ( ! function_exists( 'wp_register_ability' ) ) {
		return;
	}

	$input_schema = array( ... );

	$output_schema = array( ... );

	wp_register_ability(
		'ai-content-builder/audio-to-gutenberg-blocks',
		array(
			'category'            => 'content-generation',
			'label'               => 'Audio to Gutenberg Blocks',
			'description'         => 'Transcribes audio and converts the content into WordPress Gutenberg-compatible block objects.',
			'input_schema'        => $input_schema,
			'output_schema'       => $output_schema,
			'execute_callback'    => 'aicb_audio_to_gutenberg_blocks_callback',
			'permission_callback' => static function (): bool {
				return current_user_can( 'edit_posts' );
			},
			'meta'                => array(
				'show_in_rest' => true,
				'annotations'  => array(
					'readonly'     => false,
					'destructive'  => false,
					'idempotent'   => false,
					'instructions' => 'Processes an audio attachment: transcribes it, generates structured blog content via AI, and returns Gutenberg-ready block objects.',
				),
			),
		)
	);
}
add_action( 'wp_abilities_api_init', 'aicb_register_audio_to_gutenberg_blocks_ability' );wp_register_ability()関数では、以下の引数を設定しています。
category:Abilityが属するカテゴリーlabel:Abilityの表示名description:Abilityの役割や目的を説明する短い説明input_schema:Abilityが受け取る入力データのスキーマoutput_schema:Abilityが返す出力データのスキーマexecute_callback:Abilityが実行された際に呼び出されるコールバック関数permission_callback:Abilityを実行する権限があるかどうかを確認するコールバック関数meta:Abilityに関連付ける追加のメタデータshow_in_rest:WordPress REST APIでAbilityを公開するかどうかannotations:Abilityの動作を説明する補足情報
input_schemaは、Abilityの入力データを定義する配列です。JSON Schema形式で入力内容を定義し、受け取ったデータが期待する形式に適合しているかを検証します。
今回の例では、以下のように定義しています。
$input_schema = array(
	'type'       => 'object',
	'properties' => array(
		'audio_id' => array(
			'type'        => 'integer',
			'description' => 'The ID of the audio attachment to process and convert into Gutenberg blocks.',
		),
	),
	'required'   => array( 'audio_id' ),
);
このJSON Schemaは、このAbilityを利用する際に入力データが従うべき形式を定義しています。
一方、output_schemaは、Abilityが返す出力データの契約を定義するものです。今回の例では、それぞれの要素がGutenbergブロックを表すJSONオブジェクトとなっています。
$output_schema = array(
	'type'       => 'object',
	'properties' => array(
		'title'      => array( 'type' => 'string' ),
		'sections'   => array(
			'type'  => 'array',
			'items' => array( 'type' => 'object' ),
		),
		'blocks'     => array(
			'type'  => 'array',
			'items' => array( 'type' => 'object' ),
		),
		'transcript' => array( 'type' => 'string' ),
	),
	'required'   => array( 'blocks' ),
);最後に、Abilityが実行されたときに呼び出されるコールバック関数を定義します(コードの全貌はこちら)。
function aicb_audio_to_gutenberg_blocks_callback( array $args ) {

	// missing code
	// see GitHub
	...

	$structured_json = wp_ai_client_prompt( $prompt )
		->using_system_instruction( $instructions )
		->using_temperature( 0.4 )
		->as_json_response( $schema )
		->generate_text();

	if ( is_wp_error( $structured_json ) ) {
		return $structured_json;
	}

	$structured = json_decode( (string) $structured_json, true );
	if ( ! is_array( $structured ) ) {
		return new WP_Error(
			'invalid_ai_json',
			'Could not parse structured AI response.',
			array( 'status' => 500 )
		);
	}

	// Normalize the output.
	$normalized = aicb_normalize_structured_post( $structured );

	if ( '' === $normalized['title'] && empty( $normalized['sections'] ) ) {
		return new WP_Error(
			'empty_structured_content',
			'The AI provider returned empty structured content.',
			array( 'status' => 500 )
		);
	}

	// Convert to Gutenberg blocks.
	$blocks = aicb_sections_to_blocks( $normalized['title'], $normalized['sections'] );

	return $blocks;
}この関数は、2つの独自関数を呼び出します。1つ目のaicb_normalize_structured_post()は、AIから返された出力をあらかじめ定めた形式に整え、データをサニタイズします。
function aicb_normalize_structured_post( array $structured ): array {
	$title = isset( $structured['title'] )
		? sanitize_text_field( (string) $structured['title'] )
		: '';

	$sections = array();

	if ( isset( $structured['sections'] ) && is_array( $structured['sections'] ) ) {
		foreach ( $structured['sections'] as $section ) {
			if ( ! is_array( $section ) ) {
				continue;
			}

			$heading = isset( $section['heading'] )
				? sanitize_text_field( (string) $section['heading'] )
				: '';

			$level = 2;

			$paragraphs = array();
			if ( isset( $section['paragraphs'] ) && is_array( $section['paragraphs'] ) ) {
				foreach ( $section['paragraphs'] as $paragraph ) {
					$clean_paragraph = trim( sanitize_textarea_field( (string) $paragraph ) );
					if ( '' !== $clean_paragraph ) {
						$paragraphs[] = $clean_paragraph;
					}
				}
			}

			$bullet_points = array();
			if ( isset( $section['bullet_points'] ) && is_array( $section['bullet_points'] ) ) {
				foreach ( $section['bullet_points'] as $bullet_point ) {
					$clean_bullet_point = trim( sanitize_text_field( (string) $bullet_point ) );
					if ( '' !== $clean_bullet_point ) {
						$bullet_points[] = $clean_bullet_point;
					}
				}
			}

			if ( '' === $heading || empty( $paragraphs ) ) {
				continue;
			}

			$sections[] = array(
				'heading'       => $heading,
				'level'         => $level,
				'paragraphs'    => $paragraphs,
				'bullet_points' => $bullet_points,
			);
		}
	}

	return array(
		'title'    => $title,
		'sections' => $sections,
	);
}
この関数は、JSONオブジェクトで構成された構造化配列を受け取り、データの形式を整えてサニタイズしたうえで、タイトルと各セクションを含む配列を返します。
2つ目のaicb_sections_to_blocks()は、正規化されたデータをブロックの記述オブジェクトへ変換する関数で、以下のように定義されています。
function aicb_sections_to_blocks( string $title, array $sections ): array {
	$blocks = array();

	foreach ( $sections as $section ) {
		if ( ! is_array( $section ) ) {
			continue;
		}

		$heading = isset( $section['heading'] ) ? trim( (string) $section['heading'] ) : '';
		if ( '' === $heading ) {
			continue;
		}

		$paragraphs = array();
		if ( isset( $section['paragraphs'] ) && is_array( $section['paragraphs'] ) ) {
			foreach ( $section['paragraphs'] as $paragraph ) {
				$clean = trim( (string) $paragraph );
				if ( '' !== $clean ) {
					$paragraphs[] = $clean;
				}
			}
		}

		if ( empty( $paragraphs ) ) {
			continue;
		}

		$blocks[] = array(
			'name'       => 'core/heading',
			'attributes' => array(
				'content' => $heading,
				'level'   => 2,
			),
		);

		foreach ( $paragraphs as $paragraph ) {
			$blocks[] = array(
				'name'       => 'core/paragraph',
				'attributes' => array(
					'content' => $paragraph,
				),
			);
		}

		if ( isset( $section['bullet_points'] ) && is_array( $section['bullet_points'] ) ) {
			$bullet_items_html = '';

			foreach ( $section['bullet_points'] as $bullet_point ) {
				$clean_bullet = trim( sanitize_text_field( (string) $bullet_point ) );
				if ( '' === $clean_bullet ) {
					continue;
				}

				// core/list expects HTML in the `values` attribute.
				$bullet_items_html .= '<li>' . esc_html( $clean_bullet ) . '</li>';
			}

			if ( '' !== $bullet_items_html ) {
				$blocks[] = array(
					'name'       => 'core/list',
					'attributes' => array(
						'values' => '<ul>' . $bullet_items_html . '</ul>',
					),
				);
			}
		}
	}

	return $blocks;
}
この関数の主なポイントは以下のとおりです。
- 2つの引数を受け取る(投稿タイトルを表す文字列と、AIモデルが生成した各セクションの配列)
- 各セクションから見出しと1つ以上の段落を生成
- 箇条書きが含まれる場合は、項目数に応じたリスト項目を生成
- ブロック記述オブジェクトを格納した
$blocks配列を返す(Abilityが返す出力データの契約である$output_schemaに対応)
なお、この関数が返すのは、ブロックの生のマークアップではありません。実際のブロックマークアップは、クライアント側でJavaScriptのcreateBlock()関数を使用して生成されます。例えば、セクションの見出し要素は、以下のオブジェクトで表されます。
if ( '' !== $heading ) {
	$blocks[] = array(
		'name'       => 'core/heading',
		'attributes' => array(
			'content' => $heading,
			'level'   => ( 3 === $level ) ? 3 : 2,
		),
	);
}
Abilityを登録すると、先ほど紹介したWP-CLIコマンドを再度実行して、登録内容を確認できます。以下のコマンドを実行すると、このAbilityに定義した入力スキーマを表示できます。
wp --user=1 eval '
$ability = wp_get_ability( "ai-content-builder/audio-to-gutenberg-blocks" );

if ( ! $ability ) {
    echo "Ability not found\n";
    exit( 1 );
}

echo "Input Schema:\n";
var_dump( $ability->get_input_schema() );
'
ターミナルには、以下のような結果が表示されます。
Input Schema:
array(3) {
	["type"]=>
	string(6) "object"
	["properties"]=>
	array(1) {
		["audio_id"]=>
		array(2) {
			["type"]=>
			string(7) "integer"
			["description"]=>
			string(76) "The ID of the audio attachment to process and convert into Gutenberg blocks."
		}
	}
	["required"]=>
	array(1) {
		[0]=>
		string(8) "audio_id"
	}
}
同様に、以下のコマンドを実行すると、Abilityの出力スキーマを取得できます。
wp --user=1 eval '
$ability = wp_get_ability( "ai-content-builder/audio-to-gutenberg-blocks" );

if ( ! $ability ) {
    echo "Ability not found\n";
    exit( 1 );
}

echo "Output Schema:\n";
var_dump( $ability->get_output_schema() );
'
以下のコマンドを実行すると、Abilityオブジェクト全体を表示することもできます。
wp eval '
$ability = wp_get_ability( "ai-content-builder/audio-to-gutenberg-blocks" );

if ( ! $ability ) {
	echo "Ability not found\n";
	exit( 1 );
}

echo "Name: " . $ability->get_name() . "\n";
echo "Label: " . $ability->get_label() . "\n";
echo "Category: " . $ability->get_category() . "\n";
echo "Description: " . $ability->get_description() . "\n";
echo "nInput Schema:\n";
var_dump( $ability->get_input_schema() );
echo "nOutput Schema:\n";
var_dump( $ability->get_output_schema() );
'
Abilityを実行する
Abilityを実行するには、$abilityオブジェクトのexecute()メソッドを使用します。例えば、以下のPHPコードをWP-CLIで実行すると、core/get-site-info Abilityを実行できます。
wp --user=1 eval '
$ability = wp_get_ability( "core/get-site-info" );

if ( ! $ability ) {
	echo "Ability not found\n";
	exit(1);
}

$result = $ability->execute();

if ( is_wp_error( $result ) ) {
	echo "ERROR: " . $result->get_error_message() . "\n";
	exit(1);
}

echo json_encode( $result, JSON_PRETTY_PRINT | JSON_UNESCAPED_SLASHES ) . "\n";
'
このコマンドを実行すると、Abilityから以下のようなJSONオブジェクトが返されます。
{
	"name": "WordPress 7.0",
	"description": "",
	"url": "http://yoursite.kinsta.cloud",
	"wpurl": "http://yoursite.kinsta.cloud",
	"admin_email": "[email protected]",
	"charset": "UTF-8",
	"language": "en-US",
	"version": "7.1-alpha-62550"
}
ここで紹介したのは、サイトの情報を取得するシンプルなAbilityの例です。
前述のとおり、Abilityは入力データを受け取り、そのデータに対して処理を実行し、構造化された形式で結果を返すこともできます。前のセクションで登録したAbilityは、その代表的な例です。
引き続き、ターミナルでサイトのルートディレクトリに移動し、以下のPHPコードを実行してみましょう。
wp --user=1 eval '
$ability = wp_get_ability( "ai-content-builder/audio-to-gutenberg-blocks" );

if ( ! $ability ) {
	echo "Ability not found\n";
	exit( 1 );
}

$input = array( "audio_id" => 1755 );

$result = $ability->execute( $input );

if ( is_wp_error( $result ) ) {
	echo "ERROR: " . $result->get_error_message() . "\n";
	exit( 1 );
}

echo json_encode( $result, JSON_PRETTY_PRINT | JSON_UNESCAPED_SLASHES ) . "\n";
'execute()メソッドは、構造化された入力データをAbilityに渡します。Abilityはそのデータを処理し、Gutenbergブロックへ変換可能なオブジェクトの配列を返します。
[
	{
		"name": "core/heading",
		"attributes": {
			"content": "A Well-Deserved Rest Day in Marrakech",
			"level": 2
		}
	},
	{
		"name": "core/paragraph",
		"attributes": {
			"content": "On April 24th, our group of seven motorcyclists took a break from the open road..."
		}
	},
	{
		"name": "core/heading",
		"attributes": {
			"content": "Exploring Jemaa el-Fnaa and the Medina",
			"level": 2
		}
	},
	{
		"name": "core/paragraph",
		"attributes": {
			"content": "Our journey led us straight to Jemaa el-Fnaa, the legendary main square of Marrakech..."
		}
	},
	{
		"name": "core/list",
		"attributes": {
			"values": "<ul><li>Navigating the bustling souks and narrow alleys of the ancient Medina.</li><li>Savoring traditional Moroccan and Berber dishes.</li><li>Experiencing the vibrant street performances and food stalls of Jemaa el-Fnaa at night.</li></ul>"
		}
	},
	...
]
REST APIとの連携
WordPressのAbilities APIには統一されたルーティング構造が用意されており、外部のエージェントは、利用可能なAbilityカテゴリーの一覧(/categories)を取得したり、特定のAbilityの契約内容(/abilities/{name})を確認したり、標準の実行エンドポイント(/abilities/{name}/run)を使ってAbilityを実行したりできます。
以下は、テストサイトに登録されているカテゴリーの一覧を取得するGETリクエスト例です。
https://yoursite.kinsta.cloud/wp-json/wp-abilities/v1/categories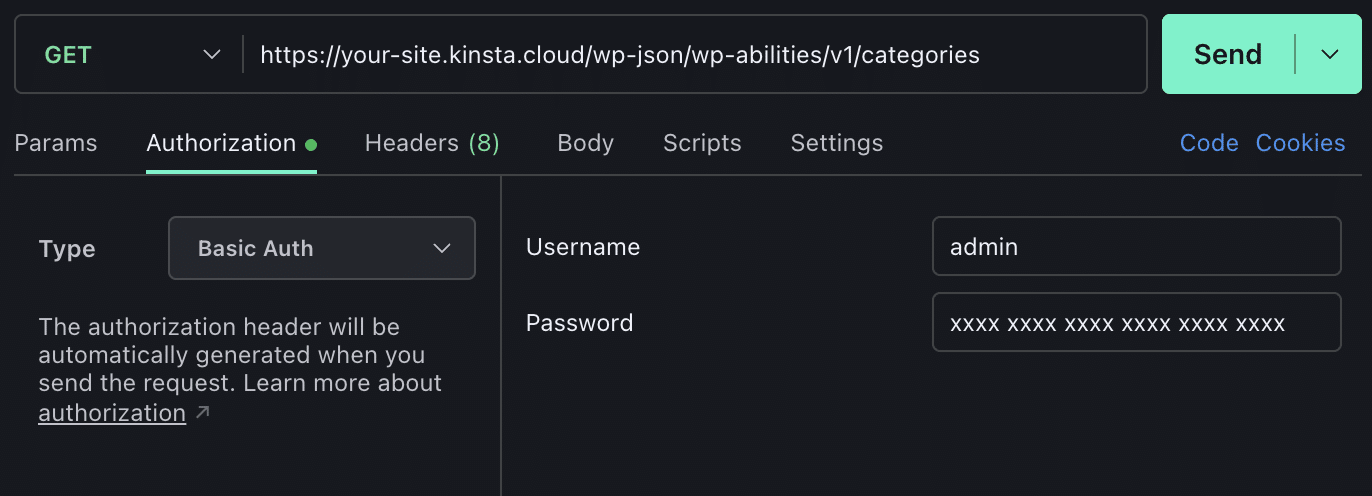
前の例でAbilityを登録した際、show_in_restパラメータをtrueに設定しました。これにより、このAbilityは、WordPress標準のREST APIエンドポイント(wp-abilities/v1)の共通名前空間から自動的に利用できるようになります。
つまり、外部環境からAbilityを呼び出すために、独自のREST APIルートを一から登録する必要はありません。外部のエージェントは、標準的なHTTPリクエストを使ってAbilityを検出し、実行できます。
例えば、以下のGETリクエストを実行すると、このAbilityの契約内容を確認できます。
https://yoursite.kinsta.cloud/wp-json/wp-abilities/v1/abilities/ai-content-builder/audio-to-gutenberg-blocks最後に、認証済みのPOSTリクエストを送信してAbilityを実行できます。
https://yoursite.kinsta.cloud/wp-json/wp-abilities/v1/abilities/ai-content-builder/audio-to-gutenberg-blocks/runこのリクエストを送信する際は、入力データを指定する必要があります。今回の例では、リクエストボディに以下のJSONを設定しています。
{
	"input": {
		"audio_id": YOUR_AUDIO_ID
	}
}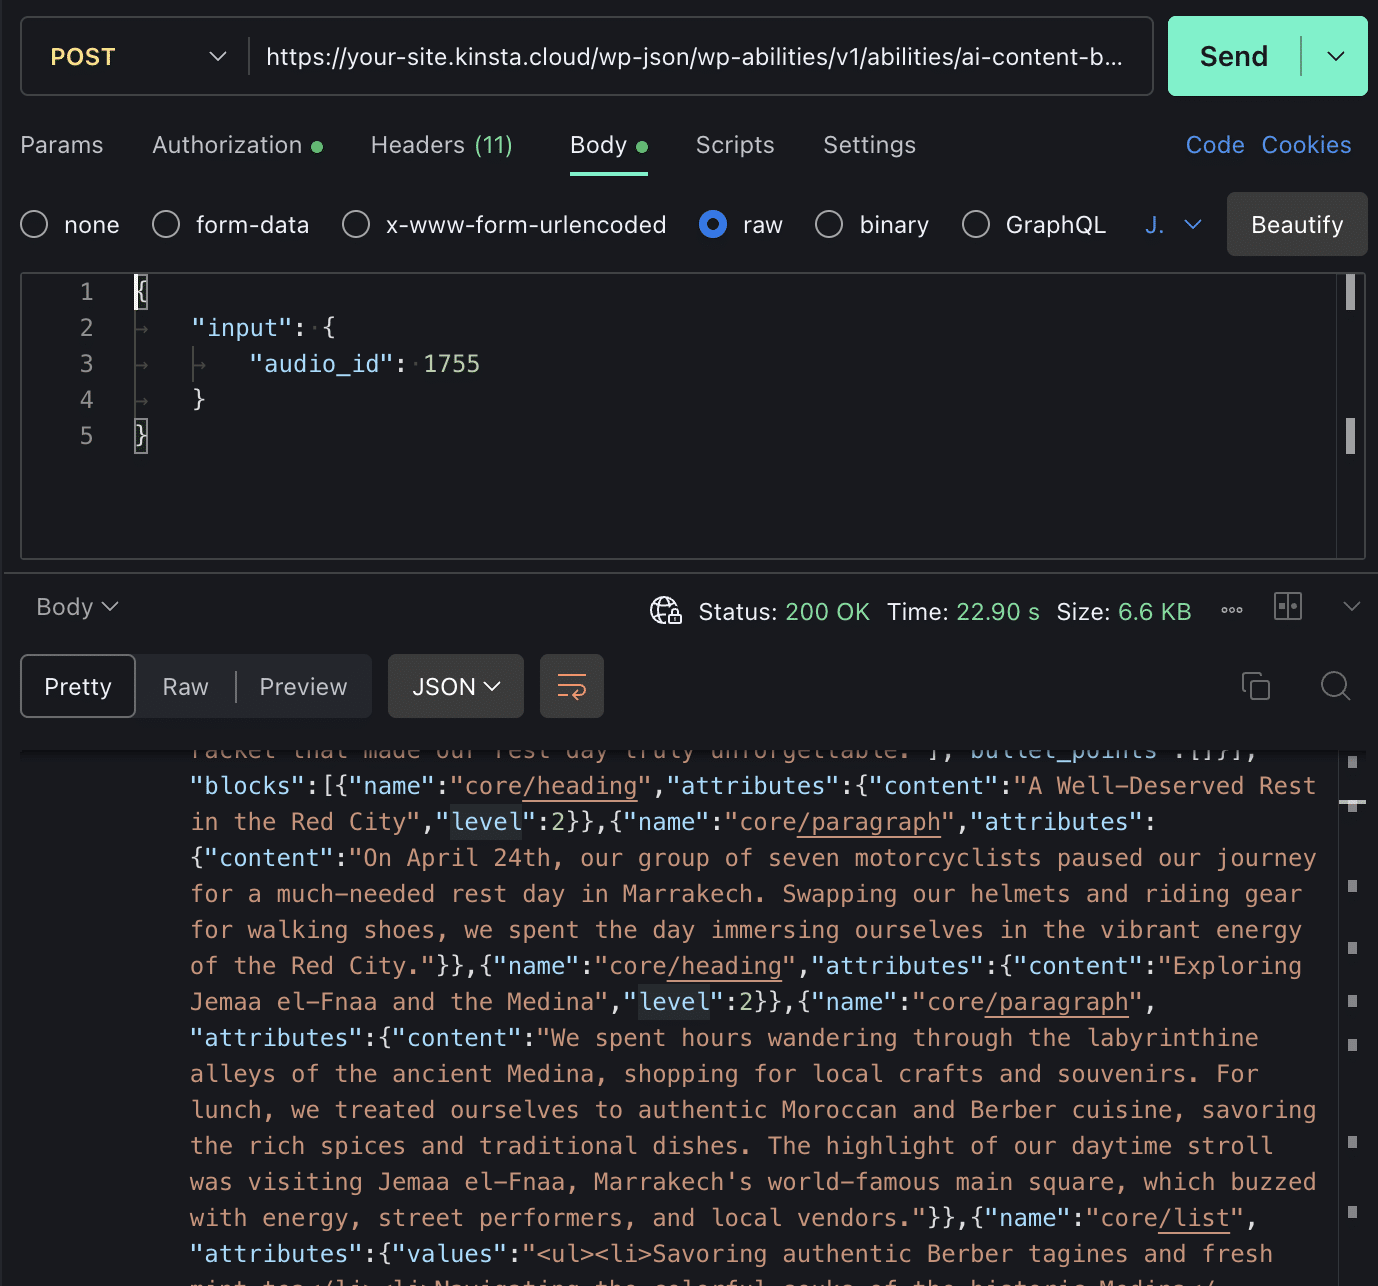
Abilityは音声データを処理し、サイトに設定されているAIモデルへ送信します。AIモデルから返された構造化データは、その後正規化とサニタイズが行われ、最終的にブロック属性を含む以下のオブジェクト配列が返されます。
{
	"blocks": [
		{
			"name": "core/heading",
			"attributes": { "content": "A Welcome Rest Day in Marrakech", "level": 2 }
		},
		{
			"name": "core/paragraph",
			"attributes": { "content": "On April 24, our group of seven motorcyclists paused our journey..." }
		}
	]
}
以上が、Abilityを利用してAIの出力をWordPressで扱えるようにする一連の流れです。
WordPressはエージェント時代へ
AIクライアントと新たなコネクタアーキテクチャの登場により、WordPressはAI処理を内部で実行できるようになりました。そして、Abilities APIは、WordPressが外部システムと連携する方法そのものを大きく変えようとしています。私たちは今、ユーザーが手作業で操作し、連携のたびに独自のエンドポイントや個別のデータ変換が必要だった従来のウェブアーキテクチャから、自動化を前提としたインテント駆動型アーキテクチャへの大きな転換点を迎えています。
WordPress開発者にとって、Abilities APIはアーキテクチャ上の大きな転換点です。機能をプラグイン内部の実装から切り離し、入力・出力スキーマによる契約を通じて安全性を担保するとともに、エコシステム全体でネイティブな相互運用性を実現します。
こうした特徴を踏まえると、Abilities APIは単なる新しいAPIではなく、WordPressがエージェントを中心とした未来へ進化していく方向性を示す、分散型の実行エンジンと言えます。