Docker is a platform that helps developers build and deploy containerized applications. It helps solve operating system compatibility challenges by providing lightweight virtualized environments for managing those applications.
Docker’s primary command line interface (CLI) provides powerful tools for developers working with containers. Beginning with the base command docker, the CLI supports nearly 60 subcommands — most of which accept a number of command-line arguments to tackle different tasks.
Getting Your Hands on the Docker CLI
Your Docker environment might be the open-source Docker Engine or the user-friendly GUI interface of Docker Desktop. The CLI will be your primary interface in a Docker Engine environment, but you’ll also gain access to the command line tool if you install Docker Desktop.
We think that even users of Docker Desktop will find themselves sliding into the CLI once they become familiar with at least these 20 essential docker commands.
Docker Commands You Should Know
Let’s dig in and find out which Docker commands you should be most familiar with.
1. docker system
The docker system command helps inspect and manage the Docker environment. It supports command-line arguments for performing specific management-related tasks, including:
dfshows how you are using the diskpruneremoves unused networks, containers, images, or volumesinfoshows system-related informationeventsdisplays a log of system events in real-time
Below is the initial prompt after executing docker system prune.

docker system prune output.2. docker context
This command helps you navigate and configure different contexts. In Docker, contexts include names, transport layer security info, endpoint configurations, and orchestrators.
Some of the docker context arguments:
lsdisplays the details of the default contextinspect [CONTEXT}inspects a specified contextcreate [CONTEXT]creates a new contextuse [CONTEXT]switches between contexts
Below is an example of output from docker context ls:

docker context ls output.3. docker pause and unpause
The docker pause command freezes a container’s active processes. To run it, you must specify the container’s name, as shown below:
docker pause [CONTAINER]Below is an example of the output you can expect after pausing a container.

docker pause output.The docker unpause command resumes paused container processes. Like the previous command, you must specify the container name, as shown below:
docker unpause [CONTAINER]Below is an example of the output you can expect after unpausing a container.

docker unpause output.4. docker rm
This command removes containers, volumes, and networks. It allows selecting the component to remove based on its attributes. For instance, you can force-remove running containers or all specified containers:
docker rm [CONTAINER] removes the container whose name is specified. The output of this command is in the screen capture below.

docker rm output.5. docker rmi
You use this command to remove images. You can remove a single image or multiple images at once. You can describe the image to remove using either the short ID or the long ID. The command is important for keeping the host node clean and efficient.
The command for image removal uses this structure:
docker rmi [IMAGE ID]Below is an example of its output.

docker rmi output.6. docker volume
This command allows you to manage volumes in Docker. You can use it to create, remove, list, and inspect volumes.
Some of the docker volume arguments are:
create [OPTIONAL NAME]creates a new volume. You can specify the volume name or let Docker generate a random name.lslists the volumes availableinspect [NAME]shows detailed volume information.rm [NAME]removes a volume from Docker.
Below is an example of the output after creating a volume.

docker volume create output.7. docker search
Use this command to search for images from Docker Hub, which you can then run as containers on your machine. It allows you to access Docker Hub registry images without visiting the website.
The command follows this structure: docker search . You can specify the names of the images you are searching for or create a filter.
Below is an example of the output from the following query:
docker search --filter is-official=true --filter stars=500 mysql
docker search output.8. docker push
The docker push command allows you to share your images in the Docker Hub registry or a private repository.
The structure of the command is:
docker push [OPTIONS] NAME[:TAG][OPTIONS] allows you to set -disable-content-trust.
By default, this value is true, and it’s not mandatory to include it.
NAME[:TAG] requires using the registry’s name, the repository, and the image tag.
Below is an example of the output from docker push.

docker push output.9. docker pull
This command downloads a Docker image from a repository in a private or public registry.
The command works like this:
docker pull [OPTIONS] NAME[:TAG|@DIGEST]This command allows you to use existing images instead of creating new ones whenever you must create a containerized application.
The example below shows the output from a docker pull command:

docker pull output.10. docker ps
By default, this command displays the list of all the running containers. However, you can add a flag to list containers based on attributes such as disk usage size, linked containers, and labels.
The command follows the structure below:
docker ps [OPTIONS]Some of its arguments include:
-adisplays a list of running and exited containers-sdisplays each container’s on-disk size and virtual size
You can use the two together like this:
docker ps -asBelow is an example of the output from a docker ps command.

docker ps command.11. docker tag
Use this tag to add metadata, such as the version, to your image. Tags are typically created when an image is built, but the docker tag command allows you to add a tag later, essentially creating an alias for the target image.
This command follows the following structure:
docker tag SOURCE_IMAGE[:TAG] TARGET_IMAGE[:TAG]In the example below, we list images with the name “redis.” After tagging the image with a version number (“2.0”), the new alias and the originally tagged image appear in the list.

docker tag output.12. docker rename
Use this command to rename a container. This is useful when you have several containers and want to differentiate them based on their purpose.
This command follows the following structure:
docker rename [OLD_NAME] [NEW_NAME]Below is an example of output before and after a docker rename command.

docker rename output.13. docker commit
This command allows you to create new images after changes to a container’s files. This is important because it enables you to debug a container using an interactive shell.
This command follows the following structure:
docker commit [CONTAINER_ID] [name-of-new-image]Below is an example and an output from the docker commit command.

docker commit output.14. docker network
This is a network management command that allows you to create powerful applications by connecting services and containers.
The command has the following structure:
docker network [OPTIONS]Its arguments include:
connectfor connecting containers to networkscreatefor building new networksdisconnectfor disconnecting running containers from networksrmfor removing single or multiple networks
Below is the output from a docker network create command.

docker network create output.15. docker history
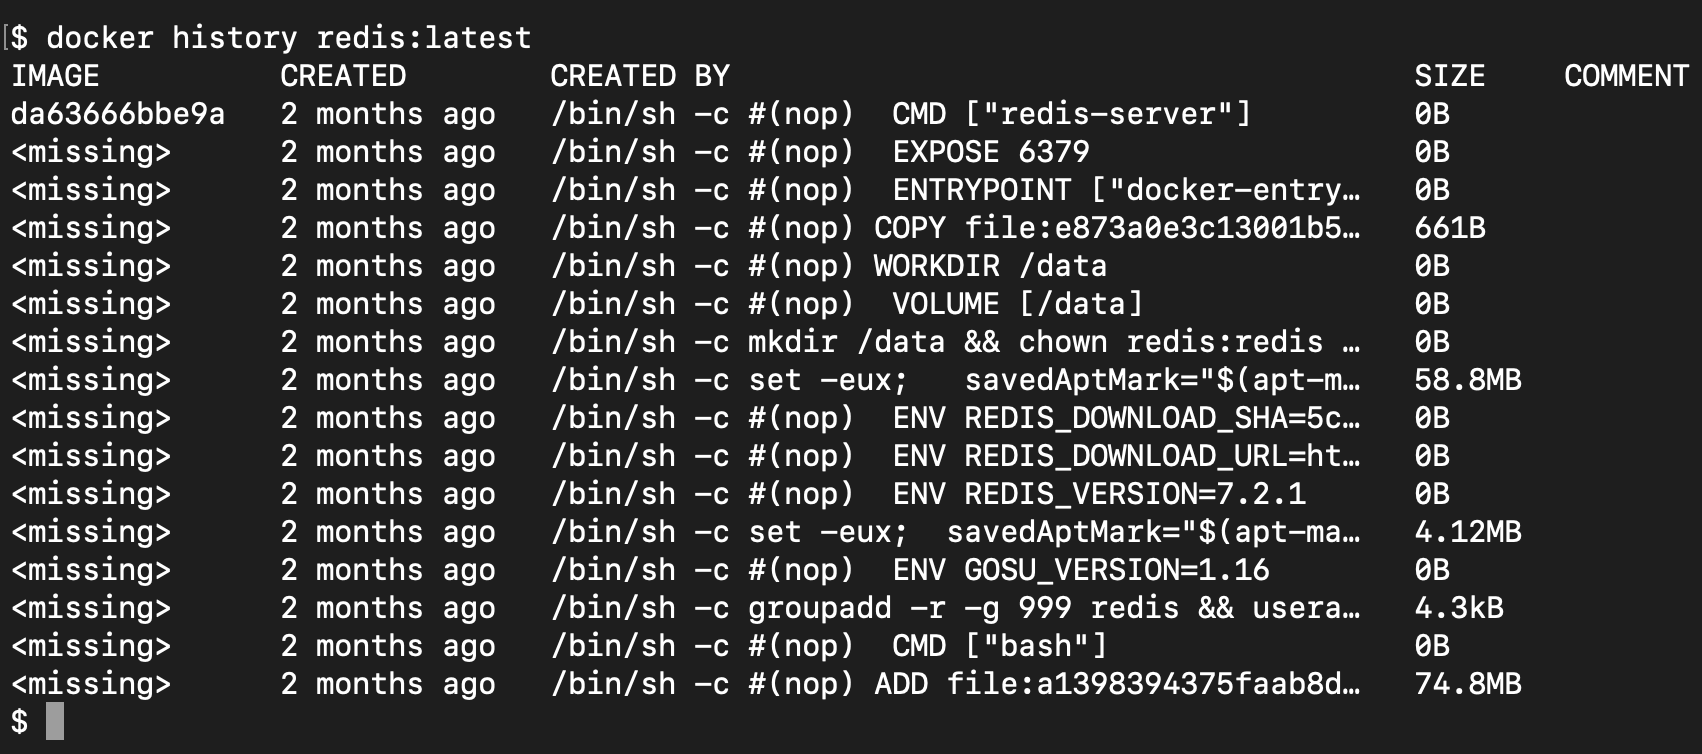
This command gives the history of a specified image, helping you understand how it was created and displaying the image size.
The command has the following structure:
docker history [IMAGE]Below, we see the history associated with the image redis:latest.

docker history output.16. docker update
This command enables you to update a container’s configuration. It helps prevent containers from consuming too many Docker host resources. The format of the command is:
docker update [OPTIONS] [CONTAINER]Some of its options include:
--restartupdates a container restart policy--memorysets a container’s memory limit--cpussets the number of allocated CPUs
Below is an example of output from a docker update command.

docker update output.17. docker plugin install
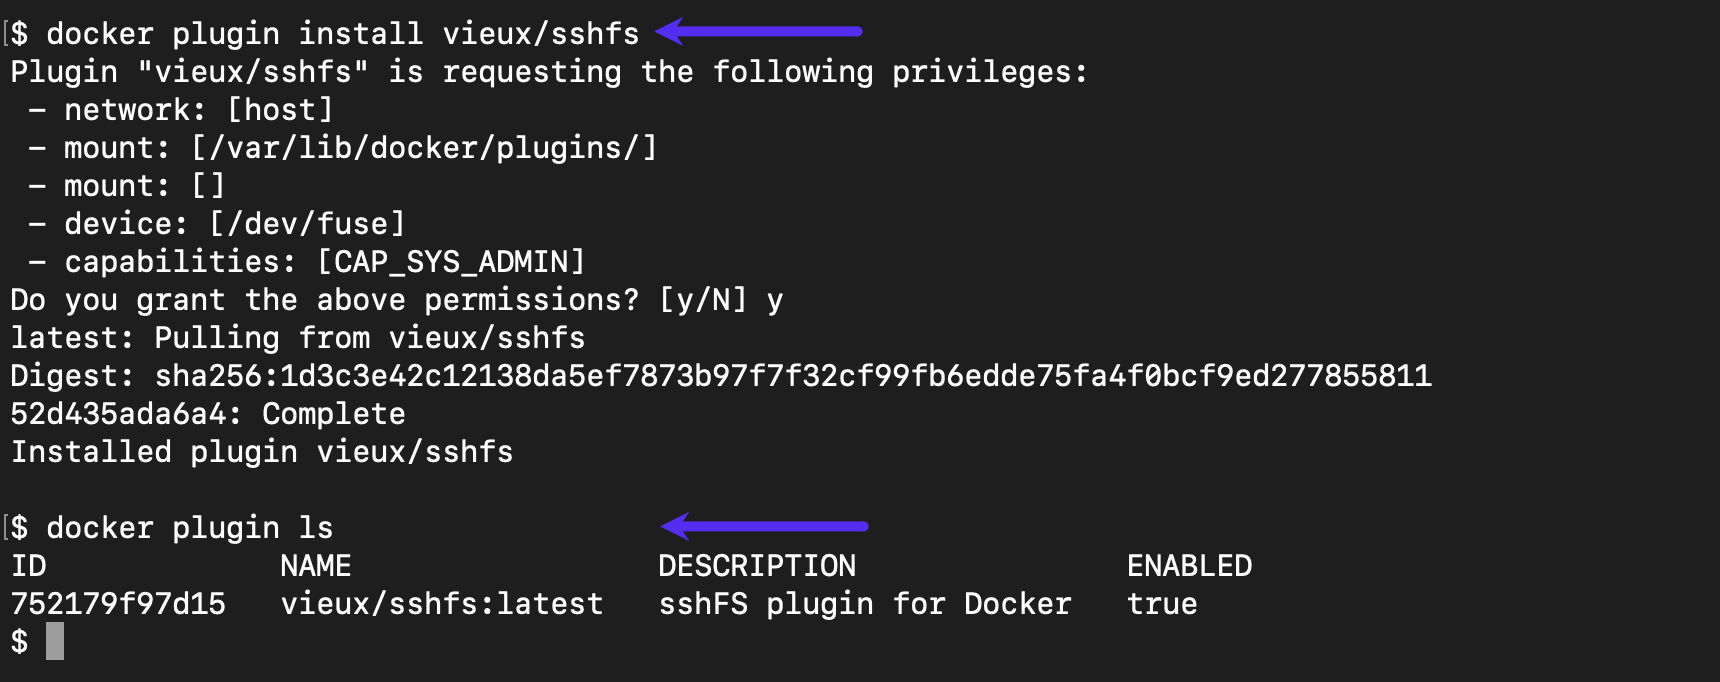
This command allows you to manage plugins. It is essential because it allows adding new functionalities without altering Docker host configurations.
The docker plugin arguments include:
createfor creating new pluginsenablefor enabling installed pluginsinstallfor installing new pluginsrmfor removing single or multiple pluginslsfor displaying a list of plugins
Below, we use docker plugin install to add a plugin to our environment. Then, we use docker plugin ls to reveal its status.

docker plugin ls output.18. docker container
This command allows you to manage containers. You use it to perform actions such as creating, killing, and removing containers, among others.
The docker container options include:
createfor creating a containercommitfor creating a new image after changes to a containerexecfor executing commands inside a running containerkillfor stopping a running containerlsfor displaying a list of containers within a Docker hostrestartfor restarting a containerrunfor creating a container from an image and running itrmfor removing a container from a Docker host
Below is an example of output from a docker container command.

docker container restart output.19. docker logs
This command retrieves logs from a container. It gives insights into a container’s operations, which can be essential when debugging.
Below is an example of output from a docker logs command.

docker logs output.20. docker swarm
This command helps manage a Docker swarm — a group of machines (virtual or physical) running Docker and configured to work together in a cluster. This command makes it easy to set up a swarm and enjoy its benefits.
Below are some of the docker swarm options:
initfor initiating a swarmjoinfor joining a swarmleavefor leaving a swarmupdatefor updating a swarm
Below is an example and an output from a docker swarm init command.

docker swarm init output.Summary
Docker is an effective tool for building and managing containerized applications. The easy-to-understand commands of its CLI make creating and manipulating even complex applications easier.
Mastering the 20 commands above can speed up the development of your containerized applications.
At Kinsta, many WordPress Hosting customers use our Docker-Desktop-based DevKinsta tools to develop and deploy their websites.
Customers of Kinsta’s Application Hosting service can work with Docker and their favorite Git provider (Bitbucket, GitHub, or GitLab) for source code version control and quick deployment of containerized applications.


