
CRON jobs are used to schedule tasks at periodic fixed times, dates, or intervals on your WordPress site. Some examples of a WordPress cron job might involve scheduling a post to publish, checking for updates, or a backup plugin running on a predefined schedule.
In WordPress, this is handled by WP-Cron, which is used to simulate a system cron. However, depending on the amount of traffic to your site, using the built-in cron handler can actually start to impact your page load times.
So today we’ll show you how to disable WP-Cron (wp-cron.php) and instead use a system cron for faster performance.
Why Disable WP-Cron?
We deal with a lot of high-traffic and demanding sites at Kinsta. Because of this, we’ve seen a lot of performance issues with the WordPress built-in Cron handler: WP-Cron.
First off, it’s important to understand that WP-Cron is not a real cron job, it’s simply what WordPress has created to mimic what a system cron does.
WP-Cron does not run continuously. By default, the wp-cron.php fires on every page load, which on high-traffic sites can cause problems. If a site doesn’t have enough PHP threads, sometimes a request will come in, WordPress will spawn the cron, but the cron has to wait for the worker, and therefore just sits there.
The reverse scenario is also true. If a site doesn’t have a lot of traffic, schedules could be missed due to the fact that no one has loaded a page.
Besides that, there’s also a security reason to disable WP-Cron. Because wp-cron.php is a publicly accessible file, anyone can trigger it by sending a request to https://yourdomain.com/wp-cron.php.
On a targeted site, this can be used to spike server load repeatedly, a simple but effective way to slow down or destabilize a site. Disabling WP-Cron closes that door entirely.
Disabling WP-Cron in WordPress (2 Steps)
Here is what you should be doing (in this order):
- First, set up a server-level cron job to replace WP-Cron
- Then, disable WP-Cron in your
wp-config.php
If you disable WP-Cron first without setting up a replacement, your scheduled tasks (post scheduling, backup jobs, plugin update checks, email notifications) will stop running silently. No errors, just missed jobs.
Step 1: Set Up a Server-Level Cron Job
Now that you understand why WP-Cron can be a problem, here’s how to replace it. The system cron runs on a pre-defined schedule and is even recommended in the official Plugin handbook.
Choose the method that matches your hosting setup.
Using cPanel
If you’re using a host with cPanel, you can create a system cron from their control panel. First, log in to cPanel. In the Advanced section, click on Cron Jobs.
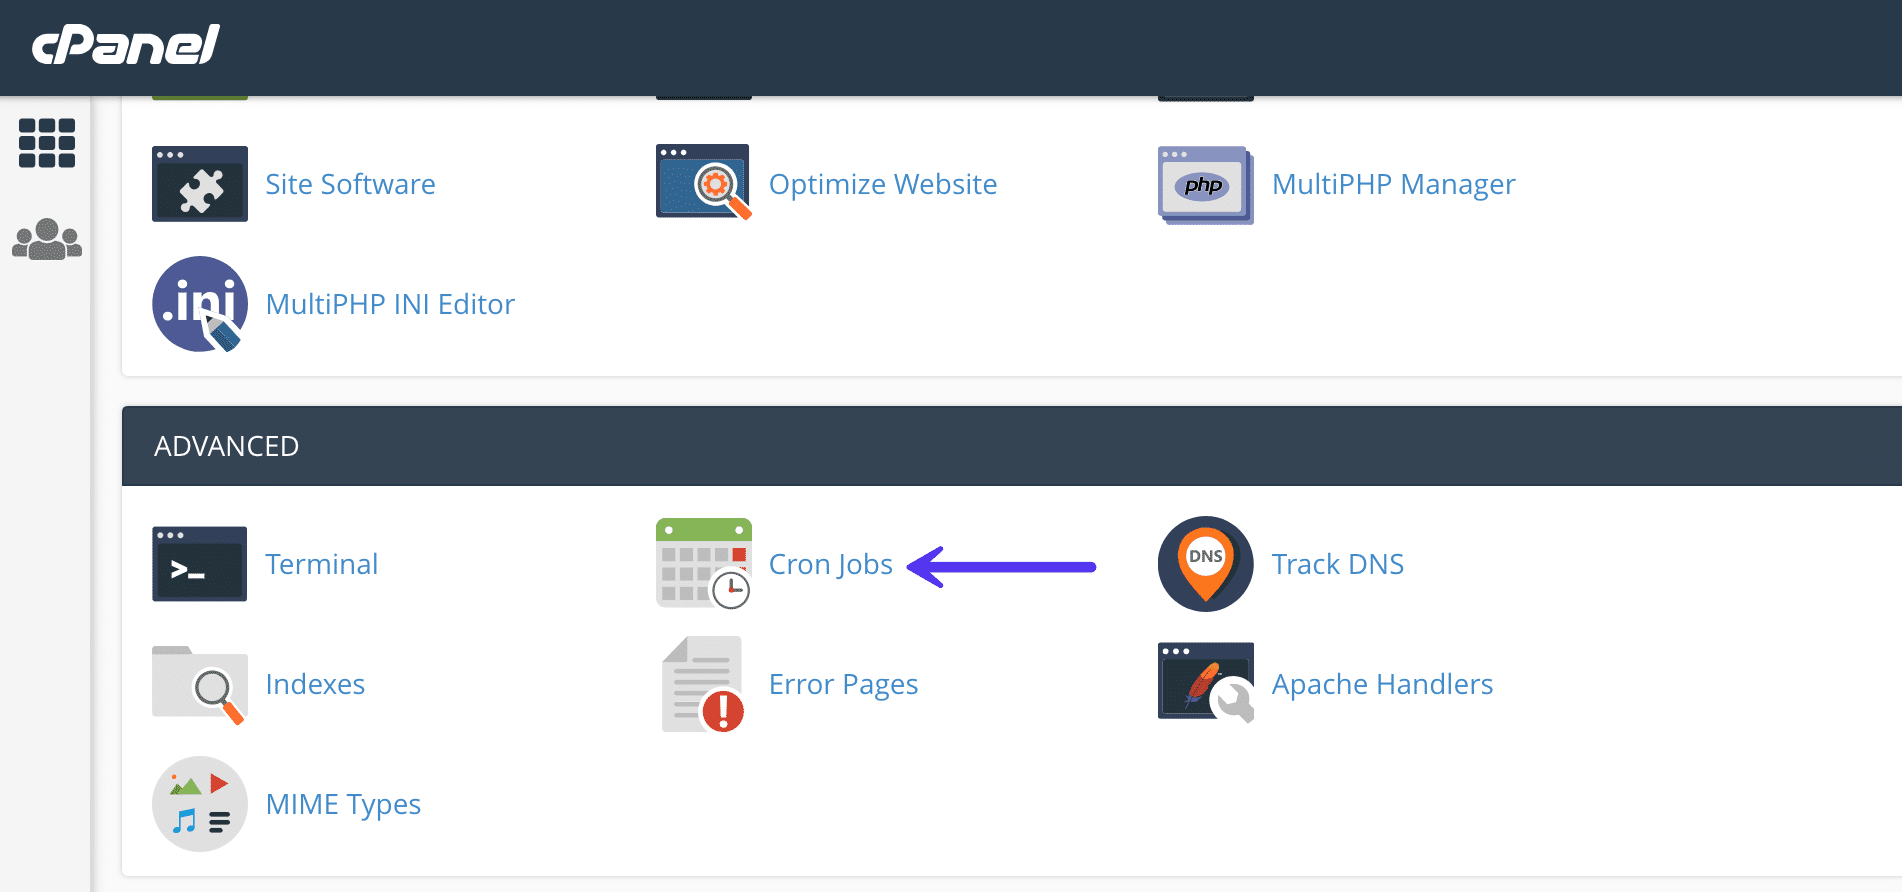
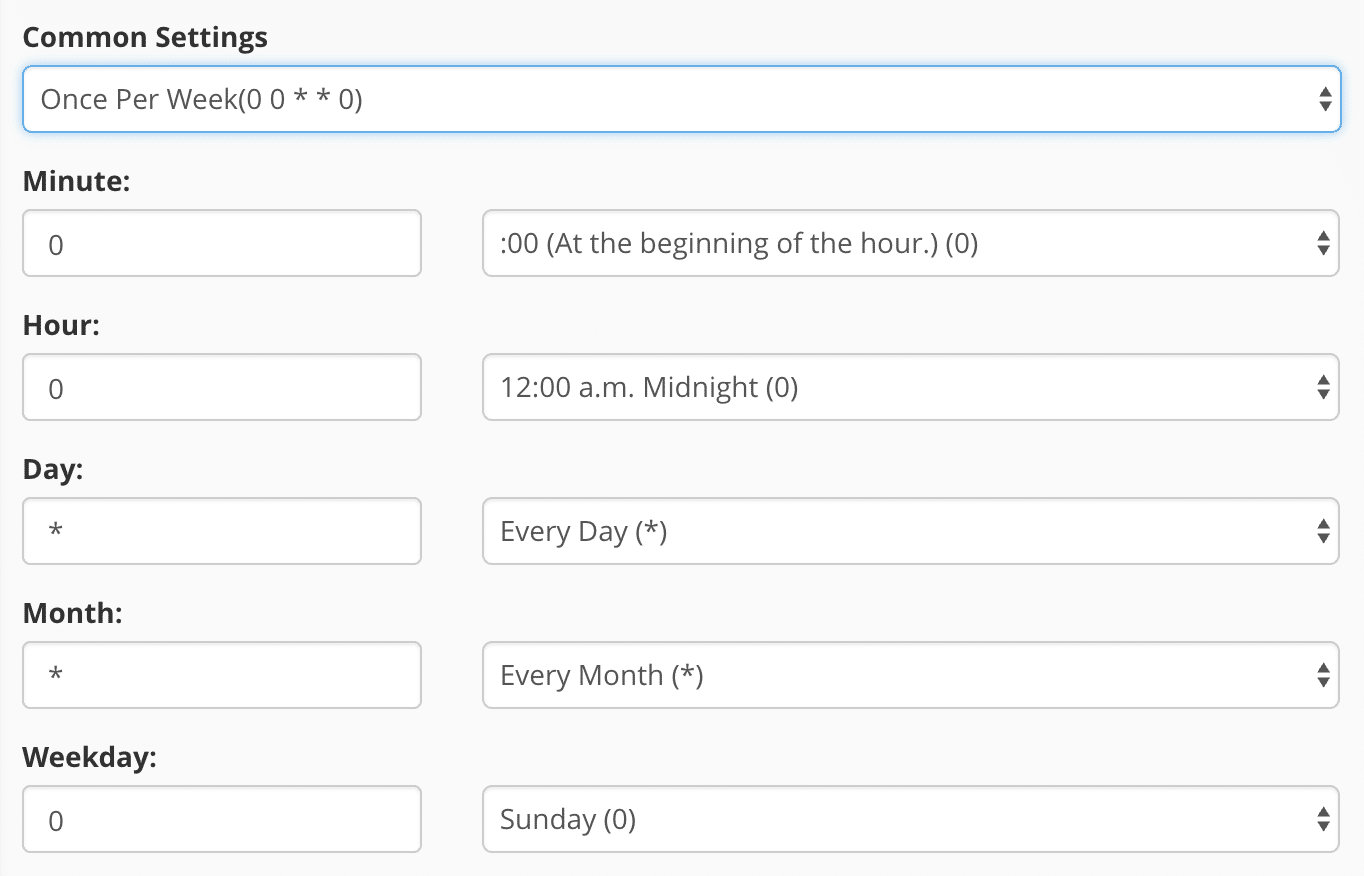
Under the Add New Cron Job section, you can choose from a number of different pre-defined schedules, such as twice per hour or once per week. Your hosting provider most likely has a limit on how often they allow cron jobs to be run. Twice per hour is a common setting for shared hosts.
Add the following command. Replace https://domain.com with your domain name. This command might vary slightly based on how your hosting is configured. Then click on “Add New Cron Job.”
wget -q -O - https://domain.com/wp-cron.php?doing_wp_cron >/dev/null 2>&1

The >/dev/null 2>&1 part of the command above disables email notifications.
Using SSH and Crontab
If you have SSH access to your server, you can set the cron directly in your server’s crontab. This works on any Linux-based server regardless of your control panel.
Connect via SSH and run:
crontab -eThen add one of the following lines (choose one).
Using wget (works on any server):
*/15 * * * * wget -q -O - https://yourdomain.com/wp-cron.php?doing_wp_cron >/dev/null 2>&1Using PHP directly (slightly faster, no HTTP overhead):
*/15 * * * * php /path/to/wordpress/wp-cron.php >/dev/null 2>&1Replace yourdomain.com and /path/to/wordpress with your actual domain and WordPress installation path. The */15 runs the cron every 15 minutes, a good default for most sites.
Using WP-CLI
If you’re using WP-CLI, this is often the cleanest method. WP-CLI’s built-in cron command runs only the events that are actually due, which is more efficient than calling wp-cron.php directly. Add this to your crontab via crontab -e:
*/15 * * * * cd /path/to/wordpress && wp cron event run --due-now --allow-root >/dev/null 2>&1You can also use WP-CLI to inspect your scheduled events at any time without running them:
wp cron event listThis is useful for troubleshooting. It shows every pending cron event, when it’s scheduled to run, and what hook it’s attached to.
Using a Third-Party Tool
If you’re not comfortable with setting up cron jobs on your server or your hosting provider doesn’t provide access, you can also use a third-party solution like EasyCron.
Important: WordPress Multisite Networks
On a multisite network, things work slightly differently.
WP-Cron needs to run for each subsite individually, not just for the main site. If you set up a single server cron pointing to wp-cron.php on the main domain, cron jobs for subsites on different domains or subpaths may not fire reliably.
The cleanest solution is to use WP-CLI, which handles multisite natively:
*/15 * * * * cd /path/to/wordpress && wp cron event run --due-now --url=https://yourdomain.com --allow-root >/dev/null 2>&1For networks with many subsites, you can loop through all of them using:
*/15 * * * * cd /path/to/wordpress && wp site list --field=url | xargs -I % wp cron event run --due-now --url=% --allow-root >/dev/null 2>&1The DISABLE_WP_CRON constant in wp-config.php works the same way on multisite: add it once and it applies across the entire network.
Step 2: Disable WP-Cron in wp-config.php
To disable WP-Cron, add the following to your wp-config.php file, just before the line that says “That’s all, stop editing! Happy blogging.”
define('DISABLE_WP_CRON', true);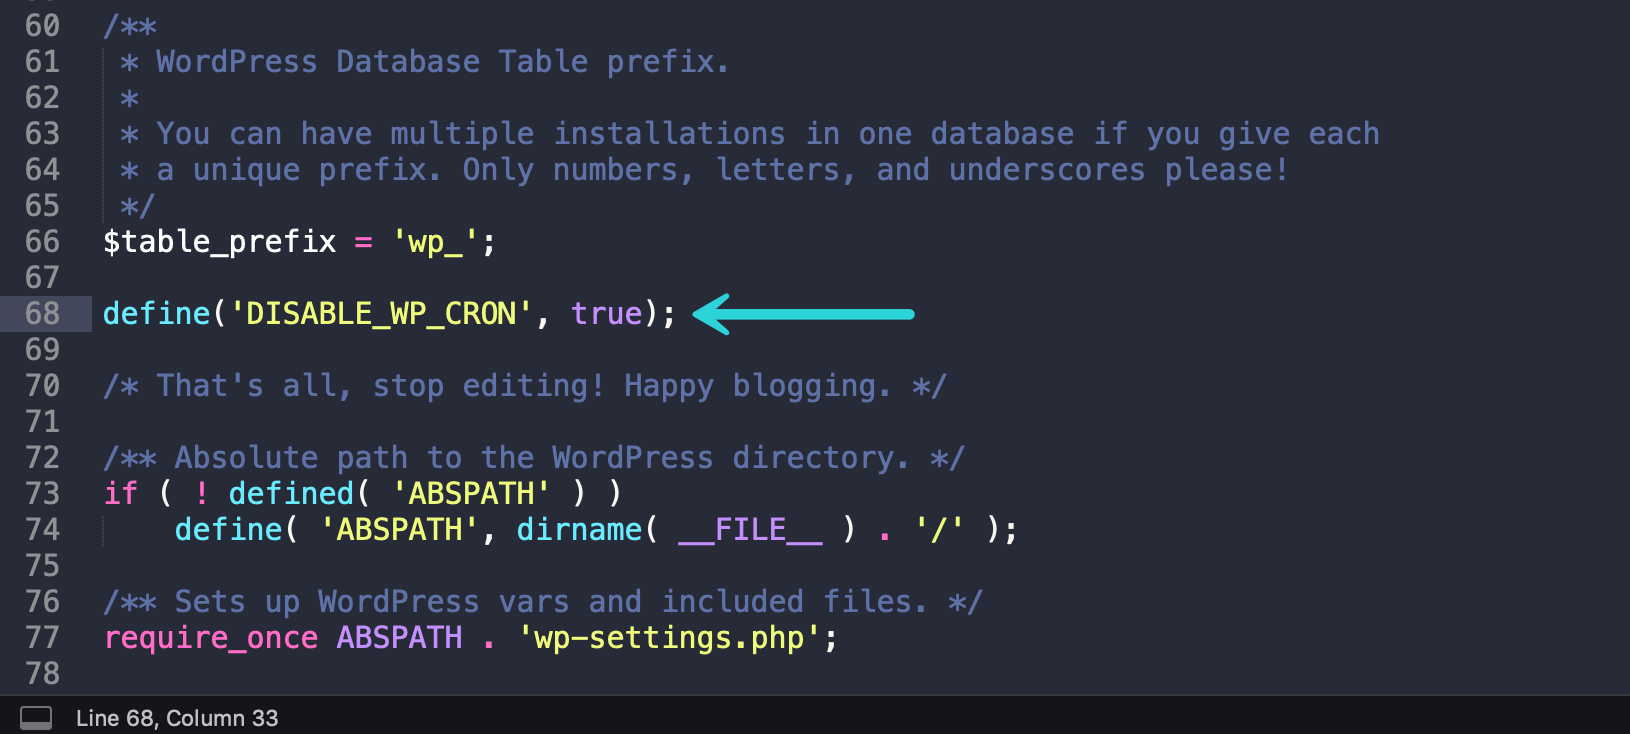
Save the file and that’s it. WP-Cron will no longer fire on page load.
This constant prevents WP-Cron from running on page load. It does not prevent wp-cron.php from being called directly. Your server cron job set up in Step 1 will still be able to trigger it as expected.
How to Verify Everything Is Working
After completing both steps, it’s worth confirming that WP-Cron is actually disabled and that your server cron is firing correctly.
Option 1: Use the WP Crontrol plugin
Install and activate the free WP Crontrol plugin. Go to Tools → Cron Events in your WordPress dashboard. You’ll see a list of all scheduled events. If WP-Cron is properly disabled, you should no longer see events being triggered on every page load, only at the intervals your server cron fires.
Option 2: Check via WP-CLI
Run this command from your server:
wp cron event listThis shows every pending cron event with its next scheduled run time. If the list looks normal and events are clearing between runs, your setup is working.
Option 3: Check your server logs
If you set up a crontab entry, you can temporarily redirect its output to a log file to confirm it’s firing:
*/15 * * * * wget -q -O - https://yourdomain.com/wp-cron.php?doing_wp_cron >> /tmp/wpcron.log 2>&1Check /tmp/wpcron.log after 15 minutes to confirm the job ran. Once confirmed, remove the log redirect.
Summary
Disabling WP-Cron and replacing it with a real server-level cron job is a simple change that improves reliability, reduces overhead, and removes an unnecessary public endpoint.
Or you can skip most of the setup entirely by choosing a host that handles it for you. Managed providers like Kinsta run a server-side cron every 15 minutes by default, so you only need to disable WP-Cron and let the platform take care of the rest.

Brian has a huge passion for WordPress, has been using it for over a decade, and even develops a couple of premium plugins. Brian enjoys blogging, movies, and hiking. Connect with Brian on Twitter.

