Cloudflare is a powerful platform that provides a global content delivery network (CDN), DDoS protection, and performance tools trusted by millions of websites (from small blogs to major brands).
At Kinsta, every site includes Cloudflare integration for free, so you already benefit from its speed and security features without needing to do anything extra. However, if you want more control like managing your own DNS settings, firewall rules, or caching, you can also install Cloudflare manually and connect your own account.
In this guide, we show you how to install Cloudflare on your WordPress site, step by step. You learn how to connect your domain, configure DNS records, and make sure your site runs smoothly with Kinsta’s Cloudflare integration.
Install and configure Cloudflare
This tutorial assumes you have a Cloudflare account. If you don’t, visit the Cloudflare signup page to get started for free.
Step 1: Add your domain
Log in to your Cloudflare dashboard and click + Add. Enter your WordPress site’s domain — you only need the root domain (for example, example.com), not the www or https:// version. Then click Quick scan for DNS records and Continue.
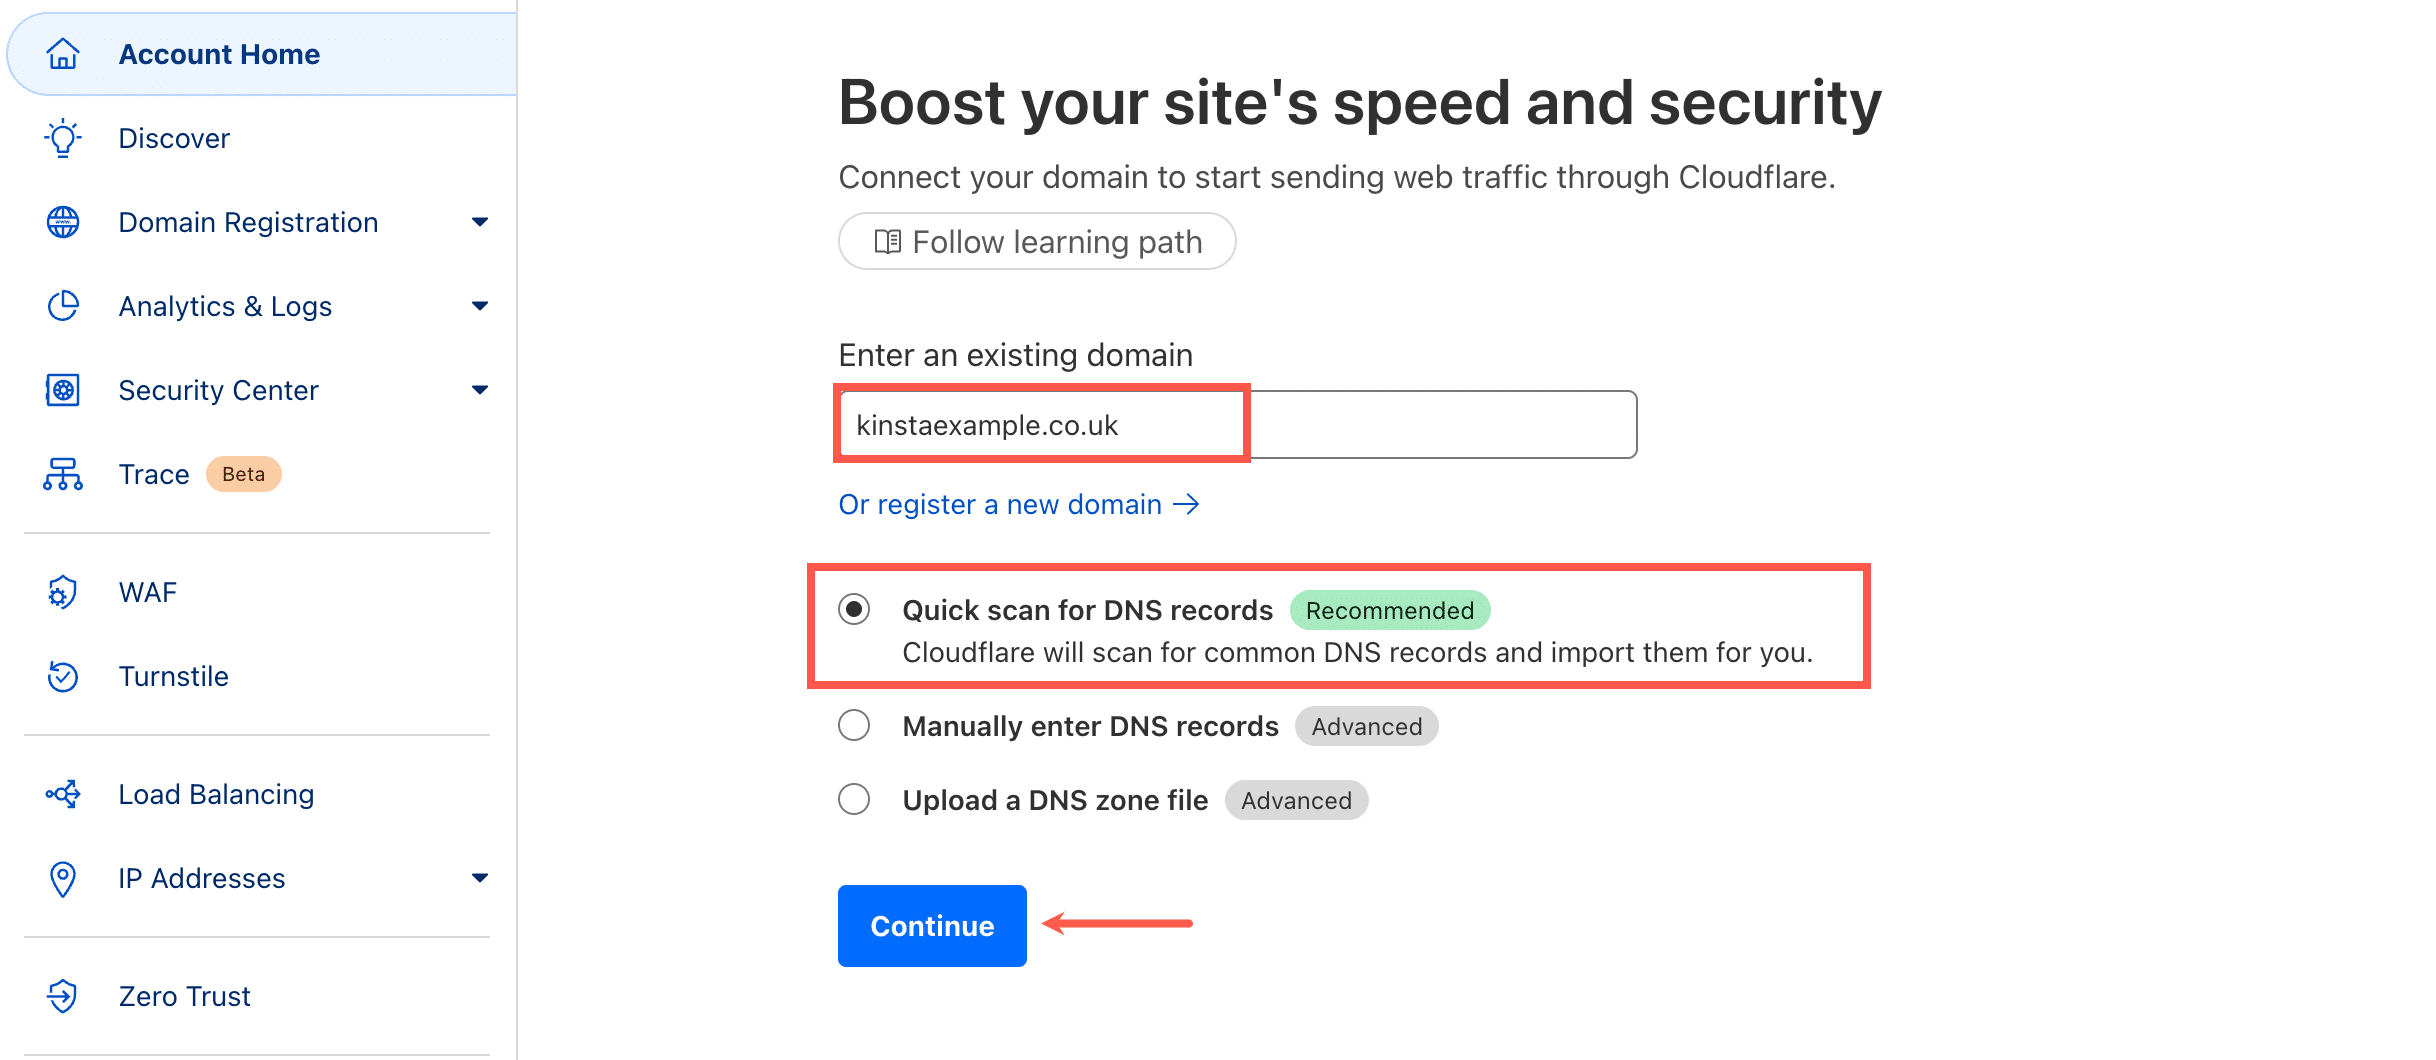
Next, choose a Cloudflare plan for your domain. The free plan works perfectly for most WordPress sites and is fully compatible with Kinsta.
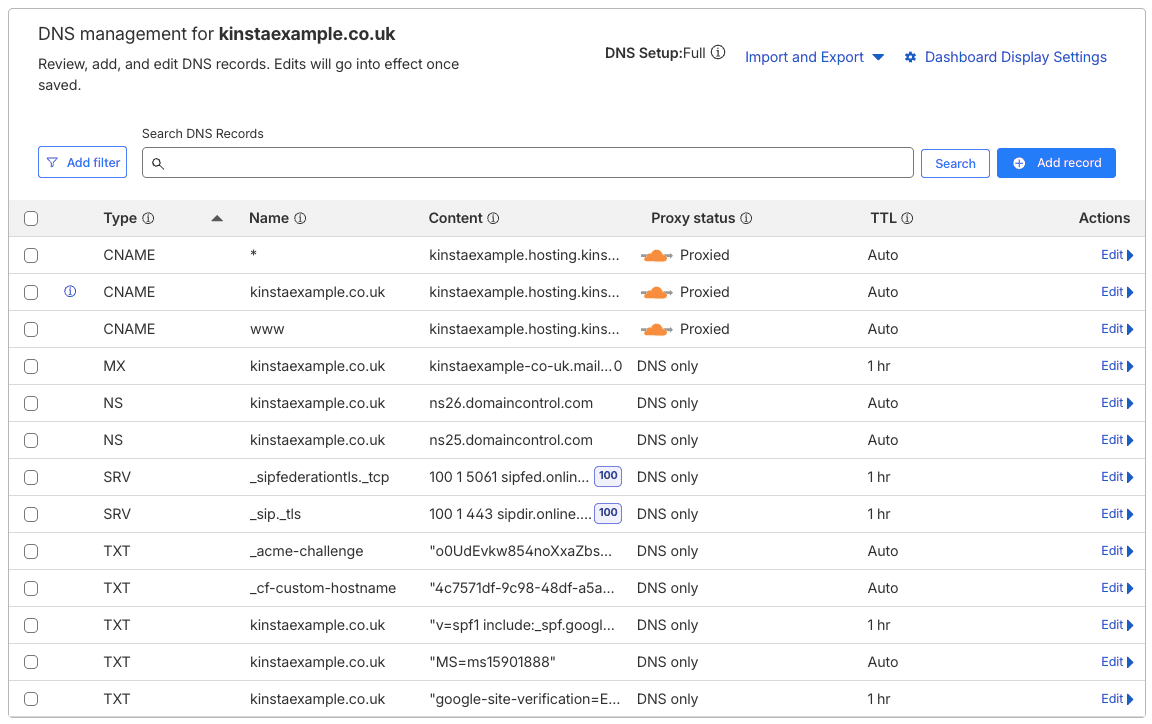
Step 2: Check your DNS records
After scanning your domain, Cloudflare automatically imports your existing DNS records. Take a moment to review them carefully and make sure everything looks correct, especially any mail (MX), TXT, or CNAME records.
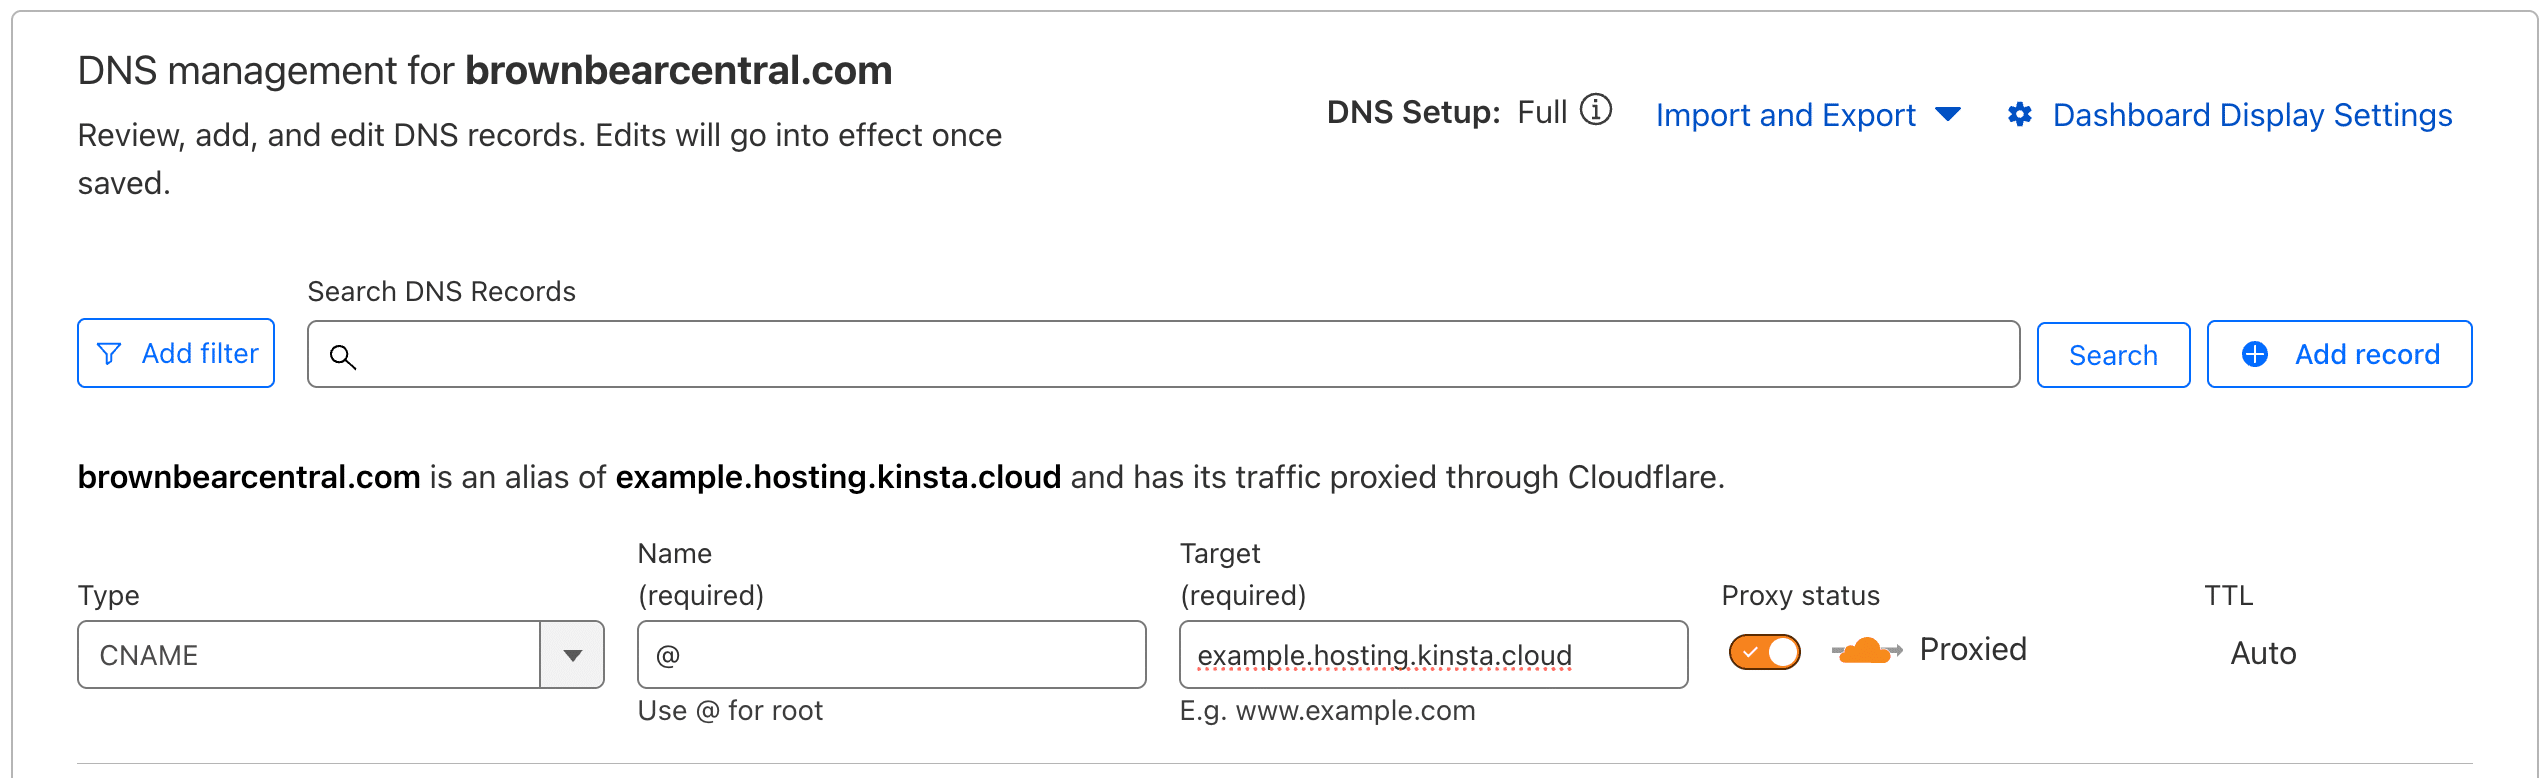
Step 3: Add CNAME records
Connect your domain to Kinsta by adding CNAME records in Cloudflare. These records ensure your domain correctly points to your WordPress site hosted at Kinsta.
Inside your Cloudflare dashboard, go to the DNS > Records tab. Remove any existing A records for your root domain, then add a CNAME record for the root/apex domain, pointing to [sitename].hosting.kinsta.cloud:
Important: To obtain the Kinsta environment [sitename] to be used above, copy the Database name from the Database access section of your site’s Info page in the MyKinsta dashboard:

Be sure the orange cloud (proxy) is enabled for both CNAME records, and click Continue to proceed to the next step.
Step 4: Update your domain’s name servers
You then need to change the nameservers on your domain to point to Cloudflare (use the ones they provide).
Because Cloudflare is a full proxy service, basically how it works is you point your domain to Cloudflare, and Cloudflare then points your domain to Kinsta. There is no downtime when you switch your nameservers. Here are a couple of links to documentation with different domain registrars on how to change them.
- How to change nameservers with Namecheap
- How to change nameservers with GoDaddy
- How to change nameservers with Bluehost
Then click Continue.
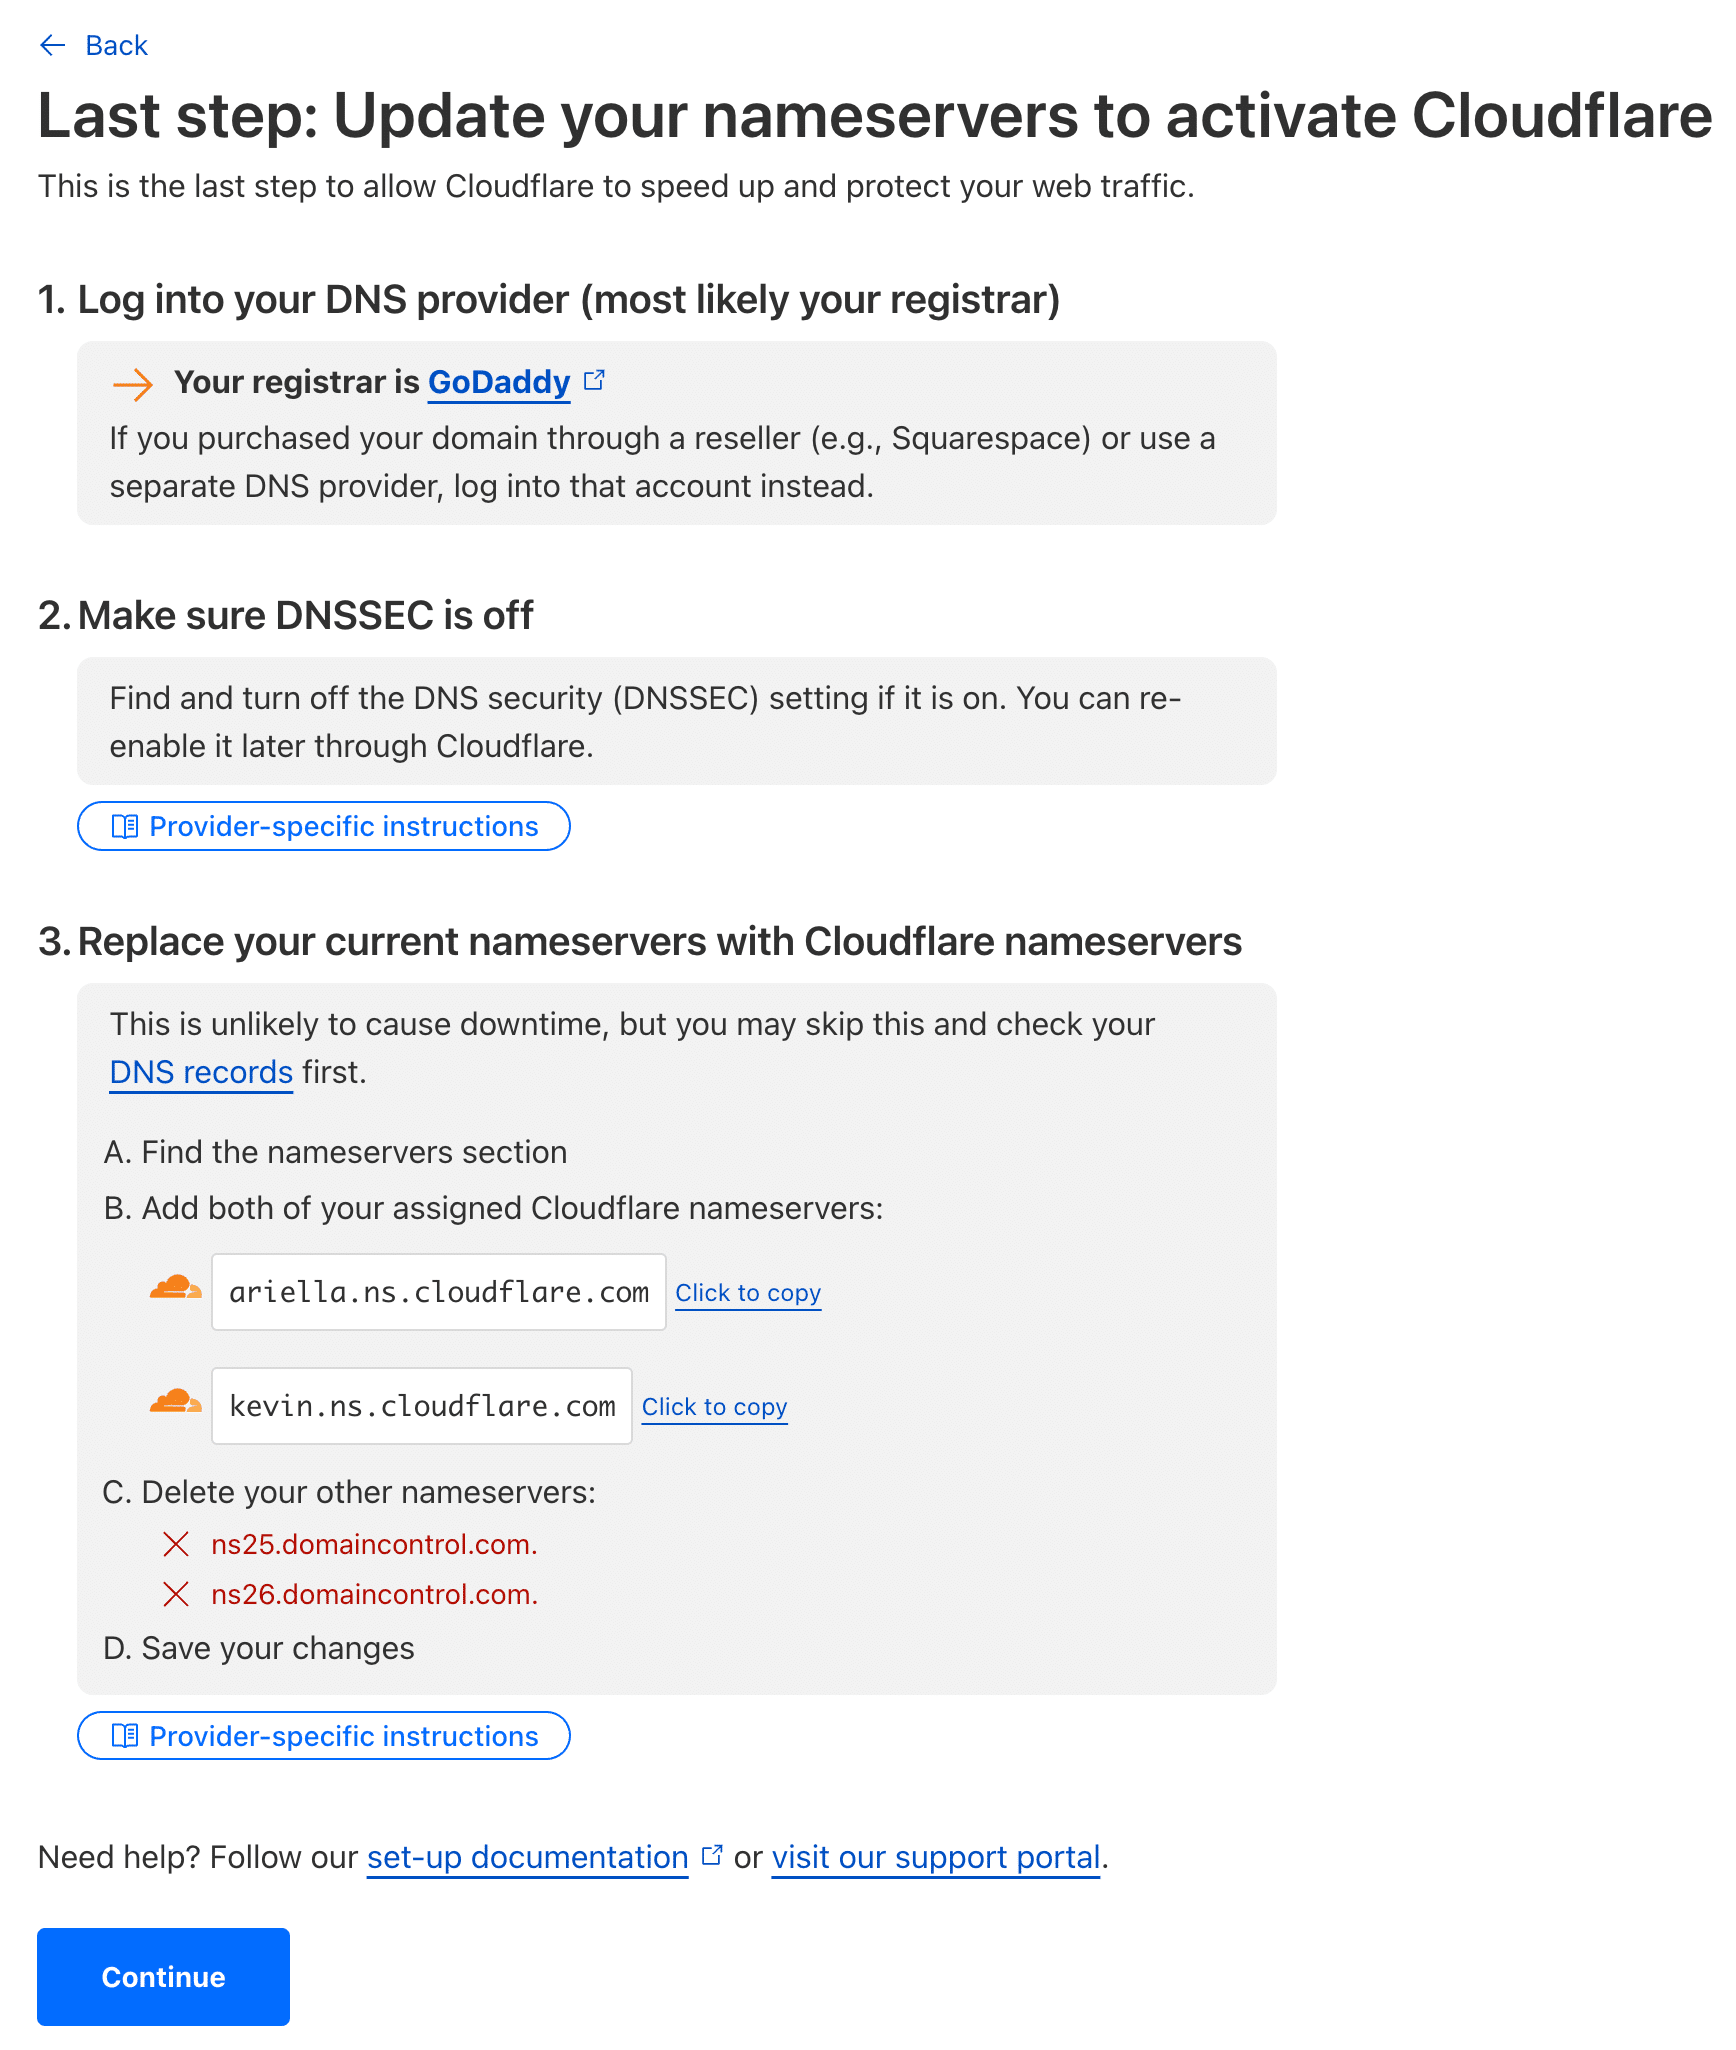
This shouldn’t take very long, but allow up to 24 hours for this change to be processed.
Step 5 (Optional)
There is an additional step for WordPress users which we do recommend. It is not required, but certain things with Cloudflare might not function properly if you don’t install the official Cloudflare plugin.
You can download it from the WordPress repository or by searching for it within your WordPress dashboard under “Add New” plugins. It features the following:
- Fix for WordPress comments appearing from the same IP address
- Automatic cache purging
- Header rewrite to prevent a redirect loop when Cloudflare’s Universal SSL is enabled
- Ability to change settings on Cloudflare account from within the plugin itself (cache purge, security level, image optimization, etc.)
- View analytics such as total visitors, bandwidth saved, and threats blocked
- Support for HTTP2/Server Push
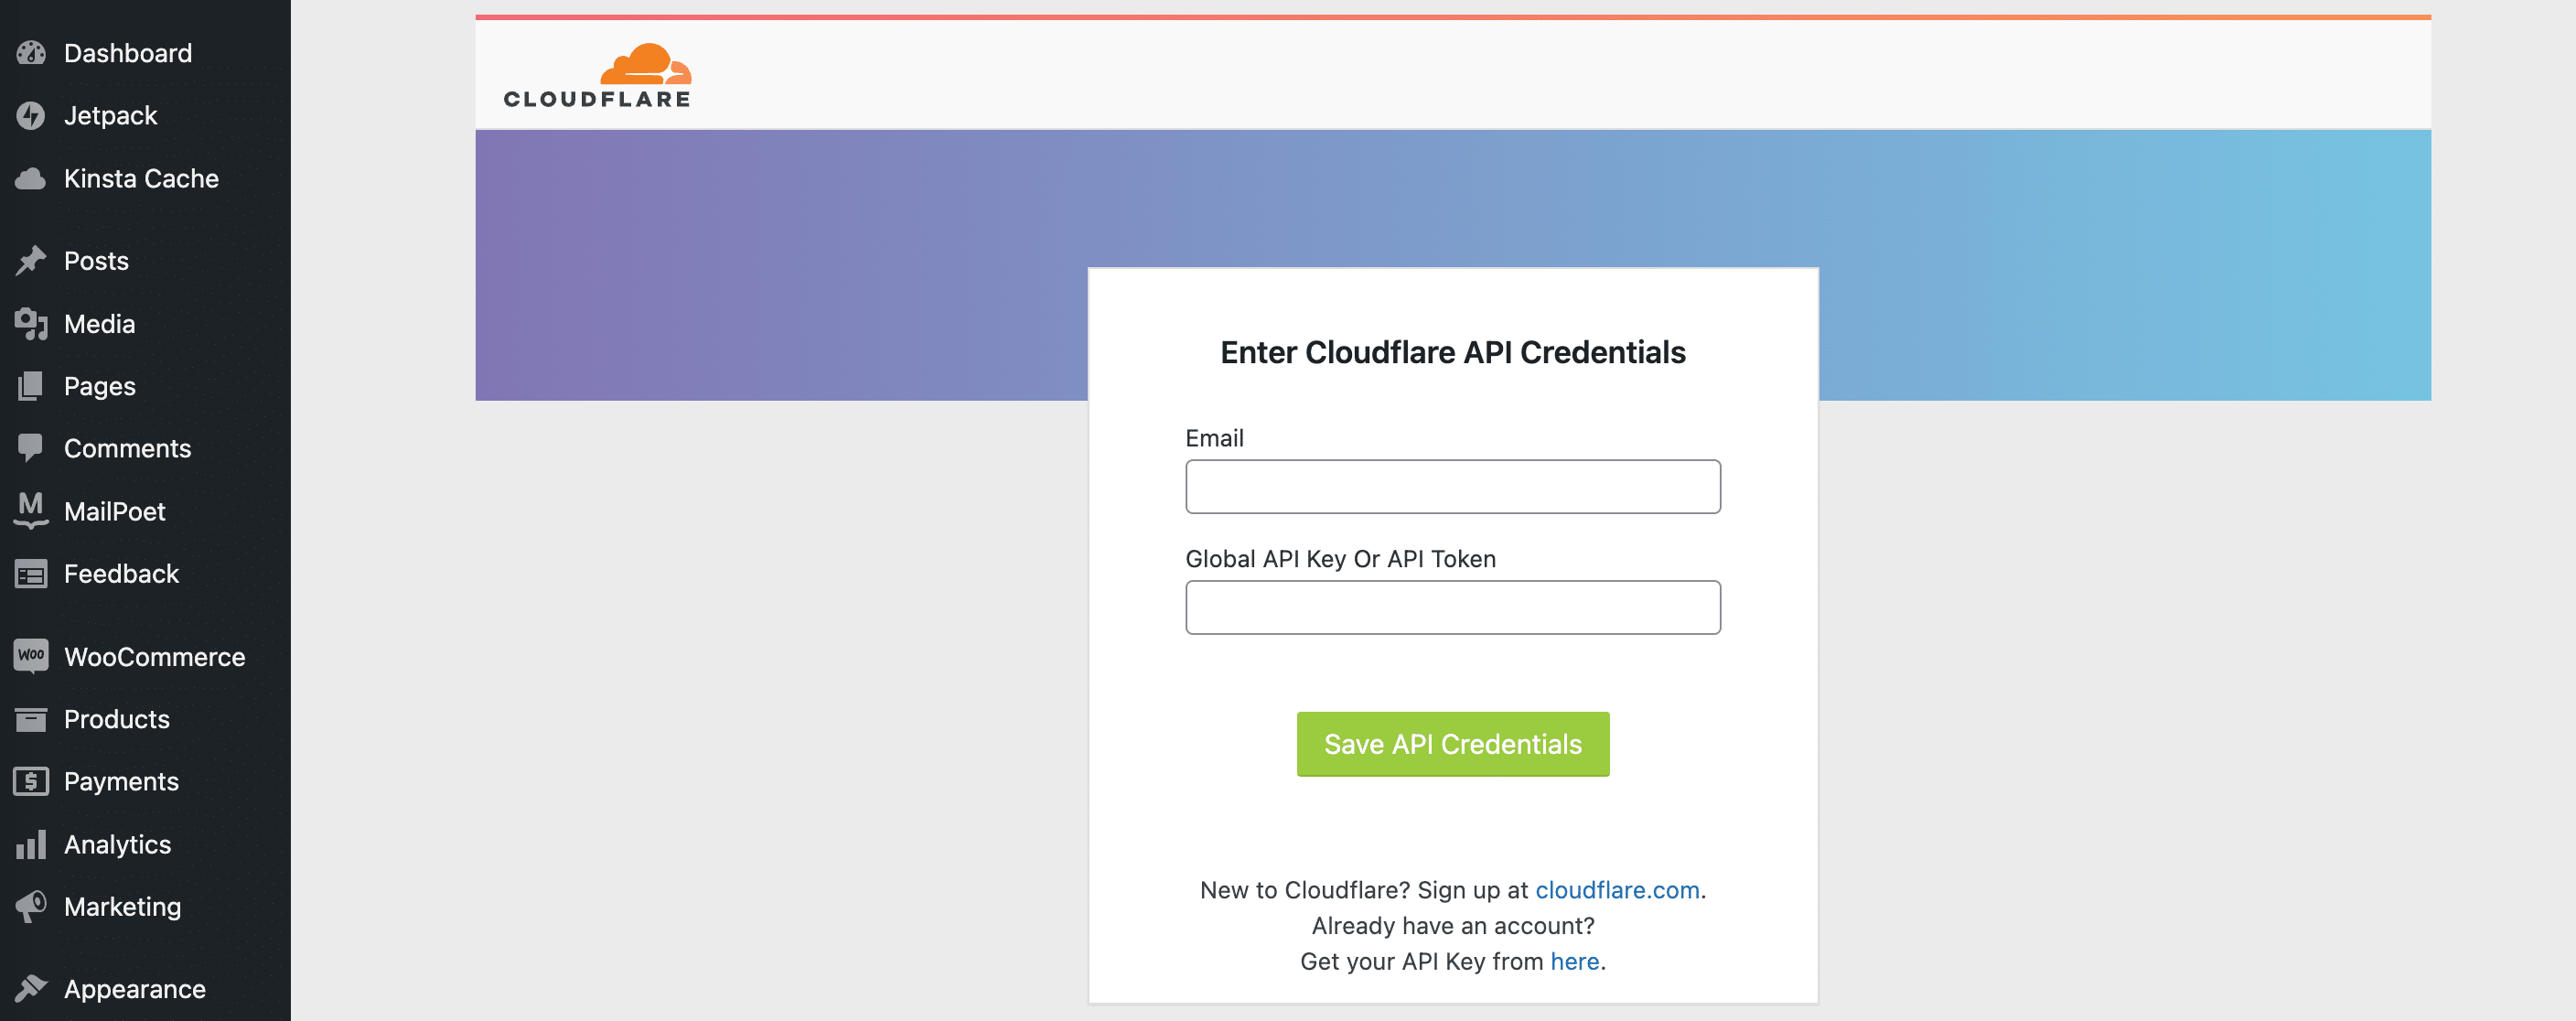
After you install the plugin you need to input your Cloudflare email address and API key in the settings. You can grab your API key here. Copy the one that says “Global API Key.” Then click on “Save API Credentials.”
Under the “Home” tab you apply the default settings or update settings as you prefer.
In the Settings tab, there are more advanced options, including:
- Image optimization (available on Cloudflare Pro plans)
- Development mode for testing changes without cache interference
- Security level adjustments
- Automatic HTTPS rewrites to prevent mixed content issues
Finally, the Analytics tab gives you an overview of your site’s Cloudflare activity — including requests, bandwidth usage, visitor data, and blocked threats.
Common Cloudflare Problems
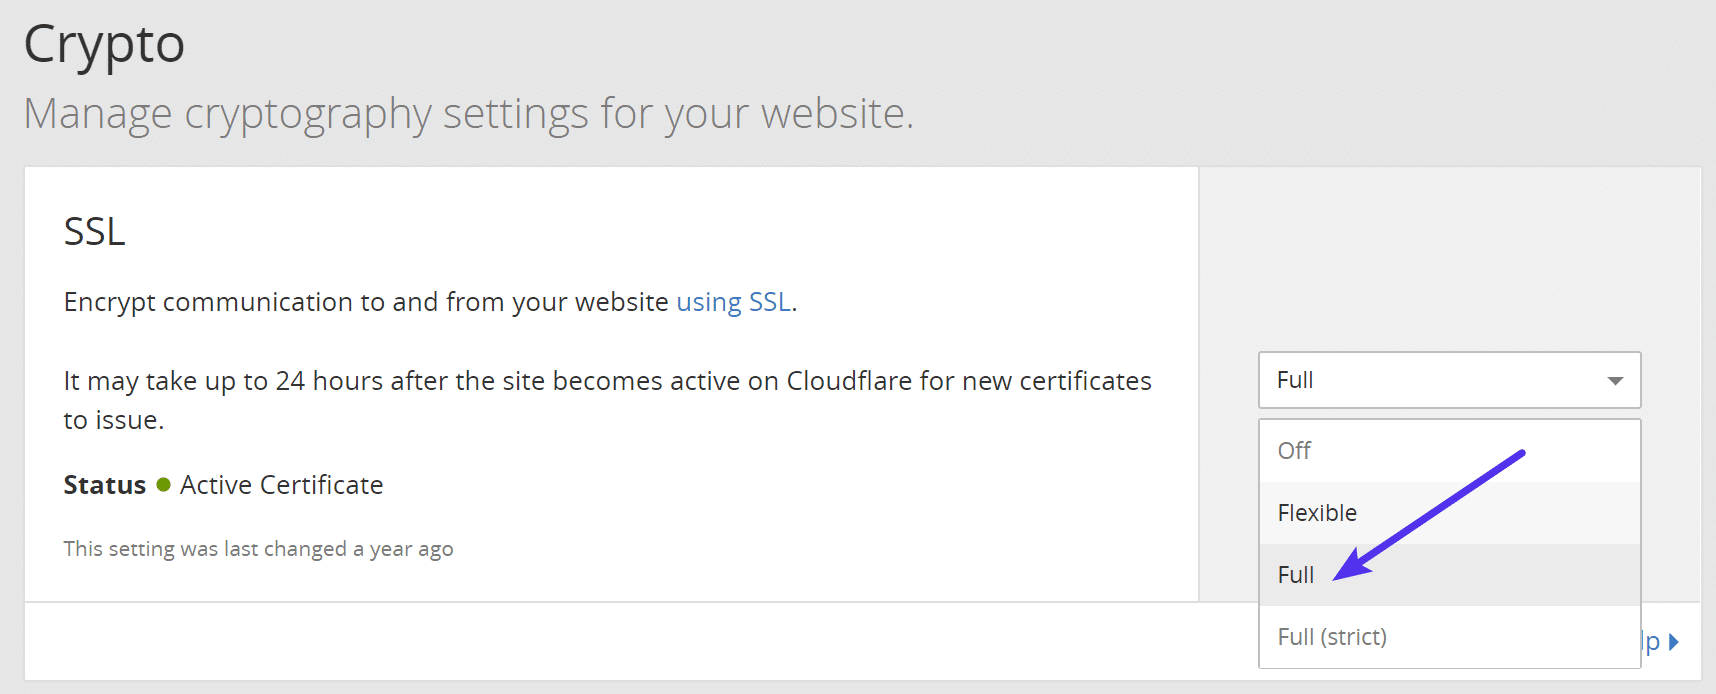
A very common error that users get when trying to install Cloudflare on their WordPress site is “ERR_TOO_MANY_REDIRECTS” in Chrome or “The page isn’t redirecting properly” (Firefox).
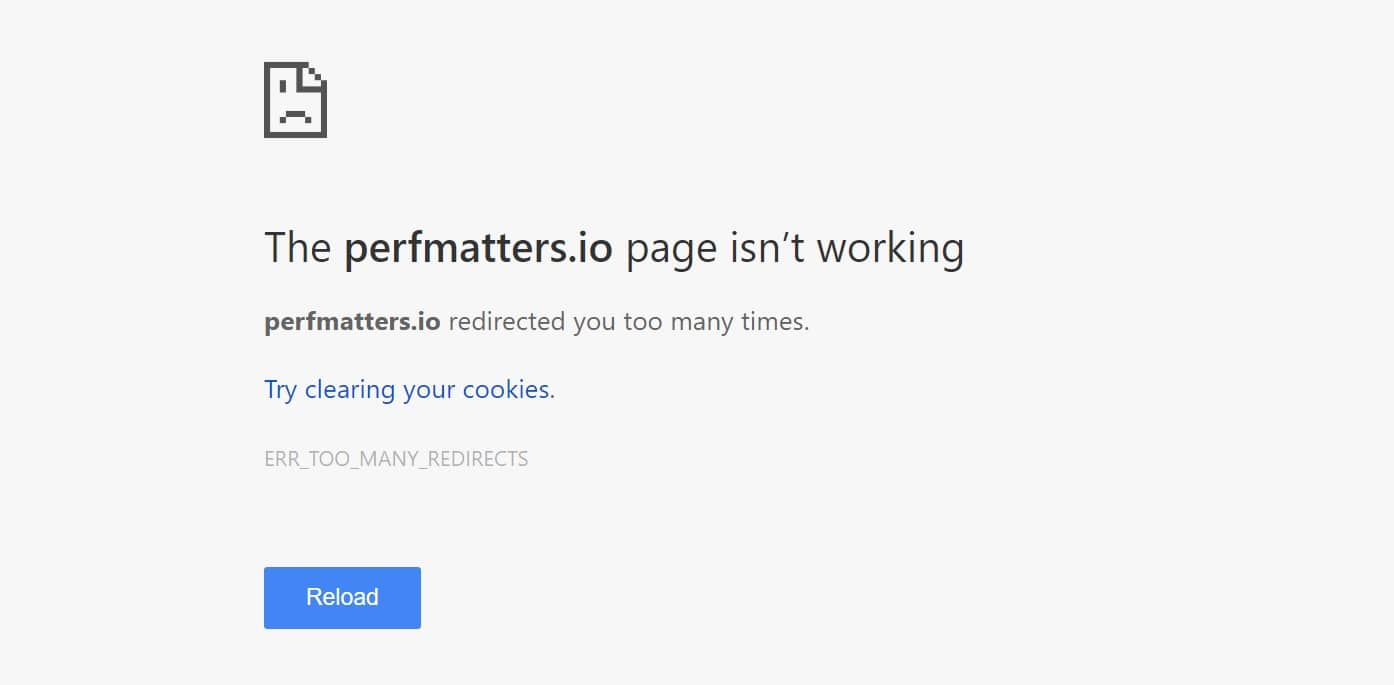
This is due to having SSL setup on your web server already and then having Flexible SSL enabled with Cloudflare. If you have an SSL certificate with your web host (Kinsta) already, then you will want to switch the SSL mode to full.
Otherwise, you can create a page rule to fix this issue.
How to clear Cloudflare cache
Running into problems? There will be times when you need to clear (purge) Cloudflare cache. There are two easy ways to do this.
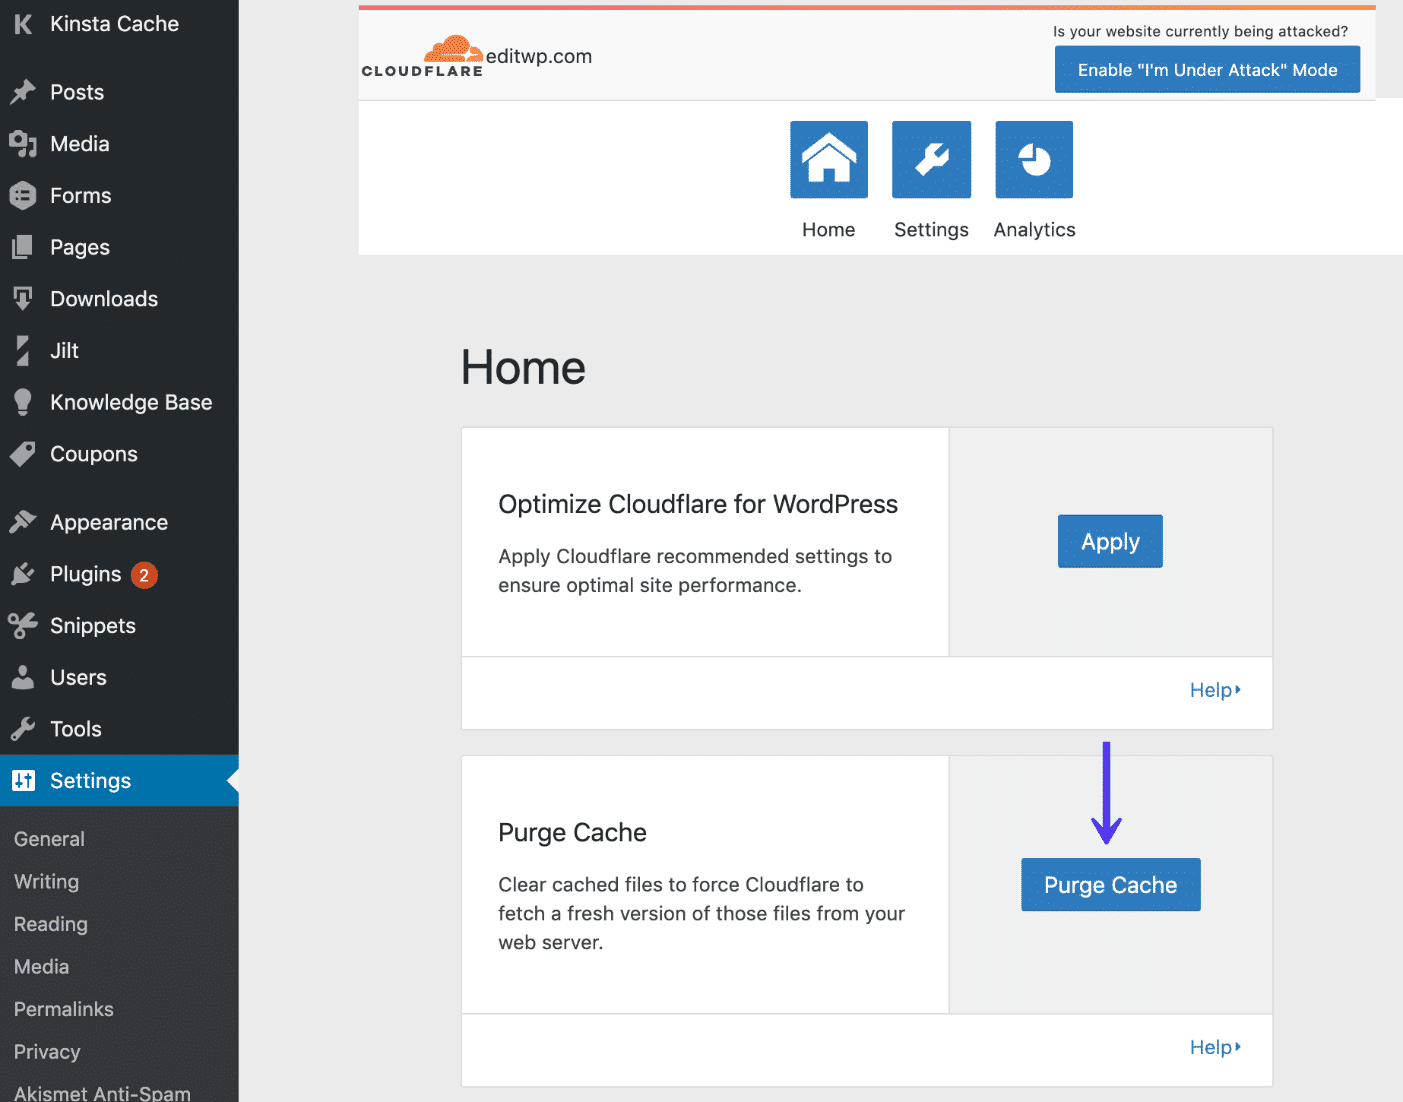
Option 1 – Clear Cloudflare cache in WordPress plugin
If you have the Cloudflare WordPress plugin installed, you can purge the cache from Settings > Cloudflare.
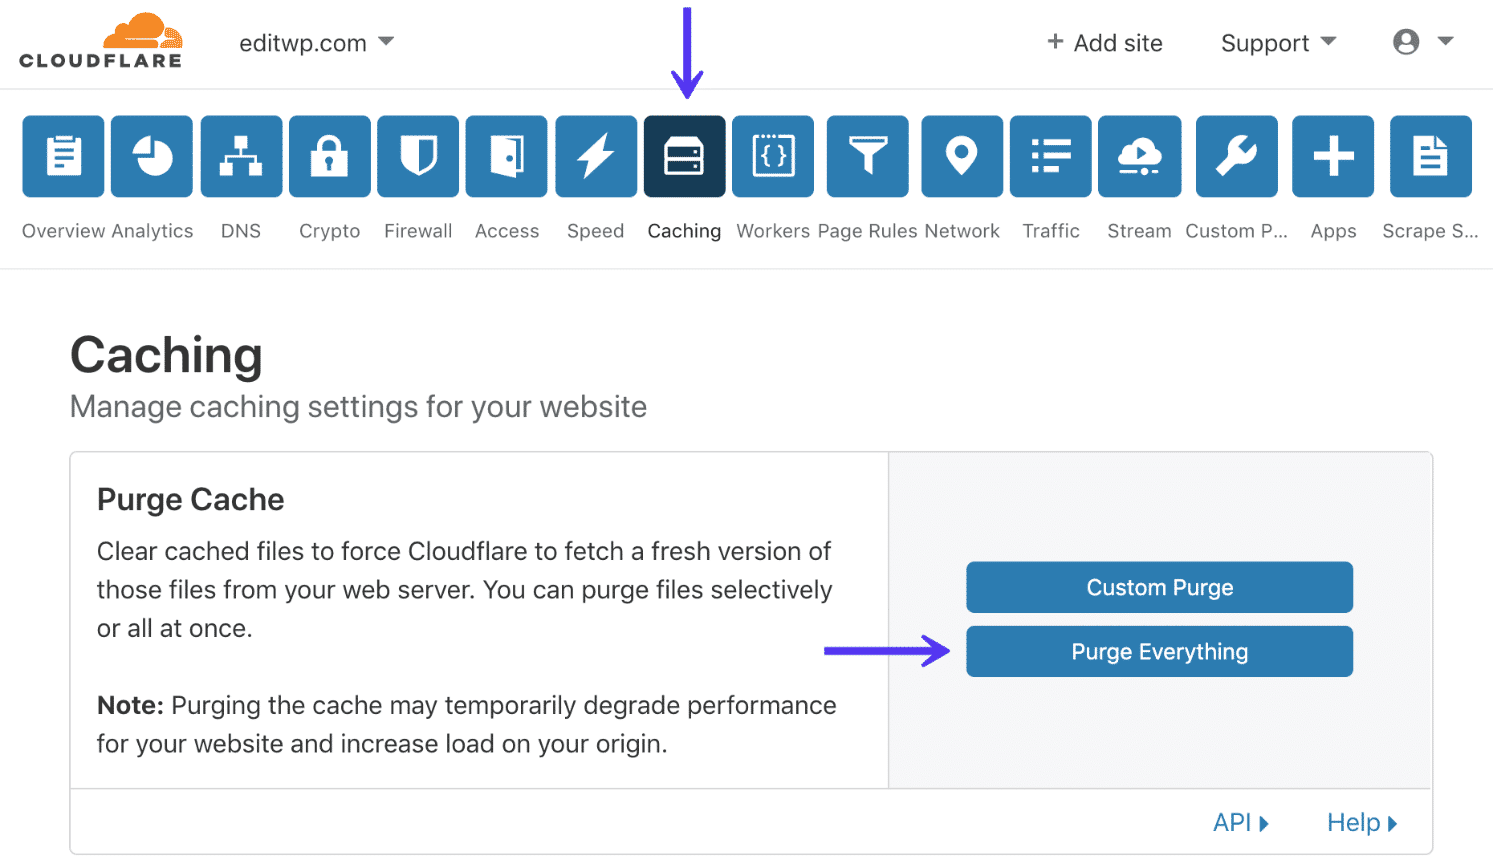
Option 2 – Clear Cloudflare cache from control panel
Your other option is to clear Cloudflare cache from their control panel. To do so, click into the Caching tab and then “Purge Everything.”
Once you have everything up and running smoothly, it’s better to only purge the cache of individual files. Cloudflare provides an easy way to do this.
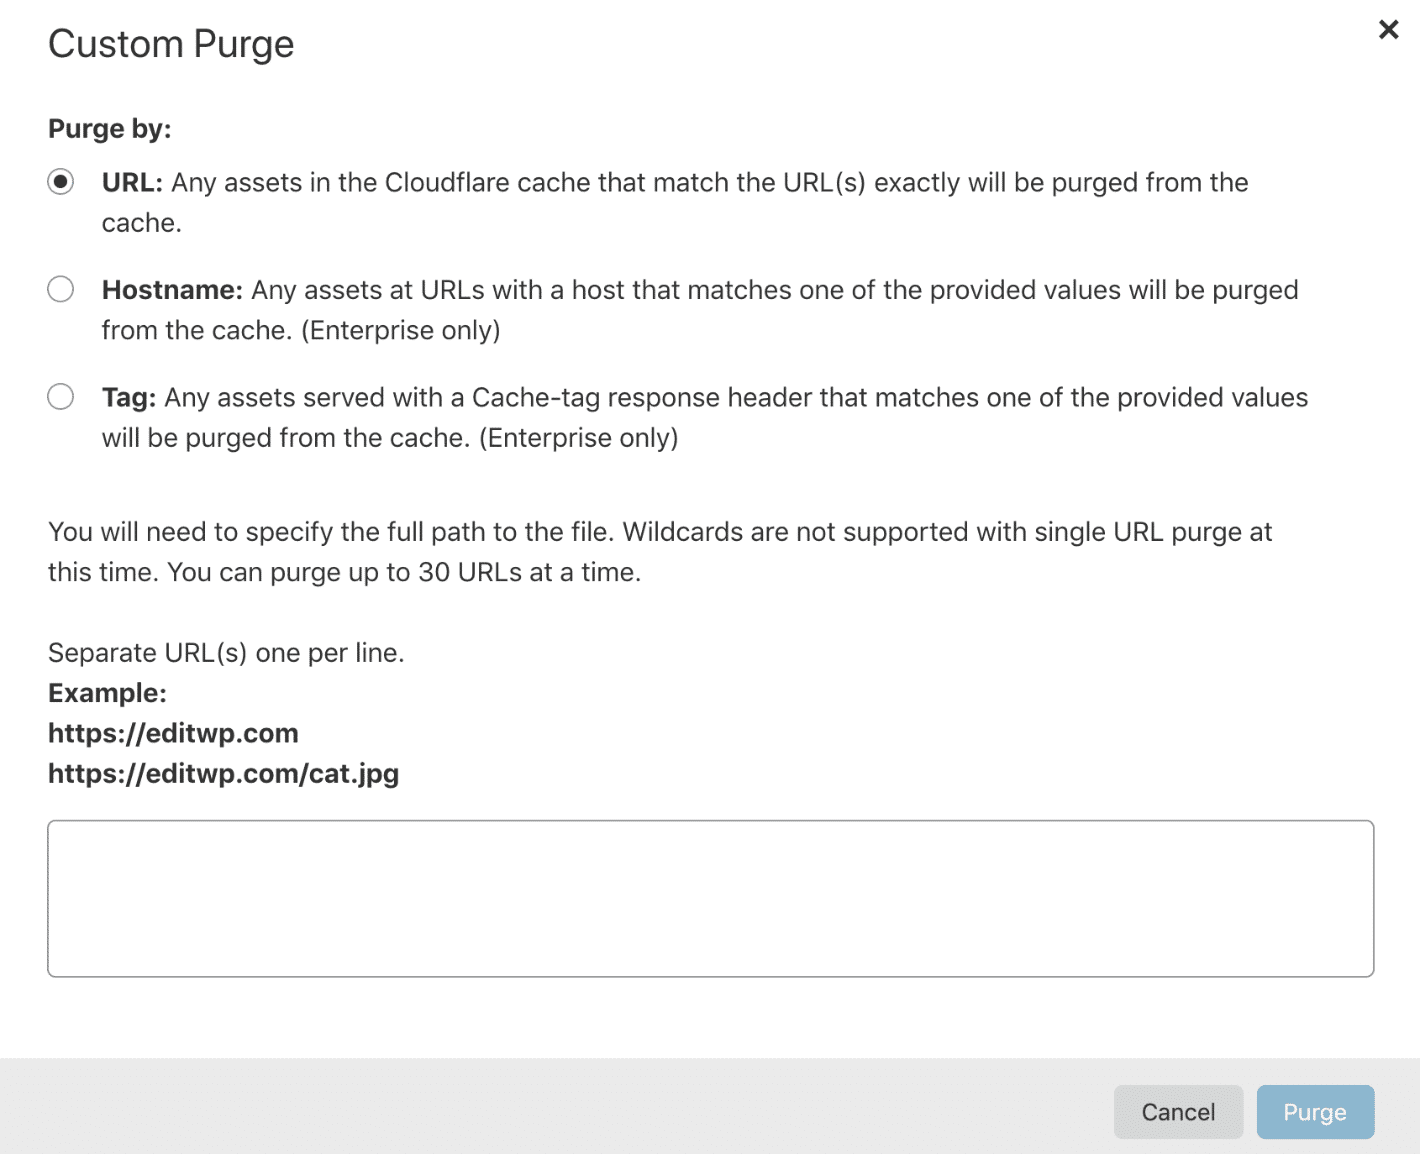
Note: If you purge everything, you may temporarily degrade performance on your website as assets have to re-cache. However, sometimes this is unavoidable, especially if you aren’t sure exactly what script or asset on your site needs to be refreshed.
Summary
Now that you know how to install Cloudflare, we recommend checking out our detailed post on the best settings for WordPress users.
You can also check out how much bandwidth your WordPress site uses vs the CDN and learn about Cloudflare’s Automatic Platform Optimization (APO) tool.

Brian has a huge passion for WordPress, has been using it for over a decade, and even develops a couple of premium plugins. Brian enjoys blogging, movies, and hiking. Connect with Brian on Twitter.