When you search for “what is a slug?”, Google serves back images of slimy gastropods. But that’s not what we’re interested in for this post. Instead, we’ll be digging into everything about what a WordPress slug is, along with how to use them correctly on your site.

What is a WordPress Slug?
In WordPress, a slug is the bit of text that appears after your domain name in the URL of a page. Essentially, it’s the part of your site’s URL that identifies every single page on your site (except for the homepage). For example, on this glossary entry, it’s “wordpress-slug”. You can see this in the actual URL below:

Sometimes, as in the example above, you’ll actually have two slugs back-to-back. The “knowledgebase” part of the URL represents the slug for our Knowledge Base section and the “what-is-a-slug” part represents the slug for the specific post.
By default, every single public page on your WordPress site, including posts, pages, categories, and author archives, has its own slug. And in one form or another, you have full control over every single slug on your WordPress site.
Slugs play an important role in search engine optimization and usability, so they are definitely something you want to consider.
How to Set Slugs in WordPress
Below, we’ll show you how to set slugs for various parts of your WordPress site. If you need to skip ahead to a specific section, you can use the links below:
- How to Set Post Slug
- How to Set Page Slug
- How to Change Category or Tag Slug
- How to Change Author Slug
What Can You Put in WordPress Slugs?
Because slugs are part of a site’s URL, you should follow some basic best practices:
- Replace spaces with dashes
- Use only lowercase letters
WordPress will actually automatically correct these issues for you. We mention them only so that you’re not confused when WordPress replaces spaces with dashes or makes your capital letters lowercase (check out the different ways in which you can do a search and replace on your own).
How to Set WordPress Post Slug
You can set the slug for a WordPress post whenever you’re creating or editing a post. If you’re writing a new post, be sure to save it as a draft first. Click on the Title box, and you’ll see a box containing the Permalink URL with an Edit icon.

When you click Edit, you’ll be able to edit the slug portion of the URL.

When you’re finished, click Save and make sure to Publish or Update your post. And remember that Google likes WordPress sites that are clean, organized, and structured; this includes using short URLs and or slugs. They can also help improve your CTR. MarketingSherpa ran a study and they discovered that executives are 250% more likely to click on an organic listing if it:
- Had a fairly short slug
- Appeared directly below a listing with a long slug
So keeping your slugs as short as possible can be an enormous competitive advantage. The one thing to keep in mind is that WordPress automatically creates a slug for you based on the title.
How to Set WordPress Page Slug
As with a post, you can set a WordPress page’s slug by looking for the Permalink URL and clicking Edit:
Enter your desired slug, click Save, and make sure to Publish or Update your page.
How to Change WordPress Category or Tag Slug
When you create a new category or tag from inside the WordPress Editor, WordPress automatically assigns that item a slug without any input from you. But if you’d prefer to manually set the slug for a category or tag, you can always go back later and change the slug. The process is essentially identical for both categories and tags.
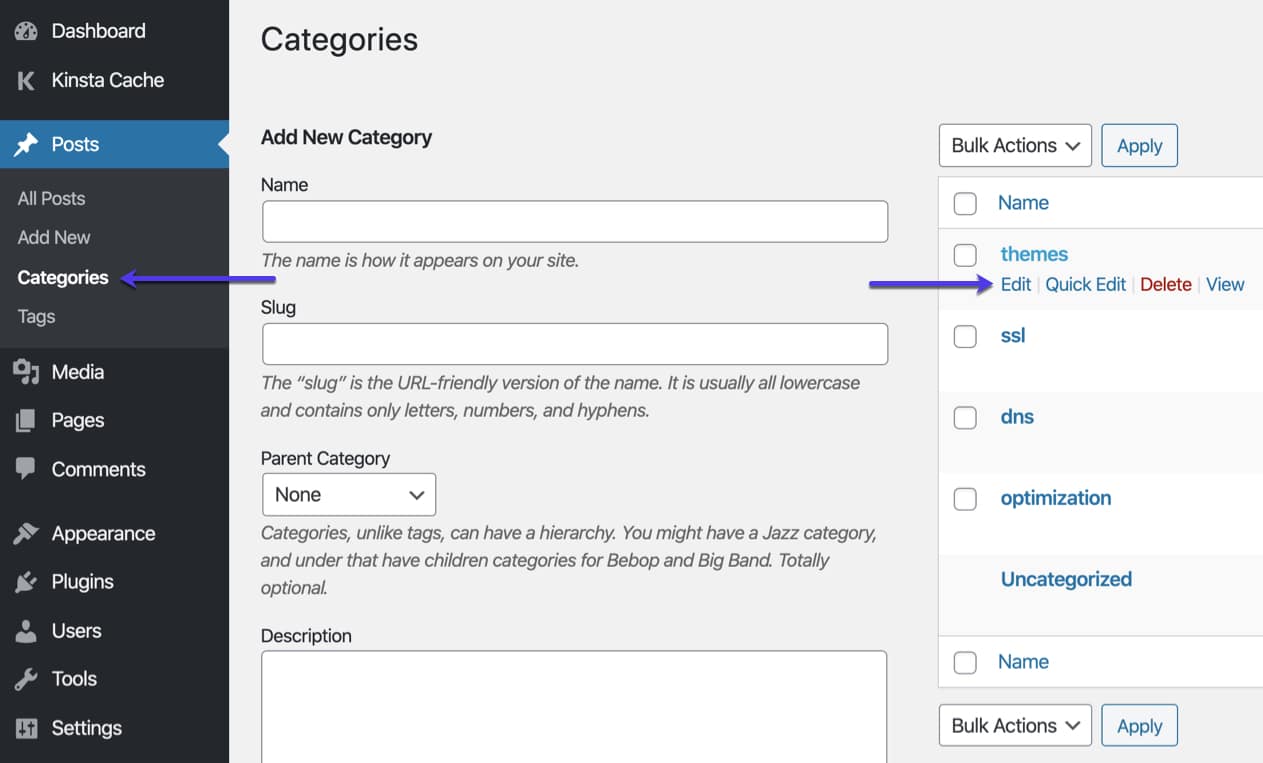
Go to Posts → Categories (for categories) or Posts → Tags (for tags). Then, look for the category or tag you want to edit, hover over it, and click the Edit button.

Enter your desired slug in the box and make sure to click Update at the bottom of the page:

How to Change WordPress Author Slug
By default, the author slug for an author’s archive page is their username. Unfortunately, you cannot change a WordPress account’s username after it’s been created. But what you can do is use a free plugin to change the WordPress author slug.
Once you activate the plugin, you’ll get a new Edit Author Slug box on a user’s profile page that lets you change the author’s archive slug.
Be Careful Changing WordPress Slugs At a Later Date
One area you need to be careful with is changing the slug for content after you’ve created it. Whenever you change the slug for a piece of content, anytime someone tries to reach that content by visiting the URL with the original slug, they might have trouble accessing your content.
For posts and pages, WordPress will try to automatically redirect users to the new slug. And while this works most of the time, it doesn’t always work. In which case you will need to setup a redirect to your new URL. Why? Because you don’t want the visitors to end up on a 404 page, and for SEO purposes you will want to retain any link juice that the page/slug has built up by using a 301 redirect.
If you are a Kinsta user you can easily implement 301 redirects from right within the MyKinsta dashboard. Or you can utilize a free WordPress plugin like Redirection or Safe Redirect Manager.
Also, WordPress doesn’t even try to redirect slugs that have changed for categories or tags. For that reason, you should try to avoid changing slugs later on whenever possible.
How Are Permalinks and Slugs Related?
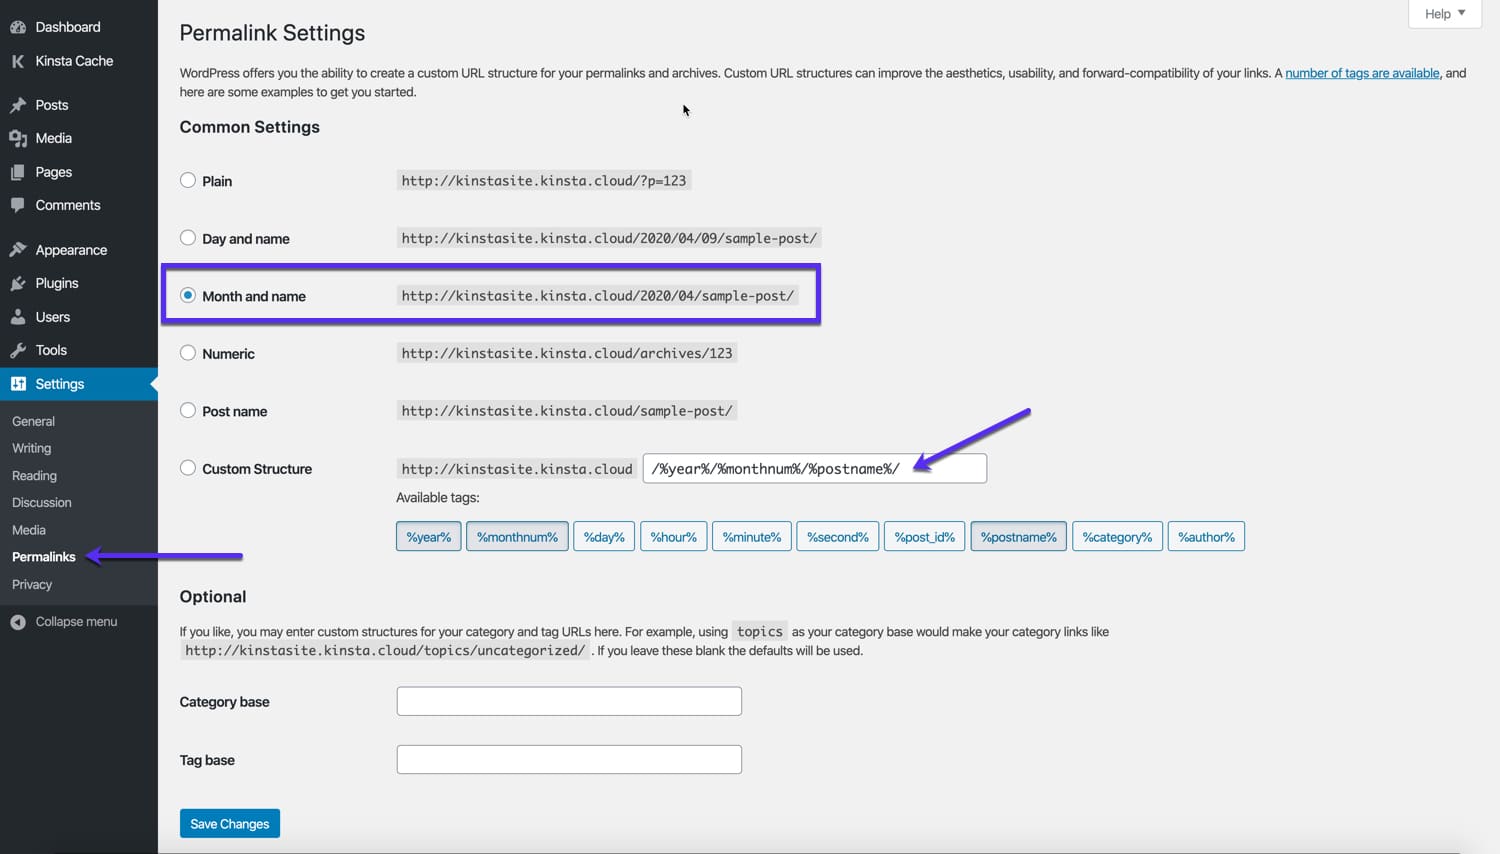
Permalinks help you set your entire site’s URL structure. Essentially, they tell WordPress where to put each individual slug that you manually set. You can access your permalinks by going to Settings → Permalinks.
For example, if you make your permalink structure Month and name, WordPress will append your slug after the year and month when the post was published:

The %postname% part of the permalink structure is what WordPress replaces with your post’s slug. Most of the time, it’s best to use the Post name permalink structure. With this configuration, the only thing that appears after your domain name is the slug that you set.

As with individual WordPress slugs, you need to be careful changing your permalink structure if your site is already receiving traffic.
A few more recommended tutorials from our blog:
Best SEO Plugins for WordPress (And Must-Have SEO Tools)
60 SEO Tips That Grew Our Traffic to >4M (+280% Growth)


