
Laravel is a PHP web application framework with an expressive, elegant syntax. It has a vast library of packages and handles much of the drudge work in programming, leaving you to focus on your creativity.
One creative use for Laravel is the construction of a personal blog. This tutorial describes how to use Laravel to build and publish a blog on Kinsta.
For a preview of the project, check out the complete project code.
Prerequisites
To follow this tutorial, ensure you have the following:
- A web server. This tutorial uses XAMPP.
- An account on GitHub, GitLab, or Bitbucket for publishing your application’s code.
- Laravel installed.
- An active MyKinsta account for application hosting. Sign up for a free trial if you don’t already have one.
Ensure that the Apache and MySQL module services are running in the XAMPP Control Panel. If not, click each service’s Start button in the Actions column. Your XAMPP Control Panel should look like this:
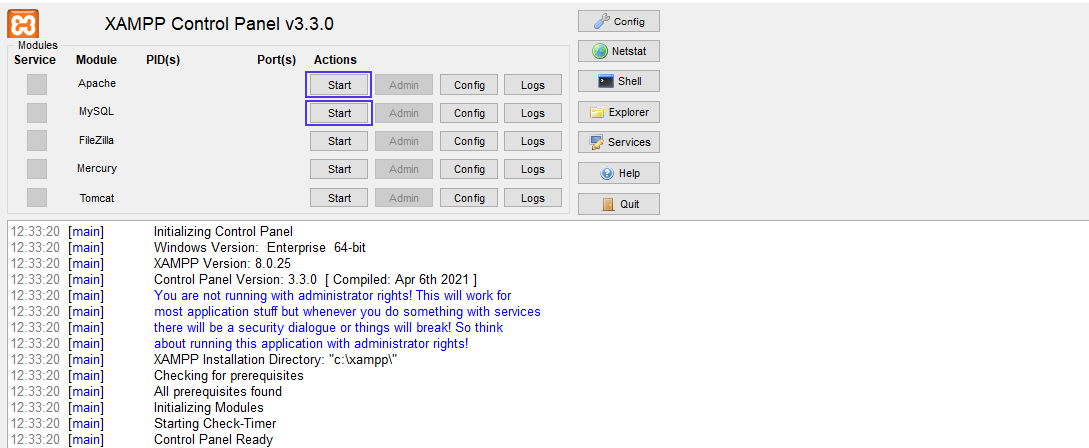
By default, MySQL/MariaDB runs on port 3306. Take note of the port if you change it.
If you use a web server other than XAMPP, ensure you are running Apache or other server software and have installed MariaDB server on your local machine.
Quickstart With phpMyAdmin
- With MySQL and Apache running, head to your browser.
- Open phpMyAdmin and paste in
http://localhost/phpmyadmin/. It should display the following:
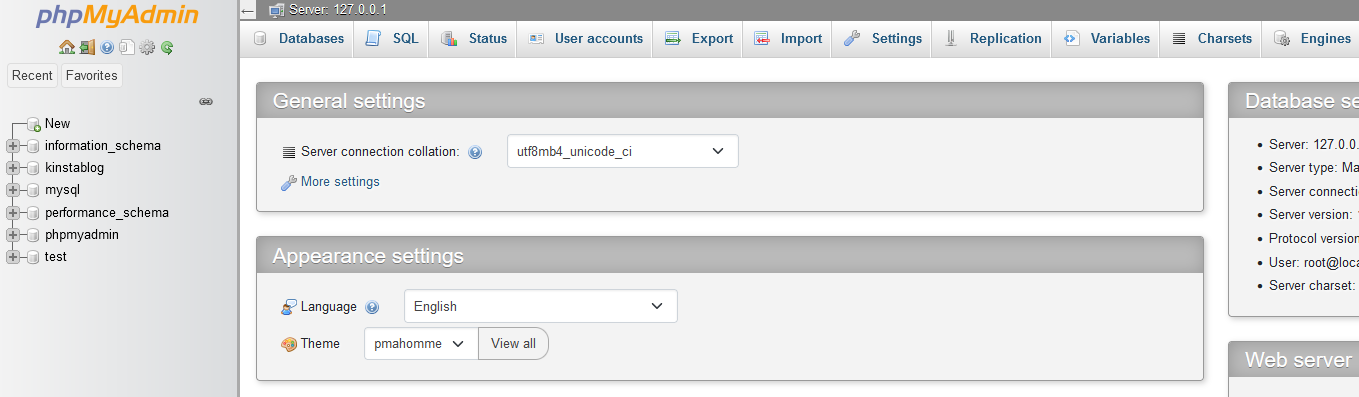
phpMyAdmin is a database management tool for MySQL and MariaDB.
Create a New Laravel Project
You can now start creating the blog using Laravel. For this tutorial, we used a computer running on Windows.
- Go to your machine’s terminal or command line interface (CLI).
- Create a Laravel project called blog using the
laravel new blogcommand. - Open your project’s blog directory with the command
cd blog. - Then, open the directory in your code editor.
- To check that you built the project successfully, run
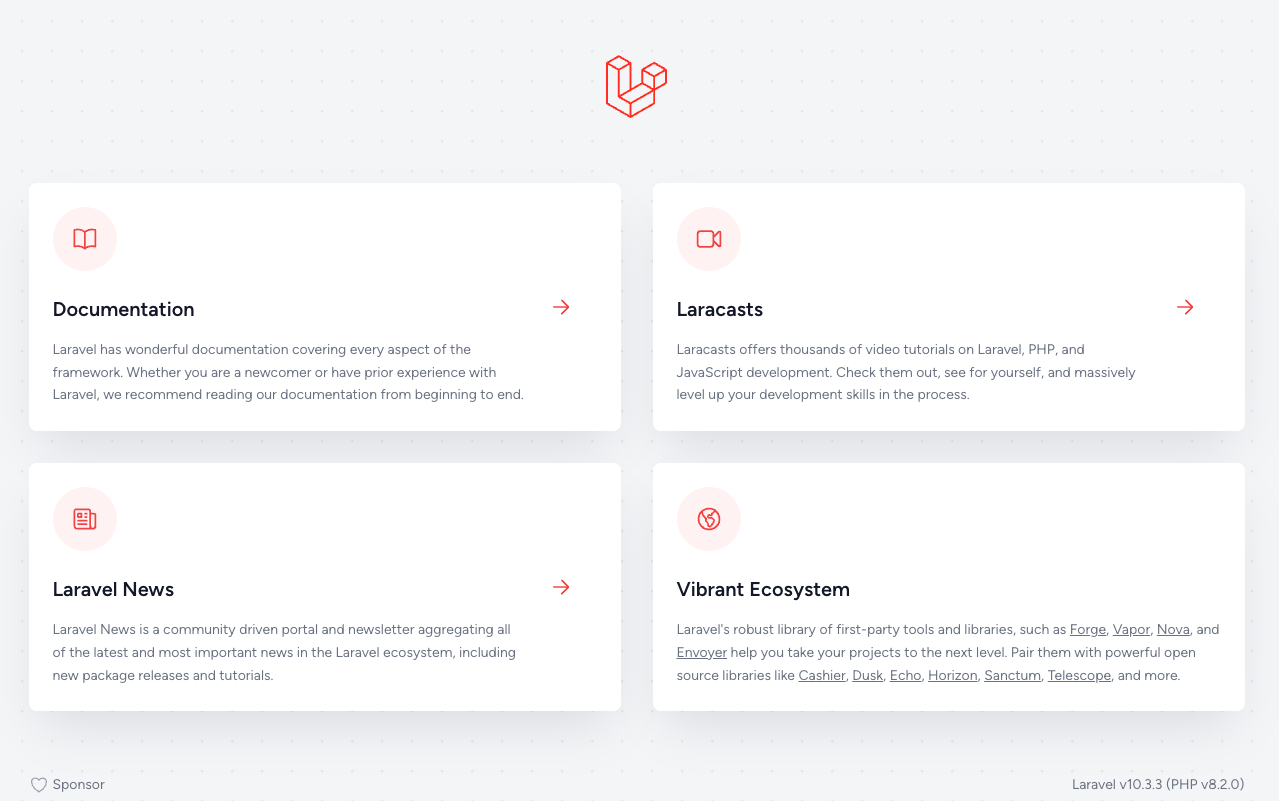
php artisan servein your terminal or CMD. - Click the local address output to serve it to the browser. The browser should display the default Laravel Welcome page, shown below:
Configure the Database
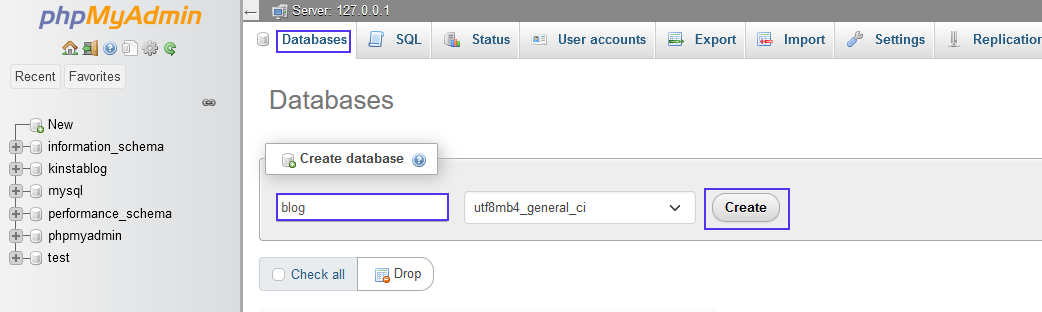
Create and configure the database by returning to phpMyAdmin in your browser and creating a database called blog.
- To create the database, on the Databases tab, type “blog” in the Create database field.
- Then, click Create.
- Next, update the database connection to your .env file at the root of your blog project. Change the
DB_DATABASEandDB_PASSWORDvalues to the ones you created.
The connection details should look like this:
DB_CONNECTION=mysql
DB_HOST=127.0.0.1
DB_PORT=3306
DB_DATABASE=blog
DB_USERNAME=your-db-username
DB_PASSWORD=your-db-password
The other database connection details remain the same as in the .env file. If you change any connection value, such as changing DB_PORT from 3306 to 3307 during configuration, ensure to update it in the .env file.
Make the Posts Table
Next, create a database model and migrate the changes.
- In your terminal, run
php artisan make:model Post -mcto create a model called Post, a table called posts, a migration file, and a controller.

- Check the database/migrations directory and open the migration file you just created. It has the following format:
YYYY_MM_DD_ID_create_posts_table.php. - In the
up()method of the migration file, create a schema withtitle,description, andimageattributes.
public function up() {
  Schema::create('posts', function (Blueprint $table) {
    $table->id();
    $table->string('title')->nullable();
    $table->text('description')->nullable();
    $table->string('image')->nullable();
    $table->timestamps();
  });
}- Now, go to your terminal and migrate the changes using
php artisan migrate, as shown below:

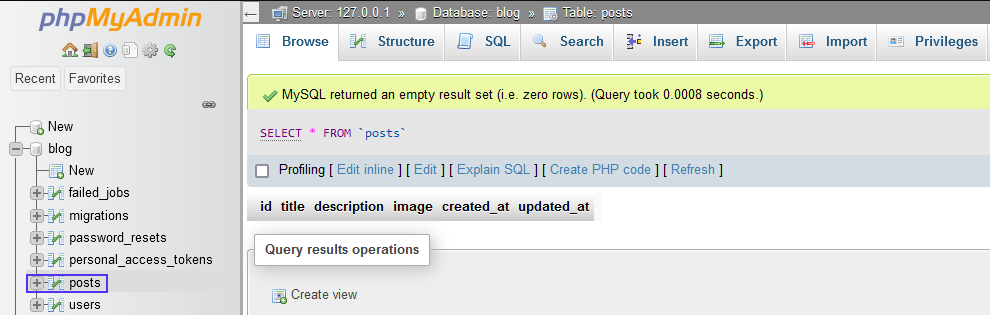
- Go to phpMyAdmin in your browser, where you will see the posts table:
How To Create Controllers
Adding views and controllers implements your business logic for the database set. The views are the user interfaces that display data objects from the model. Controllers manage the flow of data execution between the model and views.
- Before creating Blade files, run
npm install, followed bynpm run devin your terminal. The first command installs the required npm packages. The second command starts a Vite development server. - Head to the app/Http/Controllers directory, open the PostController.php file, and create an
indexcontroller method. The controller method renders a simple text to the browser. To do so, add the following code to thePostControllerclass:
public function index() {
  $post = "Laravel Tutorial Series One!";
  return view('posts.index', ['post'=>$post]);
}
This method passes $post as a context variable to the views section of the index Blade template. $post contains text to display, which, here, says, “Laravel Tutorial Series One!” You will replace this with the loop through the posts later.
- Create two new directories in the resources/views directory: layouts and posts.
- Inside the layouts directory, create an app.blade.php file. Other Blade files will inherit from it.
- Copy this code into app.blade.php:
<!DOCTYPE html>
<html lang="{{ str_replace('_', '-', app()->getLocale()) }}">

<head>
  <meta charset="utf-8">
  <meta name="viewport" content="width=device-width, initial-scale=1">
  <title>Blog</title>
  <!-- Styles →
  <link href="https://cdn.jsdelivr.net/npm/[email protected]/dist/css/bootstrap.min.css" rel="stylesheet" integrity="sha384-rbsA2VBKQhggwzxH7pPCaAqO46MgnOM80zW1RWuH61DGLwZJEdK2Kadq2F9CUG65" crossorigin="anonymous">
  @vite(['resources/css/app.css', 'resources/js/app.js'])
</head>

<!-- Navbar →
<header>
  <nav class="navbar bg-primary">
    <div class="container-fluid">
      <a class="navbar-brand" href="{{ route('posts.index') }}">Mini-Blog</a>
    </div>
  </nav>
</header>

<!-- Body -->
<body>
  @yield('content')
</body>

<!-- Footer -->
<footer class="footer mt-auto py-3 bg-dark">
  <div class="container d-lg-flex justify-content-between">
    <span class="text-light">Mini-Blog © 2023</span>
  </div>
</footer>

<script src="https://cdn.jsdelivr.net/npm/sweetalert2@11"></script>
<script src="https://cdn.jsdelivr.net/npm/[email protected]/dist/js/bootstrap.bundle.min.js"  integrity="sha384-kenU1KFdBIe4zVF0s0G1M5b4hcpxyD9F7jL+jjXkk+Q2h455rYXK/7HAuoJl+0I4" crossorigin="anonymous"></script>
</html>
By using this HTML code, you import Bootstrap version 5.2.3 and Vite to bundle the JavaScript and CSS assets. The generated page has a header with a navbar and a footer with the scripts called below it. In the body, dynamic content renders from other Blade files with the help of @yield('content').
The posts directory holds the Blade files for implementing create and read operations.
- Inside the posts directory, create a Blade file called index.blade.php and add the following code:
@extends('layouts.app')
@section('content')
<div class="container">
  <div class="titlebar">
    <h1>Blog list</h1>
  </div>
  <hr>
  <p>The Blog 1 - {{ $post }}</p>
</div>
@endsection
This code extends from the app.blade.php file on the layouts page. When rendered in the browser, it shows the content of each blog post and the navigation bar and footer inherited from the app.blade.php file in the layouts folder. Between the section tags, you pass the content from the controller to render in the browser when you execute the application.
- Set the route in the routes directory. Setting the route allows for automatic loading by the
RouteServiceProviderin the App/Providers directory. TheRouteServiceProvideris the class responsible for loading the application’s route files. - Inside the routes/web.php file, import PostController using
use AppHttpControllersPostController. - Then, set the route by adding
Route::resource('posts', PostController::class);to the routes/web.php file. - With the Vite development server still running, use
php artisan serveto execute the application in your terminal. - With your browser, open
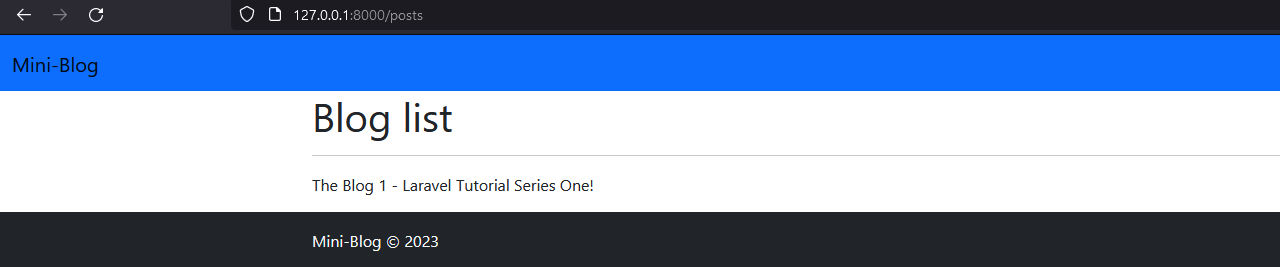
http://127.0.0.1:8000/poststo see your new blog post list.
The page should look like the following:
In the next section, we define the controller methods for displaying all posts, creating a post, and storing a post. Then, add their routes and create the Blade files in the corresponding sections.
Create the Blog Post Page
Make blog posts by inputting a title, adding a description, and uploading an image. Then, display your posts in sequential order.
- In the app/Models directory, open the Post.php file.
- In the
Postclass below theuse HasFactory;code block, addprotected $fillable = ['title', 'description', 'image'];.
This code protects your model attributes from mass assignments.
- In your app/Http/Controllers/PostController.php file, import the
Postmodel usinguse AppModelsPost;. - Replace the
indexandcreatecontroller methods created earlier in thePostControllerclass with the code below:
// Show all posts
public function index() {
  $posts = Post::orderBy('created_at', 'desc')->get();
  return view('posts.index', ['posts' => $posts]);
}

// Create post
public function create() {
  return view('posts.create');
}
In the index method you just created, the PHP application fetches all posts, puts them in chronological order, and then stores them in a posts variable. In the return view, the posts pass into the index.blade.php file as a context variable in the views/posts directory. The create method returns a create.blade.php file and places it in the views/posts directory if a user tries to make a new post.
- Create a
storecontroller method using the code below (to store blog posts in the database). Add this code to thePostControllerclass below theindexandcreatecontroller methods.
// Store post
public function store(Request $request) {
  // validations
  $request->validate([
    'title' => 'required',
    'description' => 'required',
    'image' => 'required|image|mimes:jpeg,png,jpg,gif,svg|max:2048',
  ]);

  $post = new Post;

  $file_name = time() . '.' . request()->image->getClientOriginalExtension();
  request()->image->move(public_path('images'), $file_name);

  $post->title = $request->title;
  $post->description = $request->description;
  $post->image = $file_name;

  $post->save();
  return redirect()->route('posts.index')->with('success', 'Post created successfully.');
}
The store method handles client requests regarding the data in its body, so it takes request as an argument. Next, you validate the fields used when creating a post and make a post instance from the Post model. The inputted field data is then assigned to the created instance and saved. The page redirects to the index view with a flash text that says, “Post created successfully.”
Add Routes to Your Posts
To register the routes in your web.php file:
- In the routes directory at your project’s root, open the web.php file.
- Register the routes of the controller methods by replacing the existing code with this:
<?php

use Illuminate\Support\Facades\Route;
use App\Http\Controllers\PostController;

Route::resource('/', PostController::class)->names([
  'index' => 'posts.index',
  'create' => 'posts.create',
  'store' => 'posts.store',
  'show' => 'posts.show',
]);
This controller uses these routes to create, store, and display your data objects.
Make Blade Files
To create the views, return to the PostController class:
- In the resources/views/posts directory, make a Blade file called create.blade.php and add the code below:
@extends('layouts.app')
@section('content')
<div class="container">
  <h1>Add Post</h1>
  <section class="mt-3">
    <form method="post" action="{{ route('posts.store') }}" enctype="multipart/form-data">
      @csrf
      <!-- Error message when data is not inputted -->
      @if ($errors->any())
        <div class="alert alert-danger">
          <ul>
            @foreach ($errors->all() as $error)
              <li>{{ $error }}</li>
            @endforeach
          </ul>
        </div>
      @endif
      <div class="card p-3">
        <label for="floatingInput">Title</label>
        <input class="form-control" type="text" name="title">
        <label for="floatingTextArea">Description</label>
        <textarea class="form-control" name="description" id="floatingTextarea" cols="30" rows="10"></textarea>
        <label for="formFile" class="form-label">Add Image</label>
        <img src="" alt="" class="img-blog">
        <input class="form-control" type="file" name="image">
      </div>
      <button class="btn btn-secondary m-3">Save</button>
    </form>
  </section>

</div>
@endsection
In this code, create.blade.php inherits the contents of app.blade.php in the layouts directory using @extends('layouts.app'). These contents include a header, navigation bar, and footer. After adding the Add Post text within the h1 tag, you created a form with the post method that contains the {{route('posts.store')}} action.
The code enctype="multipart/form-data" allows for image uploads, and csrf protects your form from cross-site attacks. Then, the error messages display invalid field entries and usefield attributes to create labels and inputs for the form.
- Now, replace the code in the index.blade.php file with the code below to display all the blog posts:
@extends('layouts.app')
@section('content')
<div class="container">
  <div class="titlebar">
    <a class="btn btn-secondary float-end mt-3" href="{{ route('posts.create') }}" role="button">Add Post</a>
    <h1>Mini post list</h1>
  </div>

  <hr>
  <!-- Message if a post is posted successfully -->
  @if ($message = Session::get('success'))
  <div class="alert alert-success">
    <p>{{ $message }}</p>
  </div>
  @endif
         @if (count($posts) > 0)
    @foreach ($posts as $post)
      <div class="row">
        <div class="col-12">
          <div class="row">
            <div class="col-2">
              <img class="img-fluid" style="max-width:50%;" src="{{ asset('images/'.$post->image)}}" alt="">
            </div>
            <div class="col-10">
              <h4>{{$post->title}}</h4>
            </div>
          </div>
          <p>{{$post->description}}</p>
          <hr>
        </div>
      </div>
    @endforeach
  @else
    <p>No Posts found</p>
  @endif
</div>
@endsection
This code adds an Add Post button. When clicked, it creates a post and passes any data into the page’s body. The if condition checks if there is data in the database. If there is data, it passes. If not, it displays “No Posts found.”
Structure Your Pages
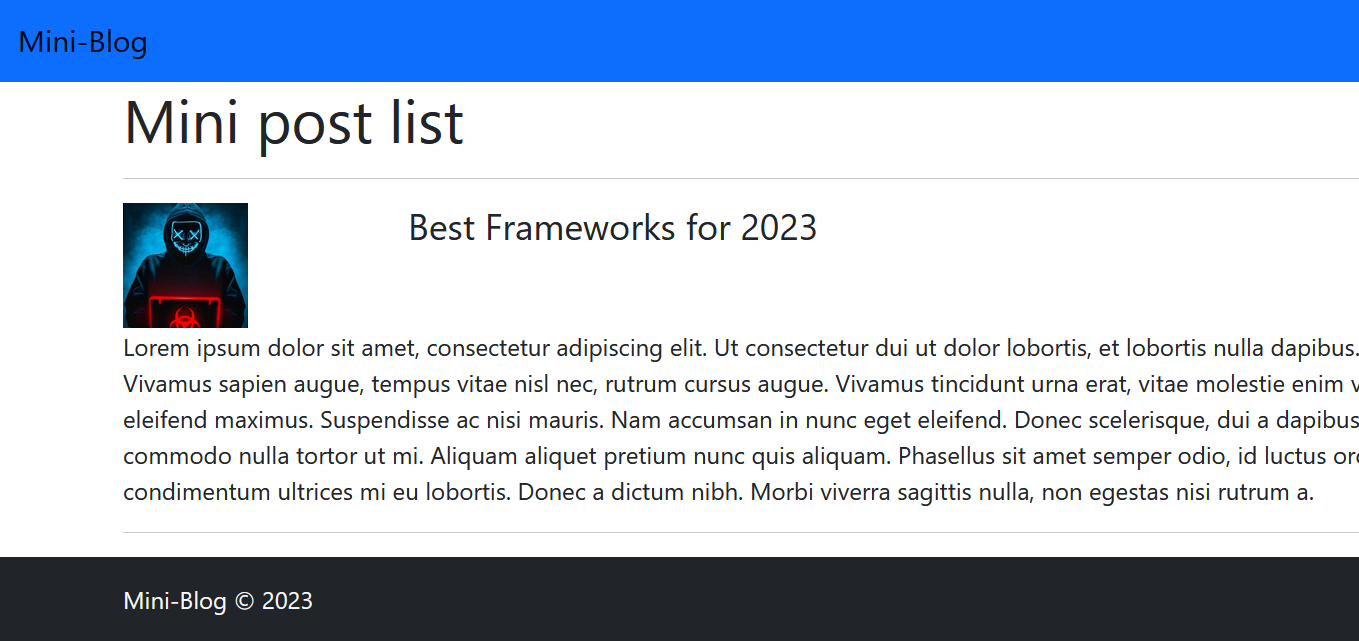
You can now run your application using php artisan serve to create and display blog posts. Open <a href="http://127.0.0.1:8000">http://127.0.0.1:8000</a >, and the page should look like this:

If you add a post, it appears like this:
Deploy Your Laravel Blog to Kinsta
To deploy and test your Laravel application using Kinsta’s Application Hosting service:
- Create a .htaccess file.
- Push the code to a repository.
- Create a database.
- Set up a project on MyKinsta.
- Build and deploy your blog.
Create an .htaccess File
In the project’s root folder, create a file called .htaccess, and add the following code:
<IfModule mod_rewrite.c>
  RewriteEngine On
  RewriteRule ^(.*)$ public/$1 [L]
</IfModule>
This code redirects your application requests to public/index.php in the deployment.
Push Your Code to a Repository
Create a repository for your project and publish the code. You can use GitHub, GitLab, or Bitbucket to host your code and deploy it to MyKinsta.
Set Up the Database in Your MyKinsta Dashboard
To create a database on MyKinsta:
- Click the Add Service button and select Database.
- Enter the details of your database as shown below. Note that for your deployment to be successful, you must leave the Database username as the default value.
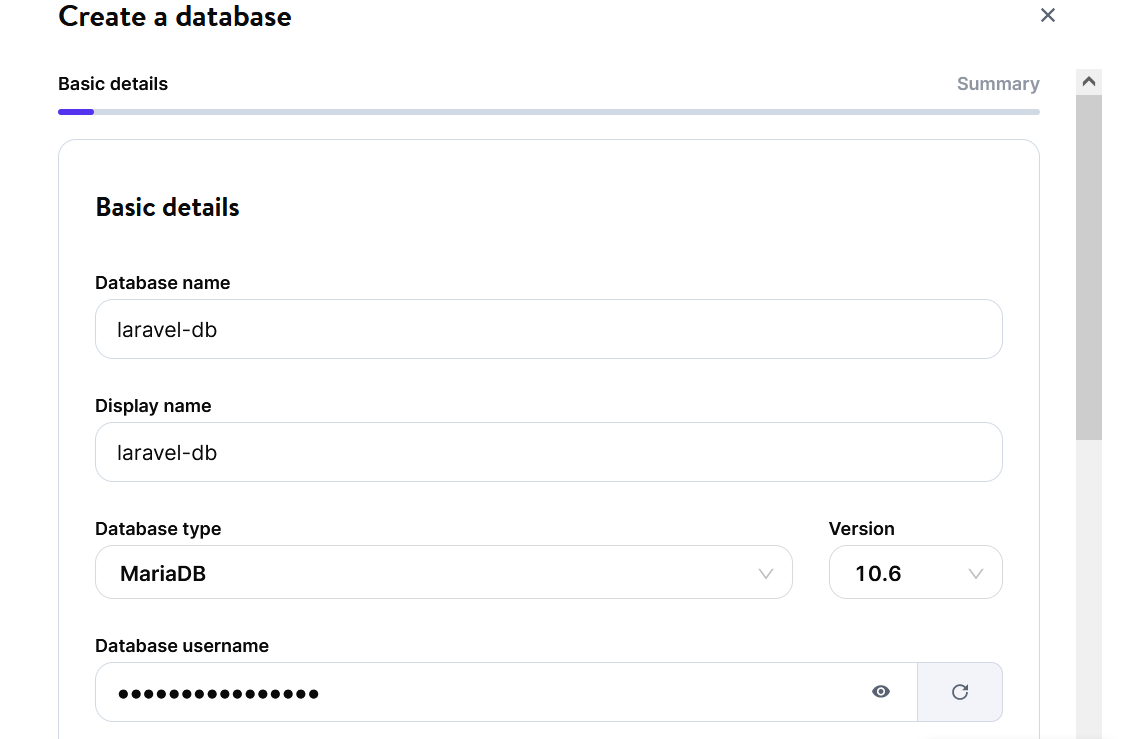
The details include the Database name, Display name, Database type, Version, Database username, Data center location, and Size. This demonstration uses MariaDB for the database, and the Size is Db3 (1CPU / 4GB RAM / 10GB Disk Space 65 USD / month). You can choose the database type and size that suits your specific needs.
- Click Continue.
- Confirm your monthly cost and payment method, then click Create database.
Set Up the Project on MyKinsta
To deploy your application to MyKinsta:
- Click the Dashboard panel.
- Click Add Service and select Application, as shown below:
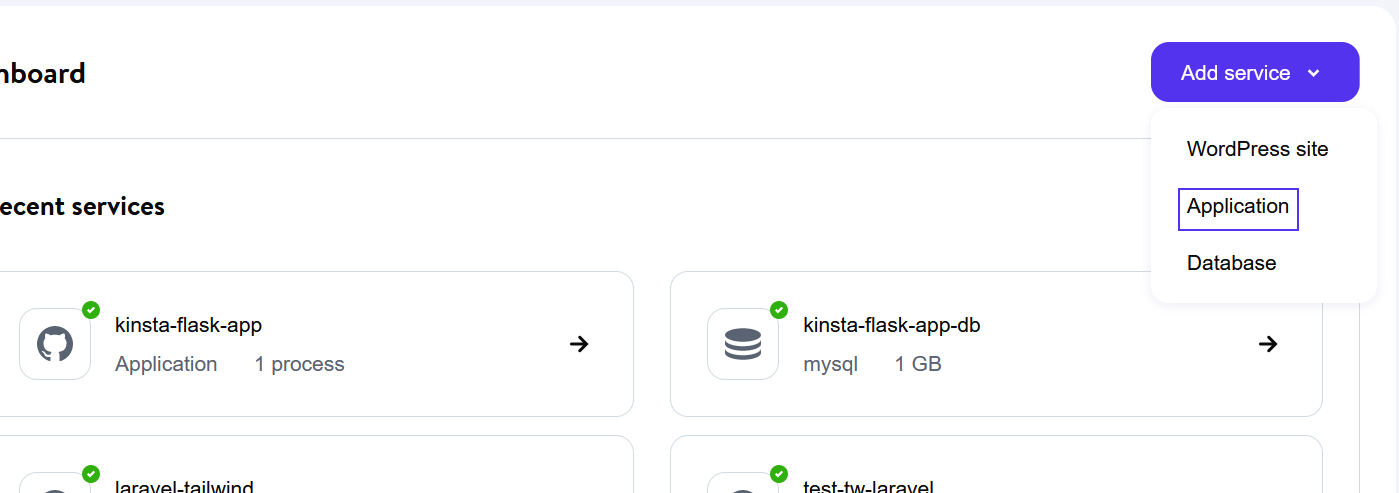
MyKinsta redirects you to the Add Application page.
- In the Select branch card section, select your GitHub repository, then select the Add deployment on commit checkbox.
- In the Basic details, input the application name and select the data center location for your application.
- Since Laravel needs an app key during deployment, in the Environment variables card, add an APP_KEY as Key 1. You can use the APP_KEY defined in your local .env file or use an online Laravel Key generator to get one.
- Click Continue.
- Select the build resources (CPU and RAM) for your application. This demonstration uses the standard build machine (1CPU / 4 GB RAM) – 0.02USD / minute.
- Leave the Set up container image automatically radio button selected.
- Click Continue.
- In the Set up your processes page, you can change your application’s pod size and instance by selecting these boxes. This demonstration uses the default values.
- Click Continue.
- Finally, click the Confirm payment method button to start your application’s deployment. Clicking this also directs you to the Deployment details page to view the progress of your deployment.
Build and Deploy Your Application
With the database and application hosted, connect the database to your application and build to deploy.
To connect the database, use the external connections of your hosted database. On the Info tab of your hosted database, you see External connections, as shown below:
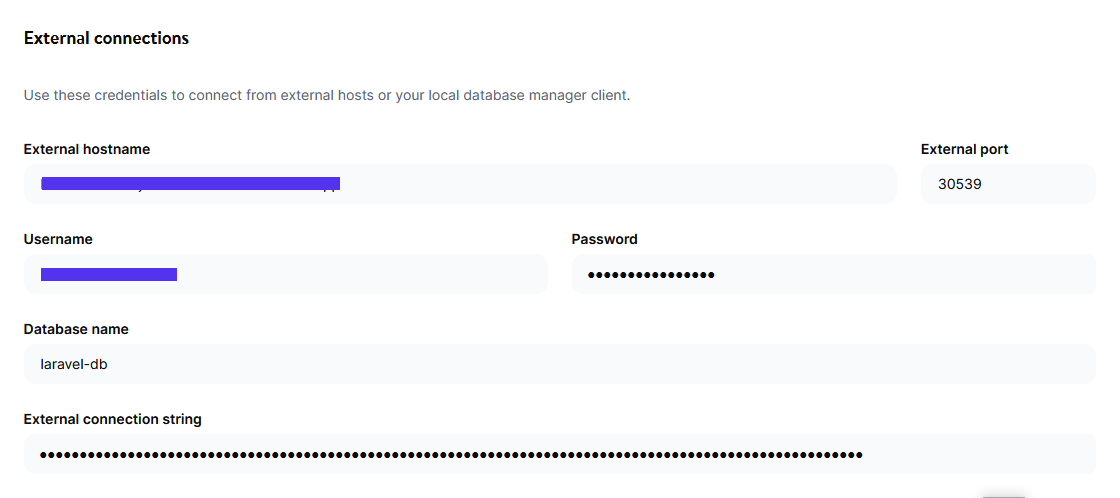
- On the deployed app’s Settings page, navigate to the Environment variable card.
- Click Add environment variable to add the external connections of your hosted database with the corresponding value. Use the same variables you have in your .env file.
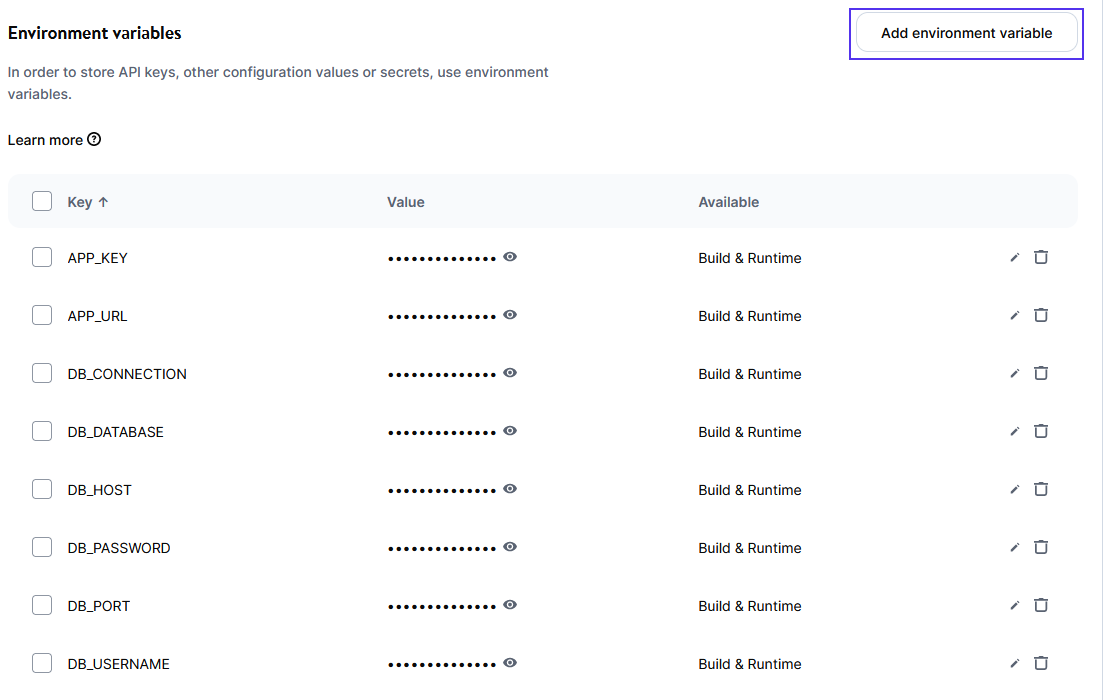
This screenshot is handy if you consider marking the <code>env</code> variables you edited manually to differentiate them from the others.
The APP_URL is the URL of your hosted application, and DB_CONNECTION is mysql.
- Head to your application’s Settings page.
- In the Buildpack card, add PHP and Node.js as build packs. Since this is a PHP application, you must add the PHP build pack last.
- Click Deploy now to rebuild your application.
Next, add a process that will migrate the database.
- Head to the Processes tab on your hosted application page.
- Select Create process on the Runtime processes card.
- Enter Migration as the name, Background worker as the type, and
php artisan migrate --forceas a start command. You can leave the pod size and instances with the default values. - Select Continue to create the process. This action triggers a new build and redeploys the application.
- On the Domains tab of your application, click your application link. You can see that it’s now up and running.
- Note that the blog application deployed to MyKinsta displays no posts. Create a new post by inputting its title, adding a description, and choosing an image.
Summary
Laravel makes it easy to develop a simple blog quickly. Its rapid page loading, robust controller architecture, and competent security make enhancing an application’s performance easy. Meanwhile, MyKinsta lets you release and ship your web applications quickly and effectively. MyKinsta’s flexible pricing model is based on usage, eliminating hidden costs.
When Kinsta hosts your Laravel application, it runs on a powerful cloud infrastructure, making it as fast as possible. Kinsta also includes enterprise-level DDoS protection and mitigation with Cloudflare and advanced firewalls to keep malicious actors at bay and much more.
Start your Application Hosting free trial right now to streamline your web application development and hosting!

I'm the Editorial Team Lead at Kinsta. I'm a open source enthusiast and I love coding. With more than 10 years of technical writing and editing for the tech industry, I love collaborating with people to create clear and concise pieces of content and improve workflows.

