
As any site owner will tell you, data loss and downtime, even in minimal doses, can be catastrophic. They can hit the unprepared at any time, leading to reduced productivity, accessibility, and product confidence.
To protect the integrity of your site, it’s vital to build safeguards against the possibility of downtime or data loss.
That’s where data replication comes in.
Data replication is an automated backup process in which your data is repeatedly copied from its main database to another, remote location for safekeeping. It’s an integral technology for any site or app running a database server. You can also leverage the replicated database to process read-only SQL, allowing more processes to be run within the system.
Setting up replication between two databases offers fault tolerance against unexpected mishaps. It’s considered to be the best strategy for attaining high availability during disasters.
In this article, we’ll dive into the different strategies that can be implemented by backend developers for seamless PostgreSQL replication.
What Is PostgreSQL Replication?
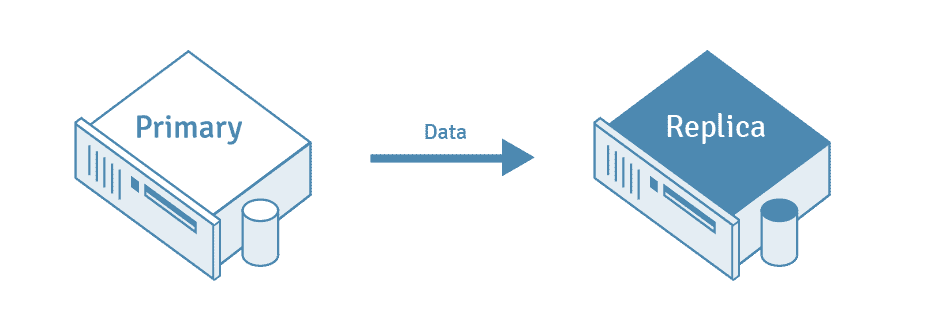
PostgreSQL replication is defined as the process of copying data from a PostgreSQL database server to another server. The source database server is also known as the “primary” server, whereas the database server receiving the copied data is known as the “replica” server.
The PostgreSQL database follows a straightforward replication model, where all writes go to a primary node. The primary node can then apply these changes and broadcast them to secondary nodes.
What Is Automatic Failover?
Failover is a method for recovering data if the primary server gives out for any reason. As long as you’ve configured PostreSQL to manage your physical streaming replication, you — and your users — will be protected from downtime due to a primary server snafu.
Note that the failover process can take some time to set up and initiate. There are no built-in tools to monitor and scope server failures in PostgreSQL, so you’ll need to get creative.
Luckily, you don’t have to be dependent on PostgreSQL for failover. There are dedicated tools that allow automatic failover and automatic switching to the standby, cutting down on database downtime.
By setting up failover replication, you all but guarantee high availability by ensuring that standbys are available if the primary server ever collapses.
Benefits of Using PostgreSQL Replication
Here are a few key benefits of leveraging PostgreSQL replication:
- Data migration: You can leverage PostgreSQL replication for data migration either through a change of database server hardware or through system deployment.
- Fault tolerance: If the primary server fails, the standby server can act as a server because the contained data for both primary and standby servers is the same.
- Online transactional processing (OLTP) performance: You can improve the transaction processing time and query time of an OLTP system by removing reporting query load. Transaction processing time is the duration it takes for a given query to be executed before a transaction is finished.
- System testing in parallel: While upgrading a new system, you need to make sure that the system fares well with existing data, hence the need to test with a production database copy before deployment.
How PostgreSQL Replication Works
Generally, people believe that when you’re dabbling with a primary and secondary architecture, there’s only one way to set up backups and replication. PostgreSQL deployments, however, can follow any of these three methods:
- Streaming replication: Replicates data from the primary node to the secondary, then copies data to Amazon S3 or Azure Blob for backup storage.
- Volume-level replication: Replicates data at the storage layer, starting from the primary node to the secondary node, then copies data to Amazon S3 or Azure Blob for backup storage.
- Incremental backups: Replicates data from the primary node while constructing a new secondary node from Amazon S3 or Azure Blob storage, allowing for streaming directly from the primary node.
Method 1: Streaming
PostgreSQL streaming replication also known as WAL replication can be set up seamlessly after installing PostgreSQL on all servers. This approach to replication is based on moving the WAL files from the primary to the target database.
You can implement PostgreSQL streaming replication by using a primary-secondary configuration. The primary server is the main instance that handles the primary database and all its operations. The secondary server acts as the supplementary instance and executes all changes made to the primary database on itself, generating an identical copy in the process. The primary is the read/write server whereas the secondary server is merely read-only.
For this method, you need to configure both the primary node and the standby node. The following sections will elucidate the steps involved in configuring them with ease.
Configuring Primary Node
You can configure the primary node for streaming replication by carrying out the following steps:
Step 1: Initialize the Database
To initialize the database, you can leverage the initdb utility command. Next, you can create a new user with replication privileges by utilizing the following command:
CREATE USER 'example_username' REPLICATION LOGIN ENCRYPTED PASSWORD 'example_password';The user will have to provide a password and username for the given query. The replication keyword is used to give the user the required privileges. An example query would look something like this:
CREATE USER 'rep_username' REPLICATION LOGIN ENCRYPTED PASSWORD 'rep_password';Step 2: Configure Streaming Properties
Next, you can configure the streaming properties with the PostgreSQL configuration file (postgresql.conf) that can be modified as follows:
wal_level = logical
wal_log_hints = on
max_wal_senders = 8
max_wal_size = 1GB
hot_standby = on
Here’s a little background around the parameters used in the previous snippet:
wal_log_hints: This parameter is required for thepg_rewindcapability that comes in handy when the standby server’s out of sync with the primary server.wal_level: You can use this parameter to enable PostgreSQL streaming replication, with possible values includingminimal,replica, orlogical.max_wal_size: This can be used to specify the size of WAL files that can be retained in log files.hot_standby: You can leverage this parameter for a read-on connection with the secondary when it’s set to ON.max_wal_senders: You can usemax_wal_sendersto specify the maximum number of concurrent connections that can be established with the standby servers.
Step 3: Create New Entry
After you’ve modified the parameters in the postgresql.conf file, a new replication entry in the pg_hba.conf file can allow the servers to establish a connection with each other for replication.
You can usually find this file in the data directory of PostgreSQL. You can use the following code snippet for the same:
host replication rep_user IPaddress md5Once the code snippet gets executed, the primary server allows a user called rep_user to connect and act as the standby server by using the specified IP for replication. For instance:
host replication rep_user 192.168.0.22/32 md5Configuring Standby Node
To configure the standby node for streaming replication, follow these steps:
Step 1: Back Up Primary Node
To configure the standby node, leverage the pg_basebackup utility to generate a backup of the primary node. This will serve as a starting point for the standby node. You can use this utility with the following syntax:
pg_basebackp -D -h -X stream -c fast -U rep_user -WThe parameters used in the syntax mentioned above are as follows:
-h: You can use this to mention the primary host.-D: This parameter indicates the directory you’re currently working on.-C: You can use this to set the checkpoints.-X: This parameter can be used to include the necessary transactional log files.-W: You can use this parameter to prompt the user for a password before linking to the database.
Step 2: Set Up Replication Configuration File
Next, you need to check if the replication configuration file exists. If it doesn’t, you can generate the replication configuration file as recovery.conf.
You should create this file in the data directory of the PostgreSQL installation. You can generate it automatically by using the -R option within the pg_basebackup utility.
The recovery.conf file should contain the following commands:
standby_mode = 'on'

primary_conninfo = 'host=<master_host> port=<postgres_port> user=<replication_user> password=<password> application_name="host_name"'

recovery_target_timeline = 'latest'
The parameters used in the aforementioned commands are as follows:
primary_conninfo: You can use this to make a connection between the primary and secondary servers by leveraging a connection string.standby_mode: This parameter can cause the primary server to start as the standby when switched ON.recovery_target_timeline: You can use this to set the recovery time.
To set up a connection, you need to provide the username, IP address, and password as values for the primary_conninfo parameter. For instance:
primary_conninfo = 'host=192.168.0.26 port=5432 user=rep_user password=rep_pass'Step 3: Restart Secondary Server
Finally, you can restart the secondary server to complete the configuration process.
However, streaming replication comes with several challenges, such as:
- Various PostgreSQL clients (written in different programming languages) converse with a single endpoint. When the primary node fails, these clients will keep retrying the same DNS or IP name. This makes failover visible to the application.
- PostgreSQL replication doesn’t come with built-in failover and monitoring. When the primary node fails, you need to promote a secondary to be the new primary. This promotion needs to be executed in a way where clients write to only one primary node, and they don’t observe data inconsistencies.
- PostgreSQL replicates its entire state. When you need to develop a new secondary node, the secondary needs to recap the entire history of state change from the primary node, which is resource-intensive and makes it costly to eliminate nodes in the head and create new ones.
Method 2: Replicated Block Device
The replicated block device method depends on disk mirroring (also known as volume replication). In this approach, changes are written to a persistent volume which gets synchronously mirrored to another volume.
The added benefit of this method is its compatibility and data durability in cloud environments with all relational databases, including PostgreSQL, MySQL, and SQL Server, to name a few.
However, the disk-mirroring approach to PostgreSQL replication needs you to replicate both WAL log and table data. Since each write to the database now needs to go over the network synchronously, you can’t afford to lose a single byte, as that could leave your database in a corrupt state.
This method is normally leveraged using Azure PostgreSQL and Amazon RDS.
Method 3: WAL
WAL consists of segment files (16 MB by default). Each segment has one or more records. A log sequence record (LSN) is a pointer to a record in WAL, letting you know the position/location where the record has been saved in the log file.
A standby server leverages WAL segments — also known as XLOGS in PostgreSQL terminology — to continuously replicate changes from its primary server. You can use write-ahead logging to grant durability and atomicity in a DBMS by serializing chunks of byte-array data (each one with a unique LSN) to stable storage before they get applied to a database.
Applying a mutation to a database might lead to various file system operations. A pertinent question that comes up is how a database can assure atomicity in the event of a server failure due to a power outage while it’s in the middle of a file system update. When a database boots, it begins a startup or replay process which can read the available WAL segments and compares them with the LSN stored on every data page (every data page is marked with the LSN of the latest WAL record that affects the page).
Log Shipping-Based Replication (Block Level)
Streaming replication refines the log shipping process. As opposed to waiting for the WAL switch, the records are sent as they get created, thus decreasing replication delay.
Streaming replication also trumps log shipping because the standby server links with the primary server over the network by leveraging a replication protocol. The primary server can then send WAL records directly over this connection without having to depend on scripts provided by the end-user.
Log Shipping-Based Replication (File Level)
Log shipping is defined as copying log files to another PostgreSQL server to generate another standby server by replaying WAL files. This server is configured to work in recovery mode, and its sole purpose is to apply any new WAL files as they show up.
This secondary server then becomes a warm backup of the primary PostgreSQL server. It can also be configured to be a read replica, where it can offer read-only queries, also referred to as hot standby.
Continuous WAL Archiving
Duplicating WAL files as they are created into any location other than the pg_wal subdirectory to archive them is known as WAL archiving. PostgreSQL will call a script given by the user for archiving, each time a WAL file gets created.
The script can leverage the scp command to duplicate the file to one or more locations such as an NFS mount. Once archived, the WAL segment files can be leveraged to recover the database at any given point in time.
Other log-based configurations include:
- Synchronous replication: Before every synchronous replication transaction gets committed, the primary server waits until standbys confirm that they got the data. The benefit of this configuration is that there won’t be any conflicts caused due to parallel writing processes.
- Synchronous multi-master replication: Here, every server can accept write requests, and modified data gets transmitted from the original server to every other server before each transaction gets committed. It leverages the 2PC protocol and adheres to the all-or-none rule.
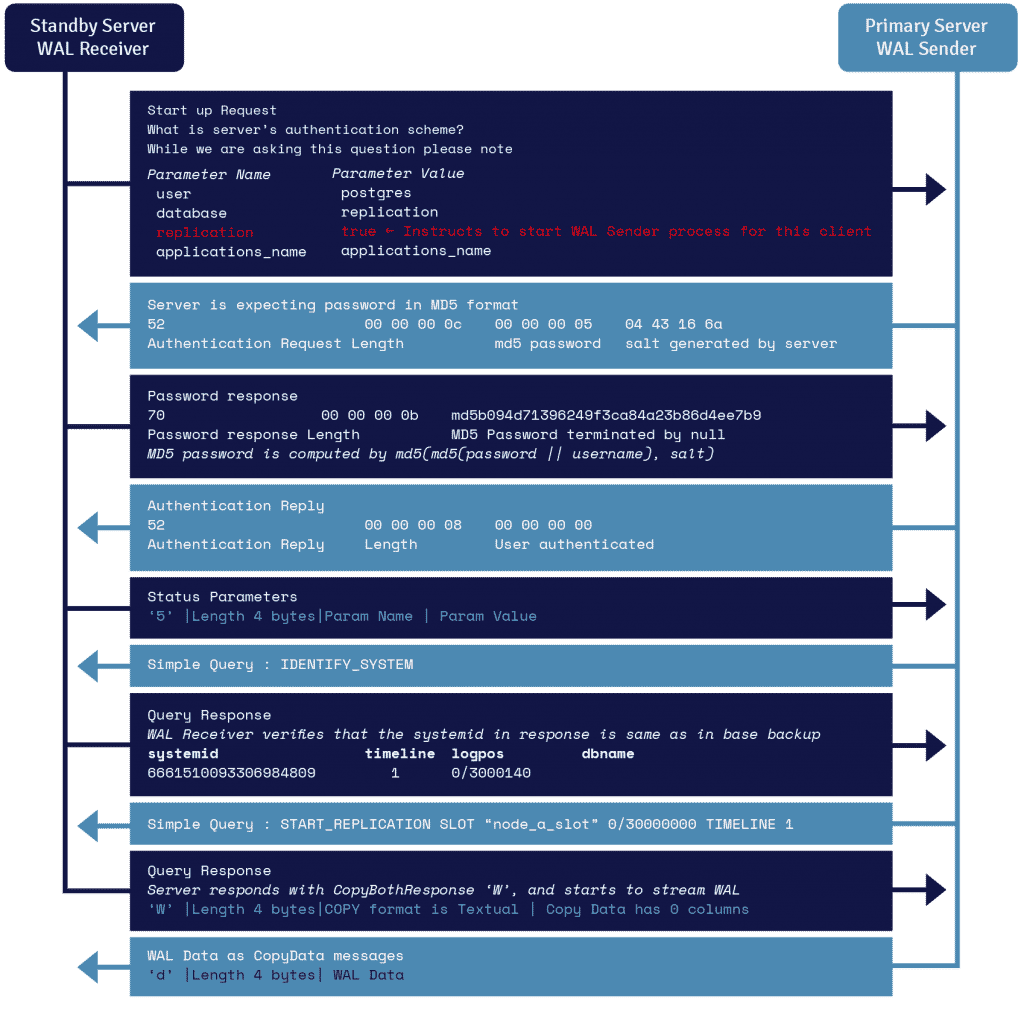
WAL Streaming Protocol Details
A process known as WAL receiver, running on the standby server, leverages the connection details provided in the primary_conninfo parameter of recovery.conf and connects to the primary server by leveraging a TCP/IP connection.
To start streaming replication, the frontend can send the replication parameter within the startup message. A Boolean value of true, yes, 1, or ON lets the backend know that it needs to go into physical replication walsender mode.
WAL sender is another process that runs on the primary server and is in charge of sending the WAL records to the standby server as they get generated. The WAL receiver saves the WAL records in WAL as if they were created by client activity of locally connected clients.
Once the WAL records reach the WAL segment files, the standby server constantly keeps replaying the WAL so that primary and standby are up to date.
Elements of PostgreSQL Replication
In this section, you’ll gain a deeper understanding of the commonly used models (single-master and multi-master replication), types (physical and logical replication), and modes (synchronous and asynchronous) of PostgreSQL replication.
Models of PostgreSQL Database Replication
Scalability means adding more resources/ hardware to existing nodes to enhance the ability of the database to store and process more data which can be achieved horizontally and vertically. PostgreSQL replication is an example of horizontal scalability which is much more difficult to implement than vertical scalability. We can achieve horizontal scalability mainly by single-master replication (SMR) and multi-master replication (MMR).
Single-master replication allows data to be modified only on a single node, and these modifications are replicated to one or more nodes. The replicated tables in the replica database aren’t permitted to accept any changes, except those from the primary server. Even if they do, the changes aren’t replicated back to the primary server.
Most of the time, SMR is enough for the application because it’s less complicated to configure and manage along with no chances of conflicts. Single-master replication is also unidirectional, since replication data flows in one direction mainly, from the primary to the replica database.
In some cases, SMR alone may not be sufficient, and you may need to implement MMR. MMR allows more than one node to act as the primary node. Changes to table rows in more than one designated primary database are replicated to their counterpart tables in every other primary database. In this model, conflict resolution schemes are often employed to avoid problems like duplicate primary keys.
There are a few advantages to using MMR, namely:
- In the case of host failure, other hosts can still give update and insertion services.
- The primary nodes are spread out in several different locations, so the chance of failure of all primary nodes is very small.
- Ability to employ a wide area network (WAN) of primary databases that can be geographically close to groups of clients, yet maintain data consistency across the network.
However, the downside of implementing MMR is the complexity and its difficulty to resolve conflicts.
Several branches and applications provide MMR solutions as PostgreSQL doesn’t support it natively. These solutions may be open-source, free, or paid. One such extension is bidirectional replication (BDR) which is asynchronous and is based on the PostgreSQL logical decoding function.
Since the BDR application replays transactions on other nodes, the replay operation may fail if there’s a conflict between the transaction being applied and the transaction committed on the receiving node.
Types of PostgreSQL Replication
There are two types of PostgreSQL replication: logical and physical replication.
A simple logical operation — initdb — would carry out the physical operation of creating a base directory for a cluster. Likewise, a simple logical operation CREATE DATABASE would carry out the physical operation of creating a subdirectory in the base directory.
Physical replication usually deals with files and directories. It doesn’t know what these files and directories represent. These methods are used to maintain a full copy of the entire data of a single cluster, typically on another machine, and are done at the file system level or disk level and use exact block addresses.
Logical replication is a way of reproducing data entities and their modifications, based upon their replication identity (usually a primary key). Unlike physical replication, it deals with databases, tables, and DML operations and is done at the database cluster level. It uses a publish and subscribe model where one or more subscribers are subscribed to one or more publications on a publisher node.
The replication process starts by taking a snapshot of the data on the publisher database and then copying it to the subscriber. Subscribers pull data from the publications they subscribe to and may re-publish data later to allow cascading replication or more complex configurations. The subscriber applies the data in the same order as the publisher so that transactional consistency is guaranteed for publications within a single subscription also known as transactional replication.
The typical use cases for logical replication are:
- Sending incremental changes in a single database (or a subset of a database) to subscribers as they occur.
- Sharing a subset of the database between multiple databases.
- Triggering the firing of individual changes as they arrive on the subscriber.
- Consolidating multiple databases into one.
- Providing access to replicated data to different groups of users.
The subscriber database behaves in the same way as any other PostgreSQL instance and can be used as a publisher for other databases by defining its publications.
When the subscriber is treated as read-only by application, there’ll be no conflicts from a single subscription. On the other hand, if there are other writes done either by an application or by other subscribers to the same set of tables, conflicts can arise.
PostgreSQL supports both mechanisms concurrently. Logical replication allows fine-grained control over both data replication and security.
Replication Modes
There are mainly two modes of PostgreSQL replication: synchronous and asynchronous. Synchronous replication allows data to be written to both the primary and secondary server at the same time, whereas asynchronous replication ensures that the data is first written to the host and then copied to the secondary server.
In synchronous mode replication, transactions on the primary database are considered complete only when those changes have been replicated to all the replicas. The replica servers must all be available all the time for the transactions to be completed on the primary. The synchronous mode of replication is used in high-end transactional environments with immediate failover requirements.
In asynchronous mode, transactions on the primary server can be declared complete when the changes have been done on just the primary server. These changes are then replicated in the replicas later in time. The replica servers can remain out-of-sync for a certain duration, called a replication lag. In the case of a crash, data loss may occur, but the overhead provided by asynchronous replication is small, so it’s acceptable in most cases (it doesn’t overburden the host). Failover from the primary database to the secondary database takes longer than synchronous replication.
How To Set Up PostgreSQL Replication
For this section, we’ll be demonstrating how to set up the PostgreSQL replication process on a Linux operating system. For this instance, we’ll be using Ubuntu 18.04 LTS and PostgreSQL 10.
Let’s dig in!
Installation
You’ll begin by installing PostgreSQL on Linux with these steps:
- Firstly, you’d have to import the PostgreSQL signing key by typing the below command in the terminal:
wget -q https://www.postgresql.org/media/keys/ACCC4CF8.asc -O- | sudo apt-key add - - Then, add the PostgreSQL repository by typing the below command in the terminal:
echo "deb http://apt.postgresql.org/pub/repos/apt/ bionic-pgdg main" | sudo tee /etc/apt/sources.list.d/postgresql.list - Update the Repository Index by typing the following command in the terminal:
sudo apt-get update - Install PostgreSQL package using the apt command:
sudo apt-get install -y postgresql-10 - Finally, set the password for the PostgreSQL user using the following command:
sudo passwd postgres
The installation of PostgreSQL is mandatory for both the primary and secondary servers before starting the PostgreSQL replication process.
Once you’ve set up PostgreSQL on both servers, you may move on to the replication set-up of the primary and the secondary server.
Setting Up Replication in Primary Server
Carry out these steps once you’ve installed PostgreSQL on both primary and secondary servers.
- Firstly, log in to the PostgreSQL database with the following command:
su - postgres - Create a replication user with the following command:
psql -c "CREATEUSER replication REPLICATION LOGIN CONNECTION LIMIT 1 ENCRYPTED PASSWORD'YOUR_PASSWORD';" - Edit pg_hba.cnf with any nano application in Ubuntu and add the following configuration:
nano /etc/postgresql/10/main/pg_hba.confTo configure the file, use the following command:
host replication replication MasterIP/24 md5 - Open and edit postgresql.conf and put the following configuration in the primary server:
nano /etc/postgresql/10/main/postgresql.confUse the following configuration settings:
listen_addresses = 'localhost,MasterIP' wal_level = replica wal_keep_segments = 64 max_wal_senders = 10 - Finally, restart PostgreSQL in primary main server:
systemctl restart postgresqlYou’ve now completed the setup in the primary server.
Setting Up Replication in Secondary Server
Follow these steps to set up replication in the secondary server:
- Login to PostgreSQL RDMS with the command below:
su - postgres - Stop the PostgreSQL service from working to enable us to work on it with the command below:
systemctl stop postgresql - Edit pg_hba.conf file with this command and add the following configuration:
// "Edit" command nano /etc/postgresql/10/main/pg_hba.conf // "Configuration" command host replication replication MasterIP/24 md5 - Open and edit postgresql.conf in the secondary server and put the following configuration or uncomment if it’s commented:
nano /etc/postgresql/10/main/postgresql.conf listen_addresses = 'localhost,SecondaryIP' wal_keep_segments = 64 wal_level = replica hot_standby = on max_wal_senders = 10SecondaryIPis the address of the secondary server - Access the PostgreSQL data directory in the secondary server and remove everything:
cd /var/lib/postgresql/10/main rm -rfv * - Copy PostgreSQL primary server data directory files to PostgreSQL secondary server data directory and write this command in the secondary server:
pg_basebackup -h MasterIP -D /var/lib/postgresql/11/main/ -P -U replication --wal-method=fetch - Enter the primary server PostgreSQL password and press enter. Next, add the following command for the recovery configuration:
// "Edit" Command
nano /var/lib/postgresql/10/main/recovery.conf
// Configuration
standby_mode   = 'on'
primary_conninfo = 'host=MasterIP port=5432 user=replication password=YOUR_PASSWORD'
trigger_file = '/tmp/MasterNow'
Here,
YOUR_PASSWORDis the password for the replication user in the primary server PostgreSQL created - Once the password has been set, you’d have to restart the secondary PostgreSQL database since it was stopped:
systemctl start postgresqlTesting Your Setup
Now that we’ve carried out the steps, let’s test the replication process and observe the secondary server database. For this, we create a table in the primary server and observe if the same is reflected on the secondary server.
Let’s get to it.
- Since we are creating the table in the primary server, you’d need to login to the primary server:
su - postgres psql - Now we create a simple table named ‘testtable’ and insert data to the table by running the following PostgreSQL queries in the terminal:
CREATE TABLE testtable (websites varchar(100)); INSERT INTO testtable VALUES ('section.com'); INSERT INTO testtable VALUES ('google.com'); INSERT INTO testtable VALUES ('github.com'); - Observe the secondary server PostgreSQL database by logging in to the secondary server:
su - postgres psql - Now, we check if the table ‘testtable’ exists, and can return the data by running the following PostgreSQL queries in the terminal. This command essentially displays the entire table.
select * from testtable;
This is the output of the test table:
|  websites  |

-------------------

| section.com |

| google.com |

| github.com  |

--------------------
You should be able to observe the same data as the one in the primary server.
If you see the above, then you have successfully carried out the replication process!
What Are the PostgreSQL Manual Failover Steps?
Let’s go over the steps for a PostgreSQL manual failover:
- Crash the primary server.
- Promote the standby server by running the following command on the standby server:
./pg_ctl promote -D ../sb_data/ server promoting - Connect to the promoted standby server and insert a row:
-bash-4.2$ ./edb-psql -p 5432 edb

Password:

psql.bin (10.7)

Type "help" for help.

edb=# insert into abc values(4,'Four');
If the insert works fine, then the standby, previously a read-only server, has been promoted as the new primary server.
How To Automate Failover in PostgreSQL
Setting up automatic failover is easy.
You’ll need the EDB PostgreSQL failover manager (EFM). After downloading and installing EFM on each primary and standby node, you can create an EFM Cluster, which consists of a primary node, one or more Standby nodes, and an optional Witness node that confirms assertions in case of failure.
EFM continuously monitors system health and sends email alerts based on system events. When a failure occurs, it automatically switches over to the most up-to-date standby and reconfigures all other standby servers to recognize the new primary node.
It also reconfigures load balancers (such as pgPool) and prevents “split-brain” (when two nodes each think they are primary) from occurring.
Summary
Due to high amounts of data, scalability and security have become two of the most important criteria in database management, especially in a transaction environment. While we can improve scalability vertically by adding more resources/hardware to existing nodes, it isn’t always possible, often due to the cost or limitations of adding new hardware.
Hence, horizontal scalability is required, which means adding more nodes to existing network nodes rather than enhancing the functionality of existing nodes. This is where PostgreSQL replication comes into the picture.
In this article, we’ve discussed the types of PostgreSQL replications, benefits, replication modes, installation, and PostgreSQL failover Between SMR and MMR. Now let’s hear from you.
Which one do you usually implement? Which database feature is the most important to you and why? We’d love to read your thoughts! Share them in the comments section below.


