
Backing up your website isn’t something to overlook. Having a backup of your WordPress site can save a lot of headaches in many situations. For example, if you run into an error that breaks your site or an update affects its functionality, you’ll be able to roll back the saved version.
Restoring a WordPress backup can save you hours of troubleshooting. Plus, having one means that you can duplicate your site or move it to a new host. We’d go as far as to say that if you don’t have a recent backup, you should add it to the top of your to-do list.
In this article, we’ll show you precisely how to do that. We’ll discuss what parts of your website you need to back up and show you four methods for doing it, including through your web host, using plugins, the manual approach, and on a local site. Let’s get to work!
When To Back Up Your WordPress Website
The short answer is that you should always have a recent backup of your website. Imagine running into a site-breaking error today without any idea how to troubleshoot it.
If you have a backup that’s a day old or less, you’ll probably be fine. But backups that are weeks (or months) old, may be missing recent updates and critical changes.
If you run a mostly static site, less frequent backups might be okay. However, for forums, online stores, blogs, and very large sites, consistent backups are a necessity:
If you shop around for a web hosting service, you’ll notice that quality web hosts like Kinsta include daily backups as a significant selling point:
The best part about this is that backups are automated. Therefore, once you’ve configured the settings, your site will run backups every day without you needing to initiate the process.
What’s more, while Kinsta offers automatic daily backups, you can also access hourly, 6-hourly, and external backups as add-ons to our hosting plans. This may seem like overkill, but it saves a lot of time and stress should you encounter the worst.
A lot of WordPress plugins also enable you to schedule backups. This can come in handy if you’re using budget shared hosting that doesn’t include backup functionality as part of the deal.
However, without a web host or backup plugin to handle the process for you, you’ll need to create backups manually. This isn’t ideal since you may forget to make a backup or even miss a few files accidentally.
Additionally, it’s best to make a fresh backup before you make major changes like moving to a new host or changing your site’s domain. You might also create a backup before you run an update or edit your site files.
How To Back Up a WordPress Site (4 Methods)
Now that we’ve covered the importance of backing up your site, it’s time to explore how to do it. Let’s take a look at how you can back up a WordPress site using four methods.
1. How To Back Up Your WordPress Website Through Your Web Host
If you use a reputable web host, it should offer you automatic backups. However, the frequency of those backups might vary. For example, at Kinsta, we provide robust automatic daily backups, which you can access by logging into your hosting dashboard.
However, that’s not the only type of backup we offer. If you run a very large website or an enterprise-level business, you can also add hourly backups, 6-hourly backups, or external backup options when you purchase one of our hosting plans.
If you’re not a Kinsta user, we recommend checking with your web host about your backup options. It may handle the process for you or point you toward ways to do it manually.
How To Access Your Automatic Kinsta Backups and Create New Ones
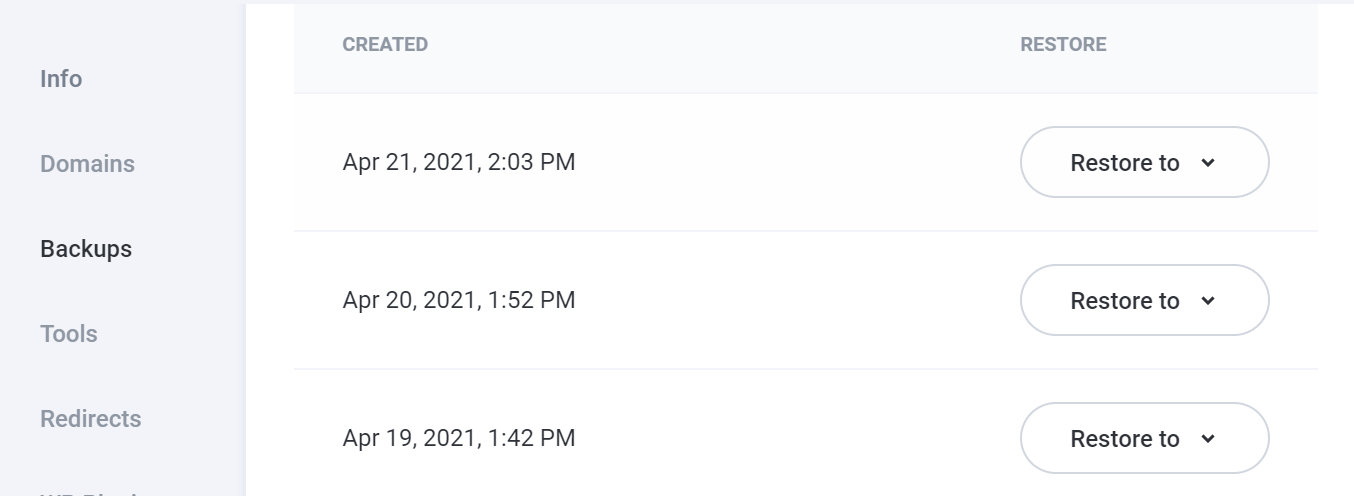
To access your automatic Kinsta backups (and create new ones), you need to log into your MyKinsta dashboard. Select your site and navigate to the Backups tab to see an overview of your backups:
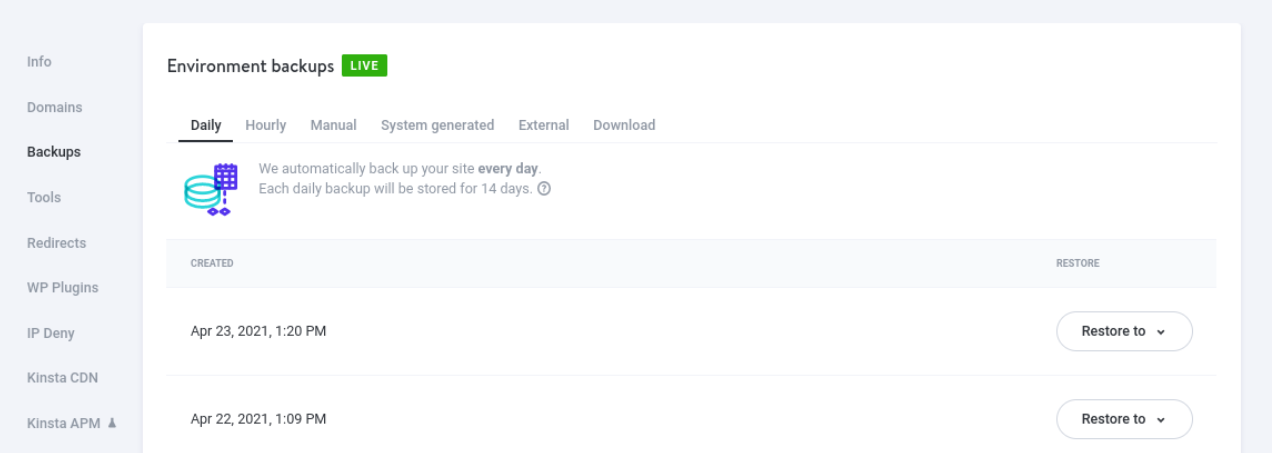
Kinsta, by default, creates a fresh backup of your website every day. Therefore, you should see a list of previous backups from the last 14 days.
Moreover, we enable you to restore backups to either your live or staging environments. The last feature can be helpful if you want to test changes to previous versions of your website.
All you need to do is click on the Restore button. Then, select either Live or Staging:
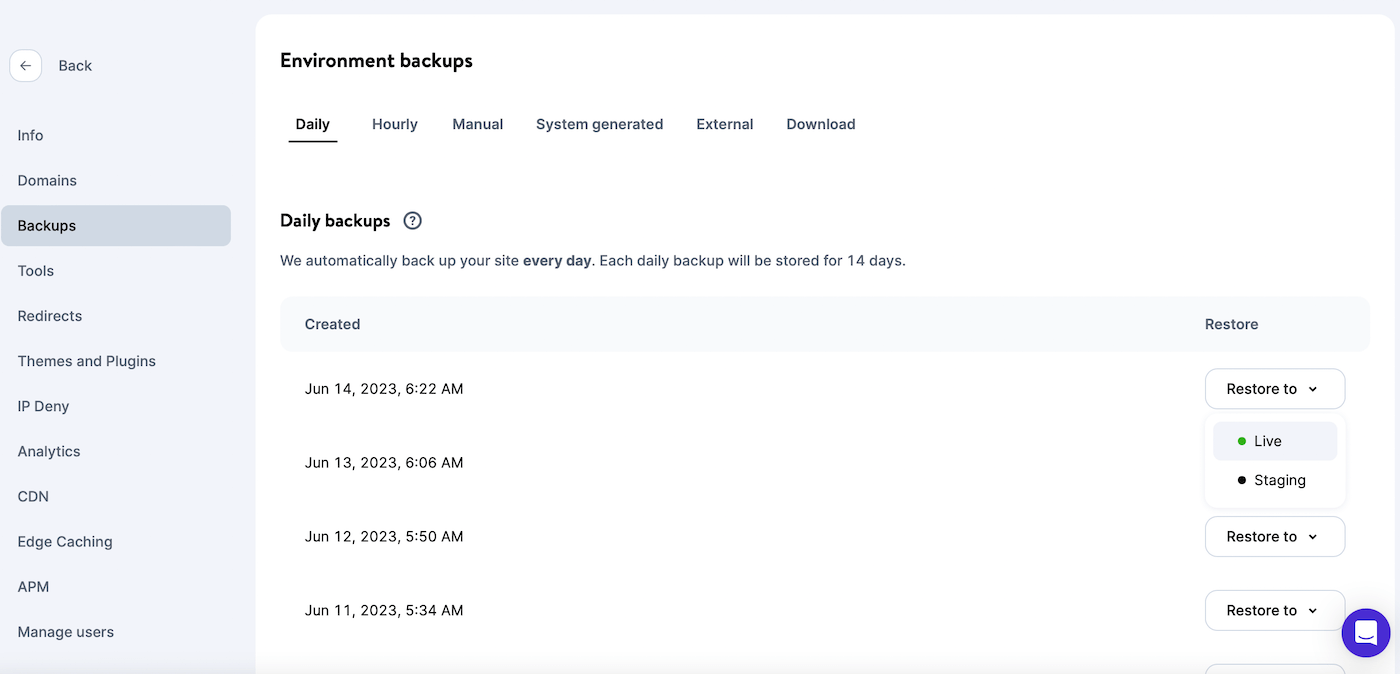
A popup will appear where you can check the backup details and confirm the restoration.
We also provide you with the option of generating backups on demand. To do this, head to the Manual tab and select the Back up now option:
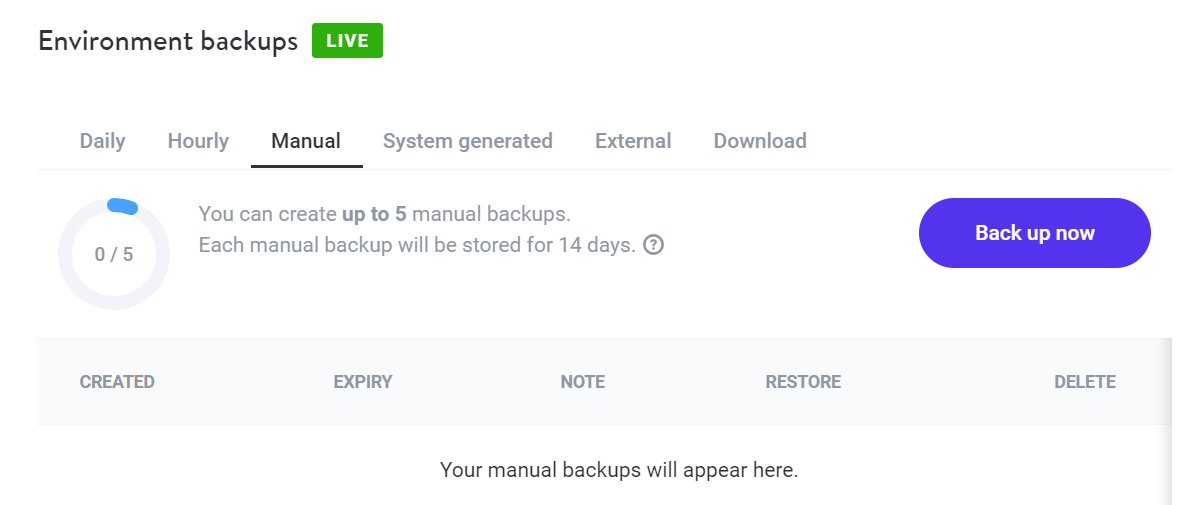
You can create up to five manual backups, which the system will store for up to 14 days. This is a useful feature that you can use right before making significant updates to your website.
2. How To Use a Backup WordPress Plugin
There are a lot of WordPress backup plugins that you can use. However, we can divide them into two broad categories:
- Full-site backup plugins: This type of plugin generates full copies of your website and saves them for a rainy day.
- Incremental backup plugins: This family of plugins only generates backups when you make changes to your website, so you avoid taking up unnecessary server storage space.
Another difference between those two types of plugins is that incremental backup tools tend to cost money. However, there are a lot of free full-site backup tools that you can use.
If you’re interested in incremental backup plugins, we offered a roundup of our favorite options in a previous blog post. For this section, we’ll show you how to use one of the most popular free solutions, Backup Migration:
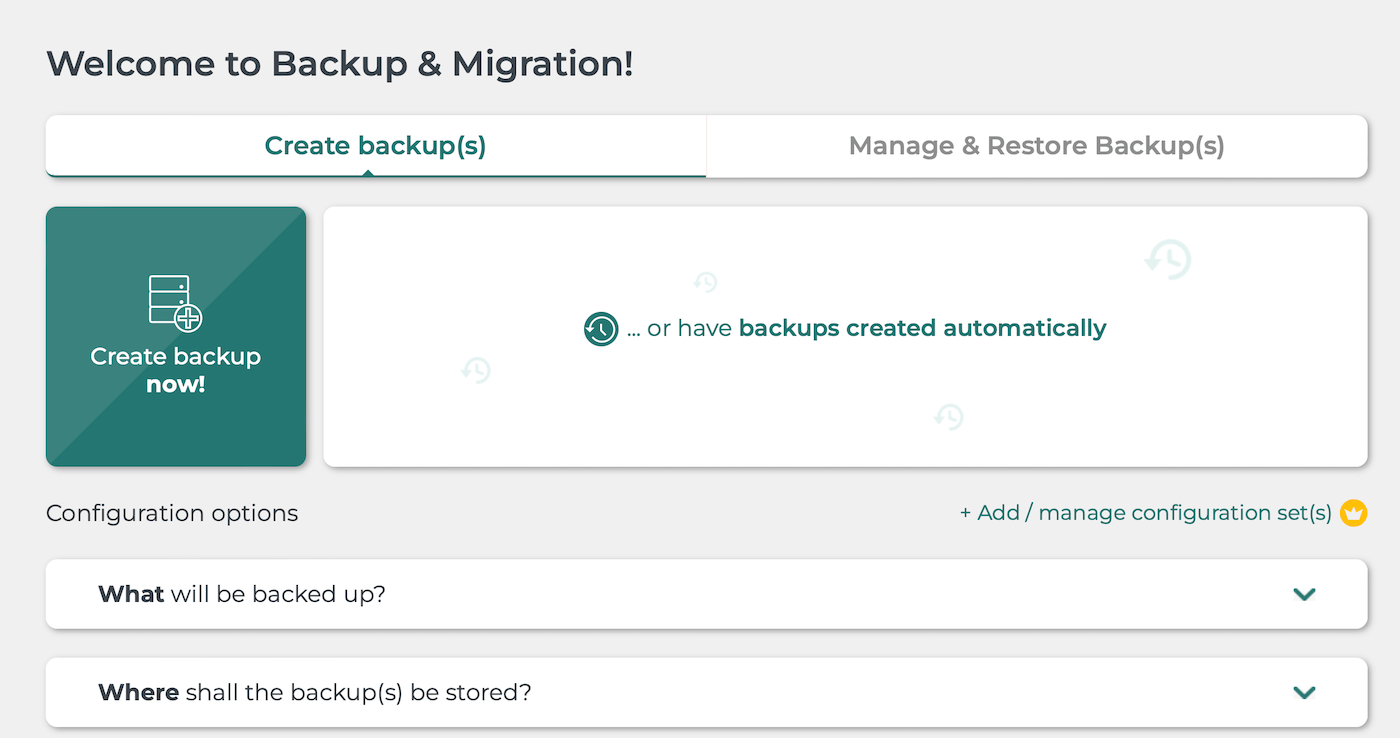
To get started, install and activate the plugin. Then, go to Backup Migration in your WordPress dashboard. Next, click on the Create backup now! button:
A popup will appear, informing you of how much data will be backed up:
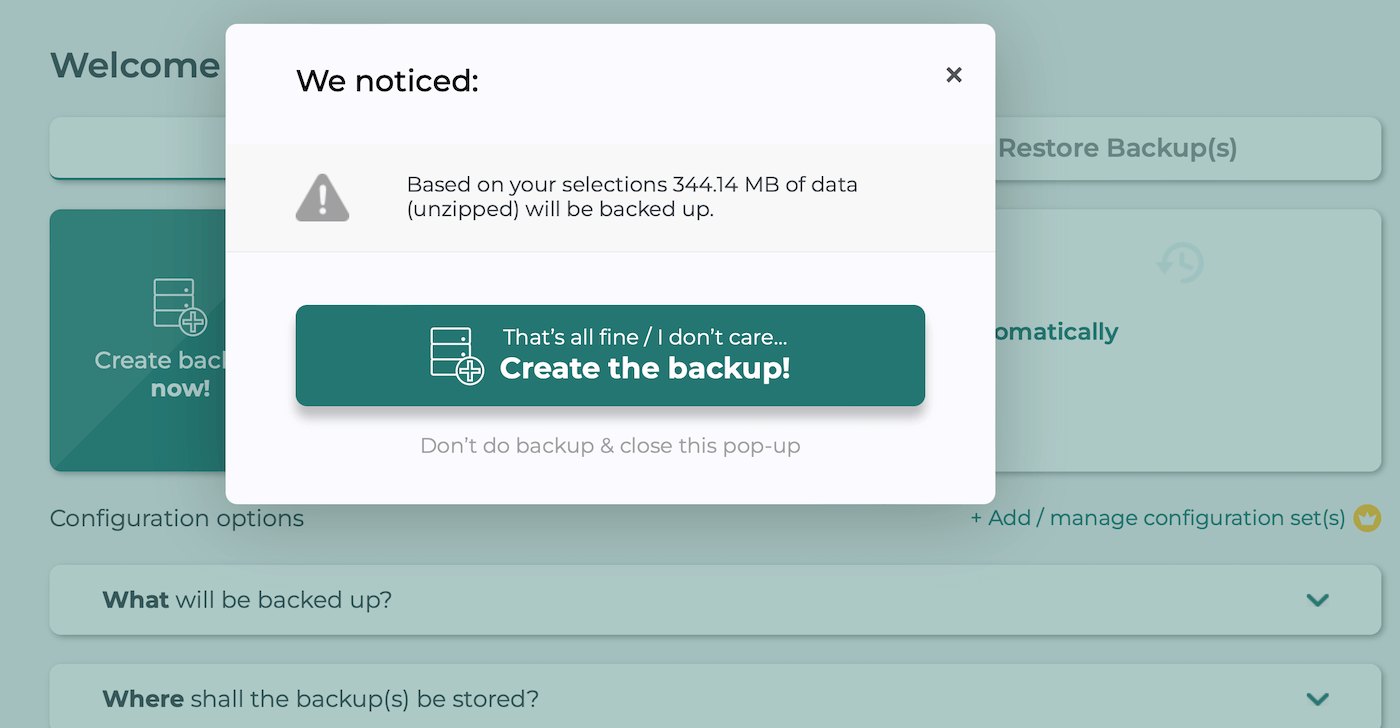
If you’re happy to proceed, click on Create the backup!. This may take a few seconds, and you’ll be notified when the backup is complete:
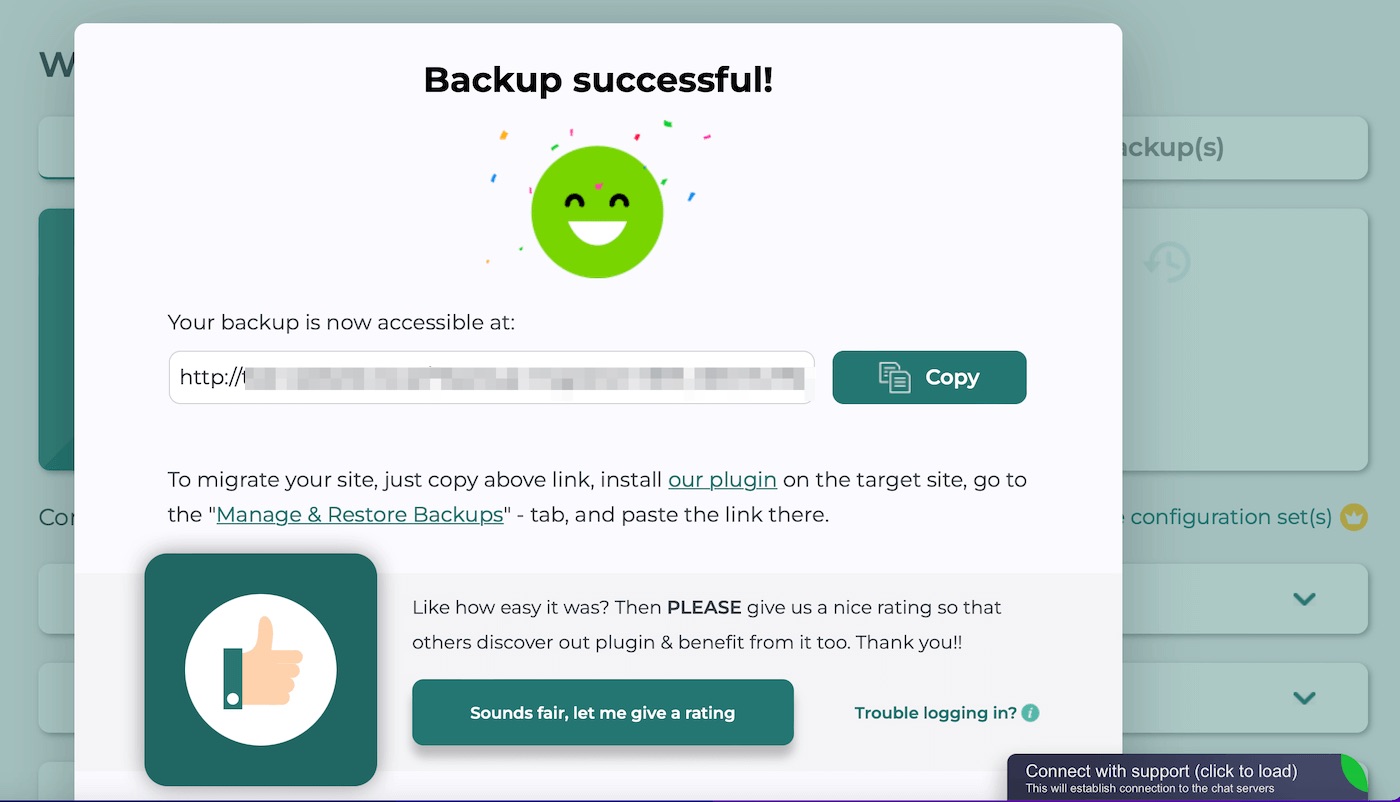
You’ll receive a link where you can view and save your backup. Copy the link and paste it into a new tab. As soon as you do this, a copy of the backup will download to your computer.
You can also choose to schedule automatic backups for your WordPress site using Backup Migration. Here, you can configure monthly, weekly, or daily backups:
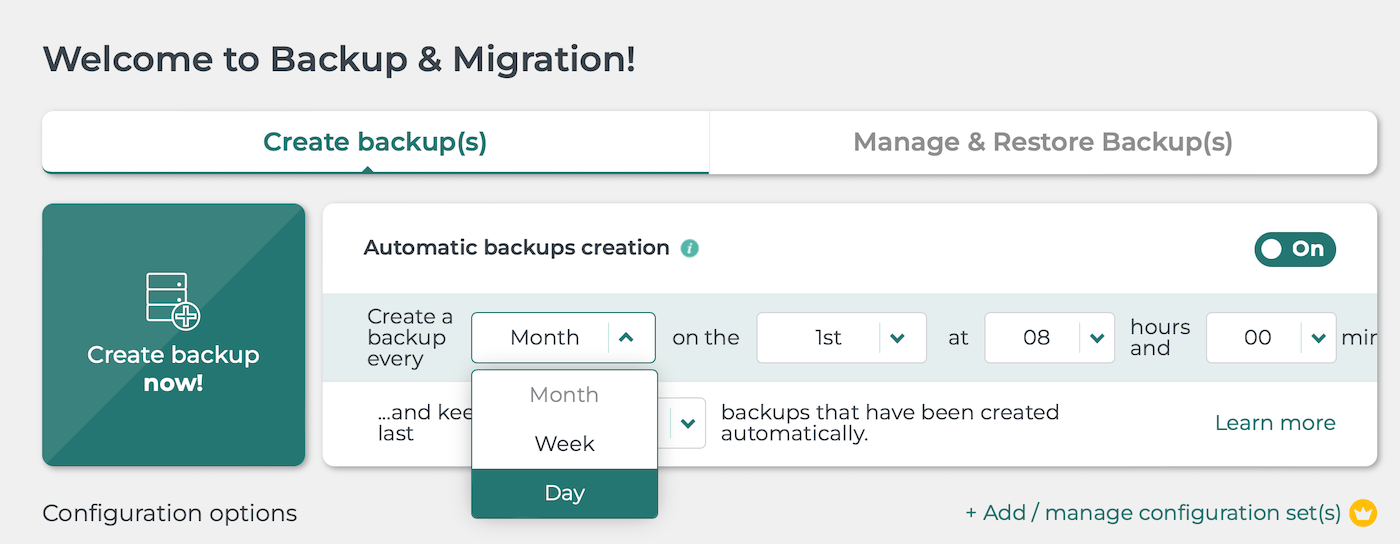
Additionally, you’re able to choose the exact time for your daily backups to take place. Meanwhile, you can tell the plugin how many backups you want it to hold on to.
Restoring Your Backup Migration Backup
Restoring a Backup Migration backup is a simple affair. All you have to do is click on Manage & Restore Backup(s). Then, head to the Your saved backups section:
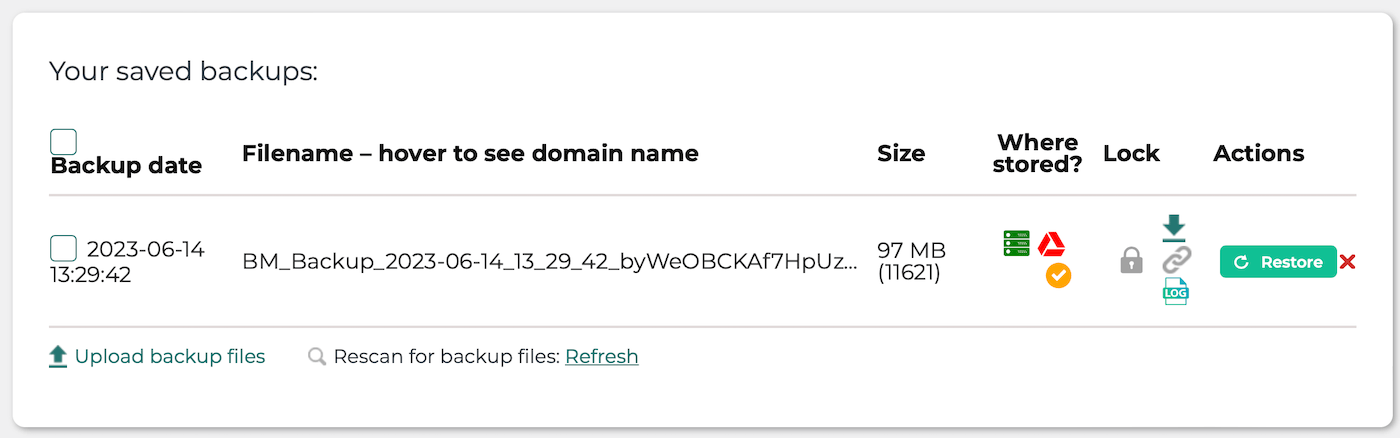
Here, you can see when your backups were conducted. Plus, for each of your backups, you can view the original domain name, the file size, and the location where the backup is stored.
Now, to restore a backup, click on the Restore button in the Actions column. A warning message will appear, informing you that existing files, folders, and databases will be overwritten:
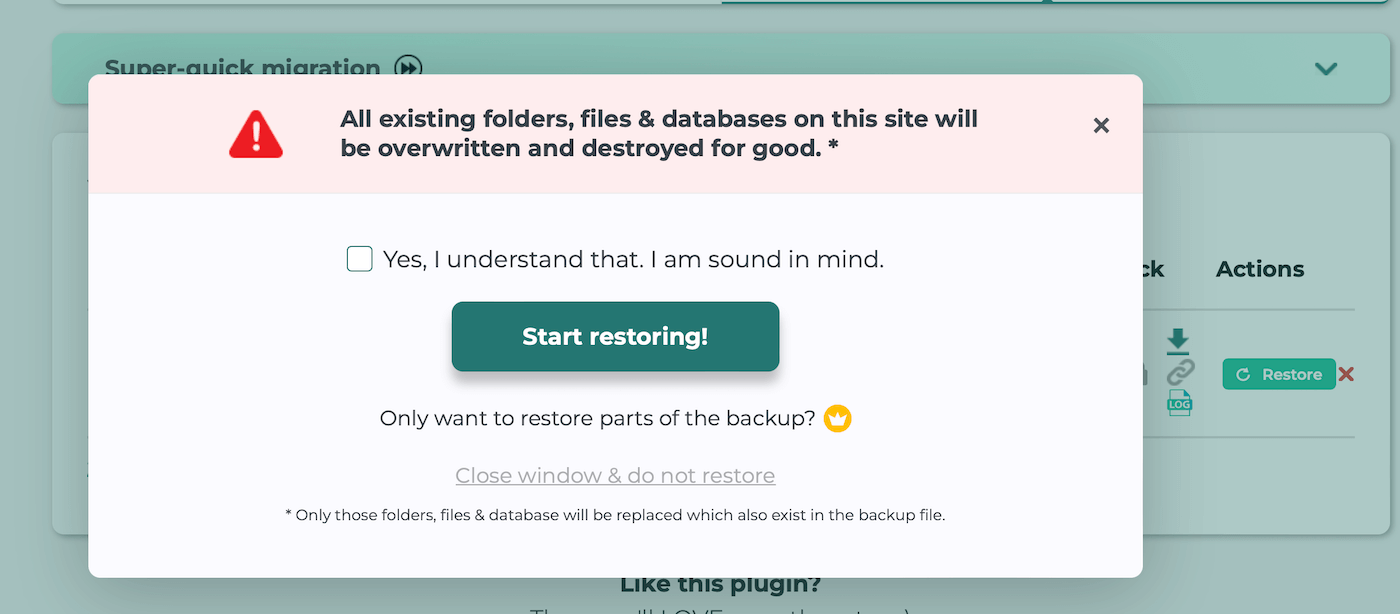
If you’re happy to go ahead with the restoration, check the box to say that you understand. Then, select Start restoring.
3. How To Manually Backup a WordPress Site
As we mentioned before, backing up a WordPress website involves copying all of its files and exporting the contents of its database. You can carry out the first of those two tasks using a File Transfer Protocol (FTP) client such as FileZilla.
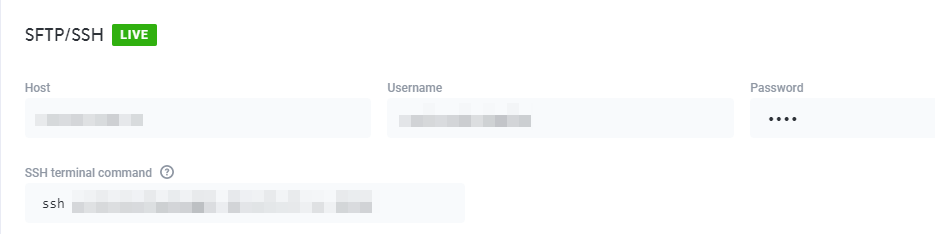
Your web host should provide you with a set of credentials that you can use to connect to your website via FTP, or SFTP in our case:
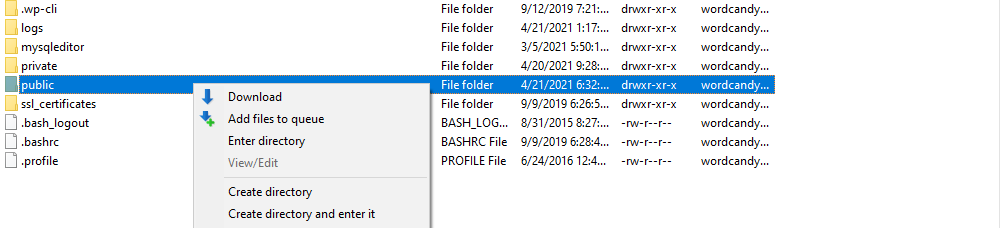
Using those credentials, you’ll be able to connect with your server and find your WordPress root directory. In many cases, that directory is called public. To get started, go ahead and copy or download the folder in its entirety:
The download might take a while, as most WordPress websites include hundreds or thousands of files. Once it’s done, we recommend that you rename that folder to the date of the backup and then store it in a safe location. This lets you store your entire WordPress site (including all media) on your PC or in a cloud storage solution.
That answers the question “How do I backup my WordPress site with FTP?” — which leaves us with your database. The easiest way to back up that element is by going to your hosting control panel and looking for your database management software.
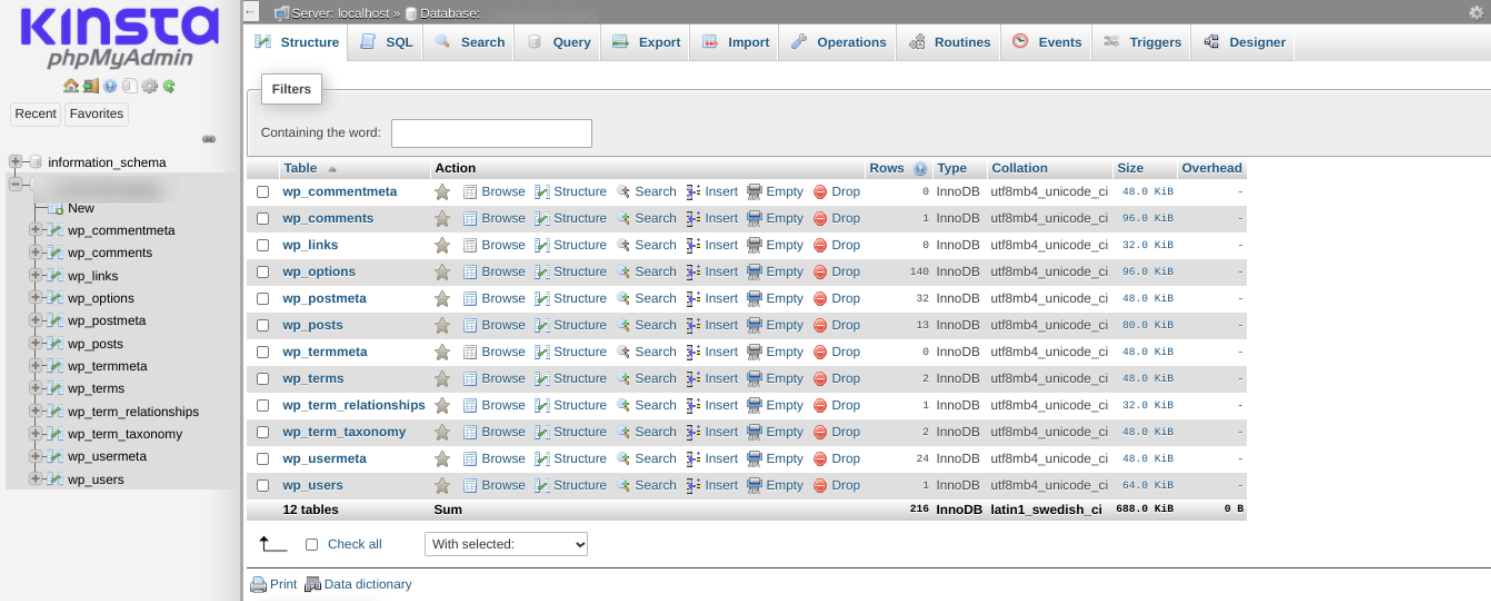
For example, if you’re using Kinsta, you can access your database by logging into your hosting account dashboard (MyKinsta if you’re a Kinsta user), selecting a website, and browsing the Info tab:

When you click on the option called Open phpMyAdmin, it will launch the database manager. Select your site’s database from the menu to the left, and you should see a list of tables like this one:
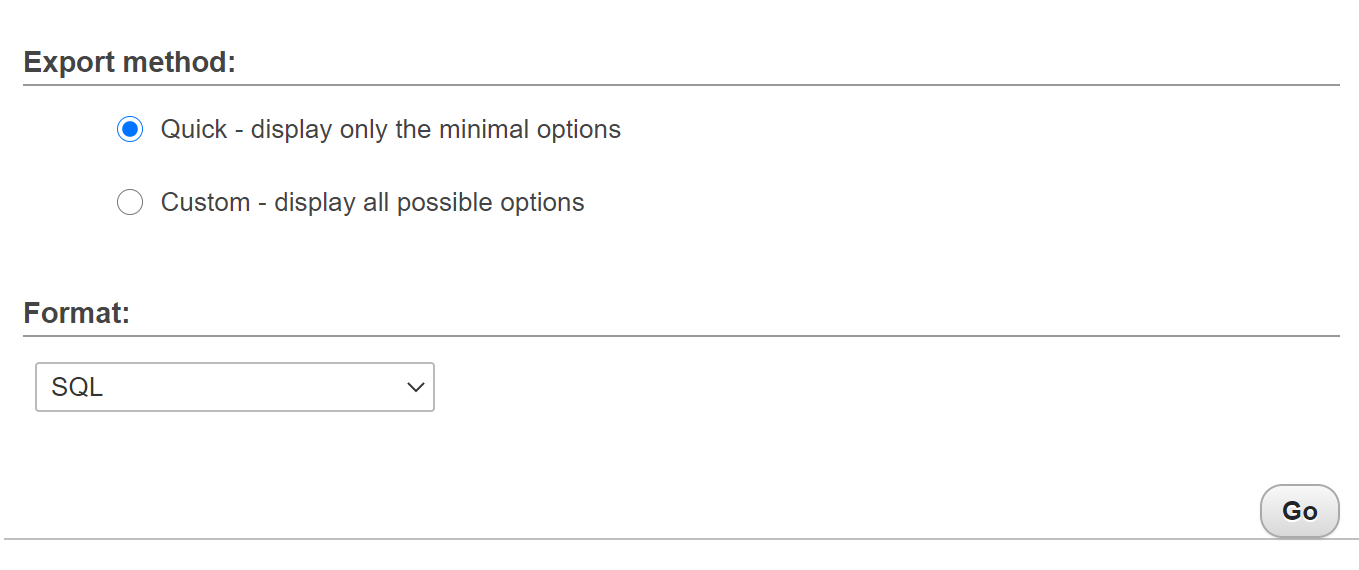
Next, select Export in the menu at the top of the screen. phpMyAdmin will ask you what export method you want to use. The Quick option will automatically include all of your site’s tables in an SQL file, which is precisely what we want.
Make sure to select SQL under Format and then click on Go:
Your database file should download immediately. That’s it! At this stage, you have both your WordPress root directory and a copy of its database. You can zip the directory and the SQL file together and save them for a rainy day.
Restoring Your Manual Backup
If you need to restore your manual backup, the best way to do so is to upload the backup root folder to your server (at the same level as the current one) with a different name. Once the directory is up, you can delete your current root folder and rename the backup to its original value.
After that, it’s time to restore your database backup. To do so, return to phpMyAdmin and find your site’s database. This time, select the Import option at the top of the screen.
phpMyAdmin will ask you to select a file to import and specify its format:
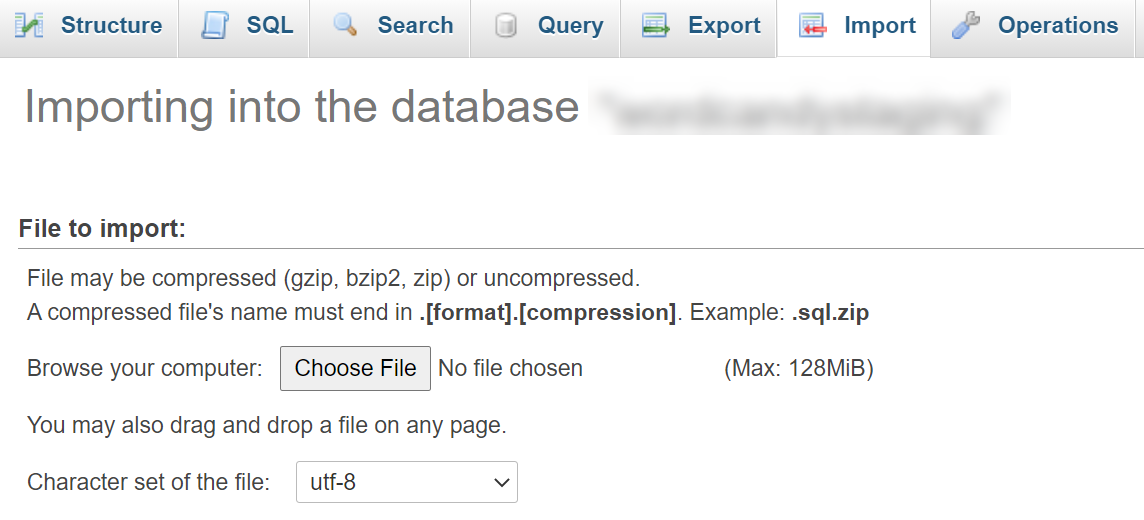
Select the database backup file you want to import, and click on Go at the bottom of the screen. Once the import process is complete, you’ll see a success message.
At this stage, if you visit your website, your backup will have replaced its most current version. If you restored a backup to fix a problem with your website, it should be working correctly now.
4. How To Back Up a WordPress Site Locally Using DevKinsta
DevKinsta is a free local WordPress development tool that anyone can use (whether you’re a Kinsta customer or not). It’s perfect if you want to test new projects locally, work on plugin or theme development, and more.
You’ll also be able to use it to test databases and email using tools like Adminer and Mailhog. Plus, DevKinsta provides easy access to auto-updates, debug mode, and site cloning. Then, if you decide to become a Kinsta customer in the future, you’ll be able to push/pull from staging environments.
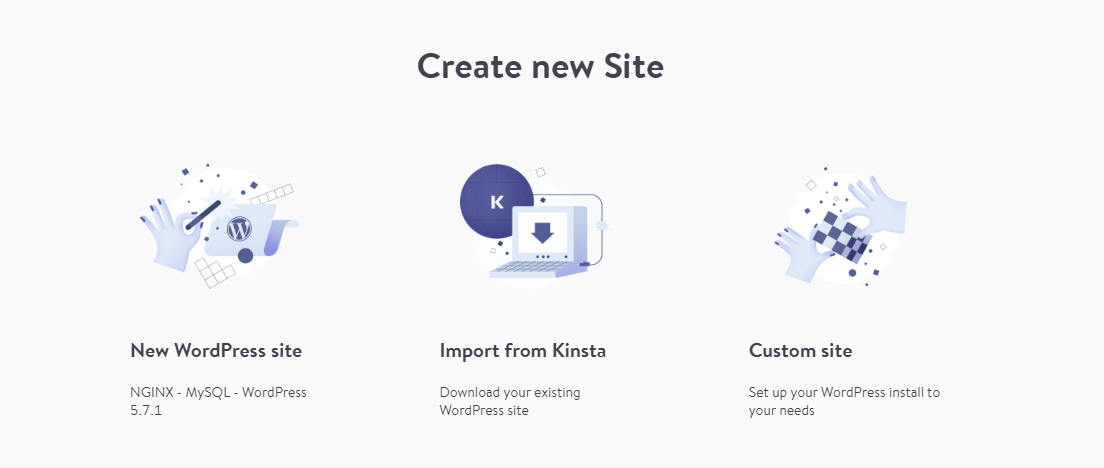
If you’re currently a Kinsta user, you can connect DevKinsta with your hosting account and use it to back up your localhost WordPress sites. To do so, open DevKinsta and select the Import from Kinsta option under Create new Site:
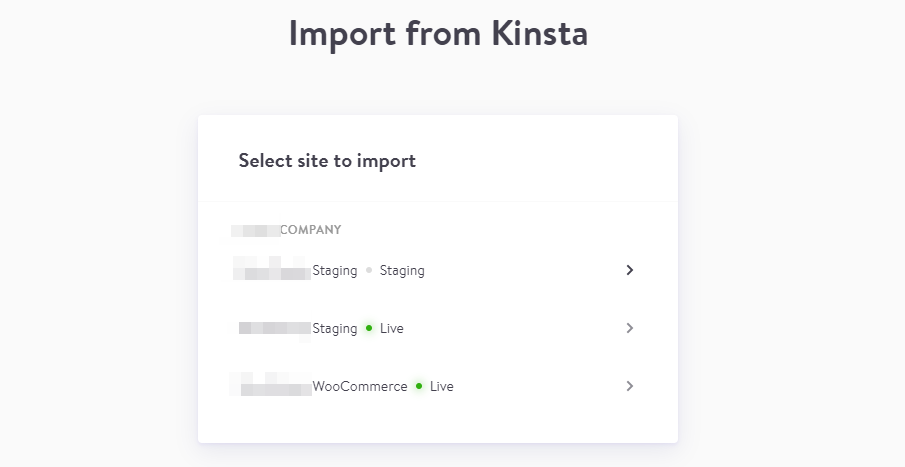
If you haven’t done so yet, DevKinsta will ask you to verify your hosting credentials. Once you do, you’ll see a list of all your existing Kinsta websites, including staging environments:
Select a website, and DevKinsta will do the rest. The import process might take a while depending on how large the website is. However, once it’s done, the copy will double as a local backup.
If you want to restore the backup, you can use DevKinsta’s push to staging functionality. Once the backup is in a staging environment on Kinsta’s servers, you can move it to production.
Summary
Learning how to backup a WordPress site is easier than you might imagine. You can do so manually, using plugins, or even let your web host take care of the entire process.
The easiest and safest approach to WordPress site backups is to use a hosting provider that automates them. At Kinsta, we offer automated daily WordPress backups with every plan. If that’s not enough, you can create manual backups at will or use DevKinsta to set up local copies of your website.
Do you have any questions about how to back up your WordPress website? Let’s go over them in the comments section below!


