WooCommerce Blocks helps you create custom store pages, showcase your products, and add advanced ecommerce functionality like filtering and searching — all without writing a single line of code.
Many blocks ship with WooCommerce by default, but several new ones do not. You can use these new blocks in your WooCommerce store by installing the WooCommerce Blocks WordPress plugin. This plugin is a testing ground for experimental offerings and potential future additions to the core WooCommerce Blocks.
Integrating WooCommerce Blocks into WordPress is straightforward with Kinsta, where you can include WooCommerce during the setup process by checking a box. This integration facilitates quick, effortless online store building.
This hands-on guide walks you through adding WooCommerce capabilities to your WordPress site using WooCommerce Blocks.
Prerequisites
To follow along with this guide, ensure you have:
- WooCommerce installed and activated in your WordPress dashboard
- Familiarity with WordPress
If you don’t have a WordPress site already, you can spin up a WordPress site with Kinsta’s dashboard or via DevKinsta locally. Once you have your site, import these sample products for your WooCommerce store.
Exploring WooCommerce Blocks
The WordPress default block editor, introduced with version 5.0, is the Gutenberg editor. It replaced the classic editor with a block-based system, letting users build and customize visually appealing content without extensive frontend coding knowledge.
WooCommerce Blocks seamlessly integrates with Gutenberg editor’s intuitive drag-and-drop interface, offering a set of dedicated blocks designed for product display, cart management, checkout processes, and more.
This integration empowers you to take full advantage of the flexibility and simplicity of the block editor while tailoring your WordPress site for optimal ecommerce performance.
To utilize WooCommerce Blocks, start by opening or creating a page or post. Click the + button on the top bar to view all blocks, then navigate to the WOOCOMMERCE section. Here’s a brief overview of the different blocks:
- Product Search — Adds a search bar for quick customer product searches.
- All Products — Displays all store products in a grid.
- All Reviews — Lists all product reviews.
- Classic Checkout — Renders the classic checkout shortcode.
- Classic Cart — Renders the classic cart shortcode.
- Customer Account — Enables customer login and logout capabilities.
- Featured Category — Highlights a product category and a call-to-action (CTA) to encourage prompt responses.
- Featured Product — Highlights a product or variation and a CTA.
- Active Filters — Displays the currently active filters.
- Filter by Price — Renders a price range that customers can use to filter products.
- Filter by Stock — Enables filtering products by inventory status.
- Filter by Attribute — Filter products based on attributes like size or color.
- Filter by Rating — Enables customers to filter the products by their rating.
- Hand-Picked Products — Displays a selection of handpicked products in a grid.
- Mini Cart — Provides a quick cart view button.
- Store Notices — Displays customer-facing notifications generated by WooCommerce or other extensions.
- Best Selling Products — Displays a grid of your store’s all-time best sellers.
- Products Categories List — Shows all the product categories as a list or a dropdown.
- Products by Category — Displays a grid of products from the selected categories.
- Product Collection (Beta) — Displays products from a designated collection.
- Newest Products — Displays the latest products in a grid.
- On Sale Products — Displays current sale items in a grid.
- Products by Tag — Displays products with the selected tag in a grid.
- Top Rated Products — Showcases the top-rated products in a grid.
- Products by Attribute — Displays the products with the selected attributes in a grid.
- Reviews by Category — Displays the product reviews from specified categories.
- Reviews by Product — Displays reviews organized by product.
- Single Product — Showcases a single product.
- Cart — Displays the shopping cart.
- Checkout — Displays the form enabling customers to submit orders.
You now know what each block represents. Let’s use some of these blocks to create an ecommerce experience.
Use Product Grid block in WooCommerce
A product grid block is a versatile tool for showcasing your store’s products in an organized, grid format on your WordPress site. Here’s how to add and customize a product grid block:
- Navigate to the page or post where you want the products displayed. Assign a title like “Products.”
- Click the + button on the top navigation bar to display all the blocks. Scroll down to the WOOCOMMERCE section and select All Products. This action displays your products in a grid layout on the page.

Using the All Products WooCommerce Block to display products in Grid. - To configure this block, use the block settings panel on the right side. You can access the settings by clicking the Settings icon (the second-rightmost icon on the top navigation bar).

Settings panel to adjust the All Products block. Here, you can tailor the grid’s layout, content, and styling:
- Layout Settings: Adjust the number of rows and columns. For example, set both to 2 for a balanced look.
- Content Settings: Decide if you want to include a sorting dropdown menu for customers. This feature allows customers to sort products in a chosen order. You can disable it if preferred.
- Advanced Styling: If needed, you can add CSS classes for more sophisticated styling.
- Preview the page once you’ve finalized the configurations to ensure everything appears as intended. Then, click the Publish button. This step allows you to make the page accessible publicly, privately, or with password protection, based on your preference.

Updated Products page displays products in a 2-by-2 grid and reflects a navigation bar.
Add a Featured Product block to your page or post
The Featured Product block lets you highlight a product on your page or post. You can select a product, customize its display settings, and add it to your content to draw attention to a particular item you want to showcase.
Follow these steps to add a featured product block:
- Begin by navigating to the page or post where you want to feature the product. Imagine you’re designing a product grid and want to place the featured product at the top. Create a space in that location, and you’ll notice a + button on the left.
Alternatively, if you have an existing block near the desired spot, click the three vertical dots so a menu pops up. You can choose Add before or Add after.
Adding the Featured Product block before the All Products block. - Select the + button on the top navigation bar to display all the blocks and search for Featured Product.

Select a product as a featured product with the Featured Product block. - Choose the product you want to display. Then, click Done.
- To give your Featured Product block a unique look and feel, click on Settings. From the block settings panel, you can:
- Decide whether to display the product description and price.
- Configure how your media (images and videos) should appear.
- Specify the alt text for the product image.
- Choose the block overlay color.
- Adjust the opacity of the block.

Adjusting the Featured Product block settings. - Once you’ve made all the necessary adjustments, you can publish your page or update it if it’s already live. This allows you to see the block in action and ensure it looks just how you want it to.

Preview of the updated Products page displaying the featured beanie item above the product grid.
Utilize Filter blocks in WooCommerce
Filter blocks allow your customers to refine product searches based on specific criteria, helping them quickly locate products that match their preferences or requirements.
- Navigate to the page or post where you want to add the blocks. This guide uses the same Products page from the previous steps.
- Choose where you wish to add the filters.
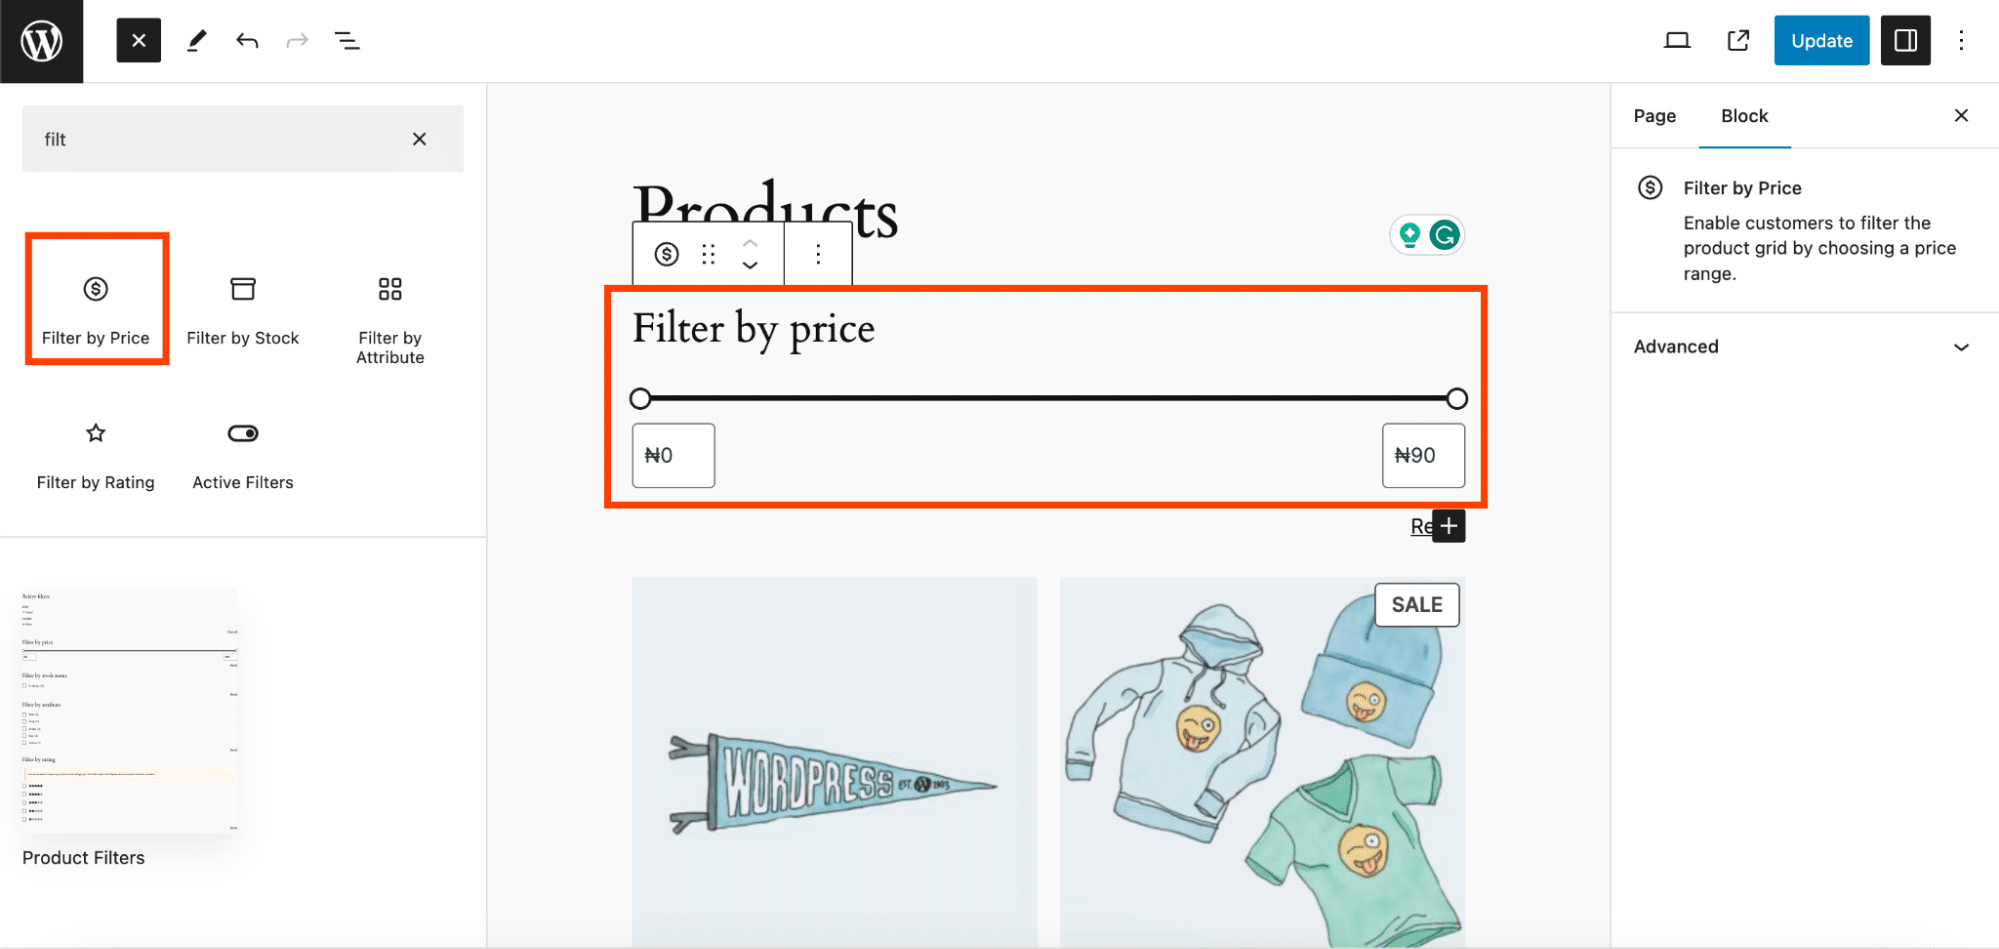
- Click the + button from the top navigation bar to display all the blocks. Scroll down to the WOOCOMMERCE section and see a filter option for price, stock, attribute, and rating. For example, if you choose Filter by Price.
Adding the Filter by Price block
By selecting this block, you can display a price range bar that allows users to filter which products appear on the page based on their desired price range. You can customize the block settings on the right-hand panel to suit your needs.
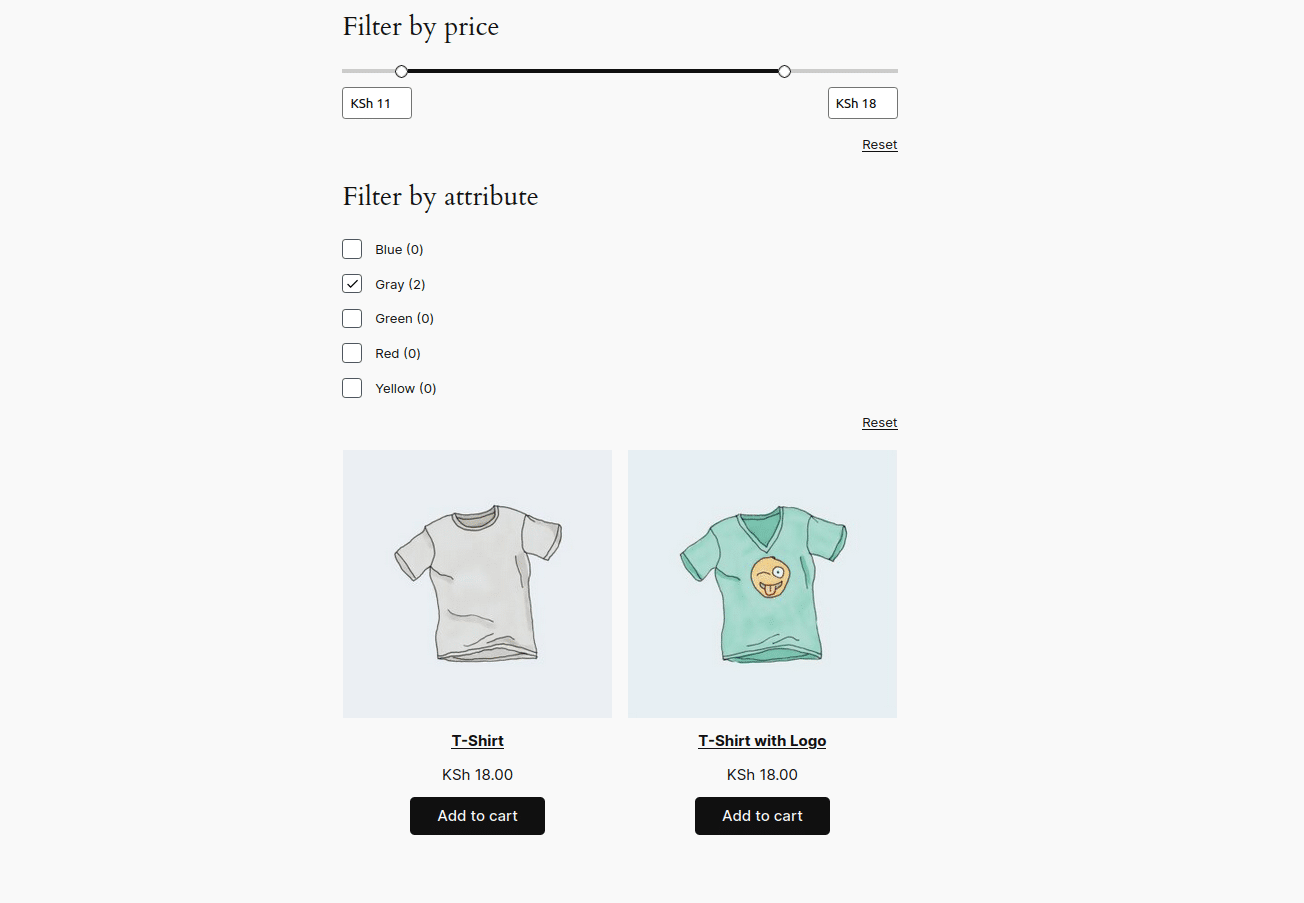
Adding the Filter by Attribute block
You can also use the Filter by Attribute block.

You can choose a specific attribute, such as Color, and then configure the settings accordingly. For example, you can enable Display product count to show the number of products available in each color.
You can then view the live page and test the functionality of the filter buttons.
By following these steps, you can offer your customers a seamless shopping experience by allowing them to easily refine their product searches based on various criteria, ultimately enhancing their satisfaction and helping them find the desired products.
Cart and checkout pages
Your web store’s cart and checkout features must be intuitive and fully functional for a smooth user journey. Ensuring an excellent customer experience relies on managing cart items effectively and facilitating an effortless checkout process.
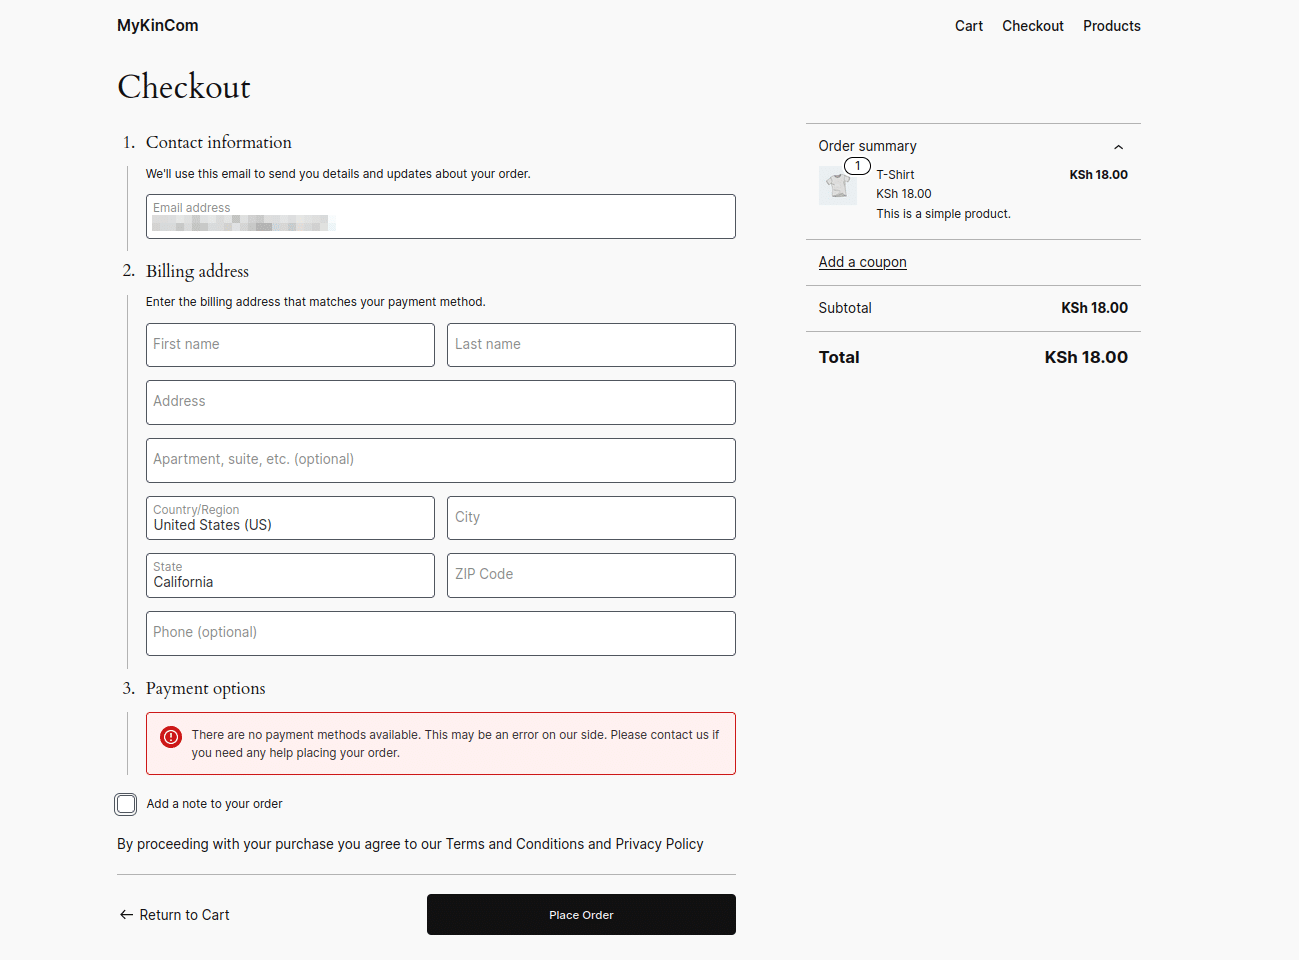
WooCommerce creates the Cart and Checkout pages by default using the appropriate blocks. Customers can add products to their cart and access it through the navigation bar.
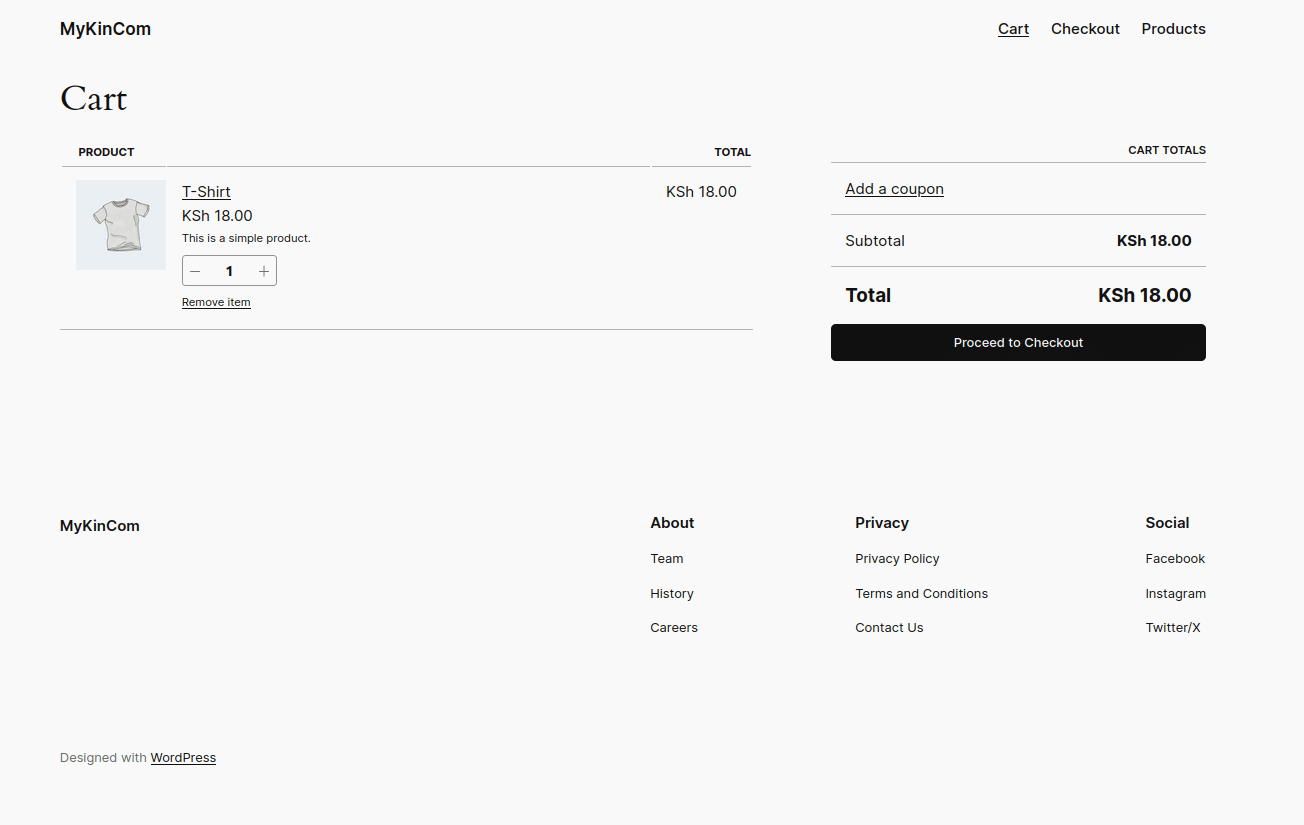
After confirming their cart contents, your customer can select the Proceed to Checkout button, fill out the necessary details, and place their order.
How to create a custom Shop page
Now that you’ve learned how to use certain WooCommerce Blocks, the next step involves combining them to create a custom user-friendly shop page with the following blocks:
- Product Search
- Filter by Price
- Product Categories
- Featured Product
- All Products
To create this custom shop layout, create a new page and follow the steps below.
- Enter “Shop” as the page title.

The Shop page in edit mode. - Using the same steps as before to add a block, add the Product Search block. Don’t apply any configurations.

Adding the Product Search block. - Add the Product Categories List block.

Adding the Product Categories List block. In the block setting page, set the DISPLAY STYLE to Dropdown.

Adjusting the Product Categories List block settings. - Next, add the Filter by Price block. Don’t configure anything for this block.
- Add the Featured Product block and select the product to display. Apply the same configurations as the Featured Product block you made earlier.

The Shop page shows the featured cap product with some settings for the featured product. - Add the All Products block.

Adding the All Products block. For this block’s settings, set the COLUMNS and ROWS values to 2 and deselect the Show Sorting Dropdown.

Adjusting the All Products block settings. - Publish the page and view the results.

Previewing the Shop page. 
Previewing the Shop page.
How to monitor and analyze block performance
Kinsta’s robust tools monitor and analyze the performance of pages that use WooCommerce Blocks.
Kinsta’s APM tool
Kinsta’s Application Performance Monitoring (APM) tool allows you to monitor the performance of pages containing WooCommerce Blocks. It captures timestamped information about PHP processes, MySQL database queries, and other crucial metrics, letting you track and analyze WooCommerce-facilitated transactions.
You might, for example, analyze the duration and frequency of interactions and potential bottlenecks associated with these pages. With this information, you can precisely troubleshoot and optimize performance.
Kinsta’s analytics tool
Evaluating the impact of WooCommerce Blocks on user engagement and sales requires a multifaceted approach. Kinsta’s comprehensive analytics tools play a crucial role here. Using the WordPress analytics features within the MyKinsta dashboard gives you valuable insights into various performance metrics that directly influence user experience — and, consequently, sales.
- The Resources section of the MyKinsta dashboard tracks your site’s total visits, disk space, and bandwidth usage. It provides a quantitative overview of site traffic and resource use.
- The Performance section includes metrics like average PHP + MySQL response time and AJAX usage. These statistics help you track the responsiveness and interactivity of the pages using WooCommerce Blocks.
- The Response section provides response code breakdowns and error analyses, helping you better understand user interactions and potential obstacles they may encounter.
- The Geo & IP section, CDN Usage section and Cache section lets you track geographical insights, content delivery network (CDN) usage, and cache efficiency. This information helps refine your site based on user behavior, location, and performance data.
By closely monitoring these analytics, you can identify potential bottlenecks and optimize your pages using WooCommerce Blocks to ensure a seamless, engaging user experience.
You can read our ultimate guide on 18 powerful ways to speed up your WooCommerce store to learn more tips. Speed is crucial for online stores, as slow-loading sites lead to user frustration and lost sales.
Summary
This guide explored the capabilities of WooCommerce Blocks, from adding product grids and featured products to implementing powerful filter blocks. It also outlined the significance of cart and checkout boxes, critical elements in guiding customers through a seamless shopping experience.
Strategically combining various WooCommerce Blocks allows for an intuitive and visually appealing layout. The process involves careful block selection, configuration, and arrangement to cater to specific functionalities and customer preferences.
Choosing Kinsta’s WordPress hosting service significantly enhances the performance and reliability of your WooCommerce sites. With optimized server configurations, robust security measures, and seamless scalability, Kinsta ensures that your online store operates at peak efficiency.
Whether using WooCommerce blocks for product displays, filters, or cart functionalities, Kinsta’s hosting infrastructure provides the speed and stability needed to deliver an exceptional shopping experience to your customers.
Have you experienced using WooCommerce blocks? If so, which block is your favorite, and what new block would you like to see added? Share your thoughts in the comments section.