
When the WordPress block editor, or Gutenberg, launched in December 2018, we didn’t know what to expect. Sure, we’d had plenty of time to play around with its beta version, but we couldn’t predict how smoothly the actual launch would go or how eager users and developers would embrace the new editor.
We’ve seen the Gutenberg editor undergo tremendous growth in the two-plus years since we first published this post. It’s moved from a minimum viable product (MVP) launch to a more mature project that’s getting closer to the goal of creating a unified Full Site Editing experience for WordPress.
To account for these changes, we’ve revisited the Gutenberg editor to take you through its new face, including where it will be going next soon.
What Is the Gutenberg Block Editor?
Gutenberg, alternatively known as the “WordPress block editor” or just the “WordPress editor,” is the WordPress content editor introduced in WordPress 5.0, released on December 6, 2018.
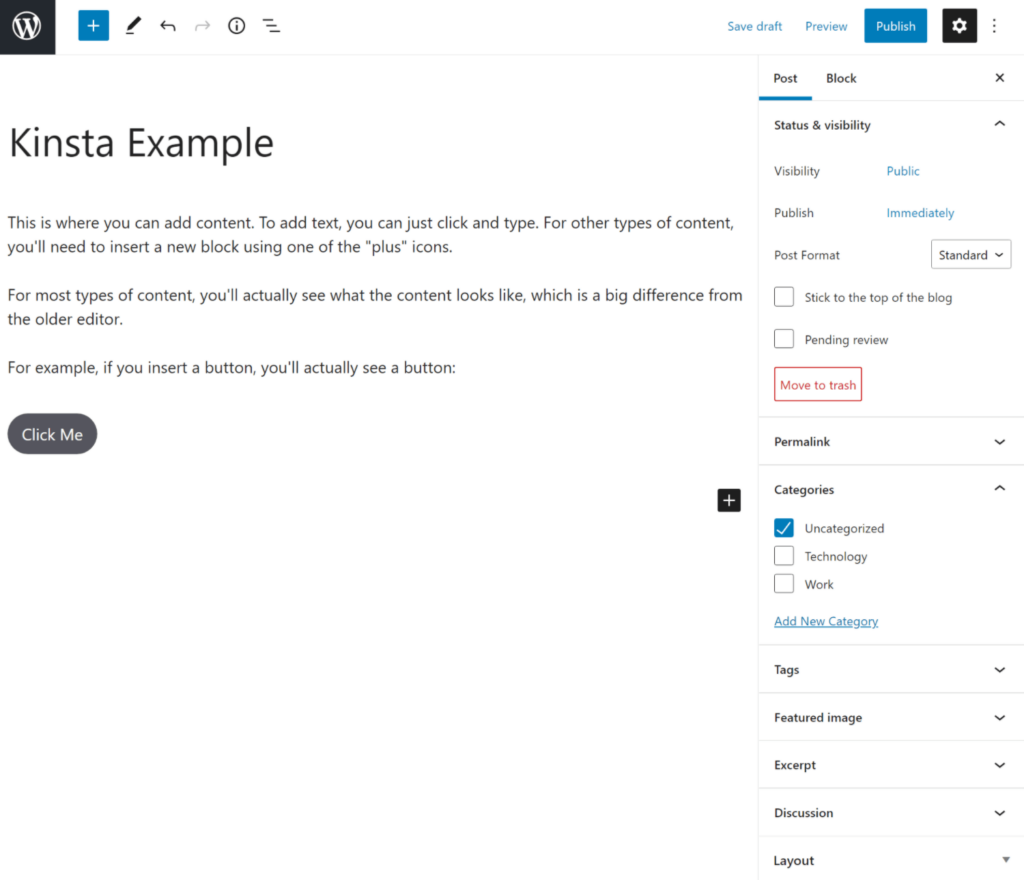
If you haven’t heard that term, it’s the default editor that all WordPress sites use unless you’ve specifically disabled it. It looks something like this:
The big difference between the Gutenberg WordPress editor and the previous WordPress editor (now called the “classic editor” or “TinyMCE editor”) is a new block-based approach to creating content.
With Gutenberg, every element in your content is a block, which allows for easy manipulation of content. Each paragraph is a block, each image is a block, each button is a block — you get it!
Third-party developers can also create custom blocks, which is helping end WordPress’s affair with shortcodes. Let’s say you want to embed a contact form. Instead of needing to add a shortcode (e.g. `[your-form-shortcode]`) as you did in the past, you can now just drop in your form plugin’s block.
Beyond that, you can also use blocks to create more complex layouts, like setting up a multi-column design or grouping blocks to create a cohesive section.
As we dig more into showing you how to use the block editor, you’ll get a better idea of how you can use blocks to improve how you create content.
Gutenberg Isn’t Just a Content Editor
One important thing to understand is that the Gutenberg project aims to be more than just a content editor.
<p>Gutenberg is still just a content editor (for the most part), but the long-term goal for Gutenberg is to move it towards something called <strong>Full Site Editing.
The idea with Full Site Editing is that you’ll be able to design 100% of your website using the Gutenberg editor. For example, instead of being limited to the header options that come with your WordPress theme, you’ll be able to use Gutenberg to design custom headers using the block editor.
This type of functionality is not available yet, but it’s on the way, and we do have some “proof of concept” projects that we’ll give you a look at near the end of this post.
Pros and Cons of Gutenberg vs Popular Alternatives
Now that we’ve been able to use the WordPress block editor for over two years, we have a good idea of some of the pros and cons of Gutenberg vs other solutions.
There are two main alternatives you have for creating content on WordPress:
- WordPress TinyMCE editor: This is the classic editor that WordPress used before WordPress 5.0.
- Page builder plugins: These are third-party plugins that add visual, drag-and-drop design to WordPress.
In general, the classic TinyMCE editor offers a more stripped-down Word Processor-like experience, while page builders provide a much more flexible visual, drag-and-drop design experience.
If we were ordering all three editors based on their design flexibility, it would go something like this:
<strong>Classic TinyMCE editor (least flexible) <; Gutenberg <; Page builders (most flexible)</stron
Now, let’s talk about some of the pros and cons of the Gutenberg block editor vs alternatives.
Gutenberg vs Classic Editor: Pros and Cons
Let’s first compare Gutenberg vs the classic TinyMCE editor.
<strong>Pros:</stron
-
- <l
i>Gutenberg offers a more visual design background
- You don’t need to use shortcodes to embed content — you get a unified block system
</l
<strong>Cons:</stron
- Some people find writing in Gutenberg to be a bit unwieldy because each paragraph is a separate block. For long posts, it can be tough to manipulate text. You might prefer writing in another editor and pasting the text into Gutenberg when you’re finished.
- While Gutenberg’s performance has improved significantly, it can still lag on massive posts, which is less likely to happen with the classic editor.
If you think the classic TinyMCE editor fits your needs better, you can disable the Gutenberg editor altogether.
Gutenberg vs Page Builders: Pros and Cons
Now, let’s take a look at how Gutenberg stacks up against third-party page builder plugins.
<strong>Pros:</stron
-
- <l
i>Gutenberg is a core feature, which means you don’t have to worry about compatibility issues.
- Because it’s a core feature, all developers can build Gutenberg support into their plugins, improving compatibility.
<li>Gutenberg outputs cleaner, more lightweight code. All things equal, a design built with Gutenberg will usually load faster than the same design made with a page builder.</l</l
<strong>Cons:</stron
-
- <l
i>Gutenberg doesn’t offer proper visual editing like a page builder. It’s more accessible than the classic editor, but still not 100% seamless like a page builder.<li>Page builders still give you more flexible design and layout options.
- Most page builders offer much more fluid and flexible drag-and-drop movement.
</l</l
Thoughts on the Comparison
For the majority of users, Gutenberg hits the sweet spot in terms of flexibility.
Most people don’t need the flexibility of a page builder for their content, especially for blog posts. But at the same time, it’s nice to quickly set up a multi-column design or insert a button, which the classic editor doesn’t make easy.
So with that in mind, let’s get into how you can start using Gutenberg.
How to Use the Gutenberg WordPress Block Editor
Now that you know a bit about the Gutenberg block editor, let’s dig into how you can use it to start creating content.
We’ll start with an introductory look at the interface and gradually develop more advanced ways to use the editor and improve your workflows.
The Gutenberg Block Editor Interface
When you open the editor, it will hide the WordPress dashboard sidebar and give you a full-screen experience:
There are three main parts to the editor:
- <strong>Content: Your content takes up most of the screen. You’ll see a visual preview of what it will look like on the front end of your site. It’s not 100% accurate, but you should have a pretty good idea of the final design.</stron
- Top toolbar: The toolbar at the top helps you insert new blocks, undo/redo, and access other vital settings
- <strong>Sidebar: The sidebar contains two tabs. The <strong>Post> tab lets you configure post-level settings like its categories, tags, featured image, etc. The <strong>Block> tab shows the settings for the block that you’ve selected — more on this later.</stron</stron</stron
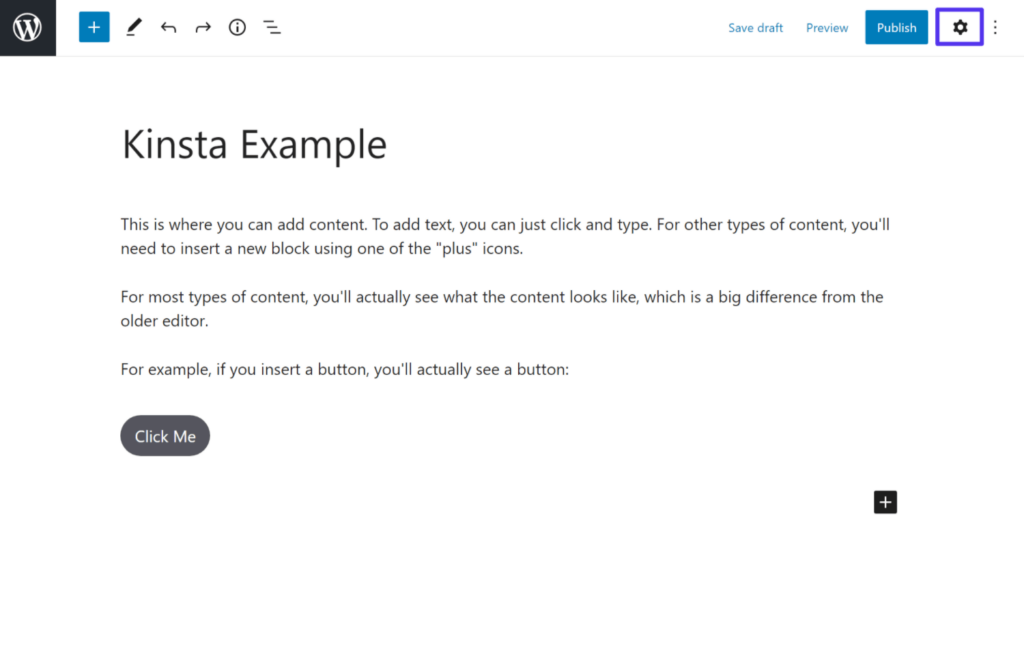
To create a more immersive writing experience, you can hide the sidebar by clicking the “gear” icon in the top-right corner. To bring back the sidebar, all you need to do is click the “gear” icon again:
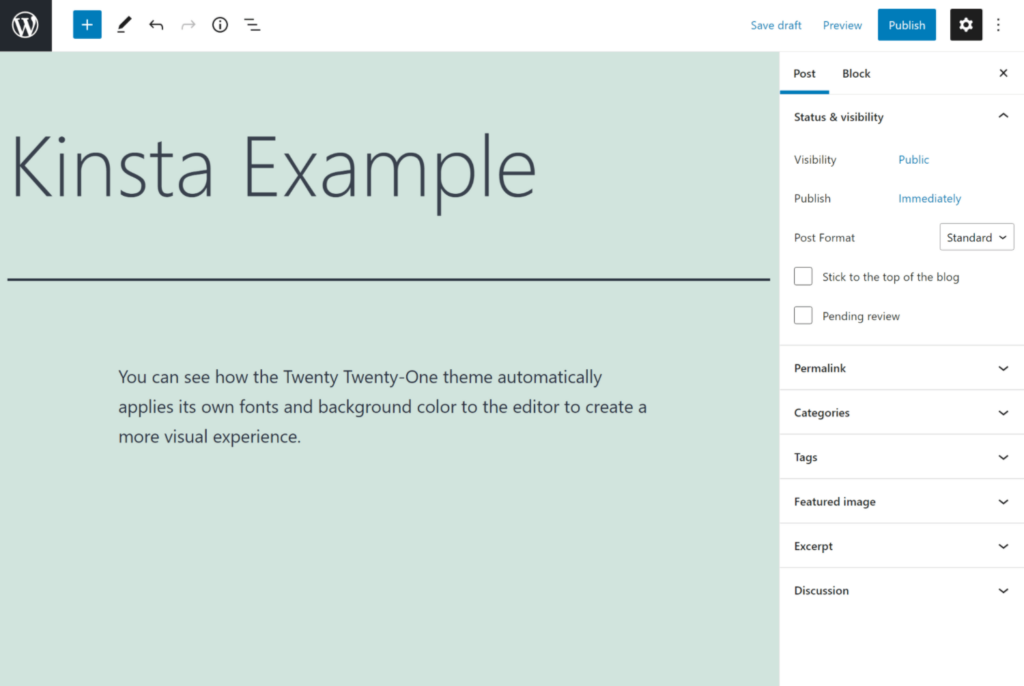
For example, here’s what the editor interface looks like if you’re using the new Twenty Twenty-One default theme:
Adding Blocks
To add regular paragraph text to your post, you can just click and type. Every time you hit enter, the editor will automatically create a new paragraph block.
For other types of content, you’ll need to insert a new block. You’ll use blocks for images, buttons, video embeds, etc.
To add a new block, you can click one of the “plus” icons in the interface. It’s the main block inserter icon in the top-left corner, but you’ll also see other icons inside the interface that opens a smaller block inserter interface:
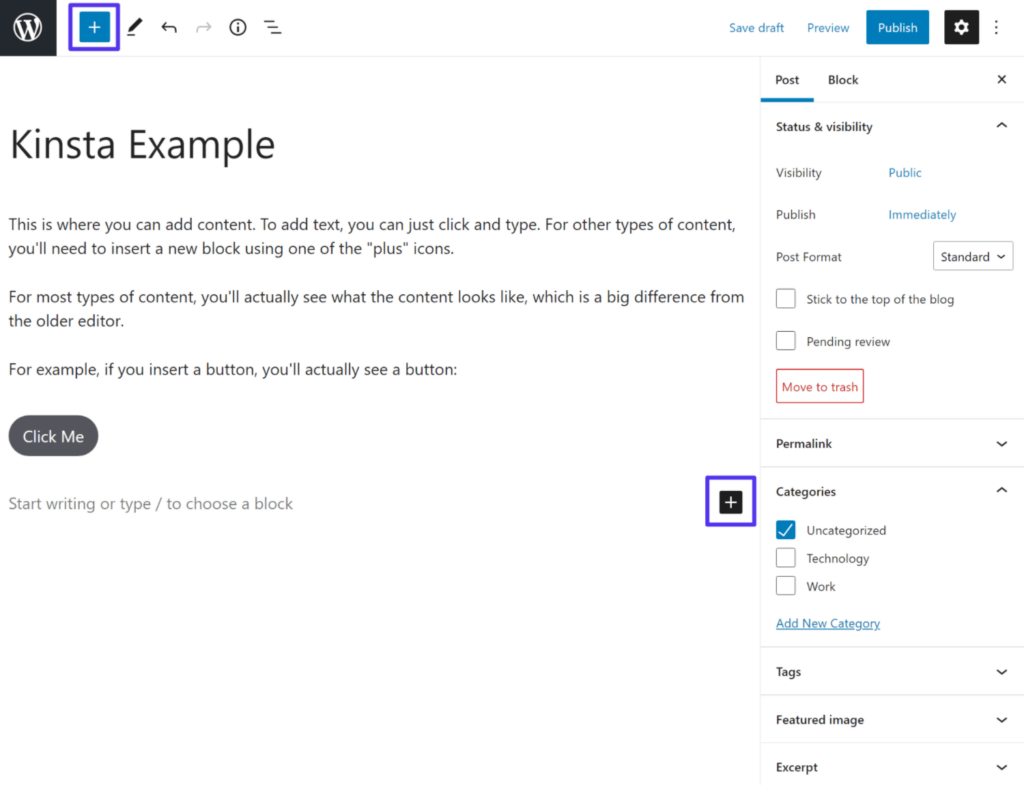
To begin, position your mouse cursor where you want to insert the new block. For example, to add a new block underneath the button, you could click below the button and then click the +> icon.
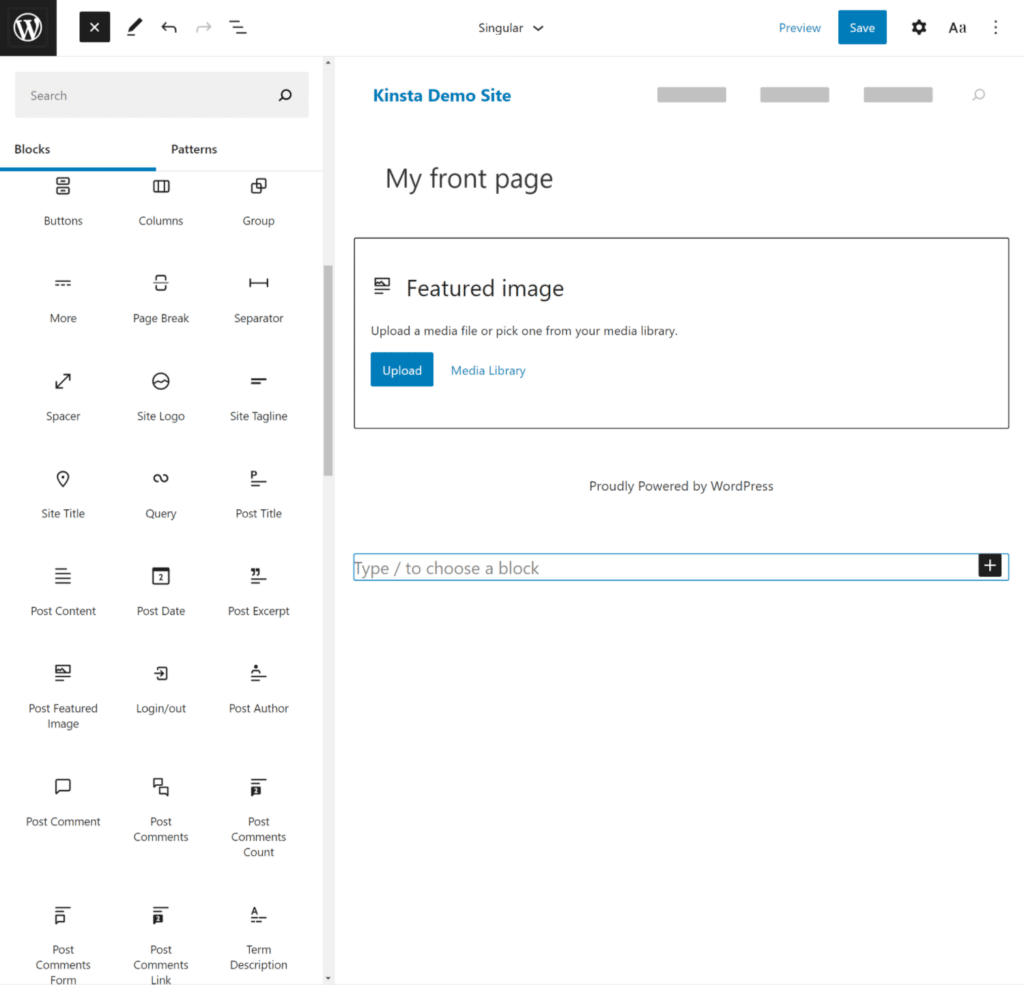
You should see a side panel that shows all the available blocks, divided into different categories. You can either search for a specific block or just choose an option from the list. When you hover over a block, you’ll see a description of what it does and a preview.
To insert the block, you just need to click on it. For example, to insert a regular image, you would just click the image block:
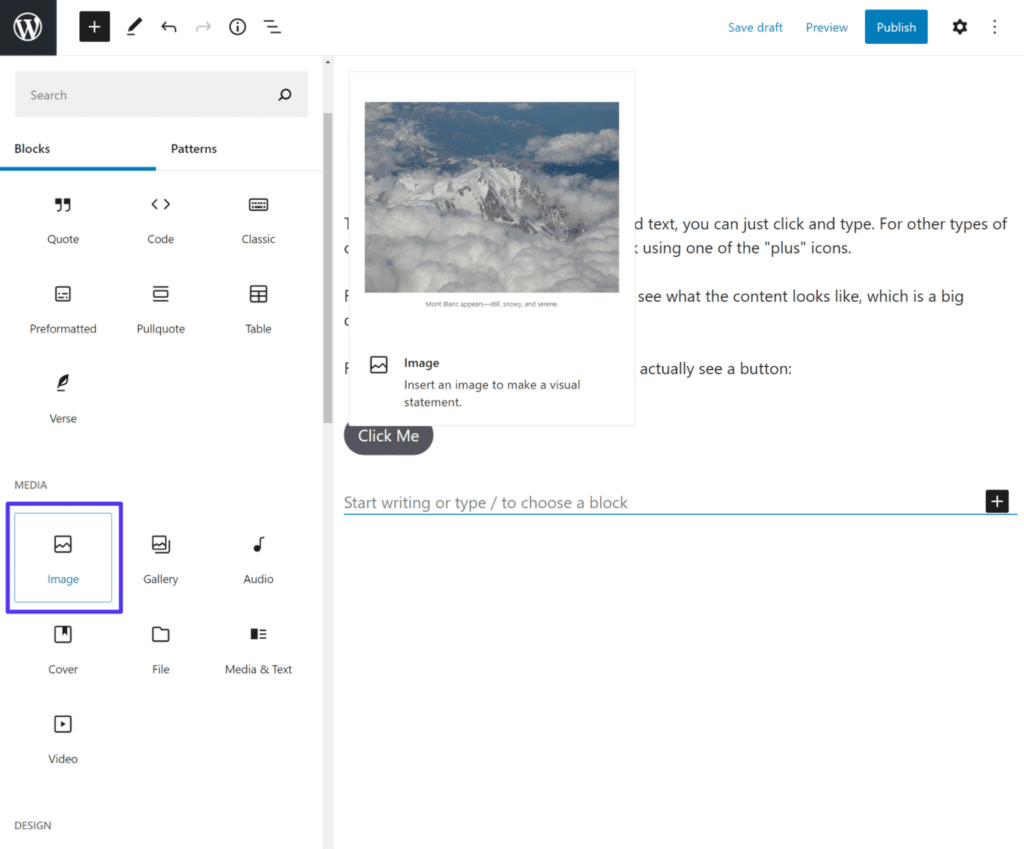
You can then follow the prompts to upload or choose an existing image from your Media Library.
Essential Formatting Options
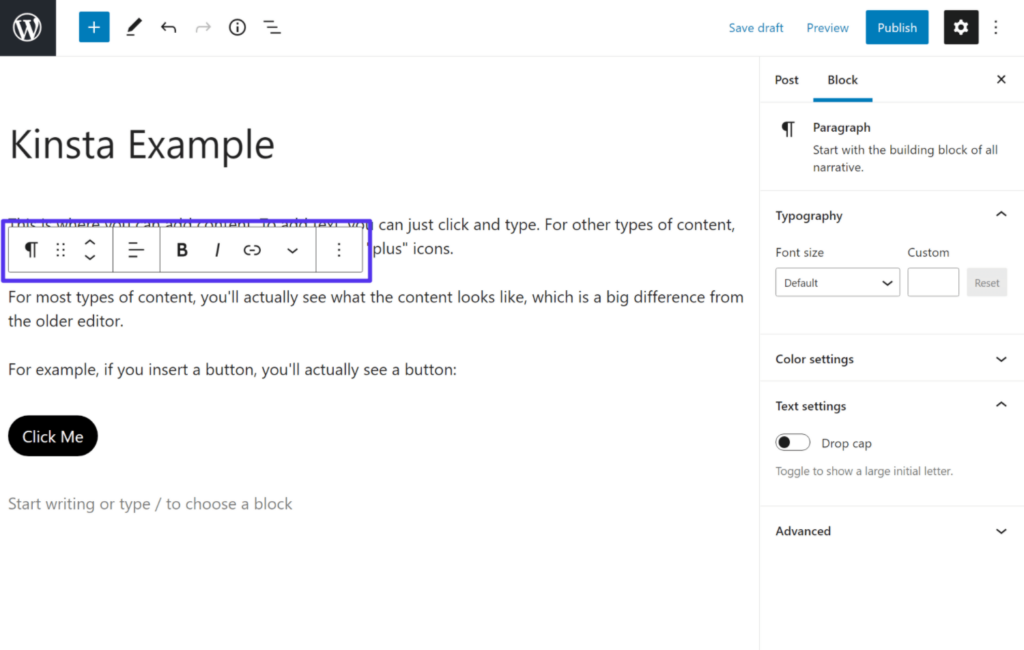
To make basic formatting choices for your blocks, you’ll get a floating toolbar that appears when you click on any block.
If you’re formatting regular text, this is where you can:
-
- Add bold or italics
- Insert links
<li>Change alignments
- Add formatting, like inline code, strikethrough, and subscription
</l
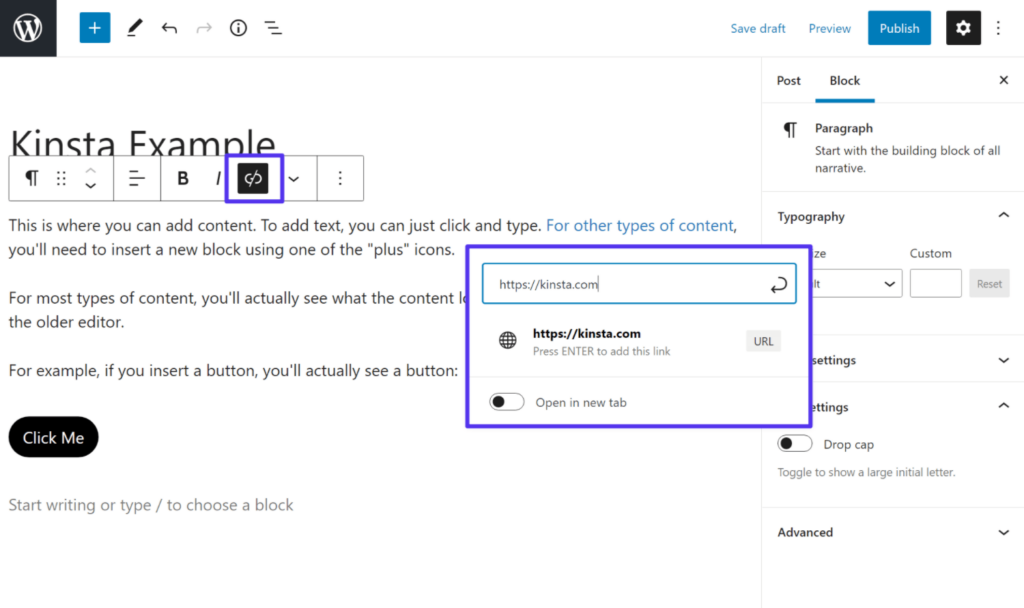
For instance, let’s say you want to insert a link into your content. You would first select the specific text you want to link — in our example, that’s “For other types of content.” Then, you can click the link icon on the toolbar to open the link insertion options:
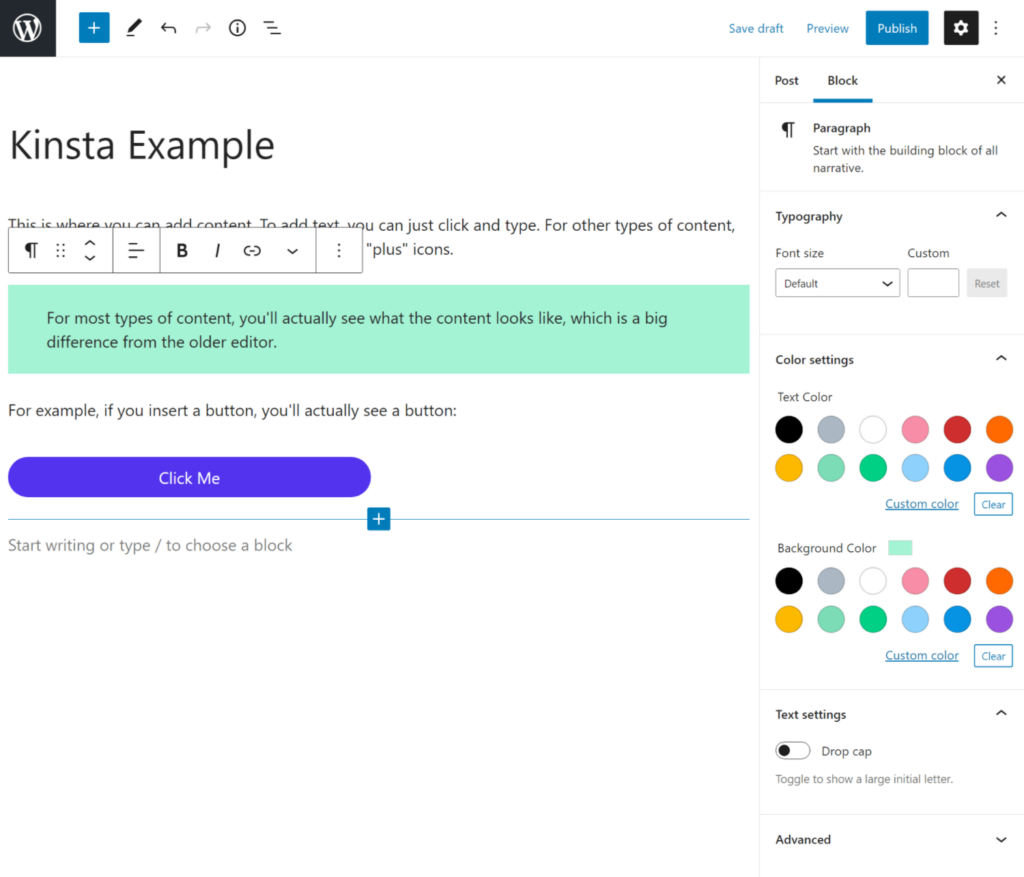
Configuring Advanced Block Settings
All the blocks that you insert come with additional settings in the sidebar. Some blocks might give you a few settings, while others give you several options to control the design, layout, functionality, etc.
To open a block’s settings, click on the block in the editor to select it. Then, go to the Block tab in the sidebar to see its settings.
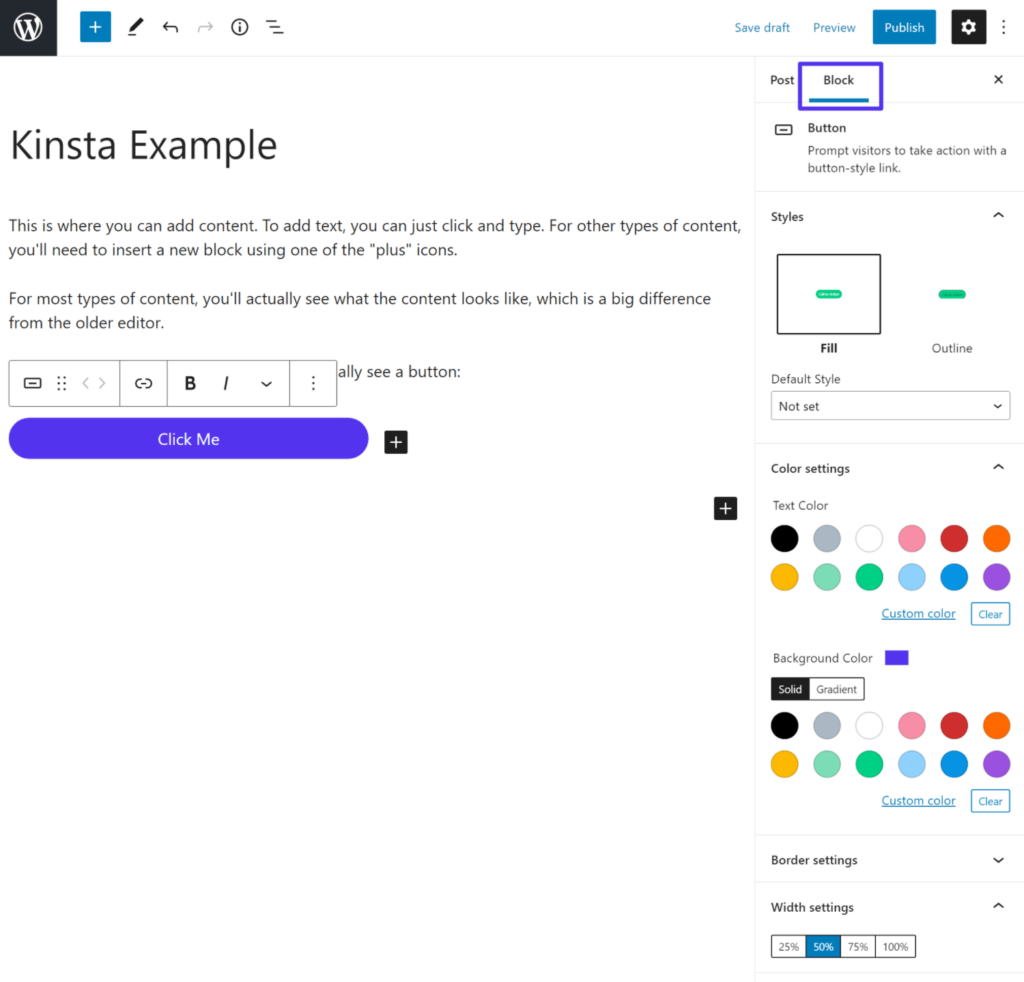
Below, you can see the settings for the button block, which is one of the more flexible blocks. You could change the color, make it wider, and lots more.
As you make changes to a block’s settings, you’ll instantly see those changes reflected in the editor.
Again, each block will have settings that are unique to that block. For example, if you open the settings for regular paragraph text, you just get some basic typography and color options. Below, you can see that we were able to apply a color background to highlight some text:
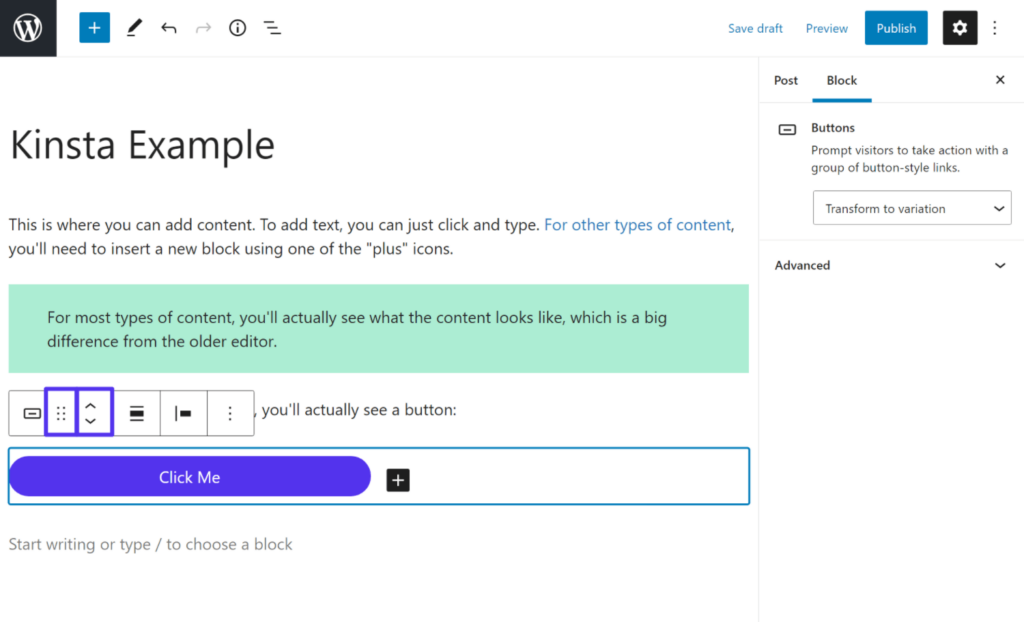
Rearranging Blocks
In addition to just using copy and paste (which you can do for text just like any other editor), Gutenberg gives you two main ways to rearrange blocks.
First, if you want to move a block up or down a few positions, you can use the up or down arrows on the floating toolbar.
For extensive moves, you can use drag-and-drop. To drag and drop a block, you need to click on the “six dots” icon to the arrows’ left.
Once you click and hold your mouse on that icon, you can drag the block anywhere on the page:
Embedding Content from Other Sources
Gutenberg comes with dedicated blocks to embed content from third-party sources such as YouTube, Vimeo, Soundcloud, etc. You can find all of these options in the <strong>Embeds</stron section of the block inserter.
For example, to embed a YouTube video, all you need to do is:
- Add the dedicated YouTube block.
- Paste in the direct URL to the video.
- Click Embed.
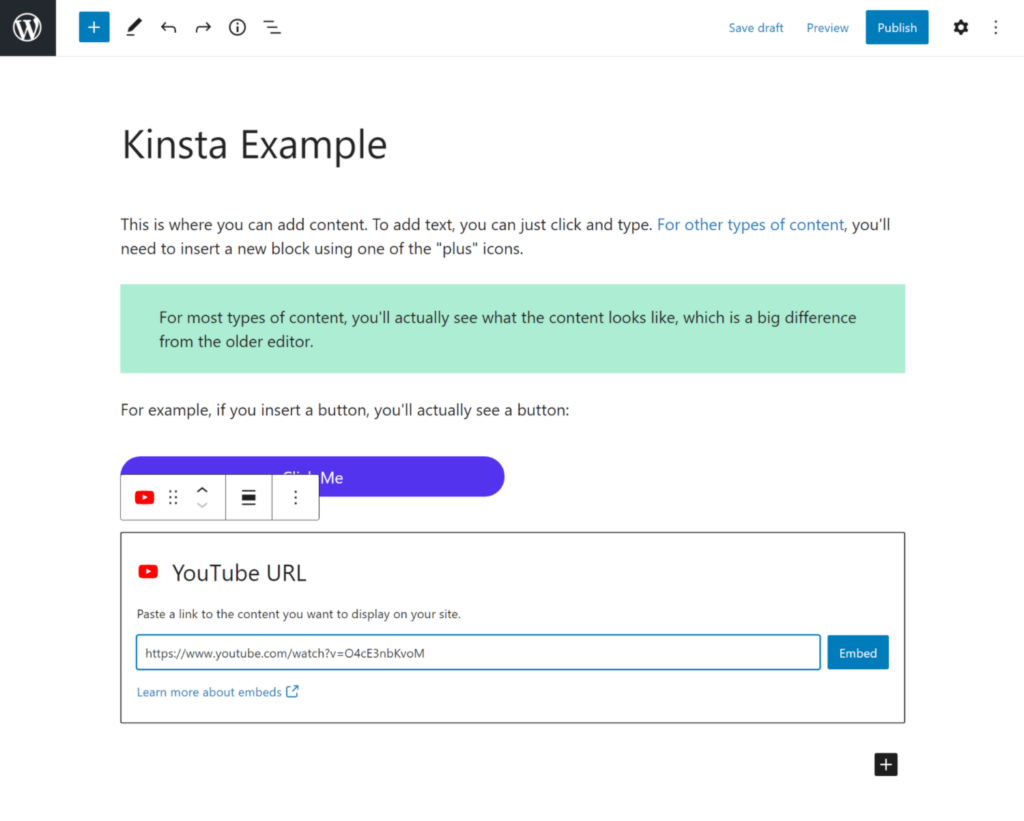
You should then see a preview of the embedded video in the editor.
Creating Multi-Column or Grouped Layouts
As we mentioned earlier, one of the significant advantages of the block editor over the older TinyMCE editor is that you can create more complex layouts without needing to rely on custom code or shortcodes.
The block editor comes with two default blocks to help you do this:
- Columns: Create a multi-column layout.
- Groups: Group multiple blocks. For example, you could use this to set a background color for an entire section that displays behind numerous blocks.
Both of these blocks work on the principle of “nesting” blocks, which means that you’ll put one or more blocks inside of another block.
We’ll show you an example using the columns block, but the same basic principle applies to the group block.
Let’s say you want to create a two-column layout where the column on the left has some regular paragraph text, and the column on the right has a button.
To get started, you would use the block inserter to add the columns block. That will show a prompt where you can choose your preferred layout:
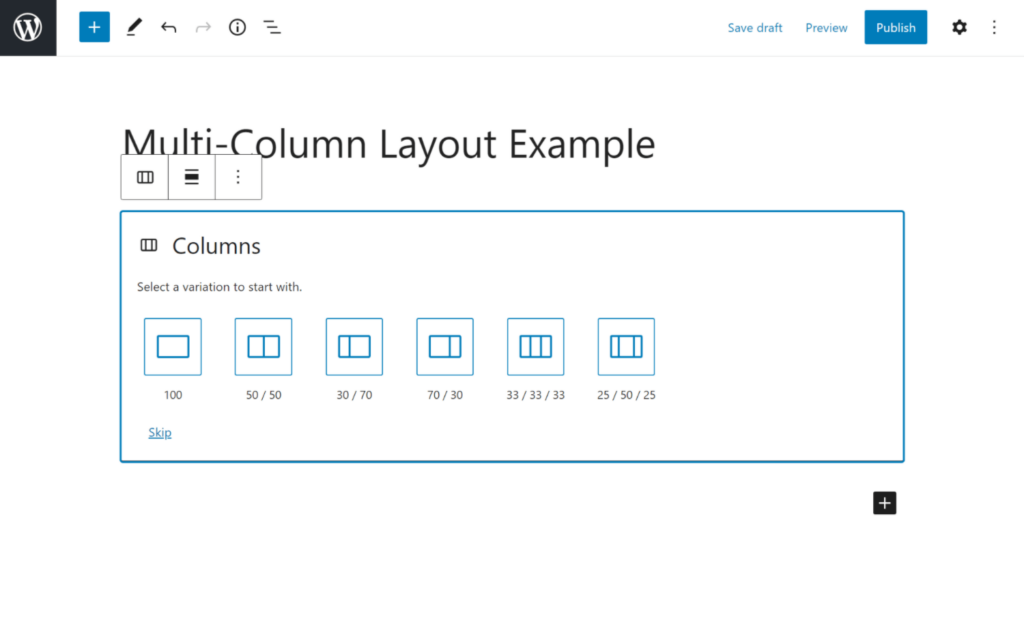
We’ll choose a two-column 50/50 layout for this example. With that, you’ll see two equal-sized boxes with + icons inside. To insert content, you can click that + icon to open the block inserter interface:
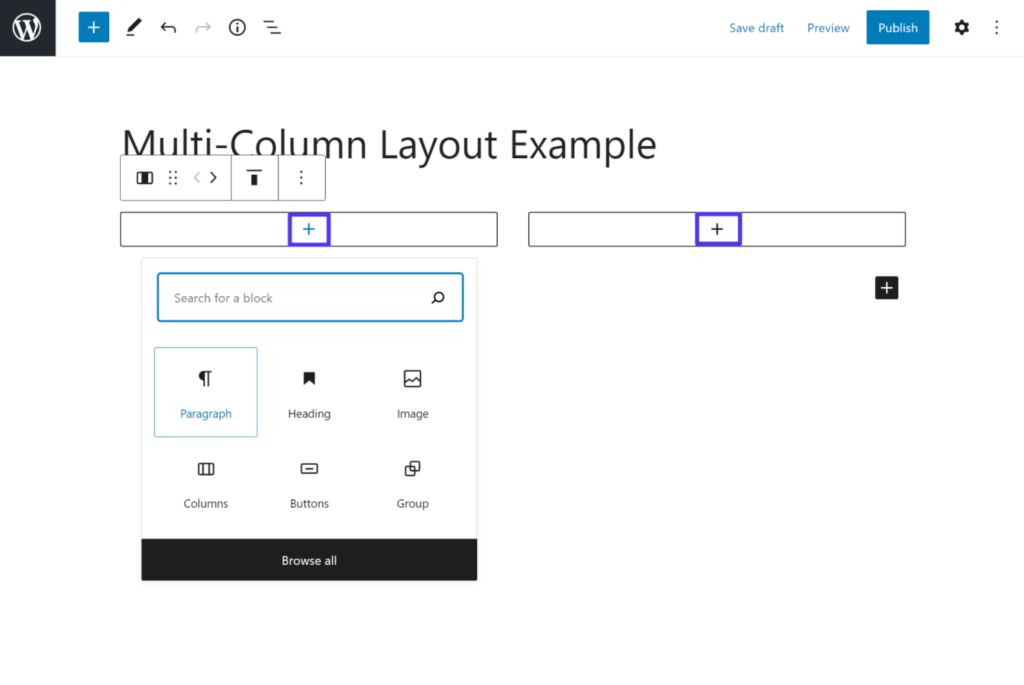
Once you’ve added the first block to a column, you can hit the + icon to insert additional blocks. Or, you can drag and drop a block from outside the column structure into the column.
10 Useful Gutenberg Tips to Work More Productively
Now that you have a basic understanding of how Gutenberg works, let’s go over some valuable tips and tricks that will help you use the block editor more effectively.
1. Use / (Forward Slash) to Quick Insert Blocks
If you need to insert many blocks, manually opening the block inserter can get a little tedious. Thankfully, once you start learning the names of the common blocks that you need to use, there’s a much quicker way to insert blocks using only your keyboard — / (forward slash).
If you hit “Enter” to start a new paragraph block, you can quick-insert a block by typing a forward slash, followed by the name of the block that you want to insert.
As you start typing, you’ll see a list of all the blocks that match your query. You can then use your keyboard arrows to navigate the blocks and hit “Enter” to select the block you want to insert.
Here’s an example of using quick-insert to add an image block:

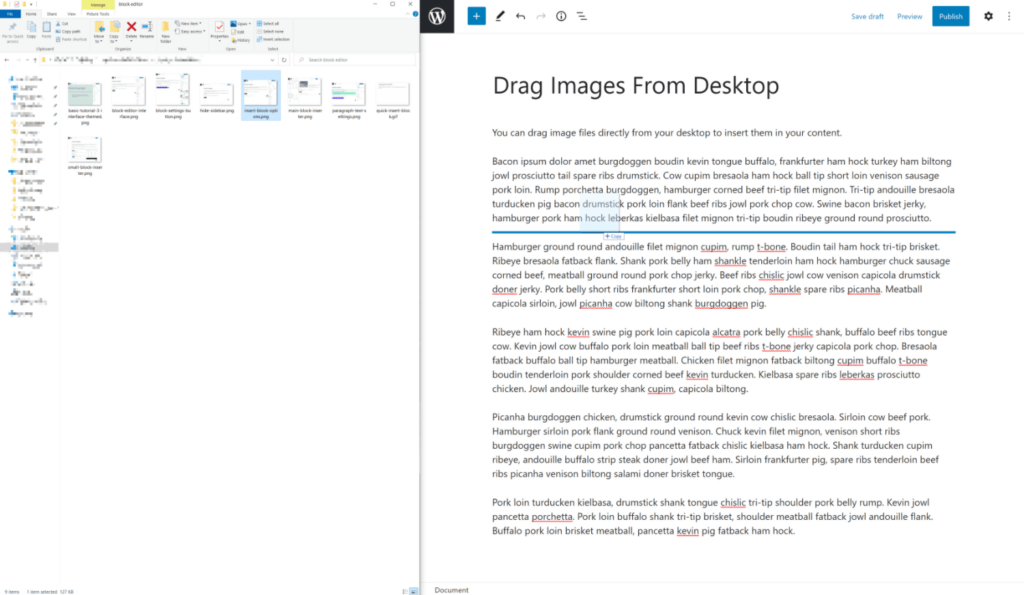
2. Insert Images by Dragging Them From Your Desktop
If you’re inserting many images, the block editor includes another time-saving feature that lets you eliminate the need to add an image block before uploading an image.
Instead, you can just drag the image file directly from your desktop to the location where you want to add it to your post. When you drag the image file over your site’s content, you’ll see a blue line marking where the image shows up.
Once you release the file, WordPress will automatically upload it and insert an image block at the proper location:
3. Use Some Markdown Formatting
If you’re a fan of the Markdown syntax for creating content, you’ll be happy to know that the block editor does support some limited use of markdown — mainly to do with headings.
For example, if you want to insert a heading block with an H3 tag, you can type three hashtags (`###`) followed by hitting the spacebar. The editor will automatically convert that to an H3, and then you can continue typing the heading:
Suppose you want even more advanced Markdown support. In that case, you can install a free plugin like EditorsKit, which also lets you use Markdown for bold, italics, and strikethrough — we’ll talk more about Gutenberg plugins a little later in this post.
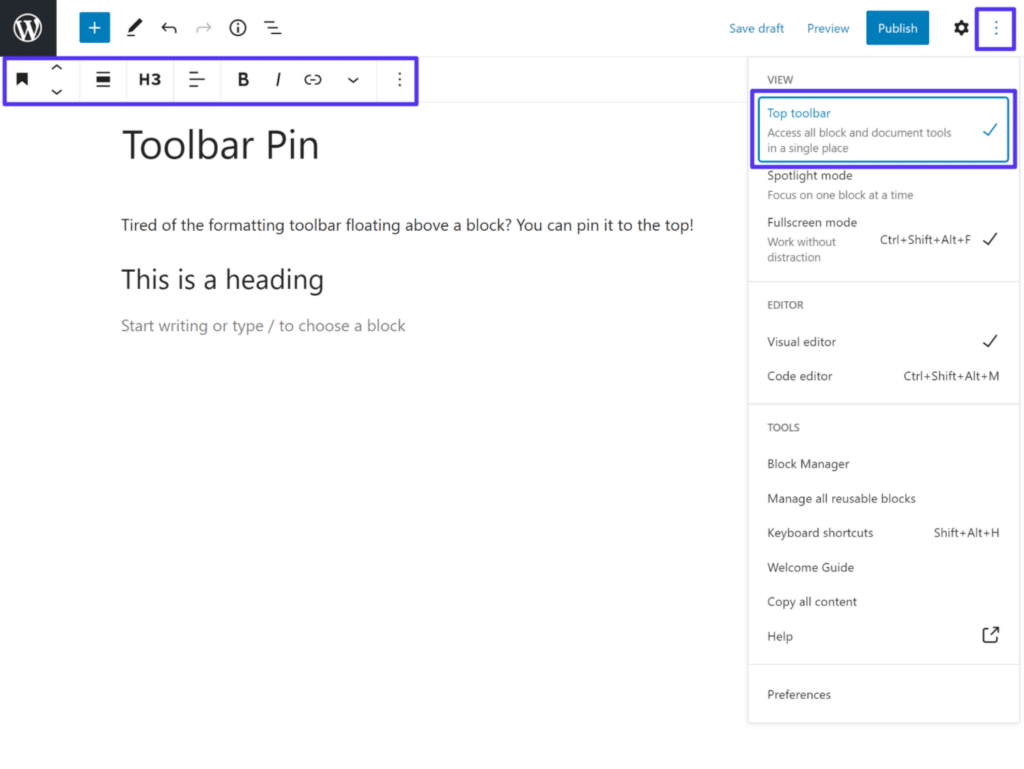
4. Pin the Formatting Toolbar to the Top of the Editor
If you don’t like how the formatting tool “floats” above a block, the block editor includes a feature that lets you pin it below the top toolbar:
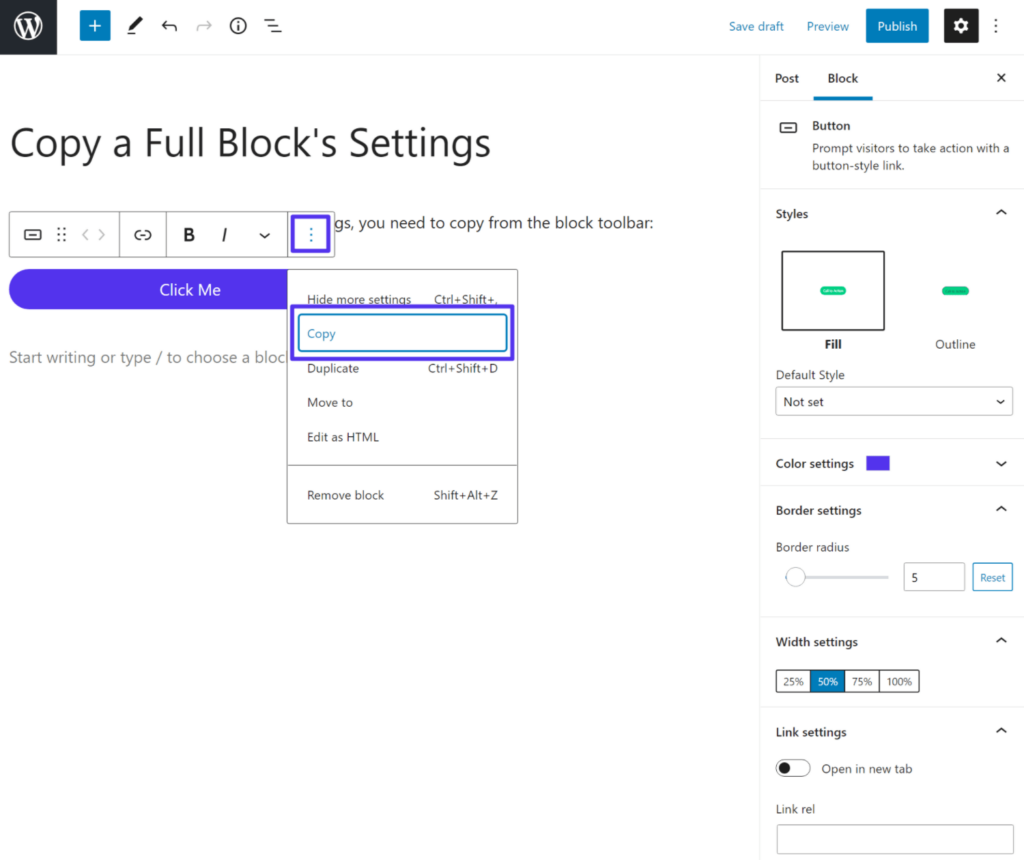
5. Copy a Block and All Its Settings
The block editor lets you copy and paste text just like you would in any editor — “Ctrl + C” or right-clicking and choosing Copy.
However, you can’t use this method to copy and paste an entire block while preserving its settings. Instead, you’ll need to:
- Select the block.
- Click the three dots icon on the block’s toolbar.
- Select Copy.
Once you’ve copied the block in this way, you can paste it like you usually would — i.e. “Ctrl + V” or right-clicking and choosing to Paste.
6. Quickly Select the Right Block Using Block List View
For most blocks, you can just click on the editor to select the block. However, this can get tricky if you start using “nested” blocks, like inserting blocks inside the columns or group blocks.
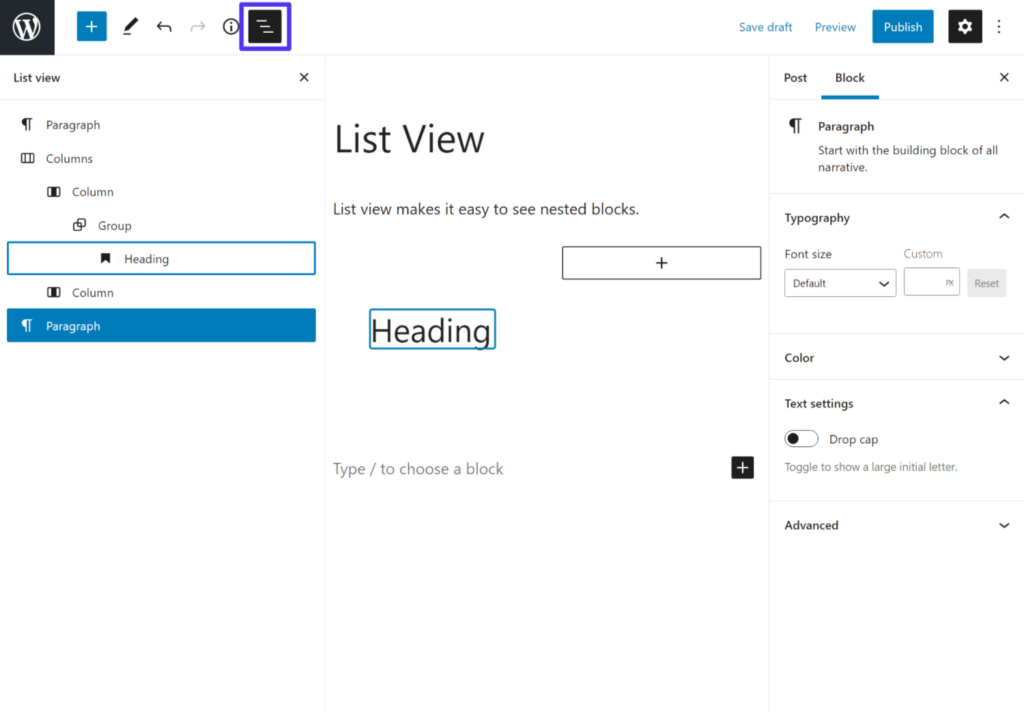
The editor includes a List View option, which you can open from the top toolbar to account for this. The list view will show you every block, including indented nested blocks.
You can select a block by clicking on it in the list, and the editor will also highlight the block when you hover over it in the list.
In the example below, you can see:
- The primary parent columns block
- Nested blocks for each column
- A nested group block inside one column
- A nested heading block inside the Group block
To select the main parent block, you can just open up list view and select it from the list:
7. Open the Code Editor (for Individual Blocks or Complete Posts)
One of the advantages of the Gutenberg block editor is that it lets you configure many styles and layout options without resorting to code. However, you still might have some situations where you want to access the code directly for more advanced users.
To help you do that, the Gutenberg editor comes with a few different options.
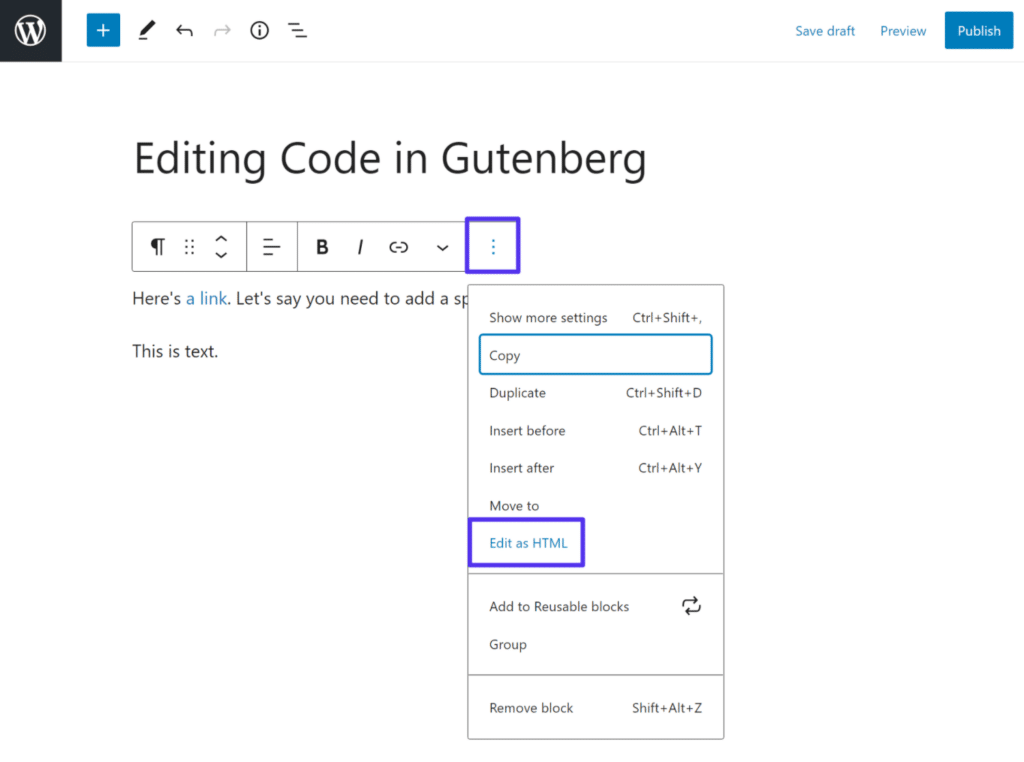
First, you can edit the code of just an individual block, useful for minor tweaks like inserting a CSS class. To do this, open the dropdown menu from the block’s toolbar and select Edit as HTML:
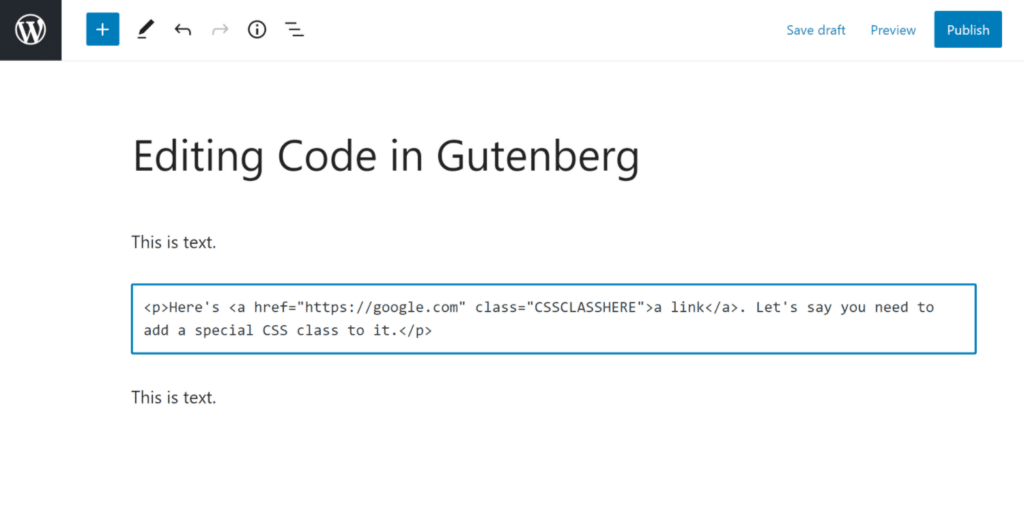
Selecting this option will turn the visual preview into a code editor for just that block, without affecting the visual previews of other blocks:
Second, the editor includes a custom HTML block that you can use to embed full HTML snippets. All you do is add the block and paste in your code.
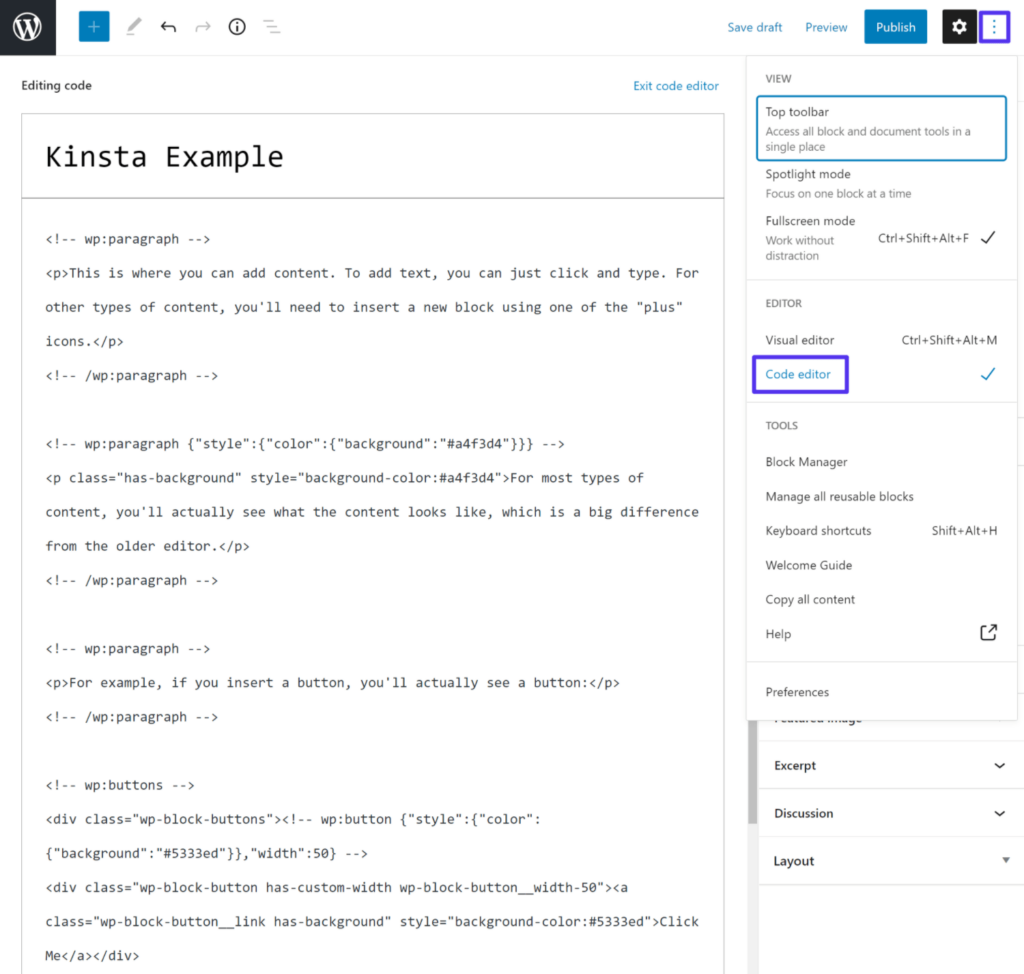
Finally, you can also open the full code editor for the entire document by using the dropdown in the top-right corner or a keyboard shortcut: Ctrl + Shift + Alt + M.
Keep in mind that, when you open the full code editor, you’ll also see the block formatting markup from Gutenberg, so it can be a little tricky to navigate:
8. Learn the Keyboard Shortcuts
The block editor includes a lot of keyboard shortcuts that let you perform common actions. It’s worth taking the time to learn them because they’ll make you more productive and save you from a lot of repetitive mouse clicks.
Here are some of the most common shortcuts — if you’re on a Mac, you’ll want to switch “Ctrl” with “Command (⌘)”:
- Open the block List View — Shift + Alt + O
- Save your changes — Ctrl + S
- Undo your last change(s) — Ctrl + Z
- Redo your last undo — Ctrl + Shift + Z
- Duplicate the selected block(s) — Ctrl + Shift + D
- Delete the selected block(s) — Shift + Alt + Z
- Insert a new block before the selected block(s) — Ctrl + Alt + T
- Insert a new block after the selected block(s) — Ctrl + Alt + Y
You can also open a full cheat sheet of all the keyboard shortcuts when you’re in the editor. To do this, you can either use a keyboard shortcut — Shift + Alt + H — or click the “three vertical dots” menu icon (⋮) in the top-right corner of the editor and choose Keyboard shortcuts from the dropdown.
9. Clean Up Your Interface by Hiding Blocks
The block editor adds many blocks by default, but you probably won’t use all of them. To help you clean up the interface, the editor includes a feature called Block Manager that lets you disable and hide blocks that you aren’t using:

10. Add Anchors for Jump Links
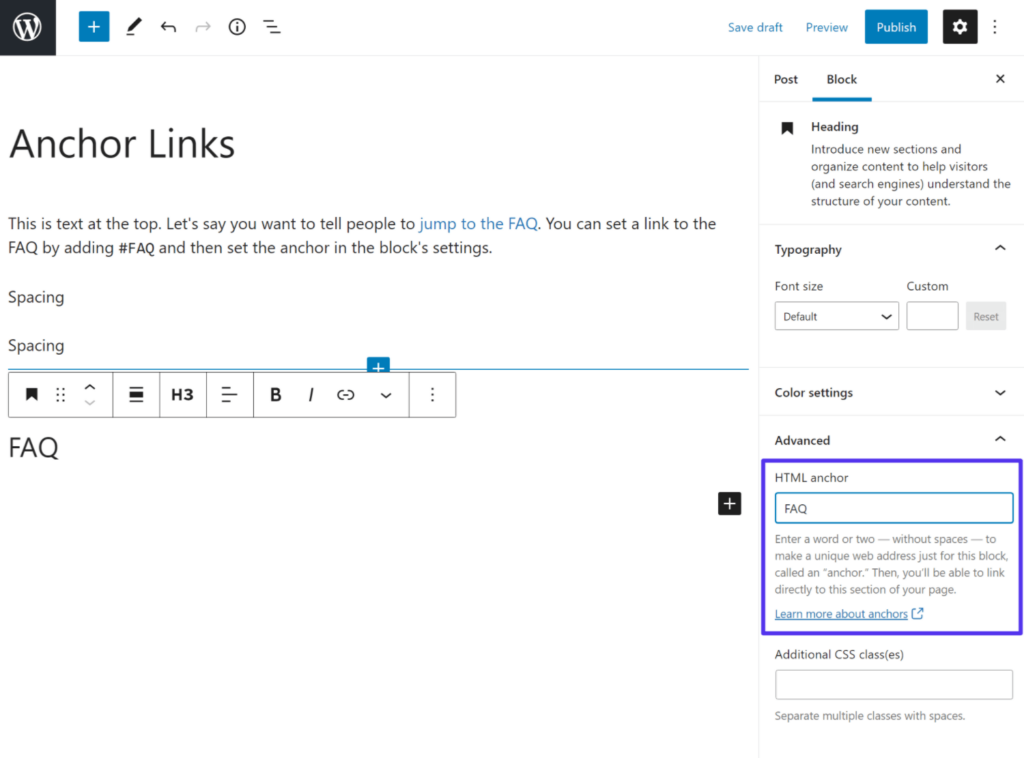
Finally, our last helpful tip is the block editor’s dedicated HTML anchor link feature, which lets you create jump links to specific sections of your content (e.g. for a table of contents).
In the classic editor, you had to add HTML anchors using code manually. But with Gutenberg, you can just enter the text for your jump link in the <strong>HTML anchor field in the Advanced area of any block’s settings:</str
Digging Into More Advanced Block Editor Concepts
At this point, we’ve covered quite a bit about how the editor works and some tips to work more efficiently. Now that you have that baseline knowledge, let’s go over two slightly more advanced tactics:
- Block patterns
- Reusable blocks
Block Patterns
A block pattern is essentially a template. It’s a collection of blocks arranged into a layout. It could be something minor, like an arrangement of buttons. It could even be a template for an entire section, or even a whole page.>
WordPress comes with its own built-in block patterns, and third-party plugin developers also can add their own.
You can insert new patterns from the Patterns tab of the main block inserter:
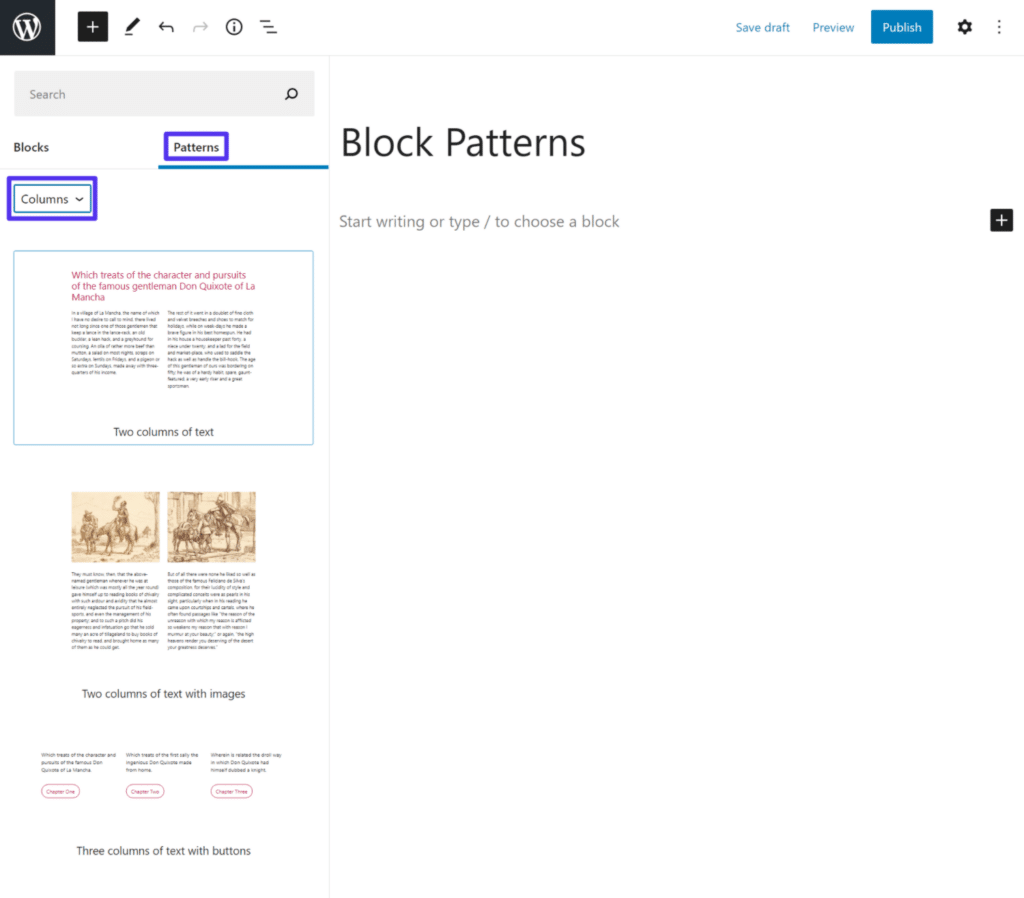
Once you insert the block pattern, you can fully edit all of the blocks that make up that pattern, just as if you’d manually added the blocks.
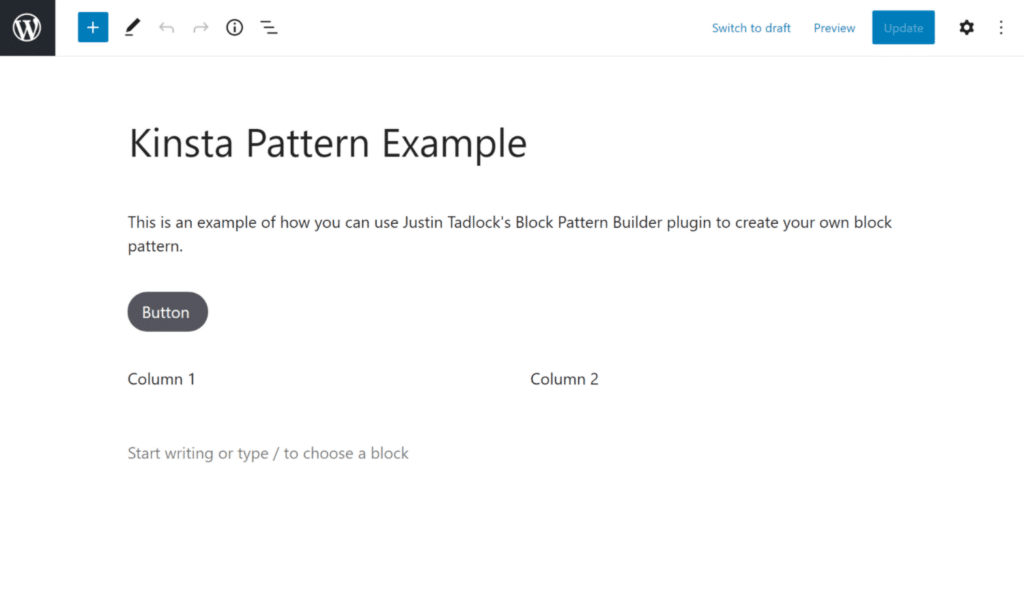
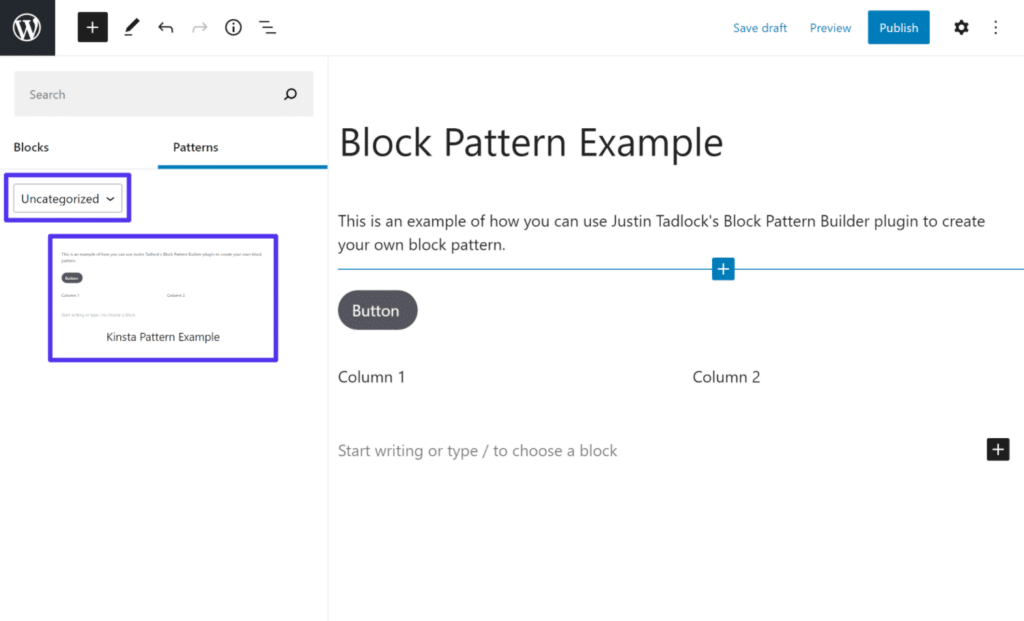
Currently, the core Gutenberg editor does not let you create your block patterns (unless you know how to code). However, you can fix this with Justin Tadlock’s free Block Pattern Builder plugin. With the plugin activated, you can create your designs using Gutenberg and then save that design as a pattern.
To begin, go to Block Patterns > Add New to create a new pattern using the editor. Make sure to publish it when you’re finished:
Once you’ve done that, you’ll be able to insert your block pattern just like any other one — look for it in the Uncategorized section:
The WordPress core team also launched an official block pattern library at WordPress.org. You can insert them into the editor using copy and paste. Just click the Copy button on the block pattern library website and then paste it into the editor.
Reusable Blocks
Reusable blocks are a collection of one or more blocks that you can insert as a group. They’re similar to block patterns, but with one key difference:
Whereas a block pattern is a starting template that you’ll edit in each instance, a reusable block will be the same in every instance where you include it.
If you update the reusable block, those changes will automatically apply to all the existing instances.
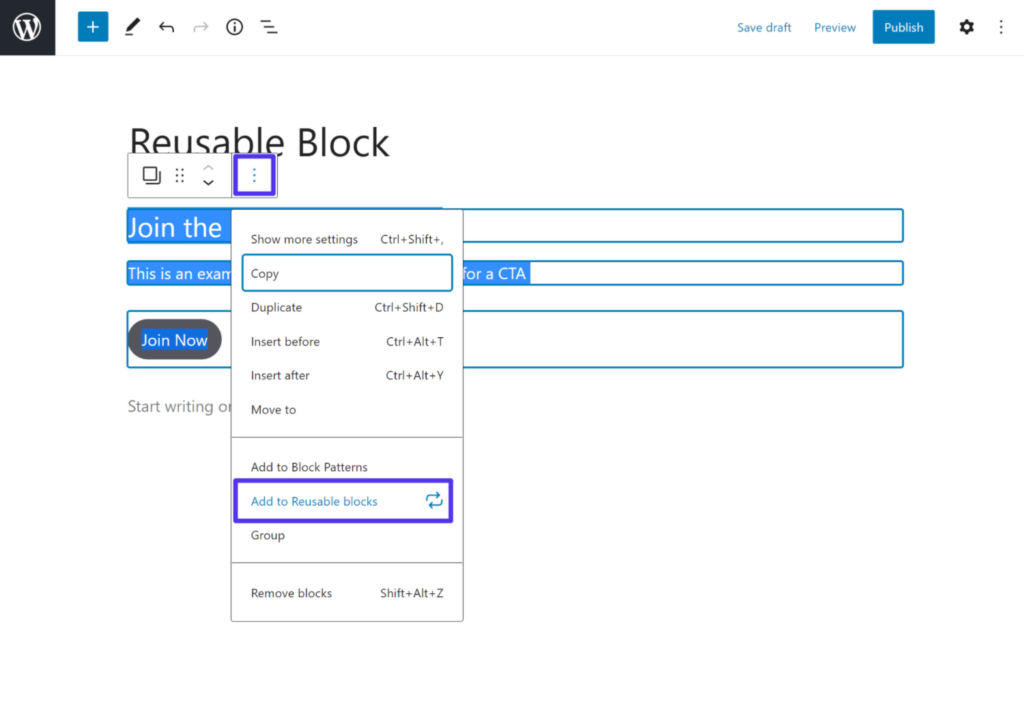
For example, you could use a reusable block to create a call to action (CTA) that you want to be the same in all your content. Then, if you ever want to update the CTA, you just need to update the reusable block once to change it across the site.
To create a reusable block in the Gutenberg WordPress editor, click and drag to select one or more blocks. Then, click the Add to Reusable blocks option. (The plugin we mentioned above also lets you create a block pattern this way.)
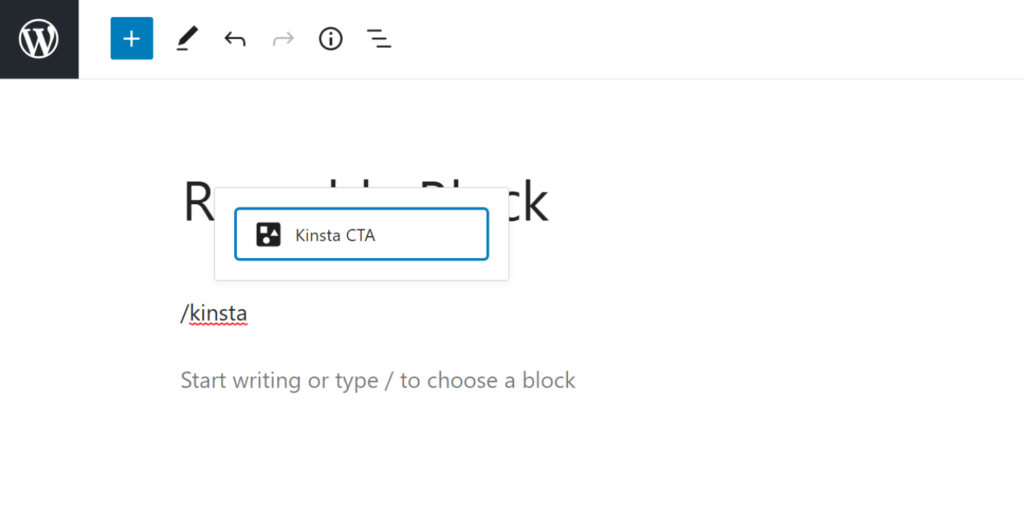
Your blocks will then be grouped — you can give your reusable block a name in the reusable block’s settings in the sidebar.
Now, you’ll be able to insert that reusable block by searching for its name. You can use `/` to quick-insert the block:
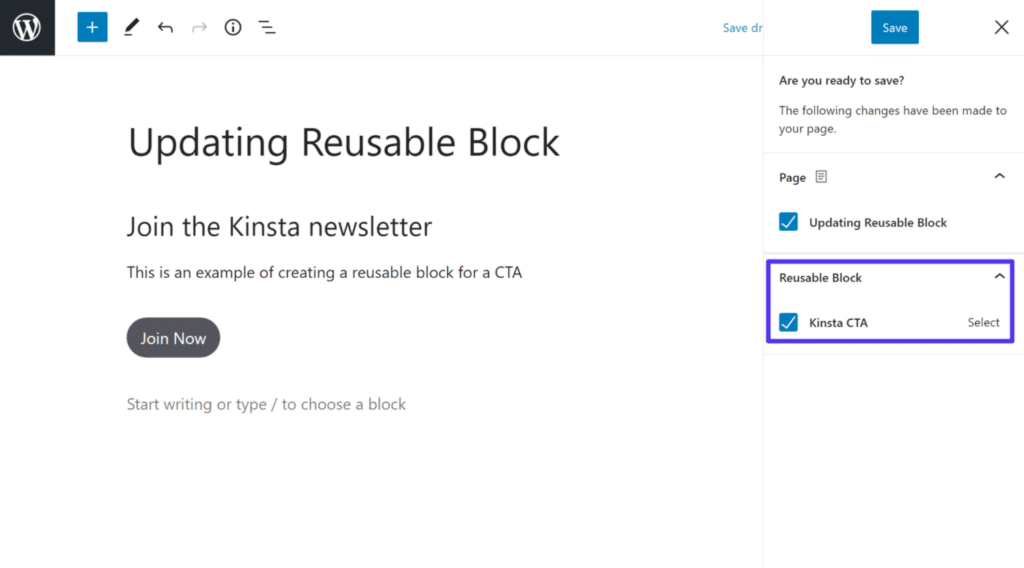
If you change the reusable block, you’ll get an option to publish those changes when you update the post. And if you decide to publish the reusable block changes, those changes will automatically apply to every instance of the reusable block:
Extending the Block Editor With Plugins
Up until now, we’ve focused on the core block editor features, with a few exceptions.
One of the great things about the block editor, though, is that you can use plugins to extend it, just like you can with the rest of your WordPress site.
You can use plugins for a few different things:
- Add new content blocks: Plugins can add new blocks that you can use in your designs. It’s the most common use case for Gutenberg plugins at the moment.
- Add new templates/block patterns: Some plugins use the core block patterns system, while others have created their own template systems.
- Change the editor interface/features: You can use plugins to modify the editor itself. For example, you can add better Markdown support.
Beyond plugins specifically built for Gutenberg, many other WordPress plugins can also use the block editor.
For example, if you’re using a contact form plugin, the plugin might give you a dedicated block that you can use to embed your forms. The same holds for many other types of plugins.
Once you master the basics of the editor, it’s worth exploring these plugins to see if you find any that can improve your experience.
Here are some of the most popular options at the time that we’re writing this post:
You can see more in the WordPress.org block-enabled plugins section.
Gutenberg WordPress Editor and Full Site Editing
As we mentioned at the beginning of this post, the Gutenberg project aims to be a lot more than just a content editor.
The long-term plan is to have WordPress move into Full Site Editing. It means exactly what it says — the goal is that you’ll eventually be able to edit all parts of your site using the Gutenberg editor. And that includes your site’s header, footer, sidebars, etc.
Unlike the launch of the block editor in WordPress 5.0, Full Site Editing takes an iterative approach. It will be a gradual addition of features, where each new release builds on the previous ones.
For example, starting in WordPress 5.8, you’ll now use the block editor to manage your site’s widgets. You’ll also get access to some new theme-focused blocks such as Site Logo, Navigation, Query Loop (lets you create templates for list posts), and more.
But while official Full Site Editing is still a work in progress, some intrepid theme developers have already started releasing block-based themes, which give us some pretty good examples of how Full Site Editing might work.
Additionally, you can access some of the experimental Full Site Editing features in the plugin version of Gutenberg.
So, let’s look at two things:
- The existing core Full Site Editing features that we have now as of WordPress 5.8
- How “full” Full Site Editing might work based on experimental features
Using Blocks Instead of Widgets
As of WordPress 5.8, you’ll now use blocks to control your sidebars and footers instead of widgets (by default — you can disable this if you want to).
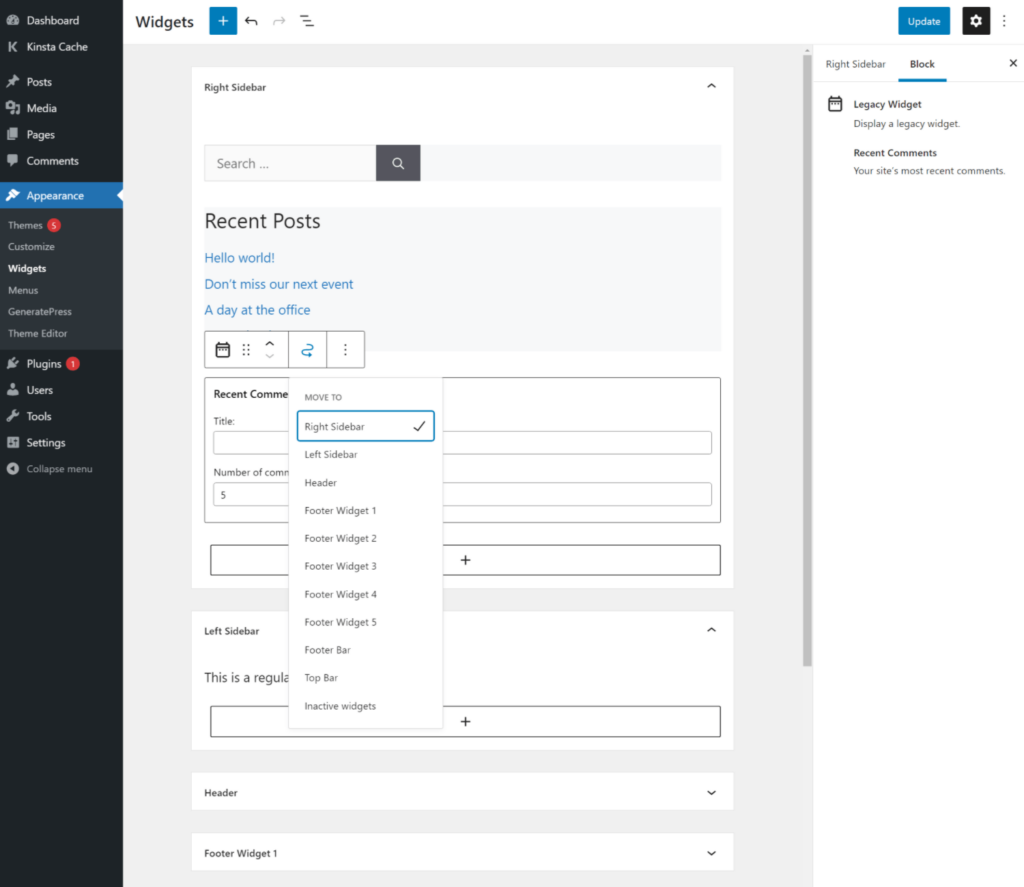
When you go to Appearance > Widgets, you’ll be able to manage the content of each widget area using the block editor.
You can see that each widget area gets a separate editor, which you can open by clicking the accordion toggles. You can also move blocks between different widget areas by clicking the hooked arrow icons near the top:
Using New Theme Blocks<!–h3>
WordPress 5.8 also adds new dedicated theme blocks that let you insert dynamic content in your site. These blocks will also play a pivotal role when you’re designing templates for your theme in future releases.
For example, let’s say you want to embed a list of your most recent content on a page. Now, you can just add the Query Loop block, and you’ll be able to dynamically insert content from a particular post type (e.g. blog posts), including filtering by categories, authors, keywords, and more:
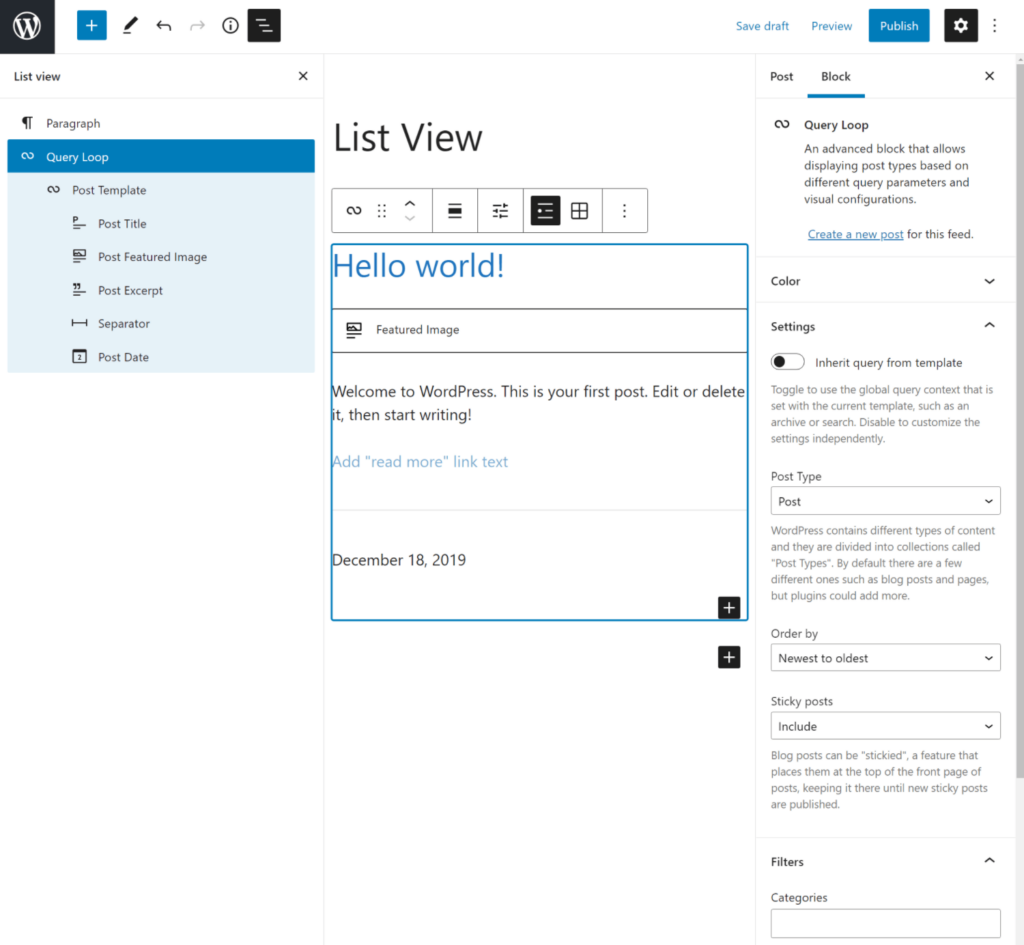
Inside the Query Loop block, you can nest the other theme blocks to control the template for the content displayed there. For example, you can display each post’s date by adding the Post Date block to your template.
With the Query Loop block in WordPress 5.8, you can essentially design your own custom blog listing page. Proper Full Site Editing will expand that to your entire theme — so let’s look at that next.
Designing Content Templates
Template editing mode is another new feature in WordPress 5.8. It lets you use Gutenberg to design the templates for your posts and pages using blocks.
Currently, this feature is only available if your theme developer has specifically enabled it, so you might not see it if your theme’s developer hasn’t done that yet.
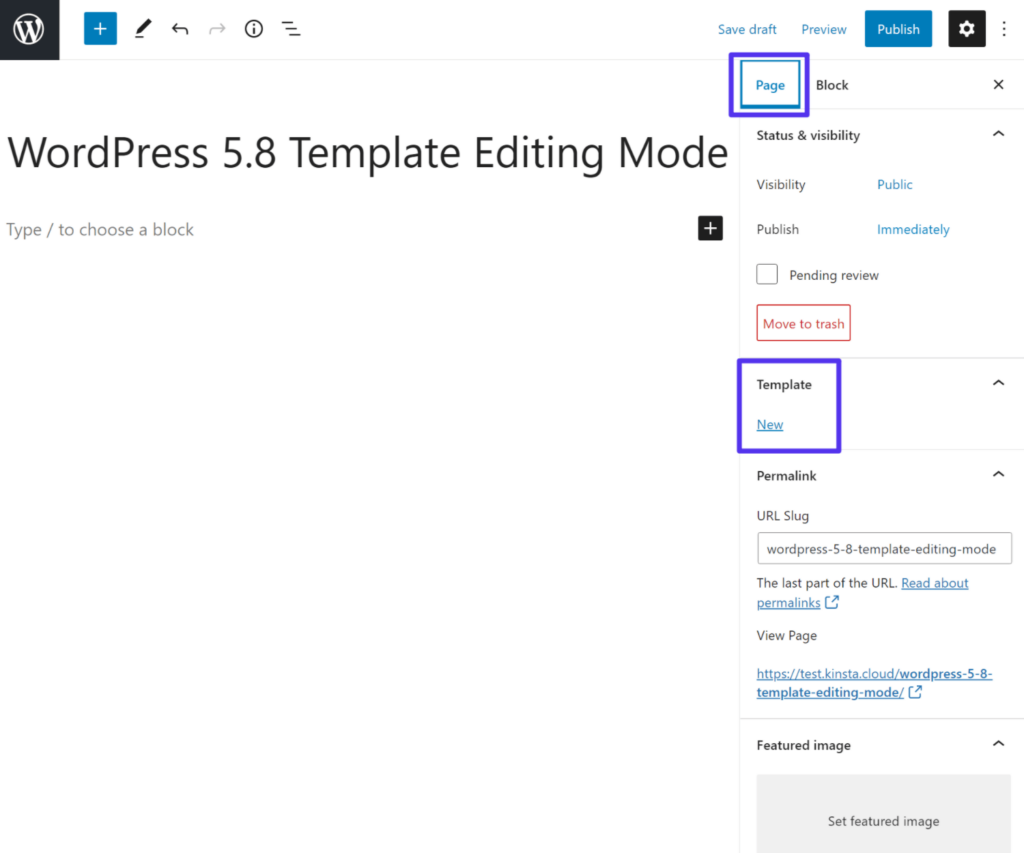
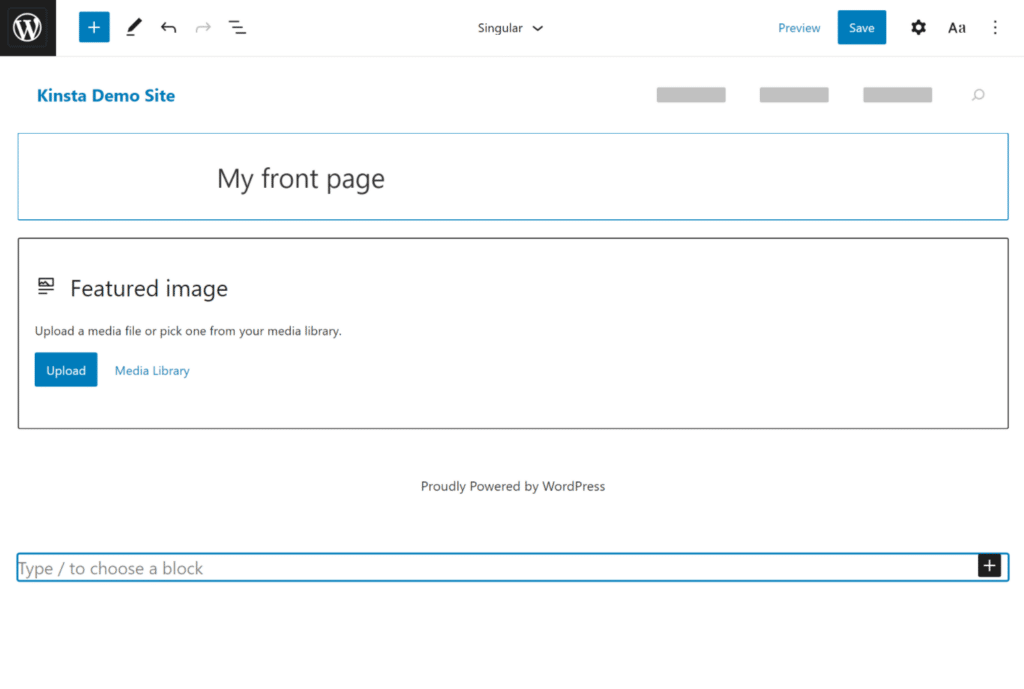
If you are using a theme that supports the template editing mode in WordPress 5.8, you’ll see a new Template section in the Post/Page tab of the sidebar when you’re editing a post or page. You can create a new template or choose one of your existing templates:
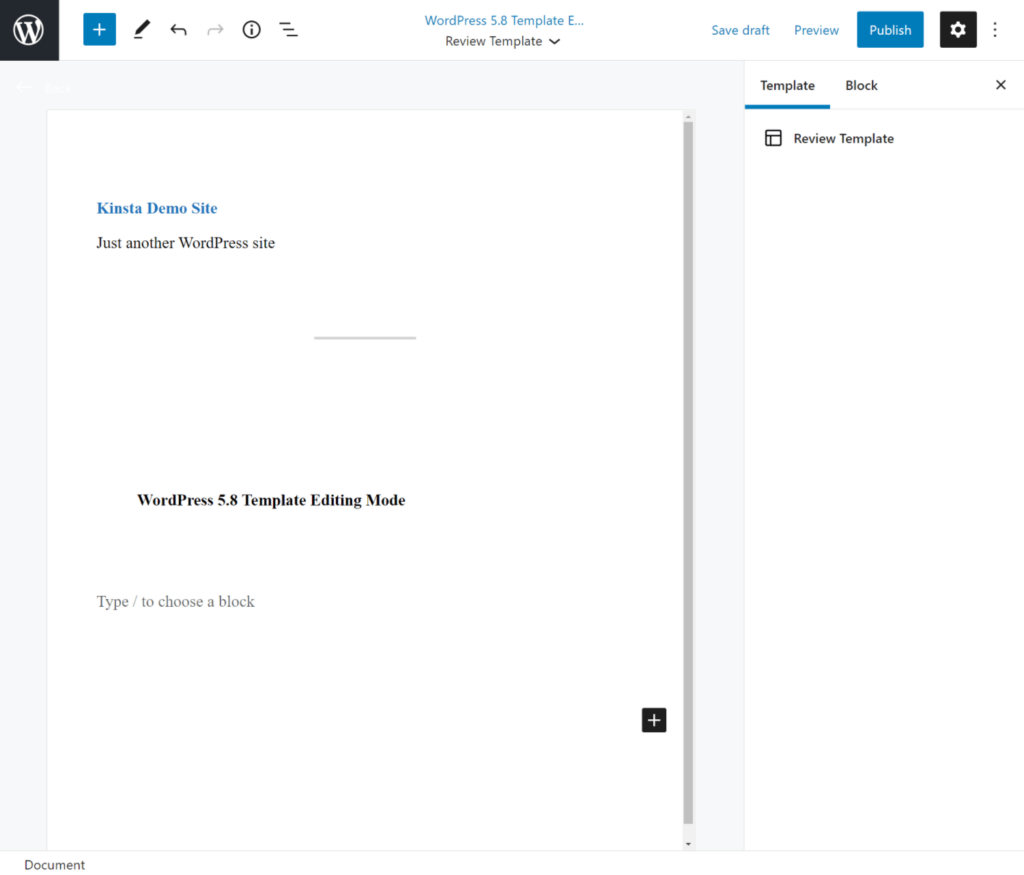
If you create a new template, you’ll be able to give it a name to help you remember it. Then, you can design the template using the special template editor mode, along with the new theme blocks that we detailed in the previous section:
Blockbase Full Site Editing Example
Blockbase is a theme from Automattic that functions as a kind of a “proof of concept” and playground for Full Site Editing. It’s still experimental, so it might change before these features are in the core WordPress software. But it provides an idea of Full Site Editing.
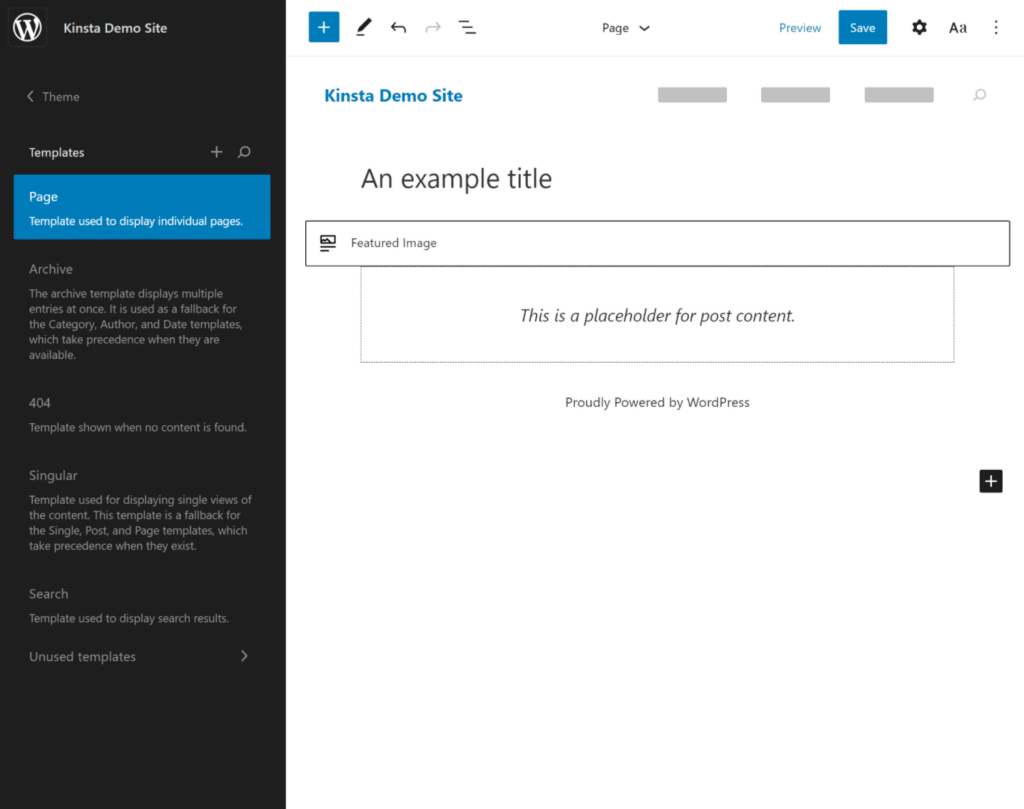
With the theme and the plugin version of Gutenberg installed, you get a new Site Editor area that lets you “build” your theme using the same editor you saw above.
The critical difference, though, is that you’re not just building a single post or page. Instead, you’re using the Gutenberg WordPress block editor to create the actual templates that all of your site’s content will use — for example, the template for your header.
To help you accomplish this, you’ll get a range of new design blocks, including some of the theme blocks that you saw above:
To navigate between different templates, you can click on the WordPress logo in the top-left corner to edit other templates and create new ones:
Again, the idea is that you’ll eventually be able to use the Gutenberg editor to control all of your theme’s templates/layouts. And when that happens, creating a WordPress site will look pretty different from what we view as “normal” now.
Summary
Since 2018, the Gutenberg block editor has made a lot of progress. With the upcoming move towards Full Site Editing, the block editor will only become an even more significant part of WordPress.
In this post, we’ve covered everything from block editor basics to advanced tips and features. We’ve also looked at what Full Site Editing might look like in the future.
If you’re not ready to try it yet, you can permanently disable Gutenberg and use the classic editor. However, Gutenberg will continue growing, so it’s not something you’ll want to ignore forever.
Do you still have any questions or thoughts about the editor? If so, we’d love to hear your comments, both good and bad.
</stron


