Push notifications, also referred to as web push notifications, have gained a lot of popularity among online businesses and marketers over the last couple years.
These present another way to capture your audience, increase return visitors, and in most cases have shown drastically higher CTR and engagements vs that of your typical newsletter signups.
Today we are going to dive into what exactly WordPress push notifications are, how they can help you expand your website’s reach, and how to quickly add them to your site. A typical setup takes less than 10 minutes!
Push notification technology is rapidly evolving from a simple message delivery system to a rich and interactive medium. – OneSignal
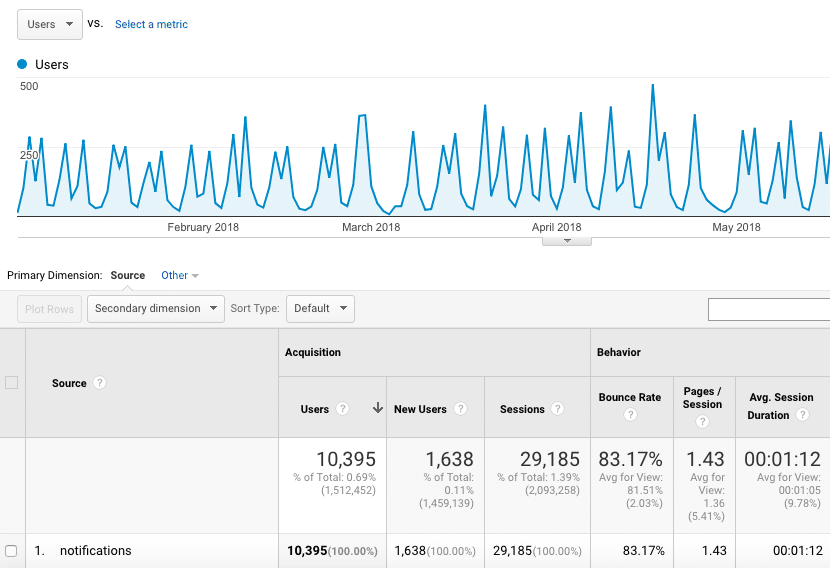
We have used push notifications at Kinsta for a couple years now and on average consistently drive 2,500+ visitors to our WordPress site every month (as seen below). And this is just from this single referral source. What’s even better is that a small portion of these also regularly convert into paying customers. How awesome is that?
What are Push Notifications?
WordPress push notifications allow you to automatically notify your audience when you have published new content on your site. Or you can send out predefined messages at any time. This can be a notification on a phone or via a browser, such as Chrome, Firefox, or Safari.
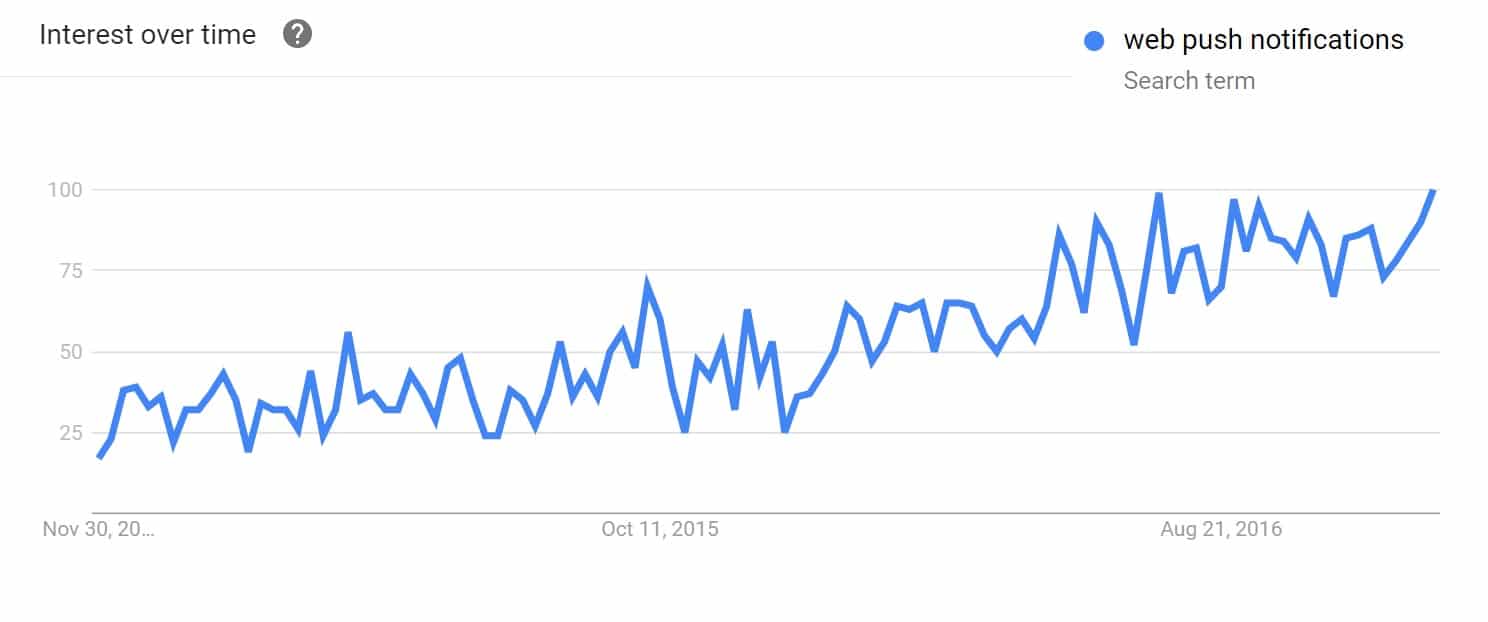
Push notifications were originally introduced for Android and iOS devices in 2009 and have been spreading to other platforms ever since. If we look at Google trends between 2014 and today, we can see that the interest around “web push notifications” has been steadily increasing.
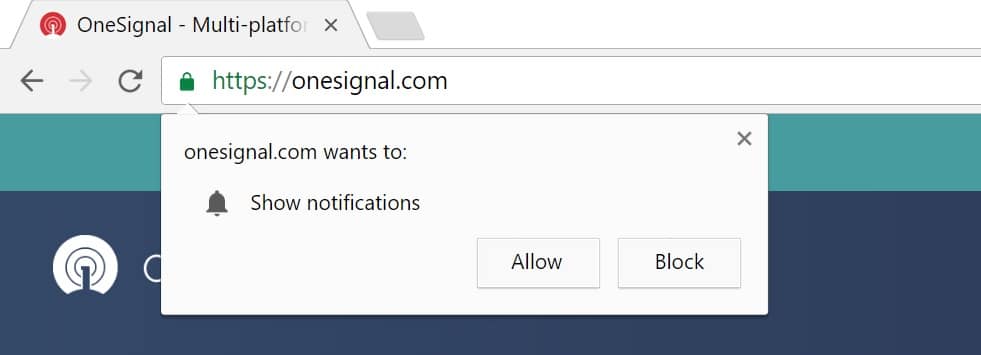
Below is an example of a push notification signup request, which you have probably seen before. By clicking “Allow” this enables the site to send you notifications via your browser. The beauty for website owners is that the visitor doesn’t have to be on your site for them to get your notification, they simply have to have their web browser running.
According to caniuse, global support for web push notifications is around 45%. Safari was the first one to provide web push, followed by Chrome, and then Firefox in 2016. Microsoft Edge and Opera also support push. Google Chrome currently holds around 77% of the browser market share, which means simply enabling push notifications in Chrome alone can reach a large audience.
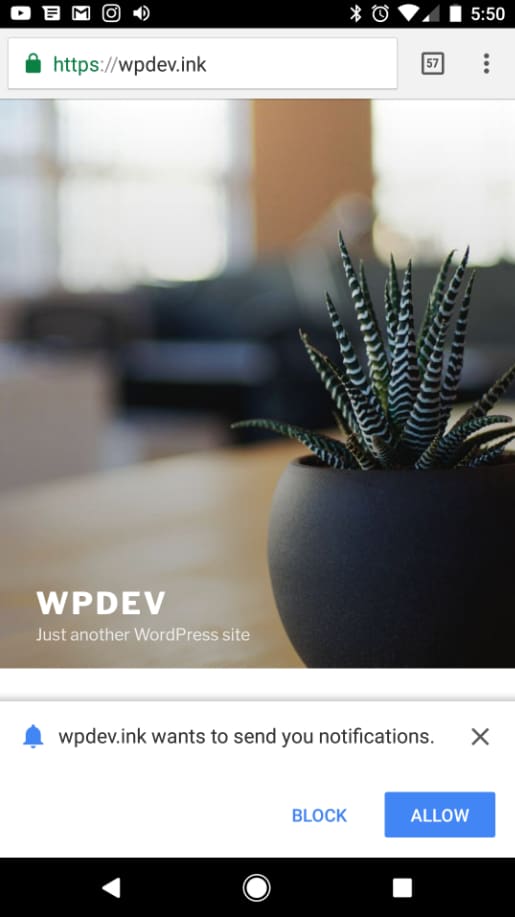
Push notifications also work out of the box on Chrome for Android mobile devices. Here is a screen capture below from an Android device and a push notification request. However, they aren’t currently supported on iOS, although they hope to be soon.
Benefits of WordPress Push Notifications
The major benefits of push notifications are that they provide another avenue of communication for your WordPress site. Lots of people skim over emails nowadays, or simply don’t even read them. Push notifications can help bring customers and visitors back to your site by placing your message right in front of them. If you have some doubts about how well push notifications work, check out some of these case studies:
- YouNow improved retention by 19% with web push notifications. – source
- United eXtra Electronics grew their eCommerce sales by 100% with web push notifications. – source
- A+E Networks achieved a 200% increase in user engagement with push notifications. – source
And those are just a couple. There are many other case studies from companies that have had massive success with push notifications. Whether you run an WooCommerce shop or an informational blog, push notifications are definitely something you should try as part of your marketing strategy.
Are push notifications for everyone? Definitely not. Some might feel that they hurt the user experience too much. In any case though, remember not to overuse them, as this might come off as annoying.
How to Set up WordPress Push Notifications
When it comes to setting up WordPress push notifications you have a lot of great options now to choose from. Below are a couple popular and actively updated ones. Note: These include free and premium solutions. Many of them have free plans up to a certain number of subscribers.
- OneSignal
- SendPulse
- VWO Engage
- PushUp
- Pushify
- Pushprime
- Roost
- PushAssist
- iZooto
- Desktop & Mobile Push Notification System
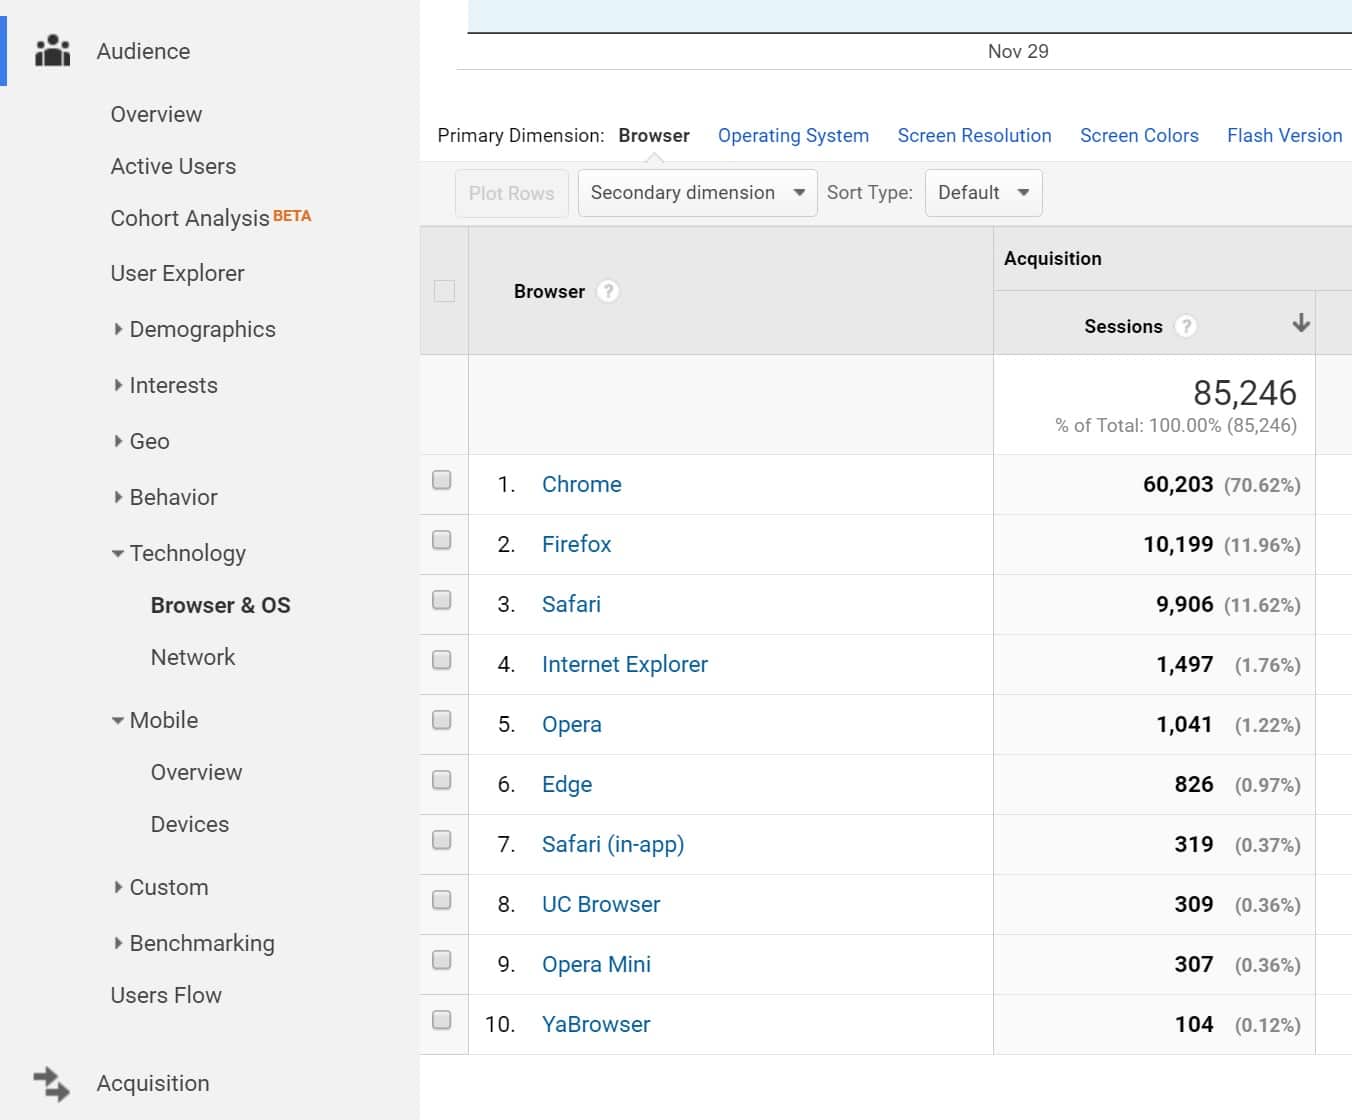
Since all of the above solutions have different browser and mobile support, we suggest looking in your Google Analytics data to see what type of traffic your WordPress site has. If you click into “Audience > Technology > Browser & OS” you can see which browsers are most frequently used by visitors on your site. In this example below you can see that enabling Chrome web push notifications would benefit us the most since over 70% of the desktop traffic is from Google Chrome.
In this tutorial we will be using a plugin from OneSignal, which is a completely free solution for WordPress push notifications. As of writing this it currently has 50,000+ active installs and rating of 4.7 out of 5 stars.

According to their website, they are used by over 100,000 developers, including big names such as Adobe, Uber, and Tom’s Hardware. Some of their features include:
- 100% free to use
- Unlimited WordPress push notifications
- Unlimited devices
- Delivery automation
- Localization
- Full API
- Unlimited segments
- A/B Testing
- Delivery scheduling
- Ability to import and export your data
Sounds to good to be true? Well, one thing to keep in mind. They don’t hide this fact at all and are very open about it on their site. The way they make money is by using the data they aggregate to improve web and mobile experiences. So if that is a problem for you, you can always upgrade to their enterprise version in which they don’t have access to your data. Prices start at $40 a month for up to 500,000 users.
An advantage that OneSignal has is that they allow you to setup as many WordPress sites (apps) as you want. So you can login to OneSignal’s dashboard and have 10+ different WordPress sites all with their separate push notification apps and data. If you manage multiple WordPress sites, and are wanting to implement push notifications on all of them, OneSignal can be a great way to easily manage them going forward. Plus its free!
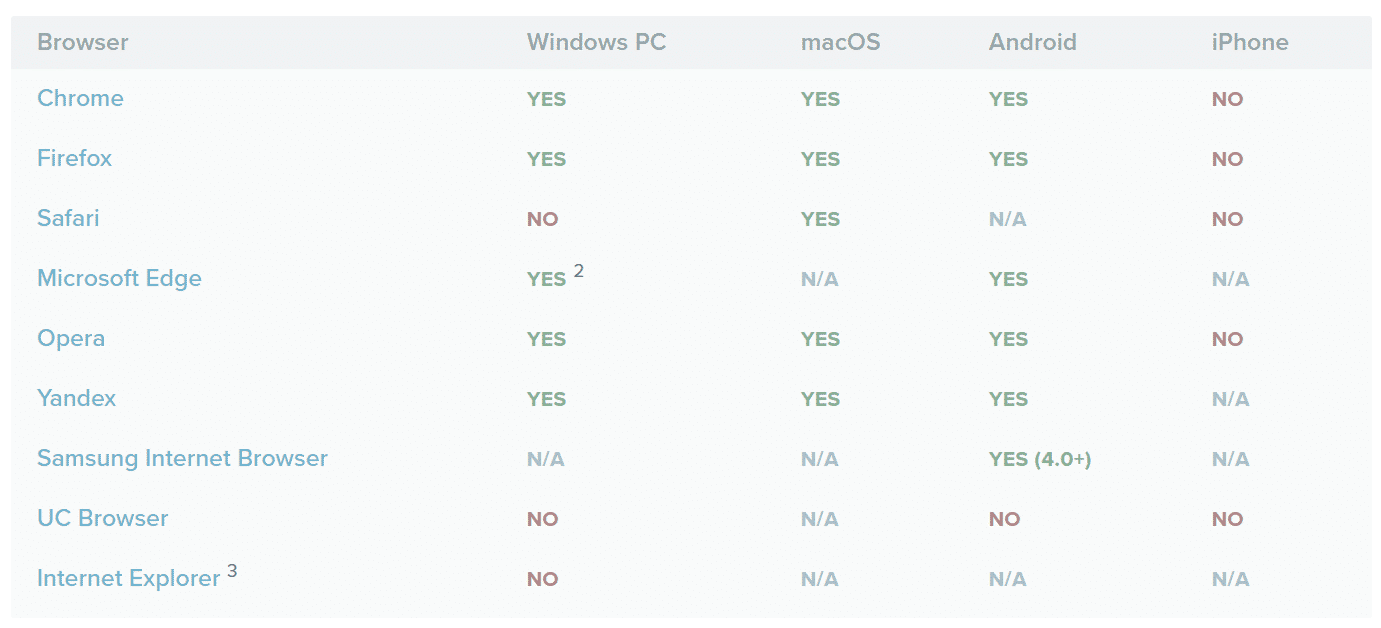
With OneSignal, web push notifications work exactly like the native mobile push. So, you don’t have to create a mobile app just to get the benefit of native push notifications on mobile. Below are the currently supported browsers.
Follow the steps below to get up and going with OneSignal in just a matter of minutes. While OneSignal has configurations for both HTTP and HTTPS sites, we highly recommend using HTTPS on your domain because web push permissions and subscriptions are separated by domain/protocol. There isn’t a way to transfer your push notifications later. Kinsta offers free SSL to all users, or Cloudflare is another good option.
Step 1
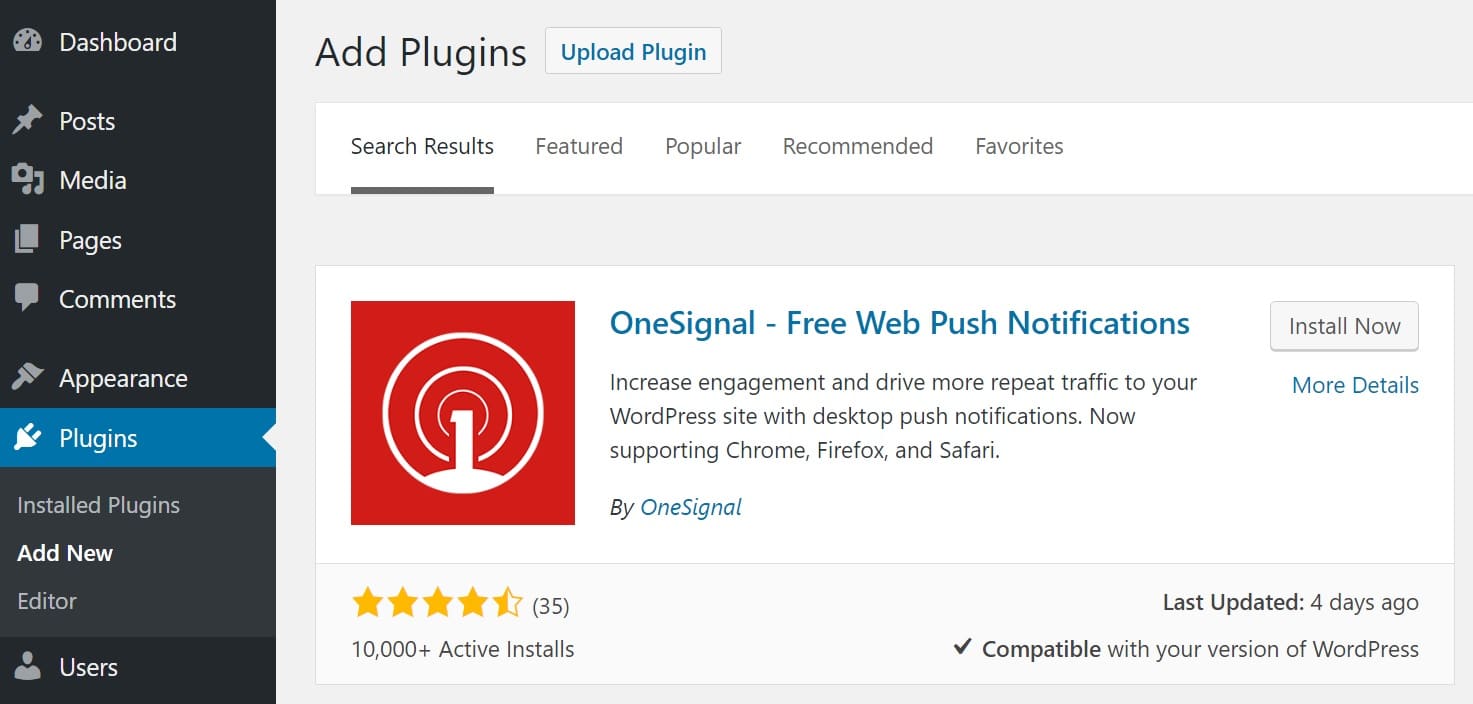
Download and install the free OneSignal plugin. You can download it from the WordPress repository or by searching for it within your WordPress dashboard under “Add New” plugins.
Step 2
Next, head over to OneSignal and create a free account.
Step 3
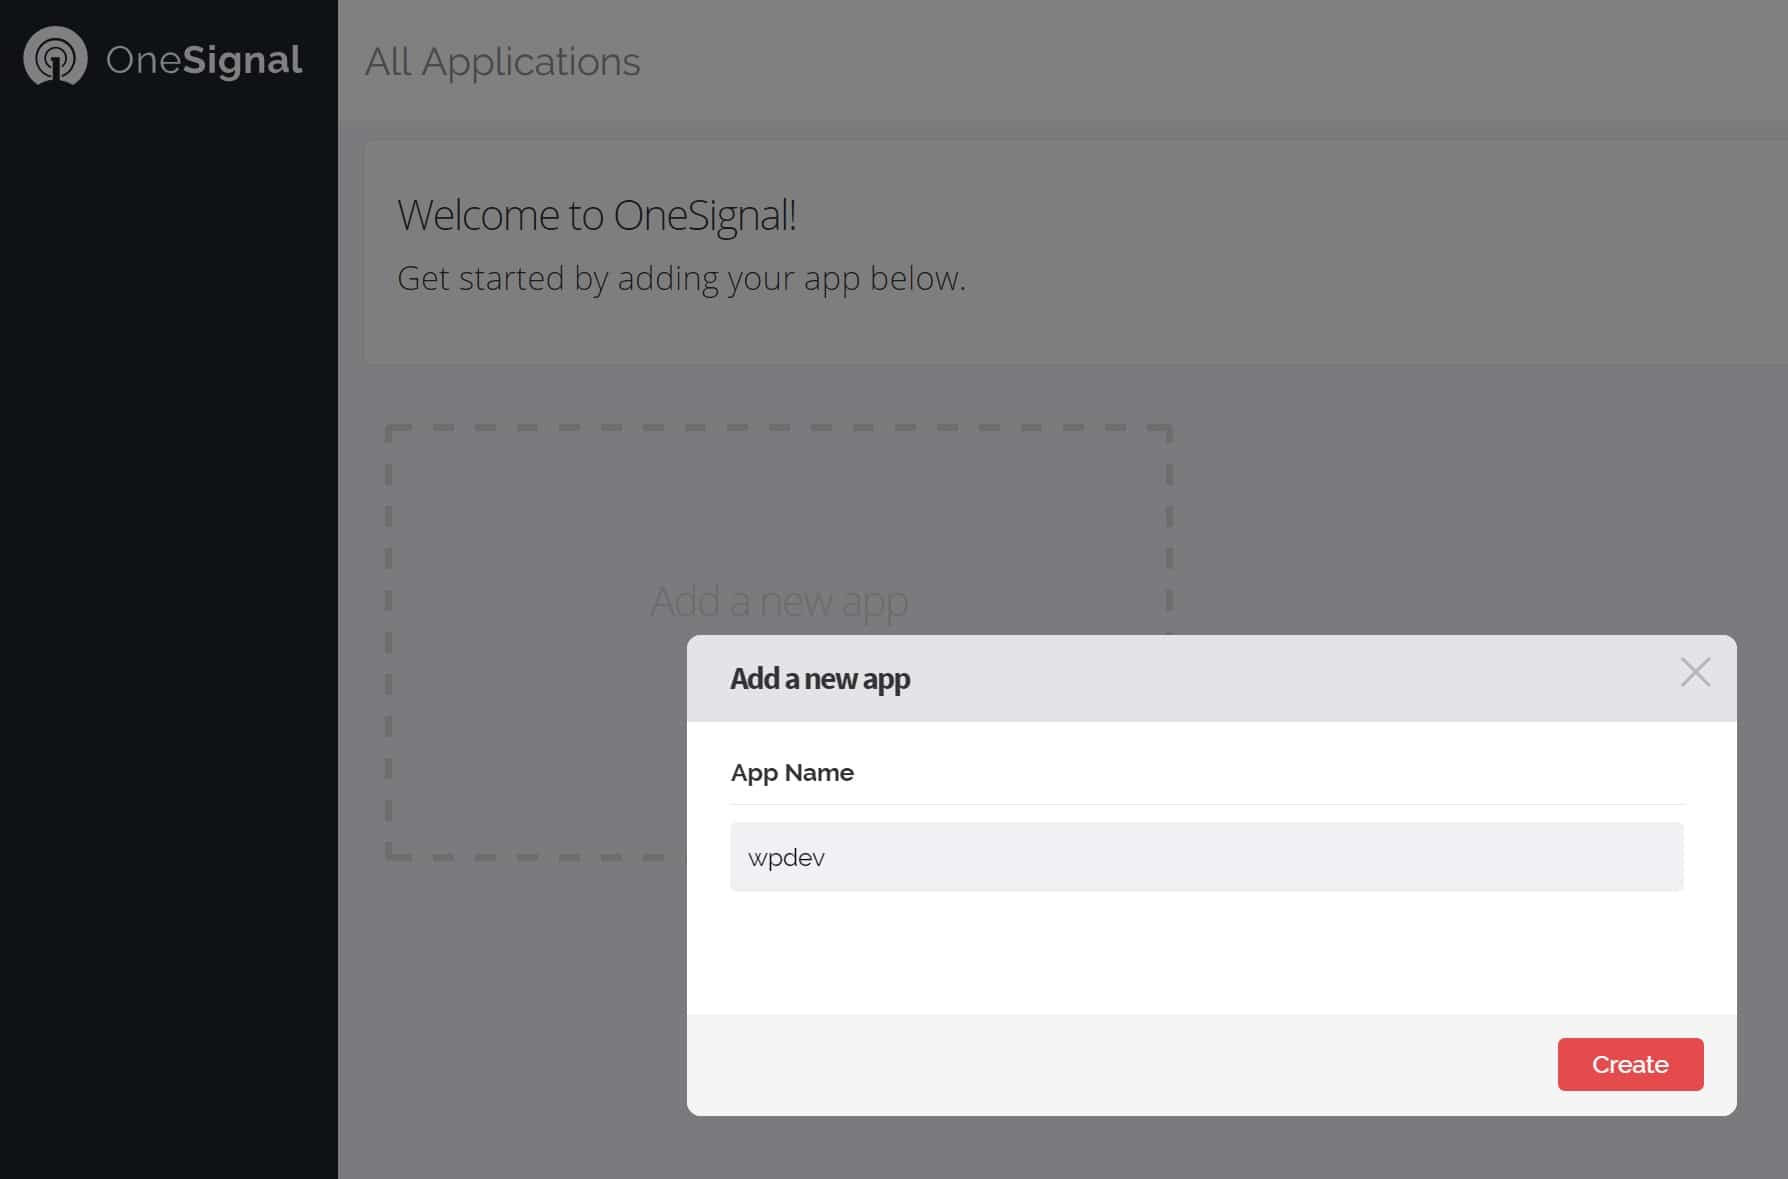
Click on “Add a new app” and give your app a name. In our example, we are simply using the name of our WordPress site. Then click on “Create.”
Step 4
Select “Website Push” and click “Next.”
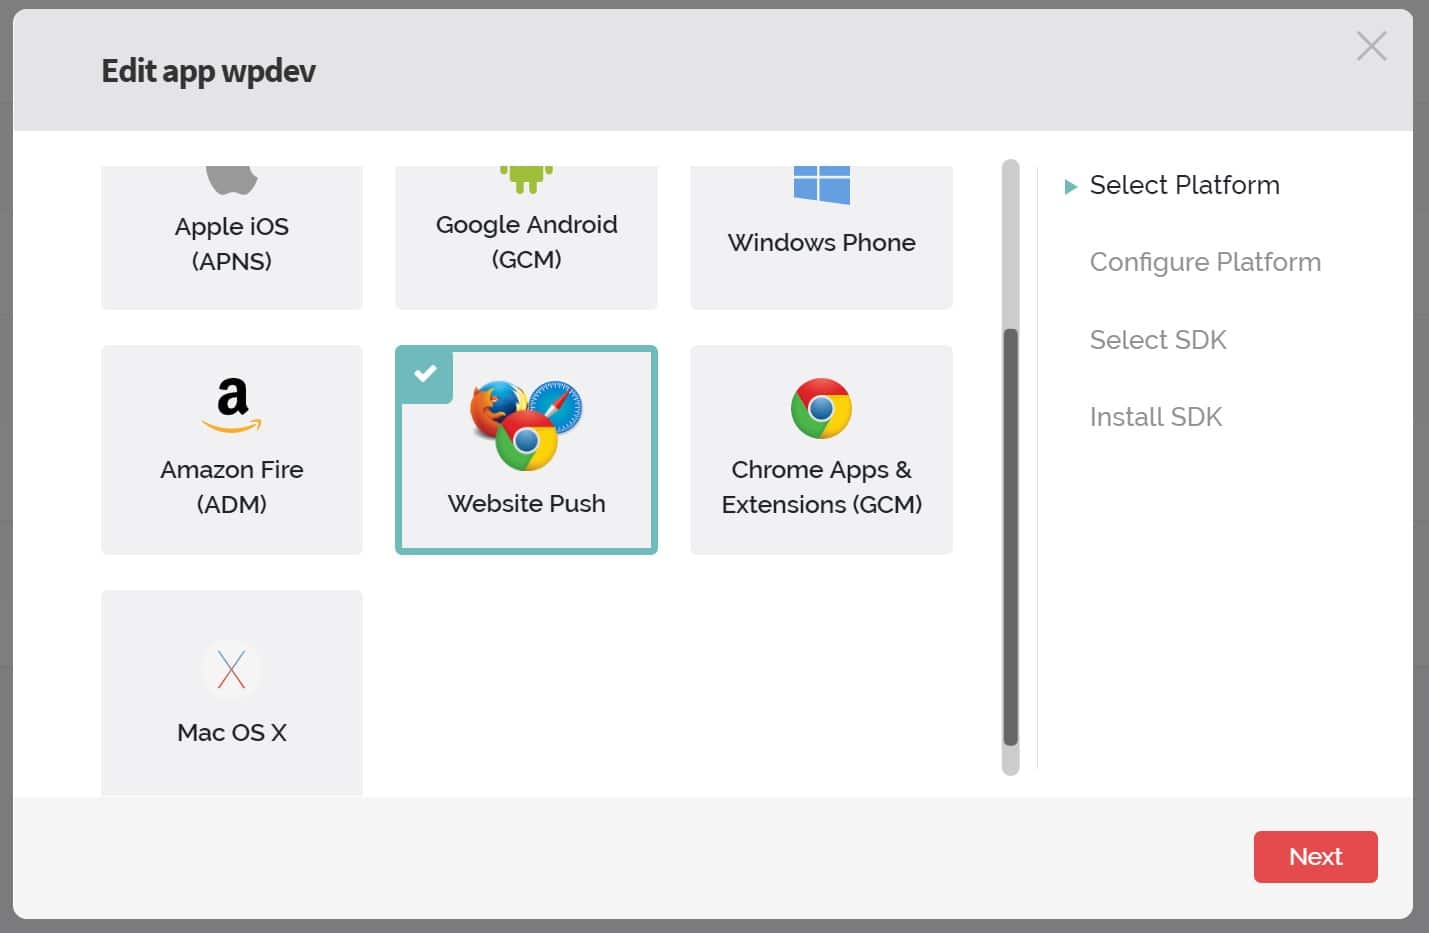
Step 5
We are first going to setup Google Chrome and Firefox. We will do Safari later on. Then click on “Next.”
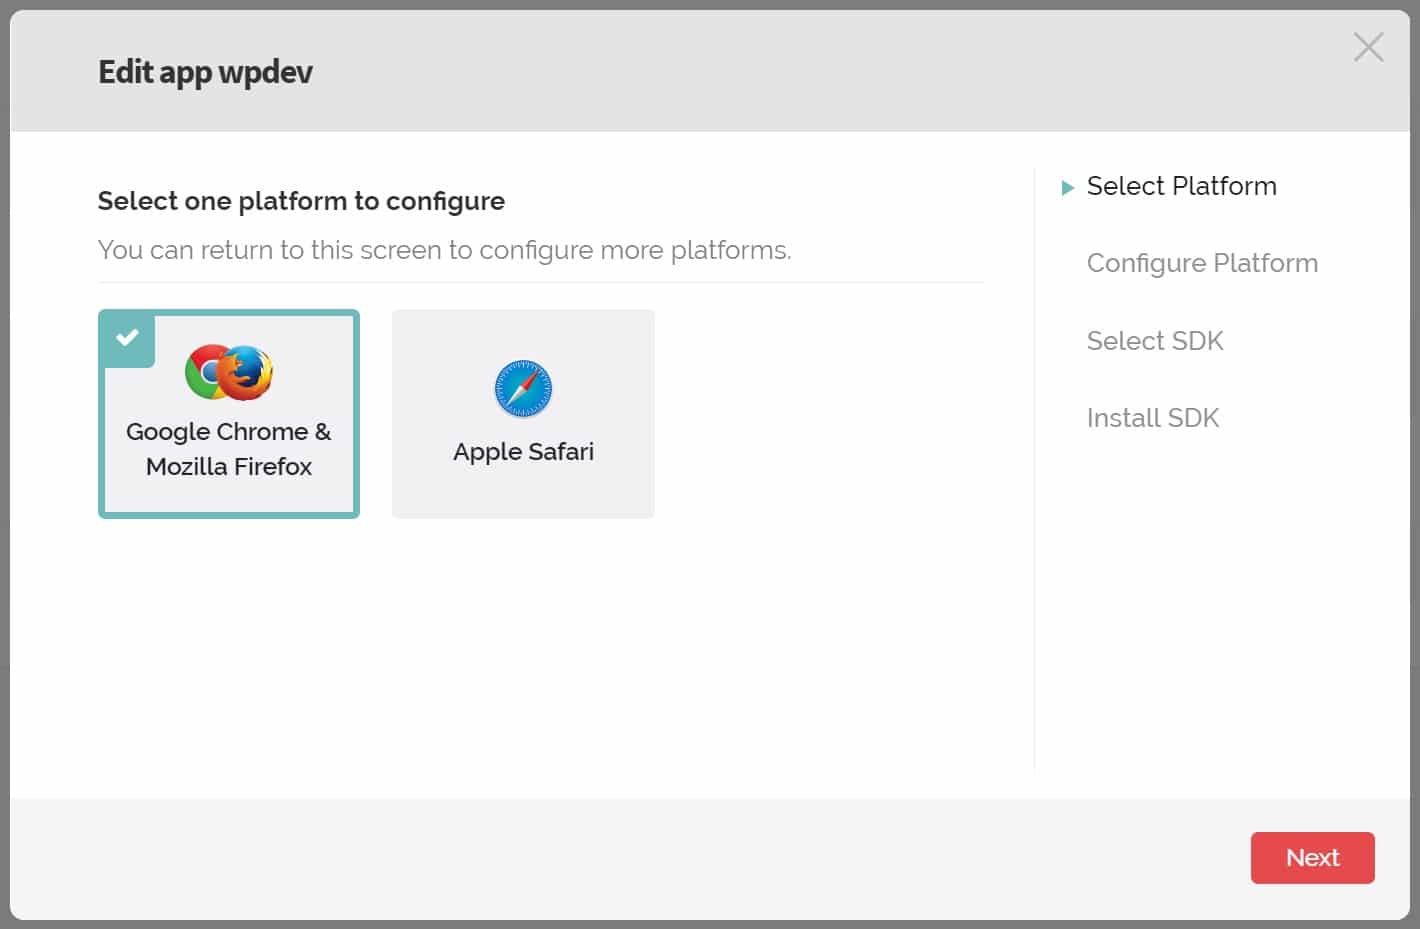
Step 6
Input your WordPress Site URL. Ensure you use the correct protocol, HTTP or HTTPS depending upon what you are running on your site. In our example our site is using HTTPS. Then input the location of your notification icon URL. According to OneSignal, icon dimensions should be 192 x 192 or larger to display well on high pixel density devices. You can upload one to your WordPress media library and copy the URL. The default OneSignal notification icon will be used if you don’t choose one. Then click “Save.”
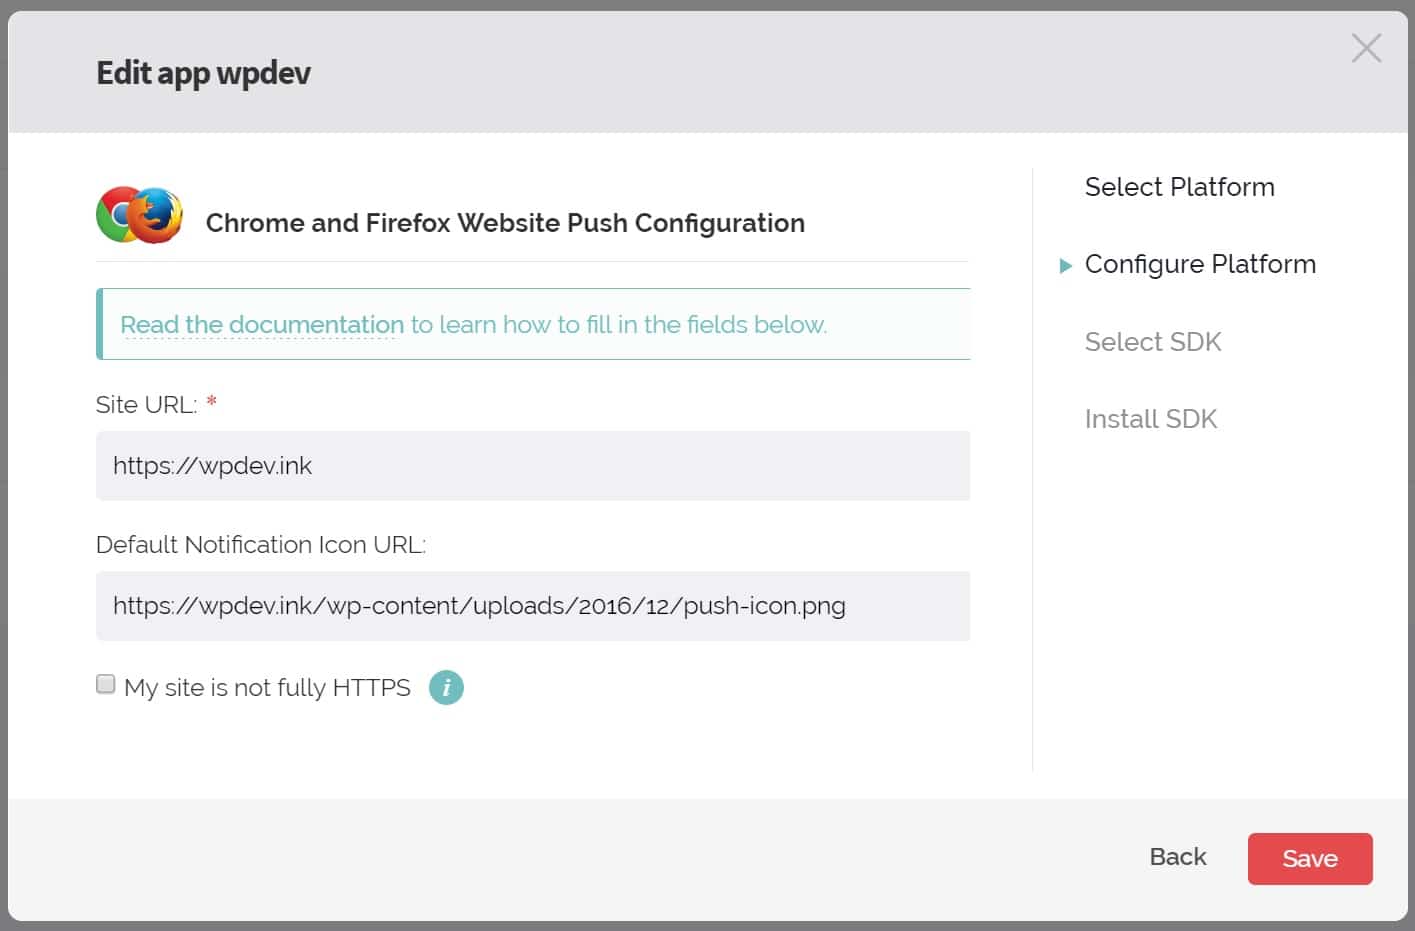
Note: If your site is running over HTTP, they let you create a subdomain on onesignal.com which allows the app to then function over HTTPS. For example, https://yoursite.onesignal.com.
Step 7
On the next screen you will need to select your target SDK, in this instance we select “WordPress” and click on “Next.”
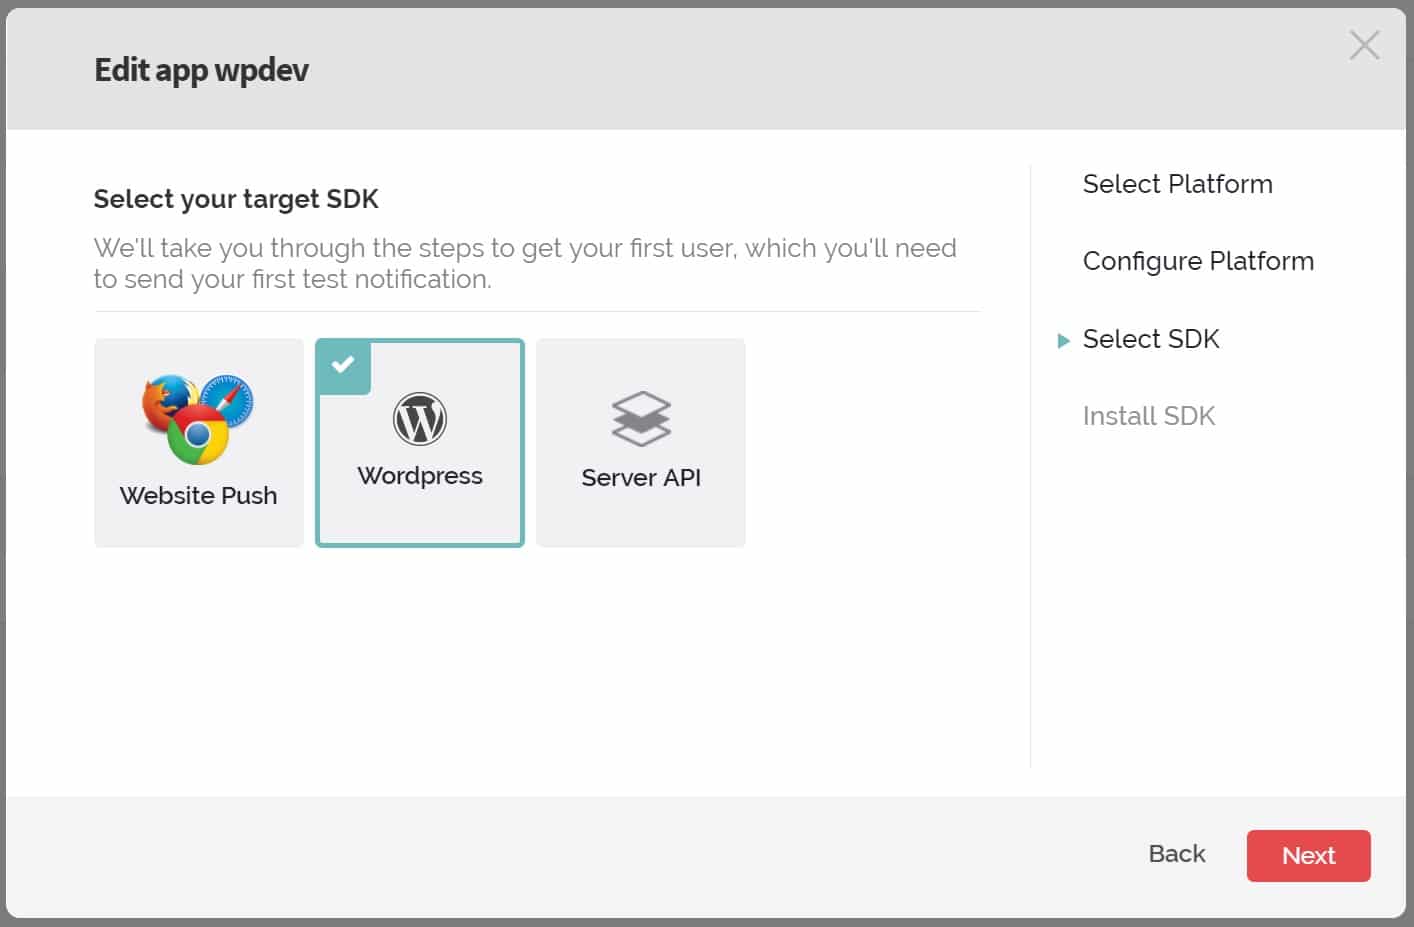
Step 8
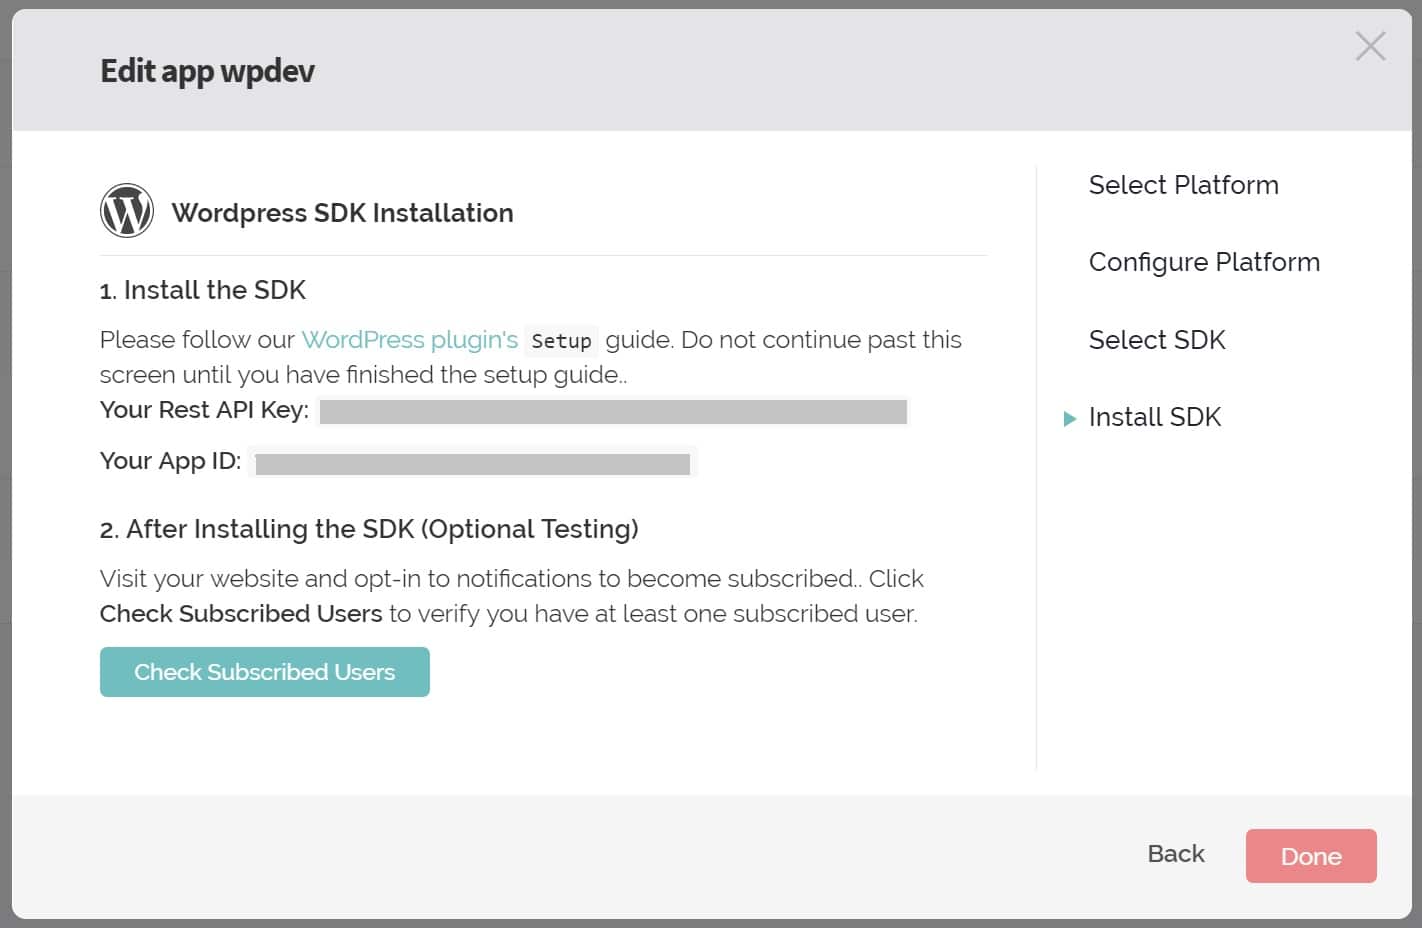
On the next screen, you will want to copy your Rest API key and App ID as you will need to input this information into the settings of the WordPress plugin. Leave this window open as you will come back here later.
Step 9
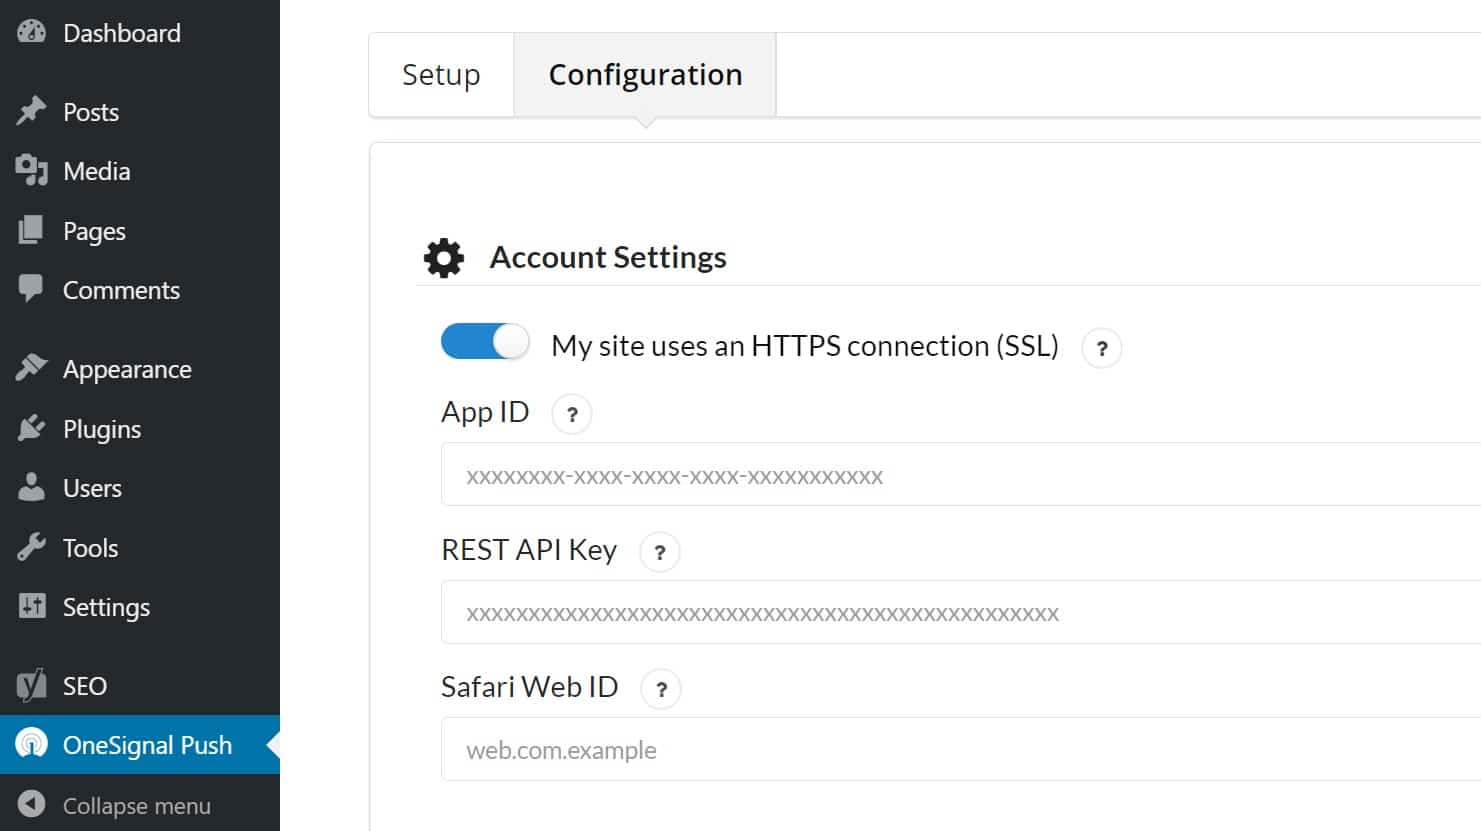
Back in your WordPress site, click into the “Configuration” tab of the OneSignal Push settings. Input your App ID and REST API Key. You can leave everything else on the default settings for now. Scroll down to the bottom and click “Save.”
Step 10
You will then want to browse to your website and subscribe to the notification to test that everything is working correctly. Click on the “red” symbol on the bottom right and click on “Allow.” You can change these options in the display settings later. (Note: You might need to disable adblocker if you have it running)
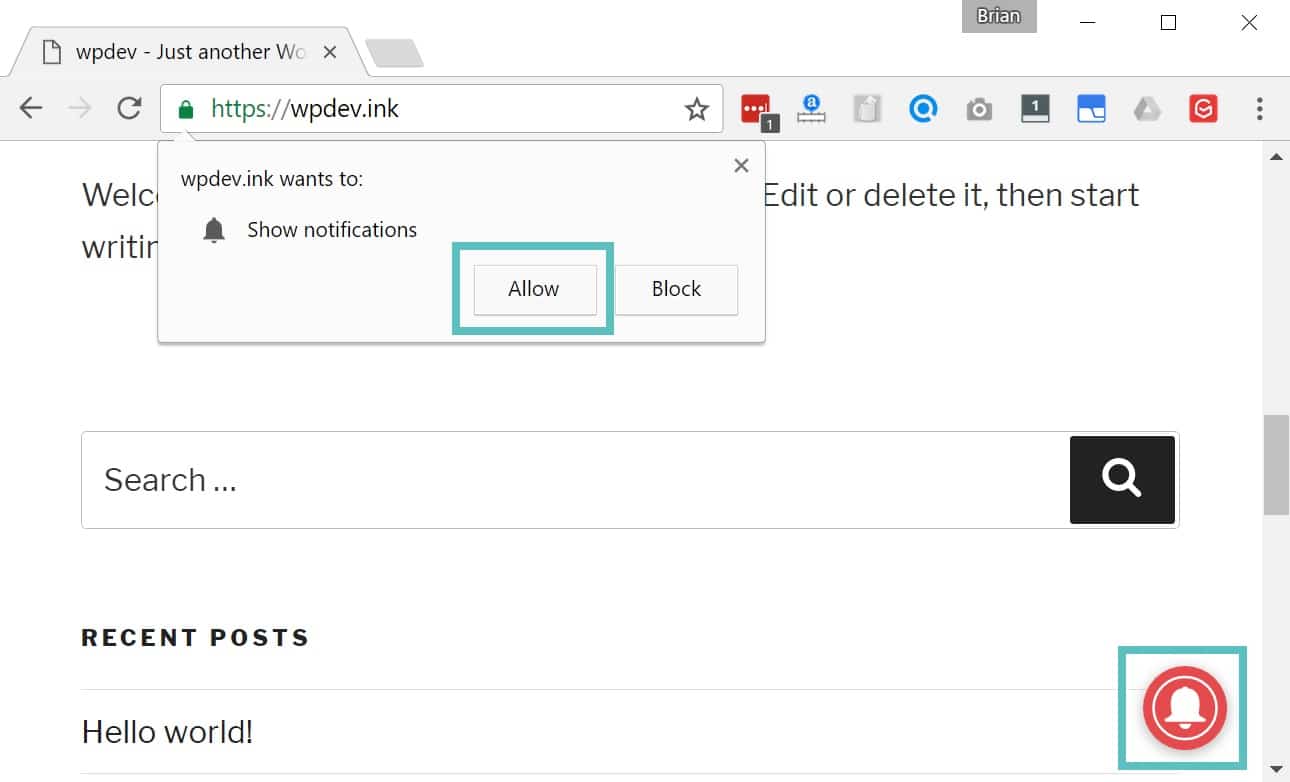
You will see a confirmation, of which you can also change the wording later.

Step 11
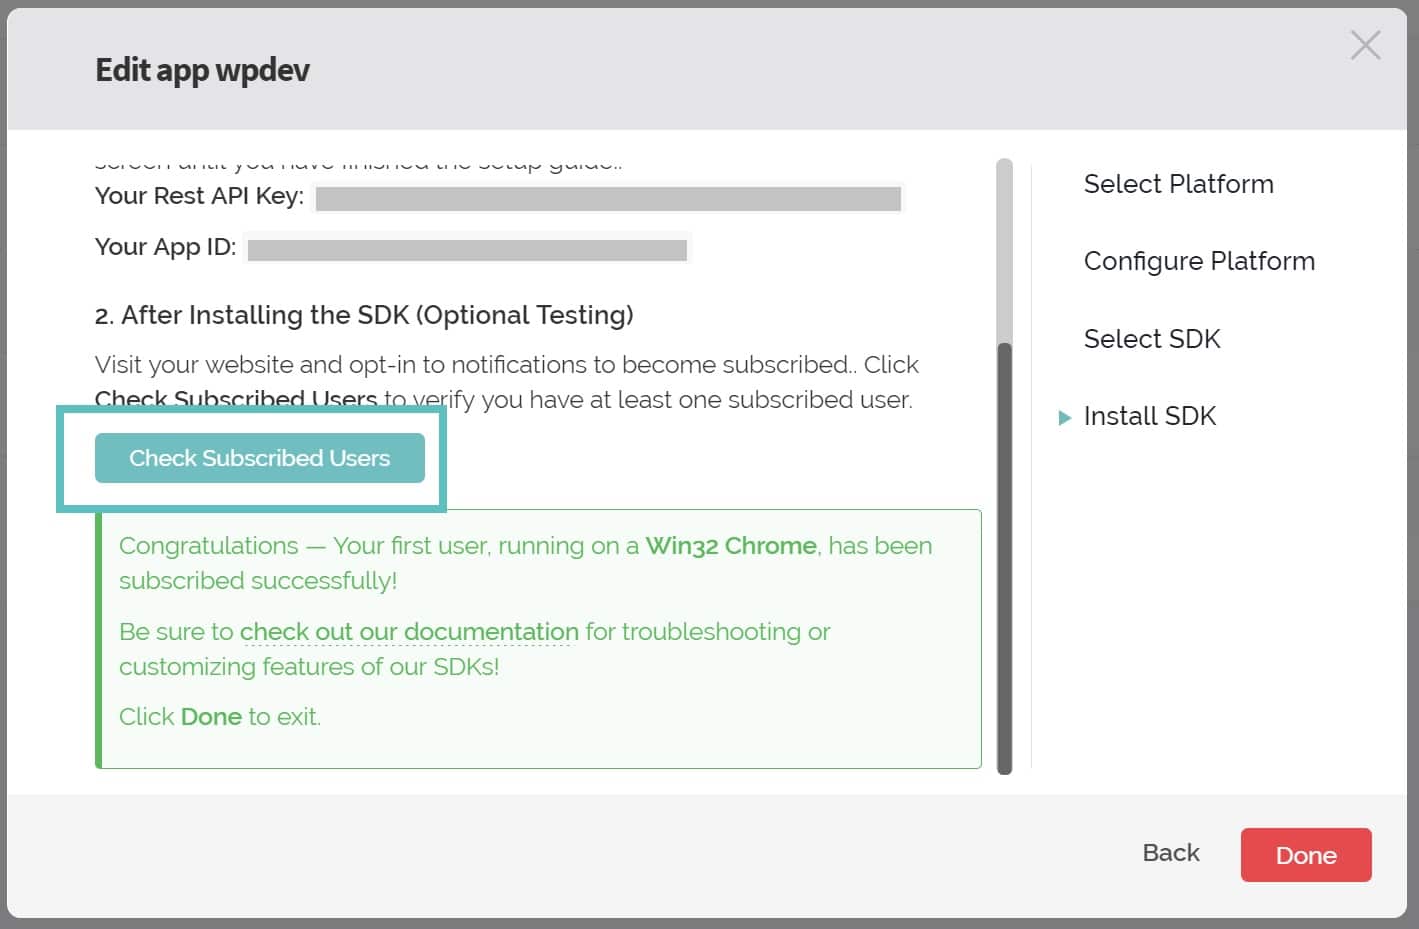
Then back on the OneSignal website, click on the “Check Subscribed Users” button and click on “Done.”
Step 12
Now it is time to setup the Safari push notifications. Click into “App Settings” and click on “Configure” next to Apple Safari (macOS).
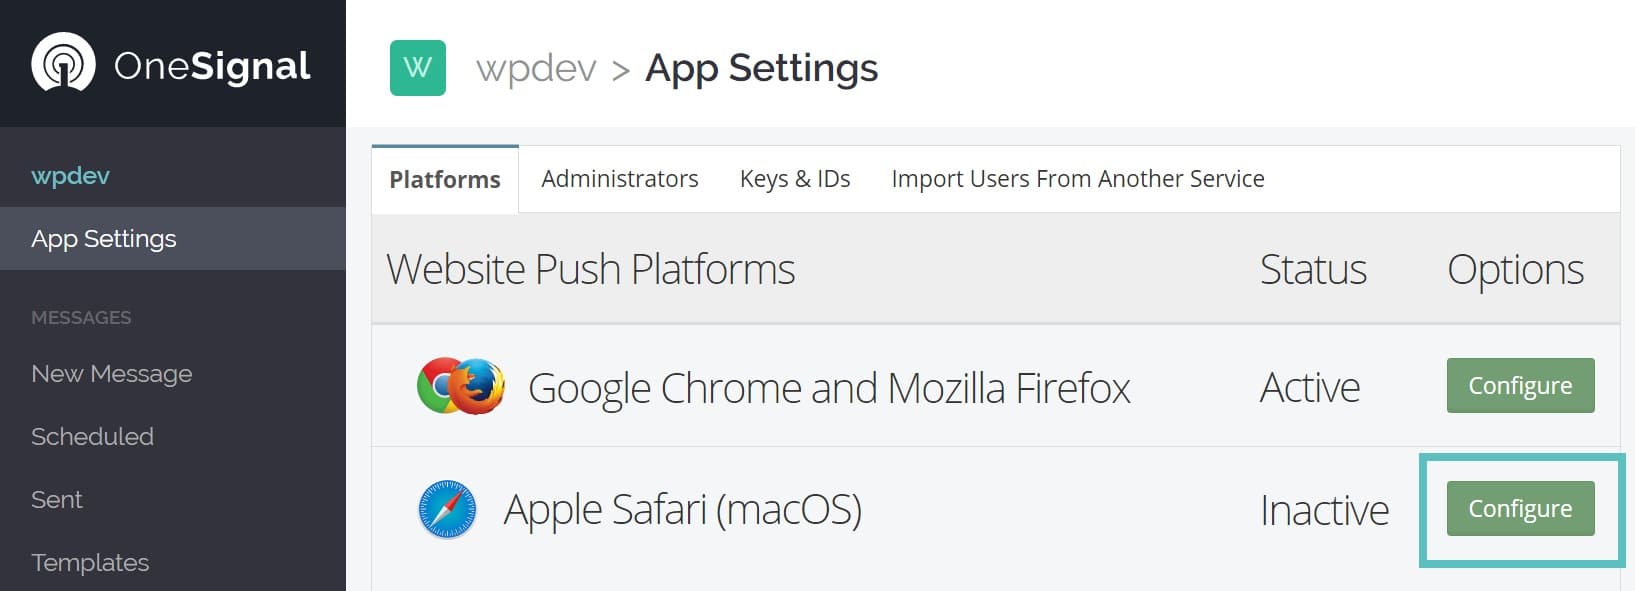
Step 13
Input your site name (this is shown in the notification) and your Site URL. You can then upload your notification icons (which include a 16 × 16, 32 x 32, 64 x 64, 128 x 128, and 256 x 256). These are uploaded directly to OneSignal, not your WordPress media library. The default OneSignal notification icon will be used if you don’t upload them. Then click “Save.”
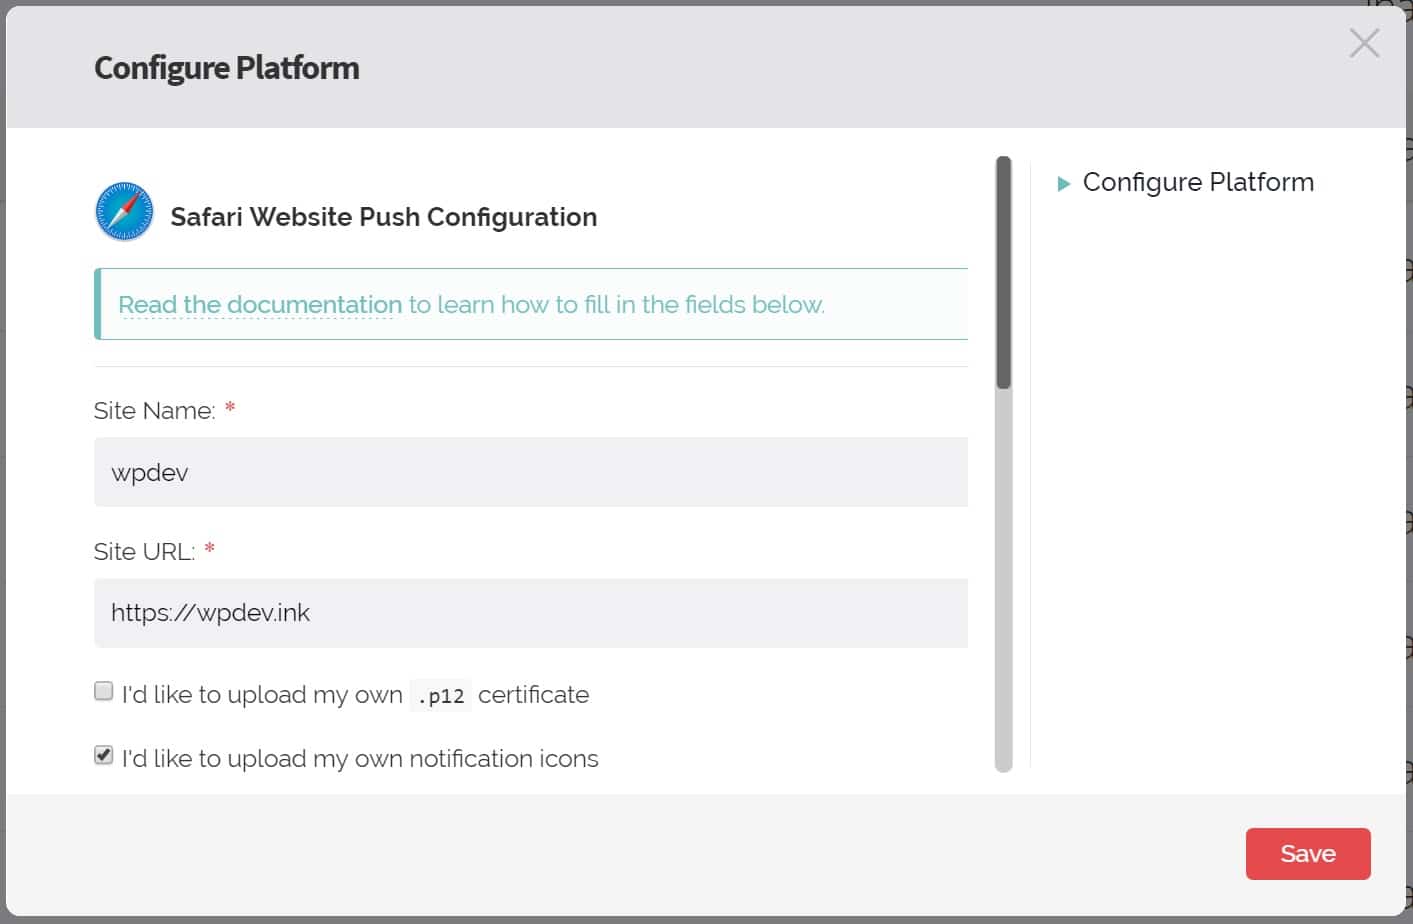
Step 14
It will then display your Web ID which you will want to copy to your clipboard.
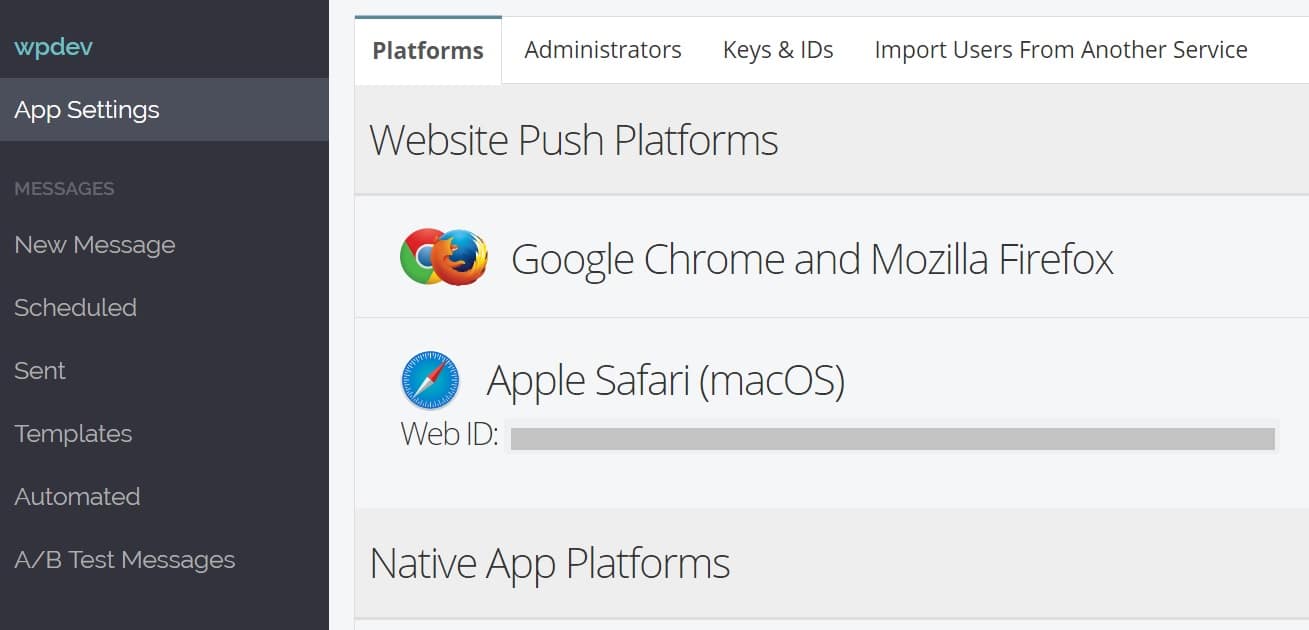
Then paste that into the Safari Web ID field of your OneSignal configuration settings. Scroll down and click “Save.”
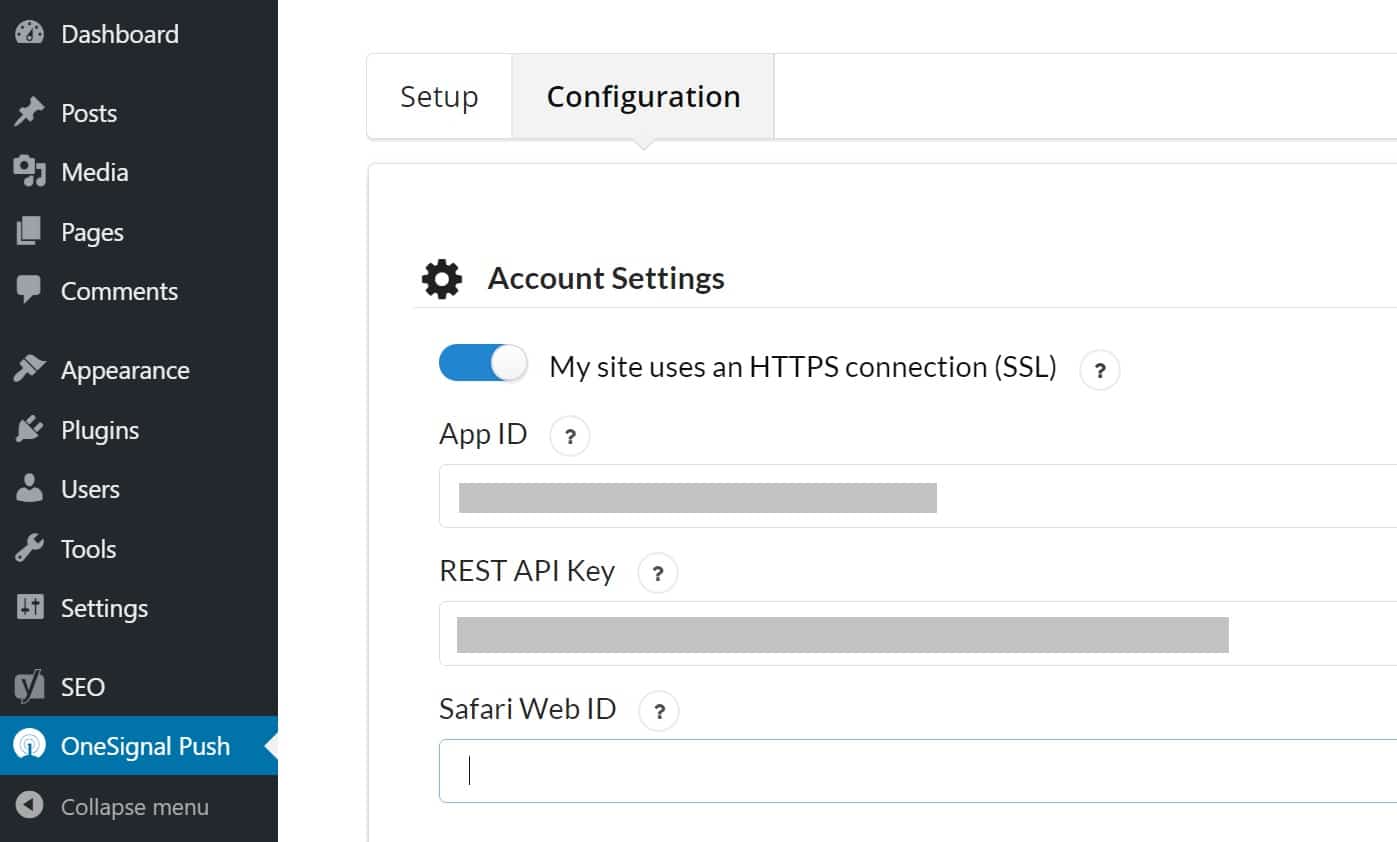
And that’s it! You now have WordPress push notifications up and running.
OneSignal Additional Notes and Options
There are dozens of settings you can configure in the plugin, some of which we will cover below. If you are curious about the performance of OneSignal, the plugin is fairly lightweight and utilizes a single script that is under 100 KB. This is served up from their CDN partner, Cloudflare. In our tests OneSignal didn’t slow down our site at all.

There is one thing to be aware of though and that is their plugin doesn’t play nice with 3rd party CDN provider plugins. In our example, we were using the free CDN plugin CDN Enabler and it required us to add the following exclusion in the settings in order for OneSignal to work correctly. If you are using another plugin or CDN provider, you can check out their additional documentation on CDN troubleshooting.
.php,.xml, onesignal-free-web-push-notifications
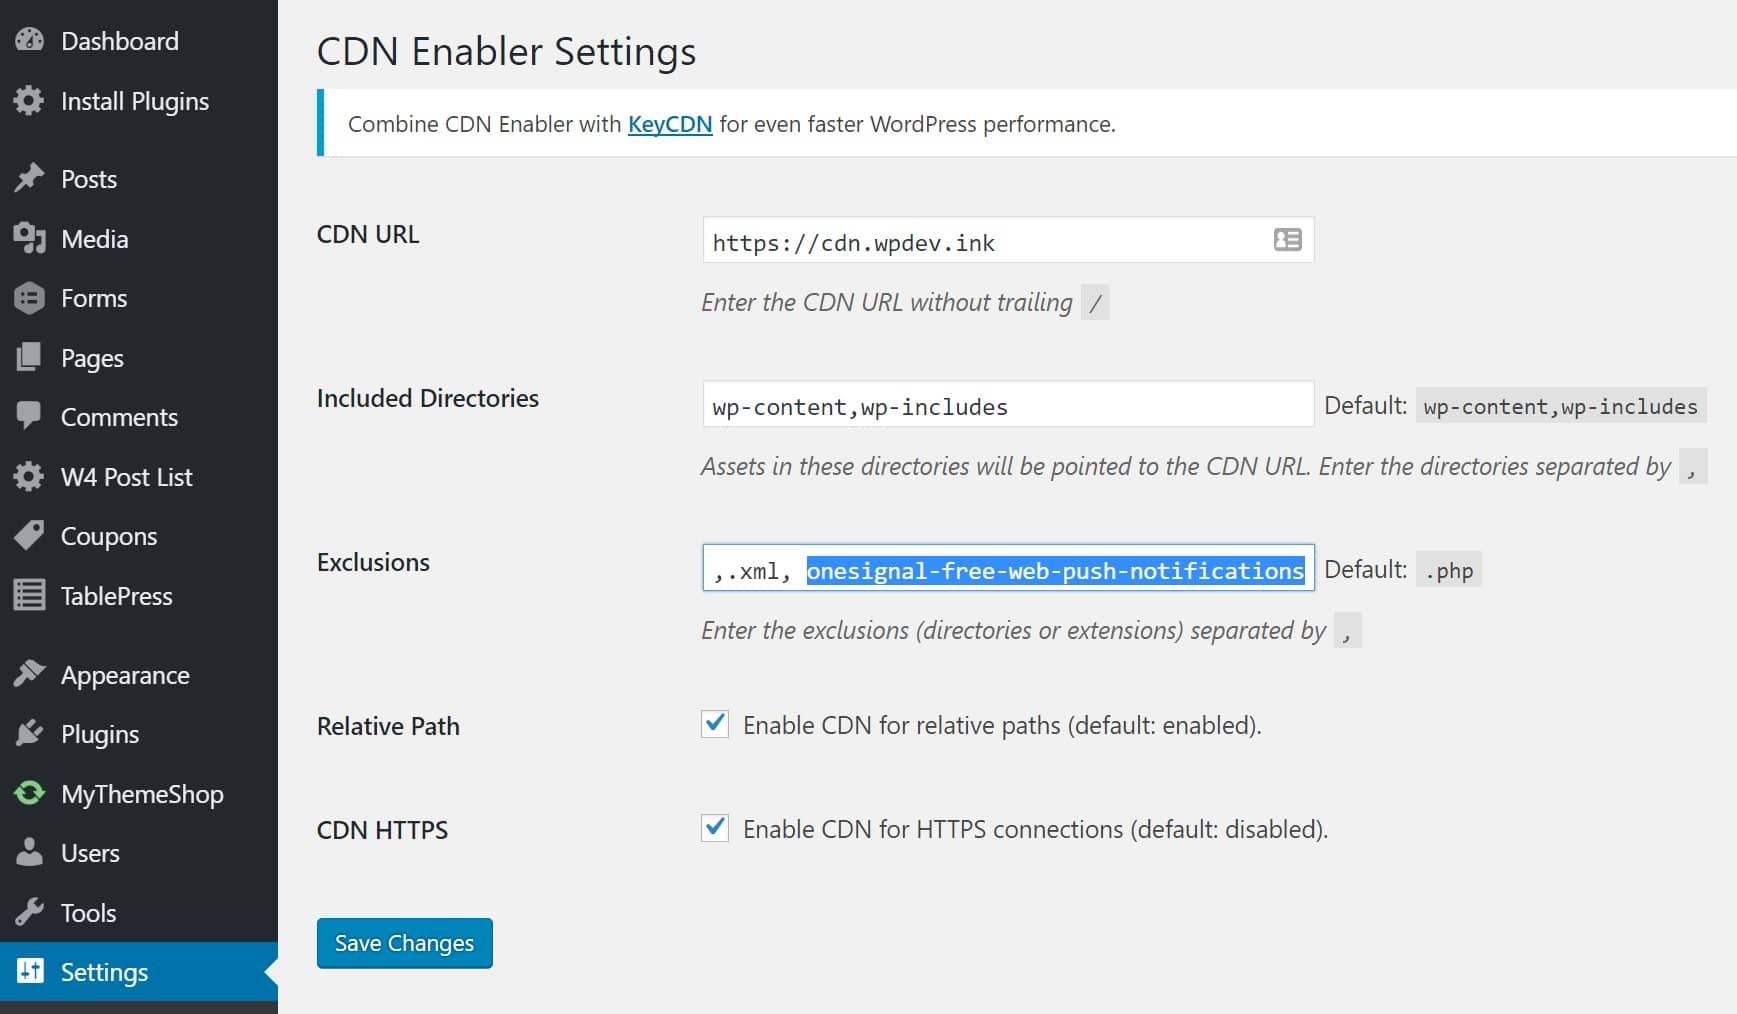
Also, if you are using the free Cache Enabler plugin on your site you will need to disable JavaScript minification.
Automatic Push Notifications
When you install the OneSignal WordPress plugin, it by default enables the option to “send notification on post publish” automatically (as seen below). You can easily un-check this if perhaps you are publishing a post you don’t want getting pushed.
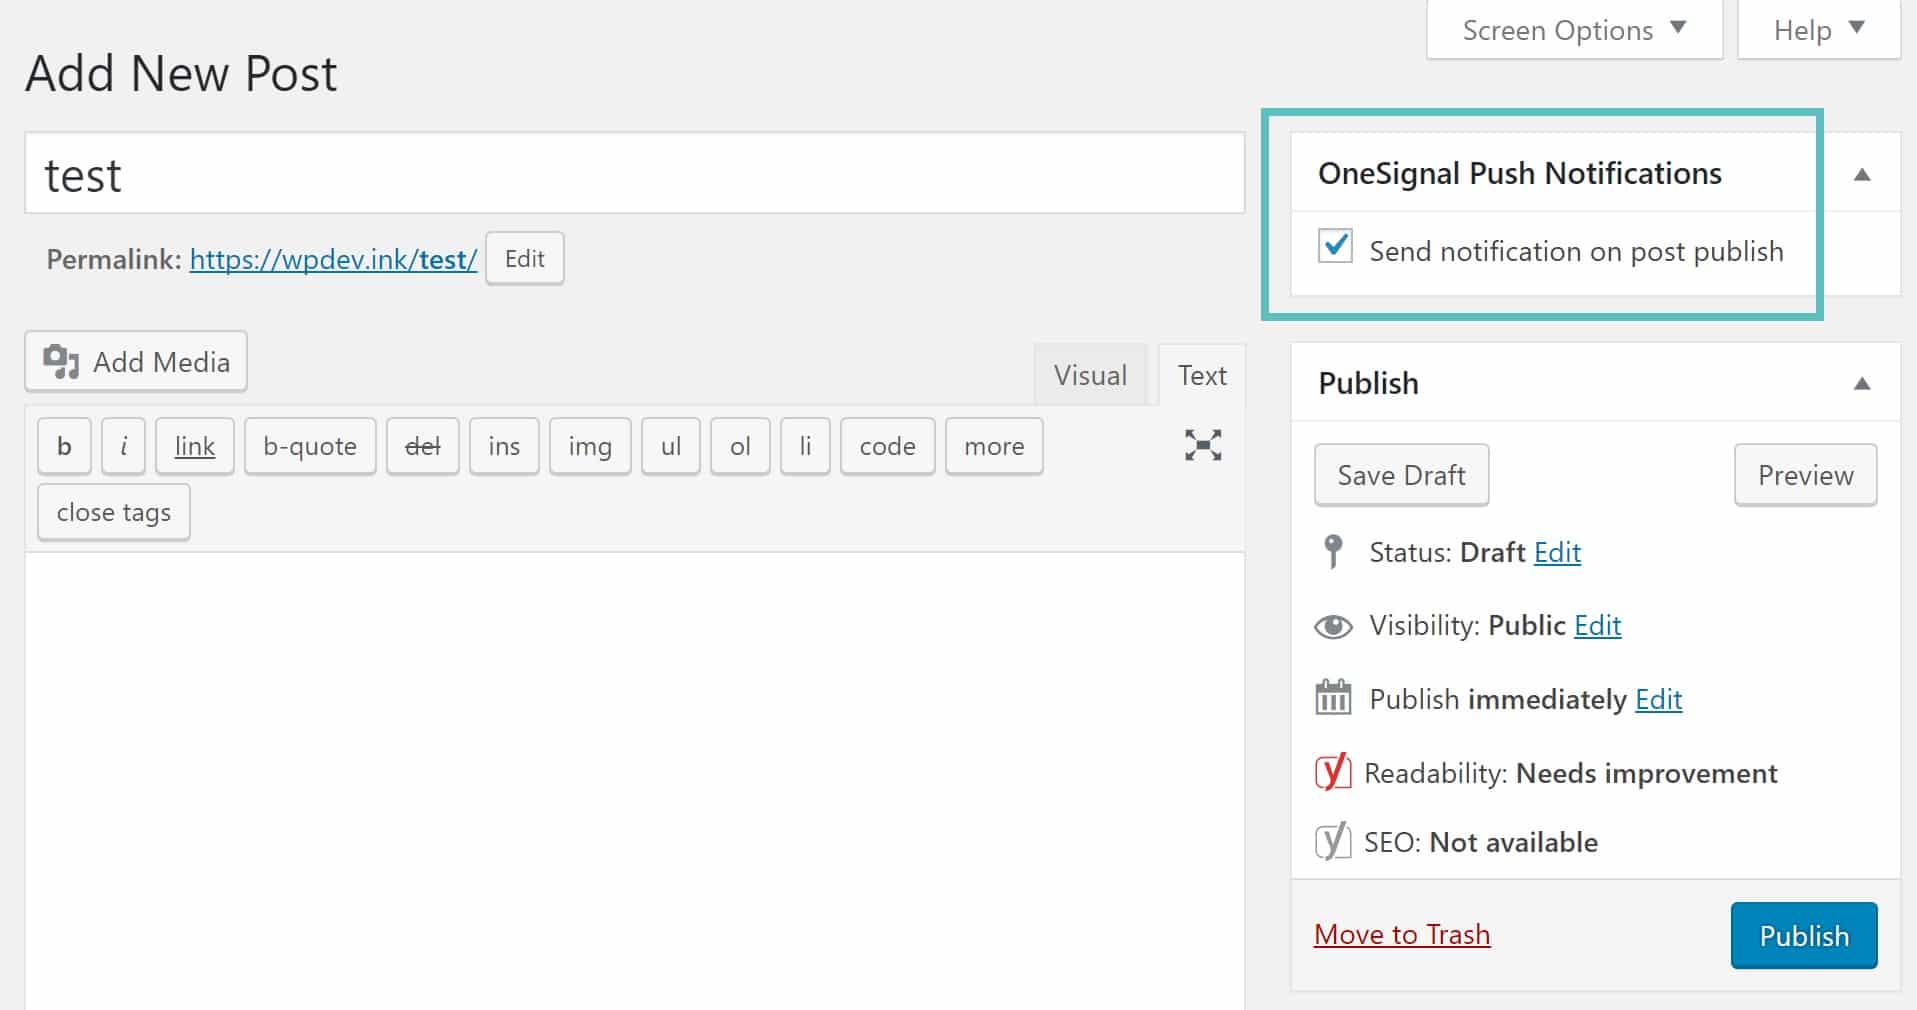
You can also disable the above from being automatically checked by going into the OneSignal Push plugin settings and flipping off the “Automatically send a push notification when I create a post from the WordPress editor” option. You could then simply manually check it from the WordPress editor when you want to push it. This is probably the safer route to go.

Automatically Prompt Users
If you want new visitors to be automatically prompted to subscribe, you can enable that within the plugin settings. You can also disable the “Red” floating icon if you think it might be too obtrusive for visitors.

There are a multitude of other options you can change such as:
- Adding additional UTM tracking parameters
- Creating additional custom post types
- Change the wording on the “thank you for subscribing” option
- Change the popup wording
- Change how the widget looks and interacts with visitors on your site
- Use the post’s featured image for the notification icon
- Dismiss notifications after ~20 seconds
You can then control everything from the OneSignal dashboard. We were even surprised by the data. On one site that we added it on, we had over 140 push notification subscribers in under 48 hours (see below). Remember, that even if you don’t personally subscribe to notifications, it doesn’t mean that is how your visitors think. Don’t ever assume when it comes to marketing your WordPress site, testing is the best way to get concrete data.
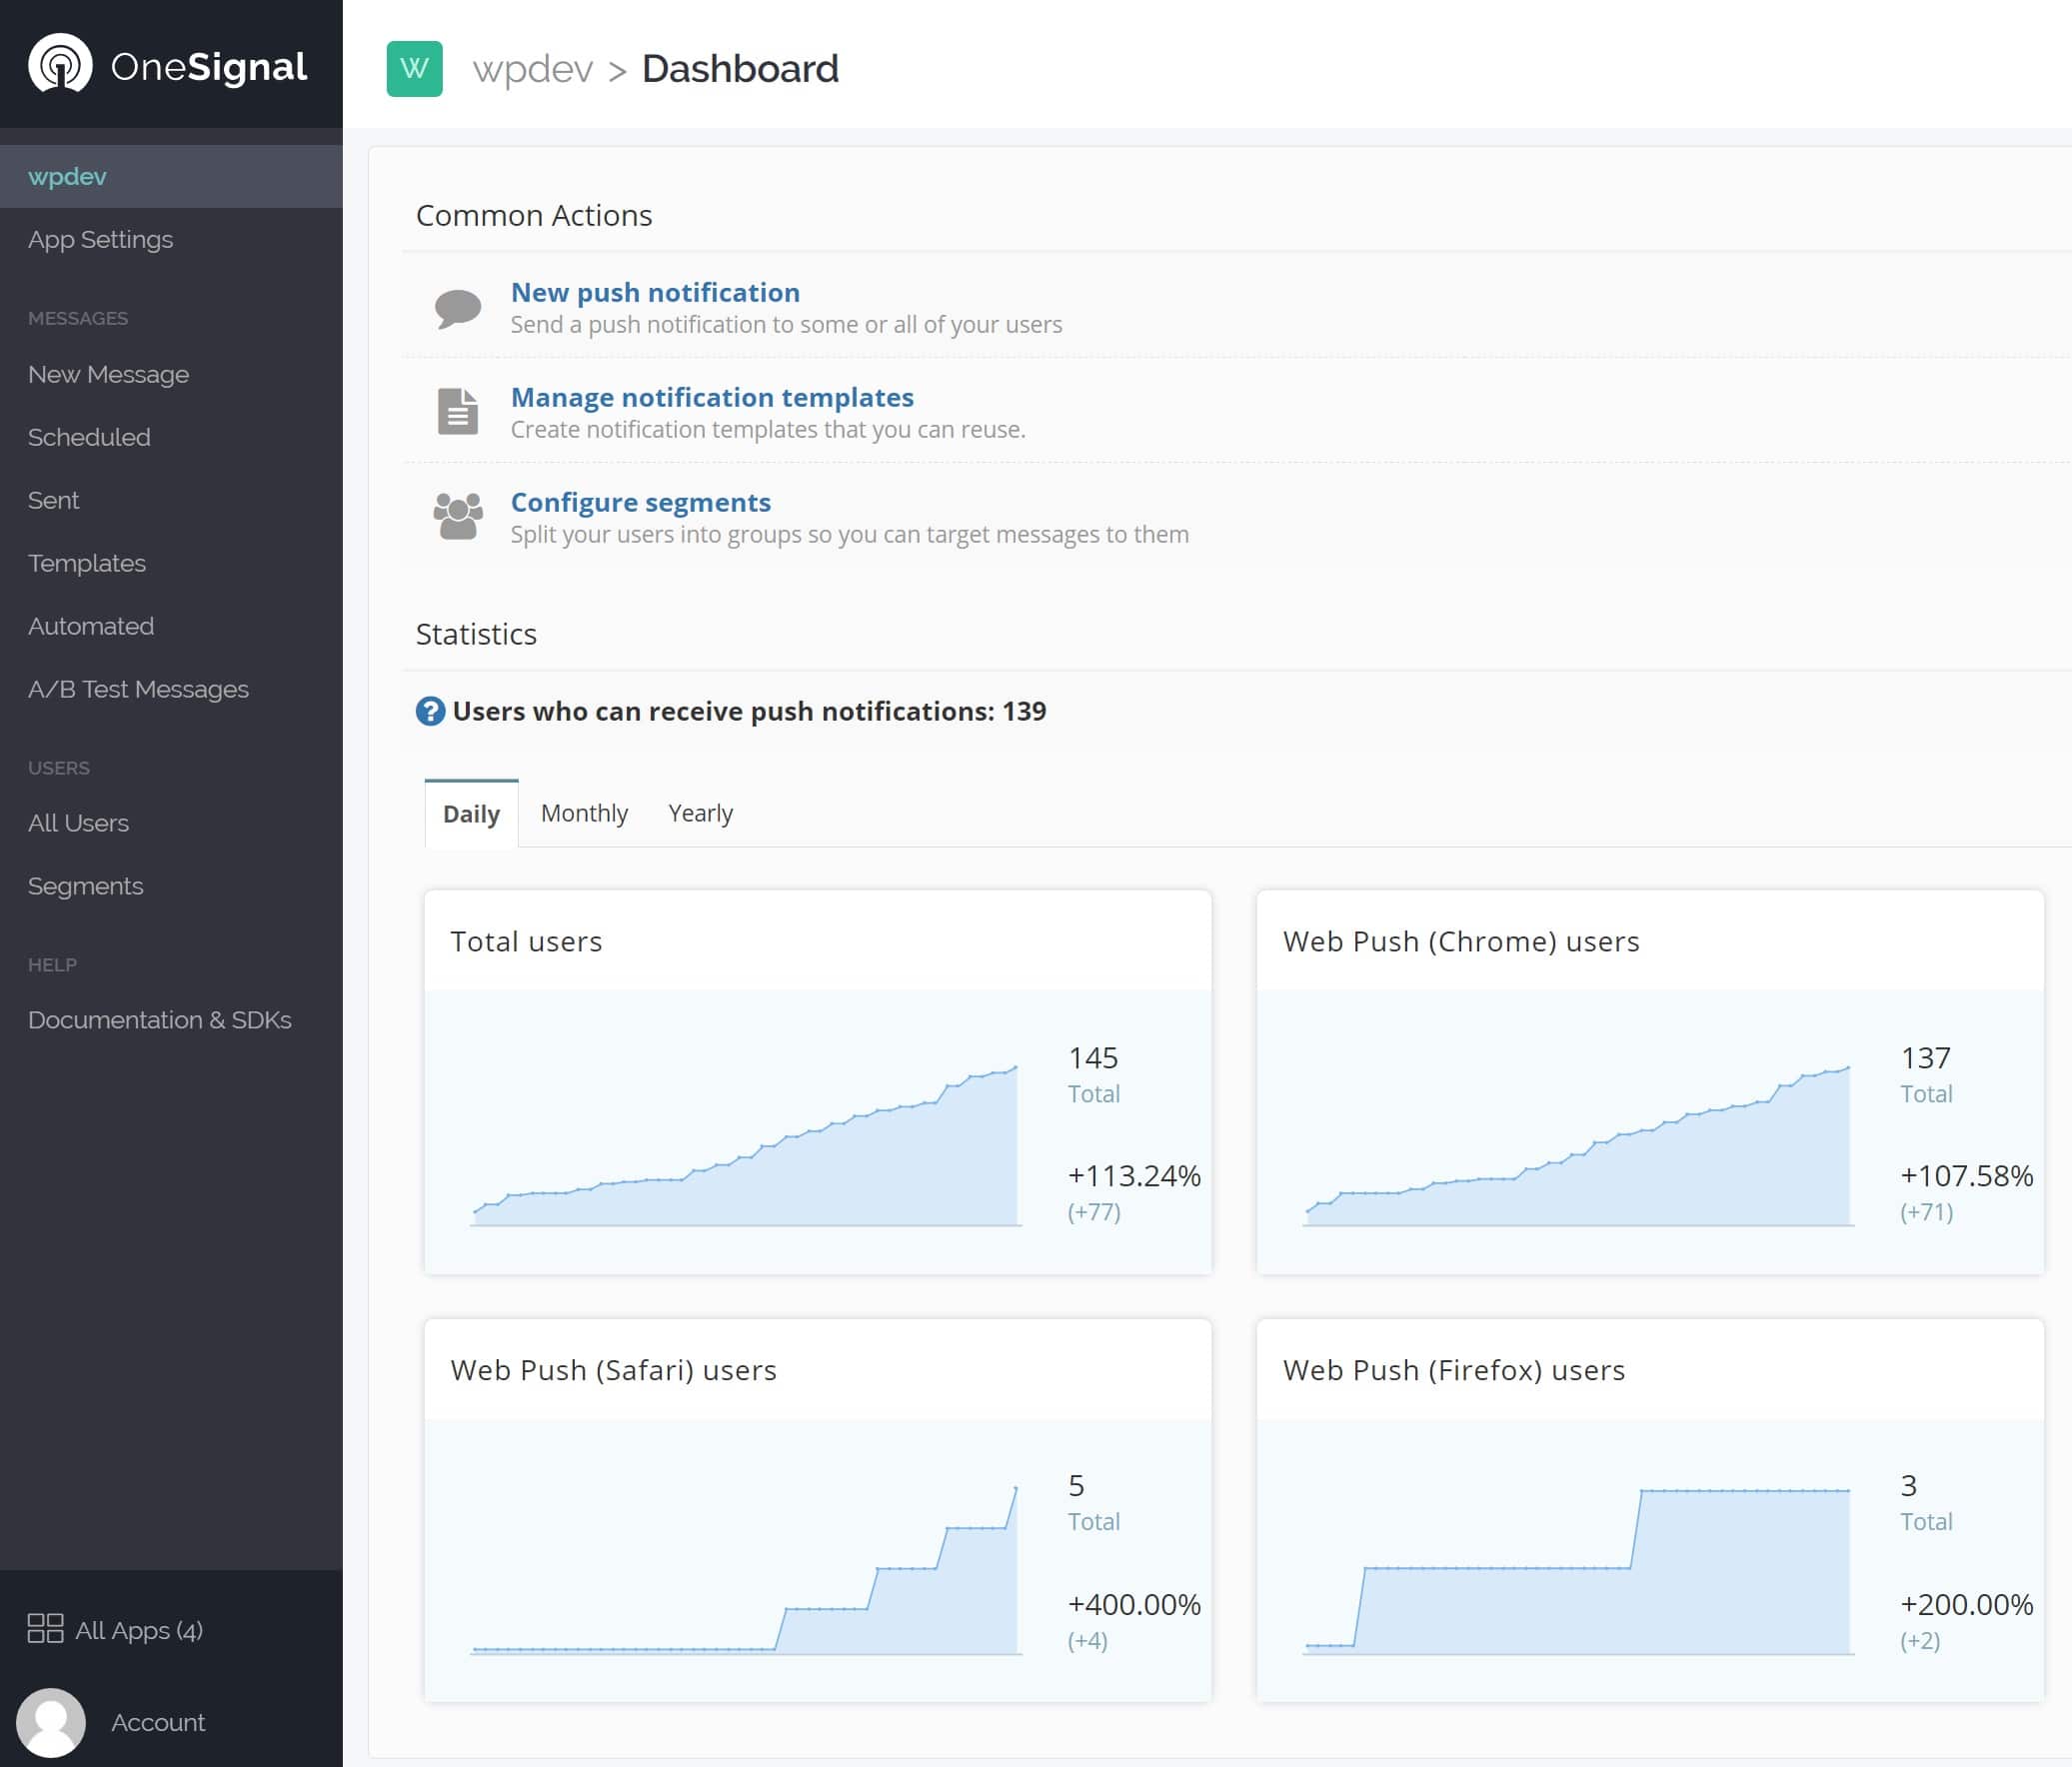
Make sure to also check out our official case study with OneSignal. In less than 3 months of using OneSignal, it is already our 3rd highest organic traffic source! If you are pushing out notifications directly from the OneSignal dashboard, make sure to add a UTM parameter so you can segment the traffic and track it. Here is an example of what we use on each URL.
https://yourdomain.com/?utm_medium=push&utm_source=notificationsUnsubscribe from Push Notifications
If you get a lot of traffic to your website, there are bound to be a few visitors that accidentally subscribe to your website’s push notifications. Therefore it’s good to have a link somewhere on your site on how to unsubscribe from push notifications. It varies per browser, so it’s typically best to point users to their official documentation.
Summary
As you can see, WordPress push notifications are fairly easy to set up! It might seem like a few steps, but really it can all be completed within a matter of 5 minutes. If you are looking for additional avenues to connect with your visitors or customers, we recommend giving this a try. There really is no risk involved. If you don’t like it, you can simply uninstall the plugin, cancel the service, and return to normal. Push notifications can be a great way to get extra eyeballs on your content and keep visitors returning to your WordPress site.
Have you experimented with WordPress push notifications yet? If so, we would love to hear about your experience or opinions below.


