One of the most important files of a WordPress installation is the configuration file. It resides in the root directory and contains constant definitions and PHP instructions that make WordPress work the way you want.
The wp-config.php file stores data like database connection details, table prefix, paths to specific directories and a lot of settings related to specific features we’re going to dive into in this post.
- The Basic wp-config.php File
- Over Basic Configuration: Editing the File System
- Features for Developers: Debug Mode and Saving Queries
- Content Related Settings
- Allowed Memory Size
- Automatic Updates
- Security Settings
- Other Advanced Settings
- Lockdown wp-config.php
The Basic wp-config.php File
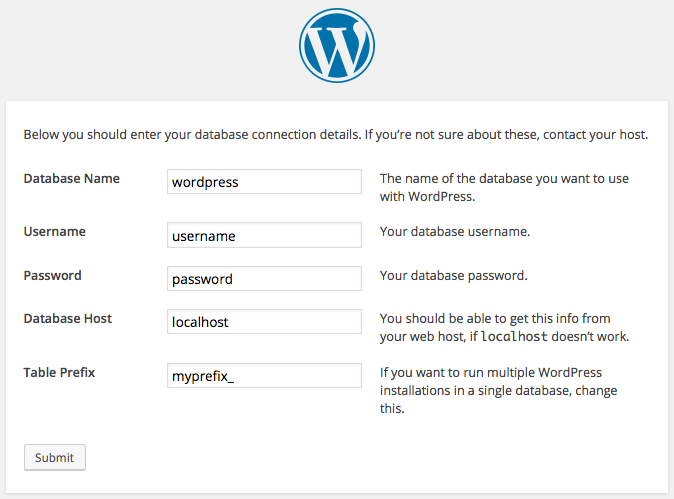
When you first install WordPress, you’re asked to input required information like database details and table prefix. Sometimes your host will set up WordPress for you, and you won’t be required to manually run the set-up. But when you’re manually running the 5-minute install, you will be asked to input some of the most relevant data stored into wp-config.
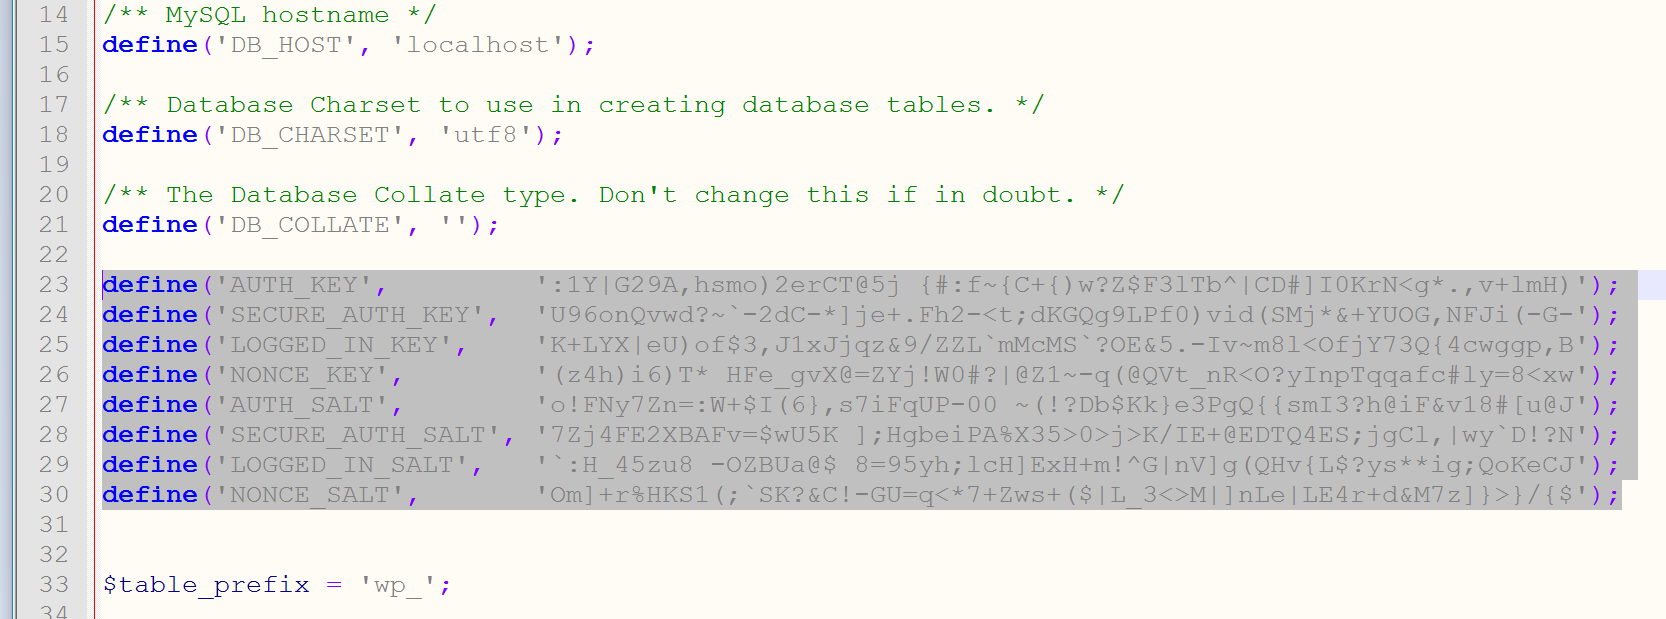
Here is a basic wp-config.php file:
// ** MySQL settings - You can get this info from your web host ** //
/** The name of the database for WordPress */
define('DB_NAME', 'database_name_here');

/** MySQL database username */
define('DB_USER', 'username_here');

/** MySQL database password */
define('DB_PASSWORD', 'password_here');

/** MySQL hostname */
define('DB_HOST', 'localhost');

/** Database Charset to use in creating database tables. */
define('DB_CHARSET', 'utf8');

/** The Database Collate type. Don't change this if in doubt. */
define('DB_COLLATE', '');

define('AUTH_KEY',		'put your unique phrase here');
define('SECURE_AUTH_KEY',	'put your unique phrase here');
define('LOGGED_IN_KEY',		'put your unique phrase here');
define('NONCE_KEY',		'put your unique phrase here');
define('AUTH_SALT',		'put your unique phrase here');
define('SECURE_AUTH_SALT',	'put your unique phrase here');
define('LOGGED_IN_SALT',	'put your unique phrase here');
define('NONCE_SALT',		'put your unique phrase here');

$table_prefix  = 'wp_';

/* That's all, stop editing! Happy blogging. */
Usually, this file is automatically generated when you run the set-up, but occasionally WordPress does not have privileges to write in the installation folder. In this situation, you should create an empty wp-config.php file, copy and paste content from wp-config-sample.php, and set the proper values to all defined constants. When you’re done, upload your file into the root folder and run WordPress.
Note: constant definitions and PHP instructions come in a specific order we should never change. And we should never add contents under the following comment line:
/* That's all, stop editing! Happy blogging. */First, come the definitions of database constants you should have received from your host:
DB_NAMEDB_USERDB_PASSWORDDB_HOSTDB_CHARSETDB_COLLATE
Following database details, eight security keys will make the site more secure against hackers. When you run the installation WordPress will automatically generate security and salt keys, but you can change them anytime, adding any arbitrary string. For better security, consider to use the online generator.
$table_prefix variable stores the prefix of all WordPress tables. Unfortunately, anyone knows its default value and this could open WordPress database to a vulnerability, which can be easily fixed by setting a custom value for $table_prefix when running the set-up.
To change table prefix in a working website, you should run several queries against the database, then manually edit the wp-config.php file. If you don’t have access to the database or you don’t have the required knowledge to build custom queries, then you can install a plugin like Change Table Prefix that will rename database tables and field names, and update the config file with no risk.
Note: it’s a good practice to backup WordPress files and database even if you will change the table prefix with a plugin.
So far the analysis has been limited to the basic configuration. But we have at our disposal many constants we can define to enable features, customize and secure the installation.
Over Basic Configuration: Editing the File System
WordPress file system is well known by users and hackers. For this reason, you may consider changing the built-in file structure by moving specific folders in arbitrary locations and setting the corresponding URLs and paths in wp-config file.
First, we can move the content folder by defining two constants. The first one sets the full directory path:
define( 'WP_CONTENT_DIR', dirname(__FILE__) . '/site/wp-content' );The second sets the new directory URL:
define( 'WP_CONTENT_URL', 'http://example.com/site/wp-content' );We can move just the plugin folder by defining the following constants:
define( 'WP_PLUGIN_DIR', dirname(__FILE__) . '/wp-content/mydir/plugins' );
define( 'WP_PLUGIN_URL', 'http://example.com/wp-content/mydir/plugins' );
The same way, we can move the uploads folder, by setting the new directory path:
define( 'UPLOADS', 'wp-content/mydir/uploads' );Note: All paths are relative to
ABSPATH, and they should not contain a leading slash.
When done, arrange the folders and reload WordPress.
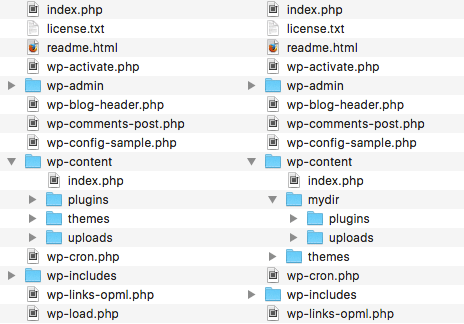
It’s not possible to move /wp-content/themes folder from the wp-config file, but we can register a new theme directory in a plugin or a theme’s functions file.
Features for Developers: Debug Mode and Saving Queries
If you are a developer you can force WordPress to show errors and warnings that will help you in theme and plugin debugging. To enable debug mode you just have to set WP_DEBUG value to true, as shown below:
define( 'WP_DEBUG', true );WP_DEBUG is set to false by default. If you need to disable debug mode, you can just remove the definition, or set the constant’s value to false.
When you’re working on a living site, you should disable debug mode. Errors and warnings should never be shown to site viewers because it can provide valuable information to hackers. But what if you have to debug anyway?
In such situations, you can force WordPress to keep memory of errors and warning in debug.log file, placed in /wp-content folder. To enable this feature, copy and paste the following code in your wp-config.php file:
define( 'WP_DEBUG', true );
define( 'WP_DEBUG_LOG', true );
define( 'WP_DEBUG_DISPLAY', false );
@ini_set( 'display_errors', 0 );
To make this feature work we first need to enable debug mode. Then, setting WP_DEBUG_LOG to true we force WordPress to store messages into debug.log file, while defining WP_DEBUG_DISPLAY to false we hide them from the screen. Finally, we set to 0 the value of PHP variable display_errors so that error messages won’t be printed to the screen. wp-config is never loaded from the cache. For this reason, it is a good place to override php.ini settings.
Note: This is a great feature you can take advantage of to register messages that WordPress would not print on the screen. As an example, when the
publish_postaction is triggered WordPress loads a script that saves data, then redirects the user to the post editing page. In this situation you can register messages, but not print them on the screen.
Another debugging constant determines the versions of scripts and styles to be loaded. Set SCRIPT_DEBUG to true if you want to load uncompressed versions:
define( 'SCRIPT_DEBUG', true );If your theme or plugin shows data retrieved from the database, you may want to store query details for subsequent review. The SAVEQUERIES constant forces WordPress to store query information into $wpdb->queries array. These details would be printed adding the following code to the footer template:
if ( current_user_can( 'administrator' ) ) {
        global $wpdb;
        echo '<pre>';
        print_r( $wpdb->queries );
        echo '</pre>';
}
For a deeper analysis of this feature, refer to How to Build Efficient Queries in WordPress.
Content Related Settings
When your website grows up, you may want to reduce the number of post revisions. By default, WordPress automatically saves revisions each 60 seconds. We can change this value by setting a custom interval in wp-config as follows:
define( 'AUTOSAVE_INTERVAL', 160 );Of course, you can decrease the auto-save interval, as well.
Each time we save our edits, WordPress adds a row to the posts table, so that we could restore previous revisions of posts and pages. This is a useful functionality that could turn into a problem when our site grows big. Fortunately, we can decrease the maximum number of post revisions to be stored, or disable the functionality at all.
If you’d want to disable post revisions, define the following constant:
define( 'WP_POST_REVISIONS', false );If you’d want to limit the maximum number of revisions, instead, add the following line:
define( 'WP_POST_REVISIONS', 10 );By default, WordPress stores trashed posts, pages, attachments and comments for 30 days, then deletes them permanently. We can change this value with the following constant:
define( 'EMPTY_TRASH_DAYS', 10 );We can even disable trash, setting its value to 0, but consider that WordPress will not allow you to restore contents anymore.
Allowed Memory Size
Occasionally you may receive a message like the following:
Fatal error: Allowed memory size of xxx bytes exhausted …
The maximum memory size depends on the server configuration. In case you didn’t have access to php.ini file, you can increase memory limit just for WordPress by setting the WP_MEMORY_LIMIT constant in wp-config file. By default, WordPress try to allocate 40Mb to PHP for single sites and 64MB for multisite installations. Of course, if PHP allocated memory is greater than 40Mb (or 64Mb), WordPress will adopt the maximum value.
That being said, you can set a custom value with the following line:
define( 'WP_MEMORY_LIMIT', '128M' );If needed, you can set a maximum memory limit, as well, with the following statement:
define( 'WP_MAX_MEMORY_LIMIT', '256M' );
Suggested reading: How to Improve PHP Memory Limit in WordPress.
Automatic Updates
Starting from version 3.7, WordPress supports automatic updates for security releases. This is an important feature that allows site admins to keep their website secure all the time.
You can disable all automatic updates by defining the following constant:
define( 'AUTOMATIC_UPDATER_DISABLED', true );Maybe it’s not a good idea to disable security updates, but it’s your choice.
By default, automatic updates do not work with major releases, but you can enable any core updates defining WP_AUTO_UPDATE_CORE as follows:
# Disables all core updates:
define( 'WP_AUTO_UPDATE_CORE', false );

# Enables all core updates, including minor and major:
define( 'WP_AUTO_UPDATE_CORE', true );
Default value is minor:
define( 'WP_AUTO_UPDATE_CORE', 'minor' );An additional constant disables auto-updates (and any update or change to any file). If you set DISALLOW_FILE_MODS to true, all file edits will be disabled, even theme and plugin installations and updates. For this reason, its usage is not recommended.
Security Settings
We can use wp-config file to increase site security. In addition to changes to the file structure we’ve looked at above, we can lock down some features that could open unnecessary vulnerabilities. First of all, we can disable the file editor provided in the admin panel. The following constant will hide the Appearance Editor screen:
define( 'DISALLOW_FILE_EDIT', true );Note: consider that some plugins could not work properly if this constant is defined to true.

A security feature is Administration over SSL. If you’ve purchased an SSL certificate, and it’s properly configured, you can force WordPress to transfer data over SSL at any login and admin session. Use the following constant:
define( 'FORCE_SSL_ADMIN', true );Check the Codex if you need more information about Administration over SSL.
Other two constants allow to block external requests and list admitted hosts.
define( 'WP_HTTP_BLOCK_EXTERNAL', true );
define( 'WP_ACCESSIBLE_HOSTS', 'example.com,*.anotherexample.com' );
In this example, we have first disabled all accesses from external hosts, then listed allowed hosts, separated by commas (wildcards are allowed).
Other Advanced Settings
WP_CACHE set to true includes wp-content/advanced-cache.php script. This constant has effect only if you install a persistent caching plugin.
CUSTOM_USER_TABLE and CUSTOM_USER_META_TABLE are used to set custom user tables other than default wp_users and wp_usermeta tables. These constants enable a useful feature that allows site users to access several websites with just one account. For this feature to work, all installations should share the same database.
Starting from version 2.9, WordPress support Automatic Database Optimizing. Thanks to this feature, setting WP_ALLOW_REPAIR to true, WordPress will automatically repair a corrupted database.
WordPress creates a new set of images each time you edit an image. If you’d restore the original image, all generated sets will remain on the server. You can overwrite this behavior by setting IMAGE_EDIT_OVERWRITE to true, so that, when you restore the original image, all edits will be deleted from the server.
Lockdown wp-config.php
Now we know why wp-config.php is one of the most important WordPress files. So, why don’t we hide it to hackers? First of all, we can move wp-config one level above WordPress root folder (just one level). However, this technique is a bit controversial, so I would suggest adopting other solutions to protect the file. If your website is running on Apache Web Server, you can add the following directives to .htaccess file:
<files wp-config.php>
order allow,deny
deny from all
</files>
If the website is running on Nginx, you can add the following directive to the configuration file:
location ~* wp-config.php { deny all; }Note: these instructions should be added only after the set-up is complete.
If your website has gone through multiple migrations or you purchased it from someone else, it is recommended that you create a fresh set of WordPress security keys. These keys are a set of random variables that improve encryption of information stored in the user’s cookies. Since WordPress 2.7 there have been 4 different keys: AUTH_KEY, SECURE_AUTH_KEY, LOGGED_IN_KEY, and NONCE_KEY.
By default, they are randomly generated for you. But WordPress actually has a free tool which you can use to generate new random keys. You can then simply update your current keys which are stored in your wp-config.php file.
Read more about WordPress security keys.
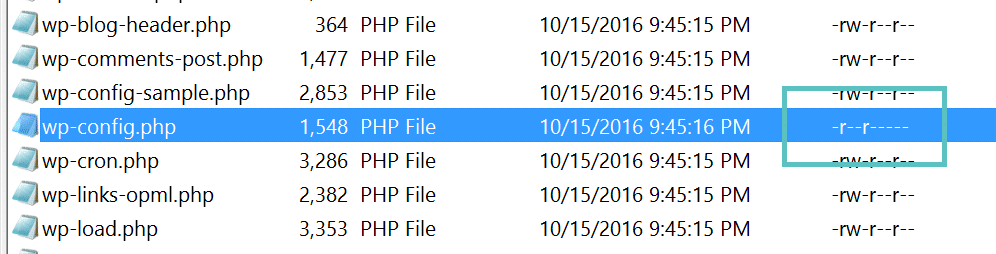
And finally, you should double check and ensure your permissions are hardened on your wp-config.php file. Typically files in the root directory of a WordPress site will be set to 644, which means that files are readable and writeable by the owner of the file and readable by users in the group owner of that file and readable by everyone else. According to the WordPress documentation, the permissions on the wp-config.php file should be set to 440 or 400 to prevent other users on the server from reading it. You can easily change this with your FTP client.
Summary
In this post, I’ve listed a lot of WordPress constant that we can define into wp-config file. Some of these constants are of common usage, and their functions are easy to understand. Other constants enables advanced features that require a deep knowledge of WordPress and site administration.
I’ve listed the most common features, leaving apart some advanced features we may discuss in future posts. If you’d want to explore features and constants not listed here, feel free to start a conversation in the comments below and we’ll dive deep.

Carlo is a passionate lover of webdesign and front-end development. He has been playing with WordPress for more than 20 years, also in collaboration with Italian and European universities and educational institutions. He has written hundreds of articles and guides about WordPress, published both on Italian and international websites, as well as on printed magazines. You can find him on LinkedIn.