XAMPP is a helpful development tool. However, you may run into problems at some point, such as receiving the notification: “Apache shutdown unexpectedly”. This error might seem to come out of nowhere, so identifying the cause – let alone the solution – can be puzzling.
Fortunately, there is a common explanation for Apache’s sudden shutdown. With a few simple modifications, you should be able to fix the problem and get Apache up and running again. All you have to do is update some settings in the configuration files.
In this article, we’ll discuss the common cause of this Apache error in XAMPP and then walk you through four steps to fix it:
Click on the links above to jump straight to the solutions or keep reading to know more about the error first. Let’s get started!
An Introduction to the XAMPP “Apache Shutdown Unexpectedly” Error
XAMPP is a free, open source server stack that includes the Apache server and MariaDB database:

It runs PHP and Perl scripts, and is used to develop and test dynamic websites on local machines. This means that if you are building a website, you can install WordPress locally on your computer. You can use XAMPP without having to upload your site’s files to your web hosting service.
If you’re reading this article, we’ll assume you’re already at least somewhat familiar with XAMPP. However, what may be new to you is the “Apache shutdown unexpectedly” error you’re seeing.
This message is most commonly caused by a blocked port. Usually, it means that another application installed on your computer, such as Skype, is using the same port as XAMPP. Additionally, you may notice that the error message indicates the problem may also be attributed to “missing dependencies, improper privileges, a crash, or a shutdown by another method.”
In any event, the easiest fix is to simply modify the XAMPP default settings. However, the method for resolving the error varies slightly between Windows and macOS. Also, the interface may look a bit different depending on the XAMPP version you’re using. We will provide instructions for both operating systems below, starting with Windows.
How to Fix the XAMPP Error “Apache Shutdown Unexpectedly” in Windows
If you’re using a Windows device, you can follow these four steps to update your default port settings in XAMPP.
Step 1: Open the Configuration Settings from the XAMPP Control Panel
The first step is, of course, to launch XAMPP. This will open the XAMPP control panel. From here, you can update the configuration settings for the server stack.
Since this error is related to Apache, we’ll focus on those settings. In the “Apache” row of options, click on the Config button.
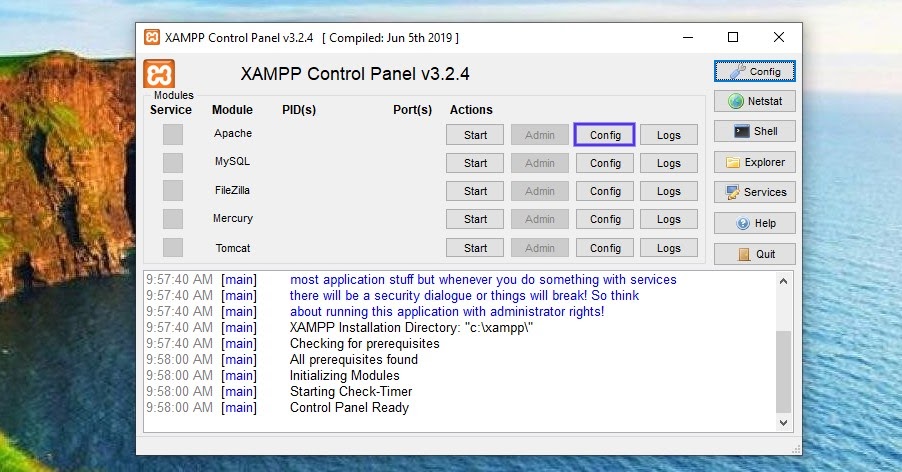
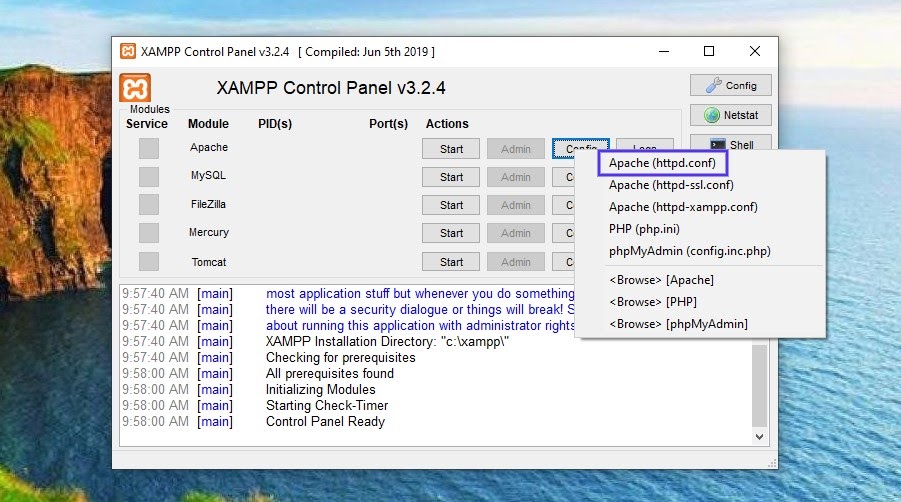
This will open a drop-down menu of files. We’re going to be editing two of these files, starting with httpd.conf.
Step 2: Change the Default Port Settings of the httpd.conf File
From the menu of files, click on Apache (httpd.conf). Once you do, the file will open in your computer’s default text editor:
Within this file, there are three settings you’ll want to update. To get started, press Ctrl + F, then enter “80” in the search field:
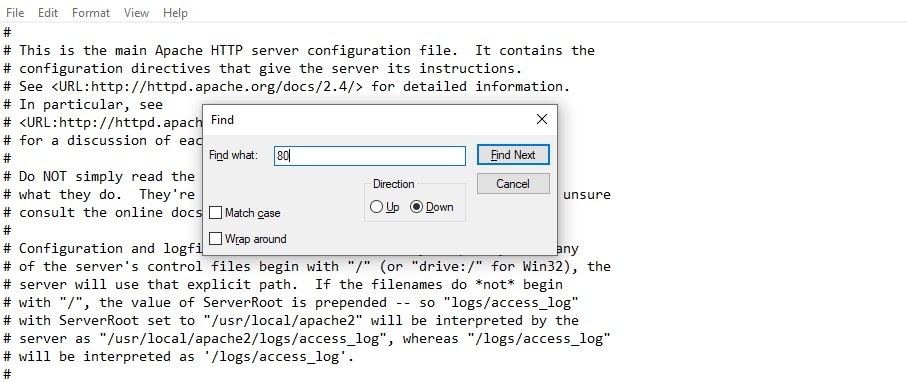
This will display all instances of the number 80 in the file. Locate “Port 80” and change it to “Port 8080”. Once the port setting is updated, search for “Listen 80” and update it to “Listen 8080”.
Finally, search for “servername localhost:80”. Once you find it, modify it to “servername localhost:8080”. When you’re finished, save and close the file.
Step 3: Update the Default Port Settings in the http-ssl.conf File
Now it’s time to move on to the second file. To do so, you can return to the XAMPP control panel, then select Config under the Apache settings again. This time, open the Apache (http-ssl.conf) file.
When the file opens in your text editor, press Ctrl + F, and then enter 443 in the search field. Locate “Listen 443” and update this to “Listen 4433”.
Next, search the file for the next instance of “443”. It should be “<VirtualHost _default_:443>”. Once you find it, you can go ahead and change it to “<VirtualHost _default_:4433>”. When you’re finished, remember to save and close the file.
Step 4: Restart Apache
Once you’ve updated the settings in both files, the final step is to stop Apache. You can do this by clicking on the Stop button along the same Apache row. After Apache has been stopped, click the Start button to complete the restart process.
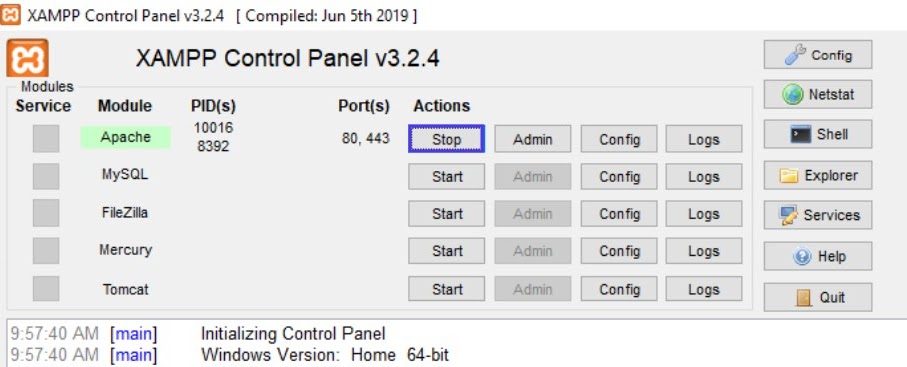
That’s it! Your port numbers will be updated and Apache should now run without error.
How to Fix the XAMPP Error “Apache Shutdown Unexpectedly” in macOS
Depending on what version of macOS you’re running, you may already have Apache installed on your computer. This default application of Apache will use the same default port settings as the Apache server in XAMPP, so this may be the cause of the “Apache shutdown unexpectedly” error.
If you’re using macOS, you can follow these four steps to update the default port settings.
Step 1: Open the XAMPP Apache Configuration
To start, open the XAMPP Application Manager if you haven’t already done so:

Next, select the Manage Servers tab next to the Welcome tab at the top:

On this screen, you’ll find a list of options. You can click on Apache Web Server, followed by the Configure button.
Step 2: Open the Conf File
From the Configure Apache Web Server box, select Open Conf File:

A warning box will appear, stating that the file is for advanced users:

You can click on Yes to continue. This will open the httpd.conf file.
Step 3: Update the Port Settings
Once the file opens in your text editor, the next step is to update the port settings. To do so, you can hit Ctrl + F, and then enter “80” in the search field. This will display instances of the number 80:

Locate the these lines:
#Listen 12.34.56.78:80
Listen 80
Once you do, go ahead and change them to the following:
#Listen 12.34.56.78:8080
Listen 8080
When you’re done, you can save and close the file. In the Configure Apache Web Server box, click on OK.
Step 4: Restart Apache
The final step is to stop and restart Apache, which you can do from the XAMPP Application Manager’s Manage Servers tab. Once Apache is stopped, click on Start to restart:

That’s it! Your port numbers will be updated and Apache should now run without error.
Summary
The XAMPP error “Apache shutdown unexpectedly” is commonly caused by another program, such as Skype, using the default Apache port. While this can be frustrating, it usually has a simple resolution.
As we discussed in this article, the easiest way to fix this problem is to update XAMPP’s Apache configuration settings. You can do this by editing the httpd.conf file and the http-ssl.conf file (for Windows users). Once this is done, you should stop and restart Apache to resume normal operation.

Brian has been a WordPress user for over 10 years, and enjoys sharing his knowledge with the community. In his free time, Brian enjoys playing the piano and exploring Tokyo with his camera. Connect with Brian on his website at brianli.com.