
WooCommerce is a powerful tool for building online stores with WordPress, handling everything from product showcases to purchase processing, tax management, and beyond.
One standout feature of WooCommerce is its ability to maintain detailed order information. It meticulously stores every aspect of an order, including the amount, currency, shipping details, taxes, and more.
This detailed information is valuable for both store owners and customers. Imagine creating a page where users can effortlessly check their order details and customize it to display additional information.
This guide walks you through the steps to build a custom WooCommerce page that displays order details based on the order ID.
Why would you create a custom order details page?
Creating a custom order details page in WooCommerce can offer several advantages, catering to both the store owner’s and the customer’s needs. Here are a few compelling reasons why you might want to go this route:
- Enhanced user experience — A custom order details page lets you present order information that best suits your customers’ needs. It lets you tailor the layout and content of your page so you can highlight important details such as shipping status, product specifics, and delivery dates, making it easier for customers to find what they’re looking for quickly.
- Additional features — A custom order details page can enable you to add unavailable features by default in WooCommerce. For instance, you can display custom fields like gift messages, special instructions, or personalized notes unique to each order.
- Interactivity — A custom order details page allows you to include interactive elements such as progress bars for order tracking, links to related products, or direct access to customer support, providing a richer, more engaging experience for your users.
- Flexibility and adaptability — Creating a custom order details page can allow you to implement business-specific logic and adapt to changing needs. You can display different information based on criteria unique to your store, such as the customer’s location or the type of products ordered.
How to get order data from the $order object
In WooCommerce, the $order object is a central piece that contains all the information about a specific order. By leveraging this object, you can retrieve various details about an order, such as the order ID, order date, billing and shipping information, and the products purchased.
Let’s go through how to access and use these different pieces of data from the $order object in detail.
1. Retrieve the order object
First, you must get the order object using the wc_get_order function. This function takes an order ID and returns the corresponding order object.
$order_id = 123; // Example order ID
$order = wc_get_order( $order_id );
2. Basic order information
Once you have the $order object, you can retrieve basic information about the order. Here are some examples:
- Order ID — The unique identifier for the order.
$order_id = $order->get_id(); echo 'Order ID: ' . $order_id; - Order date — The date when the order was created.
$order_date = $order->get_date_created(); echo 'Order date: ' . wc_format_datetime( $order_date ); - Order total — The total amount for the order.
$order_total = $order->get_formatted_order_total();
echo 'Order total: ' . $order_total;
3. Billing information
Billing information includes details provided by the customer during the checkout process. You can retrieve these details using the following methods:
- Billing address:
$billing_address = $order->get_formatted_billing_address(); echo 'Billing address: ' . $billing_address; - Billing email:
$billing_email = $order->get_billing_email(); echo 'Billing email: ' . $billing_email; - Billing phone:
$billing_phone = $order->get_billing_phone();
echo 'Billing phone: ' . $billing_phone;
4. Shipping Information
Shipping information includes the details of where the order will be shipped. Similar to billing information, you can access these details using the $order object:
- Shipping address:
$shipping_address = $order->get_formatted_shipping_address();
echo 'Shipping address: ' . $shipping_address;
5. Order items
You can retrieve the items included in an order, which is particularly useful if you want to display purchased products. Here’s how to get the order items:
$items = $order->get_items();
foreach ( $items as $item_id => $item ) {
    $product_name = $item->get_name();
    $product_quantity = $item->get_quantity();
    $product_total = $item->get_total();
    echo 'Product name: ' . $product_name . '<br>';
    echo 'Quantity: ' . $product_quantity . '<br>';
    echo 'Total: ' . wc_price( $product_total ) . '<br>';
}
6. Payment and shipping methods
You can also retrieve information about the payment and shipping methods used for the order:
- Payment method:
$payment_method = $order->get_payment_method_title(); echo 'Payment method: ' . $payment_method; - Shipping method:
$shipping_methods = $order->get_shipping_methods();
foreach ( $shipping_methods as $shipping_method ) {
echo 'Shipping method: ' . $shipping_method->get_name();
}
7. Order status
The status of the order can be helpful for various functionalities, such as tracking the progress of the order:
$order_status = wc_get_order_status_name( $order->get_status() );
echo 'Order status: ' . $order_status;
Creating a page to display order details by order ID
To provide a seamless experience for your customers, creating a custom page where they can view their order details by simply entering their order ID is beneficial.
Let’s guide you through creating a page, including setting up the template and displaying the order information.
Step 1: Create a custom page template
First, create a custom page template in your WordPress theme. This template will be used to display the order details.
To do this, navigate to your project’s source code. If you created your project with DevKinsta, this is easy to access. You can also use an FTP Client by using the settings on your site info page (WordPress Sites > sitename > Info).
In your child theme directory, create a new file named page-order-details.php. Add the following code to this file:
<?php
/**
 * Template Name: Order Details
 */
get_header();
?>

<div id="primary" class="content-area">
    <main id="main" class="site-main">

        <?php
        if ( isset( $_GET['order_id'] ) ) {
            $order_id = intval( $_GET['order_id'] );
            display_order_details( $order_id );
        } else {
            echo '<p>No order ID provided.</p>';
        }
        ?>

    </main><!-- #main -->
</div><!-- #primary -->

<?php
get_footer();

// Function to display order details
function display_order_details( $order_id ) {
    $order = wc_get_order( $order_id );
    if ( ! $order ) {
        echo '<p>Invalid order ID.</p>';
        return;
    }

    echo '<h2>Order Details</h2>';
    echo '<ul>';
    echo '<li>Order ID: ' . $order->get_id() . '</li>';
    echo '<li>Order Date: ' . wc_format_datetime( $order->get_date_created() ) . '</li>';
    echo '<li>Order Total: ' . $order->get_formatted_order_total() . '</li>';
    echo '<li>Billing Address: ' . $order->get_formatted_billing_address() . '</li>';
    echo '<li>Shipping Address: ' . $order->get_formatted_shipping_address() . '</li>';
    echo '<li>Billing Email: ' . $order->get_billing_email() . '</li>';
    echo '<li>Billing Phone: ' . $order->get_billing_phone() . '</li>';
    echo '<li>Payment Method: ' . $order->get_payment_method_title() . '</li>';
    echo '<li>Order Status: ' . wc_get_order_status_name( $order->get_status() ) . '</li>';
    echo '</ul>';

    echo '<h3>Order Items</h3>';
    echo '<ul>';
    $items = $order->get_items();
    foreach ( $items as $item_id => $item ) {
        echo '<li>';
        echo 'Product Name: ' . $item->get_name() . '<br>';
        echo 'Quantity: ' . $item->get_quantity() . '<br>';
        echo 'Total: ' . wc_price( $item->get_total() ) . '<br>';
        echo '</li>';
    }
    echo '</ul>';
}
Let’s break down this code so you understand.
First, you notice the get_header() and get_footer() functions, which include the standard WordPress header and footer for the page, ensuring it maintains the site’s overall design and layout.
We also have some basic HTML markups that are important for displaying text on the web. The next important code you notice is the condition that checks if an order_id is passed as a URL parameter.
if ( isset( $_GET['order_id'] ) ) {
    $order_id = intval( $_GET['order_id'] );
    display_order_details( $order_id );
} else {
    echo '<p>No order ID provided.</p>';
}
What it does is that if an order_id exists, it sanitizes the input using intval() and calls the display_order_details function. If no order_id is provided, it outputs a message indicating this.
The display_order_details function is the function declared below get_footer(). This function takes the order ID as an input and retrieves the corresponding order object using wc_get_order().
If the order ID is invalid, it outputs an error message. Otherwise, it retrieves and displays various order details such as order ID, date, total, billing and shipping addresses, email, phone, payment method, and order status in an unordered list.
Additionally, it loops through the order items and displays the product name, quantity, and total price for each item in another unordered list.
Step 2: Add the template to your theme and Create a new page in WordPress
Save the page-order-details.php file in your child theme directory. This will make the template available for selection when creating a new page in WordPress.
Next, go to Pages > Add New in your WordPress admin dashboard. Give the page a name, and then in the Page Attributes section on the right, select the Order Details template from the Template dropdown.
If you don’t see the Page Attributes section, you can navigate back to Pages, where you will see a list of all pages with some options when you hover over each page. Select Quick Edit, and then you will see the Page Attributes section.
Publish the page, and you can now test the custom order details page.
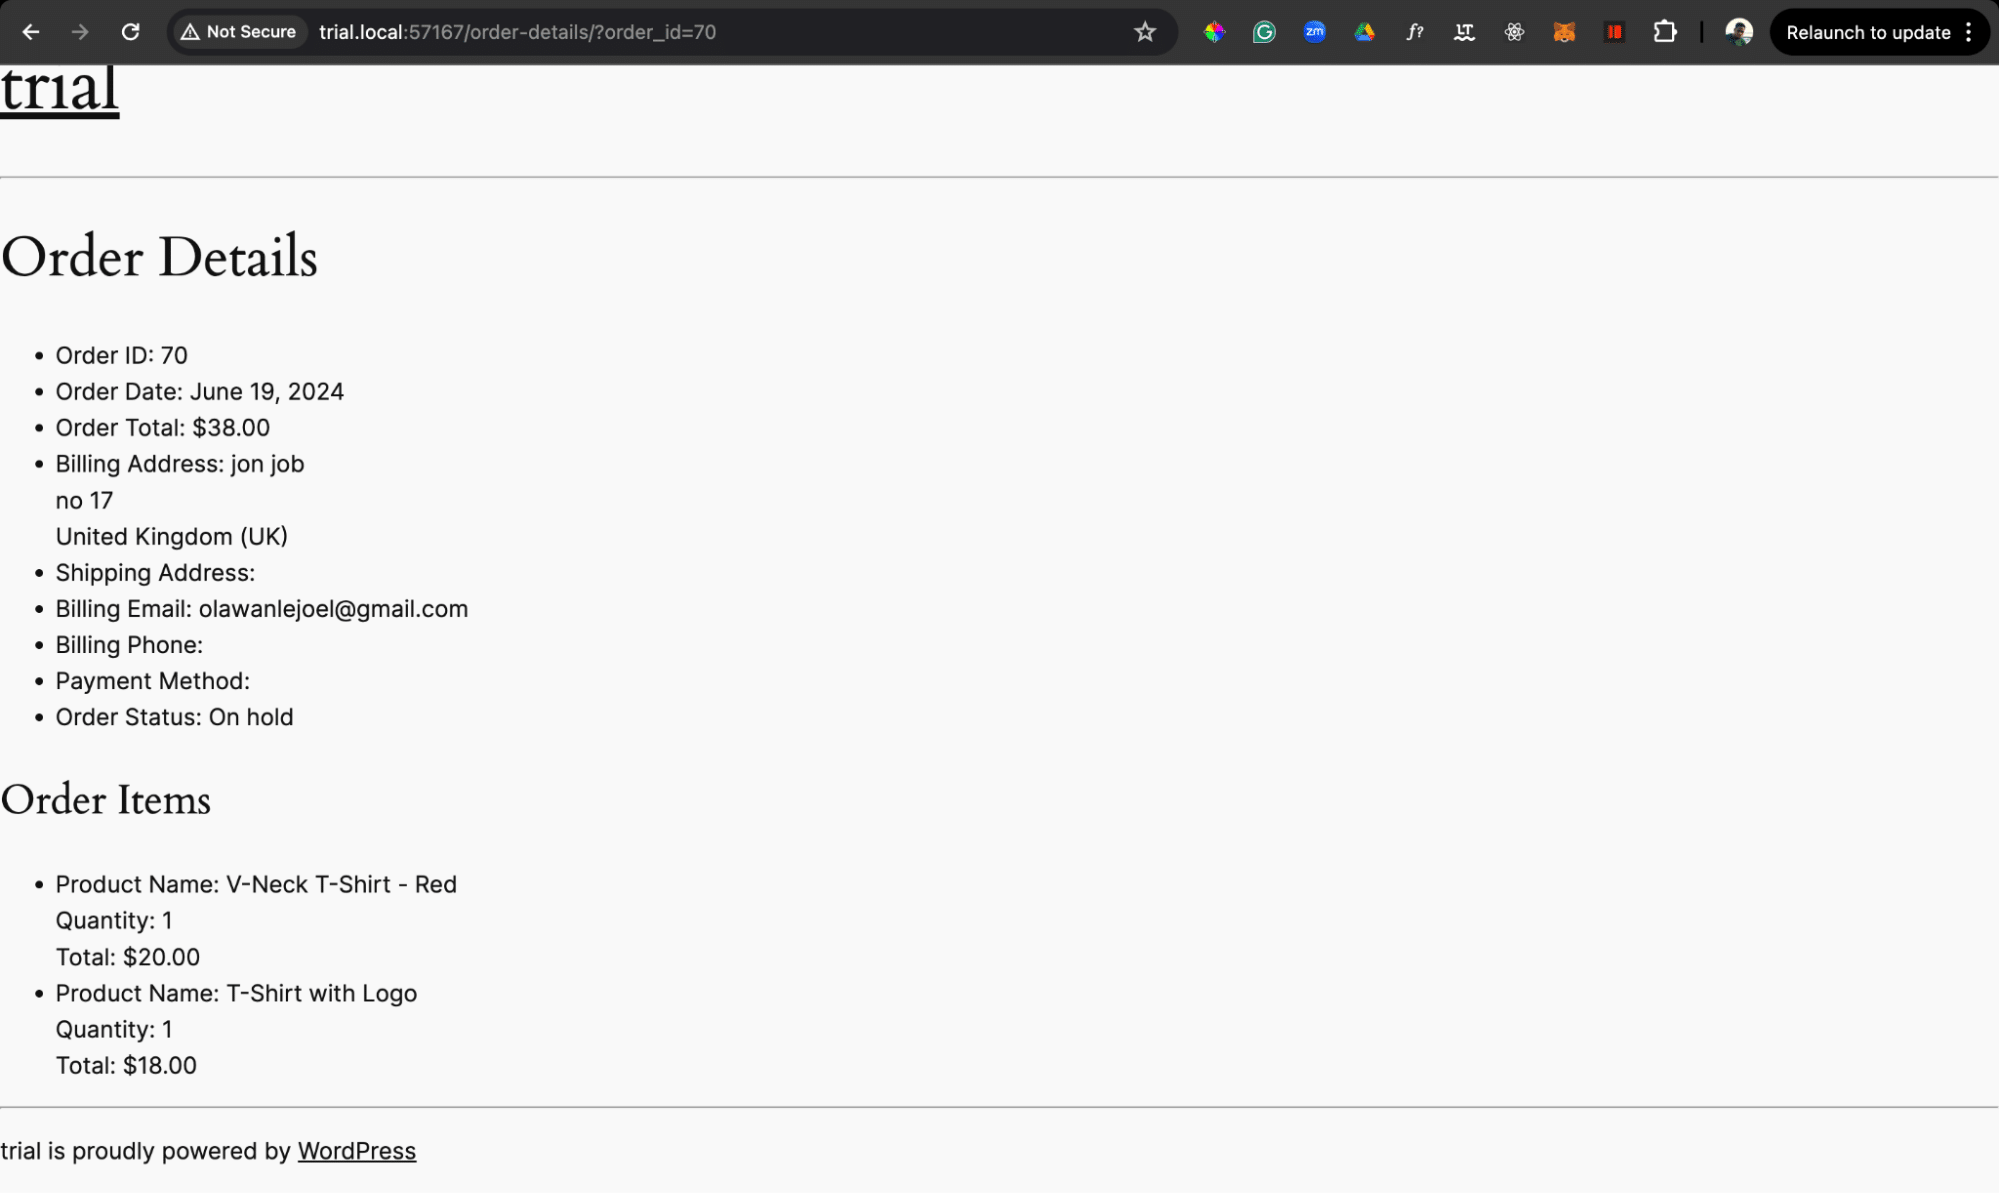
To test, navigate to your browser and append ?order_id=ORDER_ID to the URL, replacing ORDER_ID with a valid WooCommerce order ID. For example, https://yourwebsite.com/order-details/?order_id=70
This should display the order details for the specified order ID.
You can then add styling to the template as you like.
Creating an order details page using WooCommerce order tracking shortcode
Another option you may not be aware of is the WooCommerce order tracking shortcode, which provides a UI for users to search for their order details by entering their order number and email address.
This page displays the order number, date, status, items, shipping, and billing address. This can be useful if you do not intend to show more detailed information.
Creating an order tracking page using the WooCommerce order tracking shortcode is a straightforward way to enhance customer experience without delving into custom coding.
To do this, follow these steps:
- Log into your WordPress dashboard.
- Next, create a new page by navigating to Pages > Add New.
- Give the page a title, and in the page editor, add the following shortcode:
[woocommerce_order_tracking] - Next, click the Publish button to make the page live.
It’s as simple as that. But this may not give you the flexibility you desire.
Summary
Creating an order details page in WooCommerce enhances the customer experience by providing easy access to order information, improving transparency and customer satisfaction.
If you are experiencing slowness in your WordPress store, especially large stores with lots of products, it is essential to know that a significant portion of your site’s performance depends on the quality of your hosting.
Fortunately, with Kinsta as your hosting provider for your WooCommerce store, you won’t need to worry about this.


