
WooCommerce is the most popular ecommerce solution for WordPress by some margin. It boasts over 5 million active installs, a 4.5 user rating on WordPress.org, and an army of happy, loyal digital store owners.
What’s more, as of May 2023, WooCommerce powers roughly 8.7% of all websites and 23% of the top 1 million ecommerce sites. Ecommerce sales are booming, so if you’re looking to open up shop on your WordPress-powered website, going with WooCommerce is one of the best decisions you could make.
The only question left is: How can you get WooCommerce up and running on your website? To answer this, we’ve put together an extensive WordPress WooCommerce tutorial.
And remember, your ultimate goal is to increase your store’s revenue. So be sure to download our free ebook, 10 Ways to Boost Your WooCommerce Product Page Conversions. Let’s jump right in!
Is WooCommerce Free to Use?
WooCommerce is an open-source shopping cart plugin free to download and use on WordPress websites. Running an online store, though, isn’t completely free as there’ll be costs associated with hosting and domain fees, at least, along with customizations, design, branding, marketing, and advertising costs.
How To Install and Set Up WooCommerce (in 7 Steps)
Naturally, you’ll need to begin by installing and activating the WooCommerce plugin. You can do this either on a new or existing WordPress site. In the following steps, we’ll walk you through the process of setting up the plugin and configuring its settings.
Step 1: Install the WooCommerce Plugin
The first thing you’ll need to do is install WooCommerce on your website. You can download it for free from the WordPress repository and then upload it to your site.
Even easier, you can install it right through your WordPress dashboard:

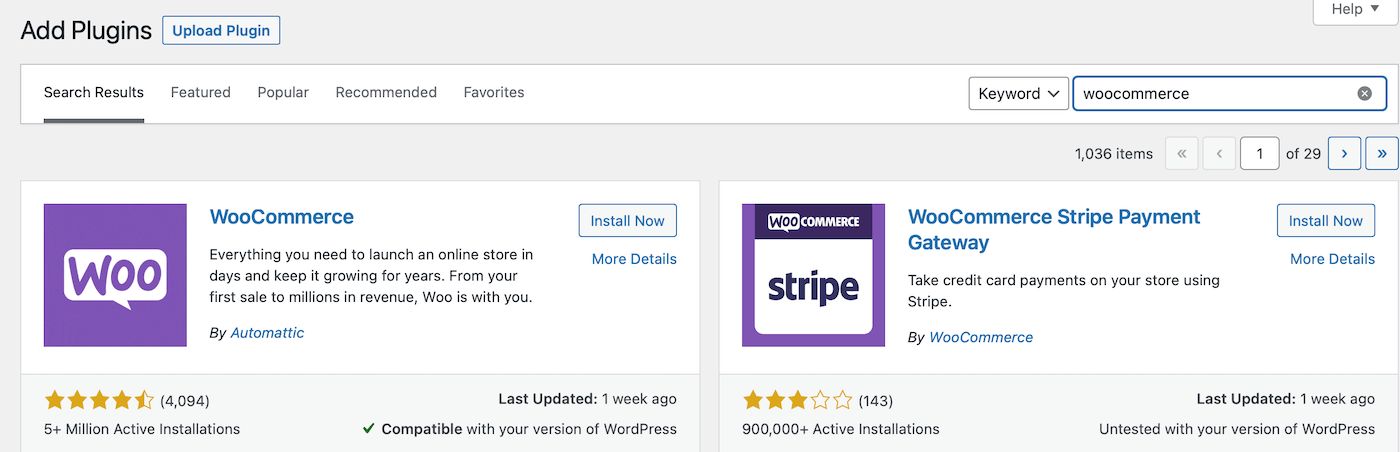
To do this, access your WordPress site and navigate to Plugins > Add New. Use the search bar to locate “woocommerce”, and click on Install Now when you find the right plugin. The plugin author should be listed as Automattic:
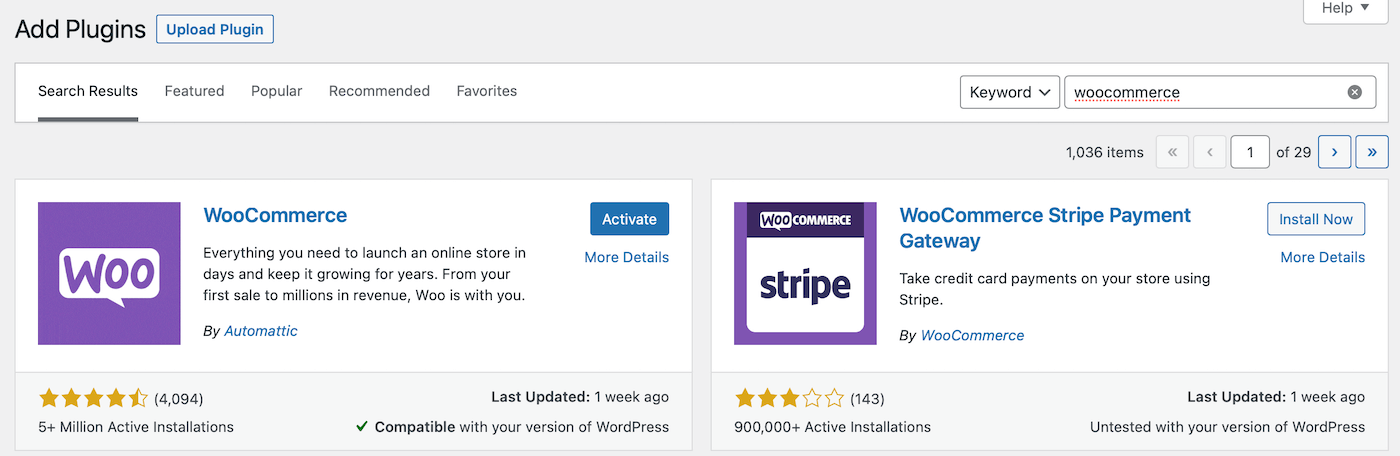
Give the plugin a moment to install. Then, click on the Activate button:
At this point, the plugin will be up and running on your website!
Step 2: Access the Setup Wizard
After installing WooCommerce, you’ll be prompted to walk through a setup wizard. It’s optional, but we recommend going through it in order to configure some key settings.
The first page of the WooCommerce setup wizard should look like this:
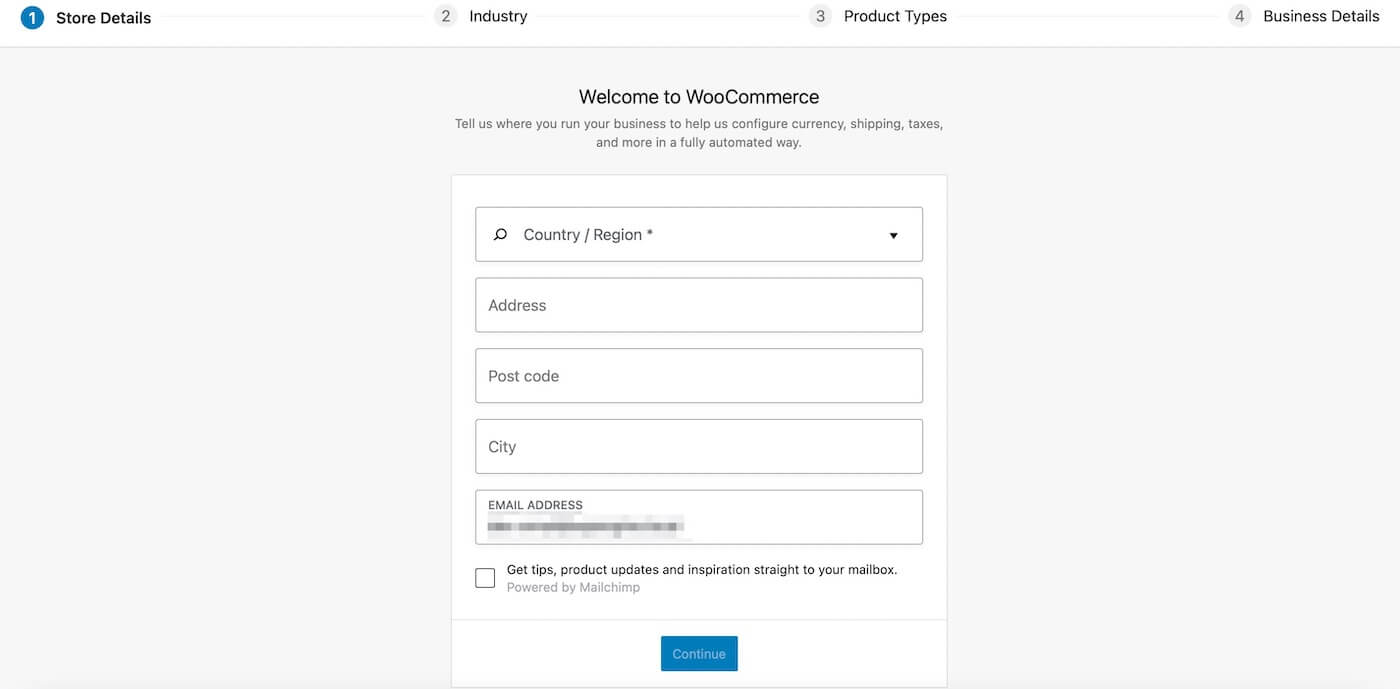
Here, WooCommerce is prompting you to enter some basic information about your store, like its address. Keep in mind that anything you set here (or throughout the rest of the setup wizard) can be changed later on in your WooCommerce settings if necessary.
Once you complete these fields, click on Continue. Next, you’ll be asked about the industry that your store operates within:
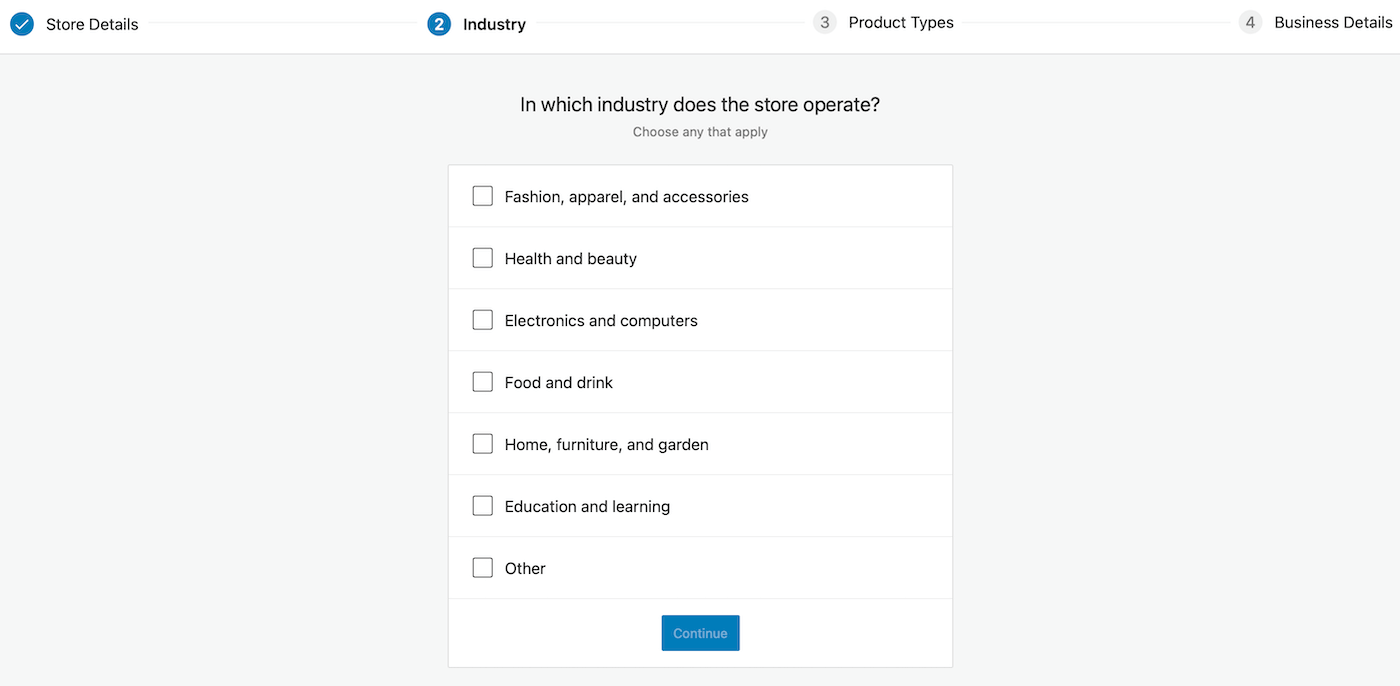
Check the boxes for the options that apply to your business. Then, select Continue.
At this point, WooCommerce will need some details about the type of products you plan to sell:
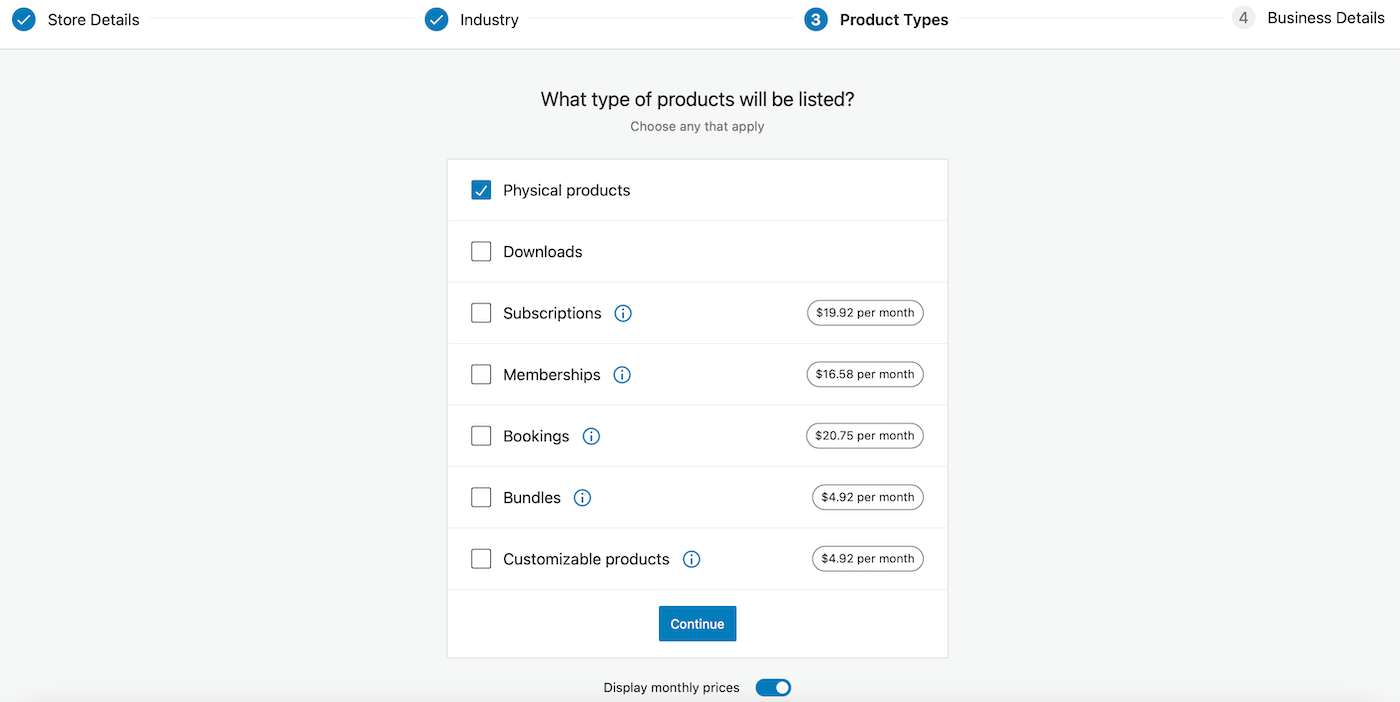
As you can see, it’s free to continue with physical products or digital downloads. However, if you plan to sell subscriptions, memberships, bookings, or more, you’ll incur a small monthly fee.
At the final stage of the WooCommerce setup wizard, you’ll need to confirm some details about your business, including the number of products you intend to display and whether you’re currently selling elsewhere:

Use the dropdown menus to make your selections. Then, click on Continue.
Now, you’ll be directed to the Free features tab:
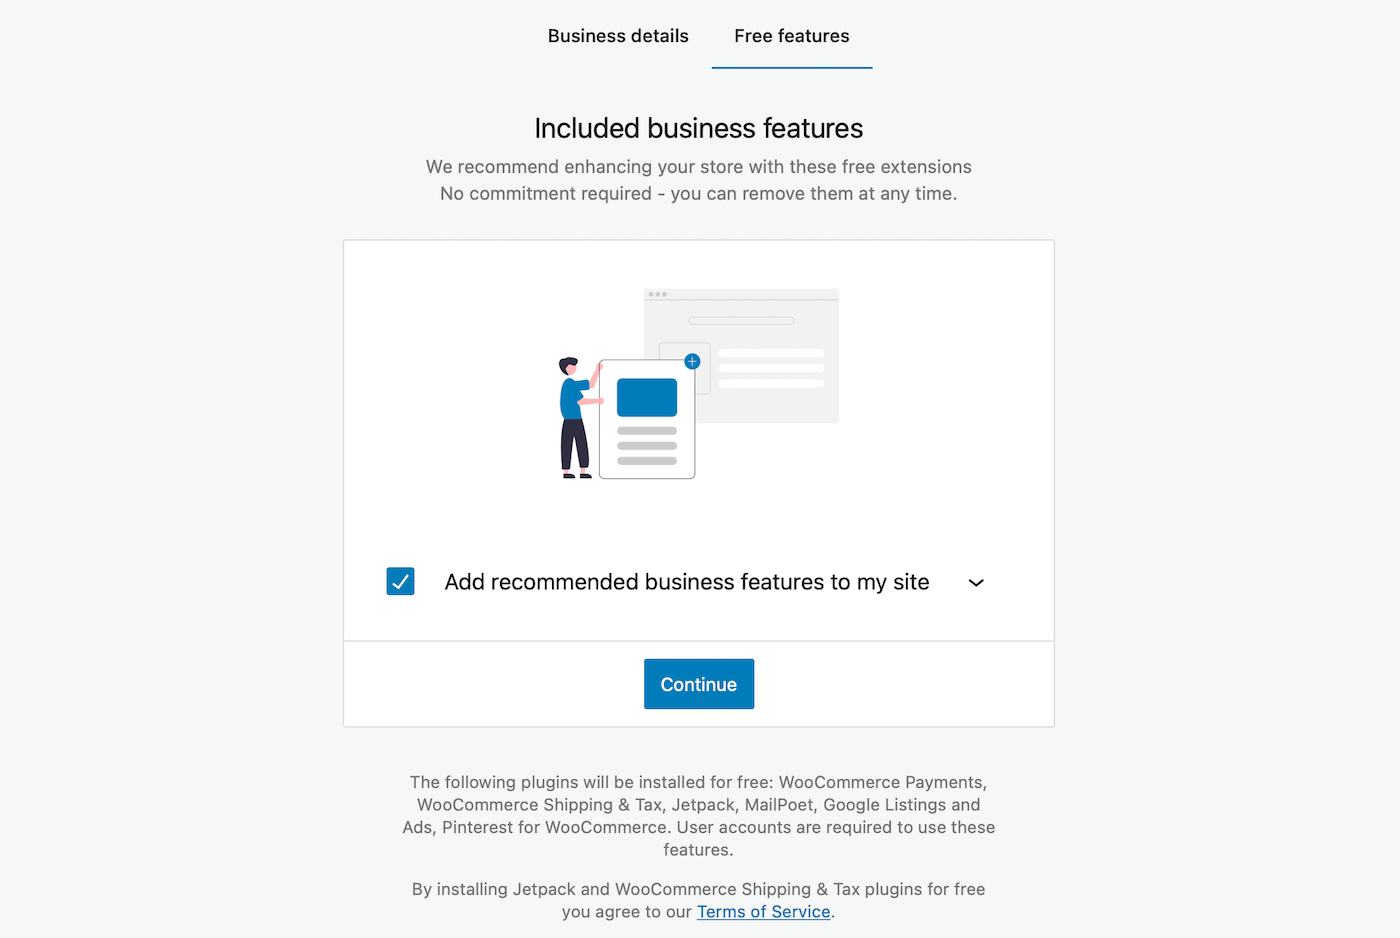
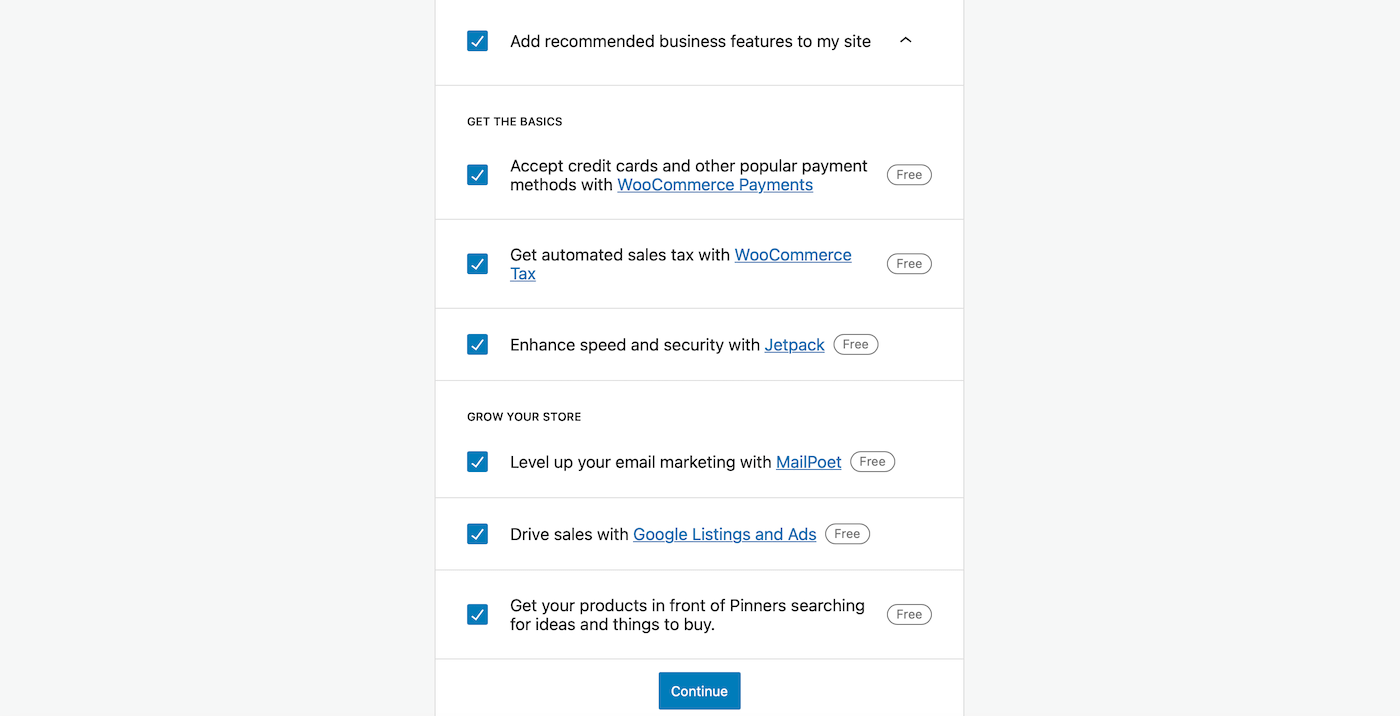
Here, you can choose to enhance your store with some free extensions. If you click on the dropdown arrow, you can see the extensions that are automatically applied when you complete the setup process, including WooCommerce Payments and Google Listings and Ads:
However, you can remove any of the options by unchecking the relevant box(es). When you’re ready, hit the Continue button to complete the installation.
Step 3: Add Products to Your Online Store
Once you hit the final Continue button in the setup wizard, you’ll be redirected to your WordPress dashboard. If you choose to enhance your site with the free Jetpack plugin, your admin panel will urge you to set up Jetpack on your site.
However, you can leave this till later on. Instead, click on the new WooCommerce tab in your dashboard. Although you’ve added your business details in the setup wizard, you’ll find a checklist here to guide you through the process of setting up your online store:
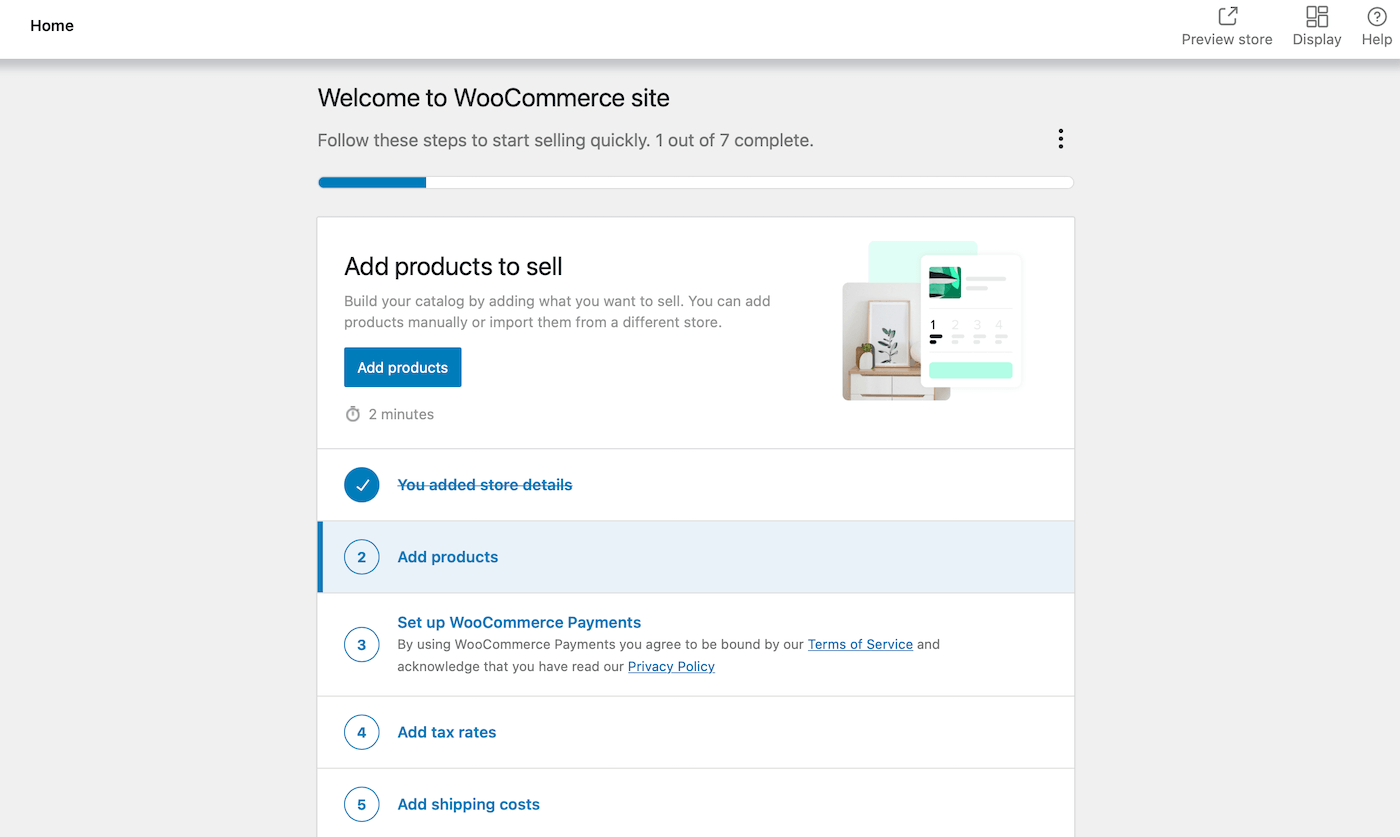
First, you can start adding products to your website. To do this, you can click on Add products from the setup screen.
But you’ll also find a dedicated Products tab in the sidebar of your WordPress dashboard. So, you can also add new products to your store by clicking on Products > Add New.
You’ll be asked about the type of product that you want to create:
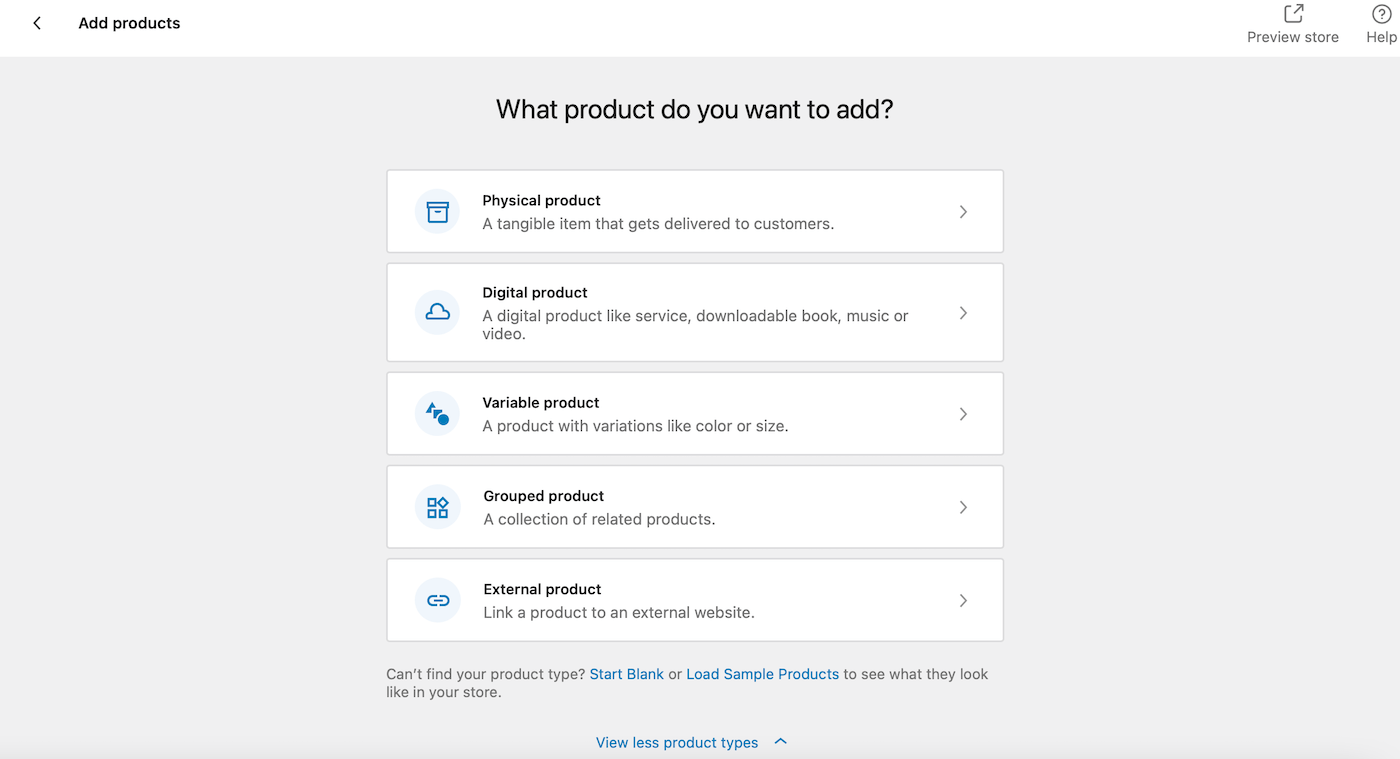
For example, you can choose to add physical products, digital products, variable products, and more. Make your selection. Then, you’ll be taken to the Edit product page:
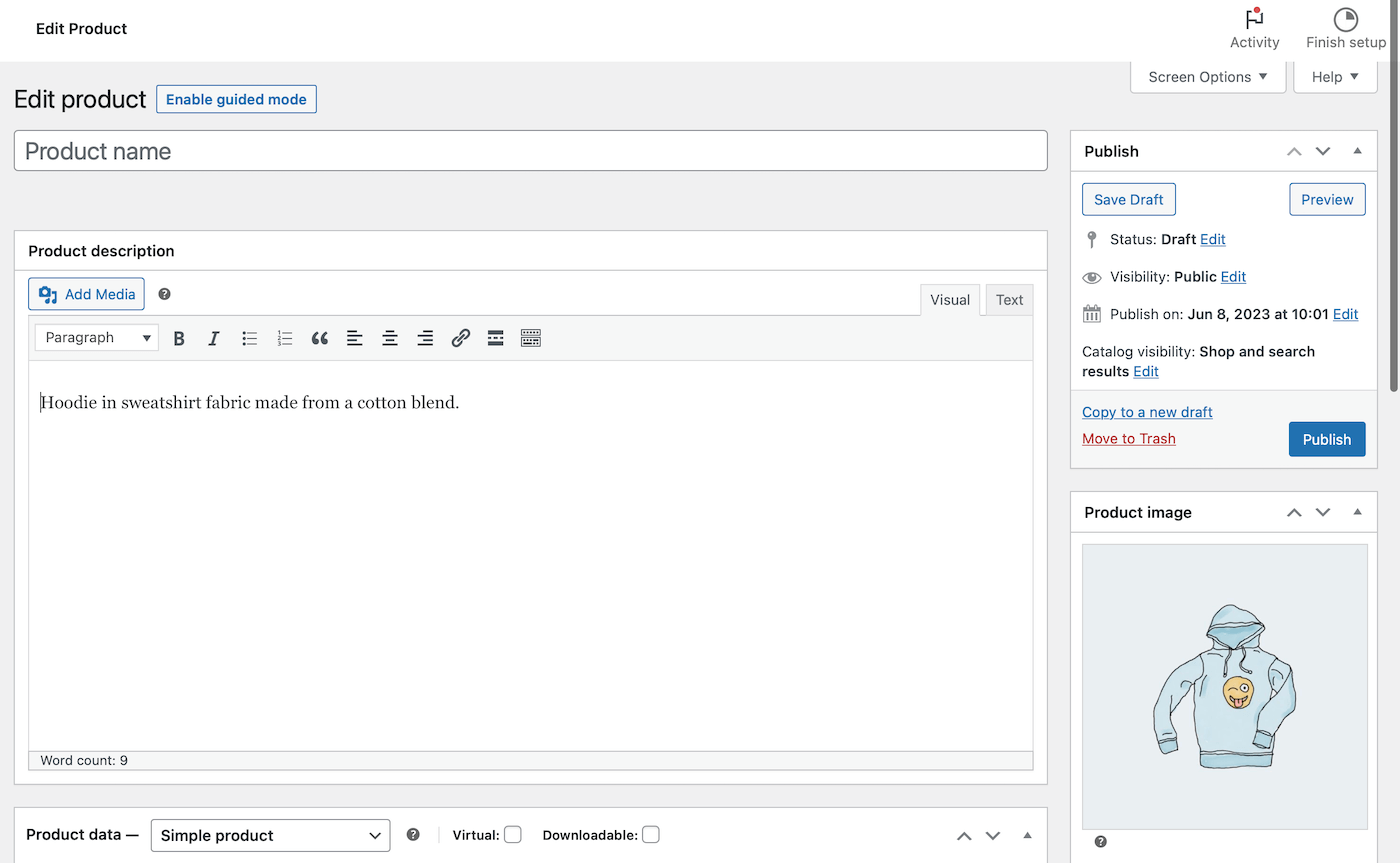
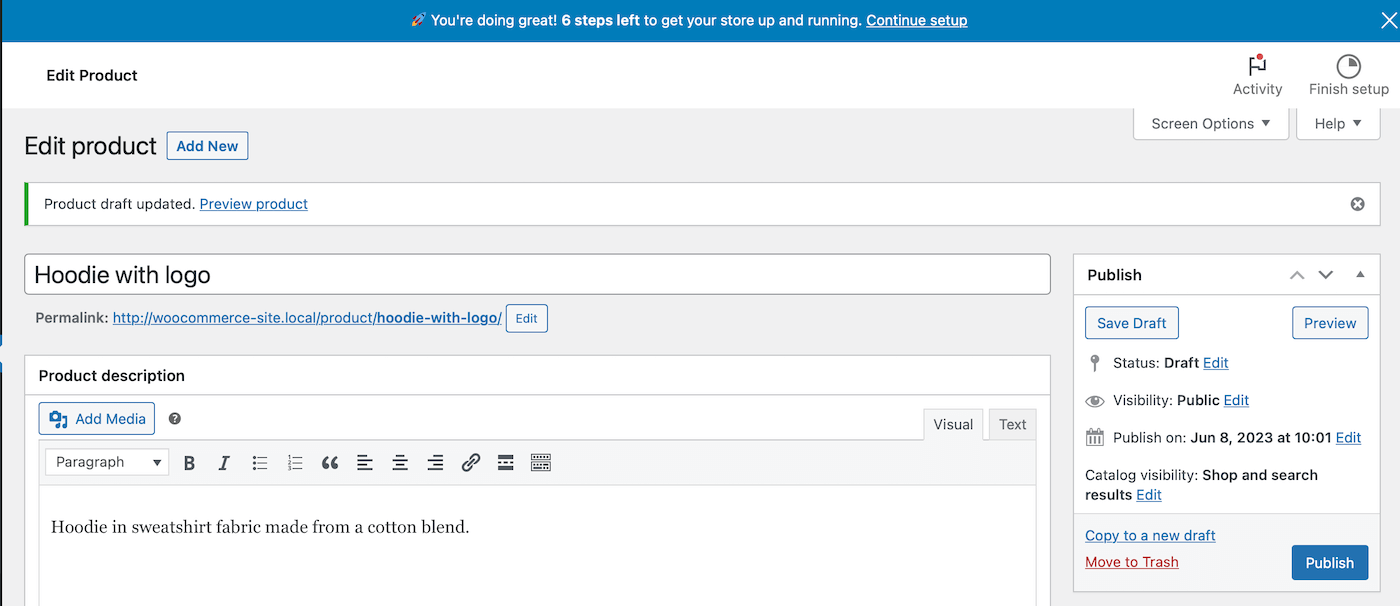
The first thing you’ll want to do is create a title and a short description of the product. Then, click on Save draft, and you’ll see a Preview product link appear:
Here, you can see a live preview of your new product:
Now, let’s take a look at some of the additional product details.
Adding Key Details to Your Product
If you scroll down below the post editor, you’ll see two new widgets not found on regular posts or pages. The first is the Product data section:
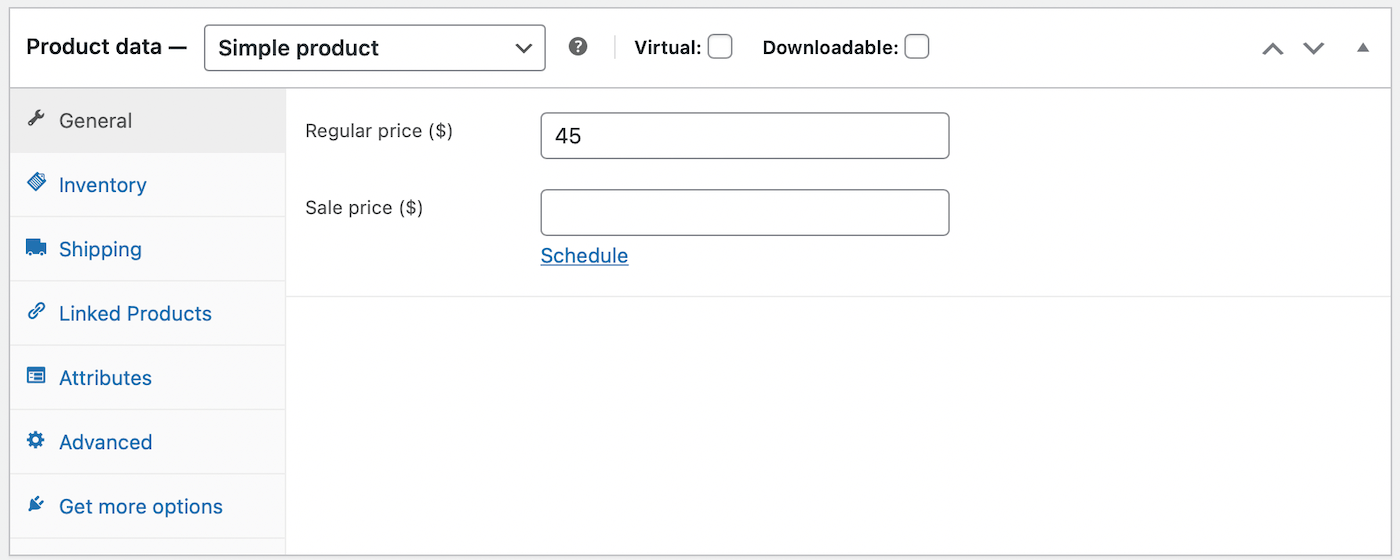
Here, you can add all kinds of details about your product. At the very top, you can select whether or not the product is virtual (which removes the Shipping tab) and if it is downloadable. Then, in the General tab, you can enter in the regular and sale prices (sales can be time-sensitive).
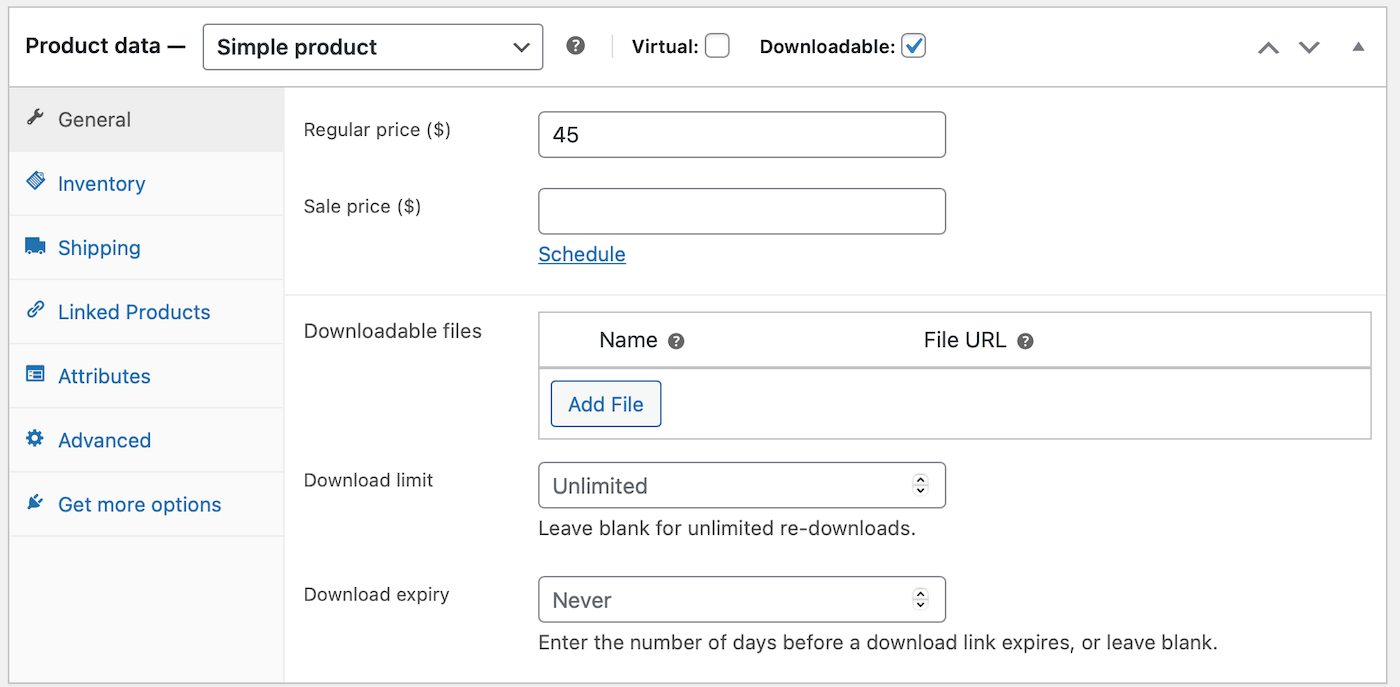
If you’re selling digital products, you’ll also have to upload the file to be purchased, customize the download limit (leave it blank to mark it as unlimited), and set the download expiry (leave it blank to keep it available permanently):
Next, in the Inventory tab, you can manage your stock by entering the quantity of the product, stock status (in/out of stock), and if you’d like to allow backorders:

Additionally, you can mark the product as individually sold, meaning only one can be bought in a single order. This is also where you can enter the product’s SKU (identification number) if you have one.
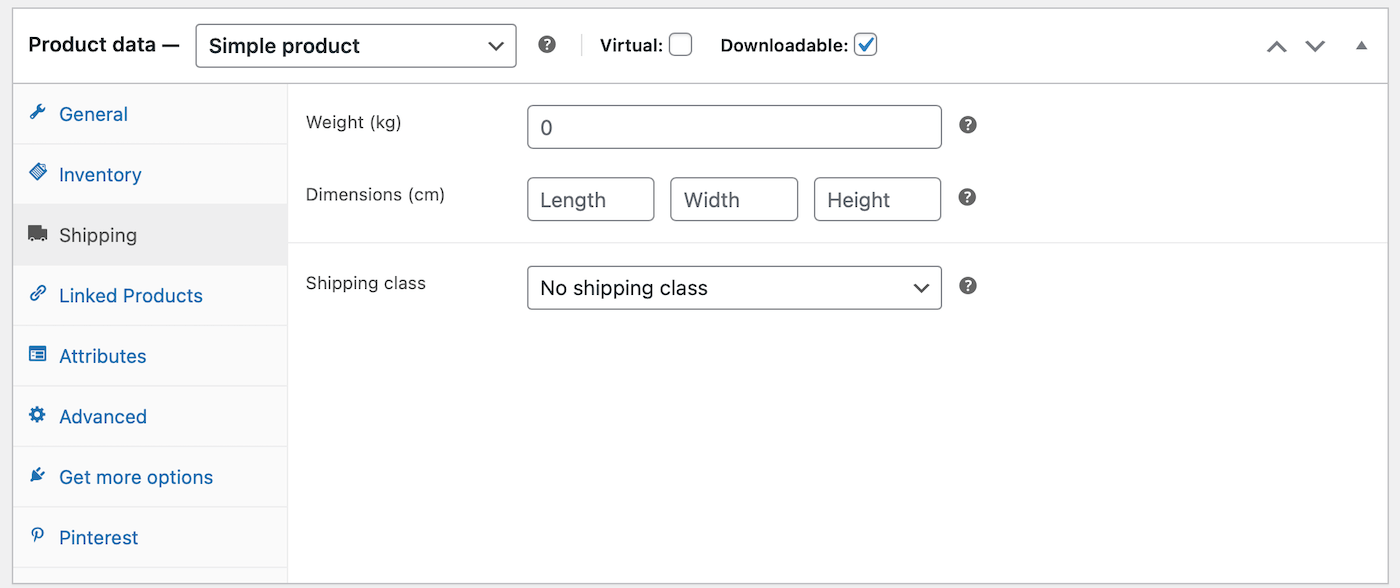
There are a number of other useful tabs here as well. The Shipping section will enable you to enter the item’s weight, dimensions, and shipping class:
In the Linked Products tab, you can add upsells and cross-sells, while Attributes enables you to describe the product’s characteristics.
Within the Advanced tab, you can enter custom purchase notes, give the product a set position in your menu, and enable or disable reviews. Plus, you can view recommended extensions under the Get more options screen.
Lastly, you’ll find a Pinterest tab at the bottom of this section. Here, you can determine the condition of your products (new/used) and select a Google category.
Create Attributes and Variable Products
As you can see, there are plenty of options for adding details to your WooCommerce products and customizing them fully. Let’s take a closer look at two of the most useful options in the Product data section – attributes and variable products.
Attributes are key descriptors for your product, and they tell potential customers important information about it. This might include the item’s color, the material it’s made out of, its size or type, and more.
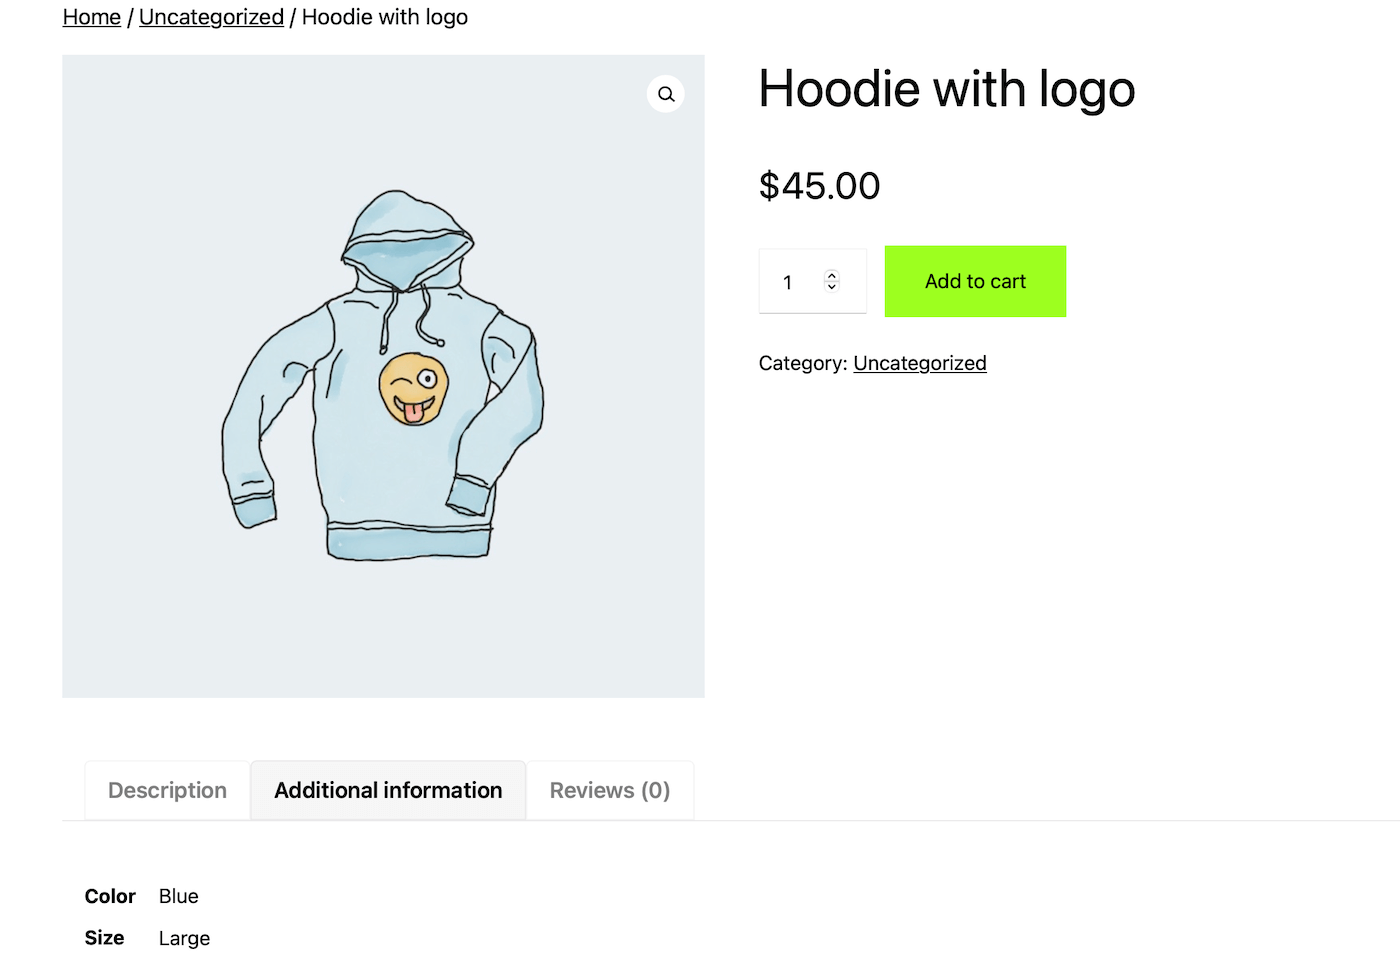
If you add these details to your product in the Attributes tab, they’ll appear on the product page under Additional information:
No matter what type of products you’re selling, attributes are useful for communicating vital characteristics in a concise way. However, what if you also sell items that come in multiple options?
For that, you can select the Variable product option from the Product data dropdown menu:
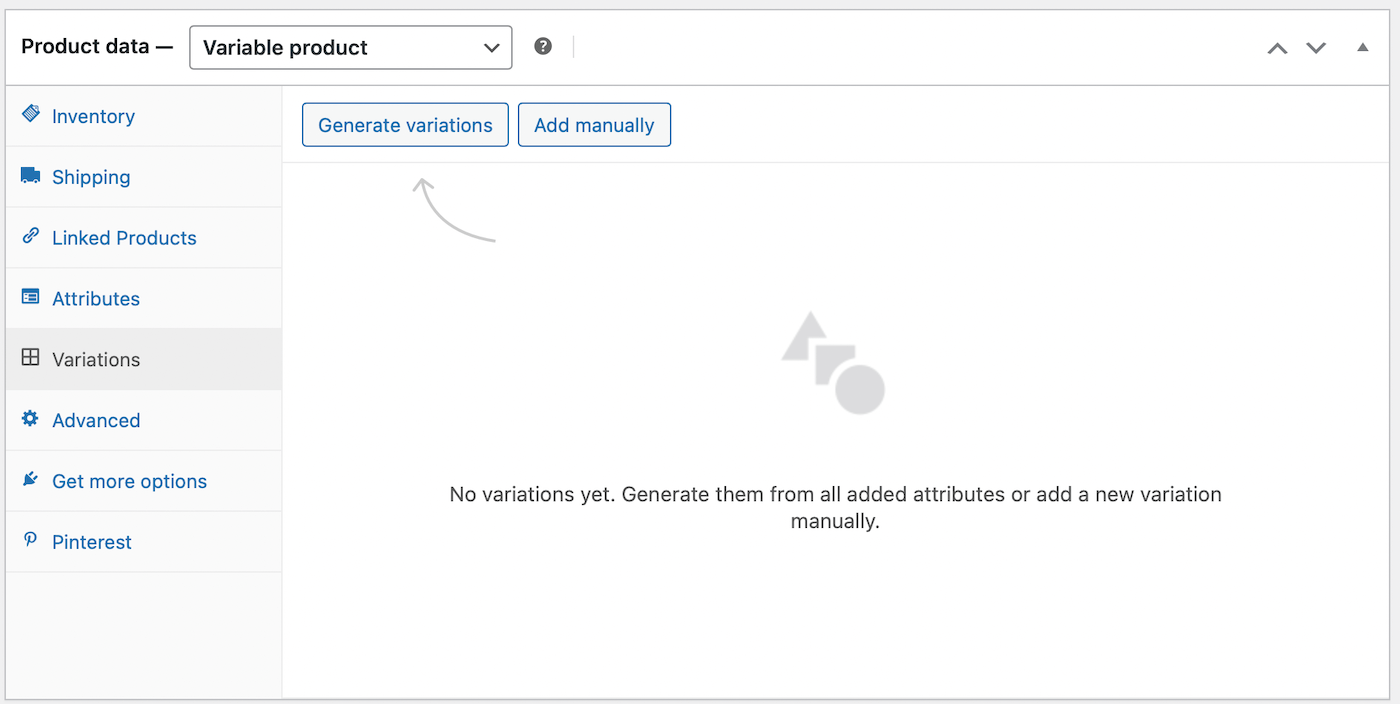
This will give you access to a new Variations tab, where you can create multiple versions of your product. You can either do this manually or use the attributes you already assigned to your product.
To proceed with the latter method, click on Generate variations:
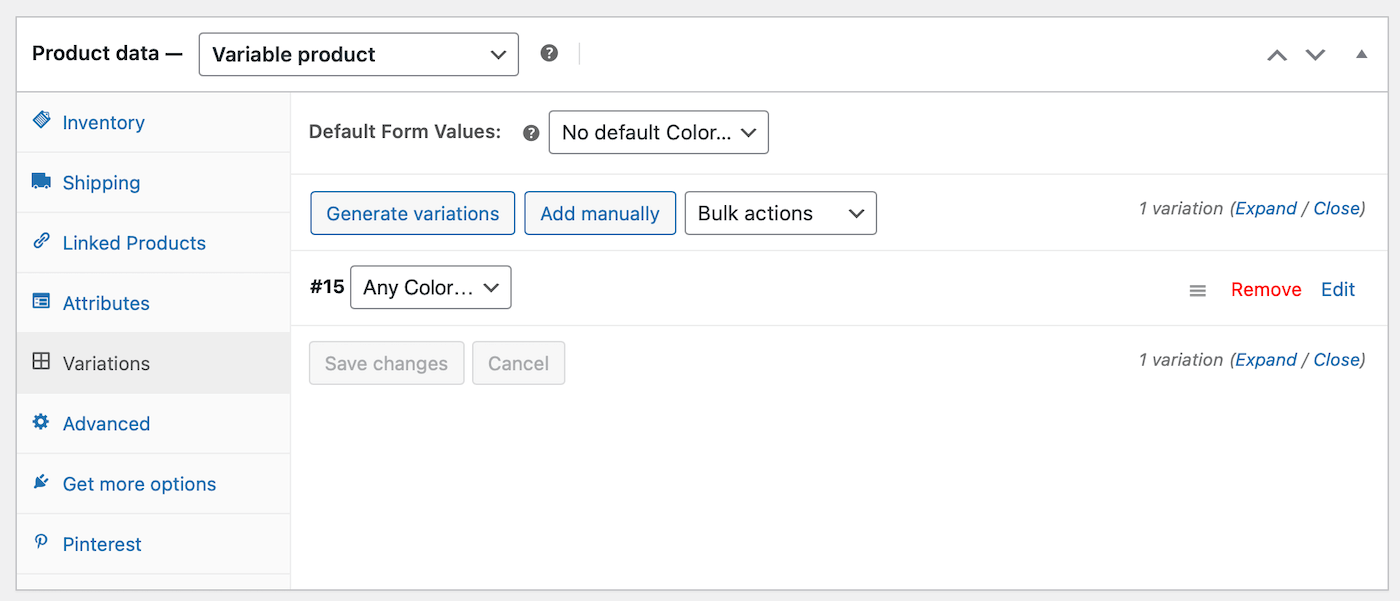
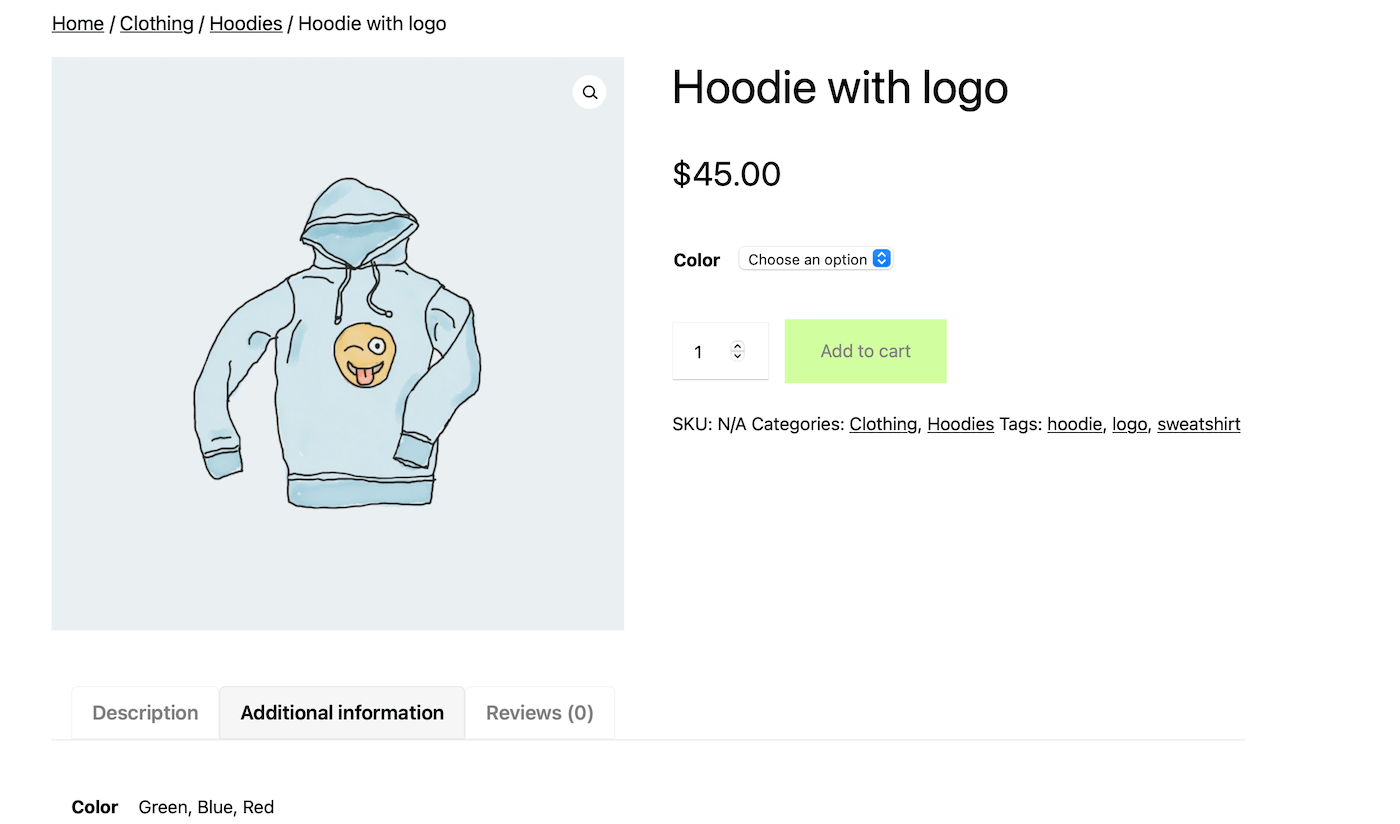
Let’s say, for example, that you offer a hoodie in red, green, and blue. You can add a variation for each color and then give each a unique description, price, and so on.
Your customers will be able to see all available variations on the product page:
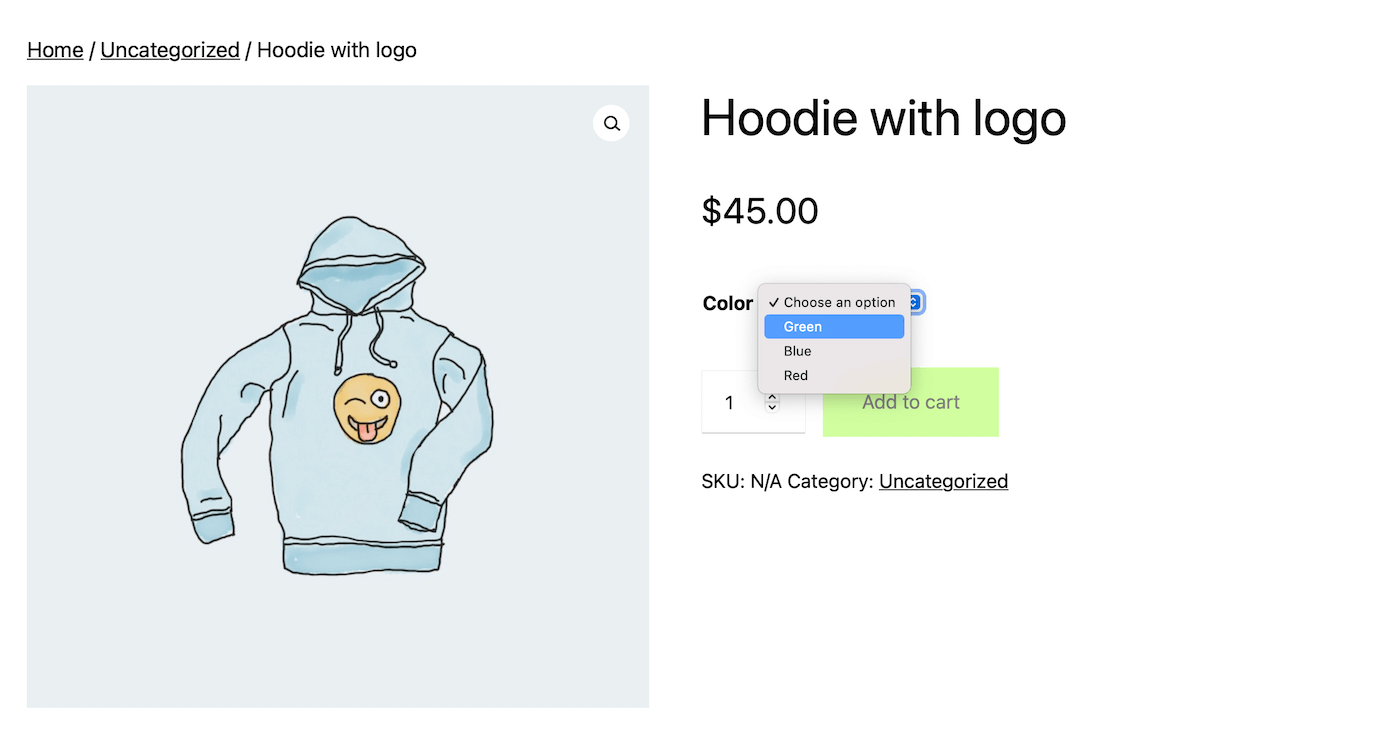
This makes it easy for visitors to view everything you have to offer at a glance. Plus, it means you don’t have to create separate product pages for slight variations on the same item.
Customizing Your Product Short Description
Underneath the Product data widget, you’ll also find a section labeled Product short description:
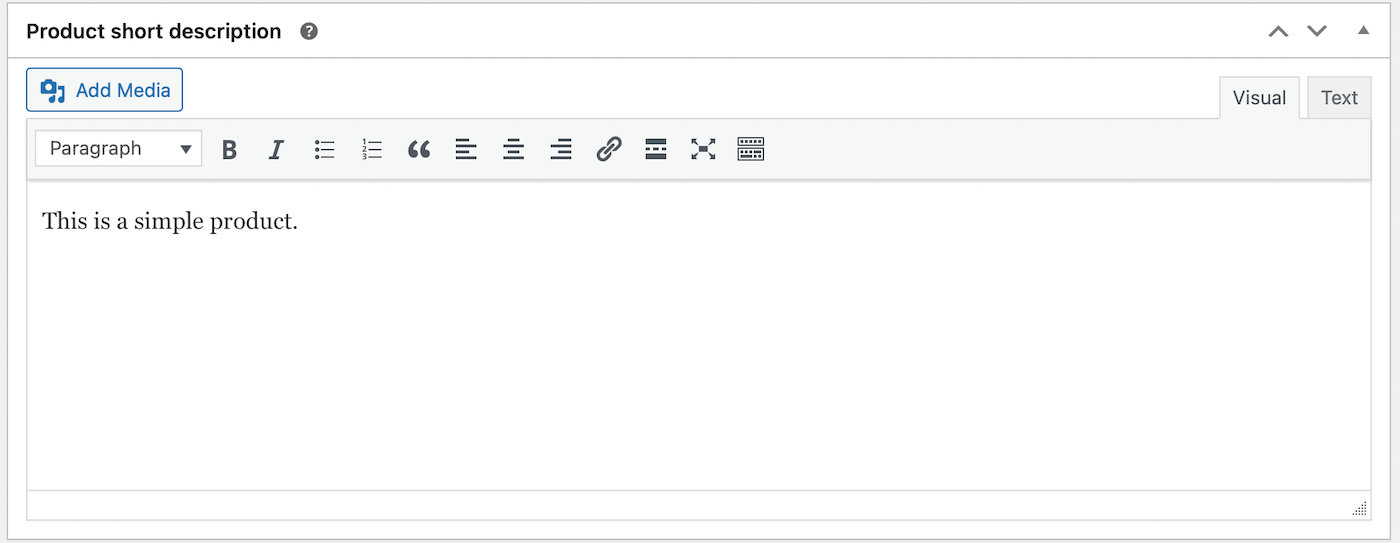
Here, you can create a concise tagline that will appear underneath the product’s title. You can use this description to highlight the item’s primary benefits and incorporate one or more keywords to help customers locate it in searches.
After customizing your product’s data and description, don’t forget to check out the other options on the product page as well. You can add tags to your product, place it in a category, and include a featured image or even an entire image gallery.
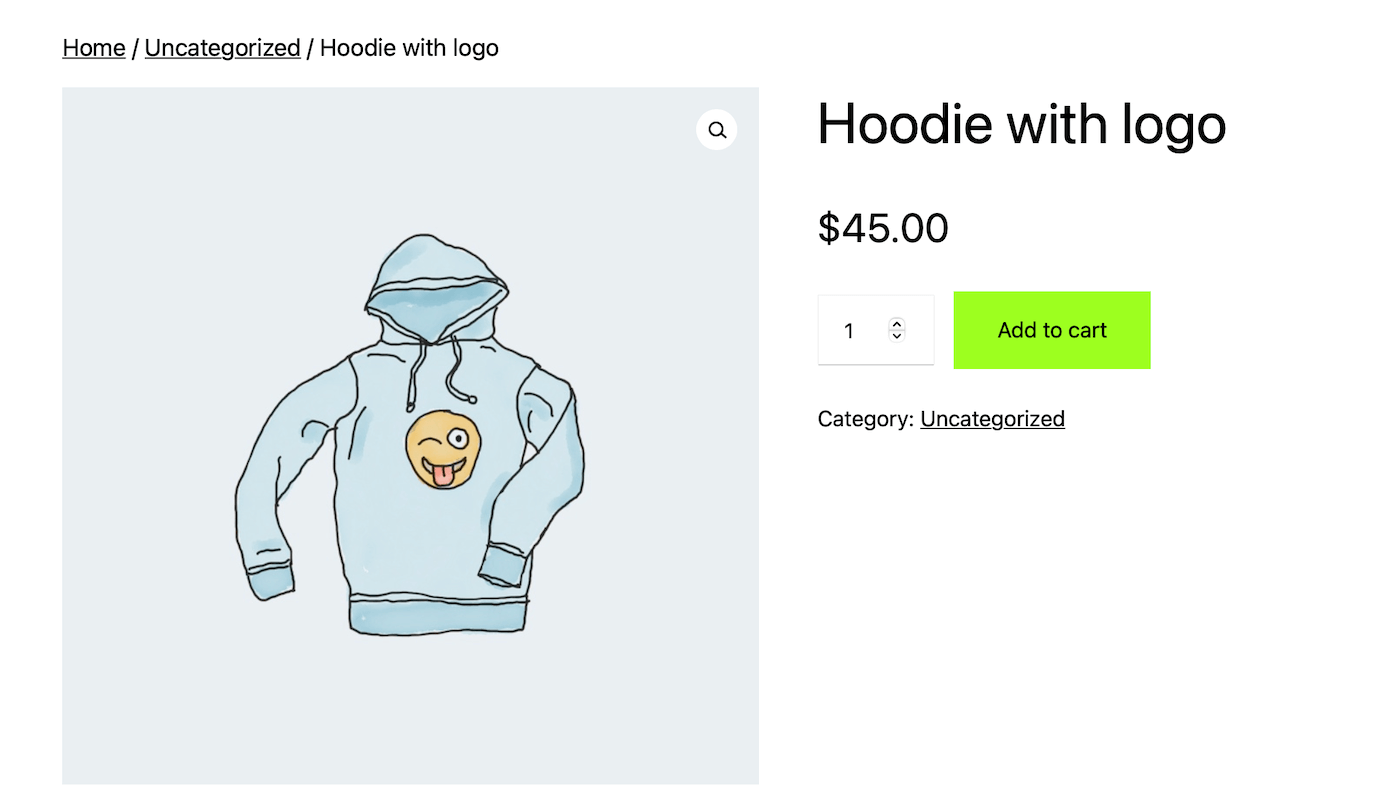
Here’s what your final product might look like on the front end:
Once your product is ready, hit Publish to make it live on your site. Then, you can repeat this process to create additional products as needed.
Managing Your WooCommerce Products
You’ll probably include a number of items in your WooCommerce store, which means you’ll need an easy way to manage your products. Fortunately, you can do this through the Products tab in your dashboard.
For example, you can select All Products to see every item currently listed in your store. You can add, edit, and delete products here as needed:
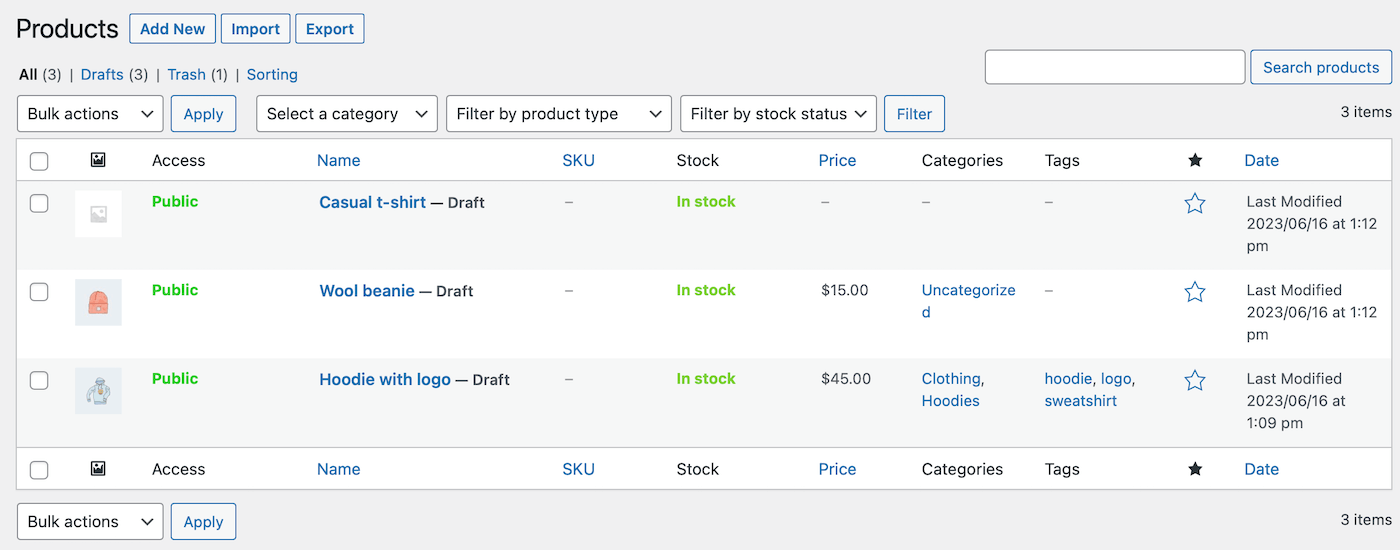
In the other pages, under the Products section, you can view your product categories, tags, attributes, and reviews. Each of these pages looks like the standard WordPress Posts > Categories page and can help you keep your entire inventory organized.
Step 4: Choose Your Payment Processors
Now, you can head back to your WooCommerce page where you can continue making your way through the store checklist. At this point, you’ve completed your store details and added some products to your site. So, you’re ready to decide what payment options you want to enable.
You can either click on the Set up WooCommerce Payments link from the setup page. Or, navigate to the Payments tab from your dashboard:
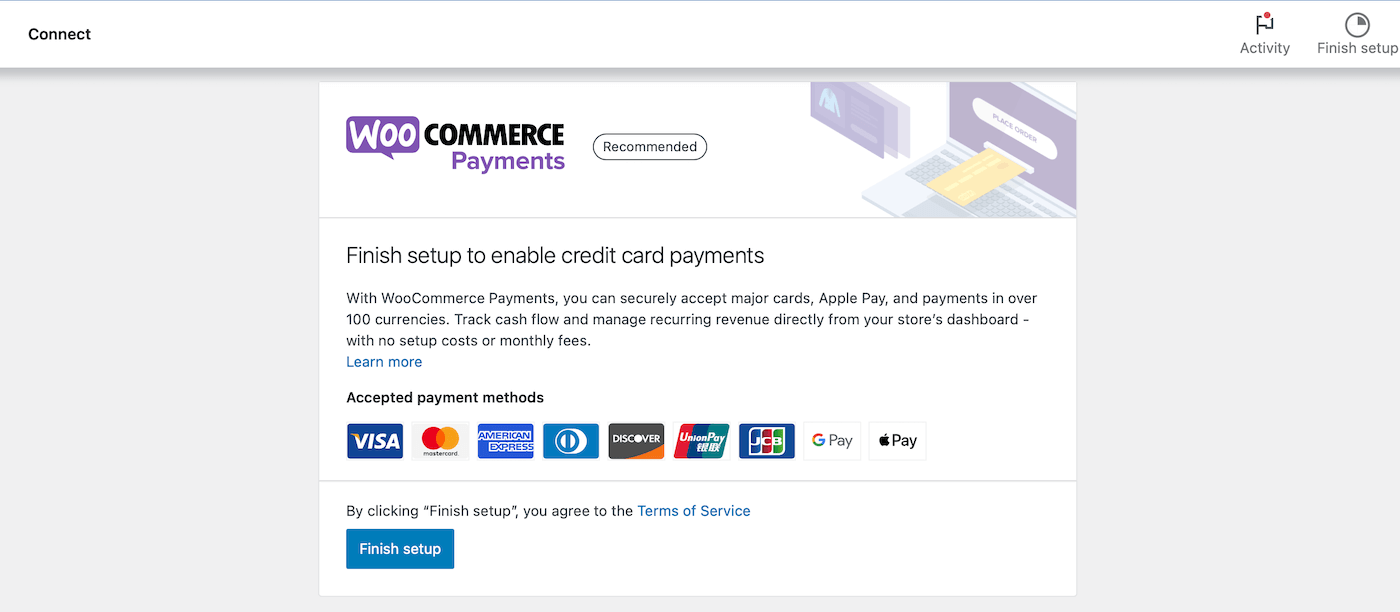
Click on Finish setup to accept credit card payments in your store.
Then, you can select the additional options you’d like to use, and WooCommerce will set them up. You can also use extensions to add more payment processors to your store, which we’ll talk about later. At Kinsta, we’re big fans of Stripe.
Recommended reading: How to Prevent and Reduce Credit Card Fraud by 98% Using Stripe Radar
Using Square instead? Check out our in-depth comparison blog post: Stripe vs Square.
Step 5: Add Tax Rates and Configure Your Shipping Options
From the WooCommerce setup page, you can also click on Add tax rates. Here, you can choose to continue with the WooCommerce Tax partner, powered by Jetpack. This is a completely free option:
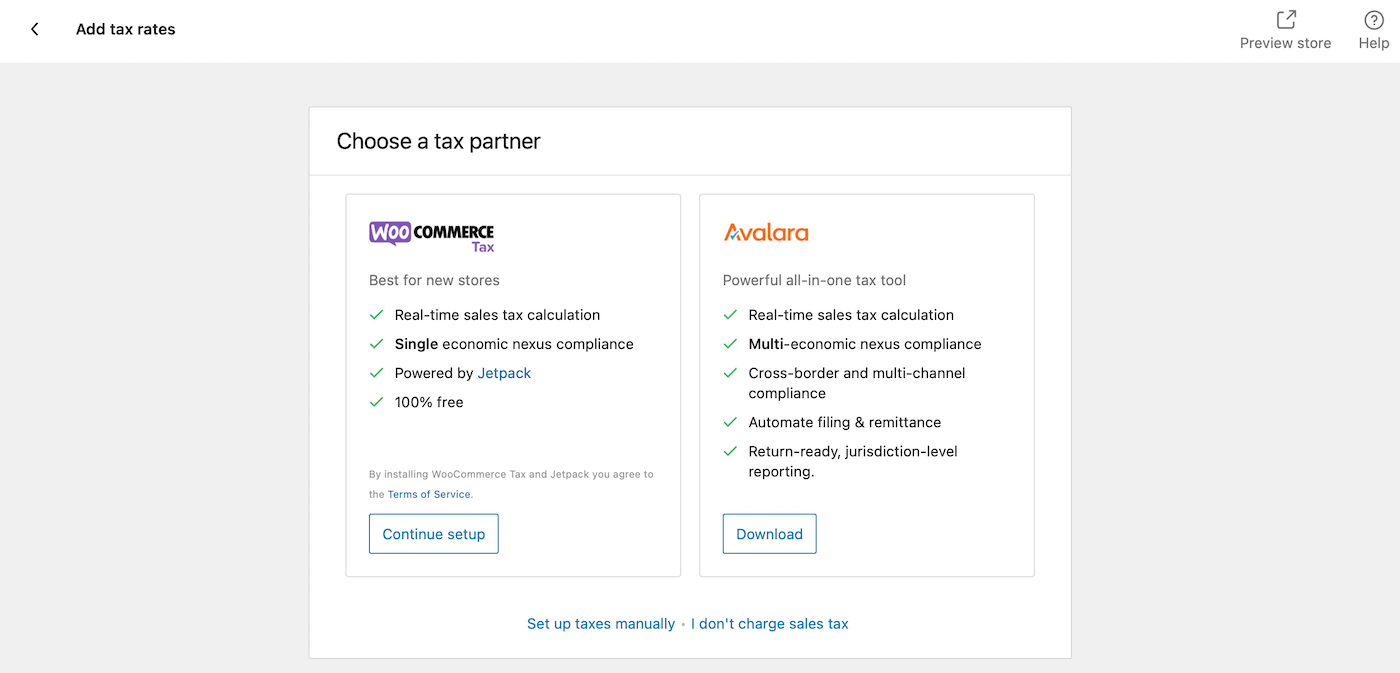
Or, you can download Avalara to calculate your taxes. Additionally, you can click the Set up taxes manually link or inform WooCommerce that you don’t charge sales tax using the appropriate link.
Once you’ve made your selection, return to the setup page and click on Add shipping costs:
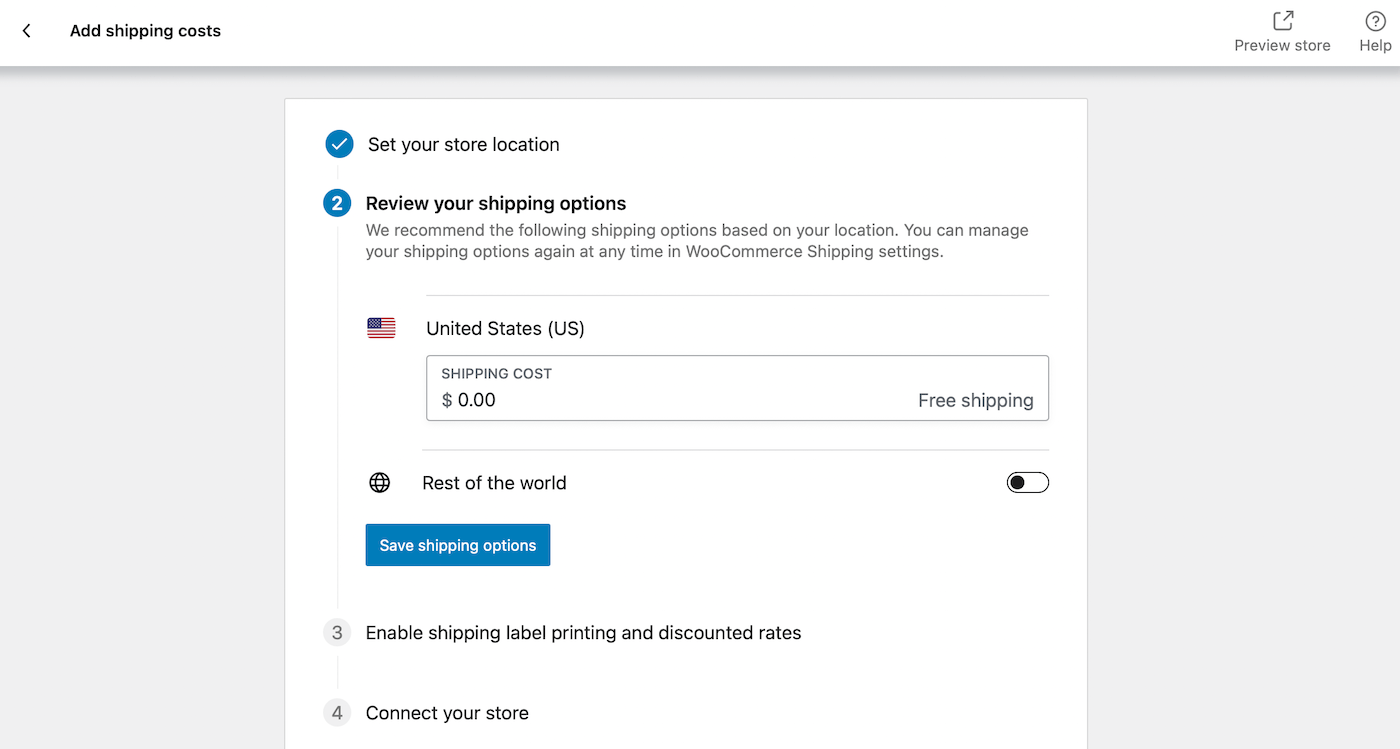
Here, you can decide how much customers will be charged for shipping. You can set one rate for your preferred zone and another for customers who are in other locations. If you like, you can also offer free shipping to one or both groups.
Then, click on Save shipping options. Now, you can select a shipping solution to print your shipping labels:
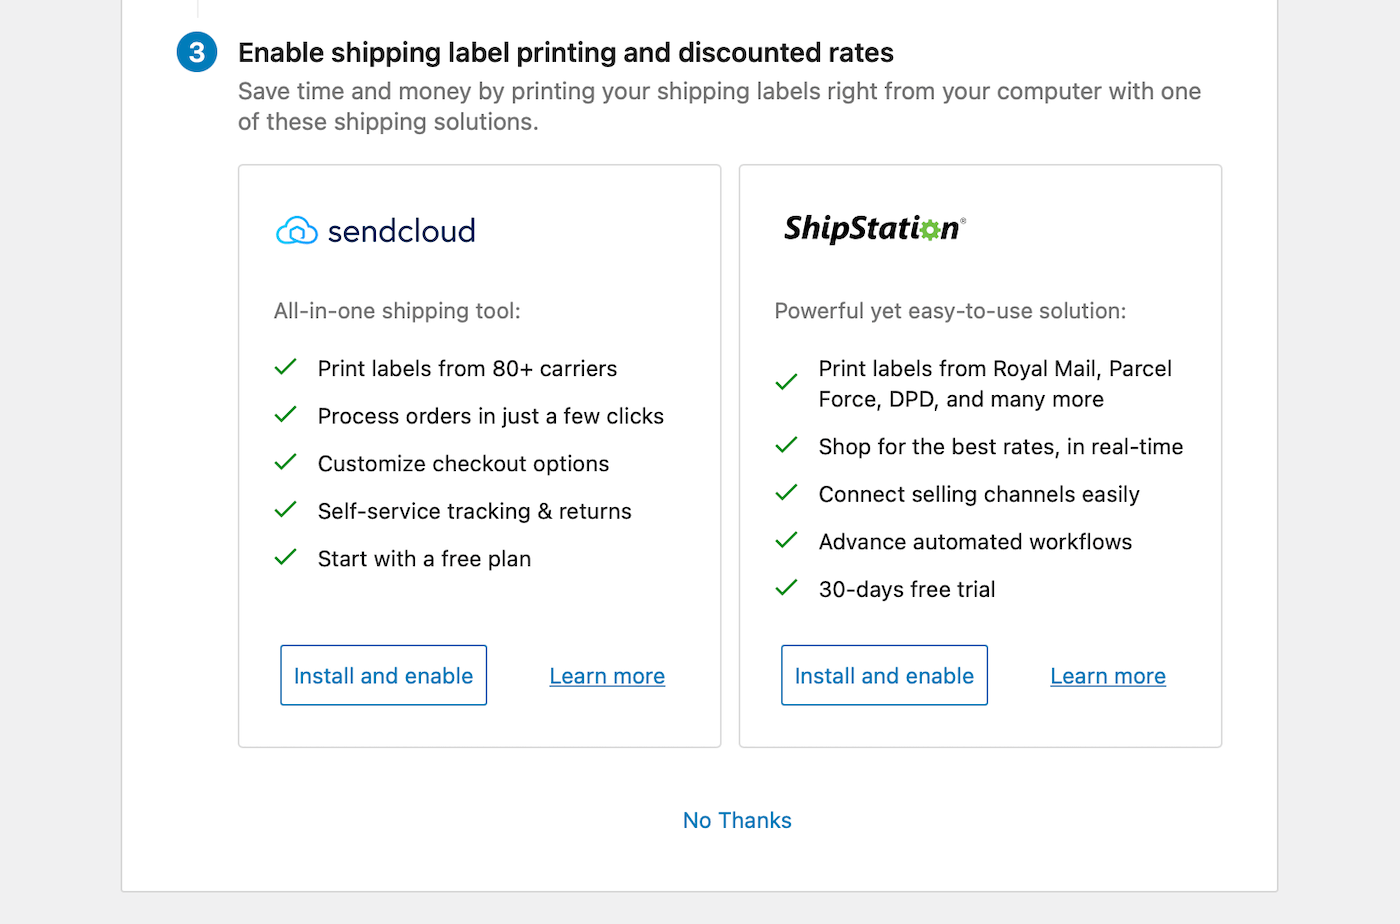
You can choose between sendcloud and ShipStation, both of which you’ll need to install and enable. Or, if you don’t require shipping labels, simply select No thanks.
Step 6: Review Additional Add-Ons
At this point, you’ve configured all the basics for your online WooCommerce store. The next page of the setup wizard presents you with a few optional add-ons.
For example, you can click on Get more sales from the WooCommerce setup screen:
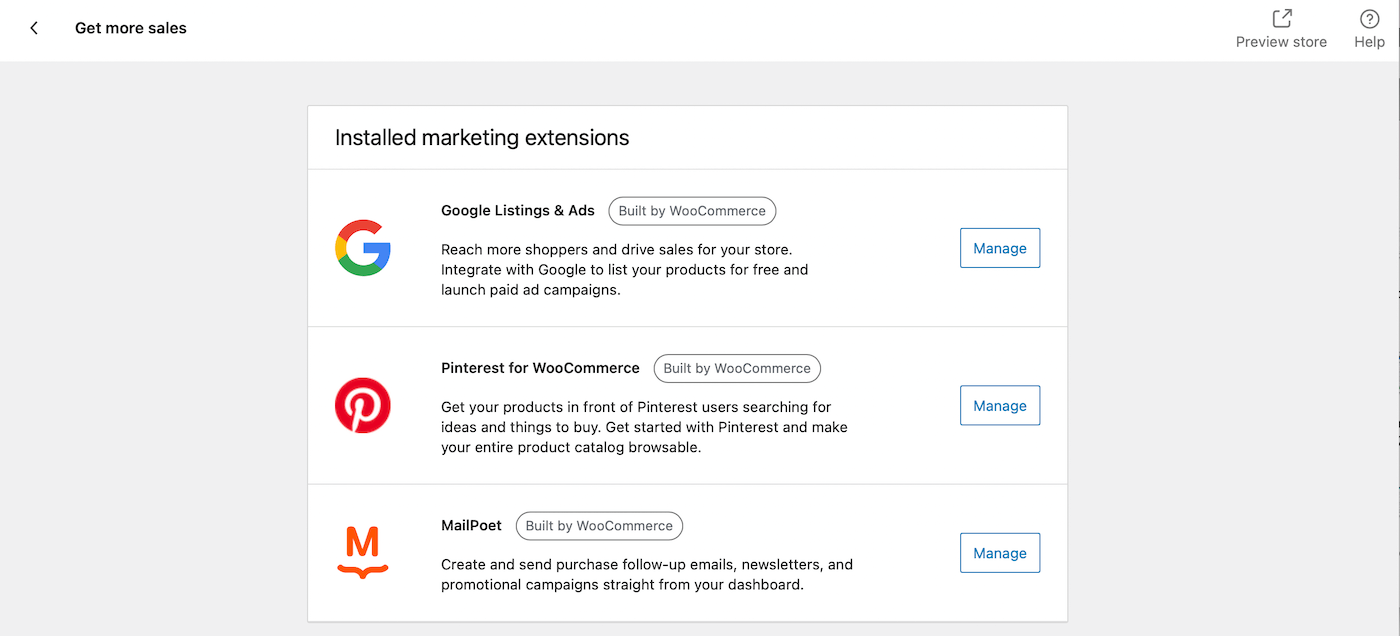
All of these tools can come in handy, although none of them are required to run your online store. For instance, the MailPoet integration is a great way to send follow-up emails, newsletters, and promotional campaigns to your customers. Meanwhile, you can list your products (and paid ad campaigns) on the Google search results page by enabling Google Listing & Ads.
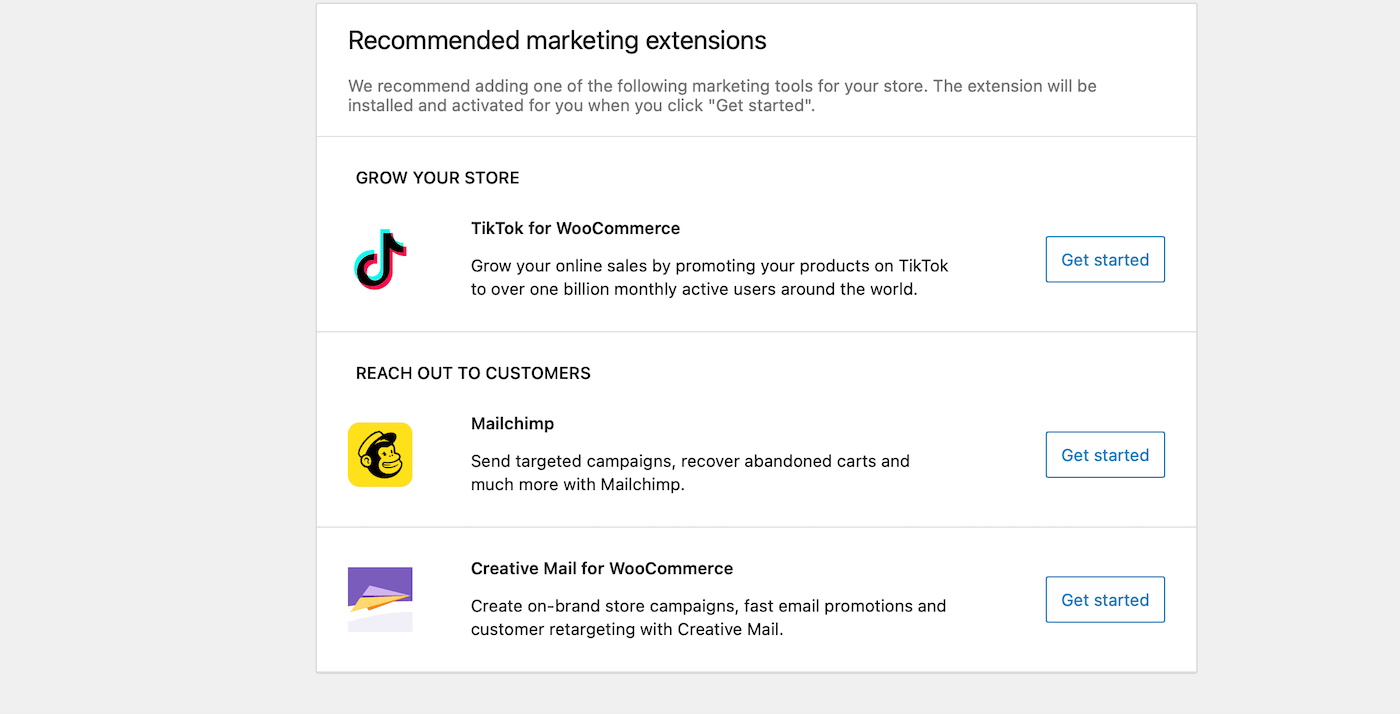
Further down, you’ll find some useful marketing extensions like TikTok and Mailchimp:
To install and activate any of these tools, click on the Get started button.
Step 7: Personalize Your WooCommerce Store
At this point, you’re almost finished setting up your WooCommerce store. However, you can customize your online store if you navigate back to the WooCommerce setup page and select Personalize your store:
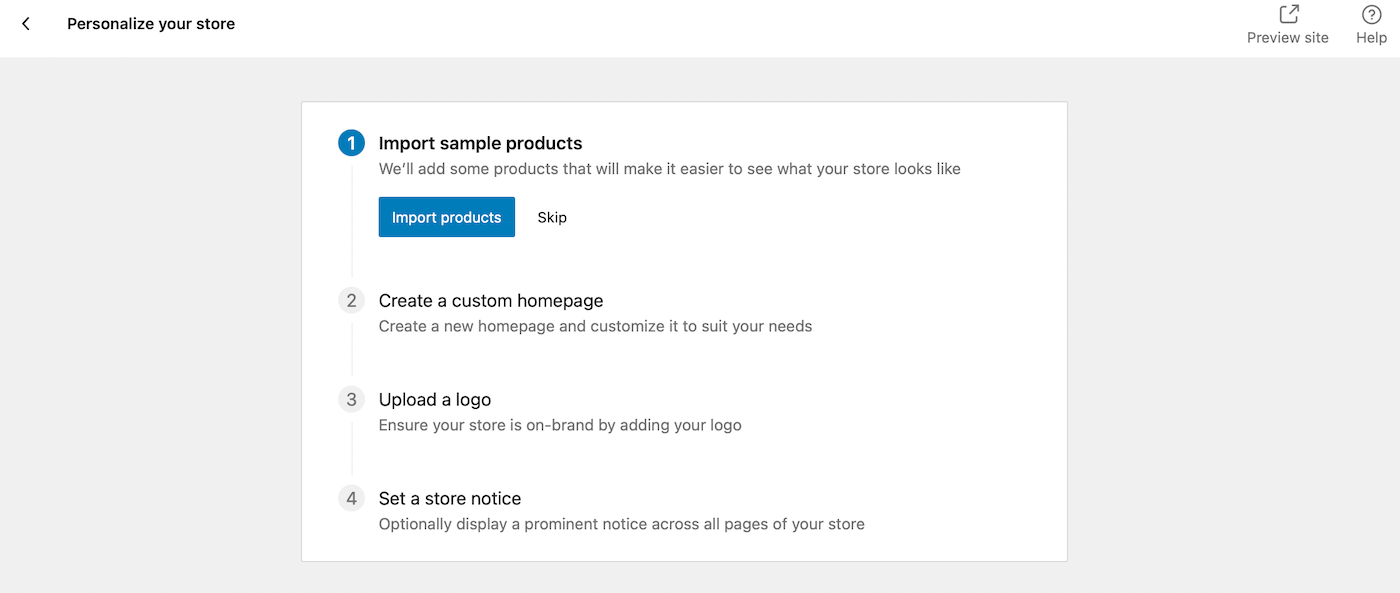
If you don’t have many products added to your store, you can click on Import products to give you a better idea of what your finished site will look like.
Now, you can create a custom homepage for your store by clicking on the Create homepage button:
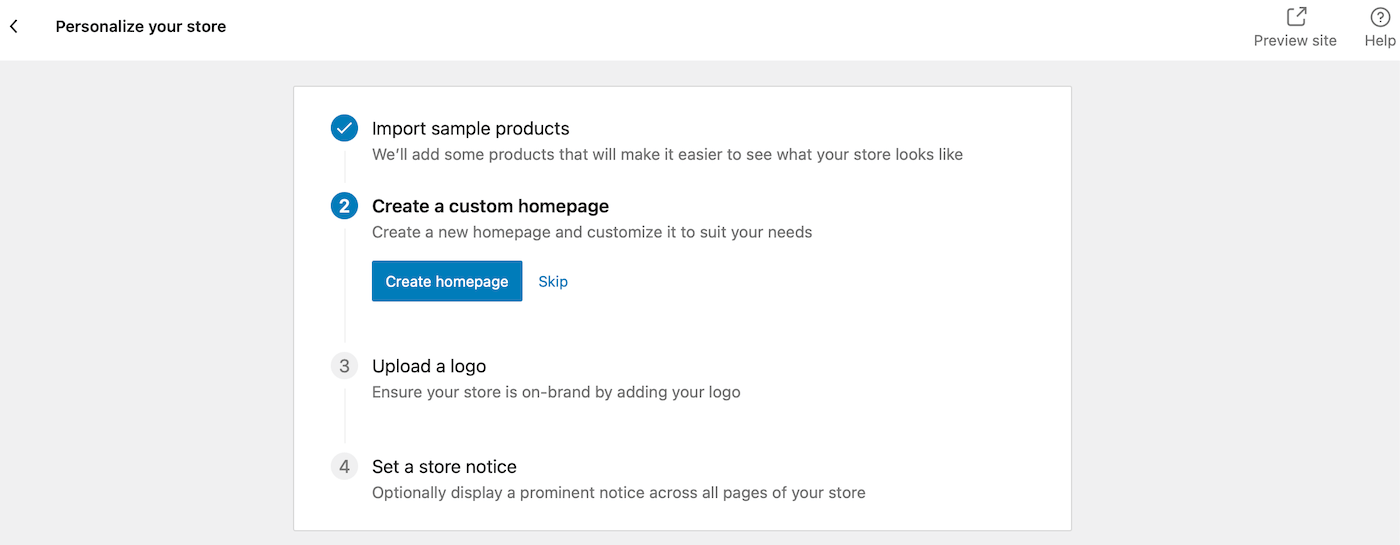
Then, you can brand your WooCommerce store by uploading a logo from your computer, and you can enter a store notice to display across all pages of your site. Click on Complete task to finish up.
If you haven’t yet verified your business details, you’ll be prompted to do so at this point. Then, you can start managing WooCommerce transactions. Your WooCommerce store is now ready to rock and roll.
How To Customize Your WooCommerce Store
Now that you’ve configured a few basic settings for your online store, there are a lot more options to play with. You can find all of these options beneath your new WooCommerce tab.
It’s here where you can view orders, coupons, and reports, as well as customize settings and add new extensions. Let’s walk through each screen one by one.
Orders and Customers
First up, the Orders page displays a list of recent purchases on your store:
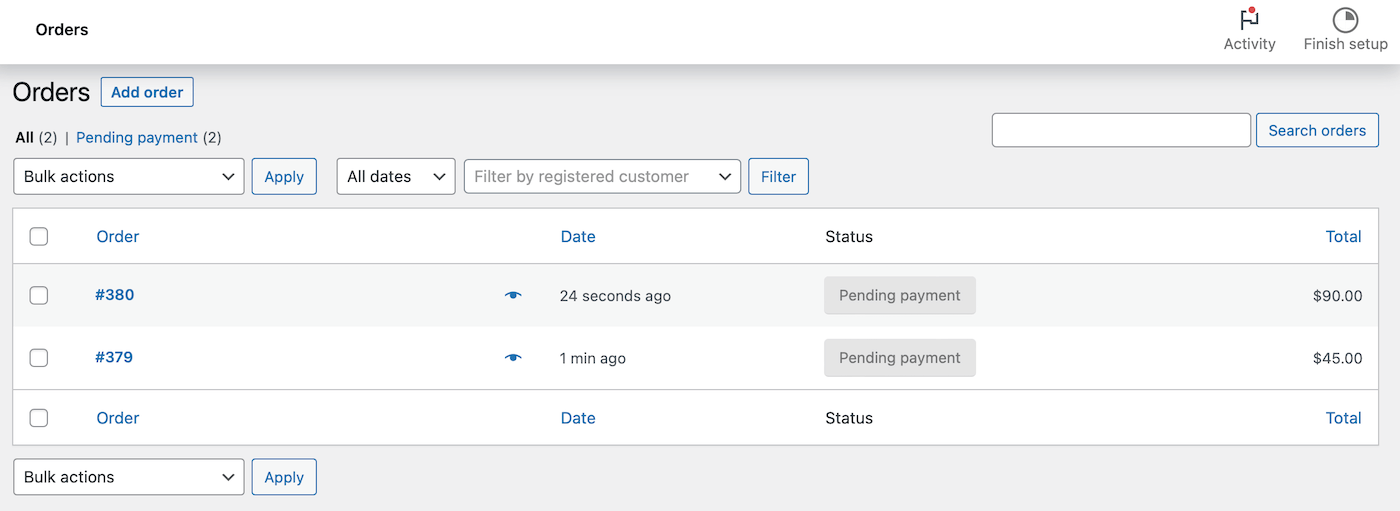
If you sell digital products, there’s not much to do here other than view what has been bought lately. However, if you sell physical goods, this is where you can find out what products you need to ship and the status of your orders.
Beneath the Orders page, you can click on the Customers tab, where you’ll find a list of all the people who have placed an order on your website. You can also search for customers using the search bar and download your customer list.
Coupons
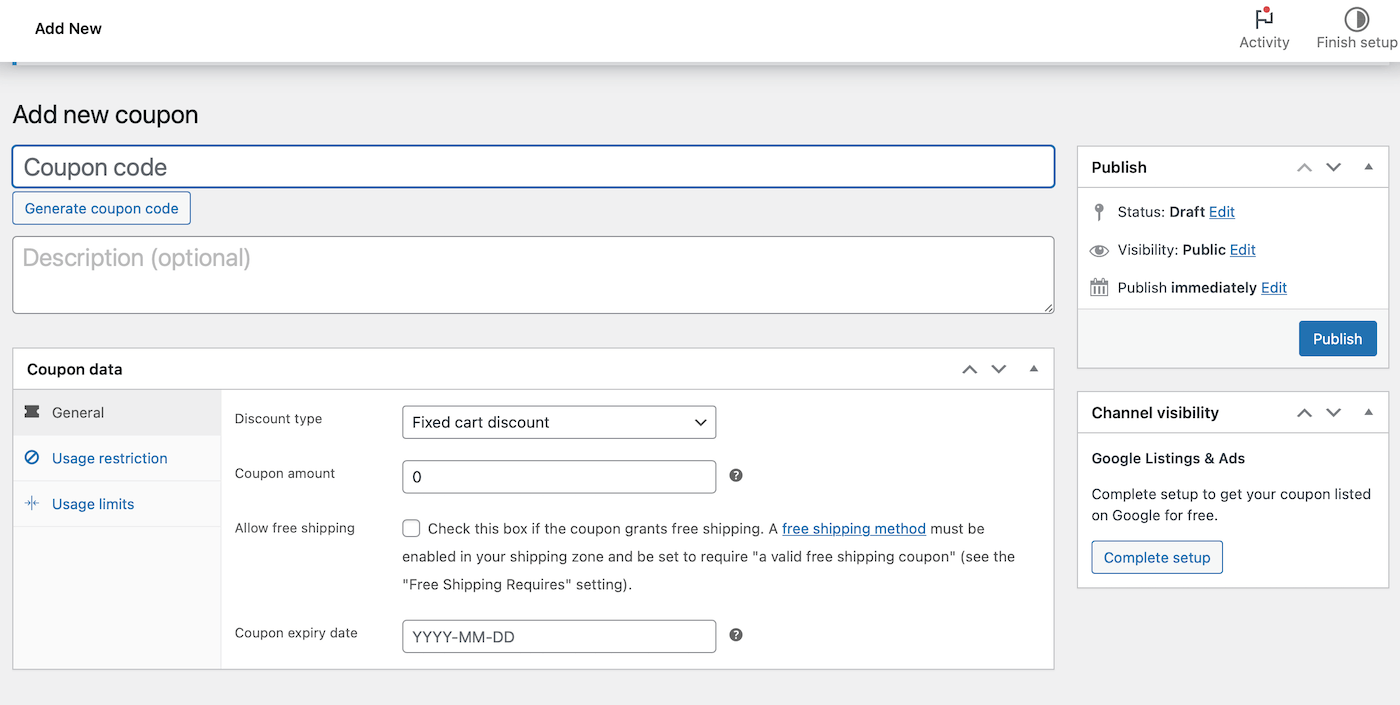
WooCommerce has several useful options for adding new coupons to your ecommerce store. In the Coupon tab, you can select Create your first coupon to access the editing screen:
It’s important to note that while you used to be able to access your WooCommerce coupons from the WooCommerce tab, the settings have now moved to the Marketing tab.
Therefore, you can create and manage coupons by going to Marketing in your WordPress dashboard. Then, select Coupons. You can also choose to remove the legacy coupon menu from the WooCommerce settings completely to avoid confusion:

You can add a coupon code (or get WooCommerce to generate one for you) and create a short description here. Then, the General tab enables you to edit its basic information: the type of coupon (percentage discount, fixed cart discount, or fixed product discount), its value, free shipping options, and its expiry date.
Under Usage Restrictions, you can set a minimum spend the customer has to make in order to validate the coupon. You can also check the box for Individual use only if you don’t want customers to use the coupon in conjunction with other offers:
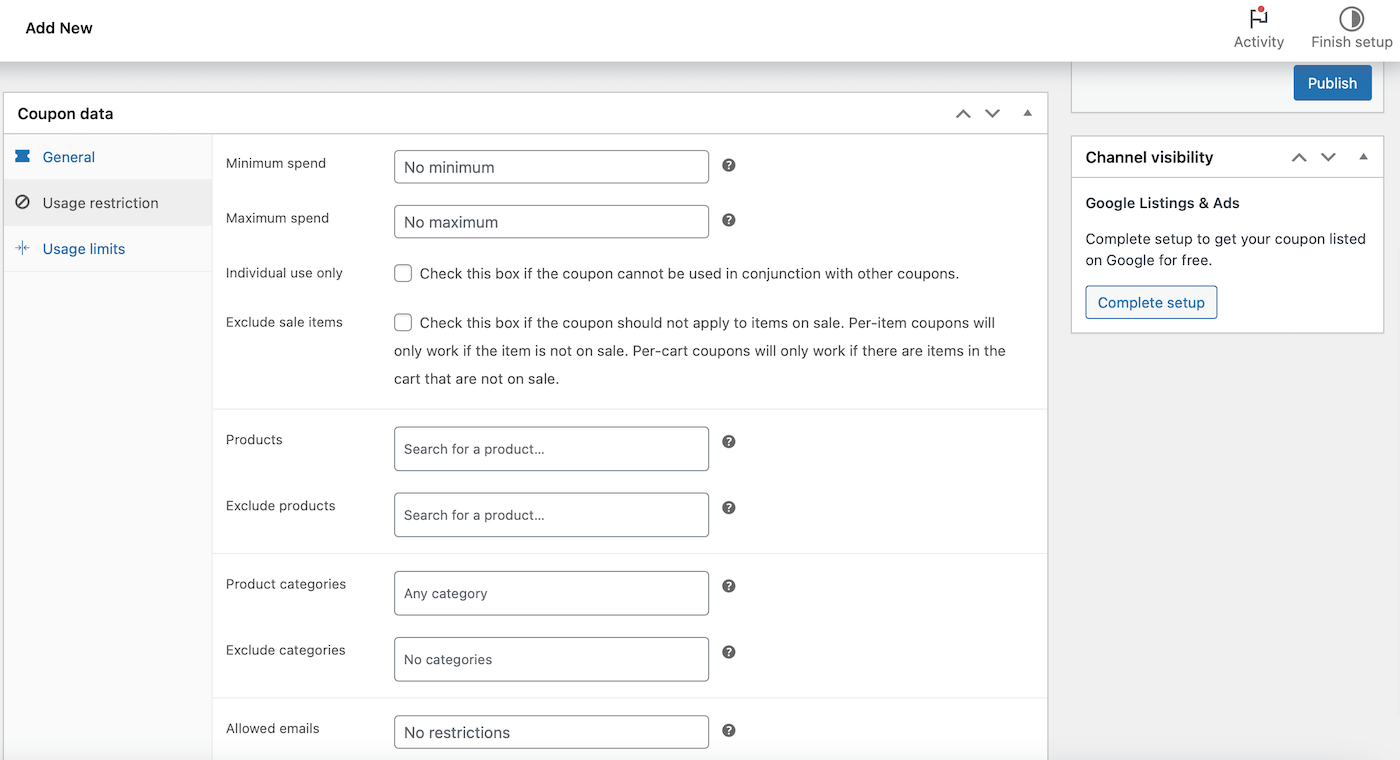
You can set if the coupon should apply only to non-sale items here, and also select the products and product categories the coupon is applicable to. Finally, you can even ban certain email addresses from coupon usage.
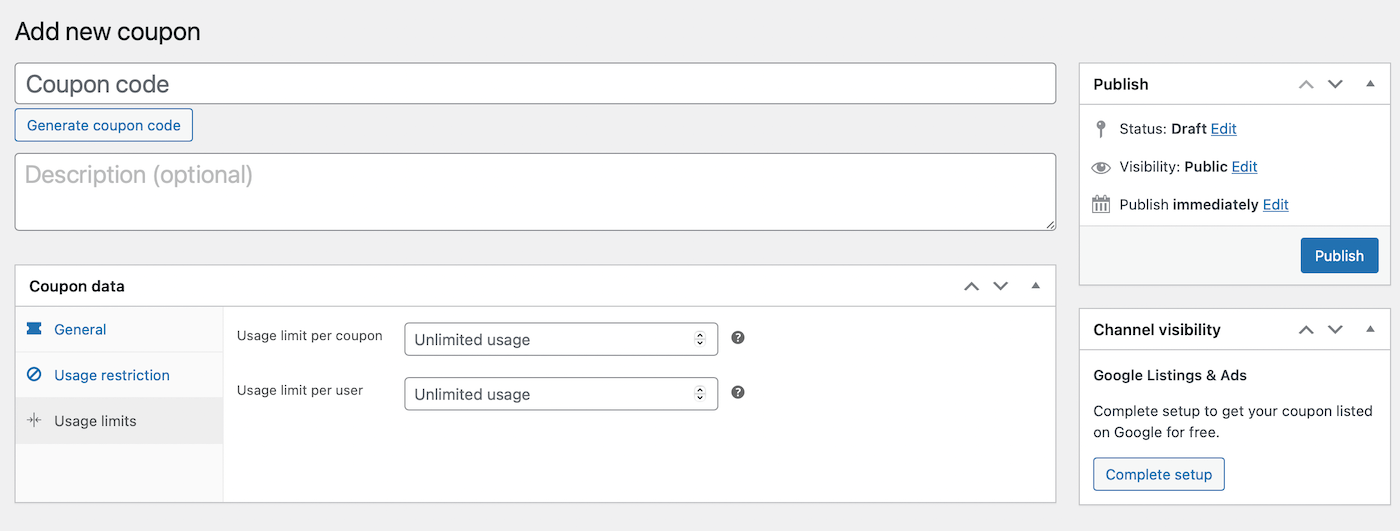
The final tab, Usage Limits, enables you to determine how many times the coupon can be used, both overall and per customer:
Then, simply publish your coupon to make it active and let your customers know about the code they’ll need.
Reports
WooCommerce also offers powerful built-in tracking functionality. In the Reports tab, you can view charts and graphs of your sales, orders, and shipping costs over different time periods:
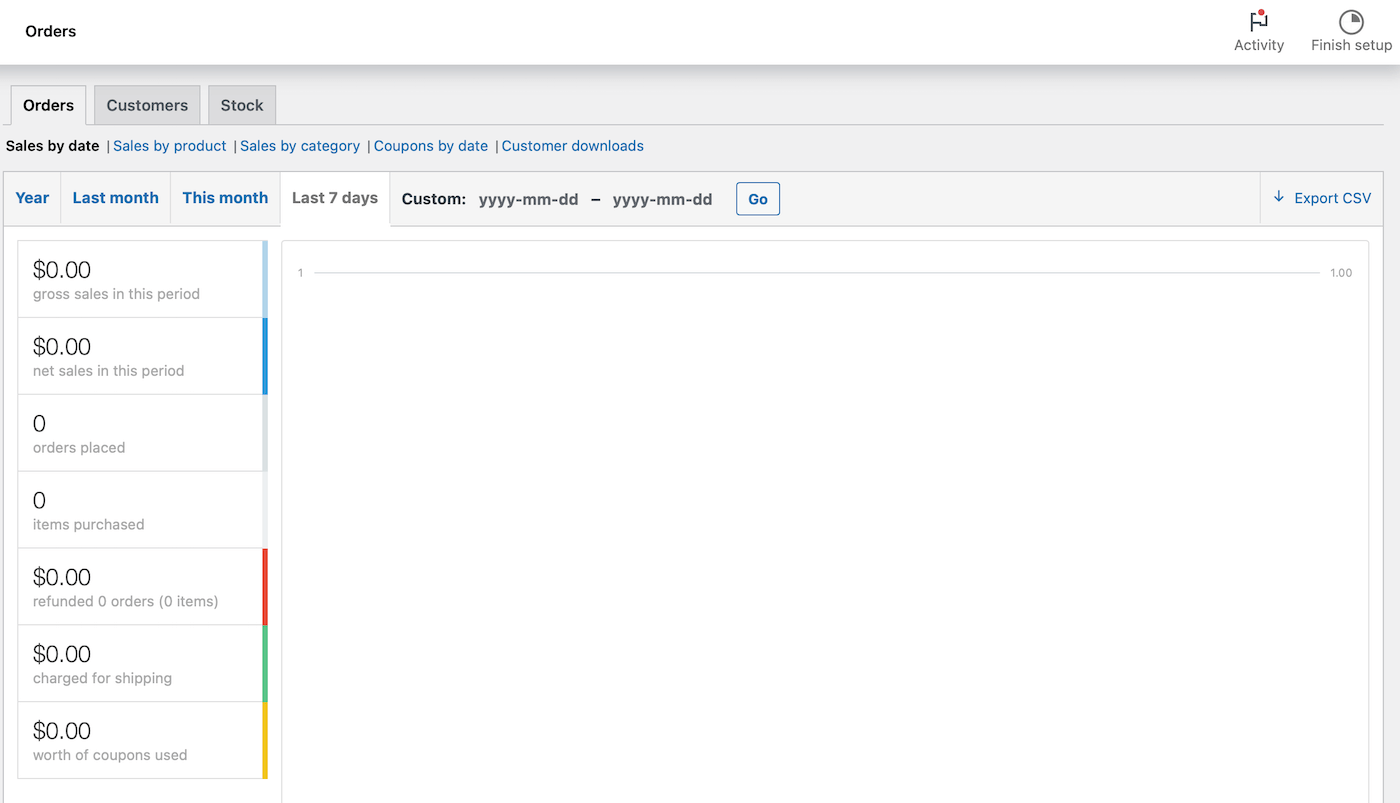
Each graph can be limited to the sales of a particular product, category, or coupon. In the Customers sub-tab, you can also view your customer acquisition over the same time periods.
Last but not least, you’ll be able to review your low-in-stock, out-of-stock, and most-stocked products in the Stock sub-tab. All of this data can be exported as a CSV sheet if needed.
Settings
This is where WooCommerce gets really impressive. In the Settings screen, you can customize just about every aspect of your ecommerce store. Elements such as the placement of your ‘thousands’ separator, the entire checkout process, email options, and much more can be tailored to meet your needs.
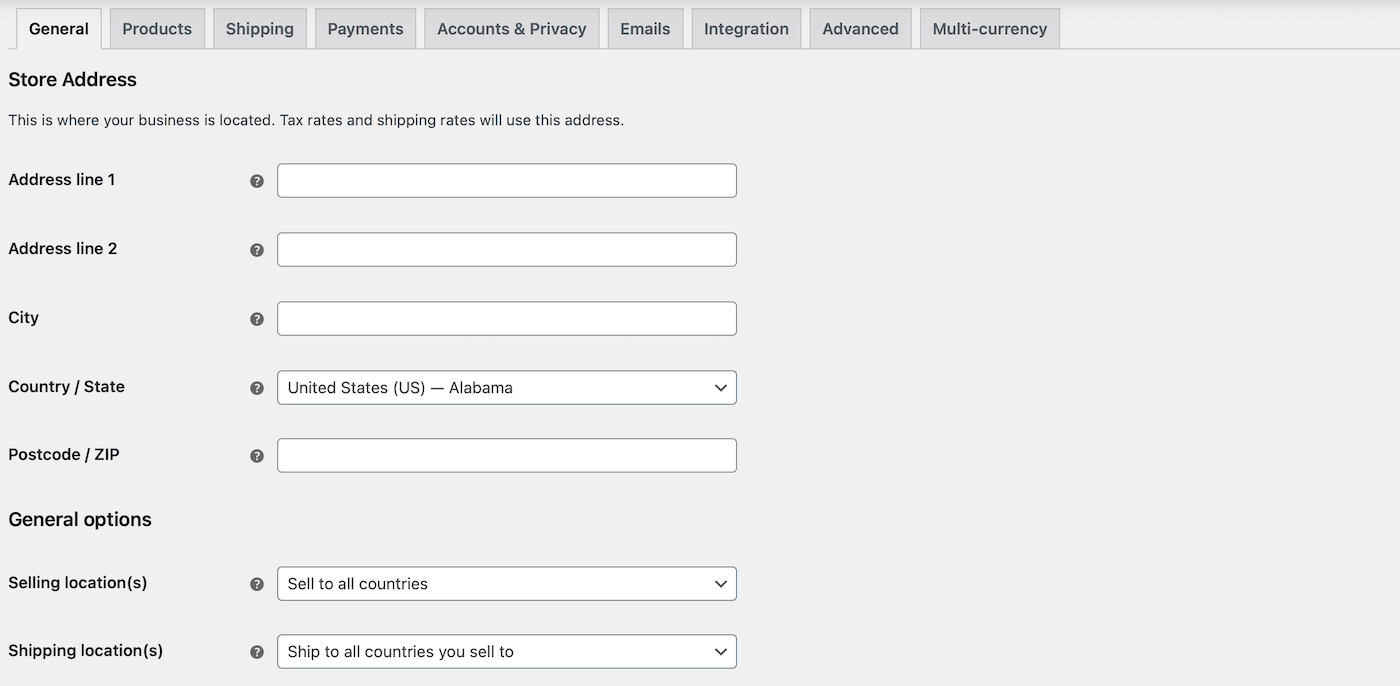
Within this section, the General tab covers your store’s basic information, including its currency, selling locations, and display options:
Another notable option here lets you scroll down and check the box that says: Enable tax. Once you check this box, you’ll gain access to a previously hidden Tax tab where you can view your tax options:
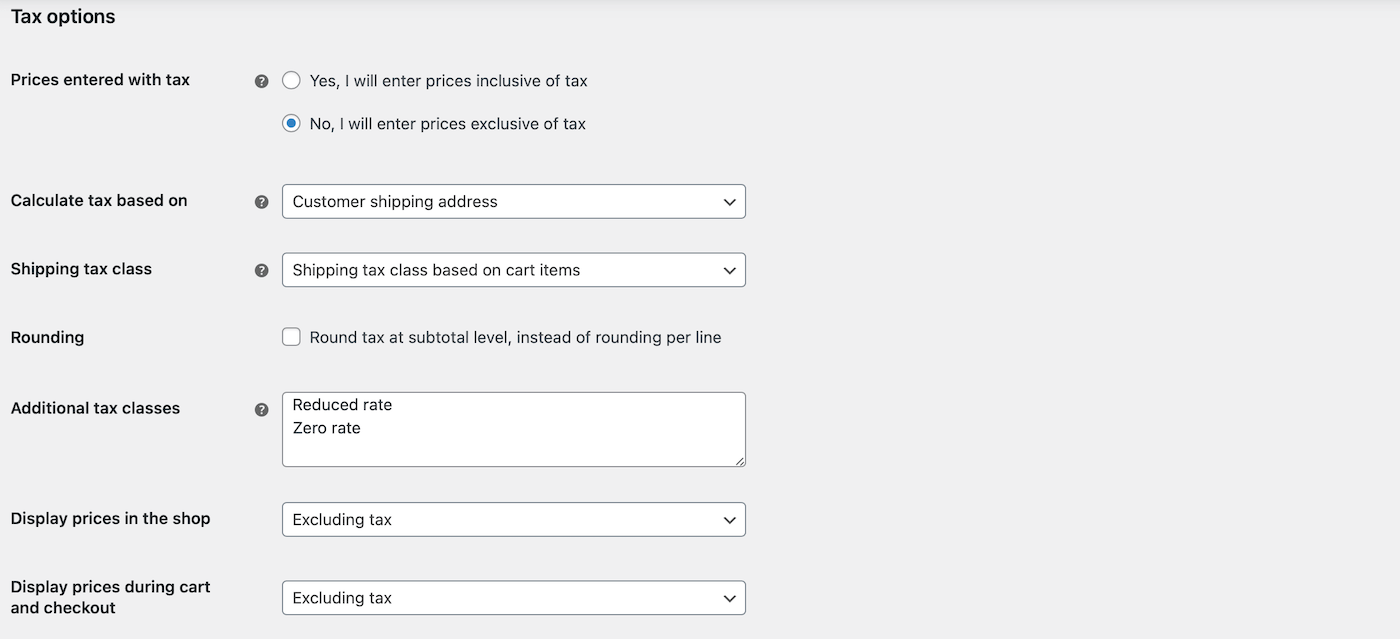
Here, you can let the platform know if the prices you enter for your products will include taxes or not. In the latter case, you can have WooCommerce calculate tax rates for you based on your store’s address, the customer’s shipping address, or the customer’s billing address.
You’ll also be able to configure how taxes will apply to shipping costs and even determine whether they’ll be rounded. Then, you can customize the way prices and taxes are displayed on the front end and during the checkout process.
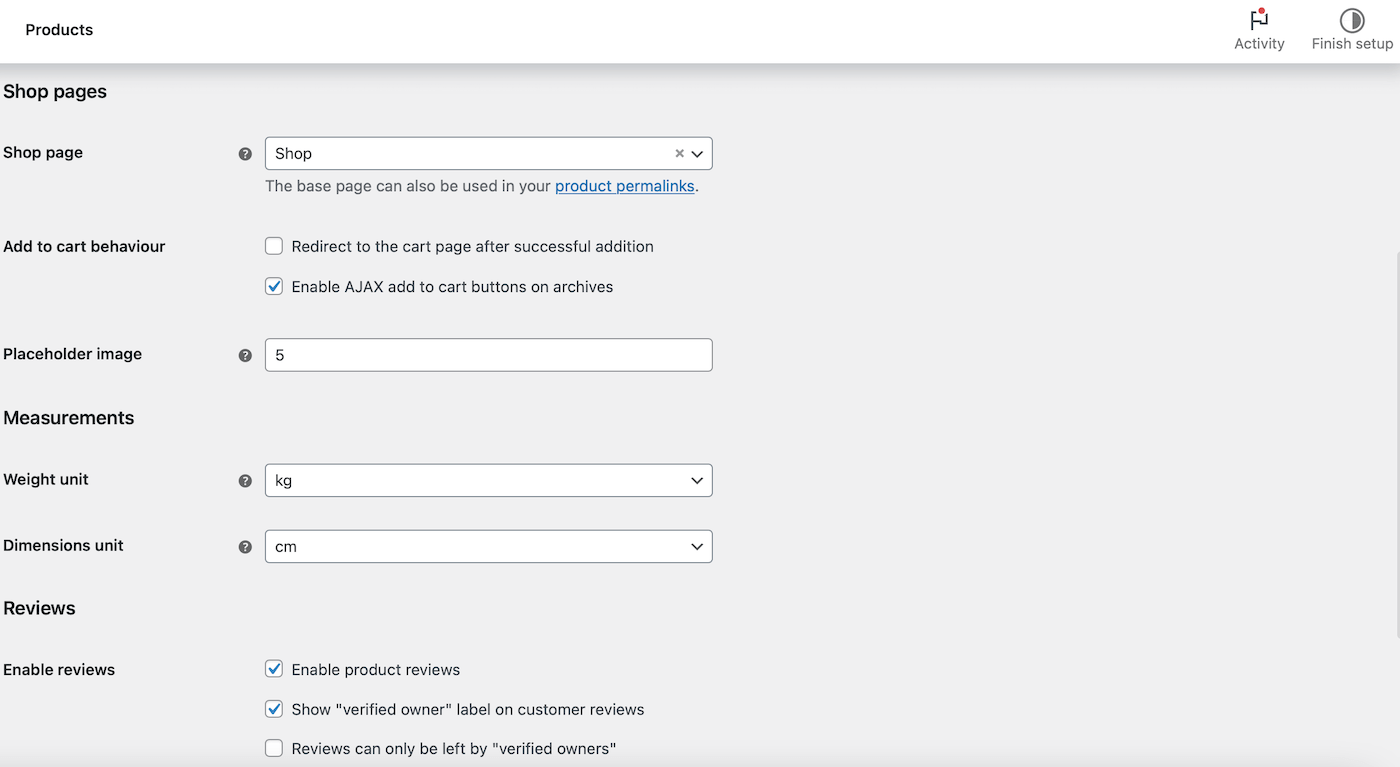
Your product data, including measurements, reviews, stock details, download methods, and even add-to-cart buttons, can be customized in the Products tab:
Shipping is where you can configure your shipping zones and pricing:
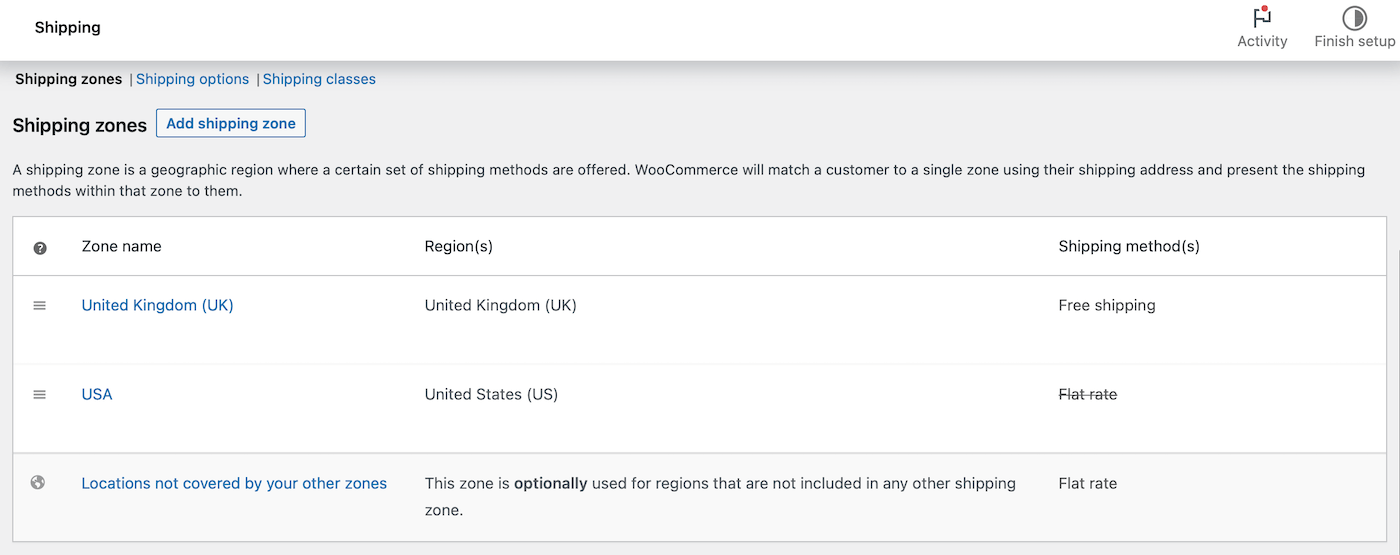
You can also customize how shipping is calculated and choose what the default shipping destination will be. Restricting your store availability only to specific countries is also possible.
The Payments tab shows you what payment processors are available and active on your store:
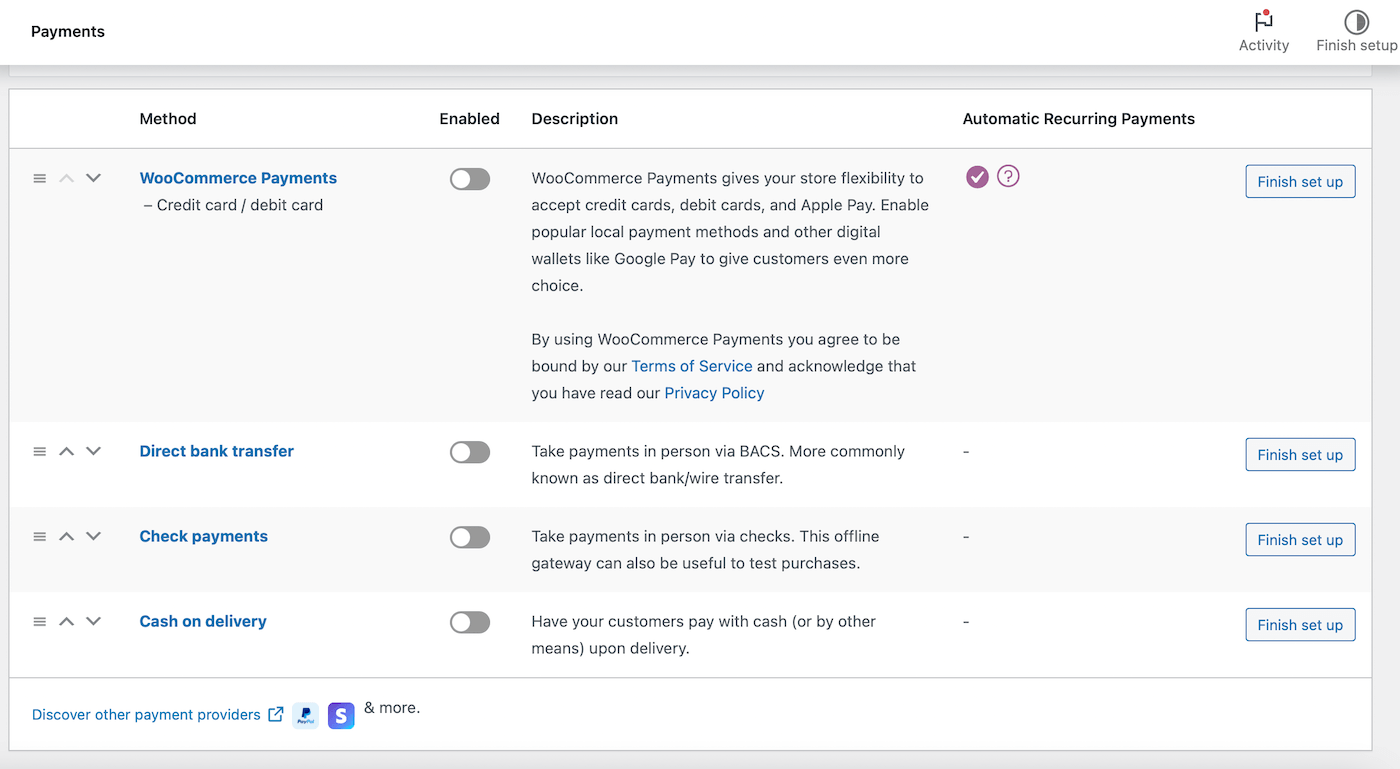
Here, you can enable and disable whatever payment options you like. Plus, you’ll find handy links for customizing the settings for specific processors.
Managing Accounts
The Accounts & Privacy tab is super important since it controls various aspects of your customer’s experience:
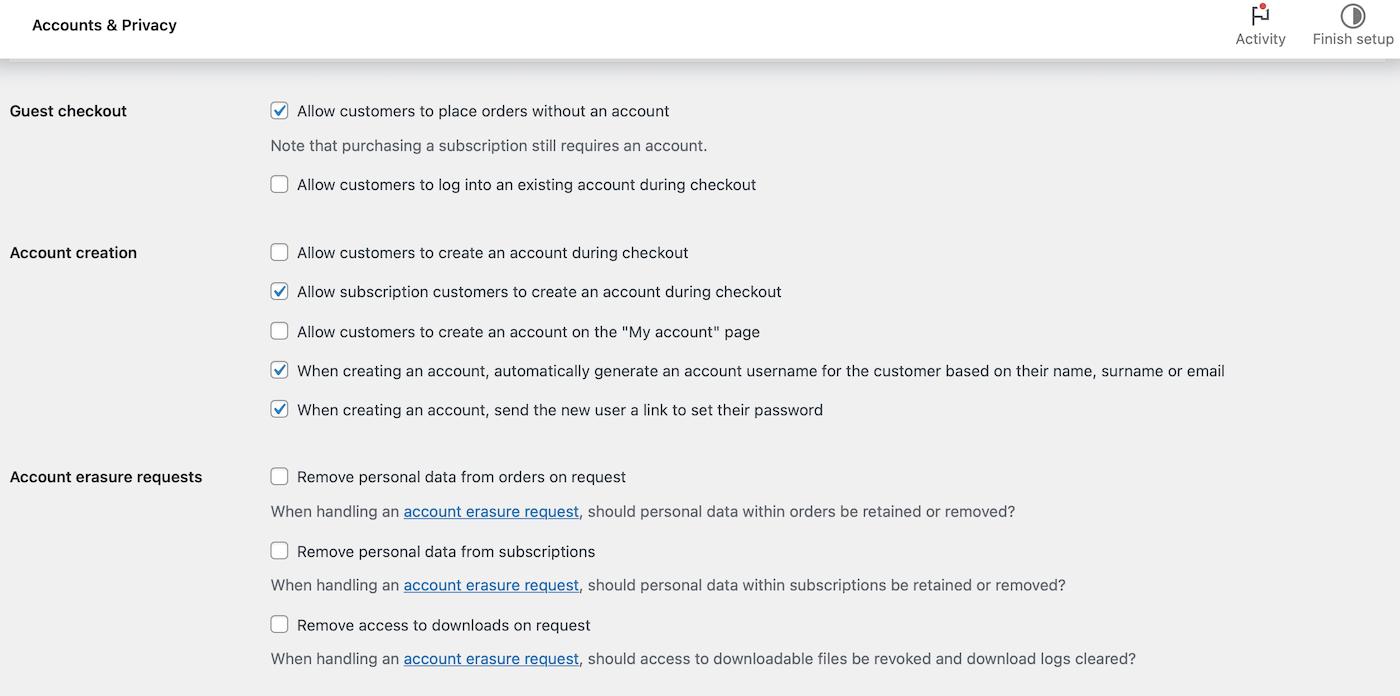
You can set up a privacy and checkout policy, configure how customer data will be stored and retained, and more.
In addition, you have various options for how customer checkouts will be handled. Under the Guest checkout and Account creation sections, you can determine whether visitors will be able to place orders as guests (i.e., without logging into an account).
Then, you can decide if they’ll have the option to log into and/or create a new account during the checkout process. You’re even able to provide them with automatically generated usernames and passwords in order to speed up the registration process.
Additional Settings
While we’ve covered some of the main settings in the previous section, there are some extra options that you can configure for your online store. First up, in the Emails tab, you can customize all things customer support:
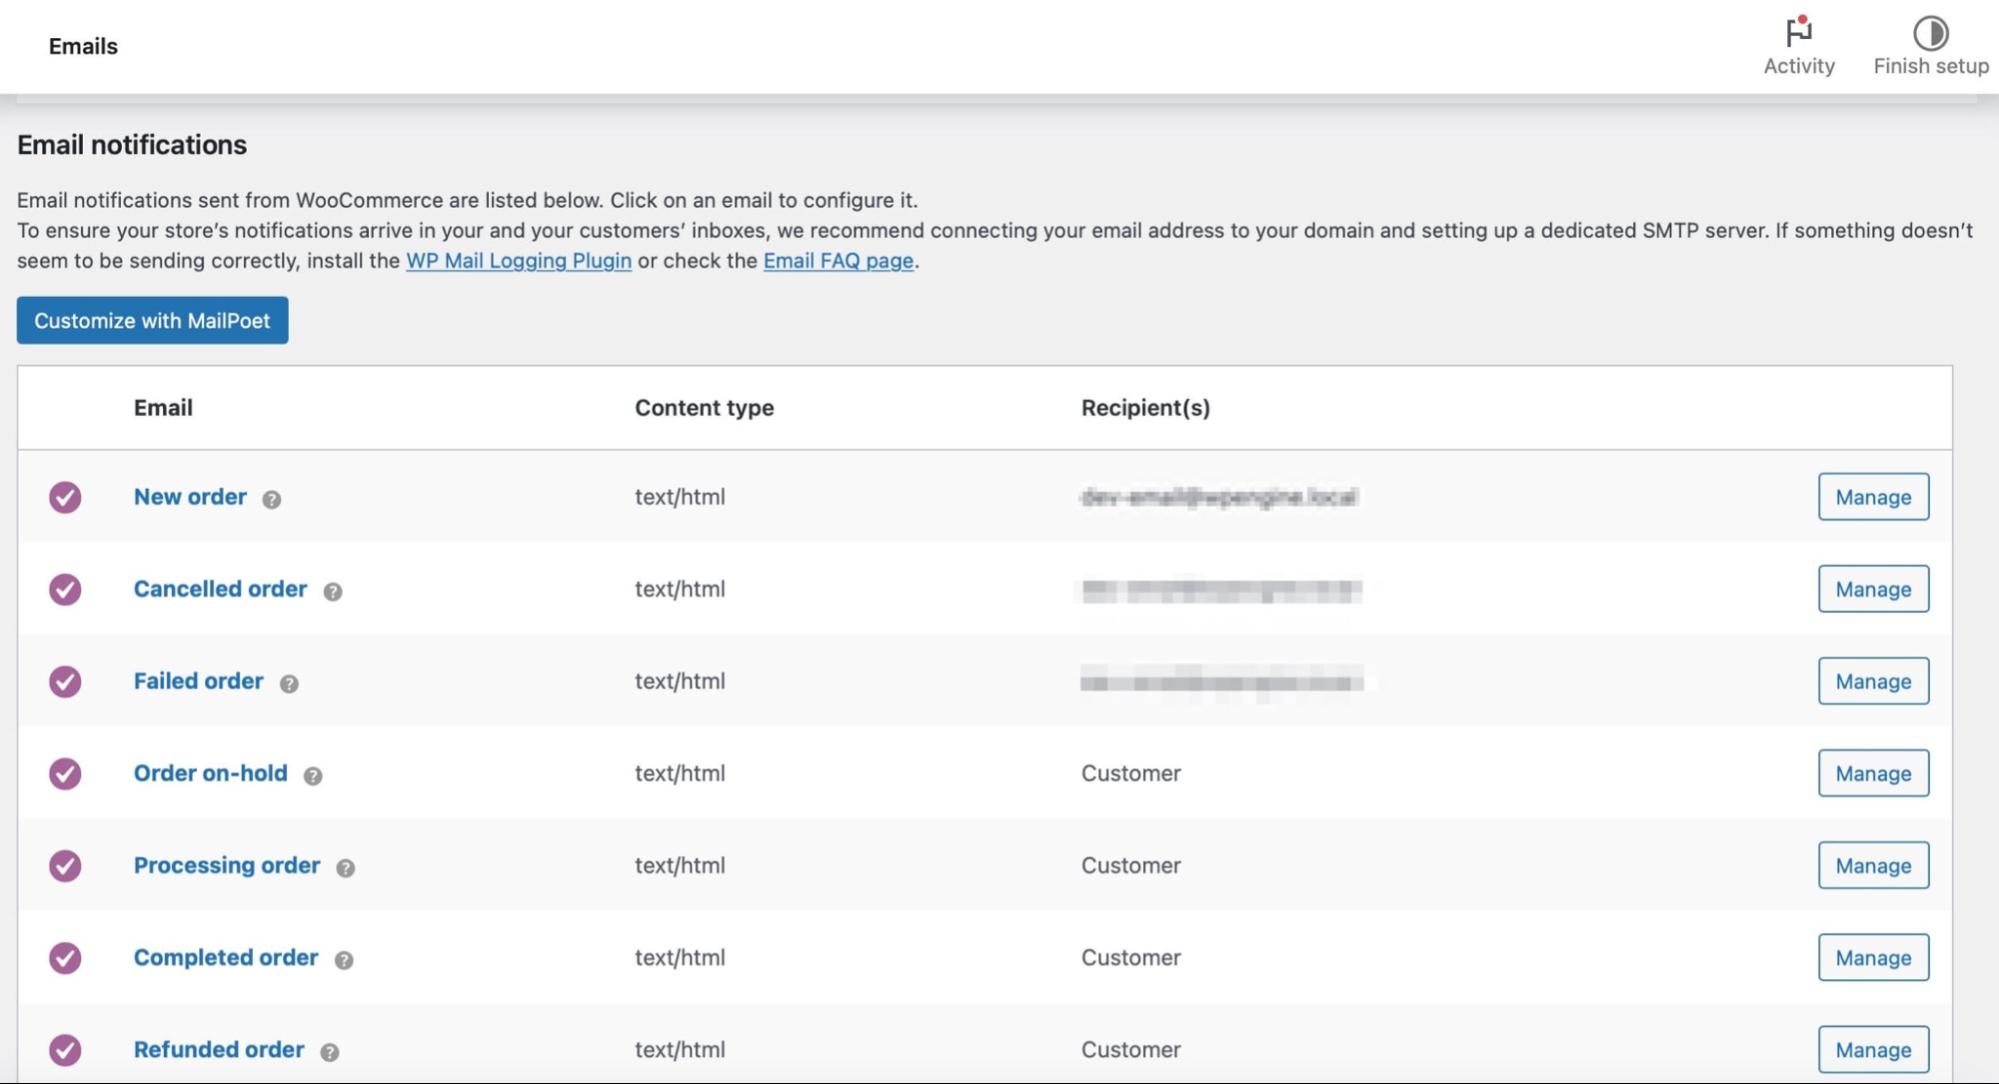
At the top of this screen, you’ll find a list of email notifications that are sent through WooCommerce in response to specific triggers (such as an order being placed or canceled). You can click on any of these emails to enable/disable them, as well as to customize their contents:

You’ll even find instructions here for editing the email templates, if you’re comfortable using HTML. You can copy the email’s file to your theme folder and then make whatever changes you like. Alternatively, you can create your own custom email templates.
Below that, you can configure a few global settings for all the emails sent from your WooCommerce store. This includes the ‘from’ name and address, footer text, and even colors and backgrounds.
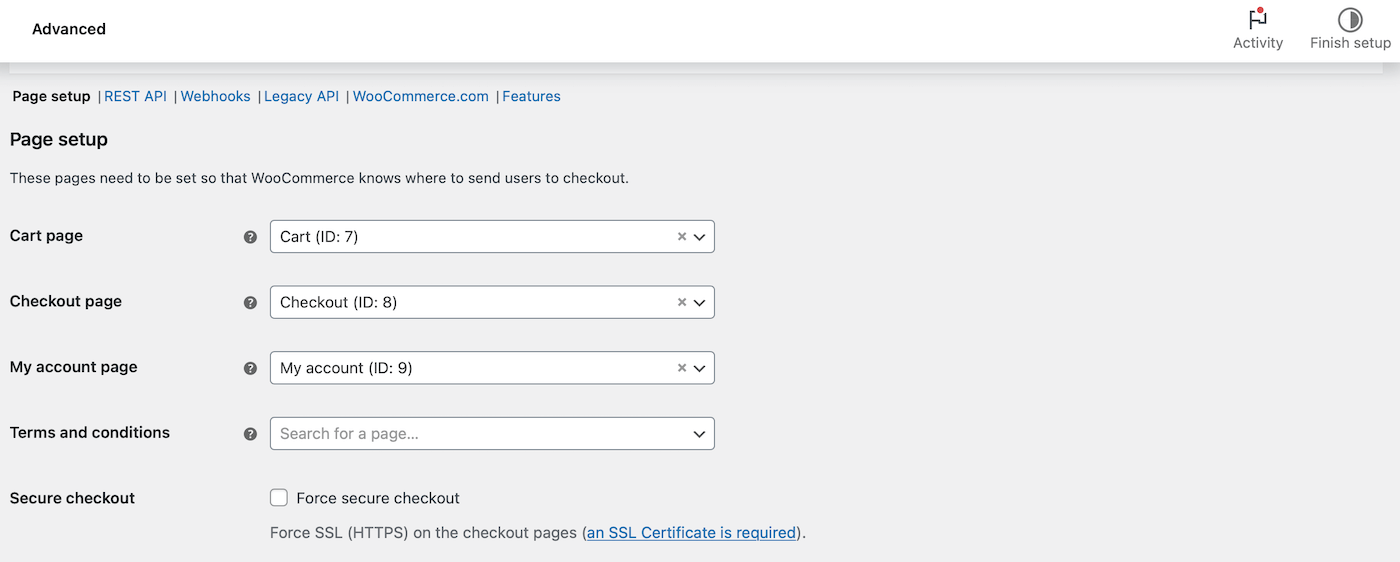
Switch over to the Integration tab, where you can utilize MaxMind to conduct geolocation lookups. Besides that, you’ll find the Advanced tab where you can enable the REST API, configure keys, apps, and webhooks, and perform other lower-level tasks:
There’s also a Multi-currency tab where you’re able to accept payments in multiple currencies. Lastly, you’ll find the Subscriptions tab:
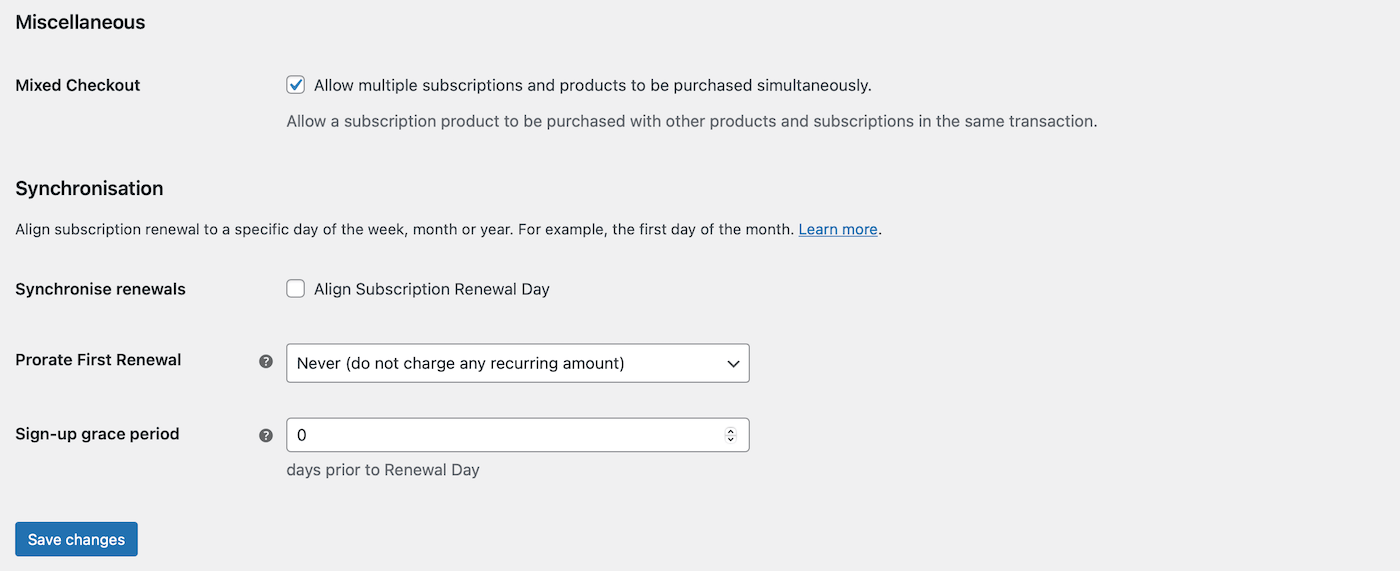
Here, you can let customers purchase subscriptions and products together. You can also synchronize renewals to take place on a specific day and determine a signup grace period. Keep in mind that all these settings can be customized and changed whenever you like, and your store will be updated automatically.
Status
Next, let’s briefly check out the Status tab:
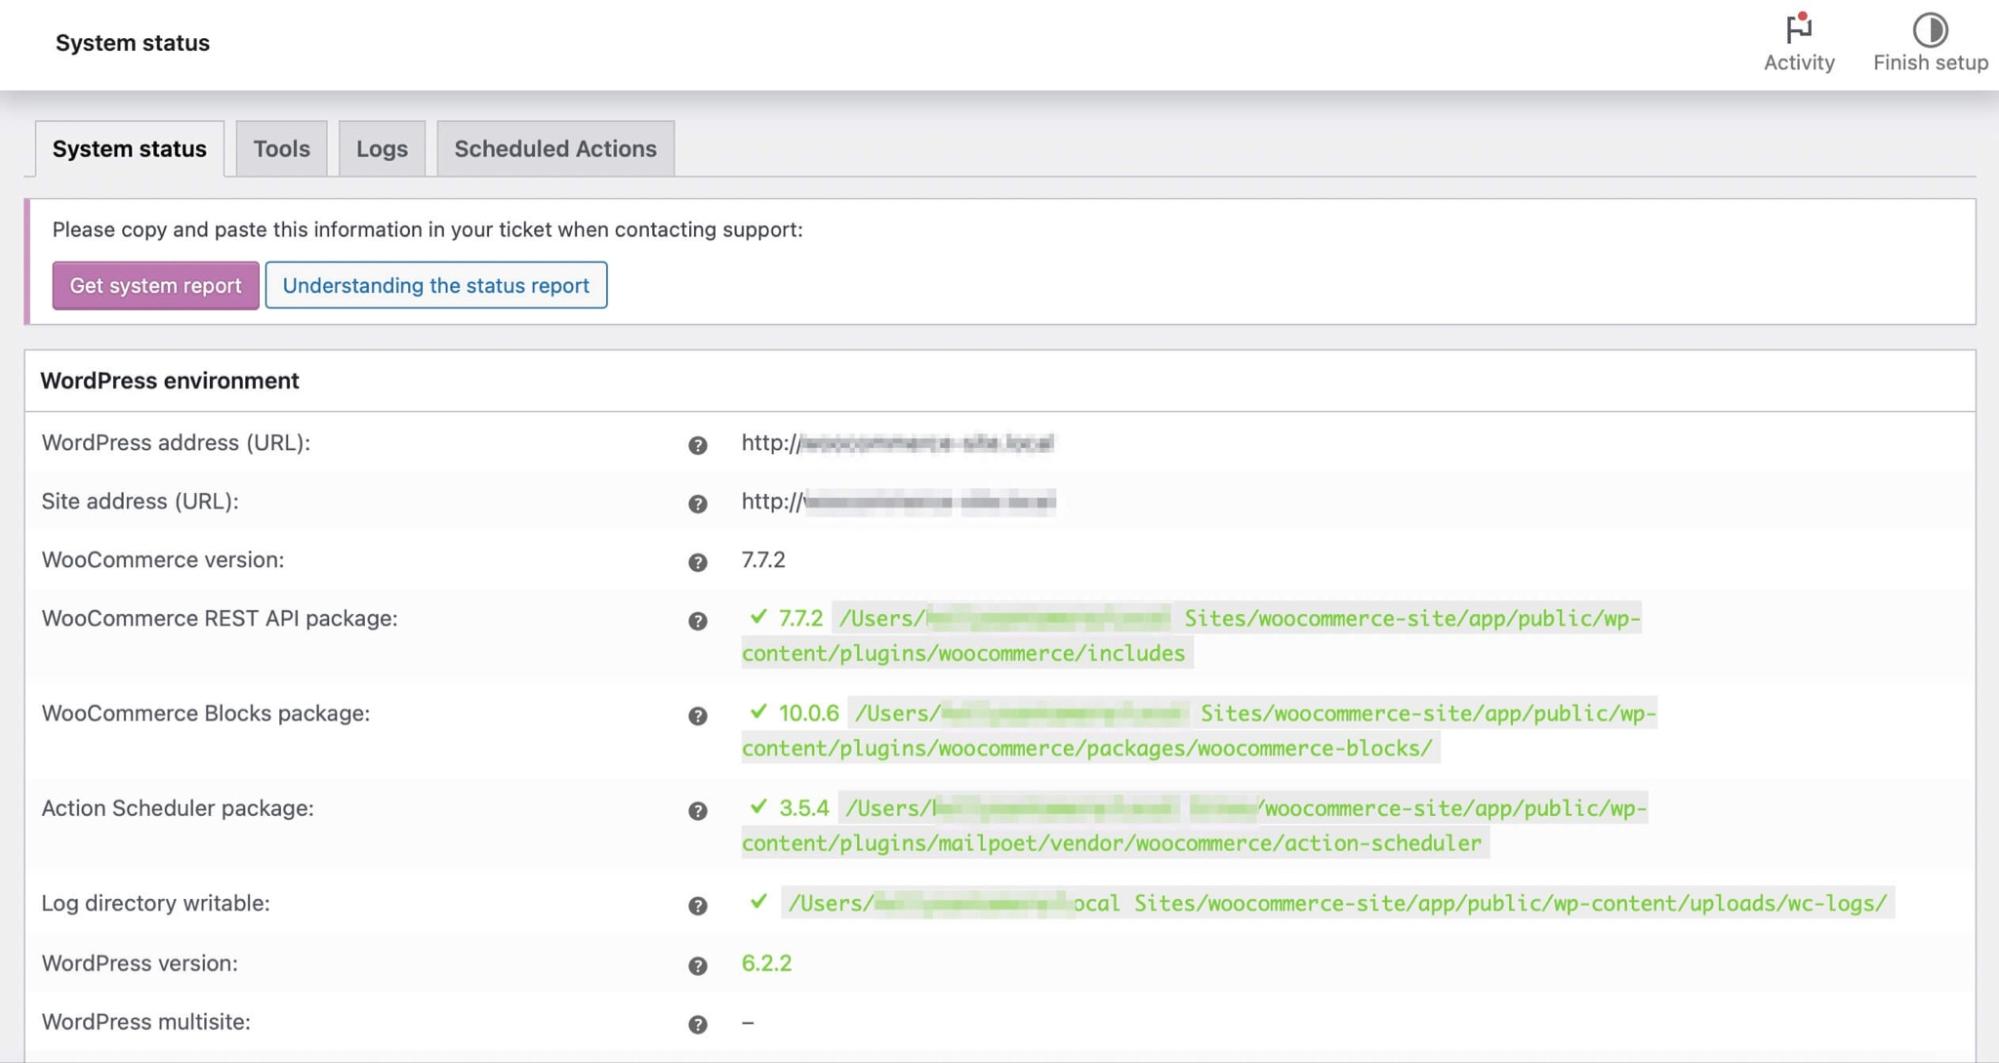
All of your backend information can be found here, such as your WooCommerce/PHP/MySQL/etc. version, size limits, logging, and more. In the Tools sub-tab on the same page, you can clear your website’s caches for multiple variables, clear out old data, and even revert your store’s settings to their defaults.
Extensions
One of the attributes that make WordPress the most popular Content Management System (CMS) on the planet is the community behind it. There are thousands of themes and tens of thousands of plugins you can use to customize your website. What’s more, nearly 100% of them are user-contributed.
This also applies to WooCommerce, although on a smaller scale. You can find lots of tools for expanding your store, adding new options and features, and customizing its look in the Extensions tab and elsewhere:
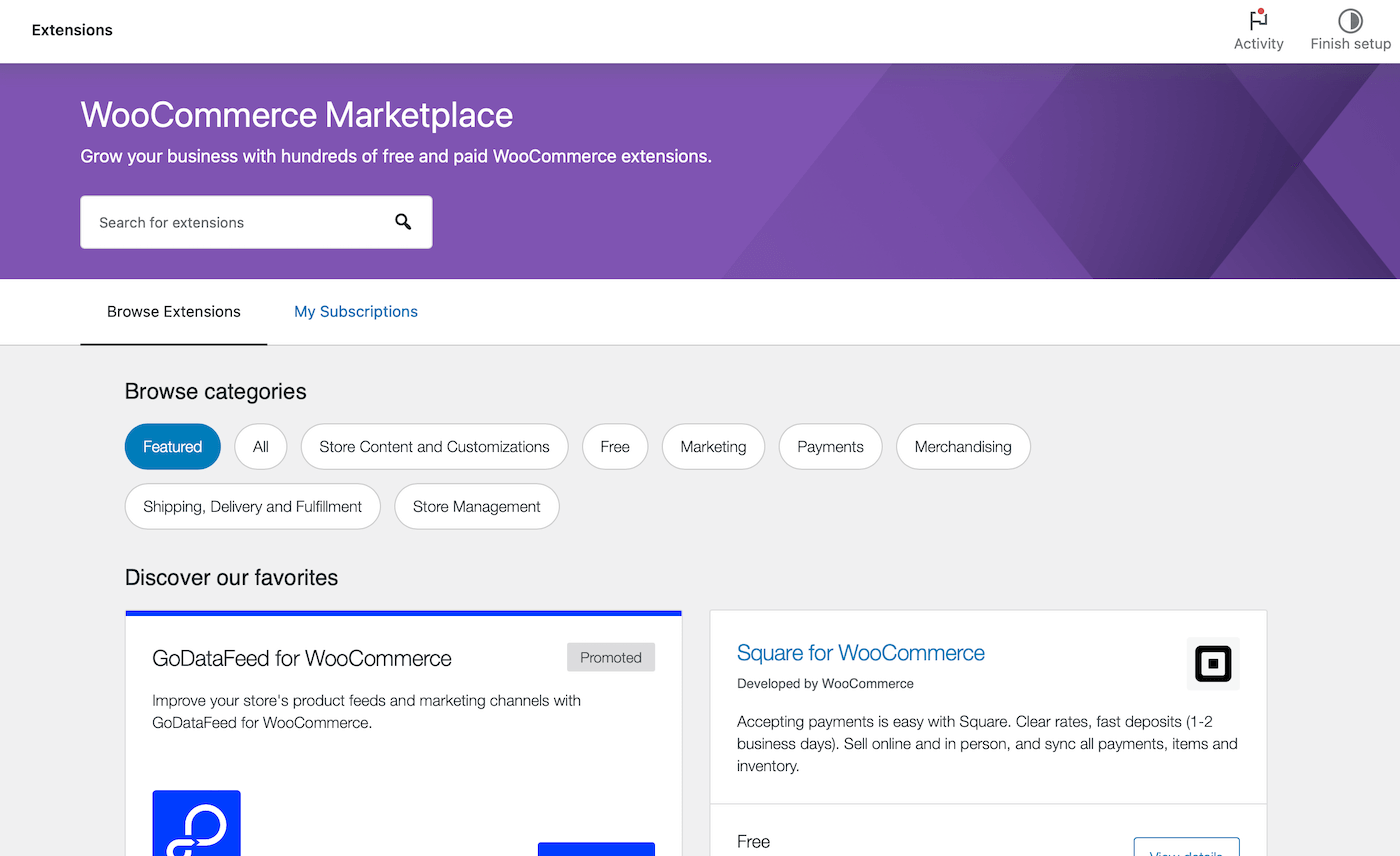
You can view some of the most popular extensions in the Discover our favorites section, or if you have a particular extension in mind, use the search box to find it.
There are extensions for adding new shipping options to your store, enabling subscriptions, customizing the checkout process, integrating email and social media marketing, and much more. You can also find free and paid extensions that let you offer additional payment processors to your customers, such as Square and Amazon Pay.
Themes
You can also pick a theme for your site that’s designed specifically for the WooCommerce plugin. To add a new theme, head over to Appearance > Themes in your WordPress dashboard.
Then, click on Add New. Here, type “woocommerce” into the search bar to browse for WooCommerce themes. Storefront is a great place to start:
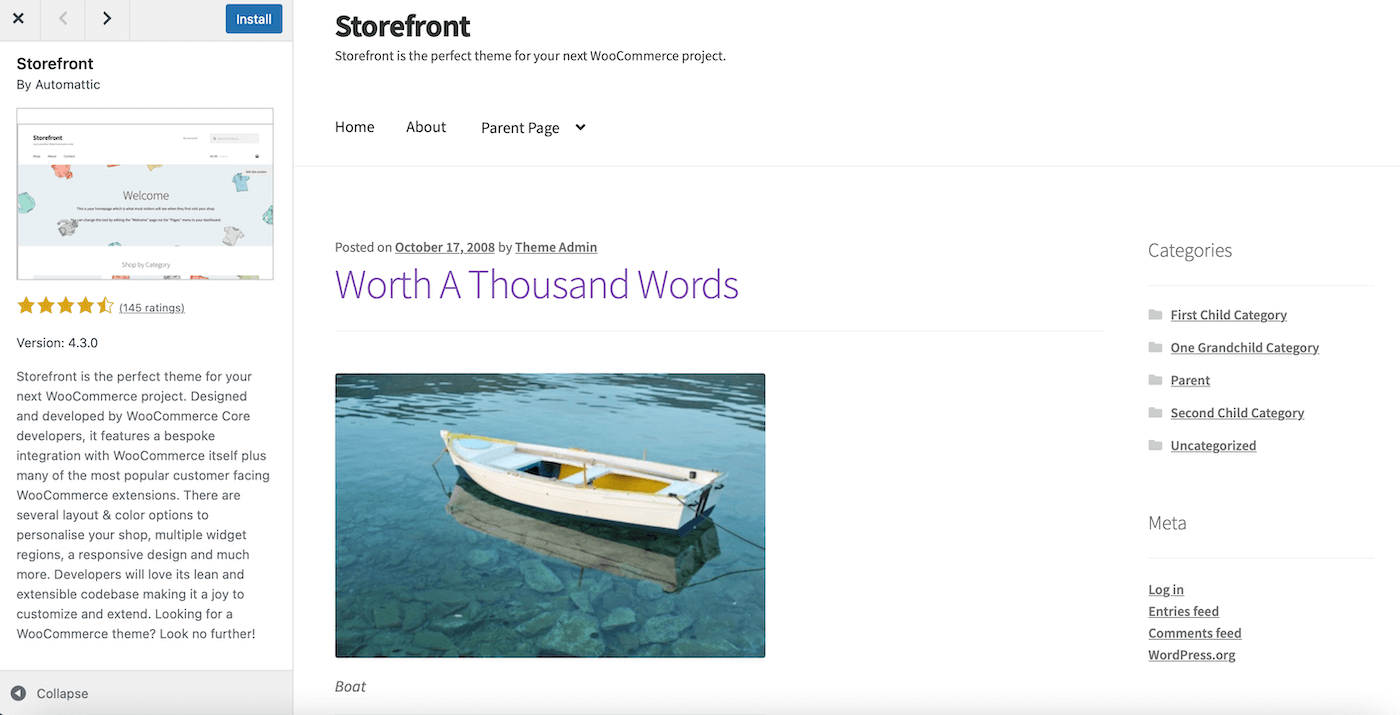
But there are plenty of other options in directories, such as ThemeForest.
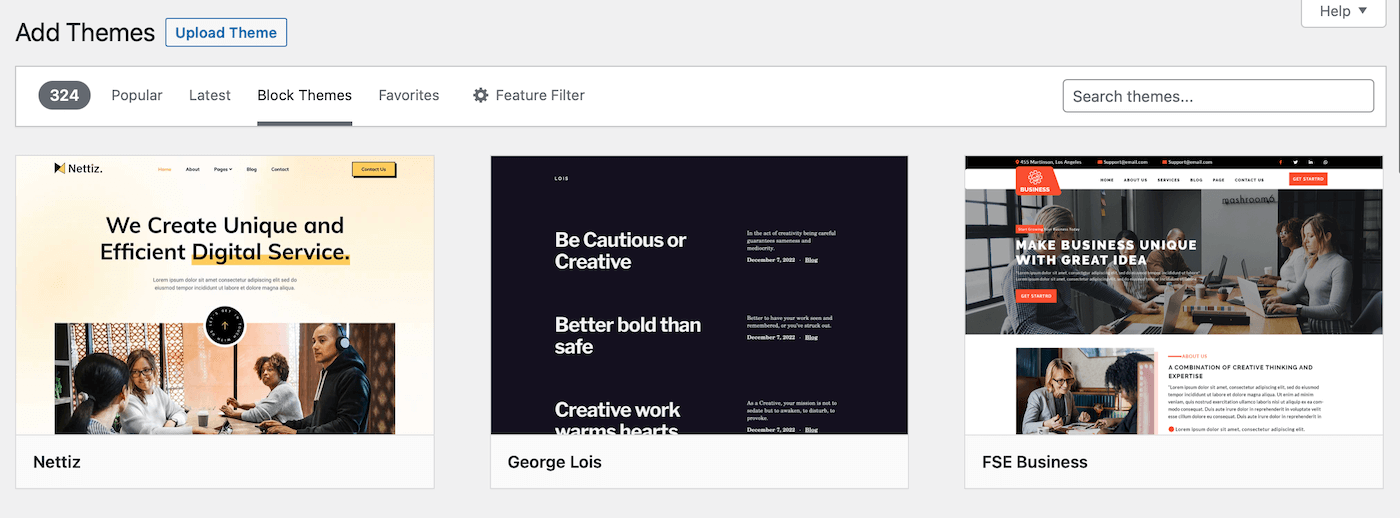
With the introduction of the Full Site Editor (FSE), you might also prefer to get started with a WooCommerce block theme. These templates are made entirely from blocks, so they enable more flexibility when it comes to customizing your website. For example, you can edit template parts like headers and footers, giving you almost total control over the look and feel of your website.
To browse for block themes, simply select the Block Themes tab from the list of options to filter the results:
If you run a clothing store, Blockette is an excellent option:

It includes custom templates for your shop pages and features global style variations for quick editing. To install the theme, just click on the Install button. Then, select Activate.
Plugins
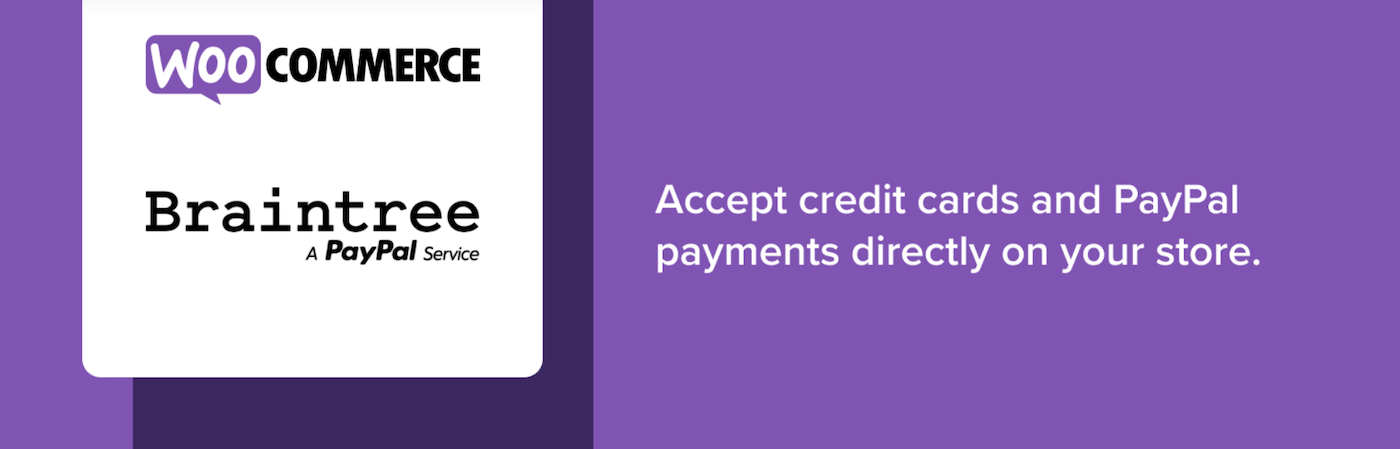
There are also plenty of plugins designed to extend Woocommerce in a variety of ways. Just to give one example, the Braintree For WooCommerce plugin enables you to accept all kinds of payments on your store:
But you can also find plugins that improve your site’s Search Engine Optimization (SEO) or caching plugins to improve your loading times. In other words, if you want to tweak something about the way your WooCommerce store works, chances are you can do so by simply finding the right tool.
Blocks
WordPress gives you access to tons of blocks to design your pages, like images, paragraph text, buttons, and more. However, once you’ve installed WooCommerce, you can access plenty of extra blocks to power up your online store.
To view your new blocks, open a post or page from your dashboard by going to Pages > Add New. Then, click on the + icon to start adding blocks to the editor.
Here, search for “woocommerce:”
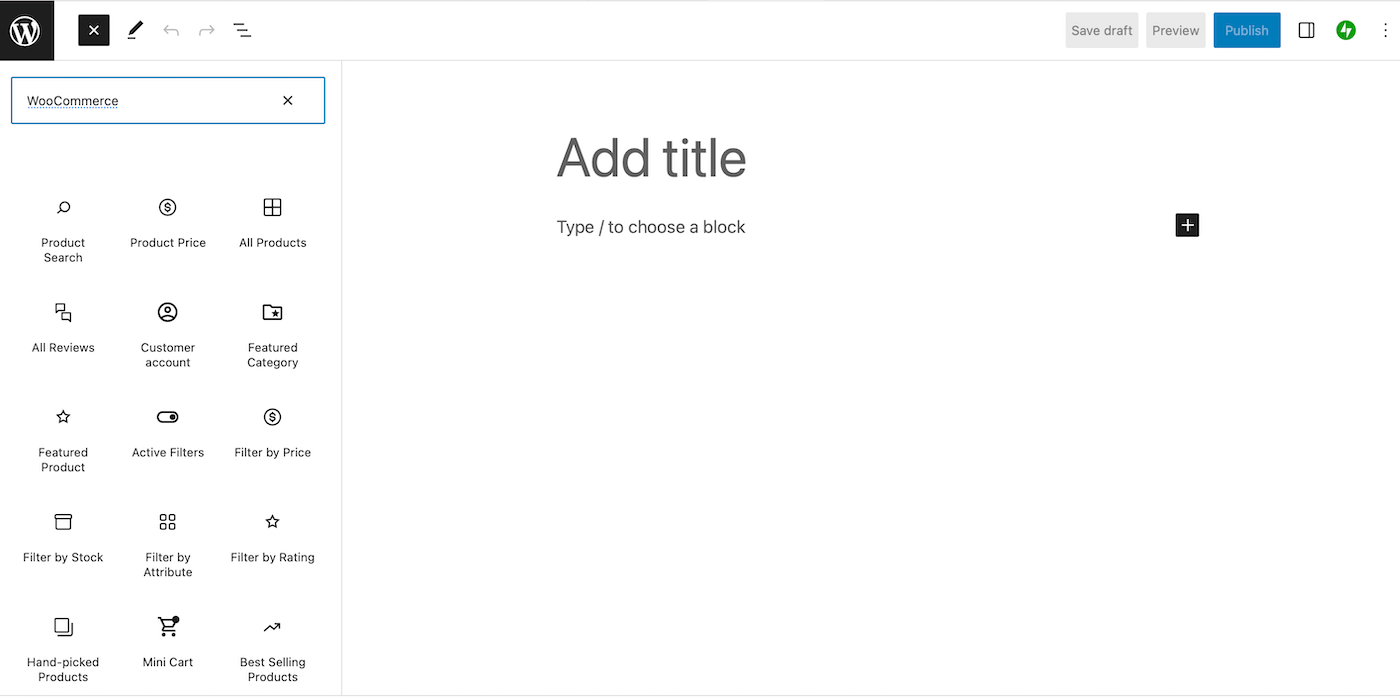
As you can see, there are plenty of useful ecommerce features here. For example, you can add product searches to help shoppers find your products more easily.
Additionally, you might include a featured product block to highlight a new item or a product that’s currently on sale. You’ll also find a cart block, which is super handy. Plus, you can add filters to your pages, enabling shoppers to search for products based on stock, price, or rating.
If you lack design skills, you can scroll further down to access numerous WooCommerce block patterns:
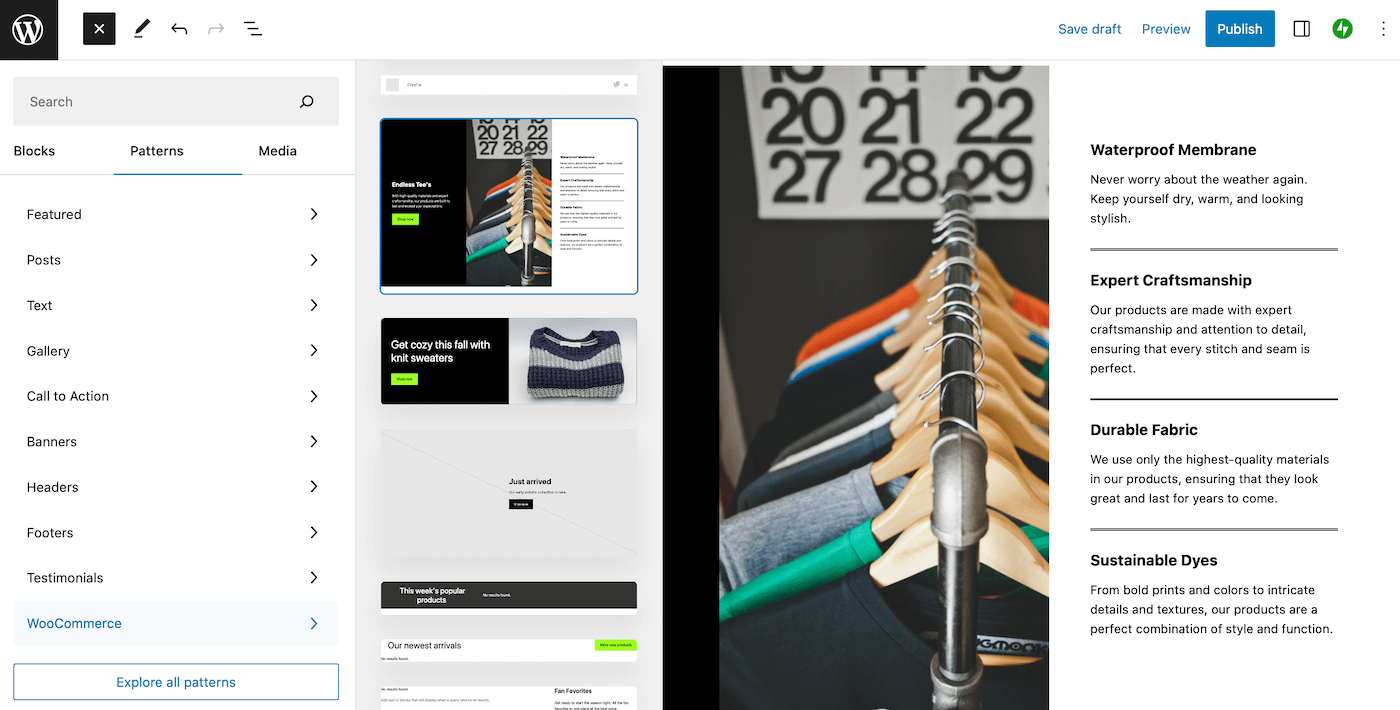
This way, you can add pre-built sections to your website, including a “Just Arrived” hero section, a footer with space for your menu, and a three-column product row.
WooCommerce Headless Configuration
If you want to separate the front and back ends of your WooCommerce website, you can build a headless WooCommerce website. This framework connects the WooCommerce back end of your site to a custom front end via the WooCommerce REST API.
You might prefer this option if you want to create a static website. Or, it can be a great way to improve your website performance and security and gain more customizability. For example, with the default WooCommerce installation, you might end up with a bunch of features you don’t need, which can slow your site down.
Here are some situations when it makes sense to opt for using WooCommerce with a headless configuration:
- You want to set up multiple WooCommerce sites that share the same back end.
- You want to connect your back end to a mobile app in addition to your website.
- You want to customize your store beyond the basic functionality, themes, and plugins.
- You want to speed up your loading times.
- You want to tighten security on your site by making your admin panel harder for hackers to locate.
The easiest way to set up a headless WooCommerce website is to use a development tool like DevKinsta:
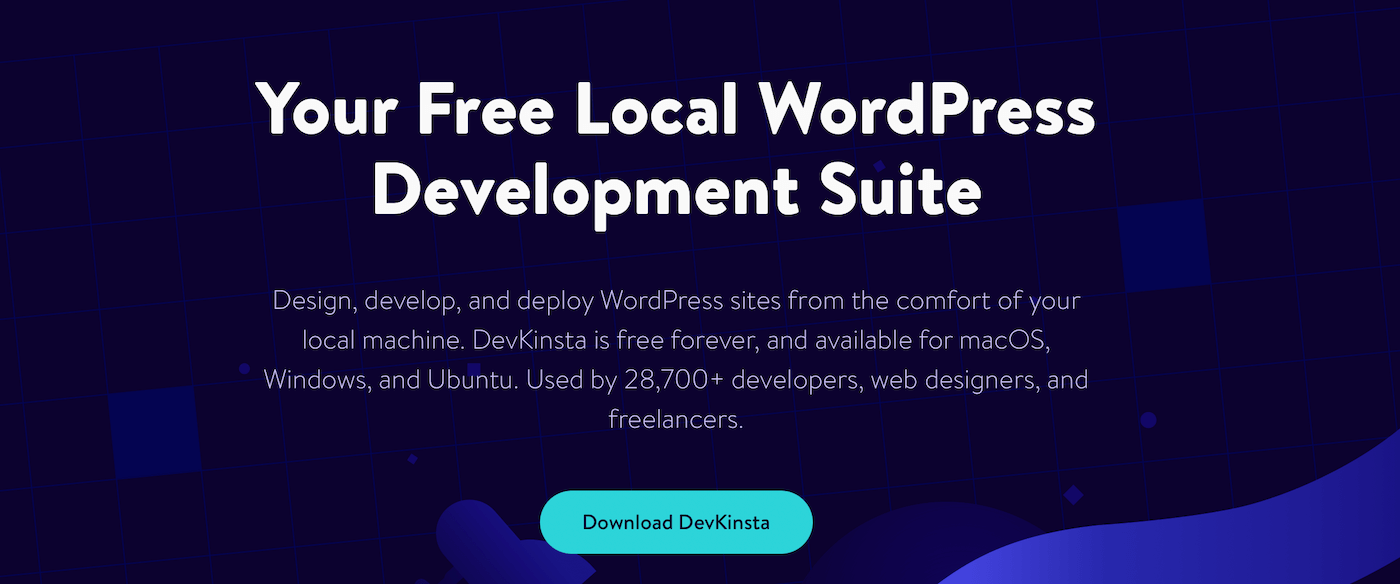
This way, you can create, manage, and deploy sites powered by your local machine. This is a totally free tool, suitable for single or Multisite WordPress. Plus, you can access tons of local database and email management tools. Better yet, you can push your changes live with just one click.
Editing WooCommerce Templates
Between the WooCommerce built-in settings and the many extensions and plugins available for it, you have a lot of flexibility over how your shop works. However, if you’re a more advanced user and want to perform your own customizations, a good place to start is by editing WooCommerce’s template files.
This will enable you to tweak the way key features work, such as the customer carts and checkout process. Please note that this is a risky process, especially if you’re new to working with theme and plugin files directly. So, before getting started, you’ll want to back up your site just in case of any accidental changes. Here’s how to safely delete a theme.
Then, you’ll need to access your site using a Secure File Transfer Protocol (SFTP) client such as FileZilla. Locate your site’s root folder (often either called public_html or named after your domain):
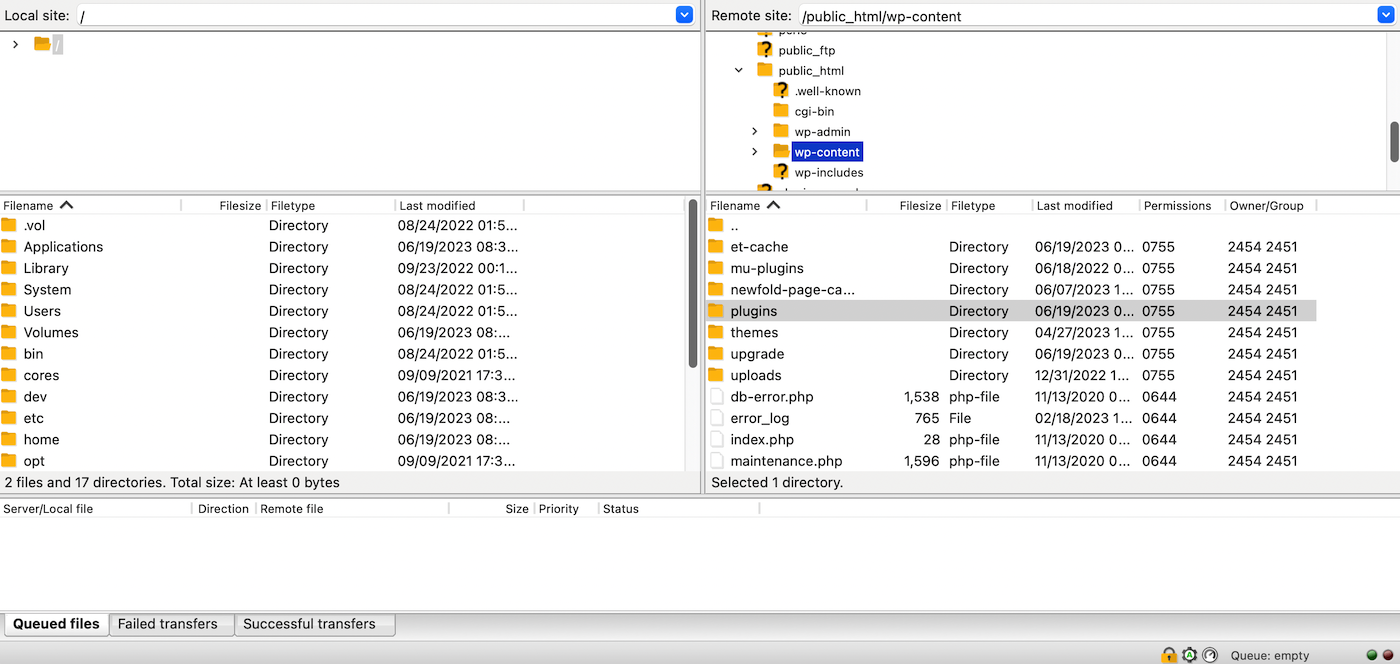
Then, navigate to wp_content/plugins/woocommerce. In this directory, you’ll find a folder called templates. Open it up, and you’ll see a list of all the templates that are currently active for your store.
At this point, you can open up any template you like and start making changes. For instance, if you want to make alterations to the ‘Thank You’ page that appears after a customer has placed an order, you can open up the checkout folder and locate the thankyou.php file. Then you can download it, edit or add elements as you see fit, and re-upload it to your server.
High-Performance Order Storage (HPOS)
In the latter half of 2023, WooCommerce will release an update, making the switch to High-Performance Order Storage (HPOS). This will enable a faster checkout experience for your customers and implement a faster ordering process.
So, if you set up your WooCommerce store after August 2023, your WooCommerce store will automatically launch with HPOS. Until this feature becomes mandatory, all existing WooCommerce stores have the option to enable HPOS, but you can also continue without it for the time being.
Currently, your store’s orders use the same database technology that stores WordPress posts. However, HPOS will move order information into a new commerce-first storage system. This will upgrade your store to a modern, scalable database.
If you have an existing store using WooCommerce 7.1 or later, you can try out HPOS whenever you like. You’ll find it as an opt-in feature within your advanced settings.
It’s important to note, however, that currently, not all extensions are compatible with the new HPOS system. Therefore, you should check out all the relevant documentation before enabling the feature in your store.
WooCommerce Hosting
When you run an online store, time is literally money. This is why it’s important to have a fast and reliable WordPress host in order to ensure longer uptime, higher conversion rates, and a better Return on Investment (ROI).
WooCommerce has been known to slow down WordPress sites, especially for large stores with lots of products. Fortunately, with Kinsta as your hosting provider, you won’t need to worry about this. We provide managed hosting services, along with highly optimized WooCommerce hosting designed specifically with performance in mind.
Thanks to our scalable infrastructure, as well as the latest technology, such as PHP 8x, Nginx, and MariaDB, we can ensure a move to Kinsta will help to increase your sales.

Brian has a huge passion for WordPress, has been using it for over a decade, and even develops a couple of premium plugins. Brian enjoys blogging, movies, and hiking. Connect with Brian on Twitter.

