
As application development evolves, databases stand as the core of most applications, storing and managing data crucial to digital businesses. As this data grows and becomes more complex, ensuring your database’s efficiency is vital to meet your app’s needs.
That’s where the idea of database maintenance comes into play. Database maintenance involves tasks such as cleaning, backups, and optimizing indices to boost performance.
This article offers valuable insights into maintenance triggers and presents practical setup instructions. It explains the process of implementing various database maintenance tasks such as backing up data, rebuilding indices, archiving, and data cleanup using PostgreSQL, integrated with an API trigger in a Node.js application.
Understanding Triggers
Before building maintenance operations for your database, it is important to understand the various ways they can be triggered. Each trigger serves distinct purposes in facilitating maintenance tasks. The three primary triggers commonly used are:
- Manual, API-based: This trigger enables you to run one-off operations using an API call. It is useful in situations like restoring a database backup or rebuilding indices when performance suddenly drops.
- Schedule (like CRON): This trigger enables you to automate scheduled maintenance activities during periods of low user traffic. It’s ideal for running resource-intensive operations like archiving and cleanup. You can use packages like node-schedule to set up schedules in Node.js that trigger the operations automatically when needed.
- Database Notifications: This trigger enables you to perform maintenance operations in response to database changes. For instance, when a user posts a comment on a platform, saved data can instantly trigger checks for irregular characters, offensive language, or emojis. Implementing this functionality in Node.js is achievable using packages such as pg-listen.
Prerequisites
To follow along with this guide, you should have the following tools on your local computer:
- Git: To manage version control for your app’s source code
- Node.js: To build your backend app
- psql: To interact with your remote PostgreSQL database using your terminal
- PGAdmin (Optional): To interact with your remote PostgreSQL database using a Graphical User Interface (GUI).
Creating and Hosting a Node.js App
Let’s set up a Node.js project, commit it to GitHub, and set up an auto-deploy pipeline to Kinsta. You need to also provision a PostgreSQL database on Kinsta to test your maintenance routines on it.
Start by creating a new directory on your local system using the following command:
mkdir node-db-maintenanceThen, change into the newly created folder and run the following command to create a new project:
cd node-db-maintenance
yarn init -y # or npm init -y
This initializes a Node.js project for you with the default configuration. You can now install the necessary dependencies by running the following command:
yarn add express pg nodemon dotenvHere’s a quick description of each package:
express: allows you to set up an Express-based REST API.pg: allows you to interact with a PostgreSQL database through your Node.js application.nodemon: allows your dev build to be updated as you develop your application, freeing you from the constant need to stop and start your app every time you make a change.dotenv: allows you to load environment variables from a .env file into yourprocess.envobject.
Next, add the following scripts in your package.json file so you can start your dev server easily and run your server on production as well:
{
    // ...
    "scripts": {
      "start-dev": "nodemon index.js",
      "start": "NODE_ENV=production node index.js"
  },
  // …
}
You can now create an index.js file which contains your app’s source code. Paste the following code into the file:
const express = require("express")
const dotenv = require('dotenv');

if (process.env.NODE_ENV !== 'production') dotenv.config();
const app = express()
const port = process.env.PORT || 3000

app.get("/health", (req, res) => res.json({status: "UP"}))

app.listen(port, () => {
    console.log(`Server running at port: ${port}`);
});
This code above initializes an Express server and configures environment variables using the dotenv package if not in production mode. It also sets up a /health route that returns a JSON object {status: "UP"}. Finally, it starts the app using the app.listen() function to listen on the specified port, defaulting to 3000 if no port is provided via the environment variable.
Now that you have a basic app ready initialize a new git repository with your preferred git provider (BitBucket, GitHub, or GitLab) and push your code. Kinsta supports deploying applications from all these git providers. For this article, let’s use GitHub.
When your repository is ready, follow these steps to deploy your application to Kinsta:
- Log in to or create an account to view your MyKinsta dashboard.
- Authorize Kinsta with your Git provider.
- On the left sidebar, click Applications and then click Add application.
- Select the repository and the branch you wish to deploy from.
- Select one of the available data center locations from the list of 29 options. Kinsta automatically detects the build settings for your applications through Nixpacks.
- Choose your application resources, such as RAM, and disk space.
- Click Create application.
Once the deployment is complete, copy the deployed app’s link and navigate to /health. You should see the following JSON in your browser:
{status: "UP"}This indicates that the application has been set up correctly.
Setting Up a PostgreSQL Instance on Kinsta
Kinsta provides an easy interface to provision database instances. Start by creating a new Kinsta account if you don’t have one already. Then, follow the steps below:
- Log in to your MyKinsta dashboard.
- On the left sidebar, click Databases and then click Add database.
- Select PostgreSQL as the Database type and choose your preferred version. Choose a name for your database and modify the username and password if you wish.
- Select a data center location from the list of 29 options.
- Choose your database size.
- Click Create database.
Once the database is created, make sure to retrieve the database host, port, username, and password.
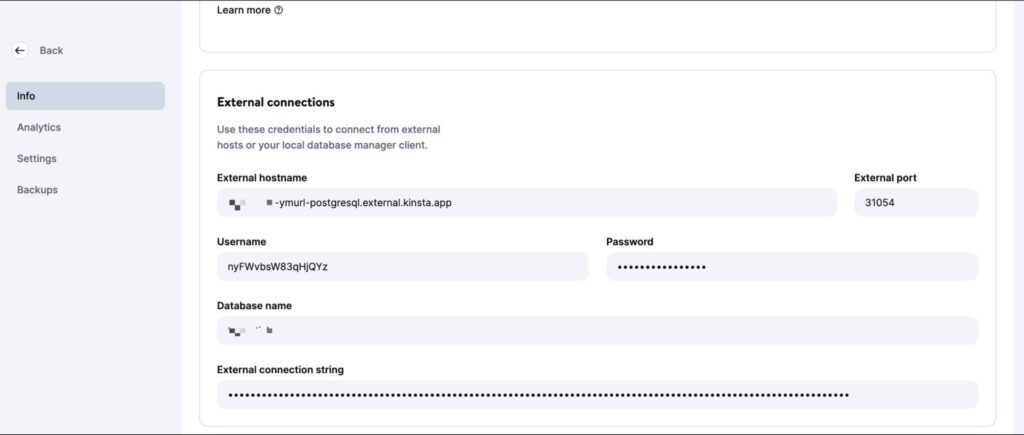
You can then plug these values in your psql CLI (or PGAdmin GUI) to manage the database. To test your code locally, create a .env file in your project’s root directory and store the following secrets in it:
DB_USER_NAME=your database user name
DB_HOST=your database host
DB_DATABASE_NAME=your database’s name
DB_PORT=your database port
PGPASS=your database password
When deploying to Kinsta, you need to add these values as environment variables to your application deployment.
To prepare for database operations, download and execute this SQL script to create tables (users, posts, comments) and insert sample data. Use the command below, replacing placeholders with your specifics, to add the data to your newly created PostgreSQL database:
psql -h <host> -p <port> -U <username> -d <db_name> -a -f <sql file e.g. test-data.sql>Be certain to input the accurate file name and path within the command above. The execution of this command prompts you to enter your database password for authorization.
Once this command completes running, you are ready to start writing operations for your database maintenance. Feel free to push your code to your Git repository when done with each operation to see it in action on the Kinsta platform.
Writing Maintenance Routines
This section explains multiple commonly used operations for maintaining PostgreSQL databases.
1. Creating Backups
Regularly backing up databases is a common and essential operation. It involves creating a copy of the entire database contents, which is stored in a secure location. These backups are crucial for restoring data in case of accidental loss or errors affecting data integrity.
While platforms like Kinsta offer automated backups as part of their services, it is important to know how to set up a custom backup routine if needed.
PostgreSQL offers the tool pg_dump for creating database backups. However, this needs to be run from the command line directly, and there is no npm package for it. So, you need to use the @getvim/execute package to run the pg_dump command on your Node app’s local environment.
Install the package by running the following command:
yarn add @getvim/executeNext, import the package in your index.js file by adding this line of code at the top:
const {execute} = require('@getvim/execute');The backups are generated as files on the local filesystem of your Node app. So, it’s best to create a dedicated directory for them by the name backup in the project’s root directory.
Now, you can use the following route to generate and download backups of your database when needed:
app.get('/backup', async (req, res) => {

    // Create a name for the backup file
    const fileName = "database-backup-" + new Date().valueOf() + ".tar";

    // Execute the pg_dump command to generate the backup file
    execute("PGPASSWORD=" + process.env.PGPASS  + " pg_dump -U " + process.env.DB_USER_NAME
    + " -d " + process.env.DB_DATABASE_NAME
    + " -h " + process.env.DB_HOST
    + " -p " + process.env.DB_PORT
    + " -f backup/" + fileName + " -F t"

).then(async () => {
        console.log("Backup created");
        res.redirect("/backup/" + fileName)
    }).catch(err => {
        console.log(err);
        res.json({message: "Something went wrong"})
    })

})
Also, you need to add the following line at the beginning of your index.js file after the Express app is initialized:
app.use('/backup', express.static('backup'))This allows the backup folder to be served statically using the express.static middleware function, allowing the user to download the generated backup files from the Node app.
2. Restoring From a Backup
Postgres allows restoring from backups using the pg_restore command line tool. However, you have to use it via the execute package similar to how you used the pg_dump command. Here’s the route code:
app.get('/restore', async (req, res) => {

    const dir = 'backup'

    // Sort the backup files according to when they were created
    const files = fs.readdirSync(dir)
        .filter((file) => fs.lstatSync(path.join(dir, file)).isFile())
        .map((file) => ({ file, mtime: fs.lstatSync(path.join(dir, file)).mtime }))
        .sort((a, b) => b.mtime.getTime() - a.mtime.getTime());

    if (!files.length){
        res.json({message: "No backups available to restore from"})
    }

    const fileName = files[0].file

    // Restore the database from the chosen backup file
    execute("PGPASSWORD=" + process.env.PGPASS  + " pg_restore -cC "
    + "-U " + process.env.DB_USER_NAME
    + " -h " + process.env.DB_HOST
    + " -p " + process.env.DB_PORT
    + " -d postgres backup/" + fileName
)

        .then(async ()=> {
            console.log("Restored");
            res.json({message: "Backup restored"})
        }).catch(err=> {
        console.log(err);
        res.json({message: "Something went wrong"})
    })
})
The code snippet above first looks for files stored in the local backup directory. Then, sorts them by the date they were created to find the latest backup file. Finally, uses the execute package to restore the chosen backup file.
Make sure to add the following imports to your index.js file so that the necessary modules for accessing the local filesystem are imported, enabling the function to run correctly:
const fs = require('fs')
const path = require('path')
3. Rebuilding an Index
The indices of Postgres tables sometimes get corrupted, and the performance of the database gets degraded. This can be due to software bugs or errors. Sometimes, indices can also become bloated due to too many empty or nearly empty pages.
In such cases, you need to rebuild the index to make sure you are getting the best performance from your Postgres instance.
Postgres offers the REINDEX command for this purpose. You can use the node-postgres package to run this command (and to run some other operations later as well), so install it by running the following command first:
yarn add pgNext, add the following lines to the top of the index.js file below the imports to initialize the database connection correctly:
const {Client} = require('pg')
const client = new Client({
    user: process.env.DB_USER_NAME,
    host: process.env.DB_HOST,
    database: process.env.DB_DATABASE_NAME,
    password: process.env.PGPASS,
    port: process.env.DB_PORT
})


client.connect(err => {
    if (err) throw err;
    console.log("Connected!")
})
The implementation for this operation is quite straightforward:
app.get("/reindex", async (req, res) => {

    // Run the REINDEX command as needed
    await client.query("REINDEX TABLE Users;")

    res.json({message: "Reindexed table successfully"})
})
The command shown above reindexes the complete Users table. You can customize the command according to your needs to rebuild a particular index or to even reindex the complete database.
4. Data Archiving and Purging
For databases that grow large over time (and historical data is rarely accessed), it might make sense to set up routines that offload the old data into a data lake where it can be stored and processed more conveniently.
Parquet files are a common standard for data storage and transfer in many data lakes. Using the ParquetJS library, you can create parquet files from your Postgres data and use services like AWS Athena to directly read them without needing to load them back into the database in the future.
Install the ParquetJS library by running the following command:
yarn add parquetjsWhen creating archives, you need to query a large number of records from your tables. Storing such a large amount of data in your app’s memory can be resource-intensive, costly, and prone to errors.
Therefore, it makes sense to use cursors to load chunks of data from the database and process them. Install the cursors module of the node-postgres package by running the following command:
yarn add pg-cursorNext, ensure you import both libraries into your index.js file:
const Cursor = require('pg-cursor')
const parquet = require('parquetjs')
Now, you can use the code snippet below to create parquet files from your database:
app.get('/archive', async (req, res) => {

    // Query all comments through a cursor, reading only 10 at a time
    // You can change the query here to meet your requirements, such as archiving records older than at least a month, or only archiving records from inactive users, etc.
    const queryString = "SELECT * FROM COMMENTS;"

    const cursor = client.query(new Cursor(queryString))

    // Define the schema for the parquet file
    let schema = new parquet.ParquetSchema({
        comment_id: { type: 'INT64' },
        post_id: { type: 'INT64' },
        user_id: { type: 'INT64' },
        comment_text: { type: 'UTF8' },
        timestamp: { type: 'TIMESTAMP_MILLIS' }
    });


    // Open a parquet file writer
    let writer = await parquet.ParquetWriter.openFile(schema, 'archive/archive.parquet');

    let rows = await cursor.read(10)

    while (rows.length > 0) {

        for (let i = 0; i < rows.length; i++) {
            // Write each row from table to the parquet file
            await writer.appendRow(rows[i])
        }

        rows = await cursor.read(10)
    }

    await writer.close()

    // Once the parquet file is generated, you can consider deleting the records from the table at this point to free up some space

    // Redirect user to the file path to allow them to download the file
    res.redirect("/archive/archive.parquet")
})
Next, add the following code to the beginning of your index.js file after the Express app is initialized:
app.use('/archive', express.static('archive'))This allows the archive folder to be served statically, allowing you to download the generated parquet files from the server.
Don’t forget to create an archive directory in the project directory to store the archive files.
You can further customize this code snippet to automatically upload the parquet files to an AWS S3 bucket and use CRON jobs to trigger the operation on a routine automatically.
5. Data Cleanup
A common purpose for running database maintenance operations is to clean up data that grows old or irrelevant with time. This section discusses two common cases when data cleanups are done as part of maintenance.
In reality, you can set up your own data cleanup routine as required by your application’s data models. The examples given below are only for reference.
Deleting Records By Age (Last Modified or Last Accessed)
Cleaning up records based on record age is relatively straightforward compared to other operations on this list. You can write a delete query that deletes records that are older than a set date.
Here’s an example of deleting comments made before Oct 9, 2023:
app.get("/clean-by-age", async (req, res) => {

    // Filter and delete all comments that were made on or before 9th October, 2023
    const result = await client.query("DELETE FROM COMMENTS WHERE timestamp < '09-10-2023 00:00:00'")

    if (result.rowCount > 0) {
        res.json({message: "Cleaned up " + result.rowCount + " rows successfully!"})
    } else {
        res.json({message: "Nothing to clean up!"})
    }
})
You can try it out by sending a GET request to the /clean-by-age route.
Deleting Records Based on Custom Conditions
You can also set up cleanups based on the other conditions, such as removing records that aren’t linked to other active records in the system (creating an orphan situation).
For instance, you can set up a cleanup operation that looks for comments linked to deleted posts and deletes them as they probably never surface in the application again:
app.get('/conditional',  async (req, res) => {

    // Filter and delete all comments that are not linked to any active posts
    const result = await client.query("DELETE FROM COMMENTS WHERE post_id NOT IN (SELECT post_id from Posts);")

    if (result.rowCount > 0) {
        res.json({message: "Cleaned up " + result.rowCount + " rows successfully!"})
    } else {
        res.json({message: "Nothing to clean up!"})
    }
})
You can come up with your own conditions specific to your use case.
6. Data Manipulation
Database maintenance operations are also used to carry out data manipulation and transformation, such as censoring obscene language or converting text combinations to emoji.
Unlike most other operations, these operations are best run when database updates occur (rather than running them on all rows at a fixed time of week or month).
This section lists two such operations, but the implementation for any other custom manipulation operation remains quite similar to these.
Convert Text to Emoji
You can consider converting text combinations such as “:)” and “xD” to actual emojis to provide a better user experience and maintain consistency of information as well. Here’s a code snippet to help you do that:
app.get("/emoji", async (req, res) => {
    // Define a list of emojis that need to be converted
    const emojiMap = {
        xD: '😁',
        ':)': '😊',
        ':-)': '😄',
        ':jack_o_lantern:': '🎃',
        ':ghost:': '👻',
        ':santa:': '🎅',
        ':christmas_tree:': '🎄',
        ':gift:': '🎁',
        ':bell:': '🔔',
        ':no_bell:': '🔕',
        ':tanabata_tree:': '🎋',
        ':tada:': '🎉',
        ':confetti_ball:': '🎊',
        ':balloon:': '🎈'
    }

    // Build the SQL query adding conditional checks for all emojis from the map
    let queryString = "SELECT * FROM COMMENTS WHERE"

    queryString += " COMMENT_TEXT LIKE '%" + Object.keys(emojiMap)[0] + "%' "

    if (Object.keys(emojiMap).length > 1) {
        for (let i = 1; i < Object.keys(emojiMap).length; i++) {
            queryString += " OR COMMENT_TEXT LIKE '%" + Object.keys(emojiMap)[i] + "%' "
        }
    }

    queryString += ";"

    const result = await client.query(queryString)

    if (result.rowCount === 0) {
        res.json({message: "No rows to clean up!"})
    } else {
        for (let i = 0; i < result.rows.length; i++) {

            const currentRow = result.rows[i]
            let emoji

            // Identify each row that contains an emoji along with which emoji it contains
            for (let j = 0; j < Object.keys(emojiMap).length; j++) {
                if (currentRow.comment_text.includes(Object.keys(emojiMap)[j])) {
                    emoji = Object.keys(emojiMap)[j]
                    break
                }
            }

            // Replace the emoji in the text and update the row before moving on to the next row
            const updateQuery = "UPDATE COMMENTS SET COMMENT_TEXT = '" + currentRow.comment_text.replace(emoji, emojiMap[emoji]) + "' WHERE COMMENT_ID = " + currentRow.comment_id + ";"

            await client.query(updateQuery)
        }

        res.json({message: "All emojis cleaned up successfully!"})
    }

})
This code snippet first requires you to define a list of emojis and their textual representations. Then, it queries the database to look for those textual combinations and replaces them with emojis.
Censor Obscene Language
A pretty common operation used in apps that allow user-generated content is to censor any indecent language. The approach here is similar—identify the instances of obscene language and replace them with asterisk characters. You can make use of the bad-words package to easily check for and censor profanity.
Install the package by running the following command:
yarn add bad-wordsThen, initialize the package in your index.js file:
const Filter = require('bad-words');
filter = new Filter();
Now, use the following code snippet to censor obscene content in your comments table:
app.get('/obscene', async (req, res) => {

    // Query all comments using a cursor, reading only 10 at a time
    const queryString = "SELECT * FROM COMMENTS;"

    const cursor = client.query(new Cursor(queryString))

    let rows = await cursor.read(10)

    const affectedRows = []

    while (rows.length > 0) {

        for (let i = 0; i < rows.length; i++) {
            // Check each comment for profane content
            if (filter.isProfane(rows[i].comment_text)) {
                affectedRows.push(rows[i])
            }
        }

        rows = await cursor.read(10)
    }

    cursor.close()

    // Update each comment that has profane content with a censored version of the text
    for (let i = 0; i < affectedRows.length; i++) {
        const row = affectedRows[i]
        const updateQuery = "UPDATE COMMENTS SET COMMENT_TEXT = '" + filter.clean(row.comment_text) + "' WHERE COMMENT_ID = " + row.comment_id + ";"
        await client.query(updateQuery)
    }

    res.json({message: "Cleanup complete"})

})
You can find the complete code for this tutorial in this GitHub repo.
Understanding PostgreSQL’s Vacuuming and Its Purpose
Aside from setting up custom maintenance routines such as those discussed above, you can also make use of one of the native maintenance functionalities that PostgreSQL offers to ensure the continued health and performance of your database: the Vacuum process.
The Vacuum process helps to optimize database performance and reclaim disk space. PostgreSQL runs vacuum operations on a schedule using its auto-vacuum daemon, but you can also trigger it manually if needed. Here are a few ways in which frequent vacuuming helps:
- Recovering Blocked Disk Space: One of Vacuum’s primary objectives is to recover blocked disk space within the database. As data is constantly inserted, updated, and deleted, PostgreSQL can become cluttered with “dead” or obsolete rows that still occupy space on the disk. Vacuum identifies and removes these dead rows, making the space available for new data. Without Vacuum, disk space would gradually become exhausted, potentially leading to performance degradation and even system crashes.
- Updating Query Planner Metrics: Vacuuming also helps PostgreSQL maintain up-to-date statistics and metrics used by its query planner. The query planner relies on accurate data distribution and statistical information to generate efficient execution plans. By regularly running Vacuum, PostgreSQL ensures that these metrics are current, enabling it to make better decisions about how to retrieve data and optimize queries.
- Updating Visibility Map: The Visibility Map is another crucial aspect of PostgreSQL’s Vacuum process. It helps identify which data blocks in a table are fully visible to all transactions, allowing Vacuum to target only the necessary data blocks for cleaning. This enhances the efficiency of the Vacuum process by minimizing unnecessary I/O operations, which would be costly and time-consuming.
- Preventing Transaction ID Wraparound Failures: Vacuum also plays a pivotal role in preventing transaction ID wraparound failures. PostgreSQL uses a 32-bit transaction ID counter, which can lead to a wraparound when it reaches its maximum value. Vacuum marks old transactions as “frozen,” preventing the ID counter from wrapping around and causing data corruption. Neglecting this aspect could lead to catastrophic database failures.
As mentioned earlier, PostgreSQL offers two options for executing Vacuum: Autovacuum and Manual Vacuum.
Autovacuum is the recommended choice for most scenarios as it automatically manages the Vacuum process based on predefined settings and database activity. Manual Vacuum, on the other hand, provides more control but requires a deeper understanding of database maintenance.
The decision between the two depends on factors such as database size, workload, and available resources. Small to medium-sized databases can often rely on Autovacuum, while larger or more complex databases may require manual intervention.
Summary
Database maintenance is not just a matter of routine housekeeping; it’s the foundation of a healthy and performant application. By regularly optimizing, cleaning, and organizing your data, you ensure that your PostgreSQL database continues to deliver peak performance, remains free from corruption, and operates efficiently, even as your application scales.
In this comprehensive guide, we explored the critical importance of establishing well-structured database maintenance plans for PostgreSQL when working with Node.js and Express.
Did we miss any routine database maintenance operations that you have implemented for your database? Or do you know a better way to implement any of those discussed above? Feel free to let us know in the comments!

Kumar is a software developer and a technical author based in India. He specializes in JavaScript and DevOps. You can learn more about his work on his website.

