
Node.js came as a blessing for JavaScript developers worldwide struggling with swapping among multiple languages and frameworks to amplify their code into a sustainable development environment.
So if you’re looking to take your web development skills to the next level, Node.js can certainly help you reach that goal.
This article is a step-by-step guide to installing Node.js on your computer and commencing your web development journey.
Node.js prerequisites
Before installing Node.js, you need to ensure that you’ve gathered all the necessary bits of knowledge and downloaded all required installation files and elements.
First, it would help if you had a basic understanding of JavaScript and its syntax — this will make picking up Node.js easier for you.
Second, a basic understanding of an object-oriented programming (OOP) language will help you work on server-side coding.
Last, rather than rushing into deep learning, take it one step at a time. Always remember that you’re not a day late or a dollar short as long as you’re progressing.
System requirements
Node.js doesn’t require a fancy hardware setup to run; most computers of this era should handle Node.js efficiently. Even the most miniature computers like BeagleBone or Arduino YÚN can run Node.js.
Nevertheless, much still depends on what other memory hog software you’ve got running on the same system. But in most cases, you shouldn’t be worried unless your computer is from the Mesozoic Era!
LTS version vs Current version
Node.js offers two different versions for you to download: the LTS version and the Current version.
The first one is Long-Term Support (LTS), which indicates the version that has been in the market for a while and comes with all mandatory support. Consequently, you can access a bunch of information and community for additional help with this version.
This LTS version is recommended to most users because of its sustainability and 18-month-long support cycle. As it’s a stable version, using it to produce backends can help you achieve a robust outcome.
The Current version indicates the latest released version of Node with the most recently added and updated features. But this version has less support behind it (around eight months) and possible bug exposure. Therefore, experts suggest using this version only for frontend development.
Considering all these factors, if you’re a regular user who loves to live hassle-free, go for the LTS version. On the other hand, if you’re an advanced user who loves the adventure of experiencing new technology, you can choose to install the Current version.
How to install Node.js on Windows
Every operating system has a distinct method of installing Node.js. The core setup file differs for each OS to OS. However, the Node.js creators have taken care to provide you with the files needed for each system.
This is the step-by-step guide to install Node.js on Windows.
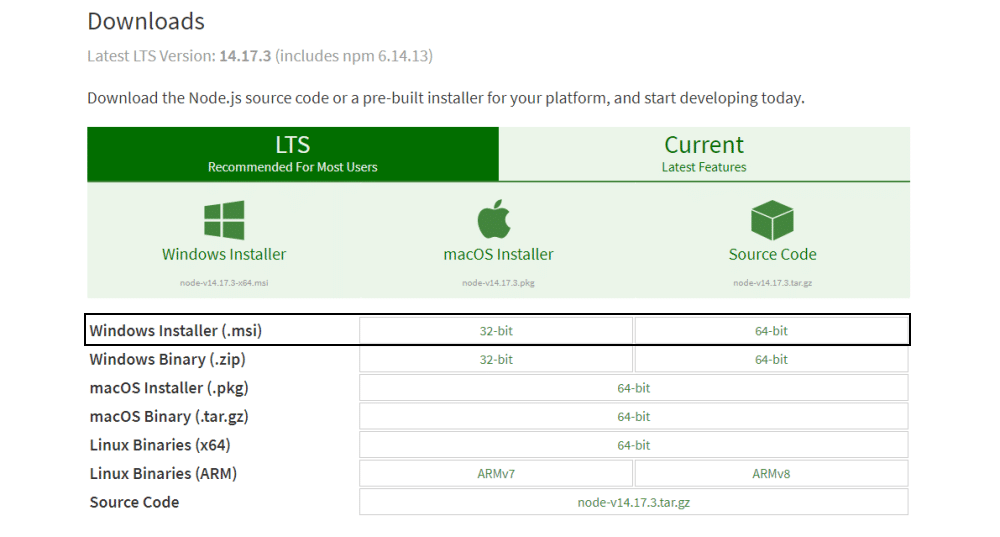
1. Download the Windows installer
First, you need to download the Windows Installer (.msi) file from the official Node.js website. This MSI installer database carries a collection of installer files essential to install, update, or modify the existing Node.js version.
Notably, the installer also carries the Node.js package manager (npm) within it. It means you don’t need to install the npm separately.
When downloading, select the correct version as per your operating system. For example, if you’re using a 64-bit operating system, download the 64-bit version, and if you’re using the 32-bit version, download the 32-bit version:
2. Begin the installation process
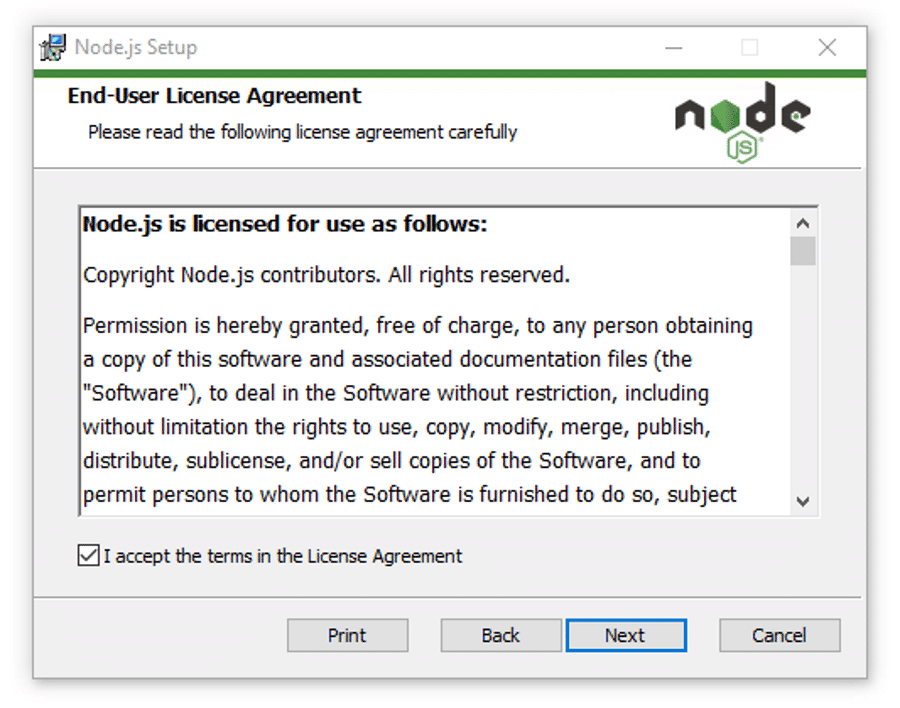
Once you open and run the .msi file, the installation process begins. But you have to set a few parameters before running the installation process.
Double-click on the installer file and run it. The installer will ask you to accept the Node.js license agreement. To move forward, check the “I accept” box and click Next:
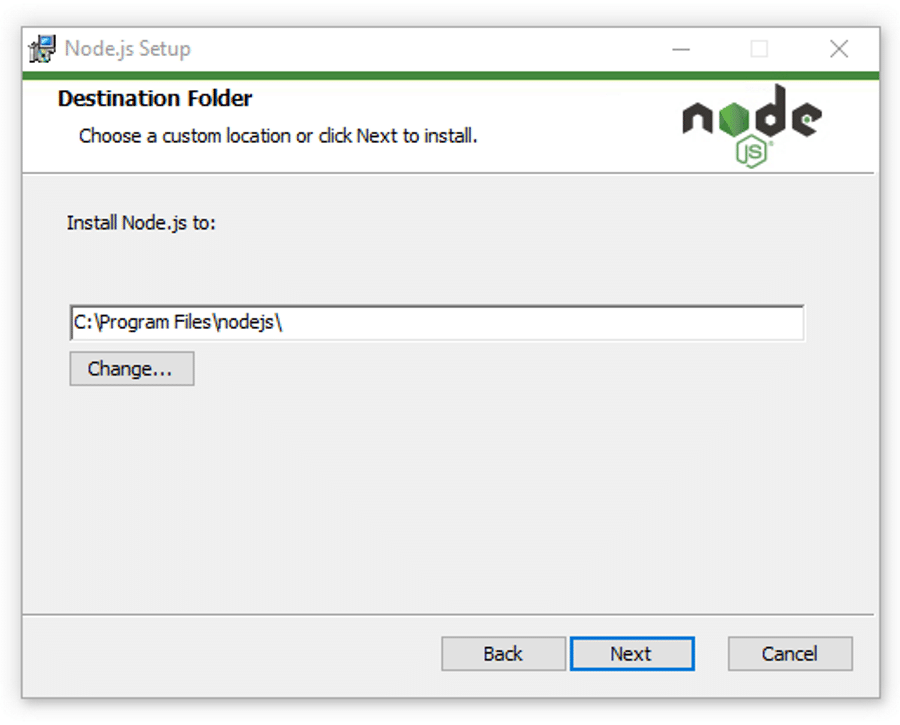
Then, select the destination where you want to install Node.js. If you don’t want to change the directory, go with the Windows default location and click the Next button again.
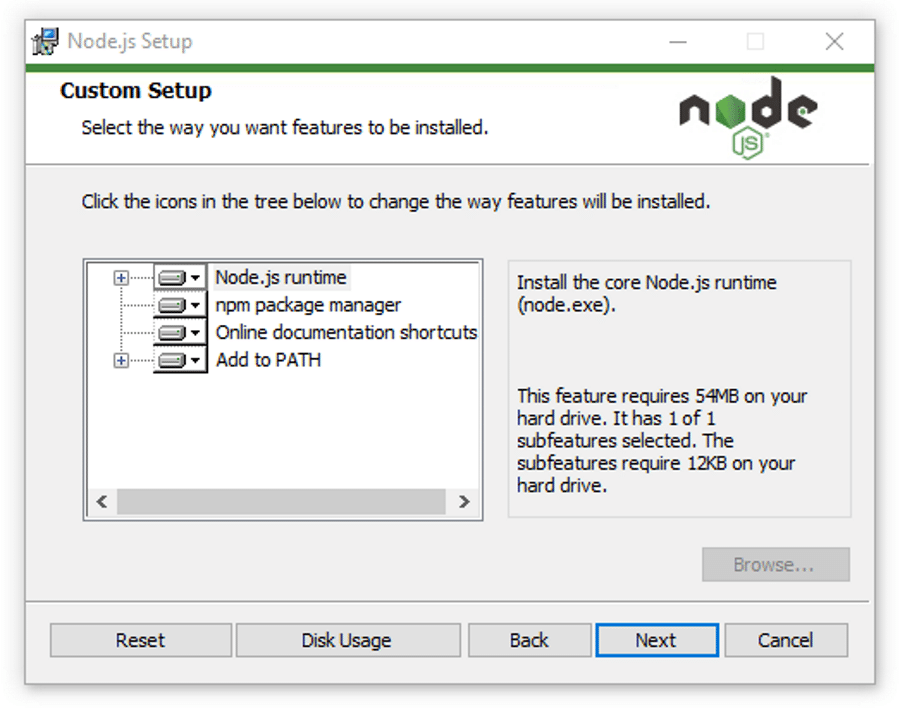
The next screen will show you custom setup options. If you want a standard installation with the Node.js default features, click the Next button. Otherwise, you can select your specific elements from the icons in the tree before clicking Next:
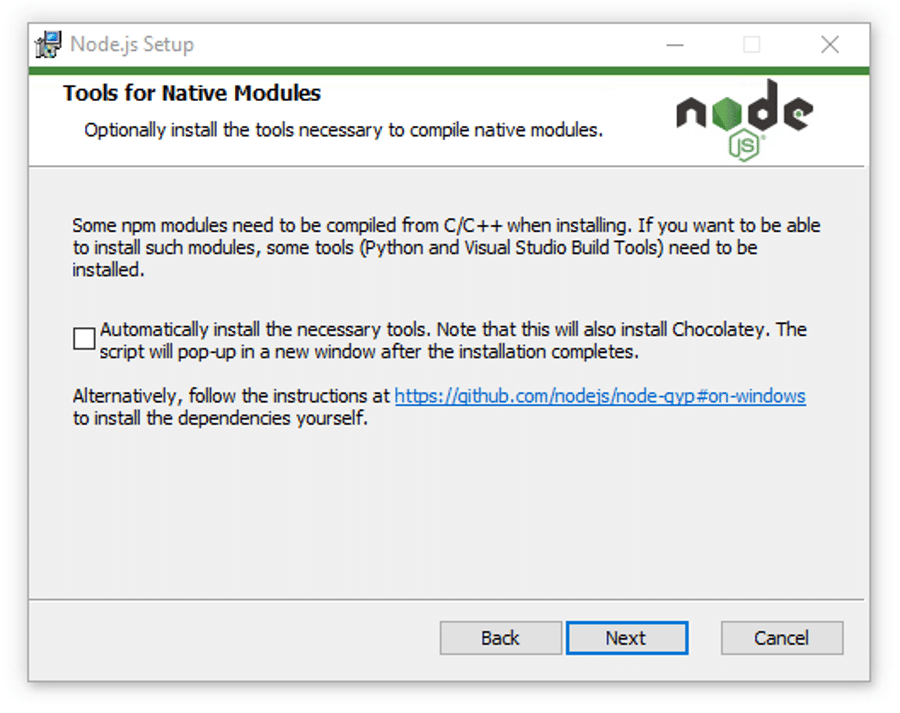
Node.js offers you options to install tools for native modules. If you’re interested in these, click the checkbox to mark your preferences, or click Next to move forward with the default:
3. Run Node.js installation on Windows
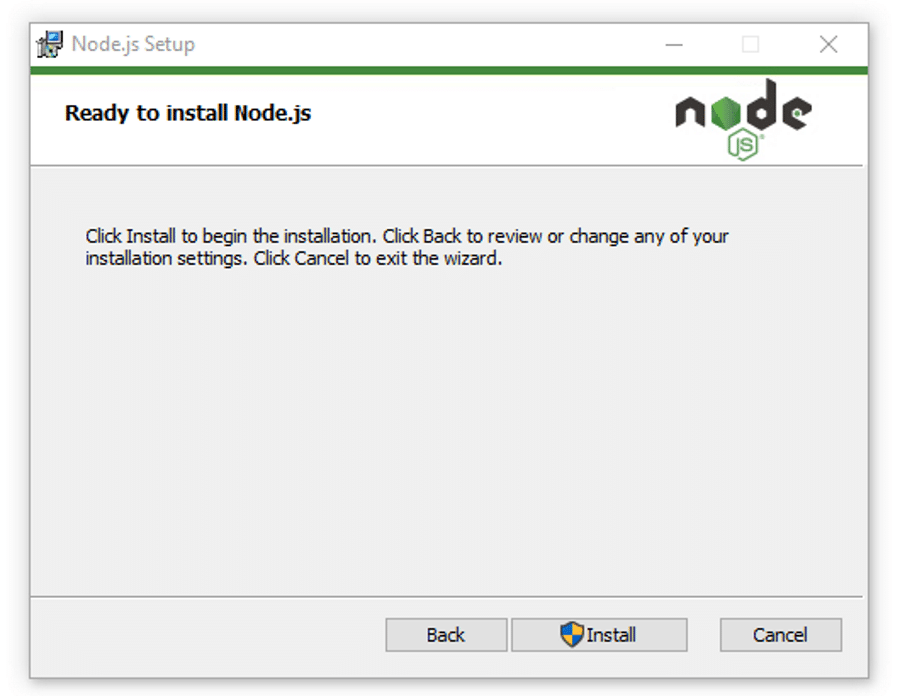
Lastly — and this is the easiest part of all — click the Install button to begin the installation process:
The system will complete the installation within a few seconds or minutes and show you a success message. Click on the Finish button to close the Node.js installer.

4. Verify Node.js installation
So the installation process is completed. Now, you have to check whether Node.js is successfully installed or not.
To verify the installation and confirm whether the correct version was installed, open your PC’s command prompt and enter the following command:
Node --versionAnd to check the npm version, run this command:
npm --version
If the Node.js version and npm are correctly installed, you’ll see the version name in the CMD prompt.
How to install Node.js on macOS
Follow these step-by-step guidelines to install Node.js on macOS.
1. Download the macOS installer
Installing Node.js on macOS follows almost the same procedure as Windows. All you have to do is to download the installation file for Mac. Then, as soon as you start it up, the installer will walk you through the rest.
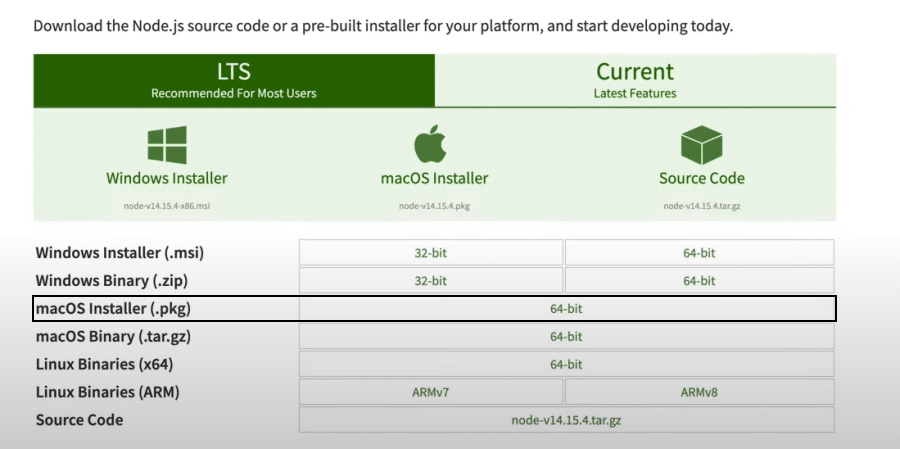
Download the macOS installer (.pkg) file from the Node.js website. There’s only a 64-bit version, so you don’t have to worry about which to download.
2. Begin Node.js installation on macOS
Check your Download folder for the installer file and click on it to start the installation process.
The Node.js installer carries the Node.js core file, and, consequently, the installation process installs both Node.js and npm from the installer file. Therefore, you don’t need to install npm separately.
Then, click Continue to move forward with the installation.

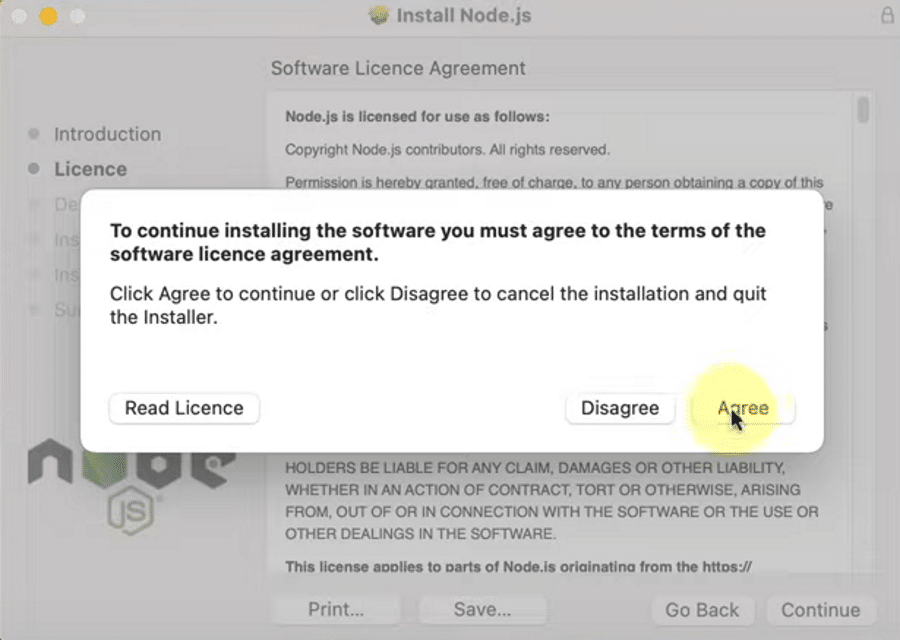
You must agree to the terms of usage to install Node.js. Read through it before clicking the Agree button to continue if you’d like to explore the license agreement.
At this screen, you need to select the installation location. Usually, the OS determines a default installation location. If you have other requirements, you can change the location. Otherwise, keep the default location.
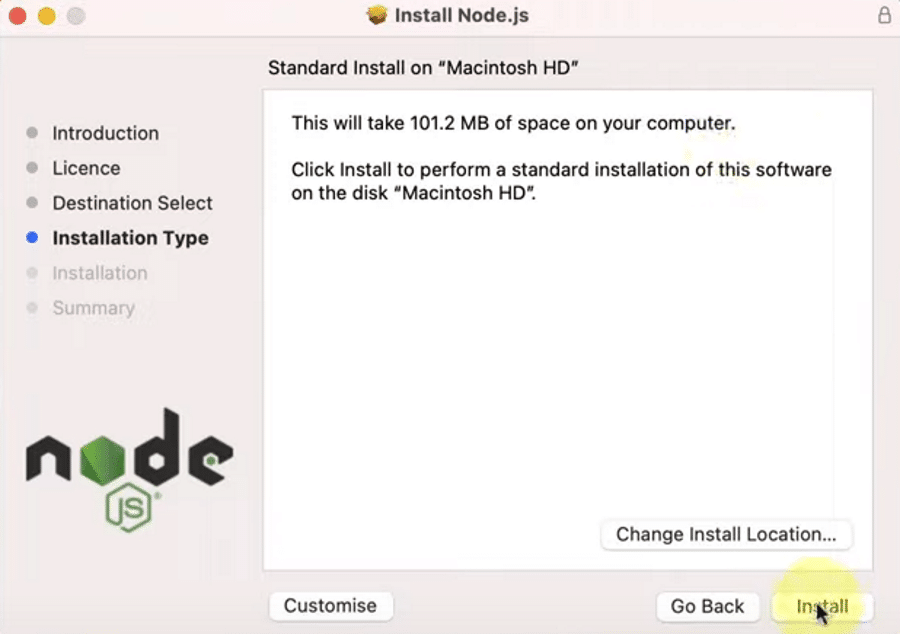
3. Run Node.js installation on macOS
Until now, you’ve set all the preferences that are needed to install Node.js on macOS fully. Now click on the Install button to finish things up.
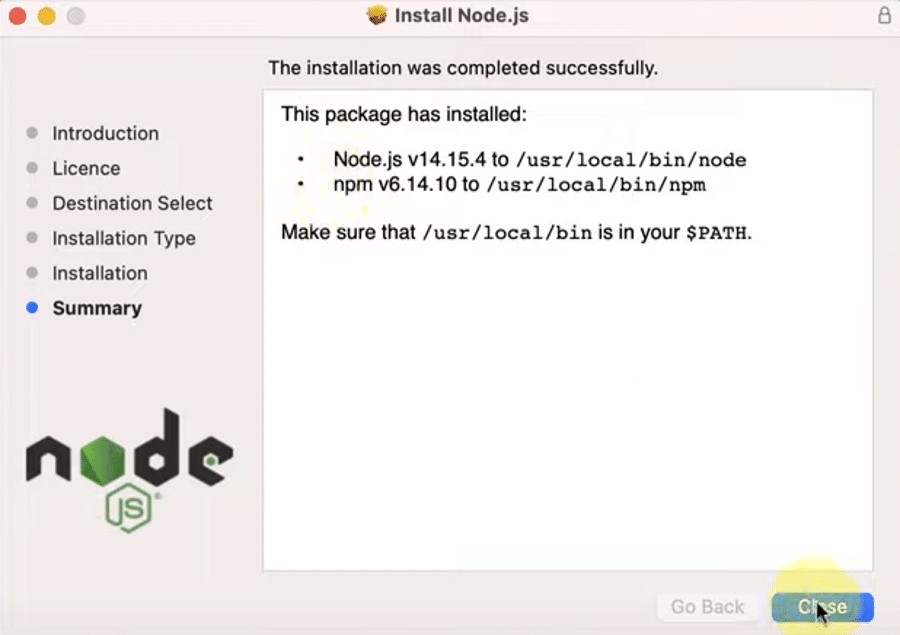
After a successful installation process, the system will show you a confirmation message. As npm is integrated within the Node.js installer, the notification should indicate proof of npm installation too.
Finally, click on the Close button to close the dialogue box.
4. Verify Node.js installation on macOS
You’ve now successfully installed Node.js on your macOS. However, you should check to confirm that the installation process was successful and whether the Node.js and npm versions are working properly on your macOS.
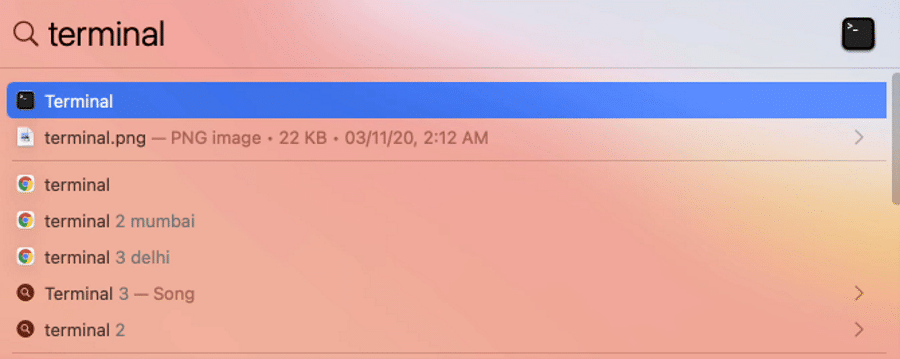
To check the Node.js version, you need to open your macOS terminal, click the Command + Space keys, or search the terminal from the search bar.
To check the Node.js version, type:
Node --versionAnd to check the npm version, run this command:
npm --version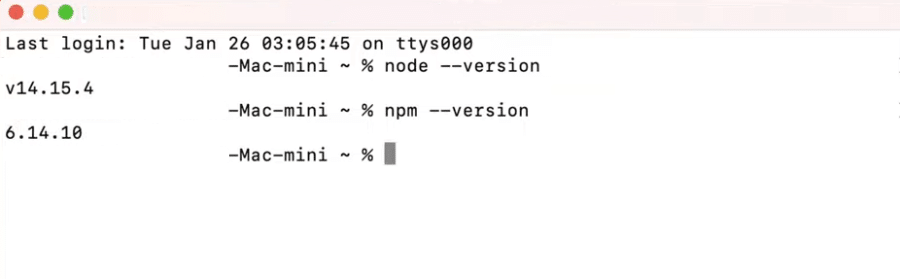
If the Node.js and npm versions are visible, both of them are correctly installed and working fine. If not, you may need to recheck to find the error or try the installation process again.
How to install Node.js on Linux
The Linux operating system works a bit differently than the other traditional operating systems. That’s because Linux is open-source, offering you more freedom, customization, and advanced functionalities.
If you’re familiar with the command line interface, you should feel comfortable with Linux. Here, we are about to discuss the easiest method of installing Node.js on the Linux operating system.
1. Choose the Node.js version for your Linux distribution
The Linux operating system has hundreds of different distributions because of the diversity it provides. And users love to customize and harness different versions’ specific functionalities using distinct distributions.
Firstly, find the installation instruction for your specific distribution from Node.js’s Binary Distributions page. For this guide, we’ll be using Ubuntu for illustration purposes.
2. Install the Curl command line tool
Before going for Node.js installation, ensure that you have the curl command-line utility installed on your system. If not, then paste this command on your terminal to install curl:
sudo apt install curlIt may ask for your system password to verify the permission of the installation. Once you input the password, the system should begin the curl installation.

3. Start Node.js installation
You need to copy and paste the Node.js installation command into your terminal (in our case, we can grab it from the Ubuntu distribution page) so that the system can begin the Node.js installation.
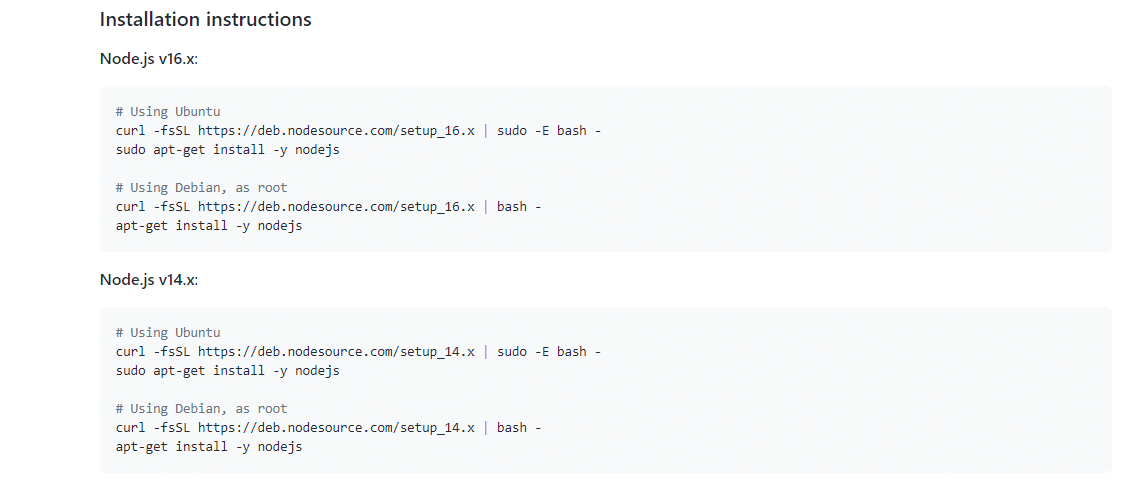
For instance, here, we’ll be installing Node.js v14.x. These are the installation commands for Ubuntu:
curl -fsSL https://deb.nodesource.com/setup_14.x | sudo -E bash -sudo apt-get install -y nodejsAs you already have the curl command line installed on your terminal, you’ll need to copy and paste the first command (the curl command) on your terminal and run it.

The curl command begins the Node.js installation process, updates your system, and downloads all Node.js libraries required to install Node.js on your Linux OS.
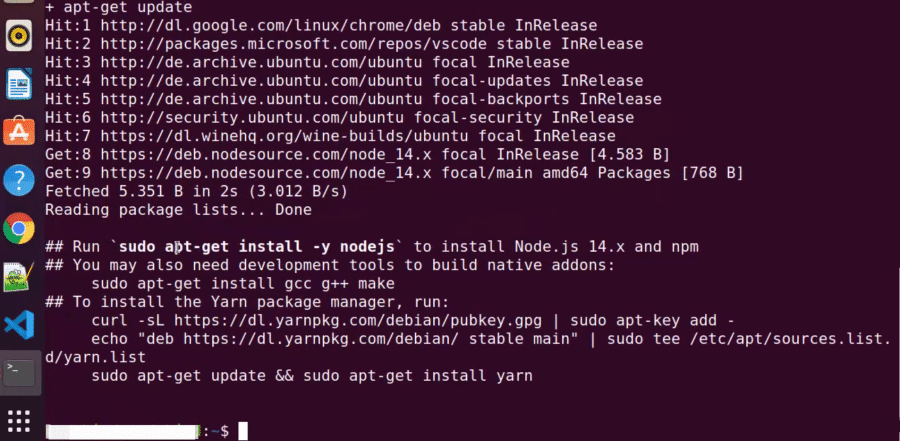
Now, all the libraries and resources of Node.js have been downloaded to your PC. With one final command, we can finish installing Node.js and npm on your computer.
Copy and paste the second line of command from the installation instructions above into your Linux terminal:
sudo apt-get install -y nodejs
If you’ve done everything correctly, Node.js will install correctly on your Linux distribution. Now input the Clear command to clear the terminal.
4. Verify Node.js installation on the Linux Ubuntu distribution
As you’ve installed Node.js, you can verify to check whether the installation is successful or not. To confirm the installation, you need to run two simple Linux commands on your Linux terminal.
To check the Node.js version, type:
Node --versionAnd to check the npm version, type:
npm --version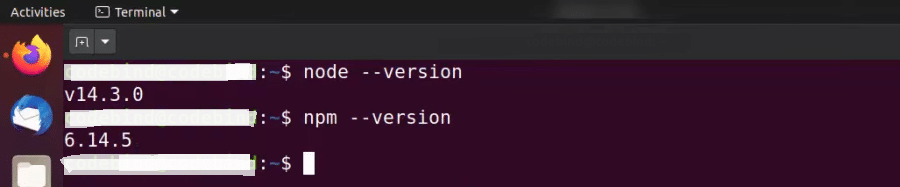
If the Node.js version and npm are installed correctly, you’ll see the Node.js and npm version names visible on the Linux terminal. It indicates that you have successfully installed Node.js and npm on your Linux distribution.
Check and update npm version
As we’ve mentioned, npm is the Node.js package manager. It manages the dependencies for packages. Without npm, you would have to unpack all your Node.js packages manually every time you want to upload a framework. But npm relieves you of this responsibility and takes care of it automatically.
Regularly updating npm also updates your local packages and improves the code used in your projects. However, as npm automatically installs with the Node.js version you choose, it often misses the latest npm release. In such cases, you can check your npm version and update it manually in a simple process.
The processes to check and update your npm version are very similar between Windows, macOS, and Linux — you’ll be running the same command on each.
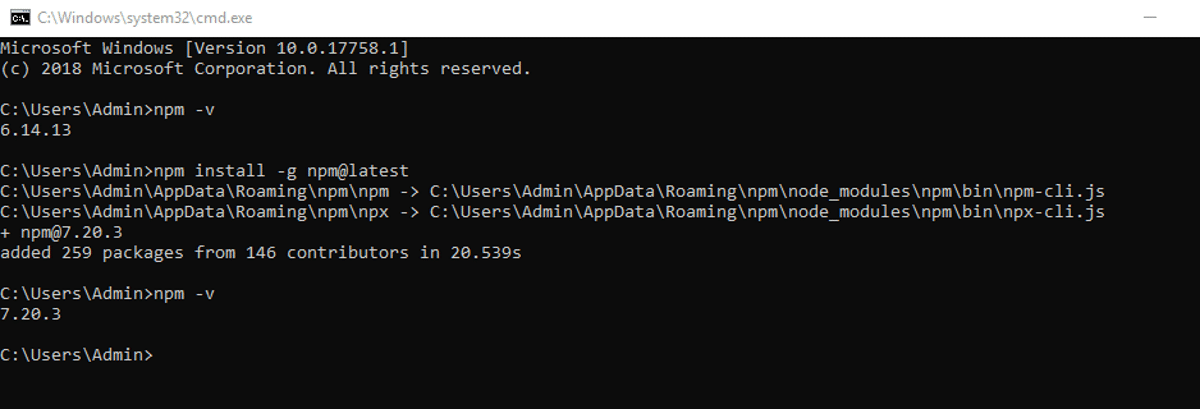
1. Update npm in Windows
To check the npm version, run the following command:
npm -v…or:
npm --versionAnd to update the npm version, run this command:
npm install -g npm@latestAfter running this command on your CMD prompt on Windows, the system will update your npm version and install the additional packages in a few seconds. In the end, you can recheck the version to confirm the update of the npm version.
2. Update npm on macOS
To check the npm version on macOS, open your terminal and run the following command:
npm -v…or:
npm --version
To update the npm version, run this command in your macOS terminal:
npm install -g npm@latest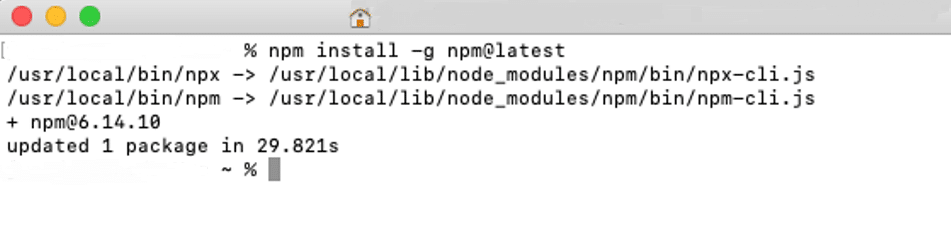
3. Update npm in Linux
To update your npm version on Linux, type these commands into your terminal:
sudo npm install -g n…and then:
sudo n latest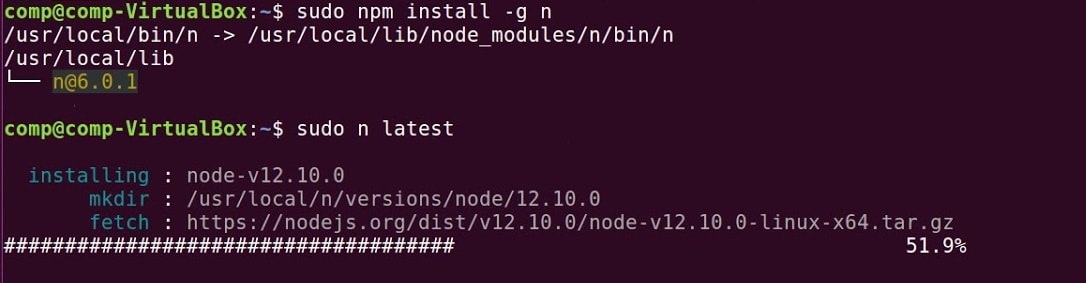
FAQ
What is Node.js?
The first thing you should know is that Node.js is not a programming language!
You may already be aware of this fact, but it bears repeating for new developers in the field who may mistake Node.js for a unique programming language. It’s not!
Node.js is an open-source runtime environment for the JavaScript language that reshapes JavaScript’s characteristics and upgrades its functionality. As a result, you can use JavaScript for frontend and backend development, enabling full-stack development solely using JavaScript.
Initially, Node.js was designed to serve real-time performance, pushed-back architectures. But since then, Node.js has grown into a vital element for server-side programming for event-driven, non-blocking servers. Many conventional websites and API services today depend on Node.js.
Before Node.js, if you wanted to store any data on the database or connect your program to the database, you needed support from a server-side language. That’s because JavaScript couldn’t regulate the backend process. Consequently, you had to learn server-side languages like PHP, Python, Ruby, or C# — or seek a backend developer’s help.
The Node.js environment empowers JavaScript to directly employ the database and function properly as a backend language. As a result, you can ultimately build and run a program using only JavaScript with Node.js.
Node.js uses the V8 JavaScript runtime engine as its root power, and it employs a non-blocking I/O architecture that adds to its robust performance.
Who uses Node.js?
According to W3Techs, Node.js was being used by some 3.2% of all websites it was monitoring in early 2024. In addition, the Node.js software has been downloaded nearly 1.5 billion times. That speaks strongly to the Node.js market scale.
From your friends in IT to the industry tycoons, many are leveraging Node.js. That’s because Node.js amplifies the performance of developers and increases the speed of the development process. A trend nowadays is using JavaScript everywhere, which has raised the profile of Node.js.
Top companies that use Node.js include:
If you study these companies, you may notice that they run their businesses on different services or products. But they all have a critical factor in common: they rely on Node.js.
Advantages of using Node.js
Choosing the right programming platform for your tech stack is as important as the labor you want to invest in. Multiple factors should be considered when you look for the advantages of using a particular platform. Things like the learning curve, development speed, community, and scale can alter the overall balance of benefits.
Here are the main advantages of using Node.js:
- Simple syntax
- Easy learning curve
- Ability to scale quickly
- Open source and flexible
- Cross-platform development
- Single-language full-stack development
- Real-time communication
- Vast and active community
Summary
Node.js has become a popular programming environment quickly because of its usefulness in both frontend and backend. Thousands of active users have created a vast community that helps keep new developers and their questions from slipping through the cracks.
In essence, it’s easy to start with Node.js because of its simplicity, and its capabilities for creating advanced applications are extraordinary. It can also help turn you into a full-stack developer in a short time. These features make Node.js an inevitable choice for next-generation programming.
Have we missed any helpful tips about installing Node.js on Windows, macOS, or Linux? Let us know in the comments section!