Over the years, we have explored Gutenberg from many perspectives. We have dissected the editor’s functionalities, compared them with those of other page builders, built static and dynamic custom blocks, and much more.
With the latest versions of WordPress, new features and tools allow you to create complex layouts more easily by enriching and enhancing the functionality of the block editor without the need to build custom blocks.
Thanks to the introduction of block patterns and developer tools such as the Block Bindings API, there are fewer use cases for custom blocks. You can now create complex block structures, inject metadata values into your content, and automate a good part of your workflow without leaving the editor’s interface. In short, today, WordPress allows you to create complex sites with as few clicks as ever before.
Adding custom controls and tools to the editor may help make the content creation process smoother. For example, you may need to add a panel to the Post sidebar to add functionality or create a custom sidebar to manage multiple meta fields.
Let’s get started!
How to create a block editor plugin without creating a custom block
WordPress provides a convenient command-line tool that allows you to install a local Node.js development environment with all the necessary files and dependencies to create a custom block. Just type npx @wordpress/create-block in the command line tool, wait a few seconds, and you are done.
However, scaffolding a custom block is not necessary when you only need to add a sidebar or a simple settings panel. In this case, you need to create a Gutenberg plugin.
WordPress does not provide a utility to automate the process of creating a plugin for Gutenberg, so you need to do it manually. But do not worry too much. The process is relatively straightforward, and we will drive you through it. These are the steps to follow:
1. Download and install a local development environment
First things first: Although you can develop your Gutenberg plugin in a remote environment, it may be more convenient for you to install a development WordPress website locally. You can use any environment based on PHP and MySQL. Among the many alternatives available out there, we recommend DevKinsta. It’s free, fully featured, easy to use, and 100% compatible with Kinsta hosting.
Once you have your development site set up, you are ready to create a Gutenberg block editor plugin.
2. Download and install Node.js and npm
Download Node.js from nodejs.org and install it on your computer. This will also install npm, the Node package manager.
Once you’ve done this, launch your command-line tool and run node -v and npm -v. You should see the installed versions of Node.js and npm.

3. Create your plugin’s folder
Create a new folder under wp-content/plugins and rename it my-sidebar-plugin or something similar. Just remember that this name should reflect your plugin’s name.
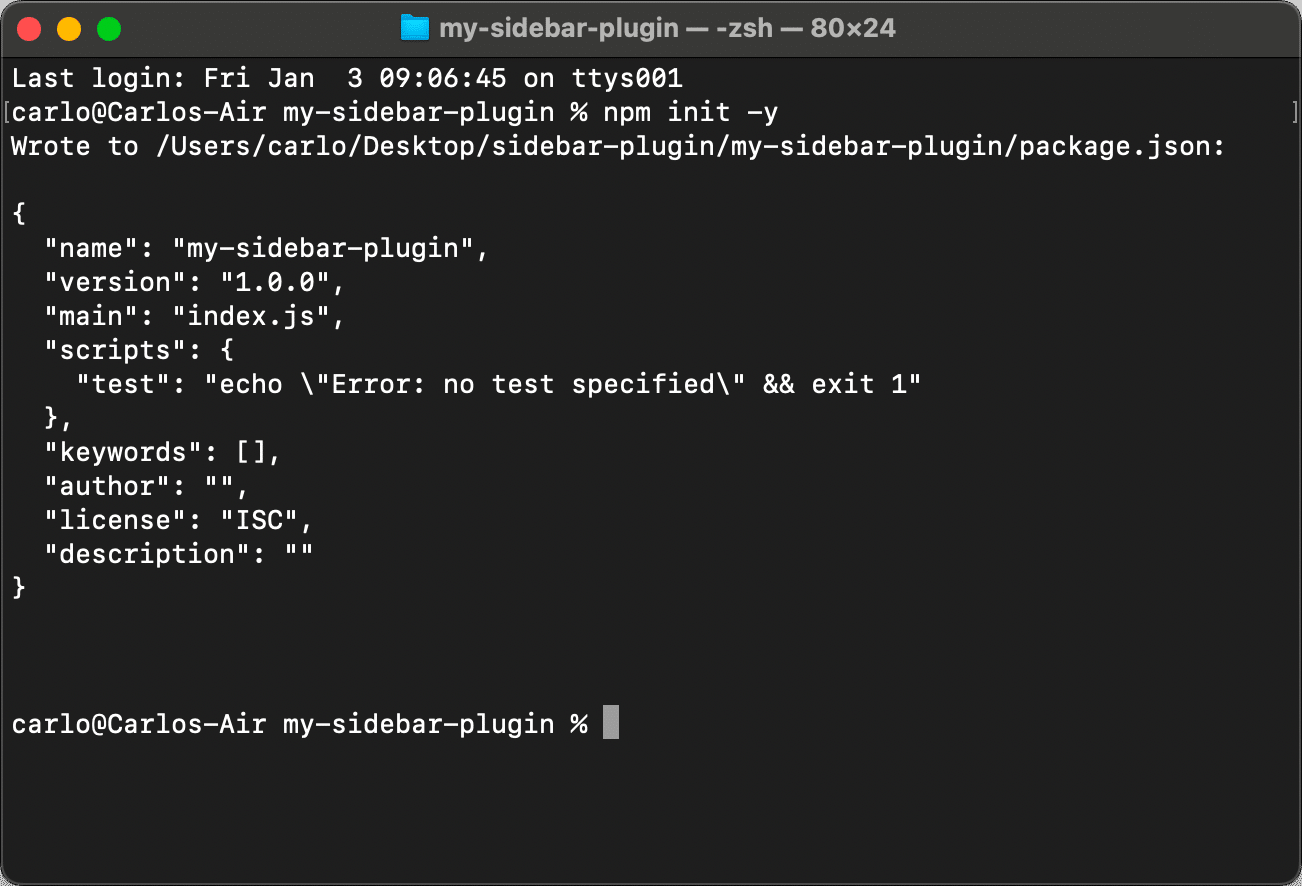
Open the terminal, navigate to the plugin’s folder, and initialize an npm project with the following command:
npm init -yThis will create a basic package.json file.
4. Install dependencies
In your command-line tool, type the following command:
npm install @wordpress/plugins @wordpress/scripts --save-dev@wordpress/pluginsinstalls thepluginsmodule for WordPress.@wordpress/scriptsinstalls a collection of reusable scripts for WordPress development.
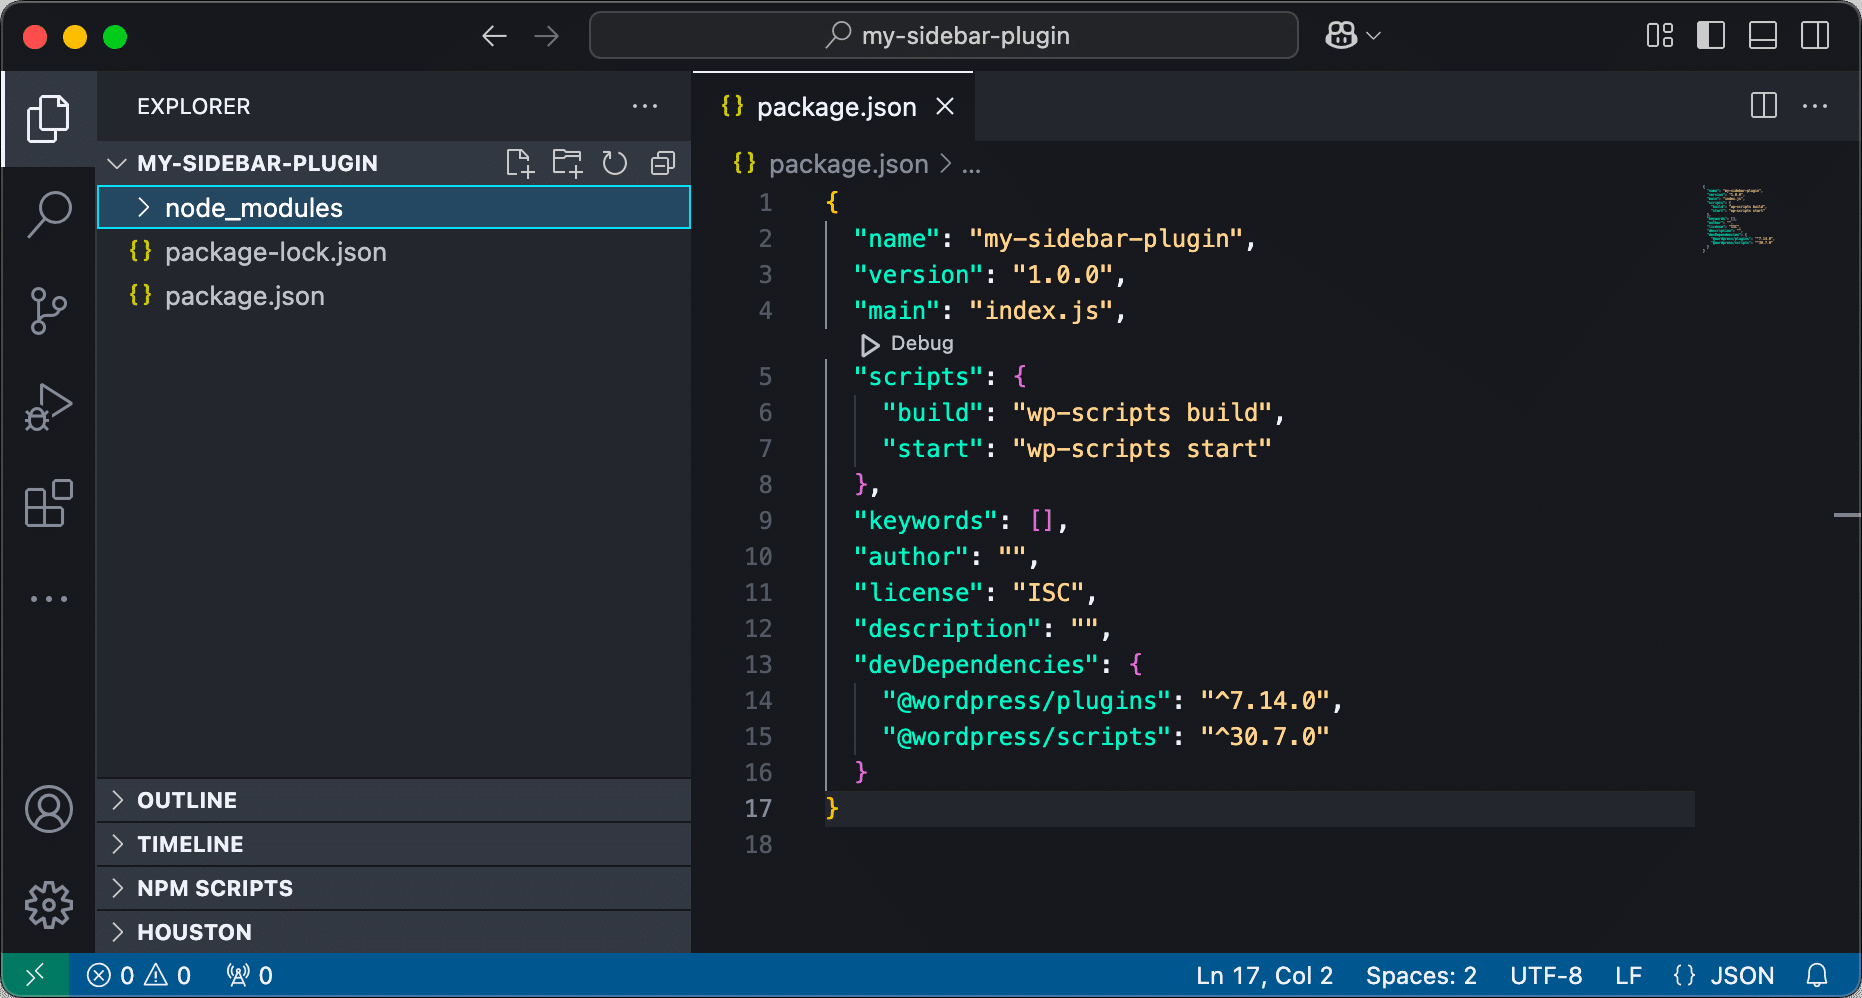
A new node_modules folder should have been added to your project.
Now, open your package.json and update the scripts as follows:
{
	"name": "my-sidebar-plugin",
	"version": "1.0.0",
	"main": "index.js",
	"scripts": {
		"build": "wp-scripts build",
		"start": "wp-scripts start"
	},
	"keywords": [],
	"author": "",
	"license": "ISC",
	"description": "",
	"devDependencies": {
		"@wordpress/plugins": "^7.14.0",
		"@wordpress/scripts": "^30.7.0"
	}
}
Now you can check the plugin’s folder:
5. Create the plugin’s files
In your plugin’s directory, create a new .php file and give it the same name as your folder. In our example, it is my-sidebar-plugin.php.
Open the file and paste the following code to register the plugin on the server:
<?php
/**
 * Plugin Name: My Sidebar Plugin
 */

function my_sidebar_plugin_register_script() {
	wp_enqueue_script(
		'my_sidebar_plugin_script',
		plugins_url( 'build/index.js', __FILE__ ),
		array( 'wp-plugins', 'wp-edit-post' ),
		filemtime( plugin_dir_path( __FILE__ ) . 'build/index.js' )
	);
}
add_action( 'enqueue_block_editor_assets', 'my_sidebar_plugin_register_script' );
Next, create a src folder in your plugin’s directory. In there, create a new index.js file with the following code:
import { registerPlugin } from '@wordpress/plugins';
import { PluginSidebar } from '@wordpress/edit-post';

const MyPluginSidebar = () => (
	<PluginSidebar
		name="my-sidebar-plugin"
		title="My Sidebar Plugin"
	>
		<div>
			Hello my friends!
		</div>
	</PluginSidebar>
);

registerPlugin( 'my-sidebar-plugin', {
	render: MyPluginSidebar,
} );
6. Compile the code
All that is missing is the build. Go back to the command line and run the following command:
npm run buildThis creates a build folder with the project’s compressed files.
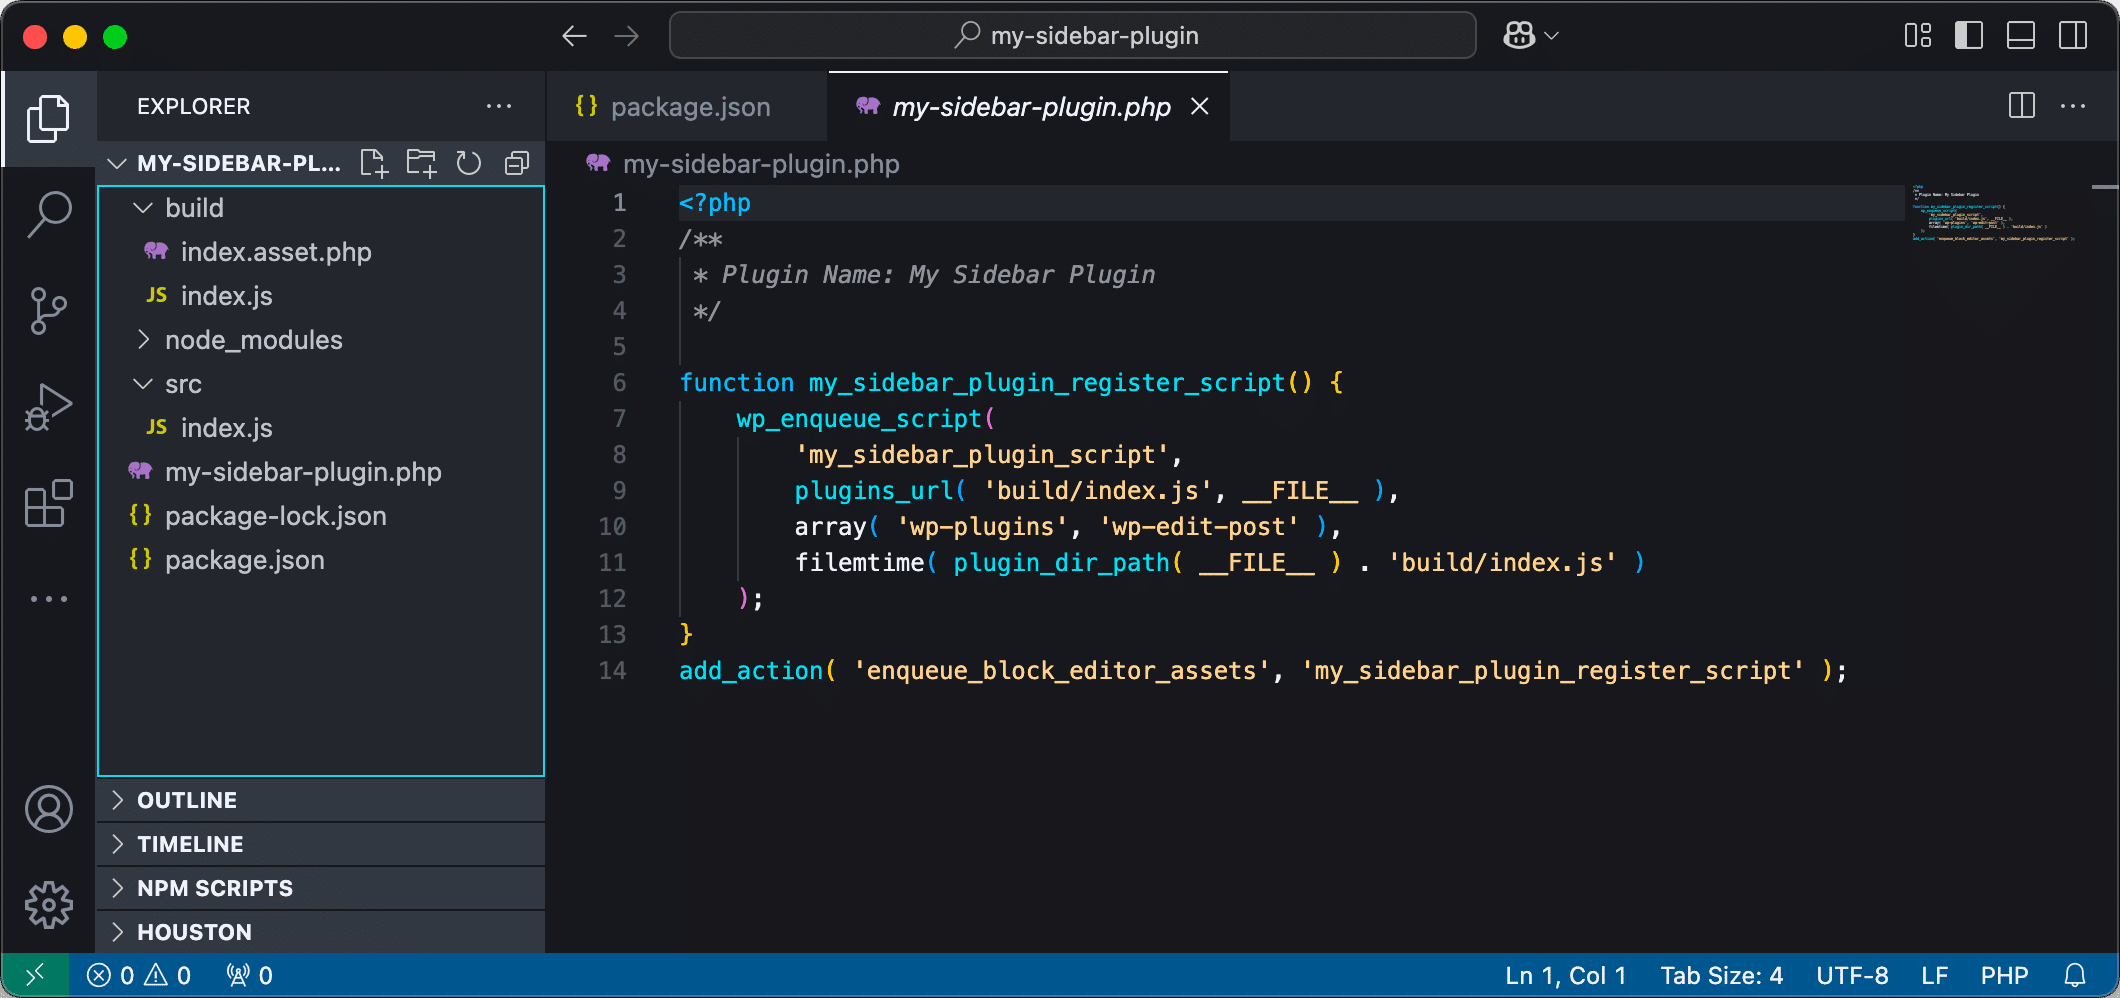
When done, navigate to the Plugins screen in your WordPress dashboard and activate the plugin. Create a new post or page and click the plug icon in the top right corner to display your custom sidebar.

7. Develop and build
We have placed the index.js file in the src folder. Using a src folder is a common convention in WordPress plugin and theme development, making your code easier for other developers to understand.
By placing your JS code in the src folder, you can use the npm start or npm run start command to start a development environment that monitors the scripts and automatically recompiles the code when necessary. When you are done with development, the npm build or npm run build command will compile the JavaScript code into the build folder, which will contain the code optimized for production.
Now, let’s put what we learned into practice and modify the plugin we have created in the previous section to add a new panel to the post editor sidebar to manage custom fields.
How to create an additional sidebar to manage post meta fields
Our goal is to create a custom sidebar that contains a panel with a single text field for adding and editing a custom meta field.
Before going into it, we should mention that we could use a custom meta box to achieve the same result. With WordPress 6.7, meta boxes have received an upgrade and are now fully compatible with the block editor, so you may wonder why manage meta fields from a custom sidebar instead of a meta box. The reason is that a sidebar allows you to take advantage of built-in components. This helps you build more friendly interfaces with powerful controls that should also be familiar to users.
That being said, here is the process for creating a custom sidebar that allows you to manage custom fields from within the editor.
my-sidebar-plugin.php
Step 1: Register post meta
First, you need to register the meta field. Add the following code to the main file of the plugin:
function my_sidebar_plugin_register_meta() {
	register_post_meta(
		'post',
		'meta_fields_book_title',
		array(
			'show_in_rest' => true,
			'type' => 'string',
			'single' => true,
			'sanitize_callback' => 'sanitize_text_field',
			'label' => __( 'Book title', 'my-sidebar-plugin' ),
			'auth_callback' => function() {
				return current_user_can( 'edit_posts' );
			}
		)
	);
}
add_action( 'init', 'my_sidebar_plugin_register_meta' );
The register_post_meta function accepts three arguments:
- The post type to register a meta key for. Setting an empty string would register the meta key across all existing post types.
- The meta key to register. Note that we are not using an underscore at the beginning of the meta key. Prefixing the meta key with an underscore would hide the custom field, so you may want to use it in a meta box. However, hiding the custom field would prevent the meta field from being used via the Block Bindings API in the post content.
- An array of arguments. Note that you must set
show_in_resttotrue. This exposes the meta field to the Rest API and allows us to bind the meta field to block attributes. For the other attributes, see the function reference.
Step 2: Register meta box
To ensure backward compatibility for your plugin, you need to register a custom meta box to allow users to manage your custom fields, even if using the classic editor. Add the following code to your plugin’s PHP file:
/**
 * Register meta box
 *
 * @link https://developer.wordpress.org/reference/functions/add_meta_box/
 *
 */
function my_sidebar_plugin_register_meta_box(){
	add_meta_box(
		'book_meta_box', // Unique ID
		__( 'Book details' ), // Box title
		'my_sidebar_plugin_meta_box_callback', // Content callback
		array( 'post' ), // Post types
		'advanced', // context
		'default', // priority
		array('__back_compat_meta_box' => true) // hide the meta box in Gutenberg
	 );
}
add_action( 'add_meta_boxes', 'my_sidebar_plugin_register_meta_box' );
Now declare the callback that builds the form:
/**
 * Build meta box form
 *
 * @link https://developer.wordpress.org/reference/functions/wp_nonce_field/
 * @link https://developer.wordpress.org/reference/functions/get_post_meta/
 *
 */
function my_sidebar_plugin_meta_box_callback( $post ){
	wp_nonce_field( 'my_sidebar_plugin_save_meta_box_data', 'my_sidebar_plugin_meta_box_nonce' );
	$title = get_post_meta( $post->ID, 'meta_fields_book_title', true );
	?>
	<div class="inside">
		<p><strong><?php echo __( 'Book title', 'my-sidebar-plugin' ); ?></strong></p>
		<p><input type="text" id="meta_fields_book_title" name="meta_fields_book_title" value="<?php echo esc_attr( $title ); ?>" /></p>
	</div>
	<?php
}
Next, write the function to save your meta fields into the database:
/**
 * Save metadata
 *
 * @link https://developer.wordpress.org/reference/functions/wp_verify_nonce/
 * @link https://developer.wordpress.org/reference/functions/current_user_can/
 * @link https://developer.wordpress.org/reference/functions/sanitize_text_field/
 * @link https://developer.wordpress.org/reference/functions/update_post_meta/
 *
 */
function my_sidebar_plugin_save_meta_box_data( $post_id ) {
	if ( ! isset( $_POST['my_sidebar_plugin_meta_box_nonce'] ) )
		return;
	if ( ! wp_verify_nonce( $_POST['my_sidebar_plugin_meta_box_nonce'], 'my_sidebar_plugin_save_meta_box_data' ) )
		return;
	if ( defined( 'DOING_AUTOSAVE' ) && DOING_AUTOSAVE )
		return;
	if ( ! current_user_can( 'edit_post', $post_id ) )
		return;
	if ( ! isset( $_POST['meta_fields_book_title'] ) )
		return;

	$title = sanitize_text_field( $_POST['meta_fields_book_title'] );

	update_post_meta( $post_id, 'meta_fields_book_title', $title );
}
add_action( 'save_post', 'my_sidebar_plugin_save_meta_box_data' );
We won’t dive deeper into this code since it is beyond the scope of this article, but you can find all the information you need by following the links in the function headers.
Last, we need to enqueue our plugin’s index.js file:
function my_sidebar_plugin_register_script() {
	wp_enqueue_script(
		'my_sidebar_plugin_script',
		plugins_url( 'build/index.js', __FILE__ ),
		array( 'wp-plugins', 'wp-edit-post' ),
		filemtime( plugin_dir_path( __FILE__ ) . 'build/index.js' )
	);
}
add_action( 'enqueue_block_editor_assets', 'my_sidebar_plugin_register_script' );
That’s all for the PHP file. Next, we need to write the JS code.
index.js
Your index.js is located in the src folder, which is where you store your JS files during the development phase.
Open your index.js and add the following import declarations:
import { __ } from '@wordpress/i18n';
import { registerPlugin } from '@wordpress/plugins';
import { PluginSidebar } from '@wordpress/editor';
import { PanelBody, PanelRow, TextControl } from '@wordpress/components';
import { useSelect } from '@wordpress/data';
import { useEntityProp } from '@wordpress/core-data';
You need these resources to build the sidebar with the required controls.
Next, you need to build the sidebar component:
const MyPluginSidebar = () => {
	const postType = useSelect(
		( select ) => select( 'core/editor' ).getCurrentPostType(),
		[]
	);
	const [ meta, setMeta ] = useEntityProp( 'postType', postType, 'meta' );

	const bookTitle = meta ? meta[ 'meta_fields_book_title' ] : '';

	const updateBookTitleMetaValue = ( newValue ) => {
		setMeta( { ...meta, meta_fields_book_title: newValue } );
	};

	if ( postType === 'post' ) {
		return (
			<PluginSidebar
				name="my-sidebar-plugin"
				icon="book"
				title="My plugin sidebar"
			>
				<PanelBody title="Book details" initialOpen={ true }>
					<PanelRow>
						<TextControl
							value={ bookTitle }
							label={ __( "Book title" ) }
							onChange={ updateBookTitleMetaValue }
							__nextHasNoMarginBottom
						/>
					</PanelRow>
				</PanelBody>
			</PluginSidebar>
		);
	}
};

registerPlugin( 'my-sidebar-plugin', {
	render: MyPluginSidebar,
} );
The registerPlugin function registers the plugin and renders the component named MyPluginSidebar.
The function MyPluginSidebar declares a few constants and returns the JSX code of the component.
useSelectis a custom hook for retrieving props from registered selectors. We used it to get the current post type. See also this blog post from the WordPress Developer Blog.useEntityPropreturns an array of meta fields and a setter function to set new meta values. See also the online reference.updateBookTitleMetaValueis an event handler that saves thebookTitlemeta field value.
We used a few built-in components to build our sidebar:
PluginSidebarallows you to add items to the toolbar of either the Post or Site editor screens. (See the component’s reference.)PanelBodycreates a collapsible container that can be toggled open or closed. (See the component’s reference.)PanelRowis a generic container for rows within aPanelBody. (See the component’s reference.)TextControlis a single-line field that can be used for free text entry. (See the component’s reference.)
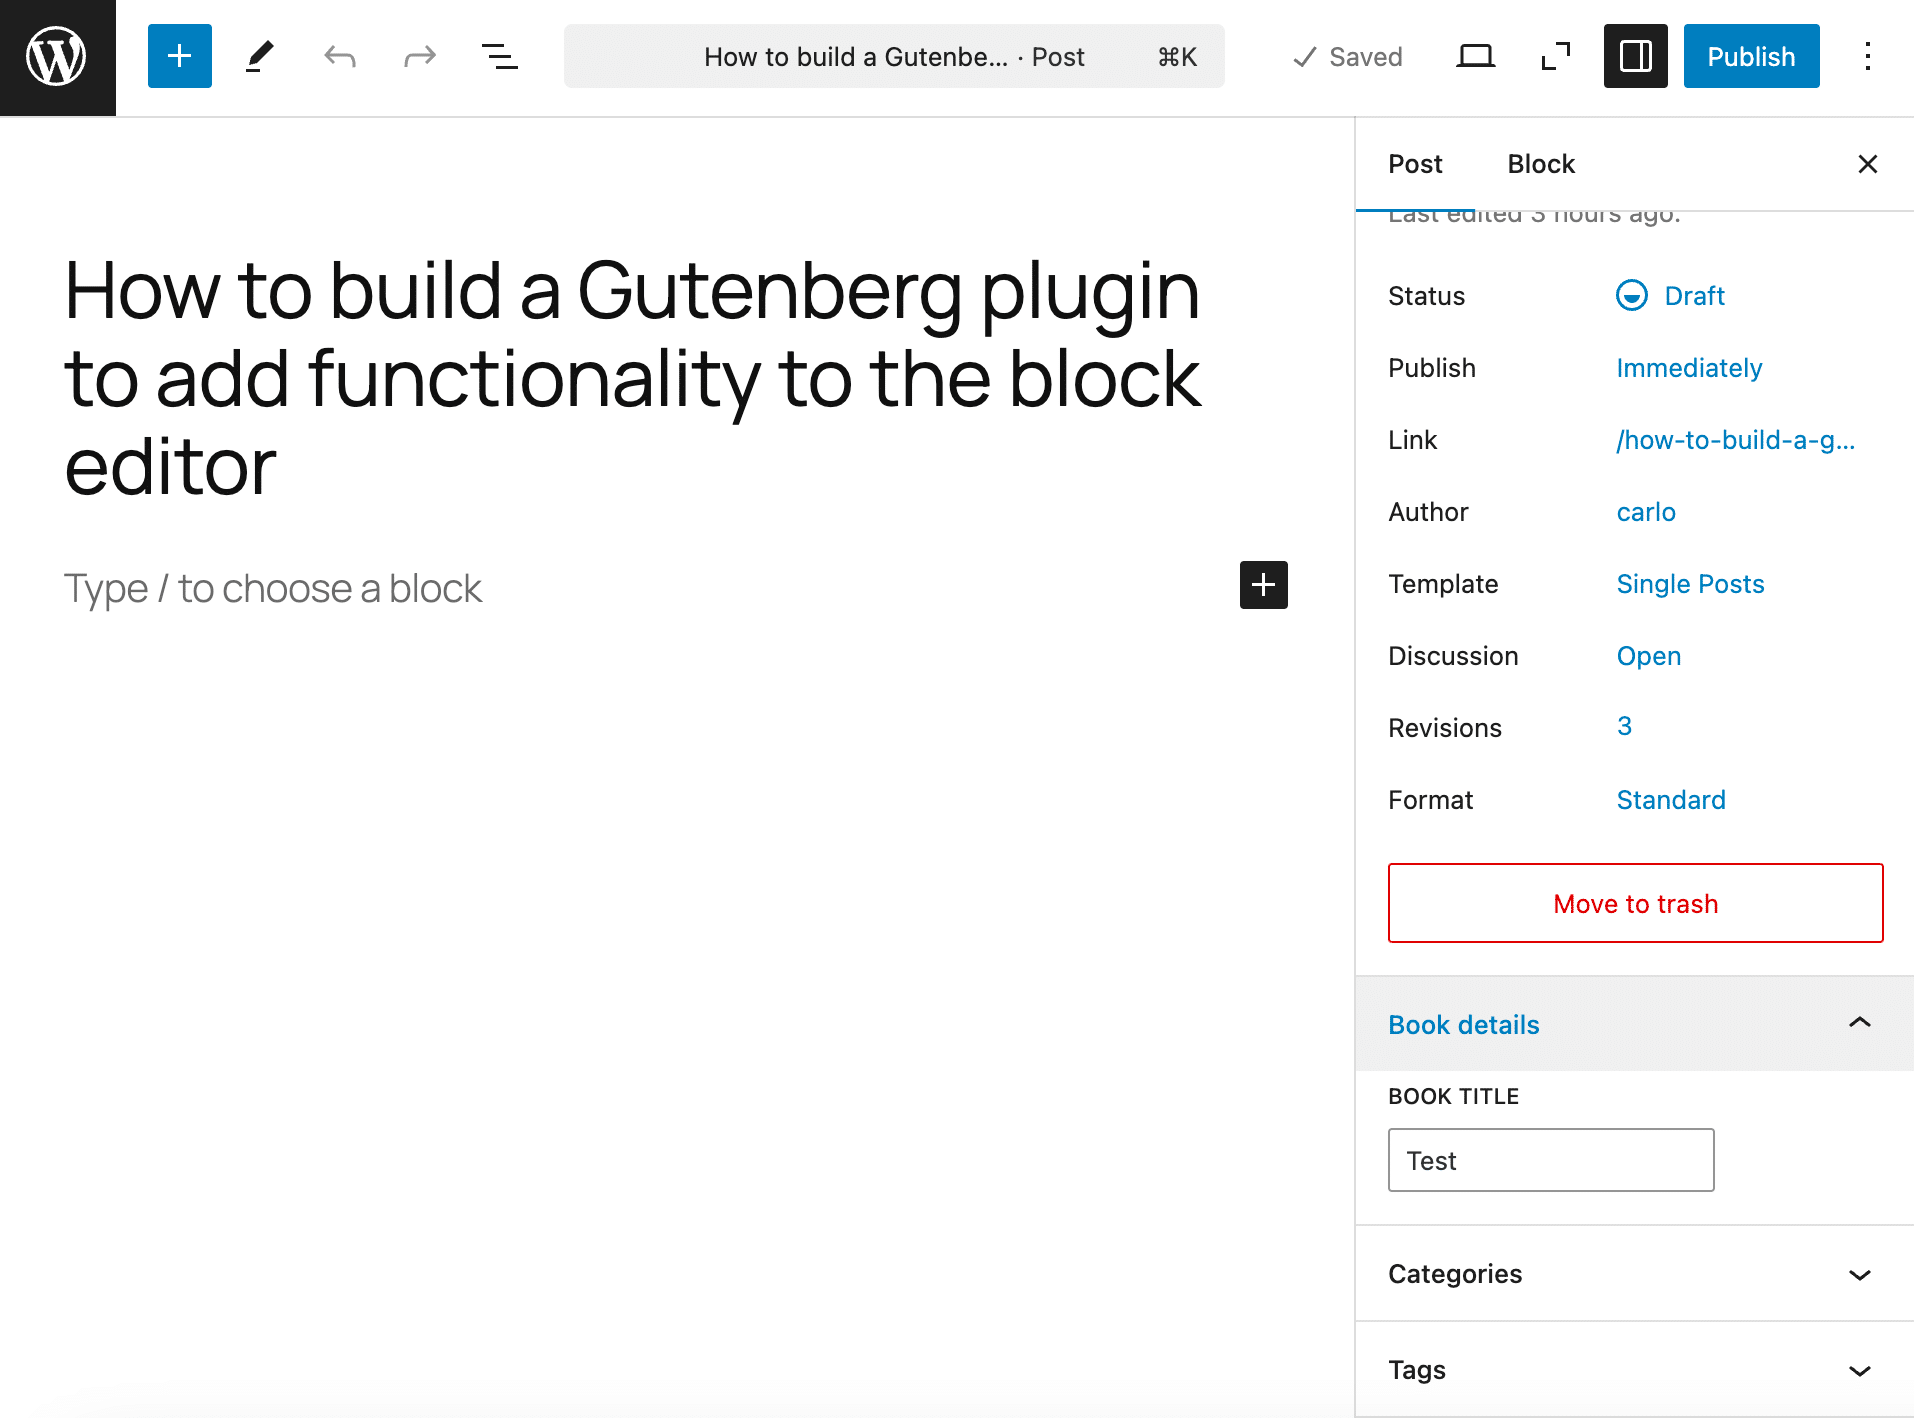
Now run the npm run build command, activate the plugin, and create a new post. A new book icon should appear in the top sidebar. Clicking on that icon shows your plugin sidebar.

What if you don’t need a new sidebar but want to display your custom field in the built-in post sidebar? You just need to replace PluginSidebar with PluginDocumentSettingPanel. This is your new index.js file:
import { __ } from '@wordpress/i18n';
import { registerPlugin } from '@wordpress/plugins';
import { PluginDocumentSettingPanel } from '@wordpress/edit-post';
import { PanelBody, PanelRow, TextControl } from '@wordpress/components';

import { useSelect } from '@wordpress/data';
import { useEntityProp } from '@wordpress/core-data';

const MyPluginSidebar = () => {
	const postType = useSelect(
		( select ) => select( 'core/editor' ).getCurrentPostType(),
		[]
	);
	const [ meta, setMeta ] = useEntityProp( 'postType', postType, 'meta' );

	const bookTitle = meta ? meta[ 'meta_fields_book_title' ] : '';

	const updateBookTitleMetaValue = ( newValue ) => {
		setMeta( { ...meta, meta_fields_book_title: newValue } );
	};

	if ( postType === 'post' ) {
		return (
			<PluginDocumentSettingPanel
				name="my-sidebar-plugin"
				title="Book details"
				className="my-sidebar-plugin"
			>
				<PanelRow>
					<TextControl
						value={ bookTitle }
						label={ __( "Book title" ) }
						onChange={ updateBookTitleMetaValue }
						__nextHasNoMarginBottom
					/>
				</PanelRow>
			</PluginDocumentSettingPanel>
		);
	}
};

registerPlugin( 'my-sidebar-plugin', {
	render: MyPluginSidebar,
} );
The following image shows the result.
A use case: a block pattern override to automate your workflow
You can now add a value for the custom field, and it will be available through the Block Bindings API for use with block attributes. For example, you can add a Paragraph block to your content and bind the custom field to the paragraph’s content attribute.
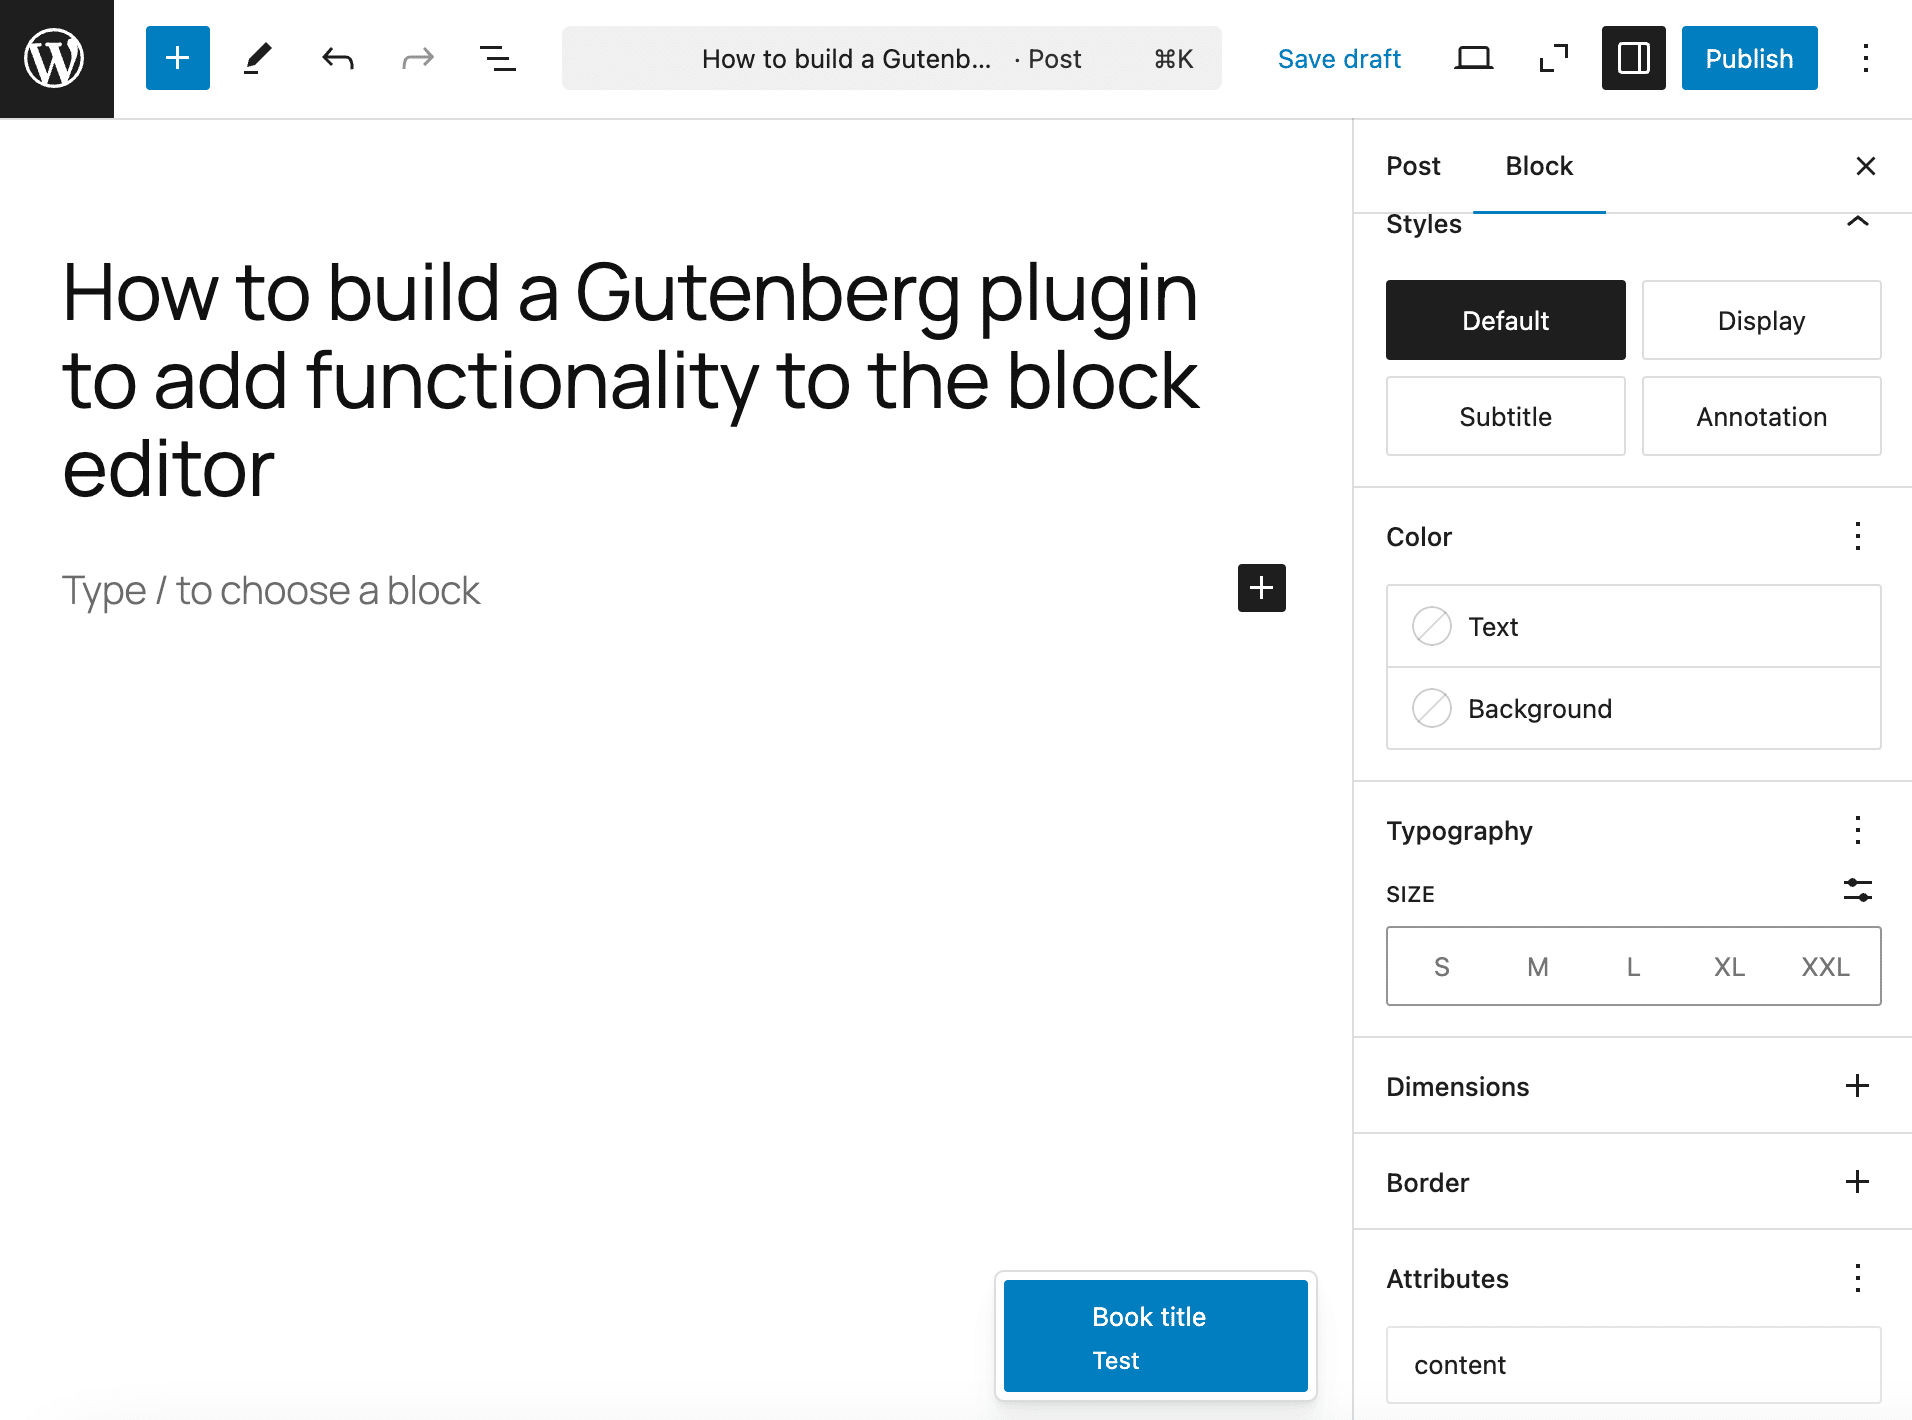
You are free to change the value of your custom field, and these changes will be automatically applied to the content of your paragraph.
If you are wondering if there’s more that you can do with custom fields and Block Bindings, the answer is yes! Block patterns and Block Bindings API allow you to automate the entire content creation process.
To have a clue, create a pattern with at least a heading or a paragraph. In this example, we create a block pattern with a Columns block, an Image, a Heading, and a couple of Row blocks, including two paragraphs each.
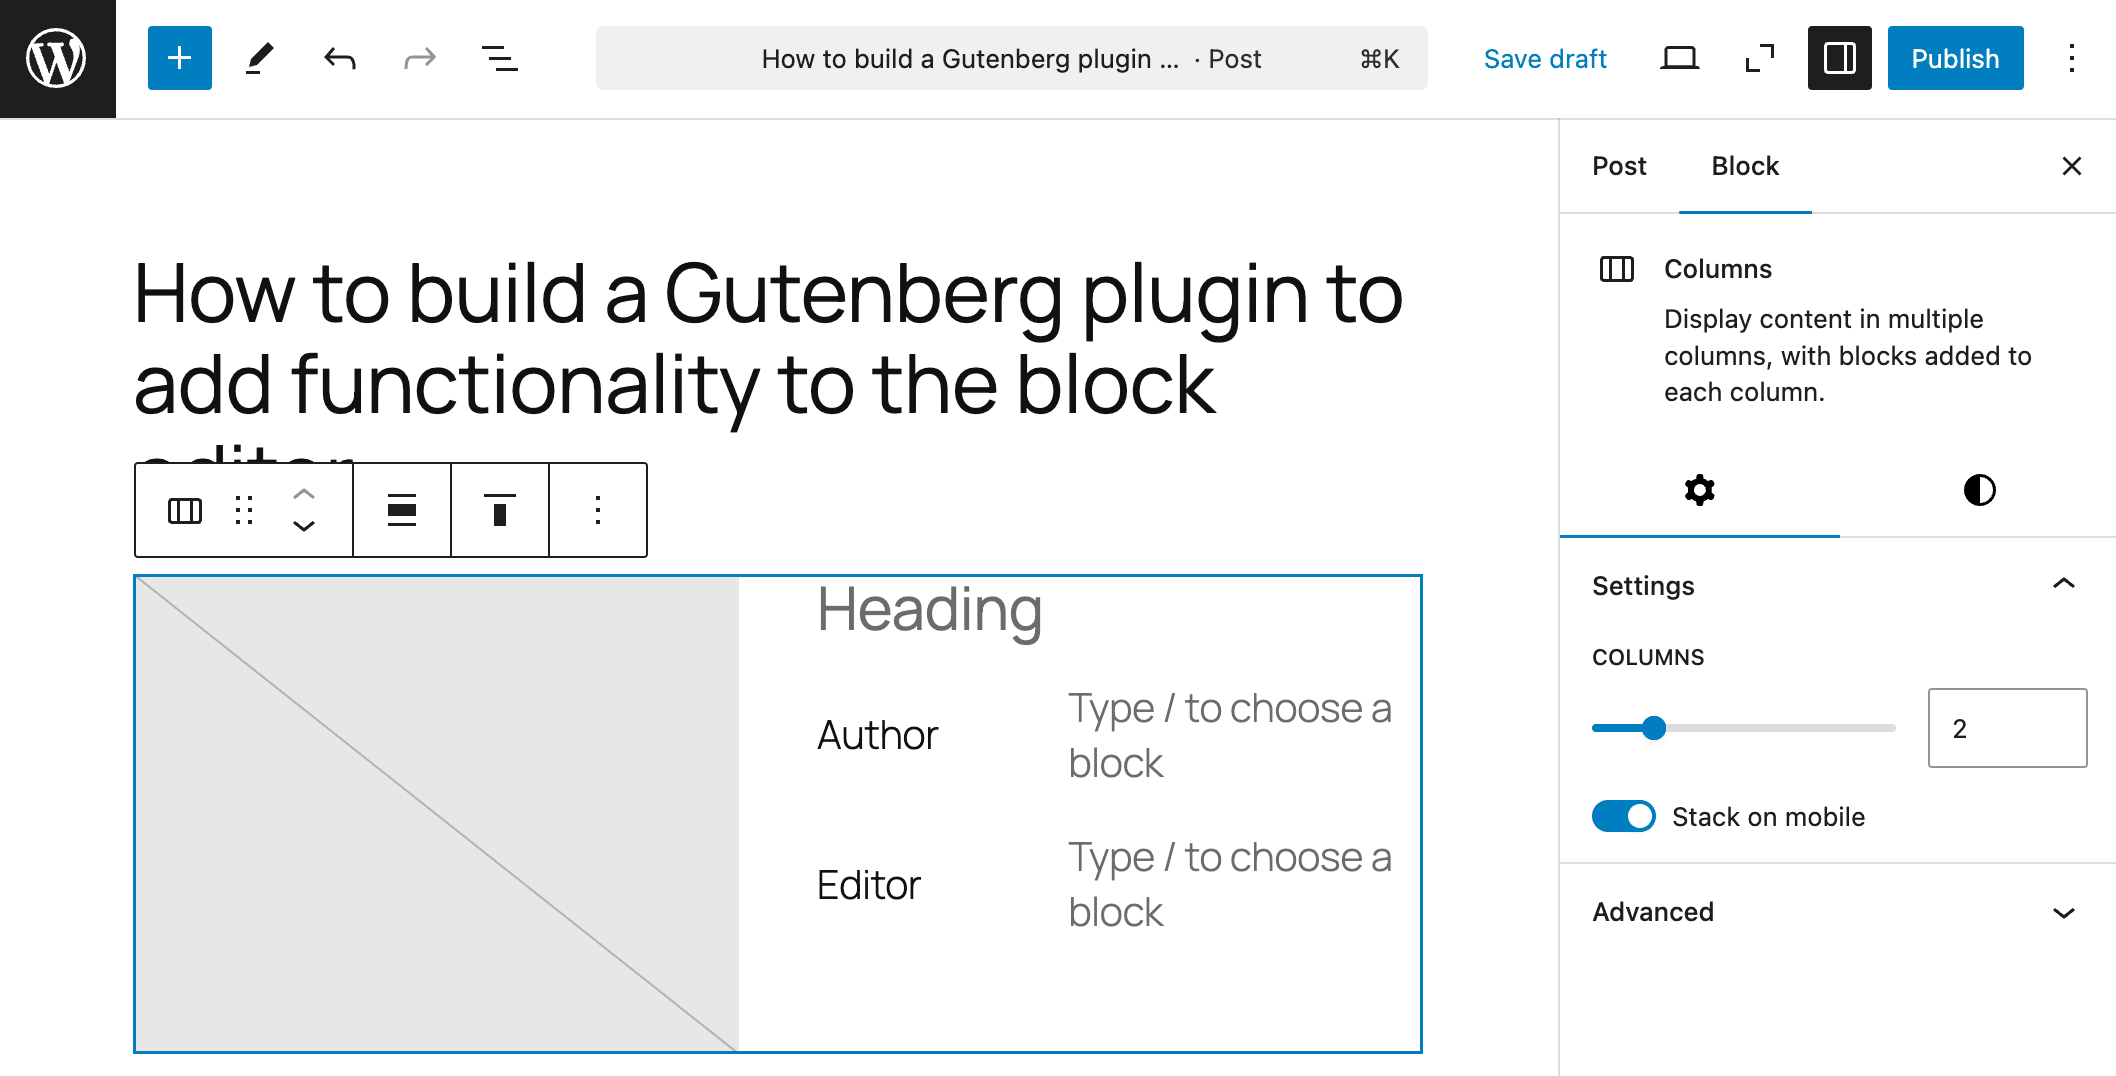
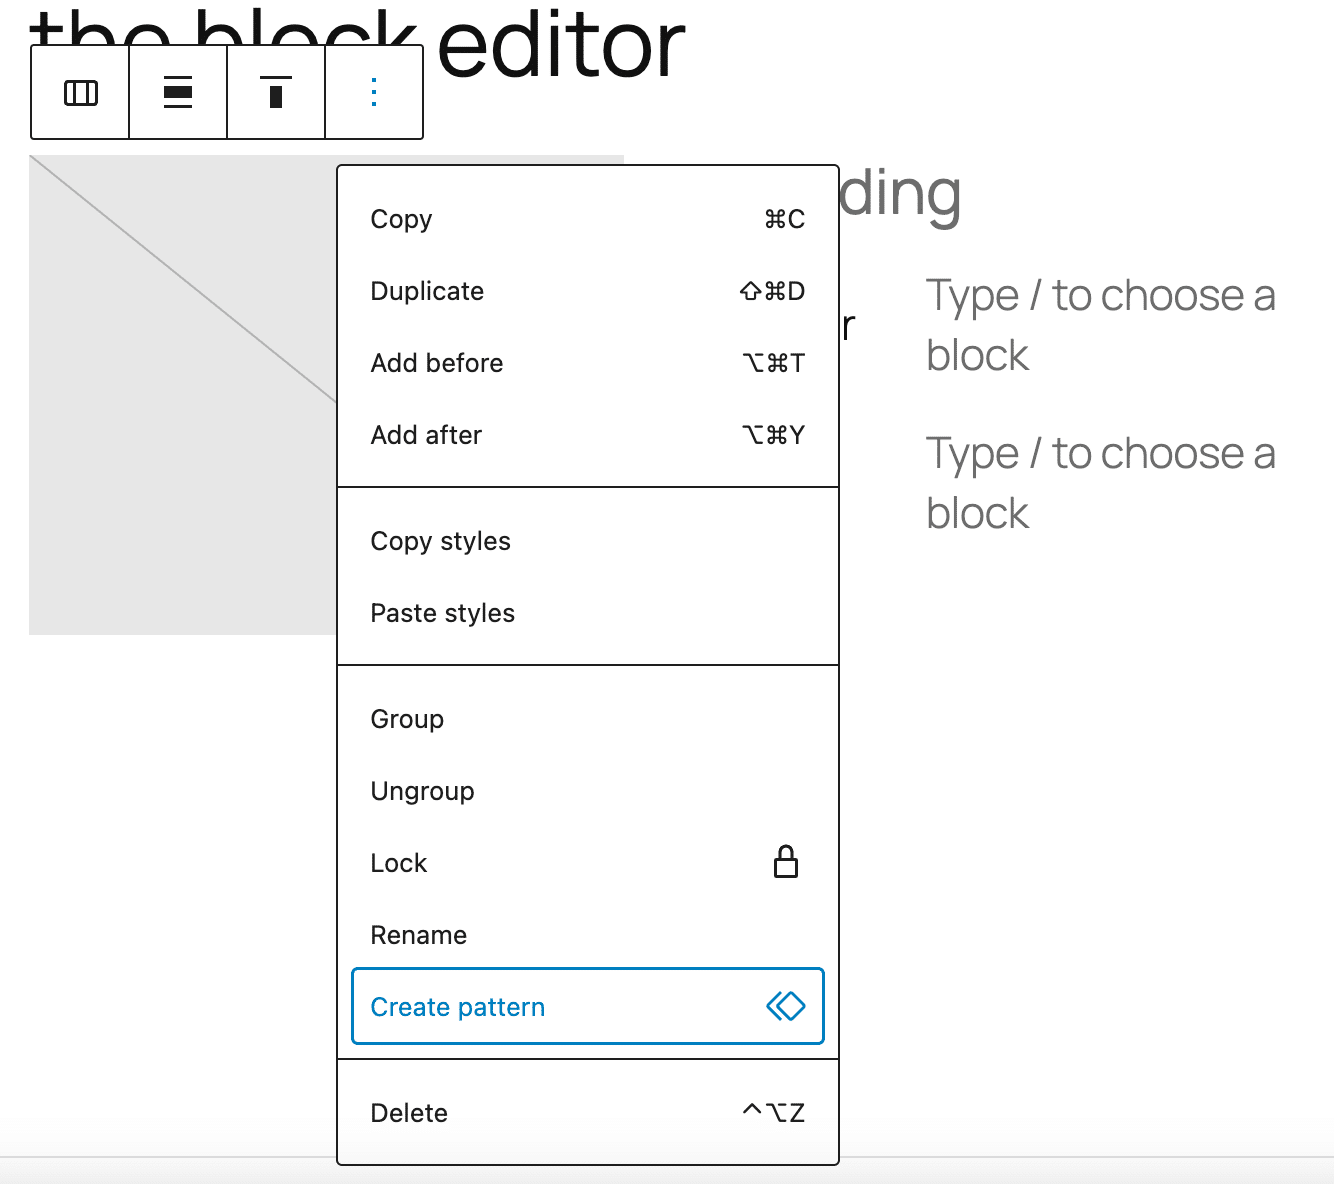
Once you are happy with your layout, select the wrapping elements and create a synced pattern.
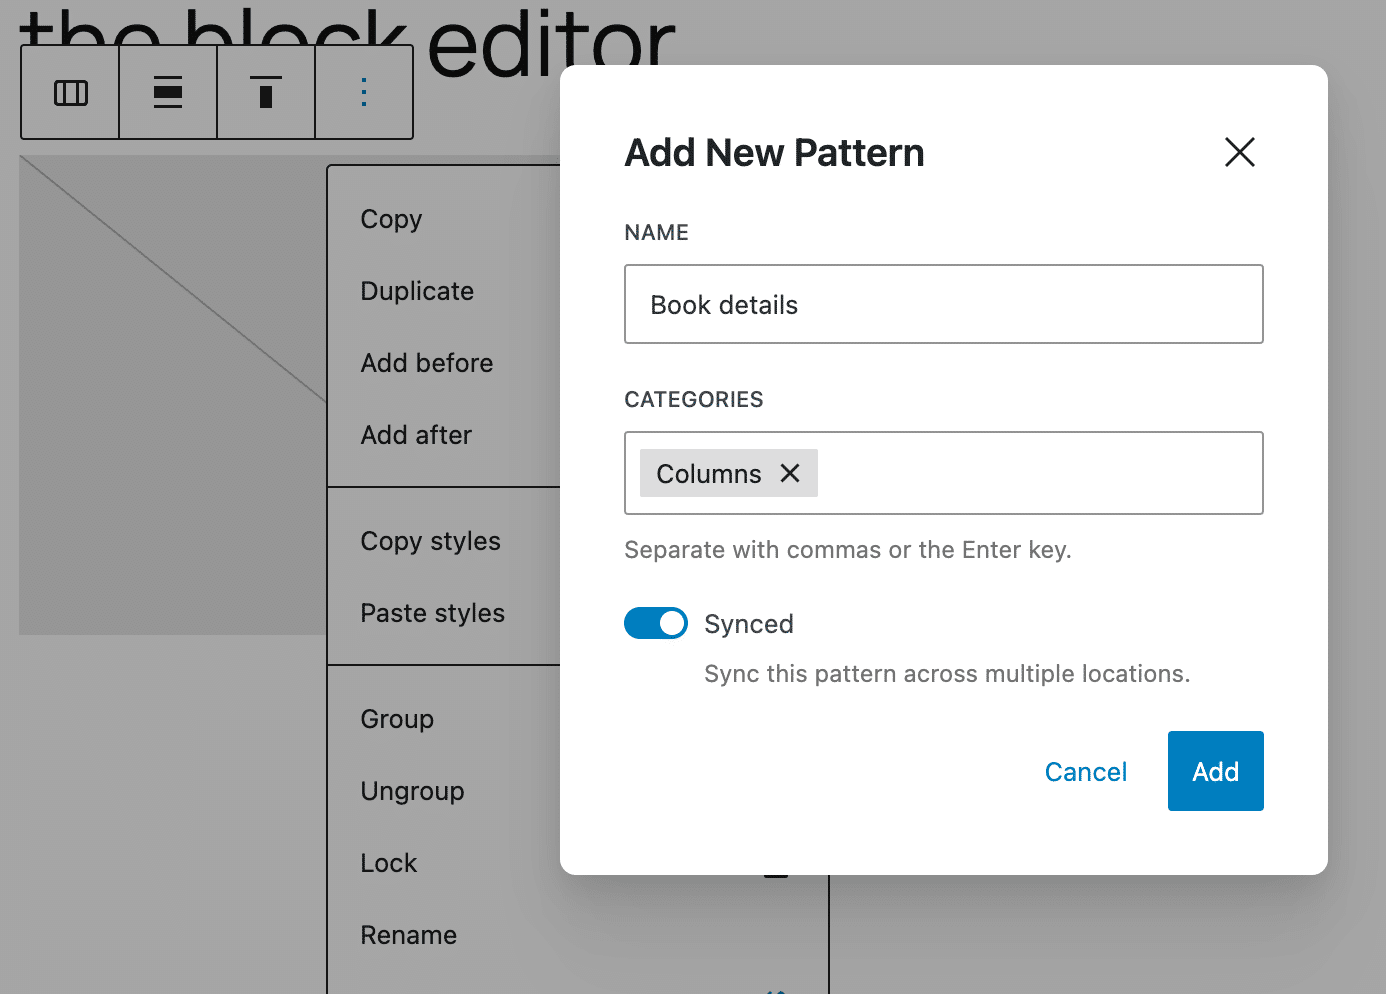
Add a name and a category for the block pattern, and make sure to sync it.
Next, if you created the pattern in the Post editor, select it and click on Edit original in the block toolbar. You can also navigate to the Patterns section of the Site editor and find the pattern under My Patterns or in the pattern category you have set before.
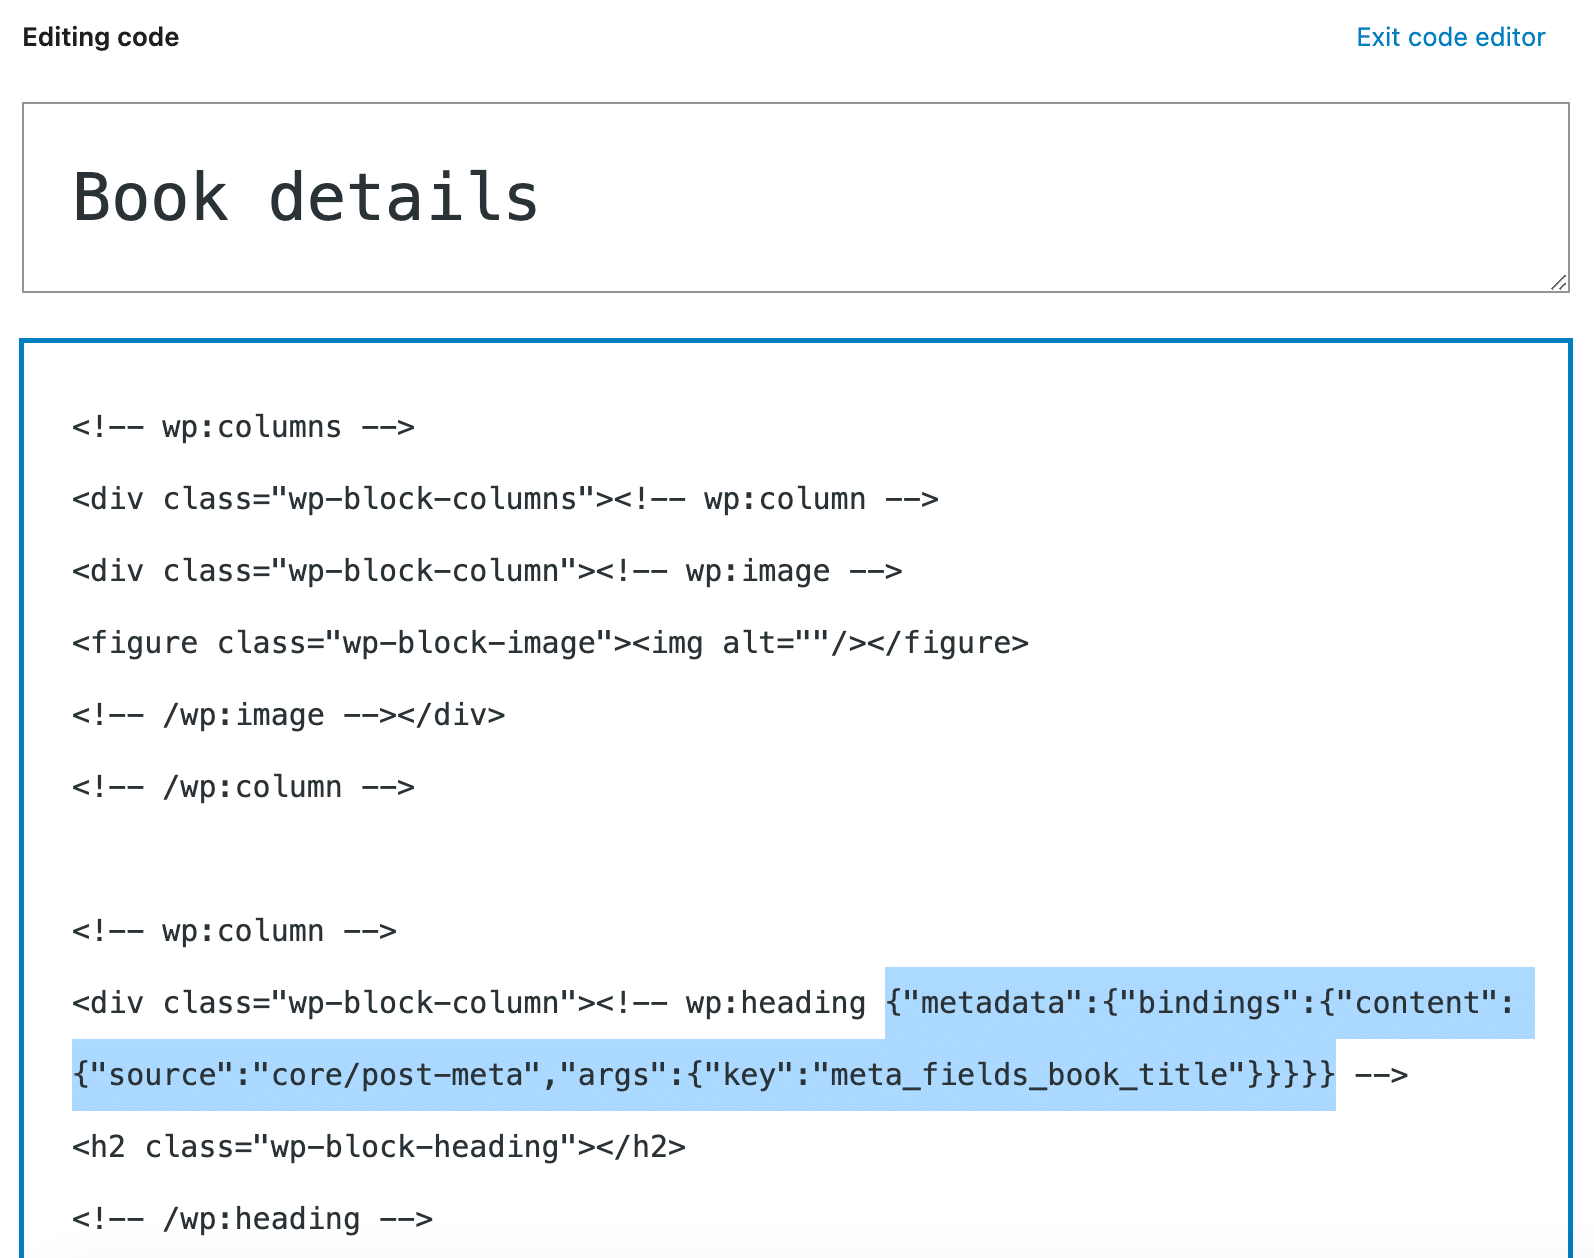
Open the Code Editor and find the block you want to bind to your custom field. In the block delimiter, add the following code:
<!-- wp:heading {
	"metadata":{
		"bindings":{
			"content":{
				"source":"core/post-meta",
				"args":{
					"key":"meta_fields_book_title"
				}
			}
		}
	}
} -->
Save the pattern and create a new post. Add the pattern to your content and set a value for the custom field. You should see that value automatically applied to your pattern.
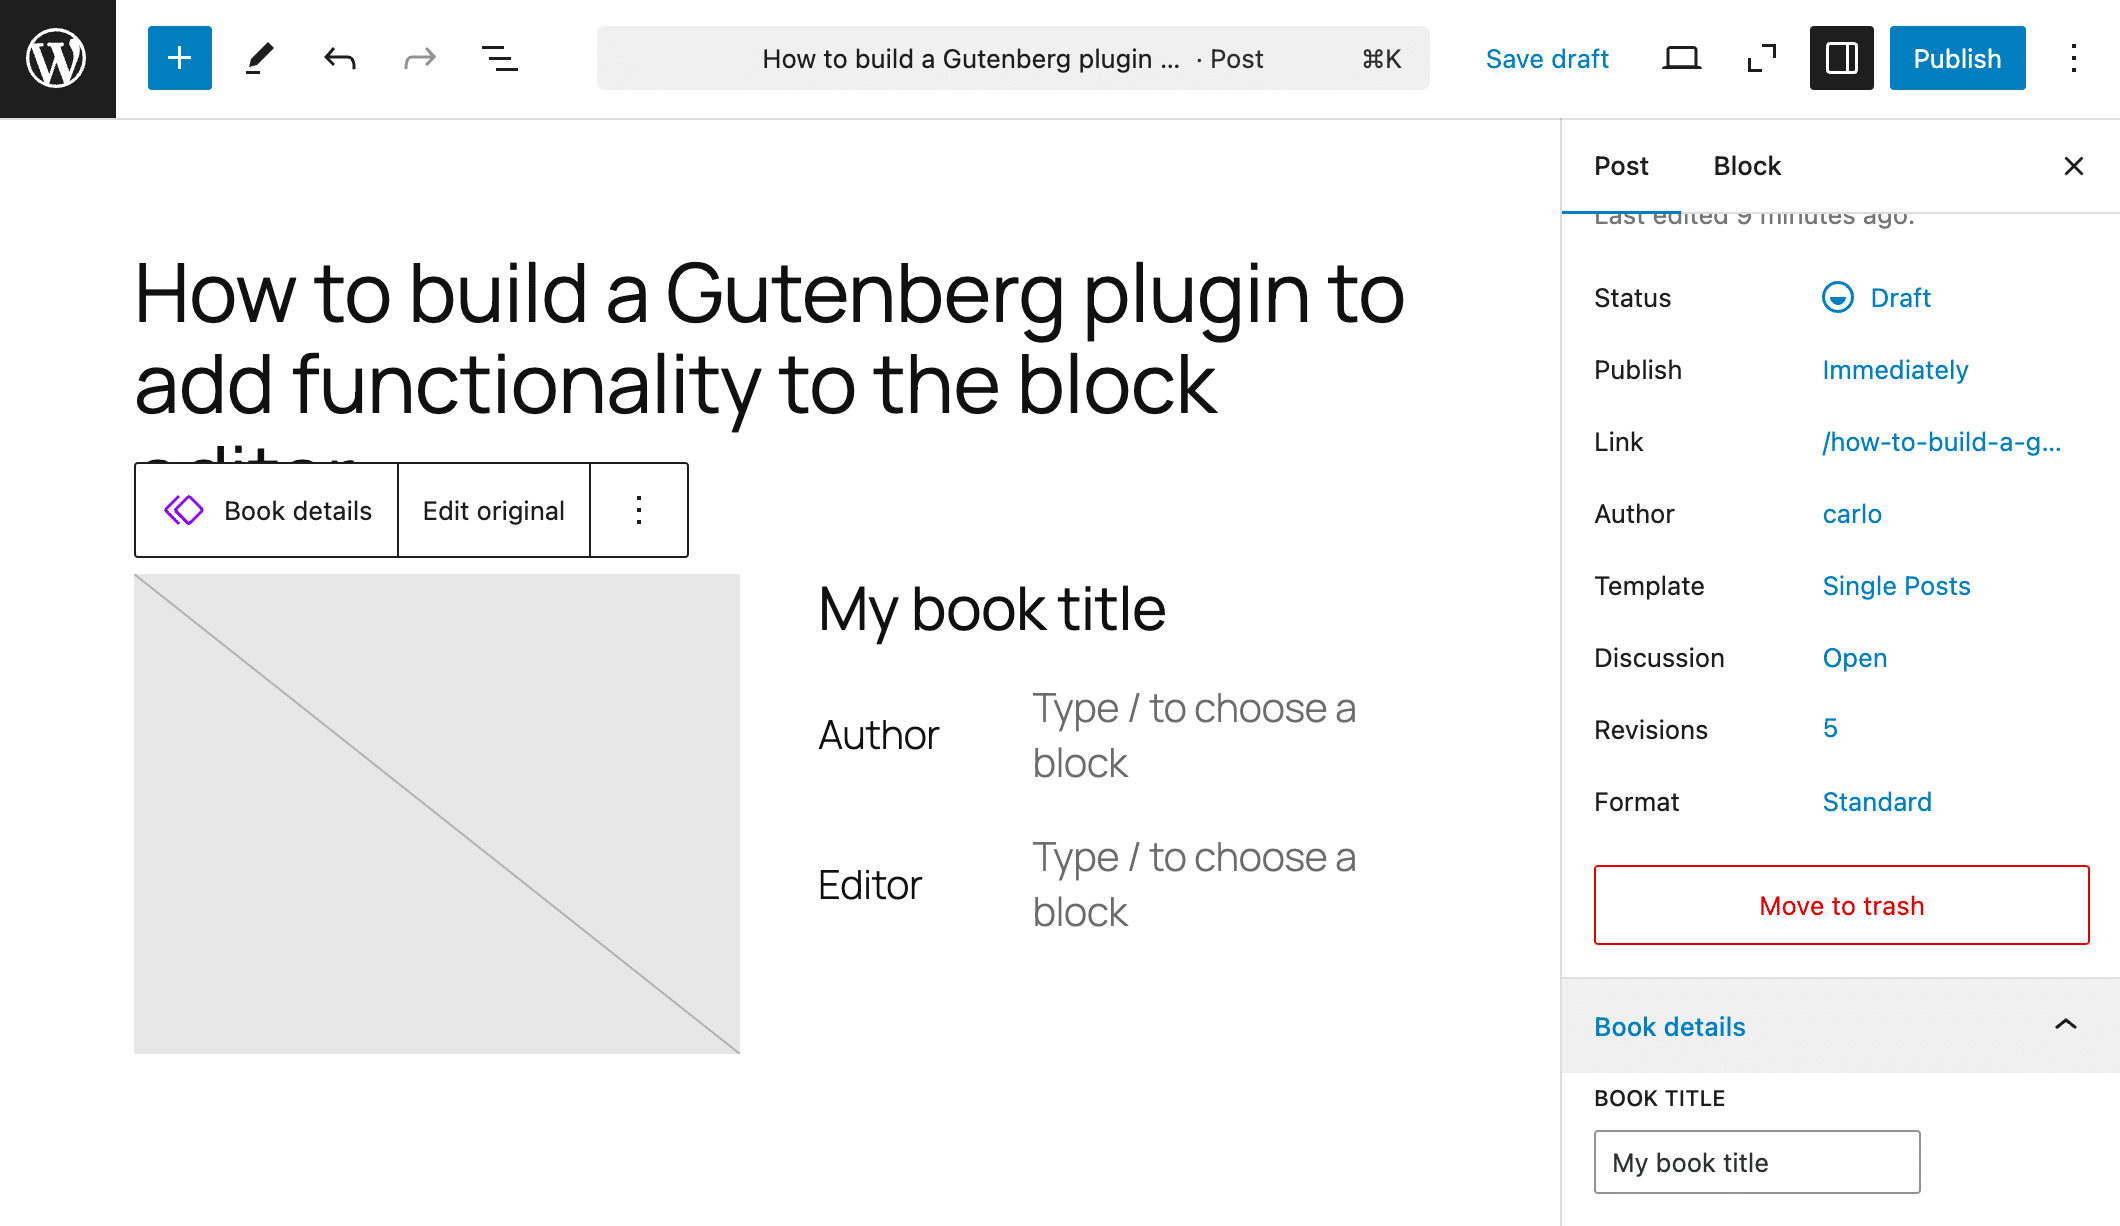
Now, you can play around with this plugin. Thanks to custom fields and the Block Bindings API, you can add more fields and controls to automatically populate your layouts.
Summary
Developing a custom block can be challenging. But do you need to build a block when you can do more with a block pattern?
With the advancements in block patterns and the introduction of powerful developer features, such as the Block Bindings API, creating custom blocks to build sophisticated and functional websites is no longer necessary. A simple plugin and a block pattern can effectively automate a significant portion of your workflow.
This tutorial demonstrated how to add functionality to the WordPress post editor through a plugin. However, what we have covered in this post only scratches the surface of what you can accomplish with the robust features WordPress now offers.
Have you already explored these features and added functionality to the WordPress editor? If so, feel free to share your experiences and insights in the comments section below.


