
Over the years, our services at Kinsta have always been handled manually via the MyKinsta dashboard. However, with the introduction of the Kinsta API and the ongoing release of new API endpoints, you can step up your game by developing a personalized method to engage with Kinsta services. One such means is developing a Slackbot to monitor and manage activities like site creation.
What You’re Building
This tutorial explains how to build a Slackbot (or Slack application) that interacts with the Kinsta API to retrieve information and delivers it as real-time messages to a designated Slack channel using the Slack API Incoming Webhooks.
To achieve this, you’ll create a Node.js application with the Express framework to create a UI for WordPress site creation and integrate it with the Kinsta API. The application uses a form to collect configuration details for your WordPress site and then sends a real-time update about the site’s information and details on how to check its operation status to the specified Slack channel.

Prerequisites
To follow along with this project, you should have the following:
- Basic knowledge of JavaScript and Node.js
- Node.js version 12 or higher
- npm (Node Package Manager) installed on your computer
- A Slack workspace
Setting Up the Development Environment
To get started, create a new directory for your application and initialize it with npm:
mkdir my-express-app
cd my-express-app
npm init -y
After running the npm init -y command, a new package.json file will be created in your project’s directory with default values. This file contains important information about your project and its dependencies.
Next, install the necessary dependencies for your project. The following dependencies are essential:
- ejs: EJS (Embedded JavaScript) is a templating engine that allows you to generate dynamic HTML content with JavaScript.
- express: Express is a fast and minimalist web application framework for Node.js. It simplifies building web applications and APIs by providing essential features like routing, middleware support, and handling HTTP requests and responses.
- express-ejs-layouts: Express EJS layouts is an extension for Express that enables the use of layouts or templates to maintain a consistent structure across multiple views.
To install these dependencies, run the command below:
npm install ejs express express-ejs-layoutsAdditionally, you’ll need to install the following dev dependencies to make it easier to build and test your Node.js project:
- nodemon: A valuable tool that automatically restarts your Node.js application whenever file changes in the directory is detected, ensuring a streamlined development workflow.
- dotenv: This zero-dependency module plays a crucial role in loading environment variables from a .env file.
To install these dev dependencies, run the command below:
npm install -D nodemon dotenvOnce your package.json is initialized and all dependencies are installed, create a new file, e.g. app.js.
touch app.jsHere’s a default setup for your app.js file, where you import necessary modules and set it to run on a specific port:
// Import required modules
const express = require('express');
const app = express();

// Set up your routes and middleware here
// ...

// Start the server to listen on the specified port
app.listen(process.env.PORT || 3000, () => {
  console.log(`Server is running on port ${process.env.PORT || 3000}`);
});
To run your Node.js application, execute the command:
node app.jsHowever, running an application like this means manually restarting it every time you make changes to your project. To overcome this inconvenience, use nodemon, which you already installed. Configure it in your package.json file by creating a script command:
  "scripts": {
    "dev": "nodemon app.js"
  },
Now, run your Node.js application with automatic restarts using the following command:
npm run devGetting Started With Express and EJS Templating
In this tutorial, you are building a Node.js application that will display content on the browser. To achieve this, express.js is used as your web framework, and EJS (Embedded JavaScript) as your templating engine.
To set EJS as your view engine, add the following line to your app.js file. This will make it possible to run .ejs files:
// Use EJS as the view engine
app.set('view engine', 'ejs');
Now that Express is configured with EJS, define your routes. In web applications, routes determine how the application responds to different HTTP requests (such as GET or POST) and specify the actions to be taken when a specific URL is accessed.
For example, create a route that will load a specific page when a user navigates to the index page (/). To do this, use the GET request method.
// Define a route for the homepage
app.get('/', (req, res) => {
  // Here, you can specify what to do when someone accesses the homepage
  // For example, render an EJS template or send some HTML content
});
In the above code, when a user accesses the index of your application the server will execute the callback function specified as the second parameter. Inside this callback function, you can handle the logic to render an EJS template or send some HTML content to be displayed on the homepage.
You can use the res.render() method to render an EJS template or use res.send() to send simple HTML content.
app.get('/', (req, res) => {
    res.send('Hello World');
});
When you run your application, “Hello World” will be displayed on the index page.
EJS Templating
This tutorial focuses on the logic and includes starter files, so you don’t have to worry about creating templates from scratch. Follow these steps to get started:
- Access the template on GitHub to create a new repository.
- Check the option Include all branches during repository creation.
- Once the repository is created, clone the project to your computer using Git.
- To access the starter code, switch to the starter-files branch in your local repository.
In the starter code, we have two major folders: public and views. The public folder holds all static assets (CSS files and images). They are added to the template as static files:
// Static files
app.use(express.static('/public'));
app.use('/css', express.static(__dirname + '/public/css'));
app.use('/images', express.static(__dirname + '/public/images'));
In the views folder, you have the layout.ejs file and two folders: pages and partials. The layout.ejs file holds the general layout of this project, so you don’t have to repeat some recurring code for all pages. Import the express-ejs-layouts library into the app.js file, then configure it:
// Import
const expressEjsLayouts = require('express-ejs-layouts');

// Configure
app.use(expressEjsLayouts);
The pages folder contains the route files (index.ejs and operation.ejs), while the partials folder contains components (header.ejs and footer.ejs). Add them to the layout like this:
<!DOCTYPE html>
<html lang="en">
    <head>
        <meta charset="UTF-8" />
        <meta name="viewport" content="width=device-width, initial-scale=1.0" />
        <link rel="icon" href="/images/favicon.ico" />
        <link rel="stylesheet" href="/css/index.css" />
        <title>Site Builder</title>
    </head>
    <body>
        <div class="app-container">
            <%- include('partials/header') %>
            <div class="container"><%- body %></div>
            <%- include('partials/footer') %>
        </div>
    </body>
</html>
When you run your Node.js application, the UI will load, but you need to add logic to this application to send the form data to the Kinsta API and send information about the site to Slack when the operation starts.
Getting Started With Slack Incoming Webhooks
Slack Incoming Webhooks provide a simple way to send messages from external applications to Slack. To use Slack Incoming Webhooks, create and configure a Slack application, then copy your Webhook URL for sending messages to Slack programmatically.
Setting Up a Slack App and Obtaining Webhook URL
Create a new Slack application by following these steps:
- Navigate to the Slack API dashboard.
- Click the Create New App button, which will open a modal.
- Select the From Scratch option to start building your app from the ground up.
- Provide a name for your Slack app, for example, Kinsta Bot.
- Next, choose the workspace where you want to install the app and click the Create App button.
Once your Slack application is created, you can enable incoming Webhooks by navigating to Features and selecting Incoming Webhooks. Toggle the switch to enable Incoming Webhooks for your app.
Scroll down to the Webhook URLs for Your Workspace section and click Add New Webhook to Workspace. You’ll be prompted to choose a channel where the messages will be sent. Select the desired channel and click Authorize.
After authorization, you’ll be provided with a Webhook URL for the selected channel. This URL is what you’ll use to send messages to Slack programmatically. This is what a Webhook URL looks like:
https://hooks.slack.com/services/T00000000/B00000000/XXXXXXXXXXXXXXXXXXXXXXXXThis Webhook is specific to a single user and a single channel. Keep it secure, as it acts as an authentication token for your app. You can store the unique codes after /services/ in your .env file. You’ll also be prompted to reinstall the app to your workspace for the changes to take effect.
Sending Messages to Slack With Node.js and Kinsta API
Now that your Node.js application’s interface is set up and the Slackbot has been successfully created (along with your WebHook URL), it’s time to handle the logic.
Fetch Form Data in Node.js
On the index page, you have a form that will send data to the Kinsta API to create a new WordPress site. To make this work, you need to create a POST request from the index page. Ensure that your form has a method POST, and the input fields have a name attribute, which will be used in the app.js file.
app.post('/', (req, res) => {
    // Perform the desired operation with the form data
});
To retrieve data from a form in Node.js, you’ll need to use the following middleware:
app.use(express.json());
app.use(express.urlencoded({ extended: true }));
Now, you can access your form values using req.body.[form field name]. For example, req.body.displayName will give you the display name submitted through the form. Let’s log the overall form data:
app.post('/', (req, res) => {
    console.log(req.body);
});
When you run your code, the form data will be displayed after you fill out the form and click the Submit button.

Site Creation With Kinsta API in Node.js
To create a WordPress site with the Kinsta API in Node.js, you can use the fetch() method, which is now supported and performs efficiently in the latest Node.js versions.
To perform any operation with the Kinsta API, you need to create an API key. To generate an API key:
- Go to your MyKinsta dashboard.
- Navigate to the API Keys page (Your name > Company settings > API Keys).
- Click Create API Key.
- Choose an expiration date or set a custom start date and number of hours for the key to expire.
- Give the key a unique name.
- Click Generate.
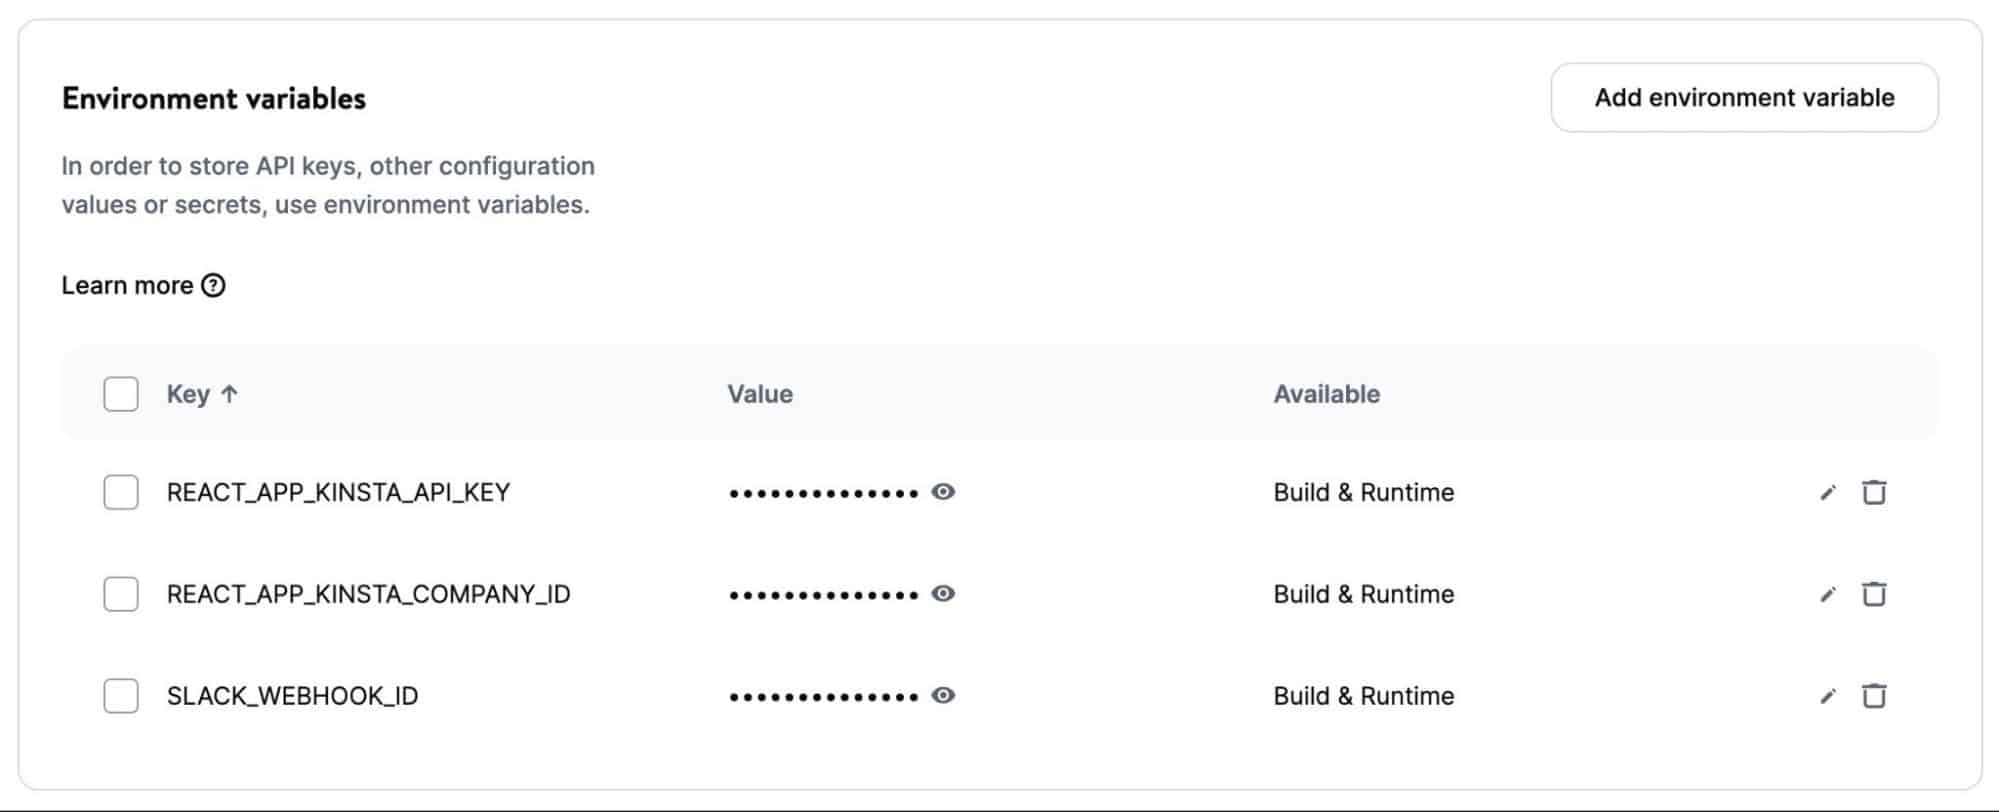
Make sure to copy the generated API key and store it securely, as it will only be visible at this moment. For this project, create a .env file in your root directory and save the API key as KINSTA_API_KEY.
Additionally, to create a WordPress site using the Kinsta API, you’ll need your Company ID (which can be found in MyKinsta under Company > Billing Details > Company ID). Store this ID in the .env file as well, so you can access these environment variables through process.env. To enable this functionality, ensure you configure the dotenv dependency at the top of your app.js file like this:
require('dotenv').config();To proceed with creating a WordPress site through the Kinsta API, send a POST request to the /sites endpoint, with the necessary data provided in the req.body object:
const KinstaAPIUrl = 'https://api.kinsta.com/v2';

app.post('/', (req, res) => {
    const createSite = async () => {
        const resp = await fetch(`${KinstaAPIUrl}/sites`, {
            method: 'POST',
            headers: {
                'Content-Type': 'application/json',
                Authorization: `Bearer ${process.env.REACT_APP_KINSTA_API_KEY}`,
            },
            body: JSON.stringify({
                company: process.env.REACT_APP_KINSTA_COMPANY_ID,
                display_name: req.body.displayName,
                region: req.body.location,
                install_mode: 'new',
                is_subdomain_multisite: false,
                admin_email: req.body.email,
                admin_password: req.body.password,
                admin_user: req.body.username,
                is_multisite: false,
                site_title: req.body.siteTitle,
                woocommerce: false,
                wordpressseo: false,
                wp_language: 'en_US',
            }),
        });
        const data = await resp.json();
        console.log(data);
    };
    createSite();
});
By running the code above, you’ll create a new WordPress site with Kinsta API. But this is not the main goal. The goal is to send a message to Slack containing information about the site when the site creation operation is successful.
Send a Message to Slack With the Incoming Webhook URL
To do this, create an If statement to check the API request response status. If it is 202, it means “site creation has started” and you can send a message to Slack using the incoming Webhooks URL. To achieve this, you can use your preferred HTTP request library (e.g. Axios) or method to send a POST request to Slack. Let’s use the fetch() method:
if (data.status === 202) {
    fetch(
        `https://hooks.slack.com/services/${process.env.SLACK_WEBHOOK_ID}`,
        {
            method: 'POST',
            headers: {
                'Content-Type': 'application/json',
            },
            body: JSON.stringify({
                text: 'Hello, world.',
            }),
        }
    );
}
Run the code above and fill out the site creation form. If the process is successful, a message will be sent to Slack immediately.

Customizing Slack Messages
The example above sends a basic text message, but Slack Incoming Webhooks support much more than simple text. You can customize your messages to include attachments, links, images, buttons, and more.
One way you can customize Slack messages is by using the Slack block Kit Builder. The Block Kit is a UI framework provided by Slack that allows you to build rich and interactive messages with various content elements.
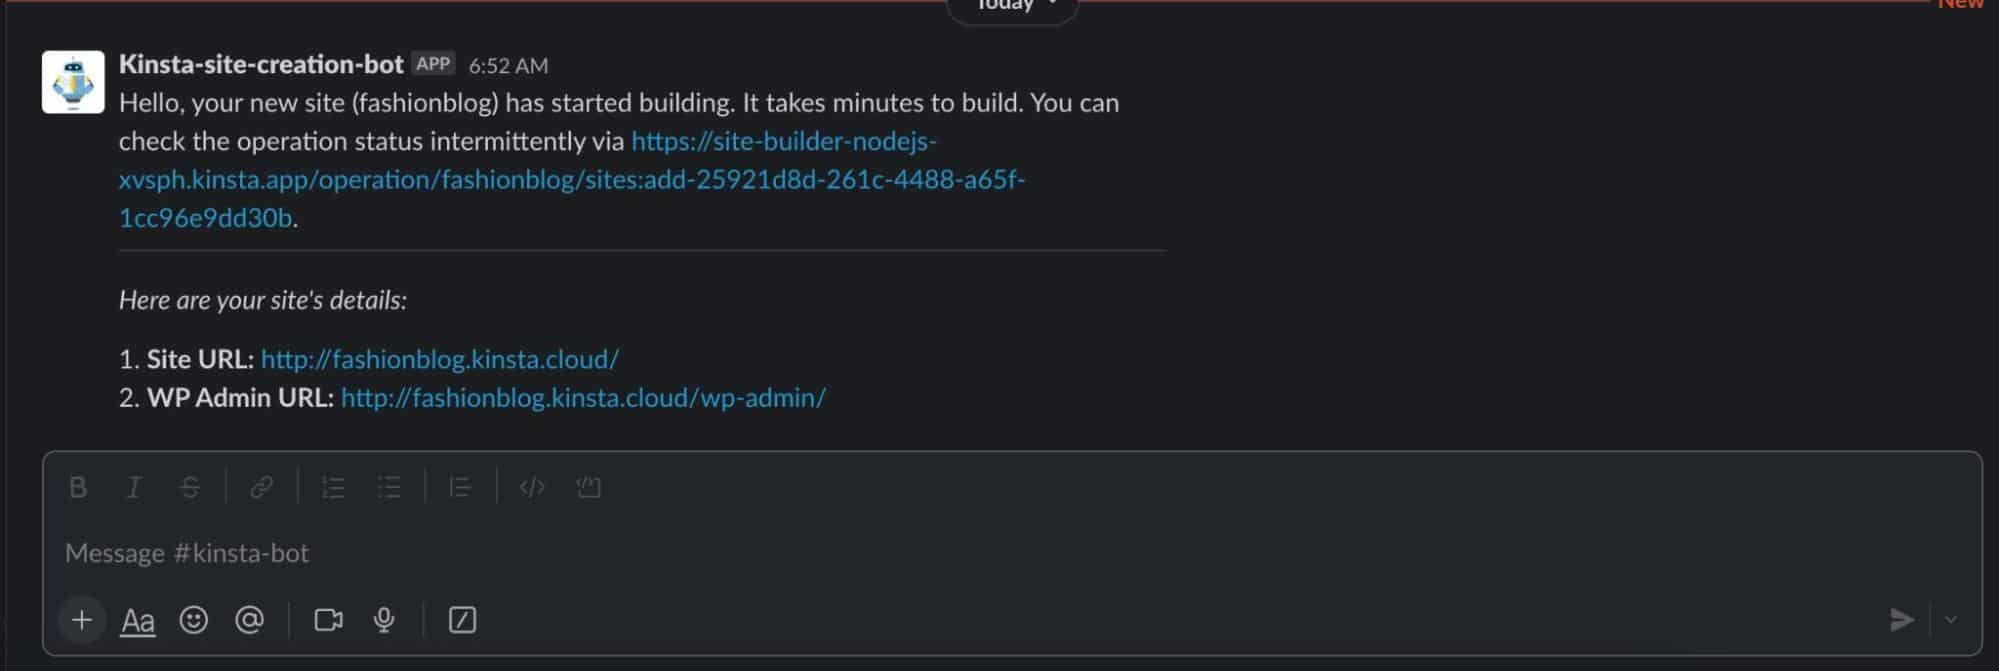
For this tutorial, here is a block created with the block kit builder to format the message properly and add some values from the form and the site creation response:
const message = {
    blocks: [
        {
            type: 'section',
            text: {
                type: 'mrkdwn',
                text: `Hello, your new site (${req.body.displayName}) has started building. It takes minutes to build. You can check the operation status intermittently via https://site-builder-nodejs-xvsph.kinsta.app/operation/${req.body.displayName}/${data.operation_id}.`,
            },
        },
        {
            type: 'divider',
        },
        {
            type: 'section',
            text: {
                type: 'mrkdwn',
                text: "_Here are your site's details:_",
            },
        },
        {
            type: 'section',
            text: {
                type: 'mrkdwn',
                text: `1. *Site URL:* http://${req.body.displayName}.kinsta.cloud/\n2. *WP Admin URL:* http://${req.body.displayName}.kinsta.cloud/wp-admin/`,
            },
        },
    ],
};
In this code, you create a message object containing an array of blocks. Each block represents a specific section of the Slack message and can have different types of content.
- Section Block: This block type is used to display a section of text. You use the
type: 'section'to indicate it’s a section block. Inside the section block, the text property is used withtype: 'mrkdwn'to specify that the text content should be interpreted as Markdown format. The actual text content is provided in the text property, and we use template literals to include dynamic values from the form and the site creation response, such asreq.body.displayNameanddata.operation_id. - Divider Block: This block type is used to add a horizontal line to separate sections of the message. We use
type: 'divider'to create the divider block.
When this message is sent to Slack using the Incoming Webhook, it will generate a visually appealing and informative message in your Slack channel. The message will include dynamic values from the form (like the site’s name) and information from the site creation response, making it a highly customized and personalized message.
To send this customized message, replace the object in the body of the fetch() with the contents of the message variable:
if (data.status === 202) {
    fetch(
        `https://hooks.slack.com/services/${process.env.SLACK_WEBHOOK_ID}`,
        {
            method: 'POST',
            headers: {
                'Content-Type': 'application/json',
            },
            body: JSON.stringify(message),
        }
    );
}
Handle Site Creation Operation With Kinsta API
In the message sent to Slack, a link is created that has the operation ID and display name. You can create a new route for the Operations page to use this data to check the operation status.
In Express, you can access URL parameters with the req parameter. For example, to get the operation ID, you use req.params.operationId.
const KinstaAPIUrl = 'https://api.kinsta.com/v2';

app.get('/operation/:displayName/:operationId', (req, res) => {
    const checkOperation = async () => {
        const operationId = req.params.operationId;
        const resp = await fetch(`${KinstaAPIUrl}/operations/${operationId}`, {
            method: 'GET',
            headers: {
                Authorization: `Bearer ${process.env.REACT_APP_KINSTA_API_KEY}`,
            },
        });
        const data = await resp.json();
        res.render('pages/operation', {
            operationID: req.params.operationId,
            displayName: req.params.displayName,
            operationMessage: data.message,
        });
    };
    checkOperation();
});
With the code above, clicking the link in Slack will make a request to the Kinsta API to check your site’s operation status. Update the operation.ejs file to add dynamic data:
<div class="container-title">
    <h1 class="title">Check Site Operation Status</h1>
    <p>
        Check the status of your site tools operation via the id. Feel free to copy
        the ID and check in few seconds.
    </p>
</div>
<div class="form-container">
    <div class="input-div">
        <input class="form-control" value="<%= operationID %>" readOnly />
    </div>
    <button class="btn" type="submit" onclick="window.location.reload()">
        Refresh Operation Status
    </button>
</div>
<div class="services">
    <div class="details">
        <p><%= operationMessage %>..</p>
    </div>
</div>
<div class="services">
    <p class="description">
        If message above indicates that "Operation has successfully finished", use
        the links below to access your WP admin and the site itself.
    </p>
    <div class="details">
        <a
            href="http://<%= displayName %>.kinsta.cloud/wp-admin/"
            target="_blank"
            rel="noreferrer"
            class="detail-link"
        >
            <p>Open WordPress admin</p>
            <FiExternalLink />
        </a>
        <a
            href="http://<%= displayName %>.kinsta.cloud/"
            target="_blank"
            rel="noreferrer"
            class="detail-link"
        >
            <p>Open URL</p>
            <FiExternalLink />
        </a>
    </div>
</div>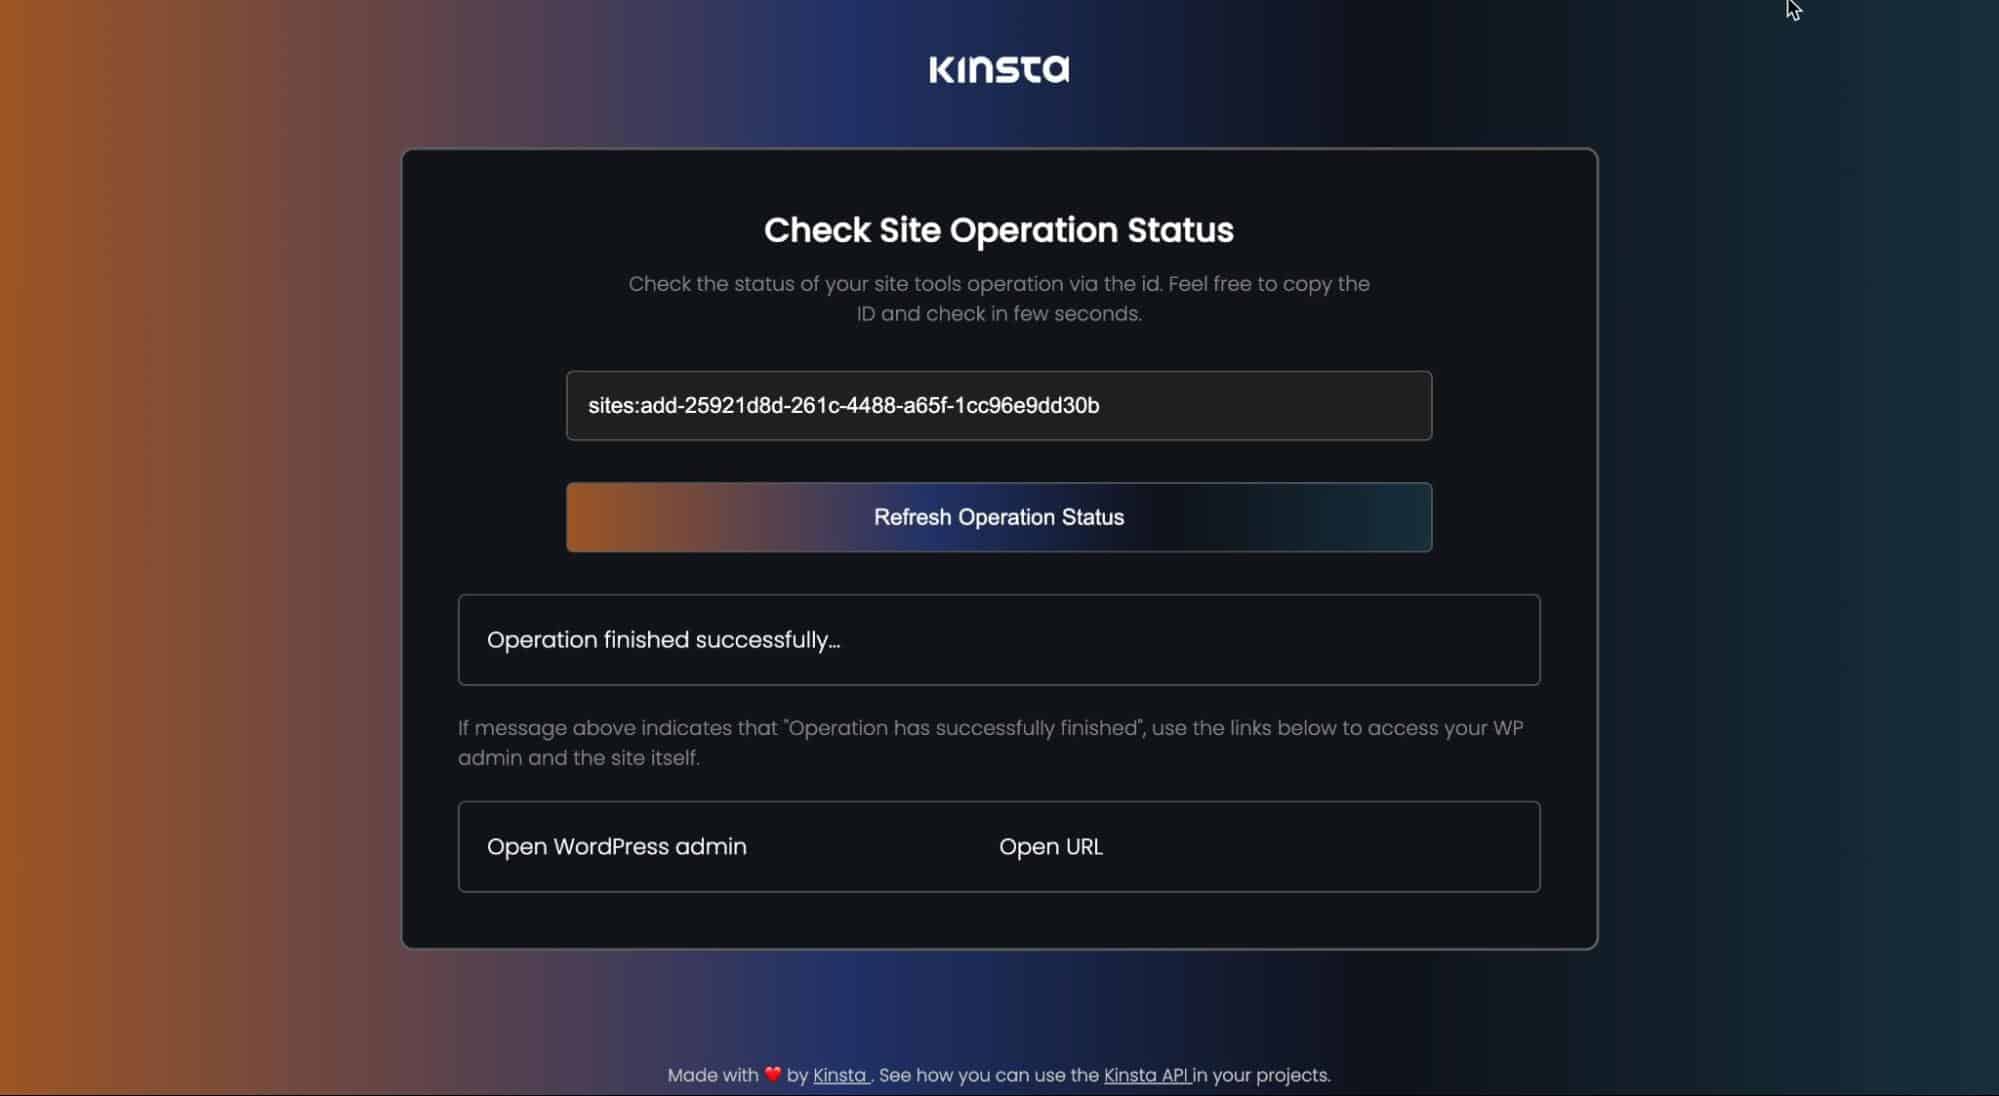
One last thing, you can use the redirect method to navigate to the operations page when a site creation process starts:
if (data.status === 202) {
    fetch(
        `https://hooks.slack.com/services/${process.env.SLACK_WEBHOOK_ID}`,
        {
            method: 'POST',
            headers: {
                'Content-Type': 'application/json',
            },
            body: JSON.stringify(message),
        }
    );
    res.redirect(`/operation/${req.body.displayName}/${data.operation_id}`);
}
The complete source code for this project is available on this GitHub repository’s main branch.
Deploying Your Node.js Application to Kinsta
You can easily deploy this Node.js application to Kinsta’s Application Hosting platform. All you have to do is push your code to your preferred Git provider (Bitbucket, GitHub, or GitLab). Then follow these steps:
- Log in to your Kinsta account on the MyKinsta dashboard.
- Click Add service.
- Select Application from the dropdown menu.
- In the modal that appears, choose the repository you want to deploy. If you have multiple branches, you can select the desired branch and give a name to your application.
- Select one of the available data center locations. Kinsta will detect and install your app’s dependencies from package.json, then build and deploy.
Finally, it’s not safe to push out API keys to public hosts like your Git provider. When hosting, you can add them as environment variables using the same variable name and value specified in the .env file.
Once you initiate the deployment of your application, it will typically build and deploy within a few minutes. A link to your new application will be provided, which looks like this: https://site-builder-nodejs-xvsph.kinsta.app.
Summary
In this tutorial, you have learned how to send messages to Slack from a Node.js application using Incoming Webhooks and how to customize Slack messages with the Block Kit Builder.
The possibilities with Slack and the Kinsta API are vast, and this tutorial is just the beginning. By integrating these tools, you can create a seamless workflow that keeps your team well-informed and boosts productivity.
How are you using Kinsta API? What features would you like to see added/exposed next?


