Kinsta is a cloud platform designed to help companies and dev teams ship and manage their web projects faster and more efficiently.

Kinsta provides developers and users with an API to manage their WordPress sites, applications, and databases programmatically.

The Kinsta API can be used to automate tasks, retrieve data, and integrate Kinsta with other applications without accessing MyKinsta. To access the API, you need an API key. This article explains the process of creating and using a Kinsta API key.

How to create an API key

To use Kinsta’s API, you must have an account with at least one WordPress site, application, or database in MyKinsta. You’ll also need to generate an API key to authenticate and access your account through the API. To generate an API key:

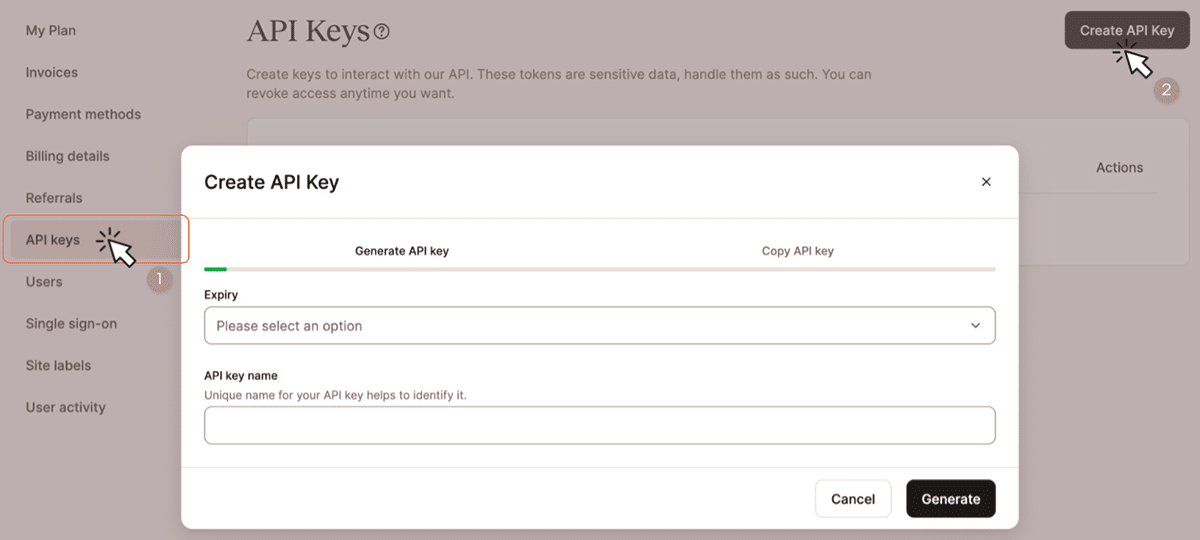
  1. Go to your MyKinsta dashboard.
  2. Navigate to the API Keys page (Your name > Company settings > API Keys).
  3. Click Create API Key.
  4. Choose an expiration or set a custom start date and number of hours for the key to expire.
  5. Give the key a unique name.
  6. Click Generate.
Create API Key on MyKinsta
Create API Key on MyKinsta.

When you create an API key, copy it and store it somewhere safe, as this is the only time you can see it. You can generate multiple API keys—they will be listed on the API Keys page. If you need to revoke an API key, click Revoke next to the one you want to revoke.

How to use Kinsta API with your API key

Once you have the API key, you can interact with all Kinsta’s services (WordPress sites, Applications, and Databases) via the Kinsta API, such as getting a list of databases by company ID, company sites, creating a WordPress site, and more.

For example, to get a list of company sites in your MyKinsta, the endpoint is /sites. The API key will serve as your authorization header; you will also add the company ID (required parameter). Here’s how to make this API request using cURL:

curl -i -X GET \
  'https://api.kinsta.com/v2/sites?company=' \
  -H 'Authorization: Bearer <YOUR_API_KEY_HERE>'

Replace YOUR_API_KEY_HERE with the actual API key you generated and

COMPANY_ID_HERE with your unique company ID. This will return a JSON response of all the company sites in your DevKinsta dashboard:

{
    "company": {
        "sites": [
            {
                "id": "YOUR_SITE_ID",
                "name": "my-test-site",
                "display_name": "Test site",
                "status": "live",
                "site_labels": []
            }
        ]
    }
}

Another example, suppose you want to fetch a specific site by ID (GET request). You can use the /sites/{site_id} endpoint. {site_id} will be replaced with the unique ID of the specific site you want to fetch. Here’s how to make this API request using NodeJS:

import fetch from 'node-fetch';

async function fetchSite() {
  const siteId = 'YOUR_SITE_ID';
  const response = await fetch(
    `https://api.kinsta.com/v2/sites/${siteId}`,
    {
      method: 'GET',
      headers: {
        Authorization: 'Bearer 
      }
    }
  );

  const data = await response.json();
  console.log(data);
}

fetchSite();

There is more to what you can do with the Kinsta API. For full details on available API endpoints and the parameters needed, to download our OpenAPI specification, and to try out endpoints, see our API Reference.

Permissions

API access permissions for Kinsta depend on the user’s role within the company, as company owners, administrators, and developers can create API keys.

For example, an API key generated by a developer will not have the same level of access as a key generated by a company owner or administrator. The specific permissions associated with each user role ensure appropriate access control and security for the Kinsta API.

How to use Kinsta API to build a status checker

When you create an application, site, or database on MyKinsta, it goes through different stages. A way to identify these stages is through their status. For example, an application deployed to Kinsta will have a status for when it is deploying, successfully deployed, or failed.

The Kinsta API provides endpoints that allow you to retrieve status information about your projects on MyKinsta. For this project, you will interact with three endpoints i.e. the /applications, /sites, and /databases, to fetch an array of all applications, sites, and databases using the JavaScript Fetch API.

Once you have retrieved the list, you can use the find() method in JavaScript to search for a specific project name entered into the user interface (UI). This returns the name and status of the project if it exists.

Status checker web application
Status checker web application.

Prerequisite

To follow along with this project, it is advisable to have a basic understanding of HTML, CSS, and JavaScript and some familiarity with React. The main focus of this project is to demonstrate the utilization of the Kinsta API, so the article will not delve into the details of UI creation or styling.

You can create a Git repository using this template on GitHub. Select Use this template > Create a new repository to copy the starter code into a new repository within your own GitHub account, and ensure you check the box to include all branches. When you pull to your local computer, ensure you switch to the status-checker-ui branch to use the starter files using the command below:

git checkout status-checker-ui

Install the necessary dependencies by executing the npm install command. Once the installation is complete, you can launch the project on your local computer using the npm run start command. This will open the project at http://localhost:3000/.

Check the status of MyKinsta projects
Check the status of MyKinsta projects.

This project has two main pages: the Home and Service pages. The Home page displays a list of services provided by Kinsta (WordPress, application, and database hosting). When you click on any of the services, you are taken to the Service page, which is designed to provide specific information related to the selected service.

For instance, clicking the “Applications” section will redirect you to the Service page dedicated to applications. You can search for any application within your MyKinsta account on this page, so it retrieves the application status using either its unique name or display name.

Interacting with the Kinsta API

To implement the search feature for this project, you would create three functions to handle fetch requests for each service (applications, sites, and databases). Then, you’ll implement a search functionality that scans the entire array of data to check if a given search value exists.

You need your company ID and API key to interact with the Kinsta API so you can fetch a list of databases, applications, and sites available in your MyKinsta account. Once you have them, store them as environment variables in your React application by creating a .env file in the root folder of your project.

REACT_APP_KINSTA_COMPANY_ID = 'YOUR_COMPANY_ID'
REACT_APP_KINSTA_API_KEY = 'YOUR_API_KEY'

You can now access these values anywhere in your project using process.env.THE_VARIABLE. For example, to access REACT_APP_KINSTA_COMPANY_ID, you use process.env.REACT_APP_KINSTA_COMPANY_ID.

Before using the API, create three states in the Service.jsx page to store the status and name of the output generated when you search for a site, application, or database. The third state is to store error information.

let [status, setStatus] = useState('');
let [name, setName] = useState('');
let [error, setError] = useState('');

Also, create a variable to store the Kinsta API URL:

const KinstaAPIUrl = 'https://api.kinsta.com/v2';

When done, attach an onClick event with a CheckQuery() function to the form’s submit button on the Service.jsx page, so it triggers a function based on the slug. Meaning if the slug indicates databases, then the CheckDatabases() function will be triggered:

const CheckQuery = async (name) => {
  if (slug === 'wp-site') {
      await CheckSites(name);
  } else if (slug === 'application') {
      await CheckApplications(name);
  } else if (slug === 'database') {
      await CheckDatabases(name);
  }
}

Fetch list of sites with Kinsta API

To fetch a list of sites available on your MyKinsta company account with Kinsta API, you will create a function, pass in a query with the company ID as its parameter, then authorize the request with your API key. This request will use the /sites endpoint of Kinsta API:

const CheckSites = async (name) => {
  const query = new URLSearchParams({
      company: `${process.env.REACT_APP_KINSTA_COMPANY_ID}`,
  }).toString();
  const resp = await fetch(
      `${KinstaAPIUrl}/sites?${query}`,
      {
          method: 'GET',
          headers: {
              Authorization: `Bearer ${process.env.REACT_APP_KINSTA_API_KEY}`
          }
      }
  );
}

This code above will fetch all the sites available in your MyKinsta account, you can now use the find() method to search if the search query matches any name or display name:

const data = await resp.json();
  let sitesData = data.company.sites;
  let site = sitesData.find(site => site.name === name || site.display_name === name);

With this, you can then create some conditions to check if it returns any value, then set the states else update the error state with a message to inform the user that such site does not exist:

if (site) {
    setName(site.display_name);
    if (site.status === 'live') {
        setStatus('🟢 Running');
    } else if (site.status === 'staging') {
        setStatus('🟡 Staging');
    } else {
        setStatus('🟡 Unknown');
    }
    setUniqueName('');
} else {
    setError('No such site found for your account');
    setUniqueName('');
}

When you put all these together, this is what your code to check for a particular site’s status will look like:

const CheckSites = async (name) => {
  setName('');
  setStatus('');
  setError('');
  const query = new URLSearchParams({
      company: `${process.env.REACT_APP_KINSTA_COMPANY_ID}`,
  }).toString();
  const resp = await fetch(
      `${KinstaAPIUrl}/sites?${query}`,
      {
          method: 'GET',
          headers: {
              Authorization: `Bearer ${process.env.REACT_APP_KINSTA_API_KEY}`
          }
      }
  );
  const data = await resp.json();
  let sitesData = data.company.sites;
  let site = sitesData.find(site => site.name === name || site.display_name === name);
  if (site) {
      setName(site.display_name);
      if (site.status === 'live') {
          setStatus('🟢 Running');
      } else if (site.status === 'staging') {
          setStatus('🟡 Staging');
      } else {
          setStatus('🟡 Unknown');
      }
      setUniqueName('');
  } else {
      setError('No such site found for your account');
      setUniqueName('');
  }
}

Note: All three states are initialized as empty strings every time the CheckSites() function is triggered. This is necessary to ensure that all previous search data is wiped.

Fetch list of applications with Kinsta API

Just like you did for sites, you’ll use the /applications endpoint, pass a query that contains the company ID, and also use the find() method to search through the returned array:

const CheckApplications = async (name) => {
  setName('');
  setStatus('');
  setError('');
  const query = new URLSearchParams({
      company: `${process.env.REACT_APP_KINSTA_COMPANY_ID}`,
  }).toString();
  const resp = await fetch(
      `${KinstaAPIUrl}/applications?${query}`,
      {
          method: 'GET',
          headers: {
              Authorization: `Bearer ${process.env.REACT_APP_KINSTA_API_KEY}`
          }
      }
  );
  const data = await resp.json();
  let appsData = data.company.apps.items;
  let app = appsData.find(app => app.unique_name === name || app.name === name || app.display_name === name);
  if (app) {
      setName(app.display_name);
      if (app.status === 'deploymentSuccess') {
          setStatus('🟢 Running');
      } else if (app.status === 'deploymentFailed') {
          setStatus('🔴 Failed');
      } else if (app.status === 'deploymentPending') {
          setStatus('🟡 Pending');
      } else if (app.status === 'deploymentInProgress') {
          setStatus('🟡 In Progress');
      } else {
          setStatus('🟡 Unknown');
      }
      setUniqueName('');
  } else {
      setError('No such app found for your account');
      setUniqueName('');
  }
}

Fetch list of databases with Kinsta API

To fetch a list of databases, you will use the /databases endpoint of the Kinsta API:

const CheckDatabases = async (name) => {
  setName('');
  setStatus('');
  setError('');
  const query = new URLSearchParams({
      company: `${process.env.REACT_APP_KINSTA_COMPANY_ID}`,
  }).toString();
  const resp = await fetch(
      `${KinstaAPIUrl}/databases?${query}`,
      {
          method: 'GET',
          headers: {
              Authorization: `Bearer ${process.env.REACT_APP_KINSTA_API_KEY}`
          }
      }
  );
  const data = await resp.json();
  let databasesData = data.company.databases.items;
  let database = databasesData.find(database => database.name === name || database.display_name === name);
  if (database) {
      setName(database.display_name);
      if (database.status === 'ready') {
          setStatus('🟢 Running');
      } else if (database.status === 'creating') {
          setStatus('🟡 Creating');
      } else {
          setStatus('🟡 Unknown');
      }
      setUniqueName('');
  } else {
      setError('No such database found for your account');
      setUniqueName('');
  }
}

Once this is done. You have successfully used the Kinsta API in your React project. To ensure your app works well, add the data that is returned from these functions, which has been set to the states we created earlier to your markup code:

{status !== '' && (
  <div className="services">
      <div className="details">
          <div className="name-details">
              <span> className="tag">Name: </span>
              <span> className="value">{name}</span>
          </div>
          <div className="status-details">
              <span> className="tag">Status: </span>
              <span> className="value"> {status}</span>
          </div>
      </div>
  </div>
)}

Also, add a condition that will be triggered when there is an error. For example, when a user searches for a project that does not exist in MyKinsta, the error is triggered.

{error !== '' && (
  <div className="services">
      <div className="details">
          <p>{error}</p>
      </div>
  </div>
)}

At this point, your project will work well, and you can check the status of either applications, sites, or databases available on your MyKinsta dashboard. You can cross-check your code with this GitHub repository.

How to deploy your status checker to Kinsta

To deploy your React project to Kinsta, you need to push the project to your preferred Git provider. When your project is hosted on either GitHub, GitLab, or Bitbucket, you can proceed to deploy to Kinsta.

To deploy your repository to Kinsta, follow these steps:

  1. Log in to or create your Kinsta account on the MyKinsta dashboard.
  2. On the left sidebar, click “Applications” and then click “Add service”.
  3. Select “Application” From the dropdown menu to deploy a React application to Kinsta.
  4. In the modal that appears, choose the repository you want to deploy. If you have multiple branches, you can select the desired branch and give a name to your application.
  5. Select one of the available data center locations from the list of 25 options. Kinsta will automatically detect the start command for your application.

Finally, it’s not safe to push out API keys to public hosts like your Git provider. When hosting, you can add them as environment variables using the same variable name and value specified in the .env file.

Set environment variables on DevKinsta when deploying
Set environment variables on DevKinsta when deploying.

Once you initiate the deployment of your application, it will begin the process and typically complete within a few minutes. You will receive a link to access your application’s deployed version when the deployment is successful. For example, in this case, the link is https://status-checker-1t256.kinsta.app/.

Summary

The Kinsta API key lets you easily automate tasks, retrieve data, and integrate Kinsta with other applications. Remember to keep your access key secure.

Now you can leverage the power of the Kinsta API to make some reportings, schedule tasks, create WordPress sites, and automate various activities.

What endpoint would you love to see added to the Kinsta API next? Let us know in the comments.

Joel Olawanle Kinsta

Joel is a Frontend developer working at Kinsta as a Technical Editor. He is a passionate teacher with love for open source and has written over 200 technical articles majorly around JavaScript and it's frameworks.