
WordPress is a popular content management system that powers millions of websites across the Internet. It provides a user-friendly interface and a wide range of customization options.
Creating WordPress sites can be time-consuming, particularly when manually performing repetitive tasks. Kinsta has simplified and expedited this process with the MyKinsta dashboard, which also provides a temporary domain for immediate testing. However, the introduction of the Kinsta API means developers can enhance the site creation workflow and develop custom interfaces to meet specific needs.
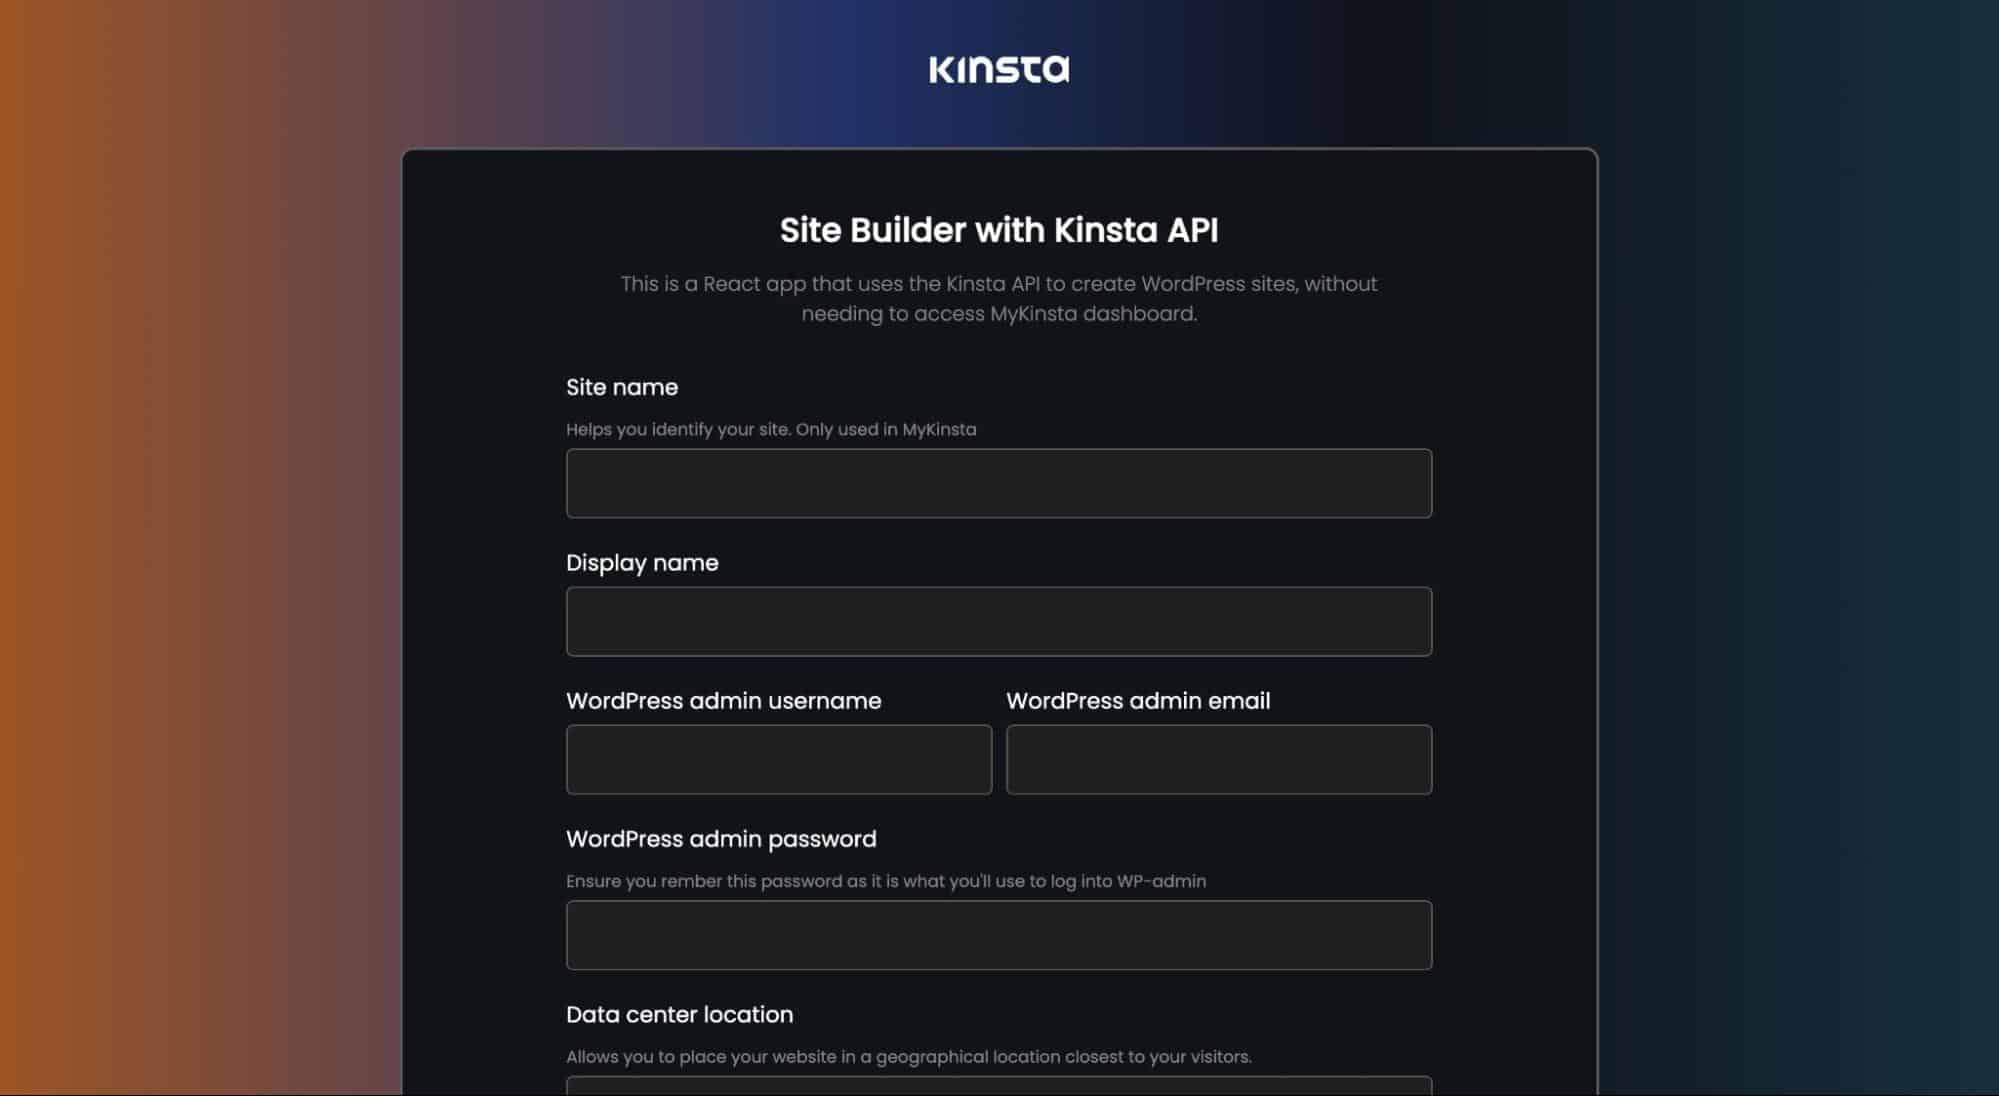
This tutorial delves into harnessing the power of the Kinsta API to create WordPress sites. And we use the React JavaScript library to demonstrate how to build an application that creates WordPress sites without MyKinsta.
Here’s a live demo of the site builder application.

Understanding the Kinsta API
The Kinsta API is a powerful tool that allows you to interact with Kinsta’s managed WordPress Hosting platform programmatically. It can help automate various tasks related to the services provided by Kinsta, including site creation, retrieving site information, getting the status of a site, and much more.
This API simplifies setting up WordPress sites, making it an invaluable tool for developers. To use Kinsta’s API, you must have an account with at least one WordPress site in MyKinsta. You also need to generate an API key to authenticate and access your account through the API.
To generate an API key:
- Go to your MyKinsta dashboard.
- Navigate to the API Keys page (Your name > Company settings > API Keys).
- Click Create API Key.
- Choose an expiration or set a custom start date and number of hours for the key to expire.
- Give the key a unique name.
- Click Generate.
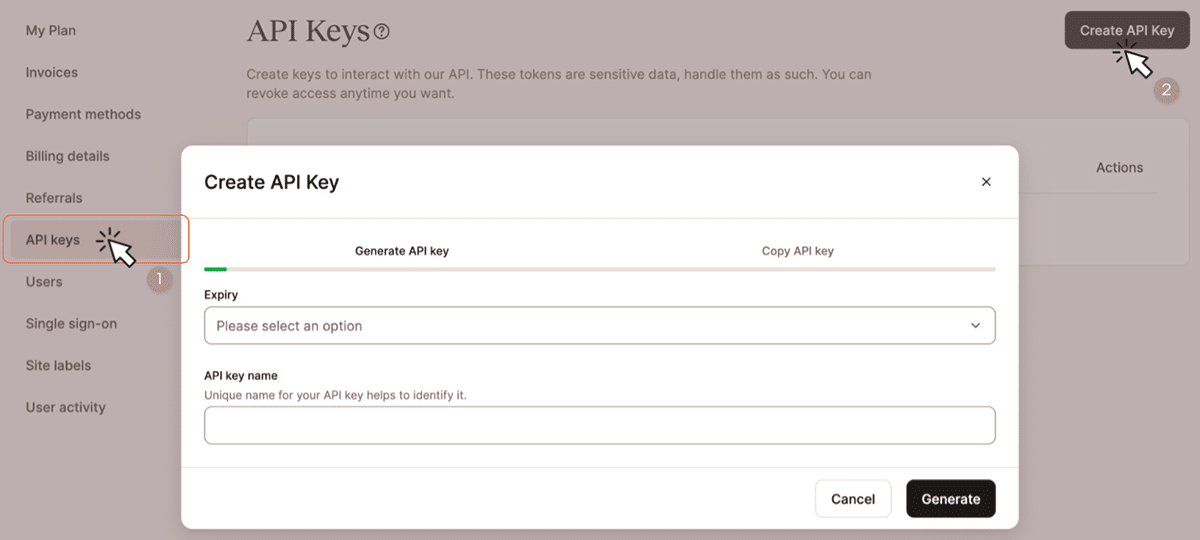
After creating an API key, copy it and store it somewhere safe (we recommend using a password manager), as this is the only time it is revealed within MyKinsta. You can generate multiple API keys — they are listed on the API Keys page. If you need to revoke an API key, click Revoke next to the one you want to revoke.
Creating a WordPress Site With the Kinsta API
Now that your API key is ready, let’s create a WordPress site with the Kinsta API. To accomplish this, use the /sites endpoint, which expects a payload containing the following data:
- company: This parameter expects a unique company ID that can be found in the settings of MyKinsta. It helps identify the company associated with the WordPress site.
- display_name: The display name, which is the same as the site name on MyKinsta, helps you identify your site. Only used in MyKinsta. It is used for the temporary domain of your WordPress site and WordPress admin (for the Kinsta API, it’s display_name.kinsta.cloud and display_name.kinsta.cloud/wp-admin).
- region: This parameter allows you to choose from 29 data center location for your website. Selecting a region closest to your target audience can help improve website performance and speed (See the list of available regions).
- install_mode: This parameter determines the type of WordPress installation. The default value is “plain,” which sets up a regular WordPress site. Other options include “new” for a fresh installation and additional modes depending on specific requirements.
- is_subdomain_multisite: This boolean (true/false) parameter specifies whether the WordPress site should be configured as a multisite using subdomains.
- admin_email: This parameter expects the email address of the WordPress admin. It is used for administrative purposes and receiving important notifications.
- admin_password: This parameter is used to set the password for the WordPress admin user account. Choose a secure password to protect your site.
- admin_user: This parameter sets the username for the WordPress admin user account. It is used to log in to the WordPress dashboard and manage the site.
- is_multisite: Similar to
is_subdomain_multisite, this boolean parameter determines whether the WordPress site should be configured as a multisite. - site_title: This parameter represents the title of your WordPress site. It appears across the top of every page of the site. You can always change it later.
- woocommerce: This boolean parameter indicates whether you want to install the WooCommerce plugin during the WordPress site creation.
- wordpressseo: This parameter controls the installation of the Yoast SEO plugin during site creation.
- wp_language: This parameter expects a string value that represents the language/locale of your WordPress site (discover your WordPress locale here).
Now that you understand each parameter. This is an example of what the payload you send to the Kinsta API looks like:
{
  "company": "54fb80af-576c-4fdc-ba4f-b596c83f15a1",
  "display_name": "First site",
  "region": "us-central1",
  "install_mode": "new",
  "is_subdomain_multisite": false,
  "admin_email": "[email protected]",
  "admin_password": "vJnFnN-~v)PxF[6k",
  "admin_user": "admin",
  "is_multisite": false,
  "site_title": "My First Site",
  "woocommerce": false,
  "wordpressseo": false,
  "wp_language": "en_US"
}
Using your preferred mode, you can send a POST request to the Kinsta API; you only have to set your API key to create a WordPress site. For this example, let’s use the JavaScript Fetch API:
const createWPSite = async () => {
    const resp = await fetch(
        `https://api.kinsta.com/v2/sites`,
        {
          method: 'POST',
          headers: {
            'Content-Type': 'application/json',
            Authorization: 'Bearer <YOUR_KEY_HERE>'
          },
          body: JSON.stringify({
            company: '54fb80af-576c-4fdc-ba4f-b596c83f15a1',
            display_name: 'First site',
            region: 'us-central1',
            install_mode: 'new',
            is_subdomain_multisite: false,
            admin_email: '[email protected]',
            admin_password: 'vJnFnN-~v)PxF[6k',
            admin_user: 'admin',
            is_multisite: false,
            site_title: 'My First Site',
            woocommerce: false,
            wordpressseo: false,
            wp_language: 'en_US'
          })
        }
      );

      const data = await resp.json();
      console.log(data);
}
The code above uses the JavaScript Fetch API to send a POST request to the Kinsta API for creating a WordPress site. The createWPSite function handles the process. Within the function, a Fetch request is made to the Kinsta API’s /sites endpoint with the necessary data.
The response is parsed as JSON using resp.json(), and the result is logged to the console. Ensure you replace <YOUR_KEY_HERE> with your API key, adjust the payload values, and call createWPSite() to create a WordPress site using the Kinsta API.
This is what the response looks like:
{
    "operation_id": "sites:add-54fb80af-576c-4fdc-ba4f-b596c83f15a1",
    "message": "Adding site in progress",
    "status": 202
}
Monitoring Operations with the Kinsta API
Once you initiate a site creation with the Kinsta API, it’s important to track the operation’s progress. This can be done programmatically without having to check MyKinsta with the Kinsta API’s /operations endpoint.
To monitor operations, use the operation_id obtained when initiating an operation, like creating a WordPress site. Pass the operation_id as a parameter to the /operations endpoint.
const operationId = 'YOUR_operation_id_PARAMETER';
const resp = await fetch(
  `https://api.kinsta.com/v2/operations/${operationId}`,
  {
    method: 'GET',
    headers: {
      Authorization: 'Bearer <YOUR_TOKEN_HERE>'
    }
  }
);
const data = await resp.json();
console.log(data);
The code above retrieves information about an operation by sending a GET request to the /operations endpoint with the appropriate operation_id. The request includes the API key for authentication.
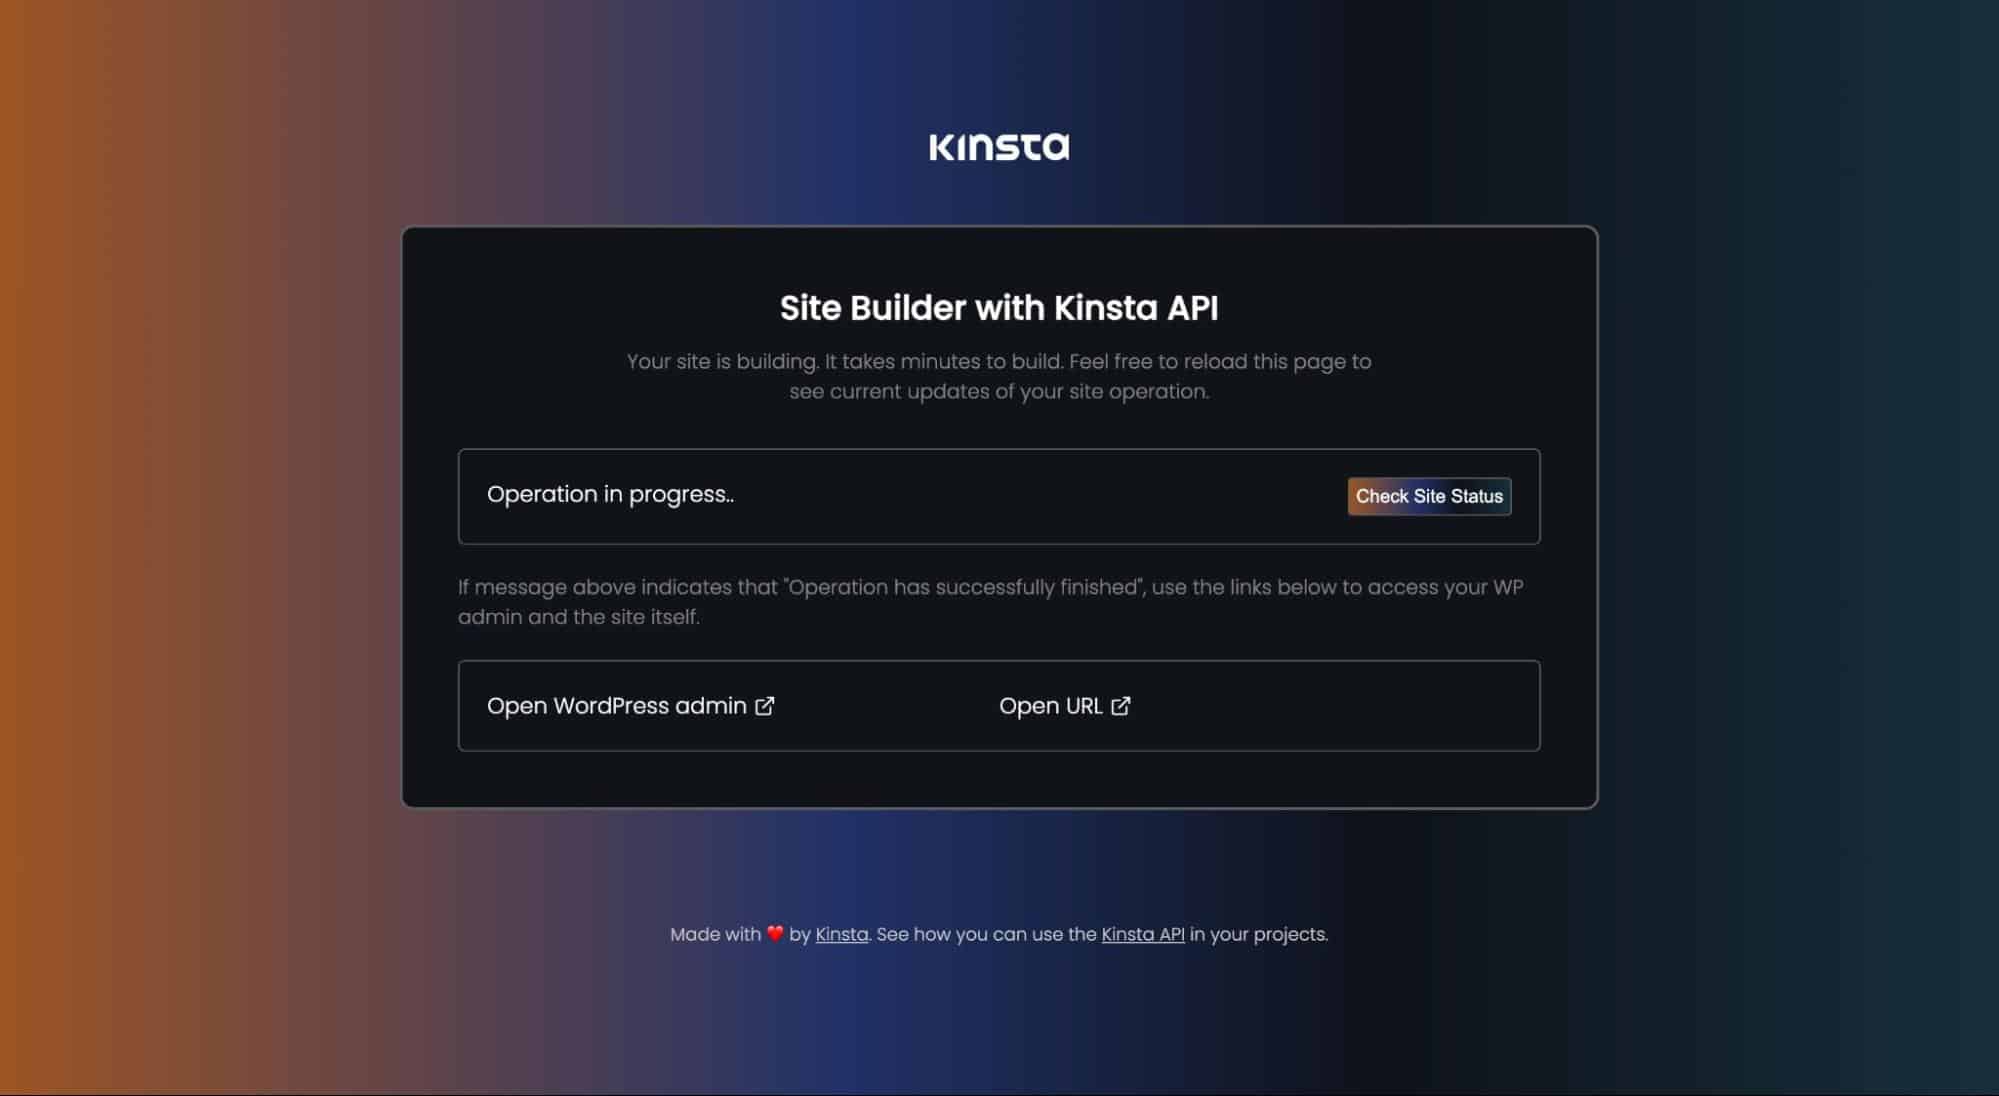
When the response data is received from the API, it is logged to the console. The response provides valuable information about the status and progress of the operation. For example, if the WordPress site creation is still in progress, the response looks like this:
{
    "status": 202,
    "message": "Operation in progress",
    "data": null
}
Similarly, once the operation is successfully completed, this is the response:
{
    "message": "Successfully finished request",
    "status": 200,
    "data": null
}
At this point, you can programmatically create a WordPress site and check its operation using the Kinsta API. To enhance this functionality, let’s go a step further and develop a customized user interface (UI) that can handle these operations. This way, even individuals without technical expertise can take advantage of the API’s capabilities.
Building a React Application To Create a WordPress Site With Kinsta API
To begin, set up a React project structure and install the necessary dependencies. Integrate the Kinsta API into your React application with Fetch API or other HTTP request libraries, such as Axios.
Prerequisite
To follow along with this project, it is advisable to have a basic understanding of HTML, CSS, and JavaScript and some familiarity with React. The main focus of this project is to demonstrate the utilization of the Kinsta API, so this article does not delve into the details of UI creation or styling.
Getting Started
To streamline the project setup process, a starter project has been prepared for you. Follow these steps to get started:
1. Create a Git repository using this template on GitHub. Select Use this template > Create a new repository to copy the starter code into a new repository within your GitHub account, and ensure you check the box to include all branches.
2. Pull the repository to your local computer and switch to the starter-files branch using the command below:
git checkout starter-files3. Install the necessary dependencies by running the command npm install. Once the installation is complete, you can launch the project on your local computer with npm run start. This opens the project at http://localhost:3000/.
Understanding the Project Files
Within the src folder of this project are two main subfolders: components and pages. The components folder contains reusable components, such as the header and footer, utilized in both the Home and Details pages.
In this project, your primary focus is implementing the logic on the Home and Details pages, as the styling and routing are already done.
The Home page has a form that collects various data fields that are passed to the Kinsta API. The response from this page is stored in the localStorage (you can explore alternative methods for storing the operation ID, which is crucial for checking the operation status).
On the Details page, the operation ID is retrieved from loaclStoage and passed to the Kinsta API’s /operation endpoint as a parameter to check the status of the operation. In this project, we include a button that allows users to check the status intermittently (you can utilize the setInterval method to automate this process).
Interacting With the Kinsta API in React
With the user interface (UI) now in place, your next step is to handle the form submission on the Home page and send a POST request to the Kinsta API’s /sites endpoint. This request includes the collected form data as the payload, enabling us to create a WordPress site.
To interact with the Kinsta API, you need your company ID and API key. Once you have these credentials, it’s best to store them securely as environment variables in your React application.
To set up the environment variables, create a .env file in the root folder of your project. Inside this file, add the following lines:
REACT_APP_KINSTA_COMPANY_ID = 'YOUR_COMPANY_ID'
REACT_APP_KINSTA_API_KEY = 'YOUR_API_KEY'
To access these environment variables within your project, you can use the syntax process.env.THE_VARIABLE. For example, to access the REACT_APP_KINSTA_COMPANY_ID, you would use process.env.REACT_APP_KINSTA_COMPANY_ID.
Retrieving Form Data in React
In the Home.jsx file, there is a form. You need to add logic to the form to get data and validate it when submitted. To retrieve the form data in your React application, use React’s controlled components approach along with the useState hook. This approach allows you to create a state for each form field and update it as the user enters data.
First, import the useState hook at the top of your file:
import React, { useState } from 'react';Next, set up a state variable for each form field within your functional component. For example, if you have an input field for the “Site title”, you can create a state variable called siteTitle:
const [siteTitle, setSiteTitle] = useState('');Here, siteTitle is the state variable that holds the value of the “Site title” input field, and setSiteTitle is the corresponding state updater function.
To bind the form fields to their respective state values, add the value and onChange attributes to each input element. For instance, the “Site title” input field:
<input
  type="text"
  className="form-control"
  value={siteTitle}
  onChange={(event) => setSiteTitle(event.target.value)}
/>
In this example, the value attribute is set to the siteTitle state variable, ensuring that the input field displays the current value of siteTitle. The onChange event handler is set to the setSiteTitle function, which updates the siteTitle state with the new value whenever the user types in the input field.
By following this approach for each form field, you can create the necessary state variables and update them as the user interacts with the form. This allows you to easily access the entered values when the form is submitted and perform further actions or validation with the form data.
When you do this for all the form fields, your Home.jsx file looks like this:
import Header from '../components/Header';
import Footer from '../components/Footer';

const Home = () => {

    return (
        <div className="app-container">
            <Header />
            <div className="container">
                <div className="container-title">
                    <h1> className="title">Site Builder with Kinsta API</h1>
                    <p> className="description">
                        This is a React app that uses the Kinsta API to create WordPress sites, without needing to access MyKinsta dashboard.
                    </p>
                </div>
                <form>
                    <div className="form-container">
                        <div className="input-div">
                            <label>Display name</label>
                            <span>Helps you identify your site. Only used in MyKinsta and temporary domain</span>
                            <input type="text" className="form-control" />
                            <span> className='error-message'>Ensure this has more than 4 characters</span>
                        </div>
                        <div className="input-div">
                            <label> WordPress site title</label>
                            <span>Appears across the top of every page of the site. You can always change it later.</span>
                            <input type="text" className="form-control" />
                            <span> className='error-message'>Ensure this has more than 4 characters</span>
                        </div>
                        <div className="input-flex">
                            <div className="input-div">
                                <label>WordPress admin username</label>
                                <input type="text" className="form-control" />
                            </div>
                            <div className="input-div">
                                <label>WordPress admin email</label>
                                <input type="email" className="form-control" />
                                <span> className='error-message'>Ensure this is a valid email</span>
                            </div>
                        </div>
                        <div className="input-div">
                            <label>WordPress admin password</label>
                            <span>Ensure you remember this password as it is what you'll use to log into WP-admin</span>
                            <input type="text" className="form-control" />
                        </div>
                        <div className="input-div">
                            <label>Data center location</label>
                            <span>Allows you to place your website in a geographical location closest to your visitors.</span>
                            <select className="form-control">
                                <option> value=""></option>
                                {/* add options */}
                            </select>
                        </div>
                        <div className="checkbox-flex">
                            <div className="checkbox-input">
                                <input type="checkbox" />
                                <label>Install WooCommerce</label>
                            </div>
                            <div className="checkbox-input">
                                <input type="checkbox" />
                                <label>Install Yoast SEO</label>
                            </div>
                        </div>
                        <button> className='btn'>Create Site</button>
                    </div>
                </form>
            </div>
            <Footer />
        </div >
    )
}

export default Home;
Implementing Form Field Validation With useRef Hook
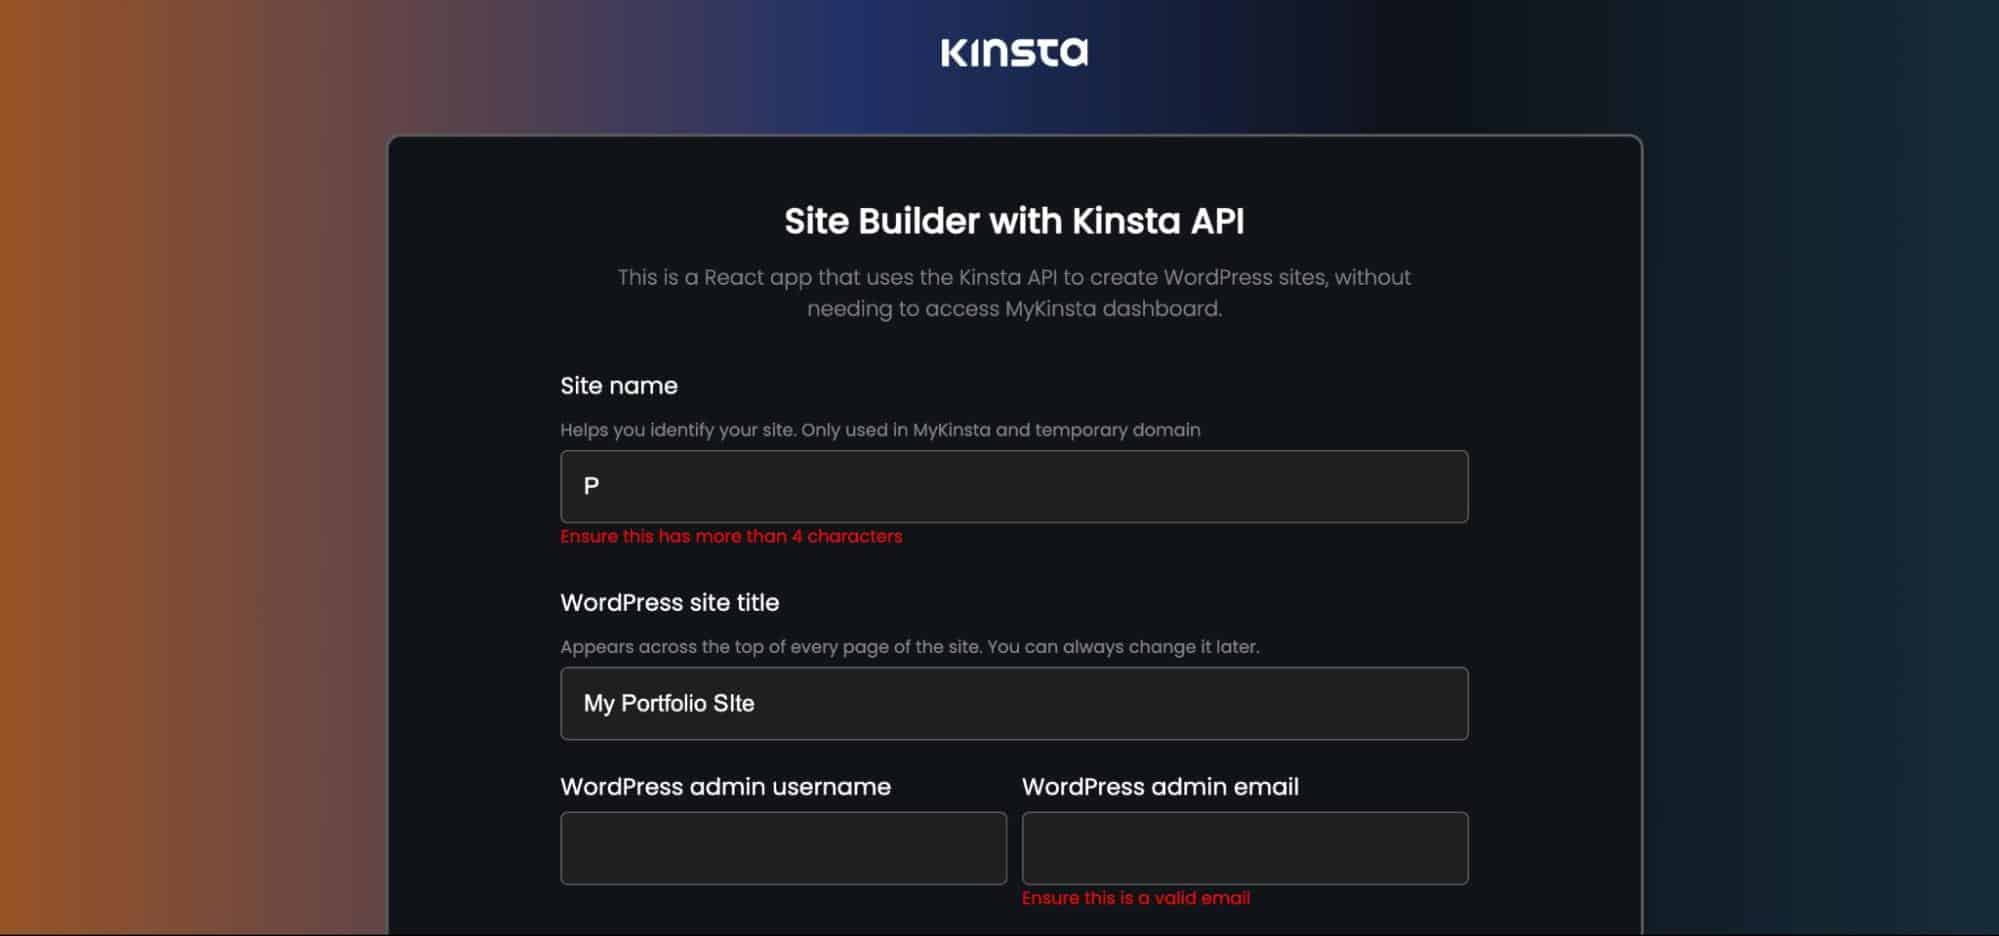
To implement form field validation in React, we can follow these steps. Let’s focus on implementing validation for the “Display name” and “WordPress admin email” fields.
First, we need to create references using the useRef hook to control the display of the error messages. Import the useRef hook and create the necessary refs for each field:
import { useRef } from 'react';

const displayNameRef = useRef(null);
const wpEmailRef = useRef(null);
Next, we attach the refs to the corresponding error message elements in the form fields. For example, for the “Display name” field, you add the ref to the span tag, which holds the error message:
<div className="input-div">
    <label>Display name</label>
    <span>Helps you identify your site. Only used in MyKinsta and temporary domain</span>
    <input type="text" className="form-control" value={displayName} onChange={(e) => setDisplayName(e.target.value)} />
    <span className='error-message' ref={displayNameRef}>Ensure this has more than 4 characters</span>
</div>
Similarly, for the “WordPress admin email” field:
<div className="input-div">
  <label>WordPress admin email</label>
  <input
    type="email"
    className="form-control"
    value={wpAdminEmail}
    onChange={(e) => setWpAdminEmail(e.target.value)}
  />
  <span> className='error-message' ref={wpEmailRef}>Ensure this is a valid email</span>
</div>
Now, we can create the validation functions that check the input values and decide whether to display the error messages. Here are the functions for “Display name” and “WordPress admin email”:
const checkDisplayName = () => {
  if (displayName.length < 4) {
    displayNameRef.current.style.display = 'block';
  } else {
    displayNameRef.current.style.display = 'none';
  }
}

const checkWpAdminEmail = () => {
  let regex = /^\w+([.-]?\w+)*@\w+([.-]?\w+)*(\.\w{2,3})+$/;
  if (!wpAdminEmail.match(regex)) {
    wpEmailRef.current.style.display = 'block';
  } else {
    wpEmailRef.current.style.display = 'none';
  }
}
These functions are called whenever the corresponding input fields are changed. They compare the input values against the validation criteria and update the display of the error messages by manipulating the style.display property of the error message elements.
Feel free to implement additional validations or customize the validation logic as per your requirements.
Handling Form Submission in React
When handling the form submission event for creating a site, we need to perform several tasks. First, we attach an onSubmit event handler to the <form> element. Inside the createSite function, we prevent the default form submission behavior by calling event.preventDefault(). This allows us to handle the submission programmatically.
To ensure the form data is valid before proceeding with the submission, we invoke the validation methods checkDisplayName and checkWpAdminEmail. These methods verify that the required fields meet the specified criteria.
const createSite = (e) => {
  e.preventDefault();

  checkDisplayName();
  checkWpAdminEmail();

  // Additional logic
};
Assuming all the validations pass and the required fields contain valid data, proceed with clearing the localStorage to ensure a clean state for storing the API response and display name.
Next, make an API request to the Kinsta API using the fetch function. The request is a POST method to the https://api.kinsta.com/v2/sites endpoint. Ensure you include the necessary headers and payload as JSON.
const createSiteWithKinstaAPI = async () => {
    const resp = await fetch(
        `${KinstaAPIUrl}/sites`,
        {
            method: 'POST',
            headers: {
                'Content-Type': 'application/json',
                Authorization: `Bearer ${process.env.REACT_APP_KINSTA_API_KEY}`
            },
            body: JSON.stringify({
                company: `${process.env.REACT_APP_KINSTA_COMPANY_ID}`,
                display_name: displayName,
                region: centerLocation,
                install_mode: 'new',
                is_subdomain_multisite: false,
                admin_email: wpAdminEmail,
                admin_password: wpAdminPassword,
                admin_user: wpAdminUsername,
                is_multisite: false,
                site_title: siteTitle,
                woocommerce: false,
                wordpressseo: false,
                wp_language: 'en_US'
            })
        }
    );

    // Handle the response data
};
The payload contains various data fields the Kinsta API requires, such as the company ID, display name, region, installation mode, admin email, admin password, etc. These values are obtained from the corresponding state variables.
After making the API request, we await the response using await resp.json() and extract the relevant data. We create a new object newData, with the operation ID and display name, which is then stored in the localStorage using localStorage.setItem.
const createSiteWithKinstaAPI = async () => {
    const resp = await fetch(
        // Fetch request here
    );

    const data = await resp.json();
    let newData = { operationId: data.operation_id, display_name: displayName };
    localStorage.setItem('state', JSON.stringify(newData));
    navigate('/details');
}
Finally, we invoke the createSiteWithKinstaAPI function so that when a user fills out the form and clicks the button, a WordPress site is created using the Kinsta API. Additionally, in the code, it’s mentioned that the user is redirected to the details.jsx page to keep track of the operation with the Kinsta API. To enable the navigation functionality, import useNavigate from <code>react-router-dom and initialize it.
Reminder: You can find the complete code for this page on the GitHub repository.
Implementing Operation Status Check with the Kinsta API
In order to check the status of the operation with the Kinsta API, we use the operation ID that was stored in the localStorage. This operation ID is retrieved from the localStorage using JSON.parse(localStorage.getItem('state')) and assigned to a variable.
To check the operation status, make another API request to the Kinsta API by sending a GET request to the /operations/{operationId} endpoint. This request includes the necessary headers, such as the Authorization header containing the API key.
const [operationData, setOperationData] = useState({ message: "Operation in progress" });
const KinstaAPIUrl = 'https://api.kinsta.com/v2';
const stateData = JSON.parse(localStorage.getItem('state'));

const checkOperation = async () => {
    const operationId = stateData.operationId;
    const resp = await fetch(
        `${KinstaAPIUrl}/operations/${operationId}`,
        {
            method: 'GET',
            headers: {
                Authorization: `Bearer ${process.env.REACT_APP_KINSTA_API_KEY}`
            }
        }
    );
    const data = await resp.json();
    setOperationData(data);
}
Once we receive the response, we extract the relevant data from the response using await resp.json(). The operation data is then updated in the state using setOperationData(data).
In the return statement of the component, we display the operation message using operationData.message. We also provide a button that allows the user to manually trigger the operation status check by calling the checkOperation.
Furthermore, if the operation status indicates that it has successfully finished, the user can use the links added to access the WordPress admin and the site itself. The links are constructed using the stateData.display_name obtained from localStorage.
<a href={`http://${stateData.display_name}.kinsta.cloud/wp-admin/`} target="_blank" rel="noreferrer" className='detail-link'>
    <p>Open WordPress admin</p>
    <FiExternalLink />
</a>
<a href={`http://${stateData.display_name}.kinsta.cloud/`} target="_blank" rel="noreferrer" className='detail-link'>
    <p>Open URL</p>
    <FiExternalLink />
</a>
Clicking on these links opens the WordPress admin and the site URL respectively in a new tab, allowing the user to access them without having to navigate to MyKinsta.
Now you can create a WordPress site easily via your custom-made application.
We recommend deploying your production code to Sevalla, the PaaS offering created by Kinsta for world-class application, database, and static-site hosting.
Summary
In this article, you have learned how to programmatically use the Kinsta API to create a WordPress site and integrate the API into a React application. Always remember to keep your API key secure and whenever you feel you have shared it publicly, revoke it and create a new one.
Kinsta API can be used not only to create a WordPress site but also to retrieve information about your WordPress sites, domains, and lots more.


