Looking for a way to embed WordPress Google Maps content on your site?
Like a lot of things in WordPress, there are several different ways that you can embed Google Maps on your site depending on what type of map content you want to include.
In this post, we’ll start by showing you how to add Google Maps in WordPress without a plugin. Then, we’ll recommend some plugins that can help you embed Google Maps, as well as some of the benefits of going that approach. We’ll also dive into how to properly use the Google Maps API, which is now required.
Finally, we’ll end with some performance considerations for using Google Maps on WordPress and share some tips on how to keep your WordPress site loading fast even if you do need to embed Google Maps.
You can click below to jump straight to a specific section or just read through the whole thing.
- Google Maps API is now required
- How to add Google Maps in WordPress without a plugin
- WordPress Google Maps plugins that give you more flexibility
- Google Maps performance effect and tips to improve performance
Google Maps API is Now Required
As of June 11, 2018, an API key is now required for Google Maps. If you’ve already implemented Google Maps on your site and it’s no longer working, this might be the reason. Or rather, you’re missing the API key. The good news is, for 99% of you, it should still be free. Below is the Google Maps API pricing.
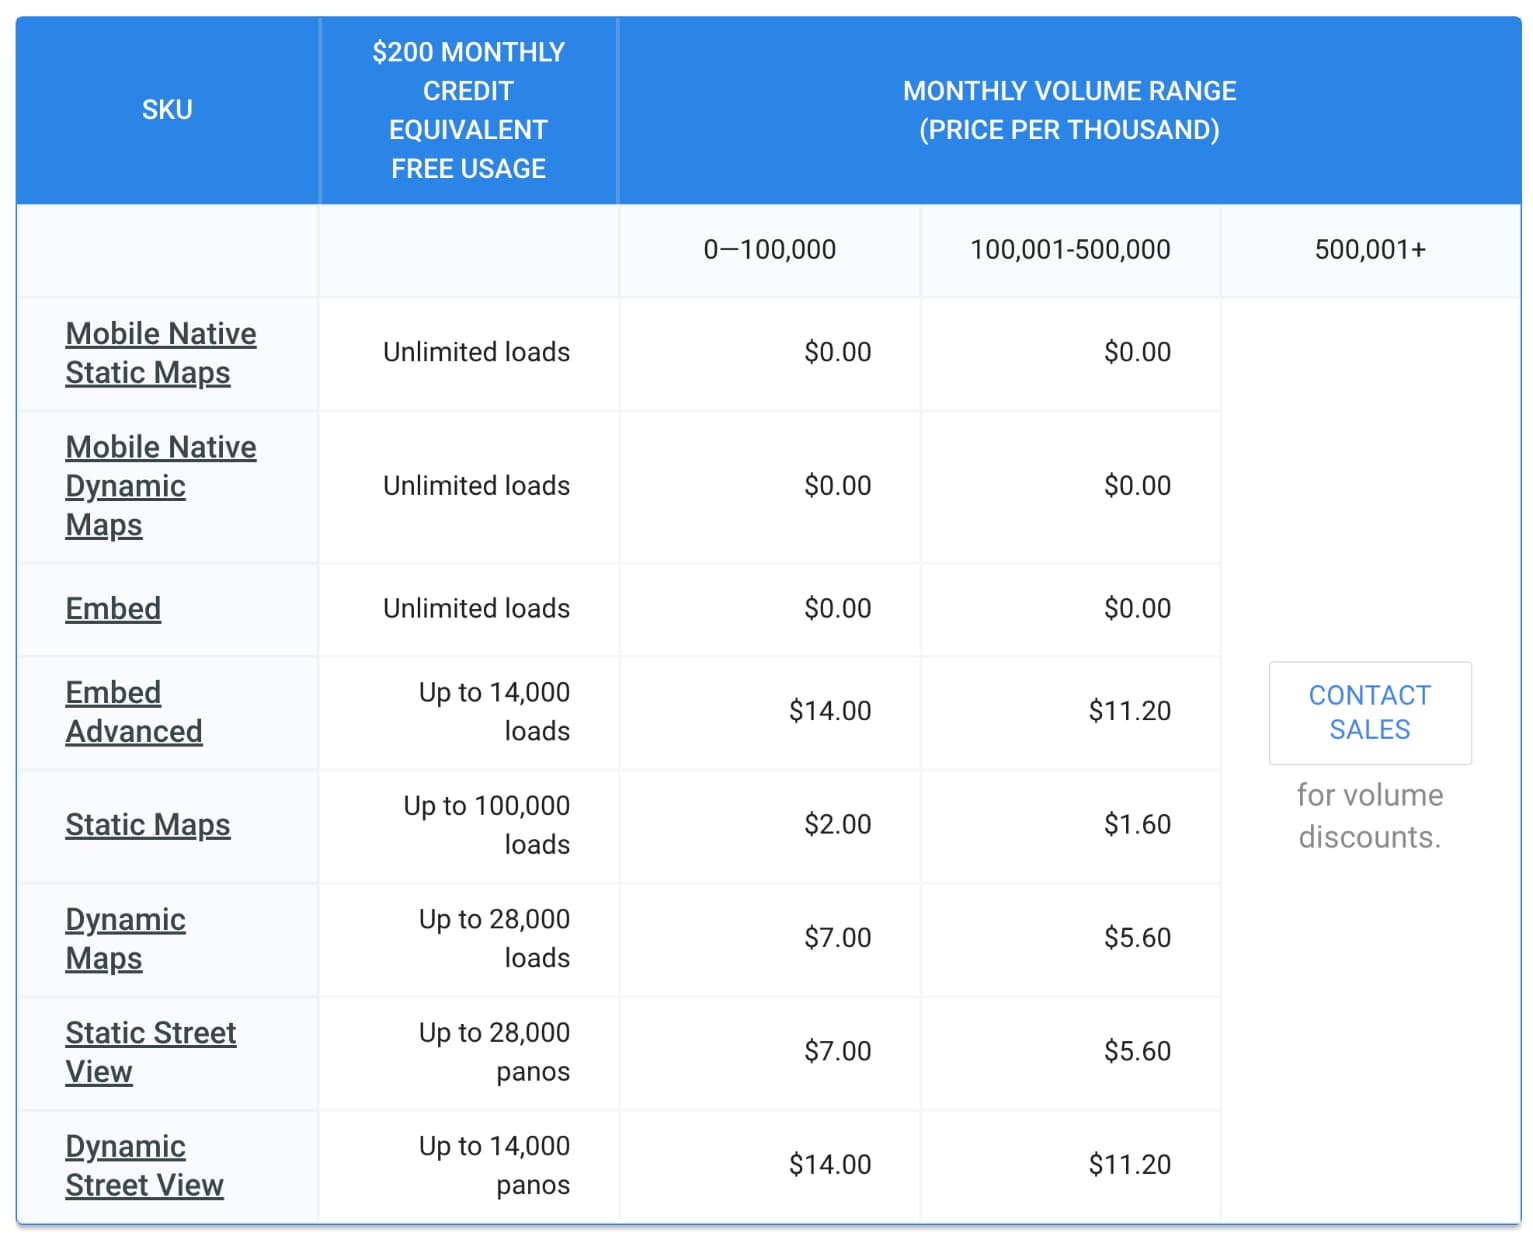
Google also gives you a recurring $200 credit on your billing account each month to offset your usage costs. So as you can see unless your generating thousands of requests, using Google Maps on your site shouldn’t cost you anything.
What else has changed? Nothing, but you will now need to do the following if you want to use Google Maps in WordPress:
- Sign up for a Google Cloud Platform Console account and configure it.
- Add your billing info, even though you might not ever be billed.
- Add the API key to your Google Maps embed code or plugin settings.
How to Get a Google Maps API Key
Below are steps on how to get your Google Maps API key.
Step 1
Go to the Google Cloud Platform Console. If you don’t have an account yet, create one, it’s free.
Step 2
Select or create a project.
Step 3
Set up your billing account. Even though they will require you to put a credit card on file, you should never be charged, unless you do go over the high usage limits.
Step 4
You will be asked to pick one or more products. This depends on the type of map you’re using. For example, if you are embedding a map on your WordPress site without a plugin (as shown in the steps further below), then you would pick the Google Maps Embed API.
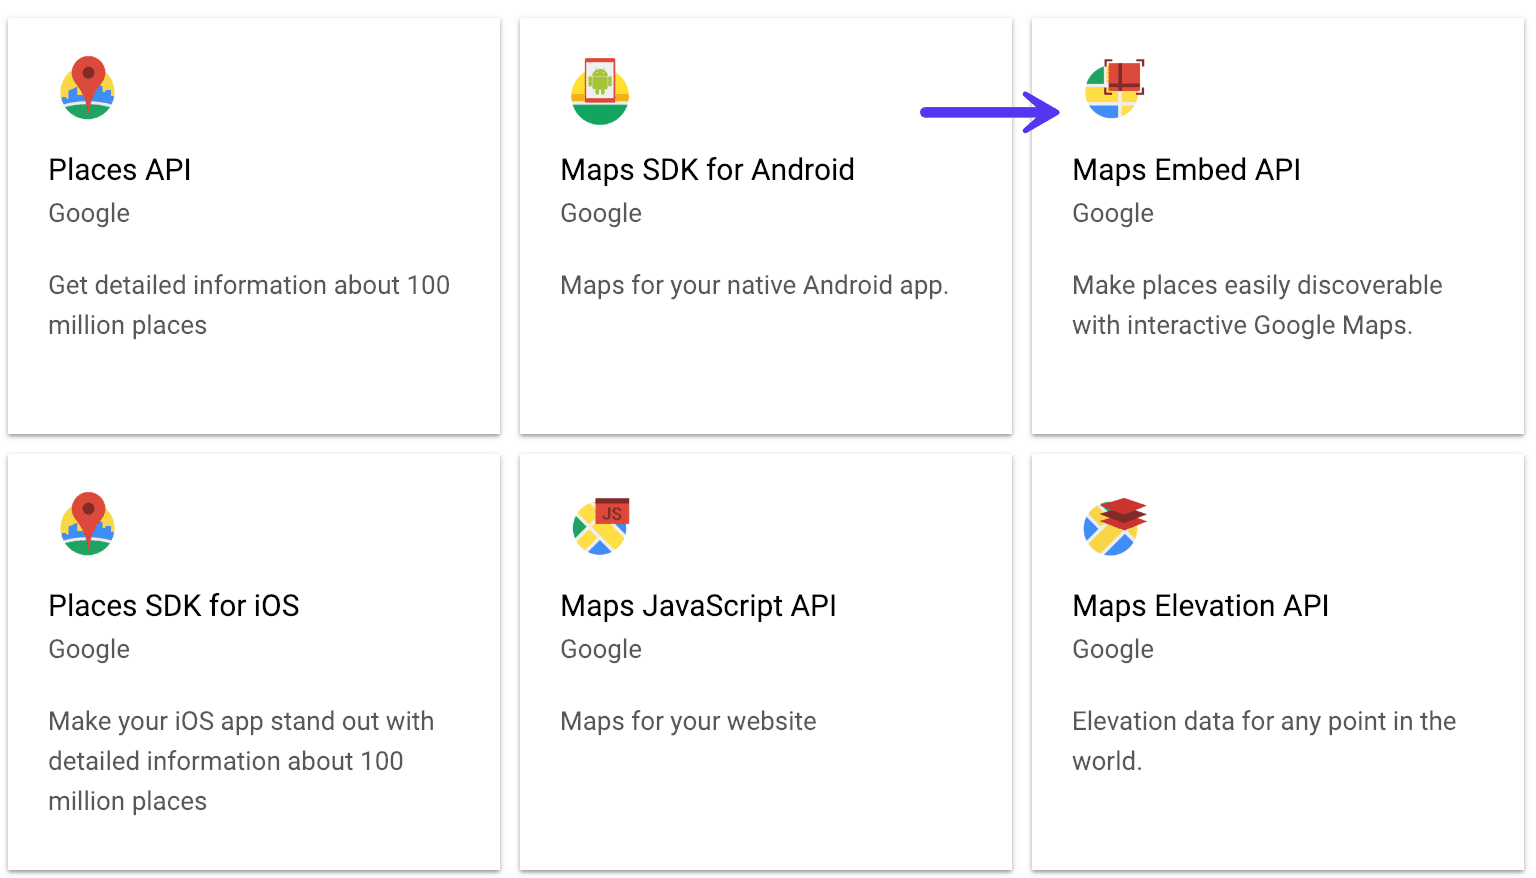
If you are using a plugin like Google Maps Widget (as shown in the steps further below), then you would choose the Google Maps Static API.
If you’re using a third-party plugin or theme, they should have documentation on which type of Google Maps deployment they are using. Don’t worry, you can always add multiple types and change these later on.
Step 5
Click “Enable.”

Step 6
Click on “APIs” and then under “Credentials”, you will see your API key.

Step 7
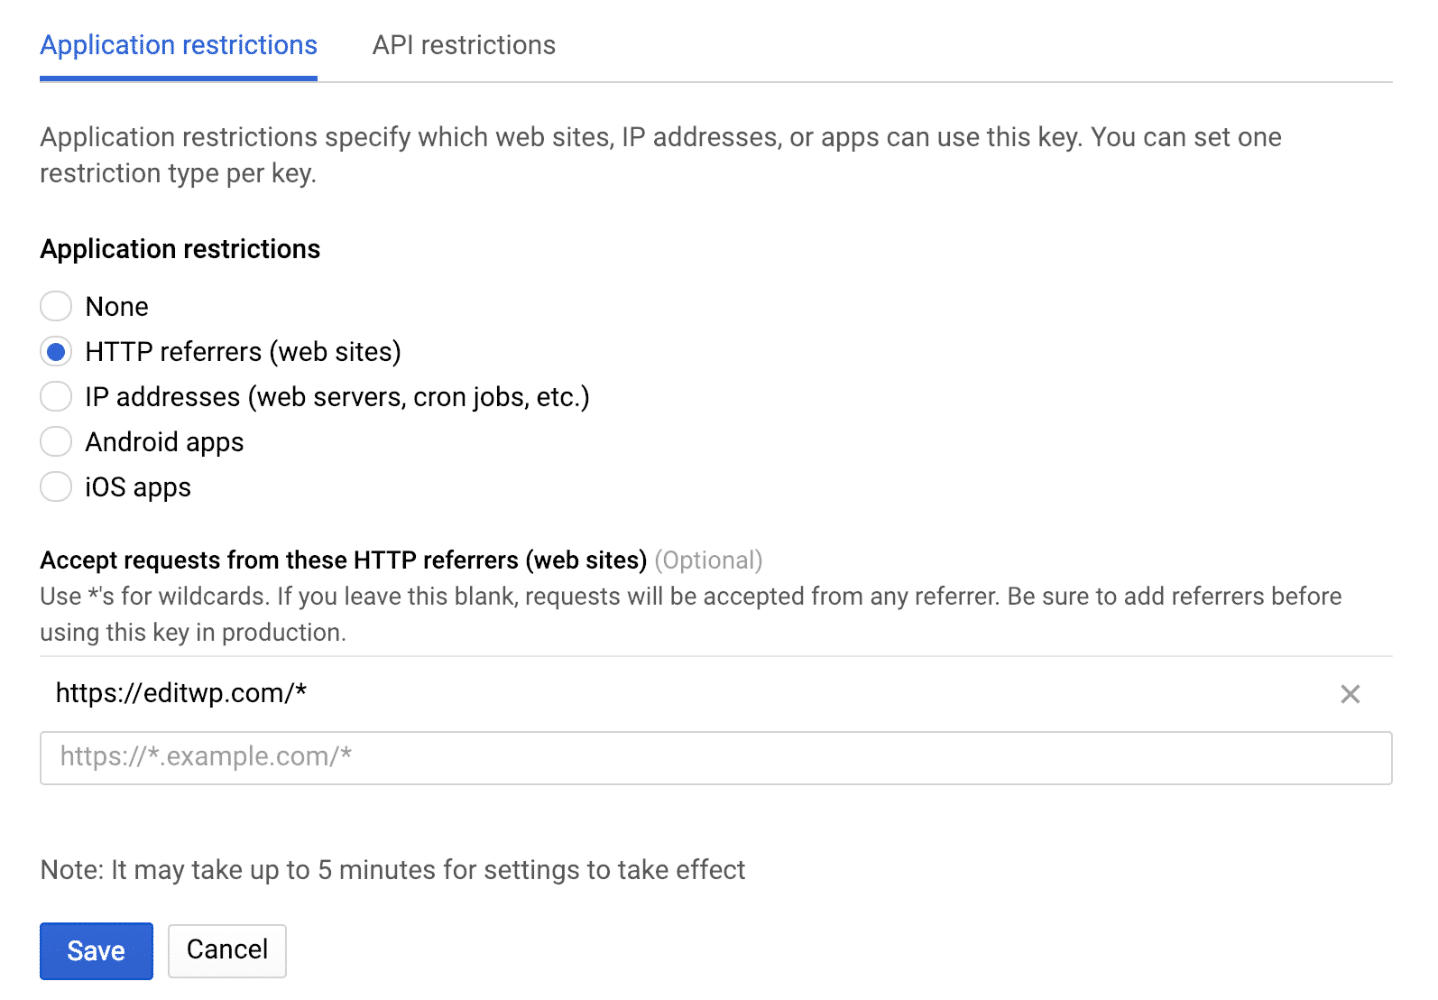
If you’re simply embedding your Google Maps API key it will show in plain text in your source code. Therefore you should restrict this, otherwise, people could use your API key on their WordPress site or projects and rack up your usage.
To do this, simply click on your API key’s name and it will allow you to add a restriction. For your WordPress site, simply adding an HTTP referrer should be good enough. Such as https://yourdomain.com/*. This will allow it to only make calls on your website.
How To Add Google Maps In WordPress Without A Plugin
If you just want to embed a simple map and don’t need more detailed functionality like custom location markers or other annotations, you can embed Google Maps without a plugin using the normal Google Maps website that you use on a daily basis.
Here’s how it works…
Step 1: Copy The Google Maps Embed Code
To get started, use the Google Maps website to create the map that you want to embed.
For example, if you want to embed a place marker, open that place in Google Maps. Or, if you want to embed directions, open the directions in Google Maps.
Once you have the map that you want to embed, click on the hamburger menu in the top-left corner:

In the list of menu items, select the option for Share or embed map:
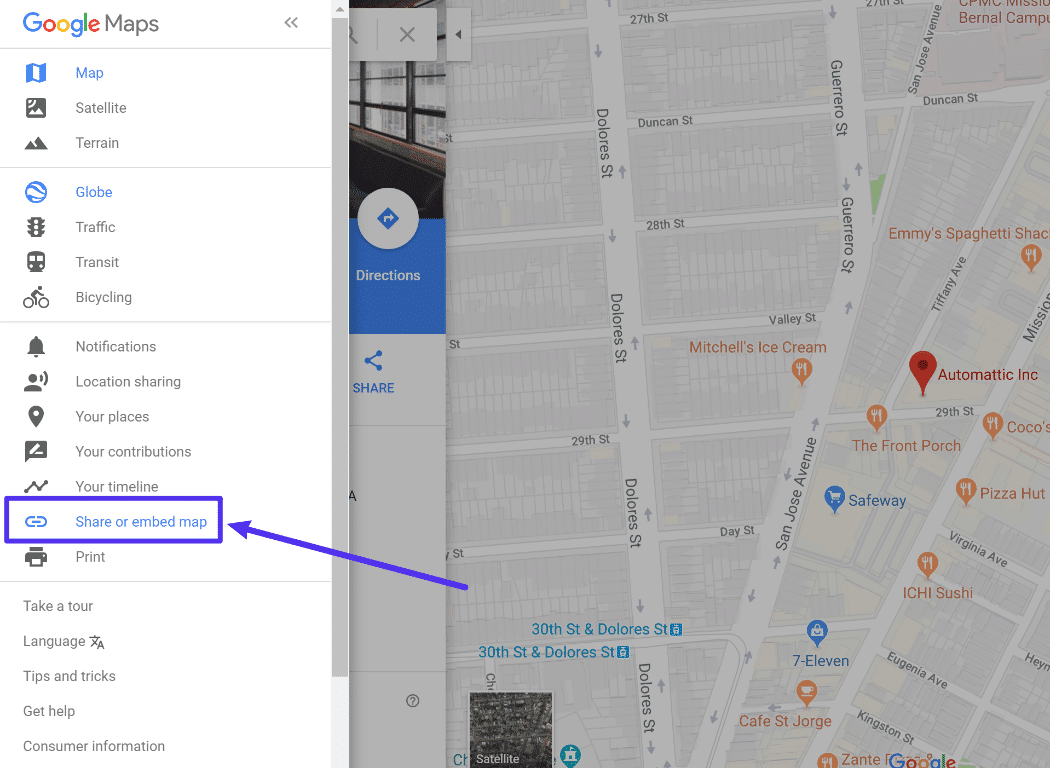
That will open up a Share popup. In that popup, click on the Embed a map tab.
Then, you can choose your desired size using the drop-down. For most WordPress sites, the default size works well, but you can make the map larger or smaller if needed.
Once you’ve done that, click on the Copy HTML button to copy the embed code:
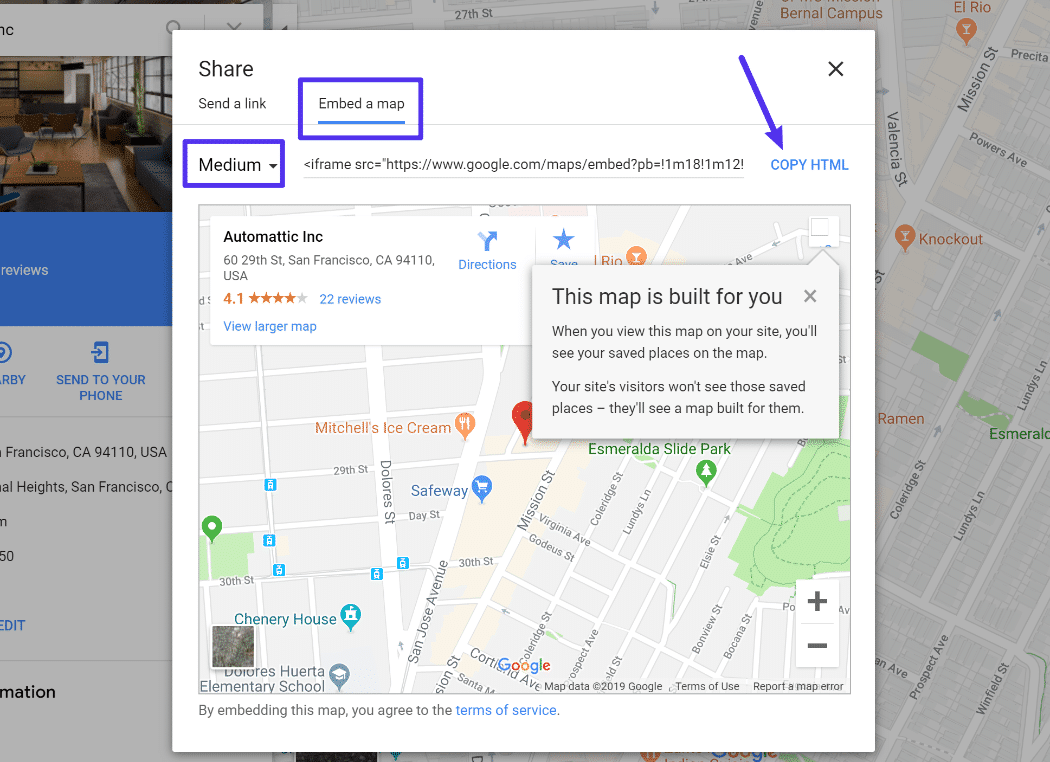
You will then need to add your API key into the code. So your code should look something like this:
<iframe src="https://www.google.com/maps/embed/v1/search?key=YOUR_API_KEY¶meters allowfullscreen></iframe>
Step 2: Add Google Maps Embed Code To WordPress Site
Now, all that you need to do is add that embed code to your WordPress site in the post or page where you want to include your map.
If you’re using the new WordPress Gutenberg block editor that was released with WordPress 5.0, you can do that by adding a Custom HTML block and pasting the embed code into the block. Don’t forget to add your API key.
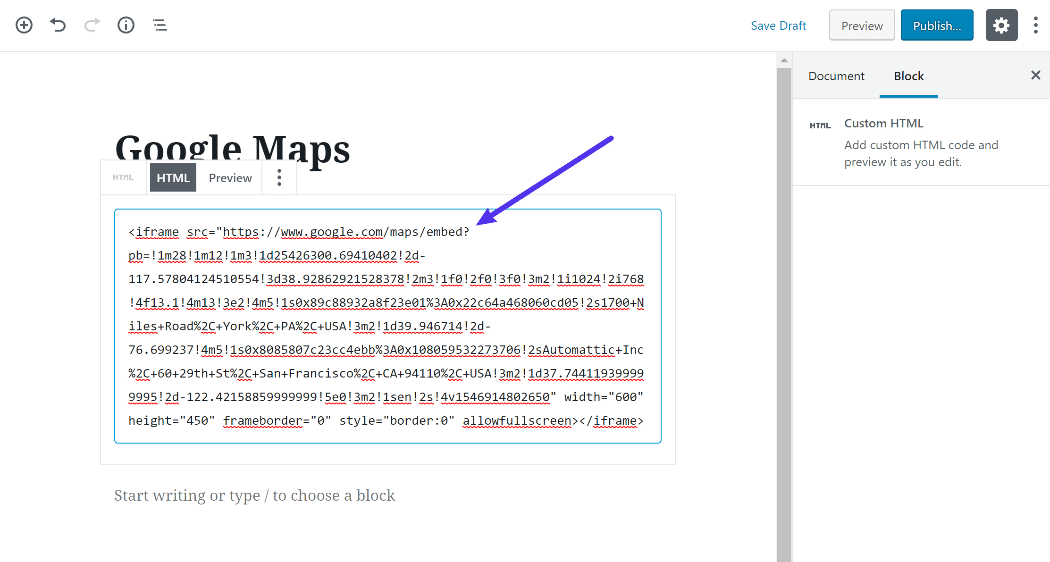
You can preview how your map will look by clicking the Preview button above the block.
If you’re still using the classic TinyMCE editor, you can add the Google Maps embed code by opening the Text tab and pasting the code there:
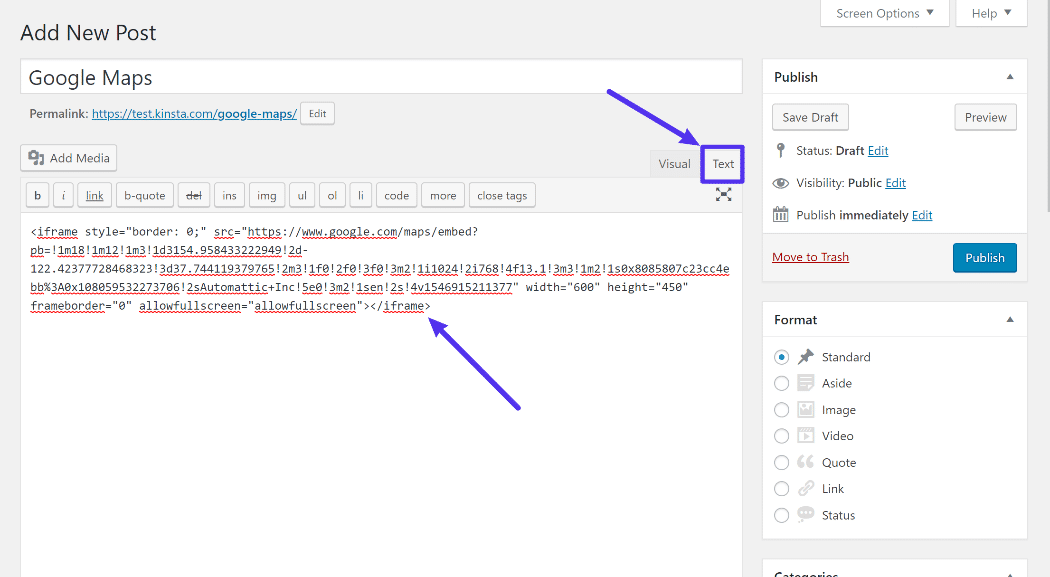
Once you add the code, you can go back to the Visual tab to see a live preview of your map.
And that’s it! You just learned how to add Google Maps in WordPress without a plugin.
Use Google My Maps To Embed More Complicated Maps Without A Plugin
If you want to get more creative when it comes to things like multiple location markers, custom annotations, etc., you can still do that without the need for a plugin with Google’s My Maps service.
My Maps is an official tool from Google that lets you create and share your own custom maps. With it, you could create something like the example below, with lots of custom markers and custom information that displays when a user clicks on a marker:
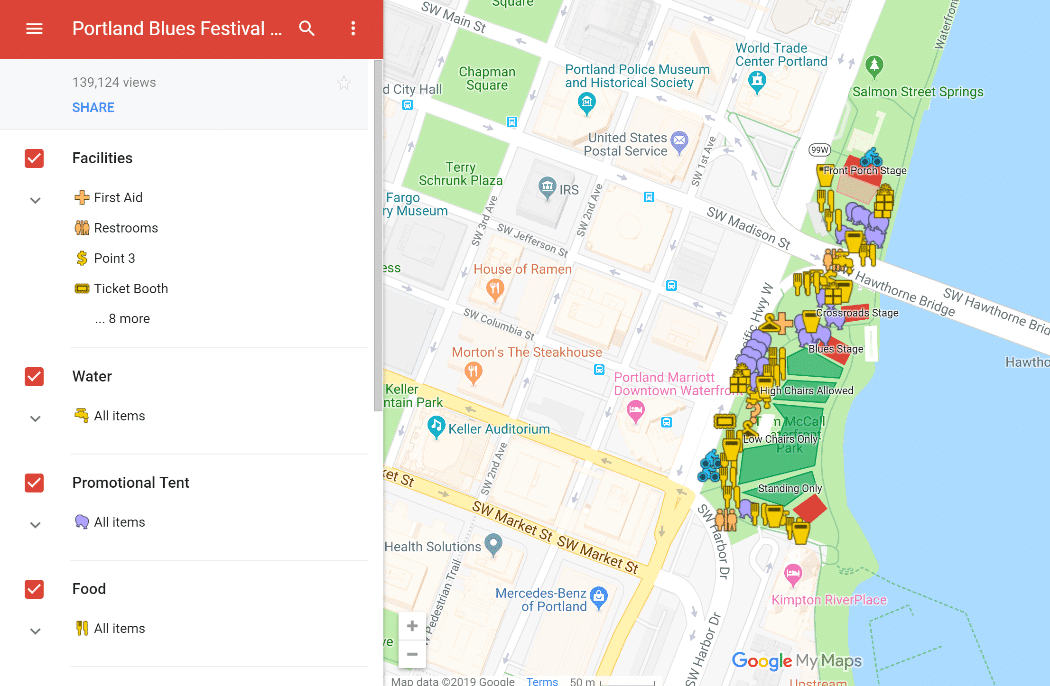
Here’s how to use it to add custom Google Maps to WordPress.
Step 1: Create Your Map In Google My Maps
To get started, head to Google My Maps and create a new map. From there, you can use the map builder interface to build your map:
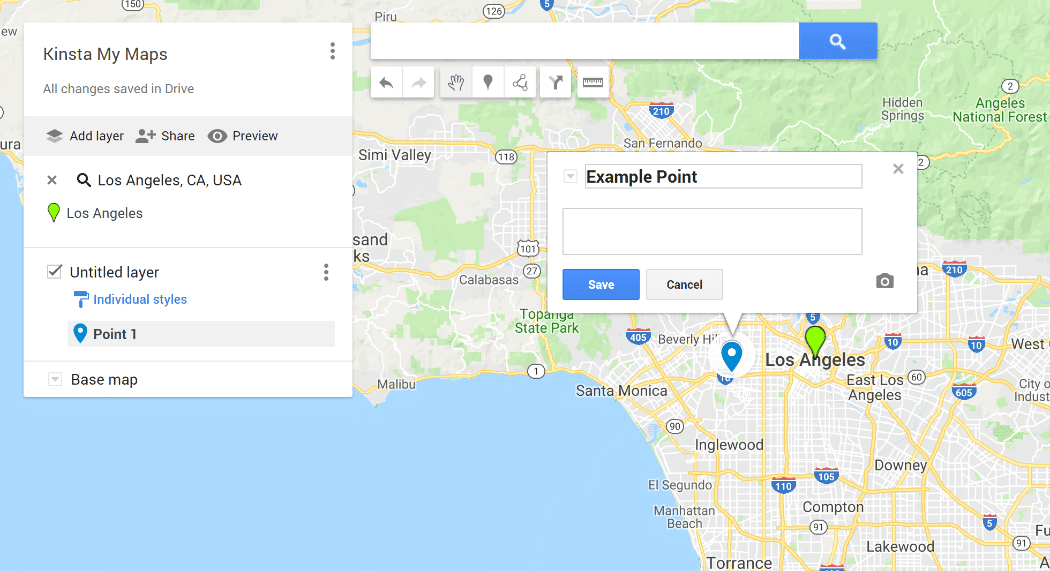
While we won’t cover it in too much detail, this interface lets you build some pretty creative maps. For a deeper look, this help article from Google covers a lot of the important functionality.
Step 2: Generate Embed Code
Once you’re finished building your map, you need to generate the embed code.
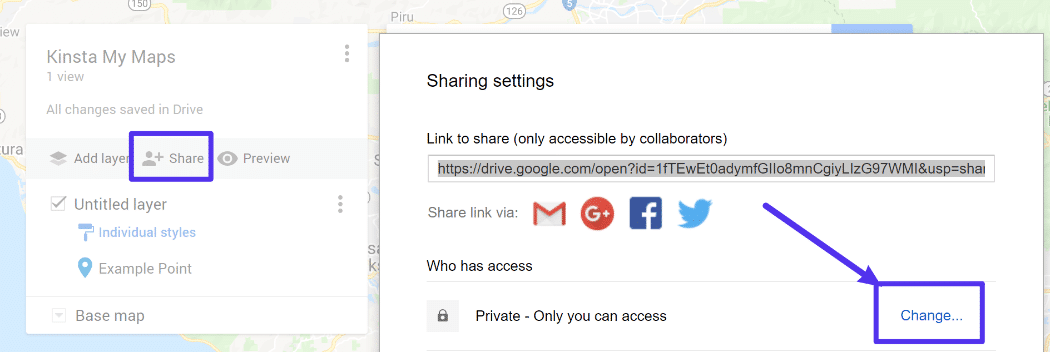
Before you can get that code, though, you first need to make your map public. To do that, click on the Share button. Then, click on Change…in the popup:
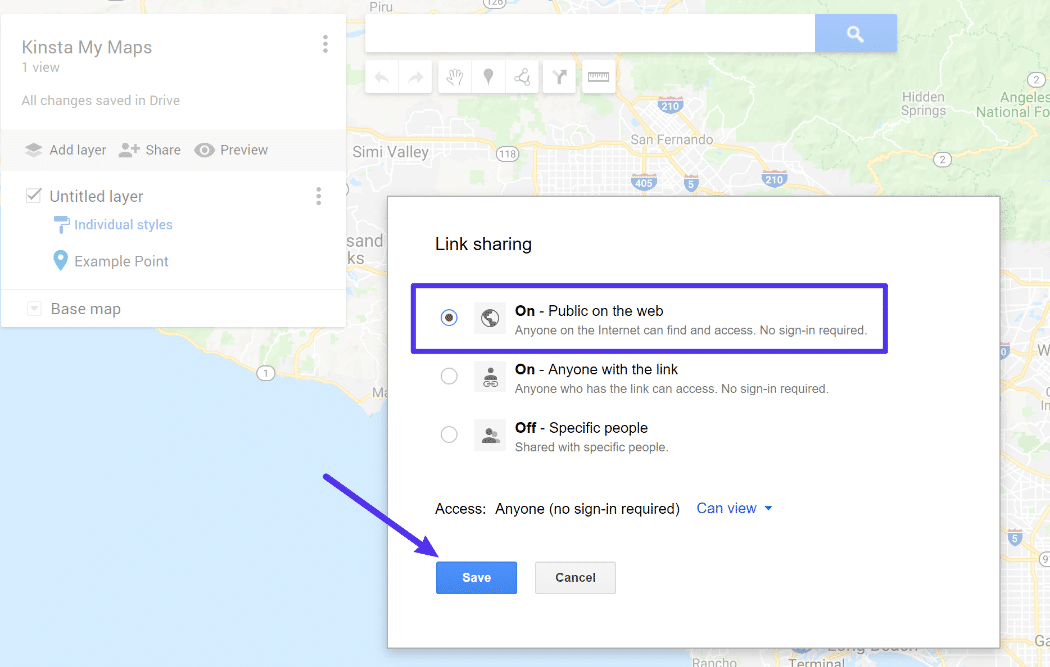
Then, select On – Public on the web and click Save:
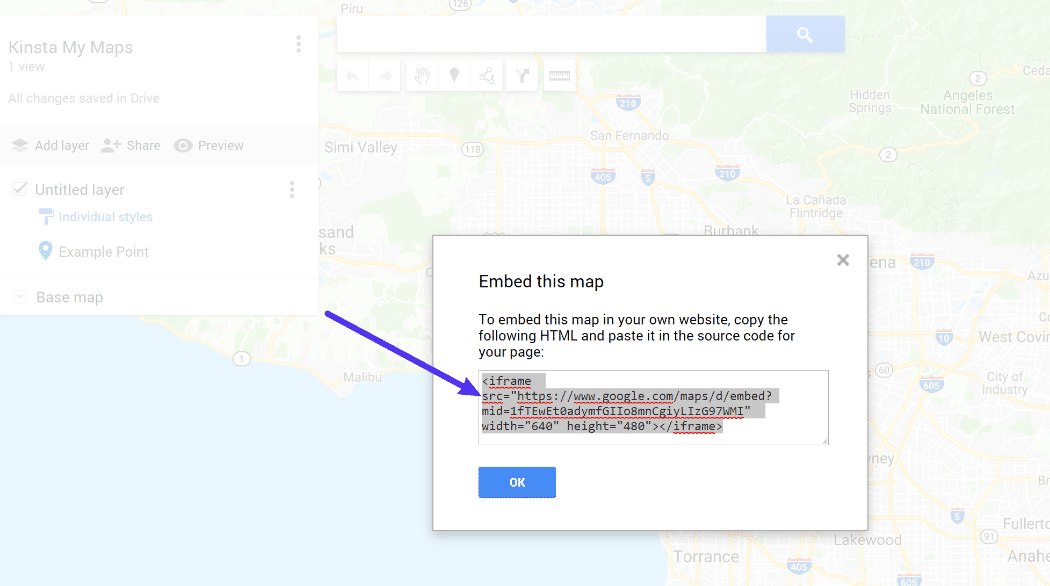
Once you’ve done that, click on the drop-down menu near your map’s title and select Embed on my site to generate the actual embed code:
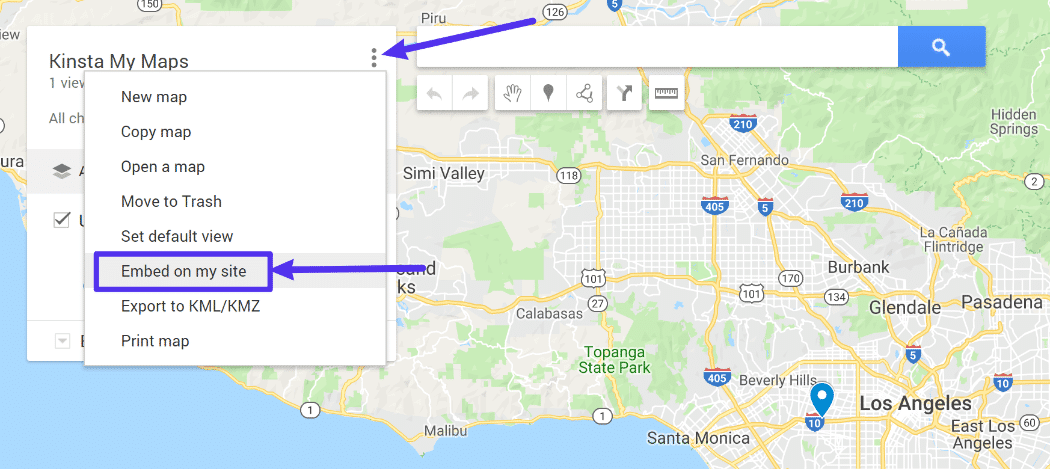
That will open a popup with the code, which you should copy. Don’t forget to add your API key.
Step 3: Add Embed Code To WordPress Site
Now, you can add that embed code to your WordPress site just like you would the embed code that you get from the regular Google Maps website.
If you’re not sure how to do that, click here to jump to that section of the tutorial from above.
Use A WordPress Google Maps Plugin Instead
Beyond the manual methods above, there are also tons of WordPress Google Maps plugins that can help you embed maps on your site.
There are a few reasons that you might want to consider one of these plugins over the manual methods:
- They let you create more complicated maps with a simple interface.
- You can do everything without having to leave your WordPress dashboard.
- Some of them link to WordPress. For example, you might be able to link map markers to WordPress posts.
- Some of them can help you optimize Google Maps for performance (more on this later).
For all of these plugins, you’ll need to generate your own Google Maps API Key before you can start embedding maps. This tutorial shows you how to do that.
Google Maps Widget
Google Maps Widget is a simple Google Maps plugin that lets you embed a map using the Google Maps Static API, which offers a more performance-friendly approach by embedding a static image rather than an interactive map (we’ll explain more about this in the next section).
It’s a great option if you want something simple and lightweight. Once you activate it, you will need to grab your Google Maps API key and plug it into the settings of the plugin. You can add a Google Map to any widget area on your site. Then, visitors can open a larger interactive version of the map in a lightbox:
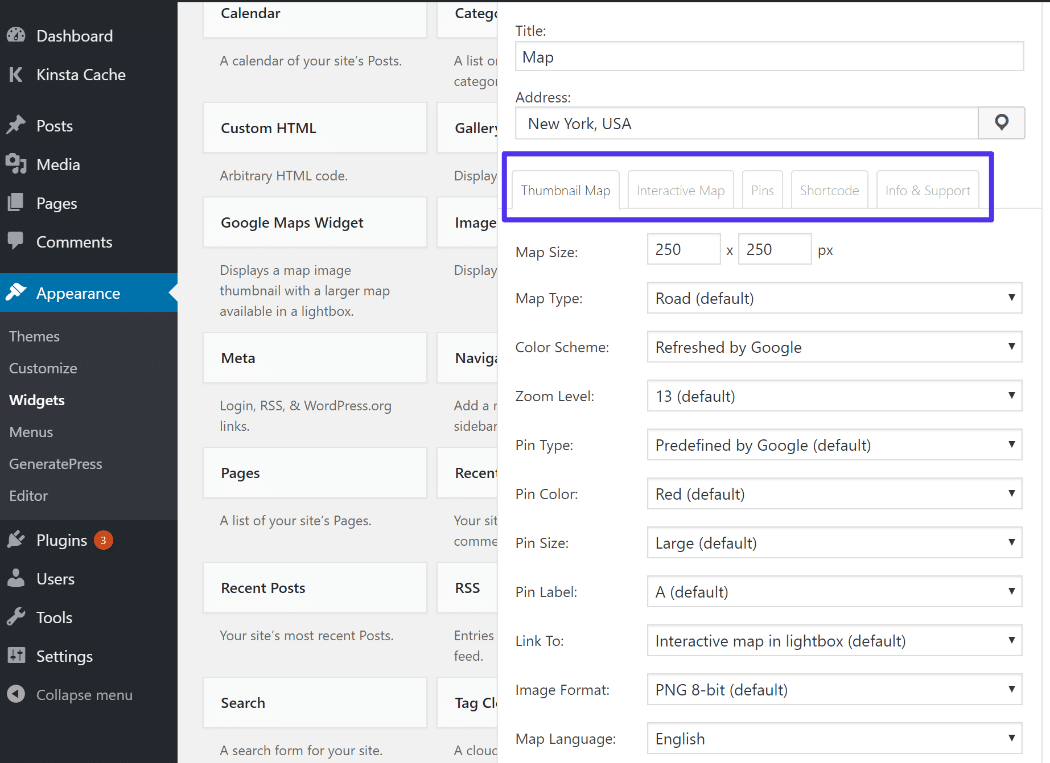
You can also use an interactive map right away if desired, and the Pro version lets you embed maps anywhere on your site with a shortcode.
Google Maps Easy
Google Maps Easy helps you create custom maps with your own markers and annotations.
When you add markers, you have the ability to upload your own custom icons, include text and images in the marker description, and plenty more. You can also control how your map functions, like choosing whether or not to let users zoom in:
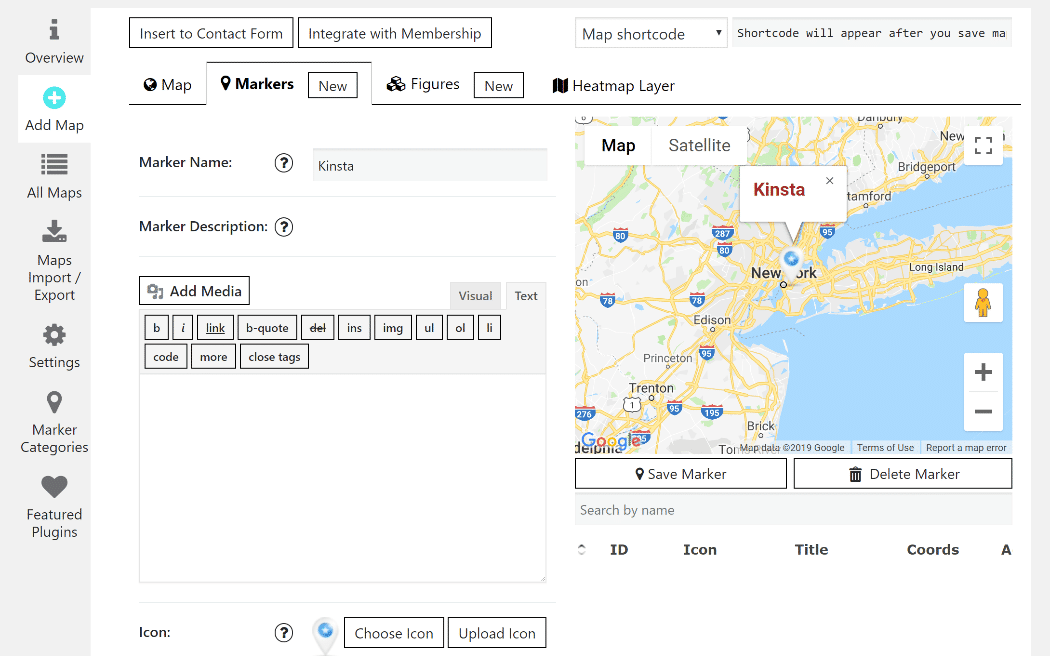
Once you build your map, you can embed it using either a shortcode or PHP function.
Intergeo
Intergeo is another popular option that lets you create your own maps with custom markers and have control over map functionality.
Once you install and activate the plugin, you’ll be able to build your maps right from your WordPress dashboard:
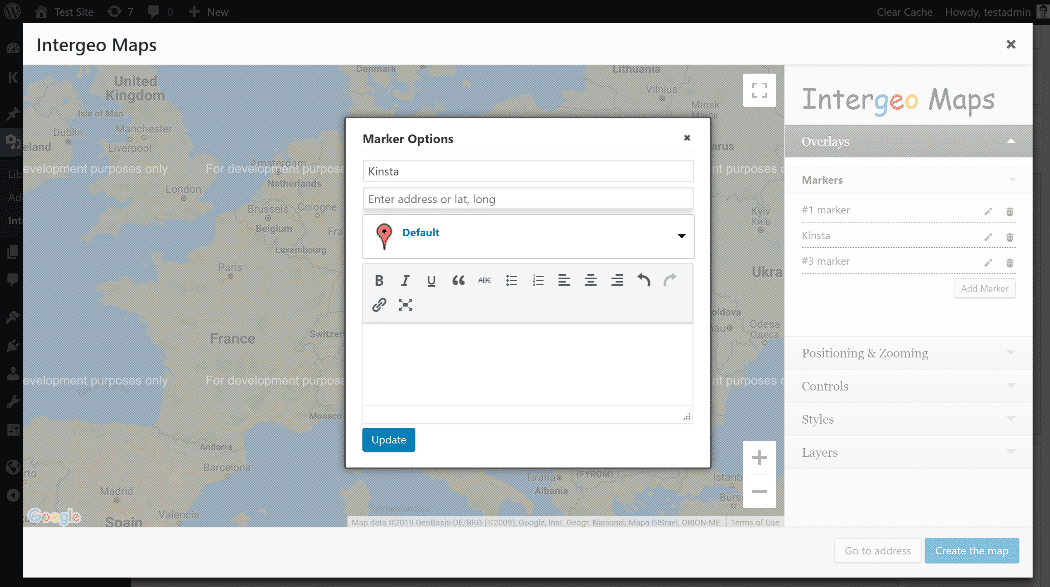
Then, you can embed them anywhere on your site using a shortcode.
Gutenberg Block For Google Maps Embed
Gutenberg Block For Google Maps Embed is a simple plugin that adds a dedicated Google Maps block to the new WordPress Gutenberg block editor.
With this block, you can embed any address and also choose:
- Dimensions
- Zoom level
- Interactive map vs static map (again, the latter method helps with performance)
It won’t let you create your own custom maps – but it is a convenient option if you use the new block editor and just want an easy way to include some simple maps.
Google Maps Can Slow Down Your WordPress Site – Don’t Let It
While Google Maps lets you embed a ton of cool functionality to your site with its interactive maps, there is a performance trade-off because it needs to load a large number of scripts to power all of that interactive functionality.
Long story short, embedding interactive Google Maps can slow down your site.
There are a few ways that you can combat this.
First, if you don’t need people to be able to interactively browse your map on your website, a simple way to speed things up without any third-party tools is to:
- Take a screenshot of the map to use on your site
- Link that screenshot to the map on the Google Maps website, or open a lightbox popup with the interactive map when a user clicks.
That way, your site is just loading a regular image – not all of the scripts associated with Google Maps.
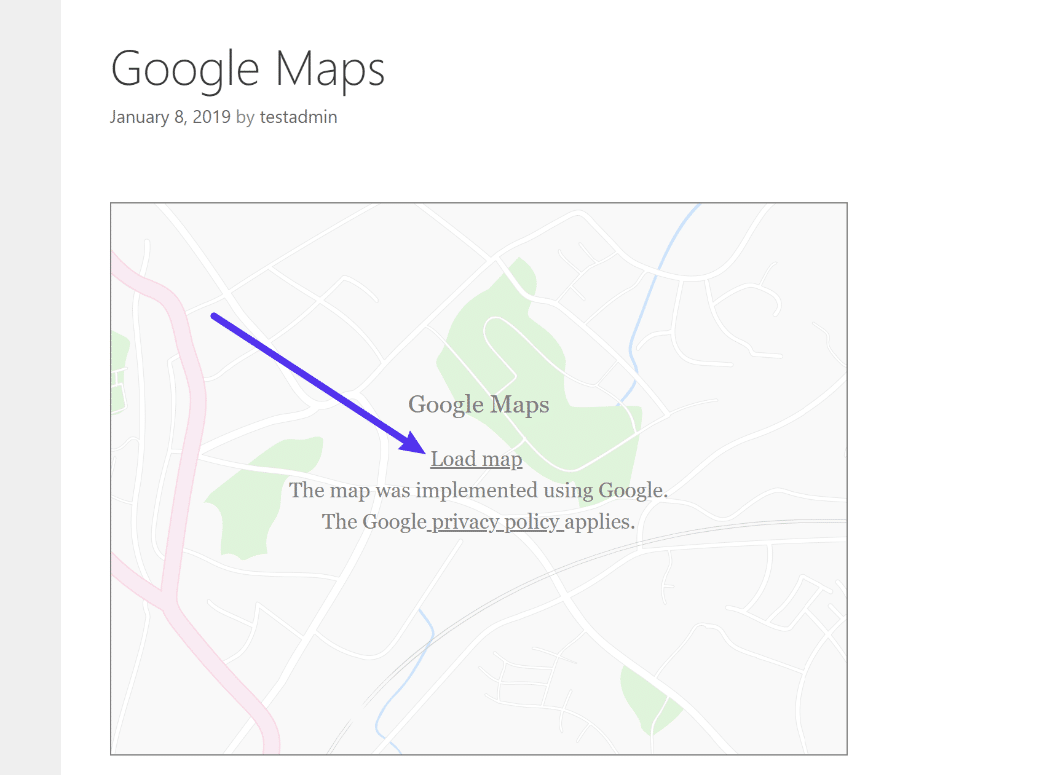
As an alternative to doing this manually, you can also use the free AWEOS Google Maps iframe load per click plugin. This plugin automatically replaces Google Maps embeds with a generic placeholder image. Then, if a user clicks the Load Map button, it will load the full Google Maps embed:
Or, you can also use the Google Maps Static API, which returns a regular image without any JavaScript. Some Google Maps plugins – including Google Maps Widget and Gutenberg Block For Google Maps Embed – let you use the Static API when you create your maps.
However, we realize that sometimes this static approach just won’t cut it, and a lot of people want to embed the interactive Google Maps experience right away.
If that’s the case, another good way to speed up Google Maps is to use lazy loading. With lazy loading, your site will wait to load any below-the-fold Google Maps embeds until visitors start scrolling down the page. That keeps your initial page load times fast, while still letting you embed interactive Google Maps content.
We’ve already written about how to lazy load images and videos and it’s the same idea for Google Maps.
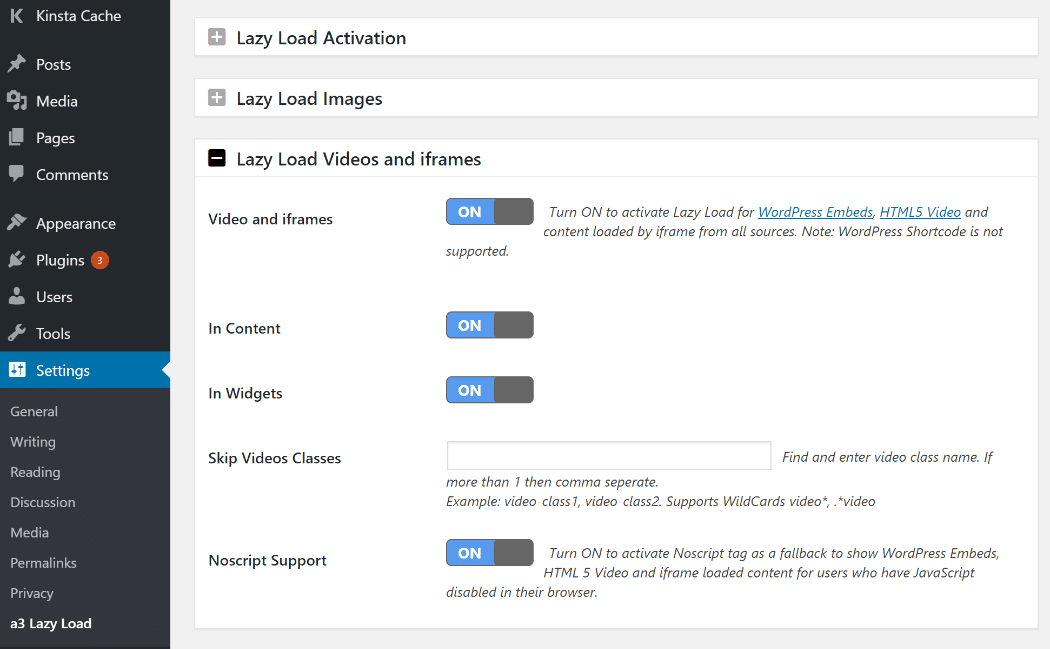
There are a few plugins that will let you do this. For example, the a3 Lazy Load plugin lets you lazy load iframe embeds, which includes Google Maps:
Other options are:
Summary
If you just want to embed a simple map on your site, you can add Google Maps to WordPress without a plugin using the built-in embed code feature. Or, you can use the Google My Maps tool to create your own custom map and embed that.
Beyond those manual methods, there are also plenty of Google Maps WordPress plugins that can give you lots of control without making you leave your WordPress dashboard.
No matter which method you choose, pay attention to the performance impact of using Google Maps. Try to only use Google Maps when absolutely necessary and consider tactics like placeholder images or lazy loading to decrease the negative effect on performance.
Do you have any other questions about using Google Maps on WordPress? Let us know in the comments!


