Did you try to connect to a server using SSL client certificate authorization only to be met by a message telling you that ERR_SSL_CLIENT_AUTH_SIGNATURE_FAILED?
SSL client certificate authorization adds an extra layer of security when connecting to essential tools and applications. But if something fails when you try to authenticate, you’ll be unable to connect, leading to some frustrating situations.
This post will take you through everything you need to know about the ERR_SSL_CLIENT_AUTH_SIGNATURE_FAILED error, including the steps you can take to fix the problem.
Check Out Our Video Guide to ERR_SSL_CLIENT_AUTH_SIGNATURE_FAILED
What Does ERR_SSL_CLIENT_AUTH_SIGNATURE_FAILED Mean?
Most people are familiar with SSL certificates at the server level.
Nowadays, most websites use SSL certificates and HTTPS to create an encrypted connection between a person’s web browser and the server. This encrypts the data in transit, but it also verifies that the server “is who it says it is,” so to speak.
With SSL client certificate authorization, the “client” — AKA the user connecting to the server — also has its own SSL certificate to verify that the client “is who they say they are.”
So if you want to connect to a server that requires SSL client certificate authorization, you’ll need to provide your SSL client certificate to connect.
You can store the client’s SSL certificate on your computer. Or, you can also keep it on some portable smart card reader, which is an approach that many organizations use.
It adds an extra layer of security by restricting access to a specific list of authenticated users, which is essential in many business applications or if someone generally wants to lock down access to a particular server.
The ERR_SSL_CLIENT_AUTH_SIGNATURE_FAILED error message indicates something has gone wrong with the client SSL certificate, rather than the server’s SSL certificate.
What Causes the ERR_SSL_CLIENT_AUTH_SIGNATURE_FAILED Error?
The ERR_SSL_CLIENT_AUTH_SIGNATURE_FAILED error is a technical error, so most of the causes are technical.
One of the leading causes is some interference in the connection. There are many potential causes within this group, which we’ll detail below. It could be antivirus software, a VPN, the macOS Keychain Access app, etc.
Another common cause is an issue with the TLS version usage, which is the protocol underpinning SSL certificates.
There are four versions of TLS — 1.0, 1.1, 1.2, and 1.3. However, TLS 1.0 and 1.1 have been deprecated as of 2022.
In some situations, using a TLS version that’s either too low or too high can trigger the ERR_SSL_CLIENT_AUTH_SIGNATURE_FAILED message. For example, if your smart card only works with TLS 1.2 but the server uses TLS 1.3, that might trigger the error.
How To Fix the ERR_SSL_CLIENT_AUTH_SIGNATURE_FAILED Error
Now, let’s get into how to fix the ERR_SSL_CLIENT_AUTH_SIGNATURE_FAILED error. We’ll start with minor technical fixes and then get into the more technical solutions.
1. Restart Your Computer
“Have you tried turning it off and then on again?”
This tech tip has reached meme status, but it’s always a good place to start to rule out any baseline glitches.
It definitely won’t solve all issues, but it will save you a lot of time if it works, so it’s always worth trying before going any further.
2. Update Chrome
If you’re using an older version of Chrome, that can trigger the ERR_SSL_CLIENT_AUTH_SIGNATURE_FAILED error. Typically, this is an issue with the version of TLS that Chrome is using.
To rule out any issues here, make sure that you’re using the latest version of Chrome before connecting.
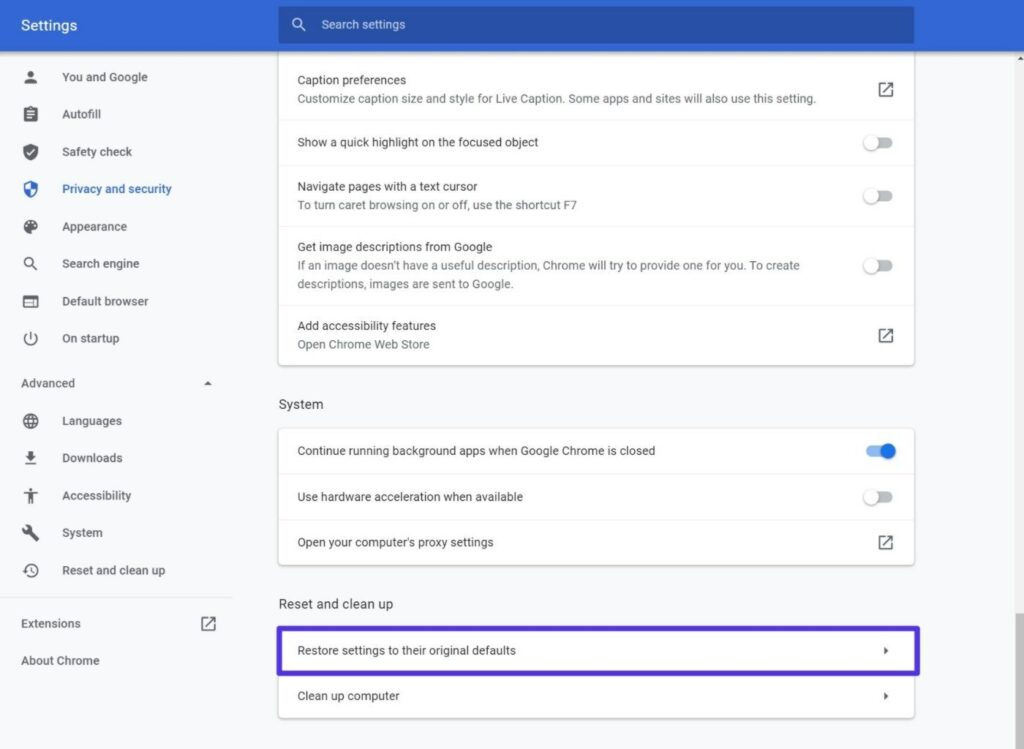
3. Reset Chrome
In addition to updating Chrome, another baseline troubleshooting step for the ERR_SSL_CLIENT_AUTH_SIGNATURE_FAILED error is to reset Chrome to its default settings.
Chrome includes a built-in tool to help you do this — here’s how:
- Enter the following address in your browser address bar — chrome://settings/privacy
- Scroll down to the bottom of the settings area that appears.
- Click the Advanced option to expand some additional options.
- Under the Restore and clean up section, click the option to Restore settings to their original defaults.
4. Disable Your Firewall or Antivirus Software
Some firewalls or antivirus software can trigger the ERR_SSL_CLIENT_AUTH_SIGNATURE_FAILED error by interfering with the connection between your computer and the server.
This could be your operating system’s built-in firewalls or dedicated antivirus software that you’ve installed.
To see if this is the case, try disabling them and testing the connection again. If it works, you can try using different antivirus software or adjusting your software’s firewall rules.
5. Disable Your VPN
If you’re actively using a VPN while trying to connect, that might cause the ERR_SSL_CLIENT_AUTH_SIGNATURE_FAILED error.
If you specifically need the VPN (e.g. your business requires it), try disabling the VPN and reconnecting.
6. Adjust Keychain Access App (macOS)
If you’re using macOS, one common cause of the ERR_SSL_CLIENT_AUTH_SIGNATURE_FAILED error is issues with the Keychain Access app. This is the native macOS app that Apple offers to store your passwords and account details, including your SSL client certificates.
If this is an issue, you might find that your SSL client certificate still works in Safari but won’t work in other web browsers like Chrome or Firefox.
Here’s how to fix it:
- Open the Keychain Access app.
- Find your SSL client certificate — it should appear under Login > My Certificates.
- Right-click on the HTTPS private key that’s failing.
- Open the Access Control tab.
- Select the option to Allow all applications to access this item. It might already appear as selected. Even if that’s the case, click to select it again.
- Save your changes.
The next time you try to connect to the server that requires client authentication, you should be prompted to enter your Keychain password. Do that and then choose Allow Always.
The problem should now be fixed going forward.
7. Change Your Web Browser TLS Configuration
Another common cause of this error is some issue with the TLS version configuration — either because it’s too high or too low.
The most common issue is that your operating system or smart card reader doesn’t work with TLS 1.2 or 1.3. One temporary workaround to fix this is confining your web browser to use TLS 1.1 instead.
We do not recommend this as a long-term fix as it’s always better to use modern TLS protocols, especially because TLS 1.0 and 1.1 have been deprecated. However, it might be a viable short-term fix in urgent situations.
Here’s how to configure Chrome to use an older TLS version:
- Right-click on the Chrome shortcut on your desktop and select Properties. This is the shortcut that you click to open the Chrome browser.
- Find the Target setting in the Shortcut tab (which should be open by default).
- Add the following text outside of the existing target: ssl-version-max=tls1.1 (put a space between the text and the end quotation mark).
- Click OK to save your changes.
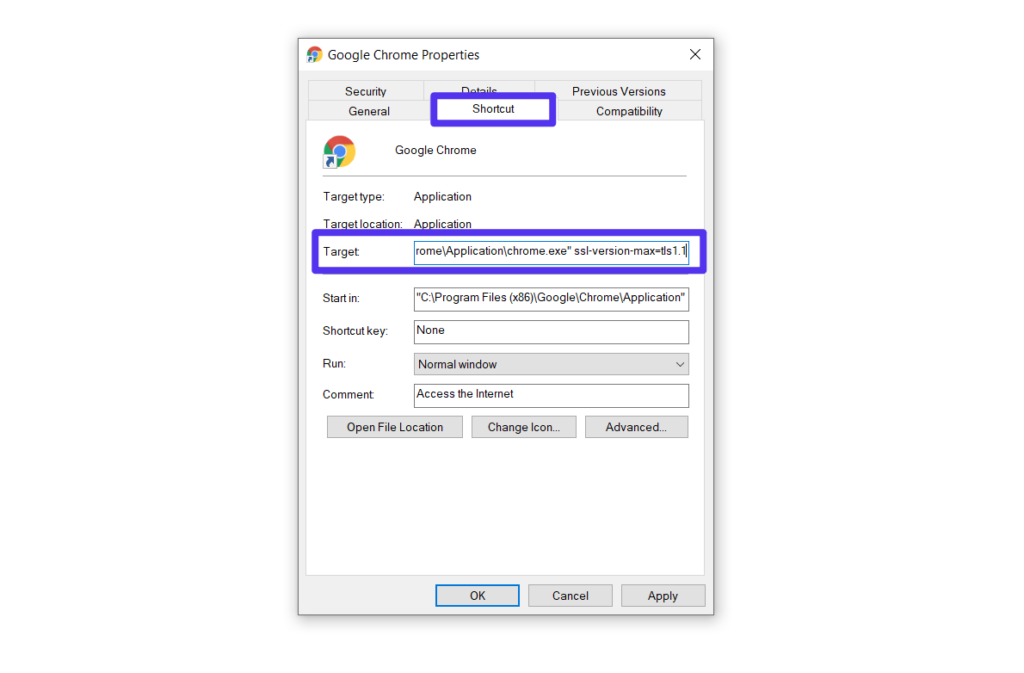
When you open Chrome using that shortcut, it will now use that TLS version.
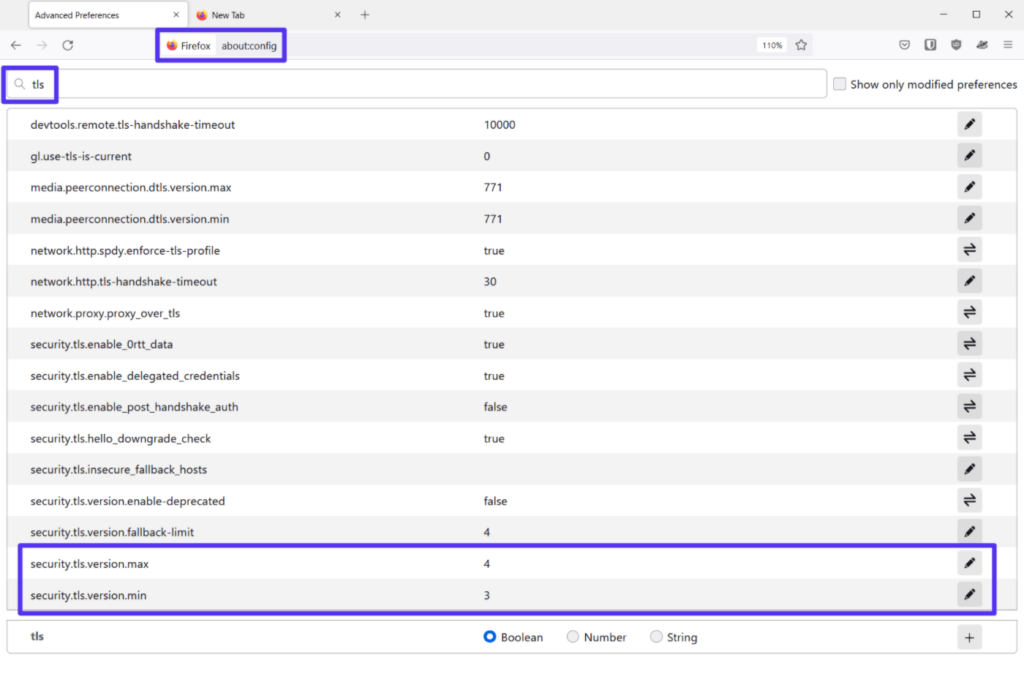
In Firefox, you can change the TLS version configuration in Firefox’s settings:
- Open Firefox.
- Enter about:config in the browser address bar.
- Search for TLS.
- Adjust security.tls.version.min and security.tls.version.max according to your preferences. You can learn more in this help article.
8. Change Your Server TLS Configuration
Above, we talked about how you can try to fix this error by changing the TLS version that your browser uses.
However, if you have access to the server, you also might be able to fix specific issues by adjusting the server configuration.
For example, if you’re storing the SSL client certificate on a smart card reader, some smart card readers will only work on TLS v1.2.
To fix this, you can try playing around with the server configuration.
For example, one user initially had their server configured to use TLS min v.1.0 and was able to fix the error by adding another flag to set the max version to 1.2.
9. Update Windows
One final troubleshooting tip is to update the Windows software if all else fails. Often, the ERR_SSL_CLIENT_AUTH_SIGNATURE_FAILED error results from older versions of Windows.
If possible, update your system to the latest version (or at least a more modern version).
Summary
The ERR_SSL_CLIENT_AUTH_SIGNATURE_FAILED message is an error that appears when something goes wrong with SSL client certificate authorization.
You might have an SSL client certificate on your computer or a smart card reader that you cannot use because of this error message.
There are two broad groups of strategies that can fix the problem:
- You can check if something is interfering with the connection, such as a firewall, the macOS Keychain Access app, a VPN, etc.
- You can see if there’s some issue with the TLS version you’re using, as it might be too low or too high for your specific use case.
For some help fixing other SSL errors, we have a general guide on fixing SSL connection errors. We also have specific guides on fixing various server-side or client-side SSL errors: