
PHP has moved to a predictable release schedule. Each new version is actively maintained for two years and receives an additional year of critical security updates.
To make sure your WordPress sites are as fast and secure as possible, Kinsta has adopted the same schedule, which means that we will be removing unsupported versions of PHP when they reach end-of-life (EOL).
In this guide, we’ll explain why keeping PHP up to date matters and show you how to update the PHP version of your WordPress site.
All Kinsta clients can easily choose the PHP version for a WordPress site within the MyKinsta dashboard. We recommend using the latest available version of PHP supported by your WordPress installation.
What PHP version should you be running?
The short answer: PHP 8.4.
It’s actively supported, mature enough that most major plugins have caught up, and it’s measurably faster than anything in the 7.x range.
PHP 8.5 is also a good option if your stack supports it, but 8.4 remains the safer default recommendation because it’s more established and widely tested in production.
PHP 8.3 is also fine, especially if you’re running a complex plugin stack and want to play it safe.
Here’s where things stand right now (source: endoflife.date):
| PHP Version | Status | Active Support Until | Security Support Until |
| PHP 8.5 | Active support | Dec 2027 | Dec 2029 |
| PHP 8.4 | Active support | Dec 2026 | Dec 2028 |
| PHP 8.3 | Security fixes only | Ended Dec 2025 | Dec 2027 |
| PHP 8.2 | Security fixes only | Ended Dec 2024 | Dec 2026 |
| PHP 8.1 | End of life | Ended Nov 2023 | Expired Dec 2025 |
| PHP 8.0 | End of life | Ended Nov 2022 | Expired Nov 2023 |
| PHP 7.4 | End of life | Ended Nov 2021 | Expired Nov 2022 |
“Active support” means bug fixes and security patches. “Security fixes only” means they’ll patch critical vulnerabilities but nothing else. End-of-life means nothing, no patches of any kind, for any reason.
Nearly half of all WordPress sites are still running a PHP version that’s past end-of-life. Which means half of all WordPress sites have known, publicly documented vulnerabilities with no fixes coming. It’s worth knowing which half you’re on.
One note on WordPress’s own labeling: you’ll see PHP 8.4 and 8.5 marked as “beta support” in the WordPress dashboard. That sounds scarier than it is. WordPress core runs fine on PHP 8.4 in production. The “beta” label is the WordPress project being conservative, not a warning against using it.
Why update the PHP version of your WordPress site?
The two main reasons for updating the version of PHP running behind your site are security and speed.
The speed difference is real and measurable. According to Kinsta’s PHP benchmark data, WordPress running on PHP 8.5 handles about 6.6% more requests per second than PHP 7.4.
For a standard blog, that’s a modest but real improvement. For WooCommerce stores, the gap is considerably larger: PHP 8.2 handles roughly 23% more requests per second than PHP 7.4, and PHP 8.5 pushes that above 60%, largely due to smaller response payloads.
If you’re running a store on PHP 7.4 right now, upgrading is one of the cheapest performance wins available to you.
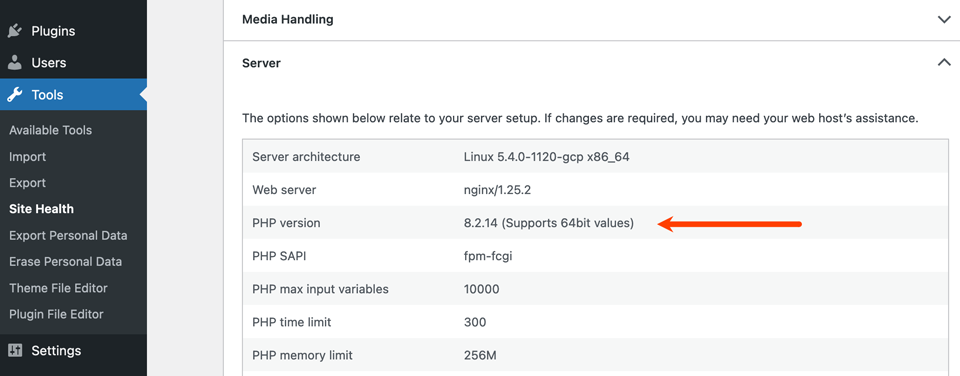
Not sure what version of PHP you’re running? You can check in the MyKinsta dashboard Tools menu. Or, you can see the PHP version using the WordPress Site Health tool:
What if my site breaks?
Problems happen when code on your site uses functions or syntax that newer PHP versions no longer support. The culprit is almost always a plugin or an active theme. Rarely WordPress core itself, which stays well ahead of PHP releases.
The PHP 7.x to 8.0 transition was the most disruptive in recent PHP history. Type handling became stricter, several functions were removed entirely, and many warnings that were previously ignorable became fatal errors.
Sites that jumped from 7.4 straight to 8.2 or 8.3 sometimes hit several breaking changes at once. If you’re on 7.4 and going all the way to 8.4, don’t be surprised if a couple of things need attention.
PHP 8.4 introduced a deprecation that currently affects some popular plugins, including Yoast SEO, WooCommerce PayPal Payments, Easy WP SMTP, and MailPoet.
Deprecation notices are warnings, not errors. Your site will still function, but your error logs will fill up, and in a future PHP version, those warnings will become fatal errors. Better to deal with them now.
The plugins most likely to cause trouble are older commercial plugins with legacy codebases, niche add-ons with small development teams, and anything that hasn’t been updated in the past year.
Well-maintained plugins from established developers typically sort out PHP compatibility within a few weeks of a new release. Before you do anything to your live site, back it up. All of it. Then use a staging environment to test the update first, which we’ll walk through below.
How to update PHP versions in WordPress
We’ll walk through the steps on how to best test your WordPress site for compatibility before updating PHP versions. Many of you shouldn’t experience any downtime, and there will be little work required.
For others, additional testing, troubleshooting, and even hiring a WordPress developer to make things compatible might be required.
If you simply want to update the PHP version on your live WordPress environment right away, you can skip down to Step 5.
However, we strongly recommend following all of the steps below to ensure everything works properly. Especially if you’re running an older version, such as PHP 7.4.
- Step 1 – Create a Staging Site
- Step 2 – Update PHP Version for WordPress
- Step 3 – Test Your Site, Plugins, Theme
- Step 4 – Push Staging to Live
- Step 5 – Update PHP on Your Live Site
Step 1 – Create a Staging Site
The first thing you should do is create a staging site. This is separate from your live environment and will allow you to test newer versions of PHP without breaking your live site.
In the MyKinsta dashboard, click on WordPress Sites in the left navigation. You will see a list of your sites. Click on the one for which you want to change the PHP version. Next, click on the Jump to or search box (or press CMD + / or CTL + / on the keyboard) and select Create New Environment option.

From here, follow the steps in our documentation for creating a WordPress staging environment.
Make sure to also check out the important notes regarding staging environments. For example, if you’re using a third-party CDN, you might need to disable it for your site to render correctly.
This is because your staging site uses a different URL. Caching is also disabled on Standard Staging Environments, so please keep this in mind if you are trying to test performance.
Step 2 – Update PHP Version for WordPress
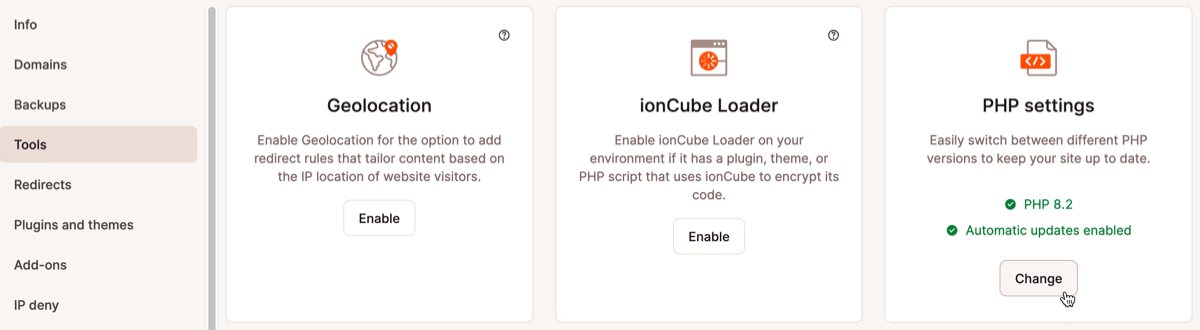
To update your WordPress site’s PHP version, navigate to WordPress Sites > environment name > Tools, then click the Change button on the PHP settings card:
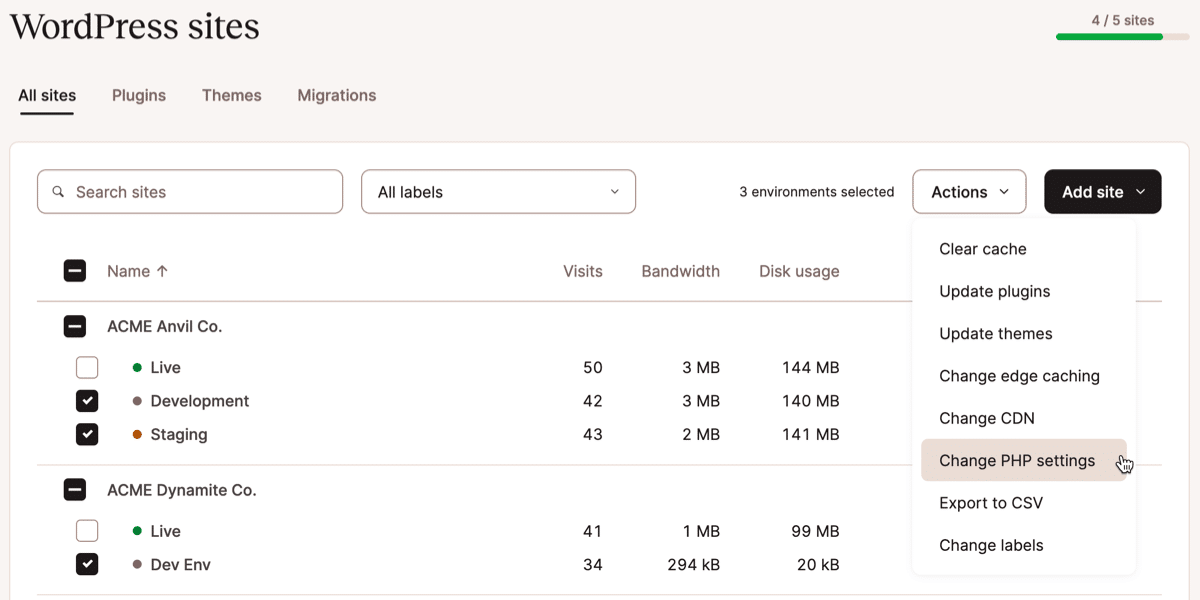
Alternatively, you can perform a PHP update in bulk for multiple environments from the WordPress Sites page. In the example below, we’ve selected the checkboxes beside the names of multiple staging environments and are choosing Change PHP settings from the Actions dropdown menu:
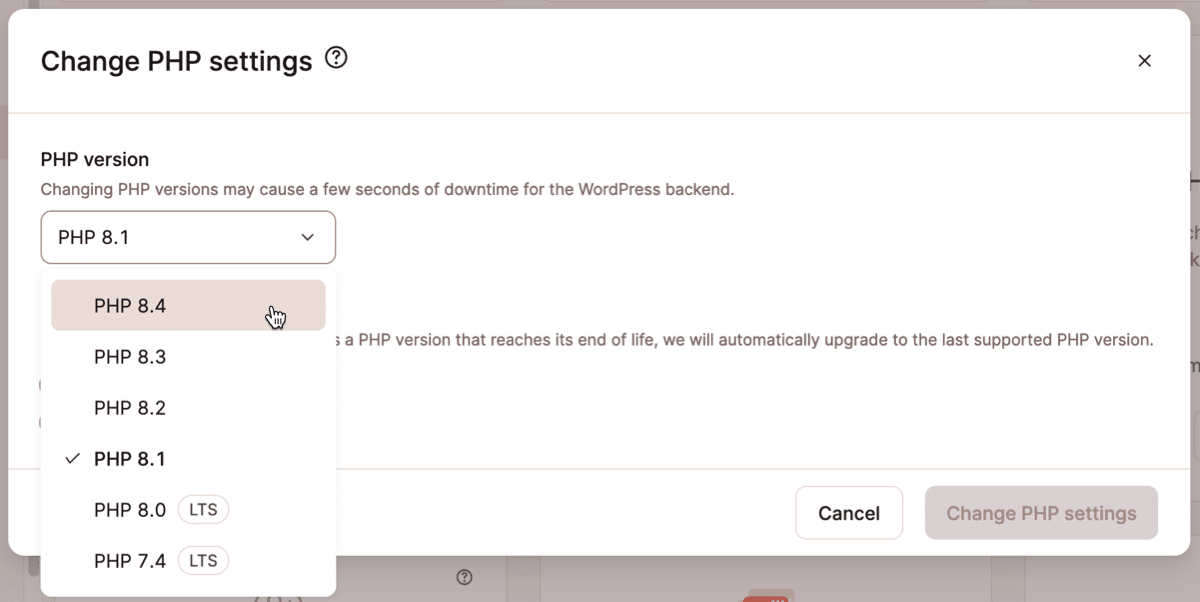
Whichever path you choose, the next step is to choose the PHP version you want to adopt and click the Change PHP settings button:
Note: When bulk-updating multiple WordPress environments, the version of PHP chosen above will be applied to all of them.
Whichever method you choose in MyKinsta, the update process may take up to three minutes. When complete, your PHP engine will be restarted, which may result in a couple of seconds of downtime for your WordPress backend only. Your site visitors will not experience any downtime.
While the PHP version is being changed, you can navigate elsewhere in MyKinsta, but some actions — like cache management — will be unavailable until the new engine has been activated. You will receive a notification in the dashboard as soon as the change has been made.
Step 3 – Test Your Site, Plugins, Theme
You should now have a staging site up and running on the latest version of PHP (or the version you want to switch to). The first thing you should do is simply browse and click around on your WordPress site to see if you notice anything broken.
If something is incompatible, such as a plugin or your theme, you might see a 500 error (501, 502, 503, 504, etc.) or white screen of death on the front-end of your site. In this case, the easiest and quickest way to determine what might be causing it is to disable all of your third-party plugins and re-enable them one by one. Remember, you’re on a staging site. So you don’t have to worry about breaking anything.
Disabling plugins within MyKinsta
Kinsta customers can enable and disable plugins (and choose automatic update options for them) within the MyKinsta dashboard. They can navigate to WordPress Sites > Plugins in the dashboard and then use the checkboxes beside plugin names and sites to select the plugins to be disabled:
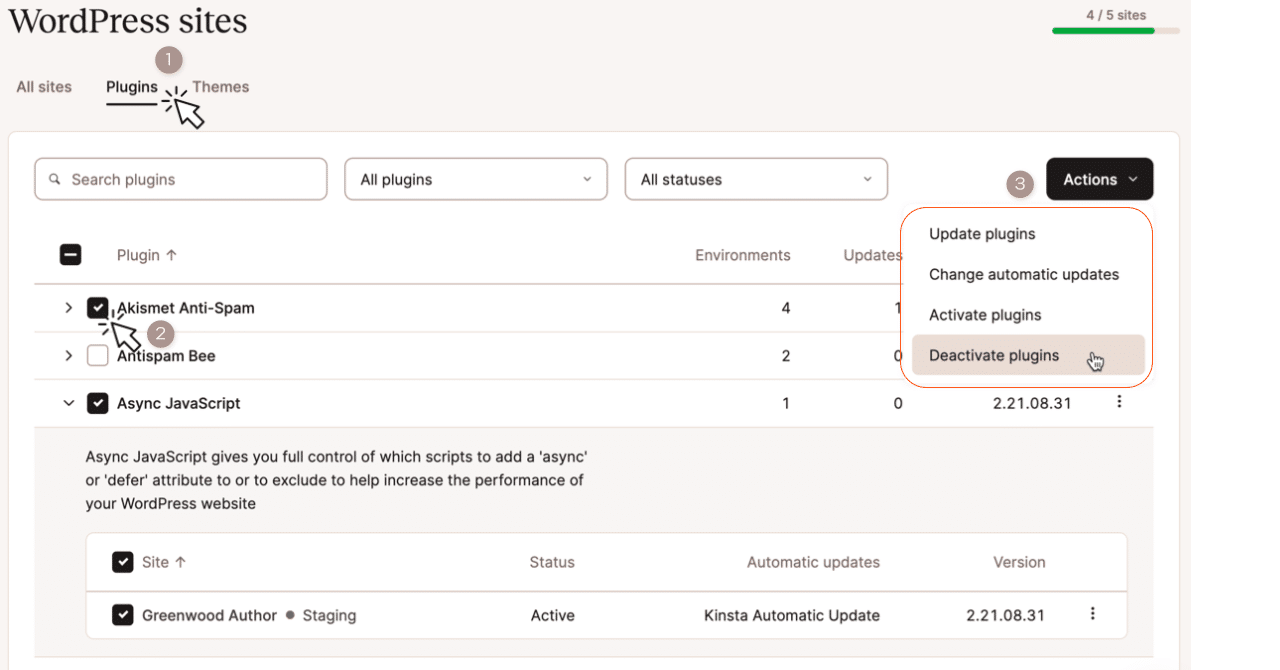
After making your selection, click on the Actions menu and select Deactivate plugins. You will use this same interface within MyKinsta later to activate the plugins again.
Disabling plugins within the WordPress dashboard
If you are not a Kinsta customer, you may be able to disable plugins within the WordPress dashboard. Under the Plugins screen, select all of your plugins. Then select Deactivate from the Bulk Actions drop-down and click Apply.
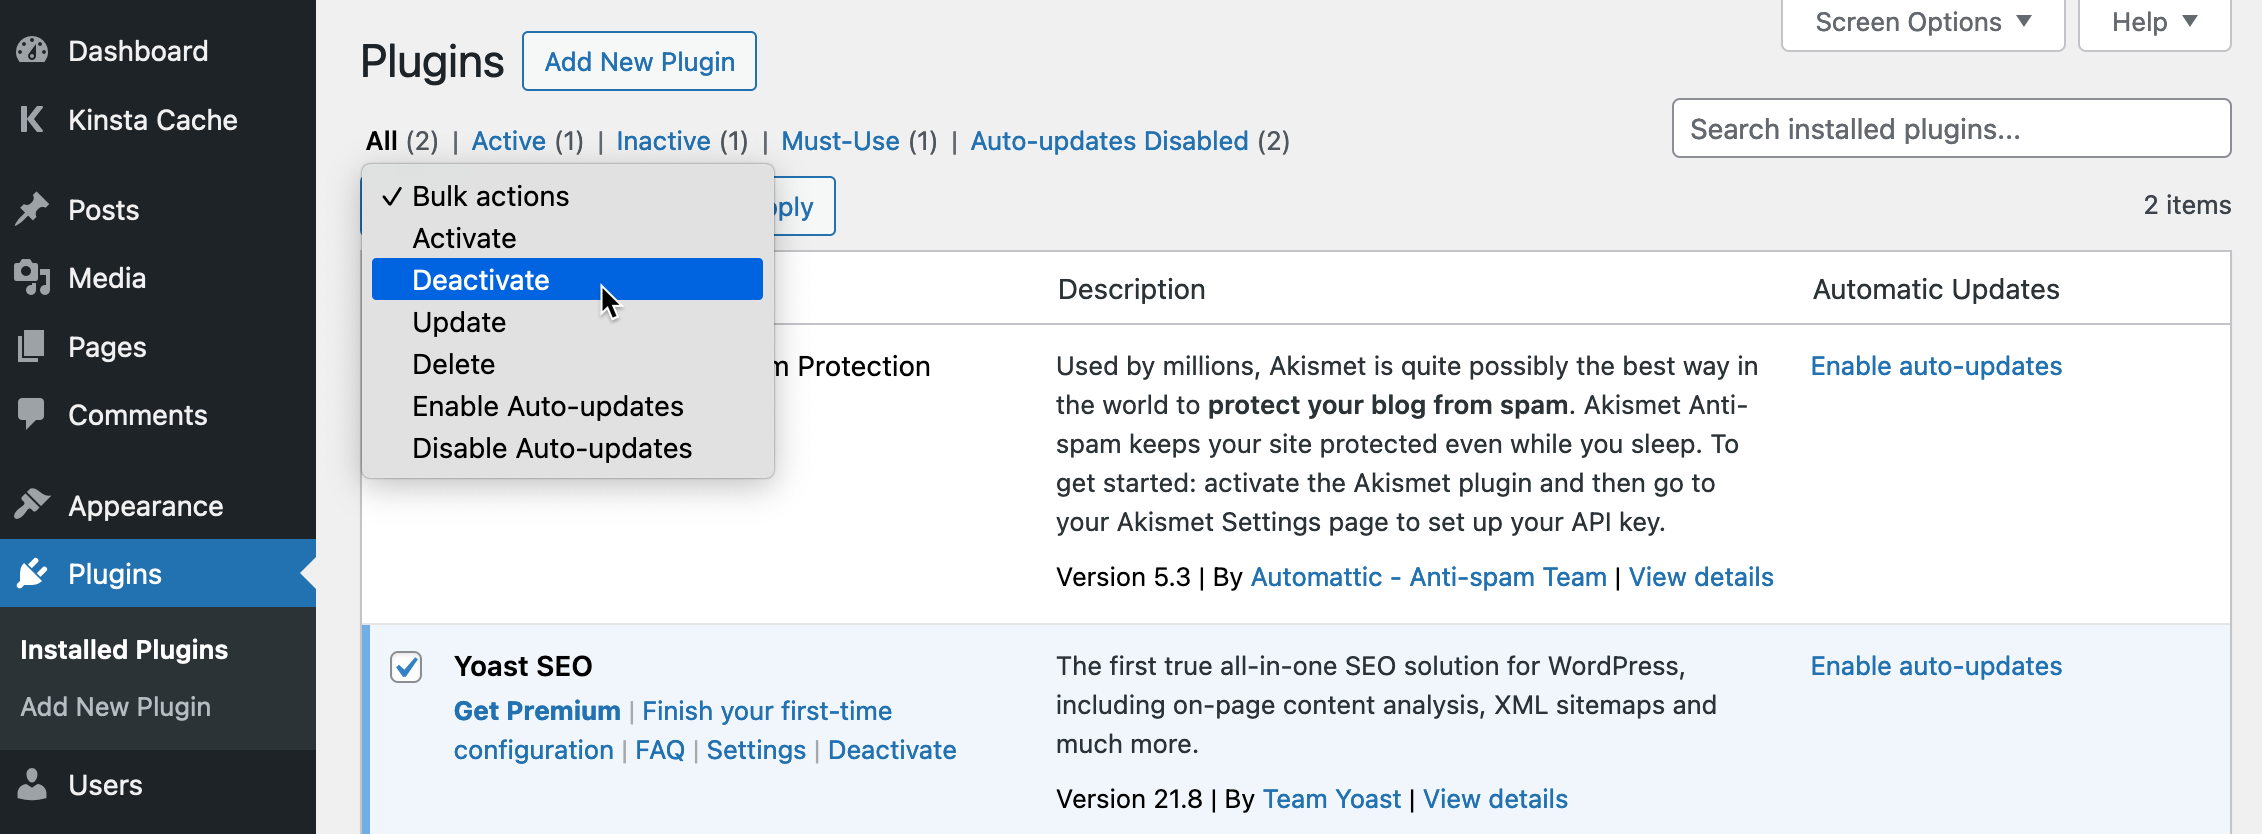
You can then re-enable them one by one, visiting your WordPress site each time. This will help narrow down what might be causing an issue. Don’t have access to your WordPress dashboard because of an error? No problem, check out how to disable plugins via FTP.
The exact same tests can be used with your WordPress theme. You can temporarily switch back to the default WordPress theme, such as the Twenty Nineteen theme.
View Log Files in MyKinsta
Perhaps you have determined which plugin or theme is causing the issue but are not sure why? This is where your WordPress error logs can come in handy. Simply click into one of your WordPress sites, and on the right-hand side, click on Error Logs.
You can view your error.log, kinsta-cache-perf.log, and access.log files. By default, it will show the last 1,000 lines. You can use the line-count drop-down to select a larger amount (up to 20,000 lines).
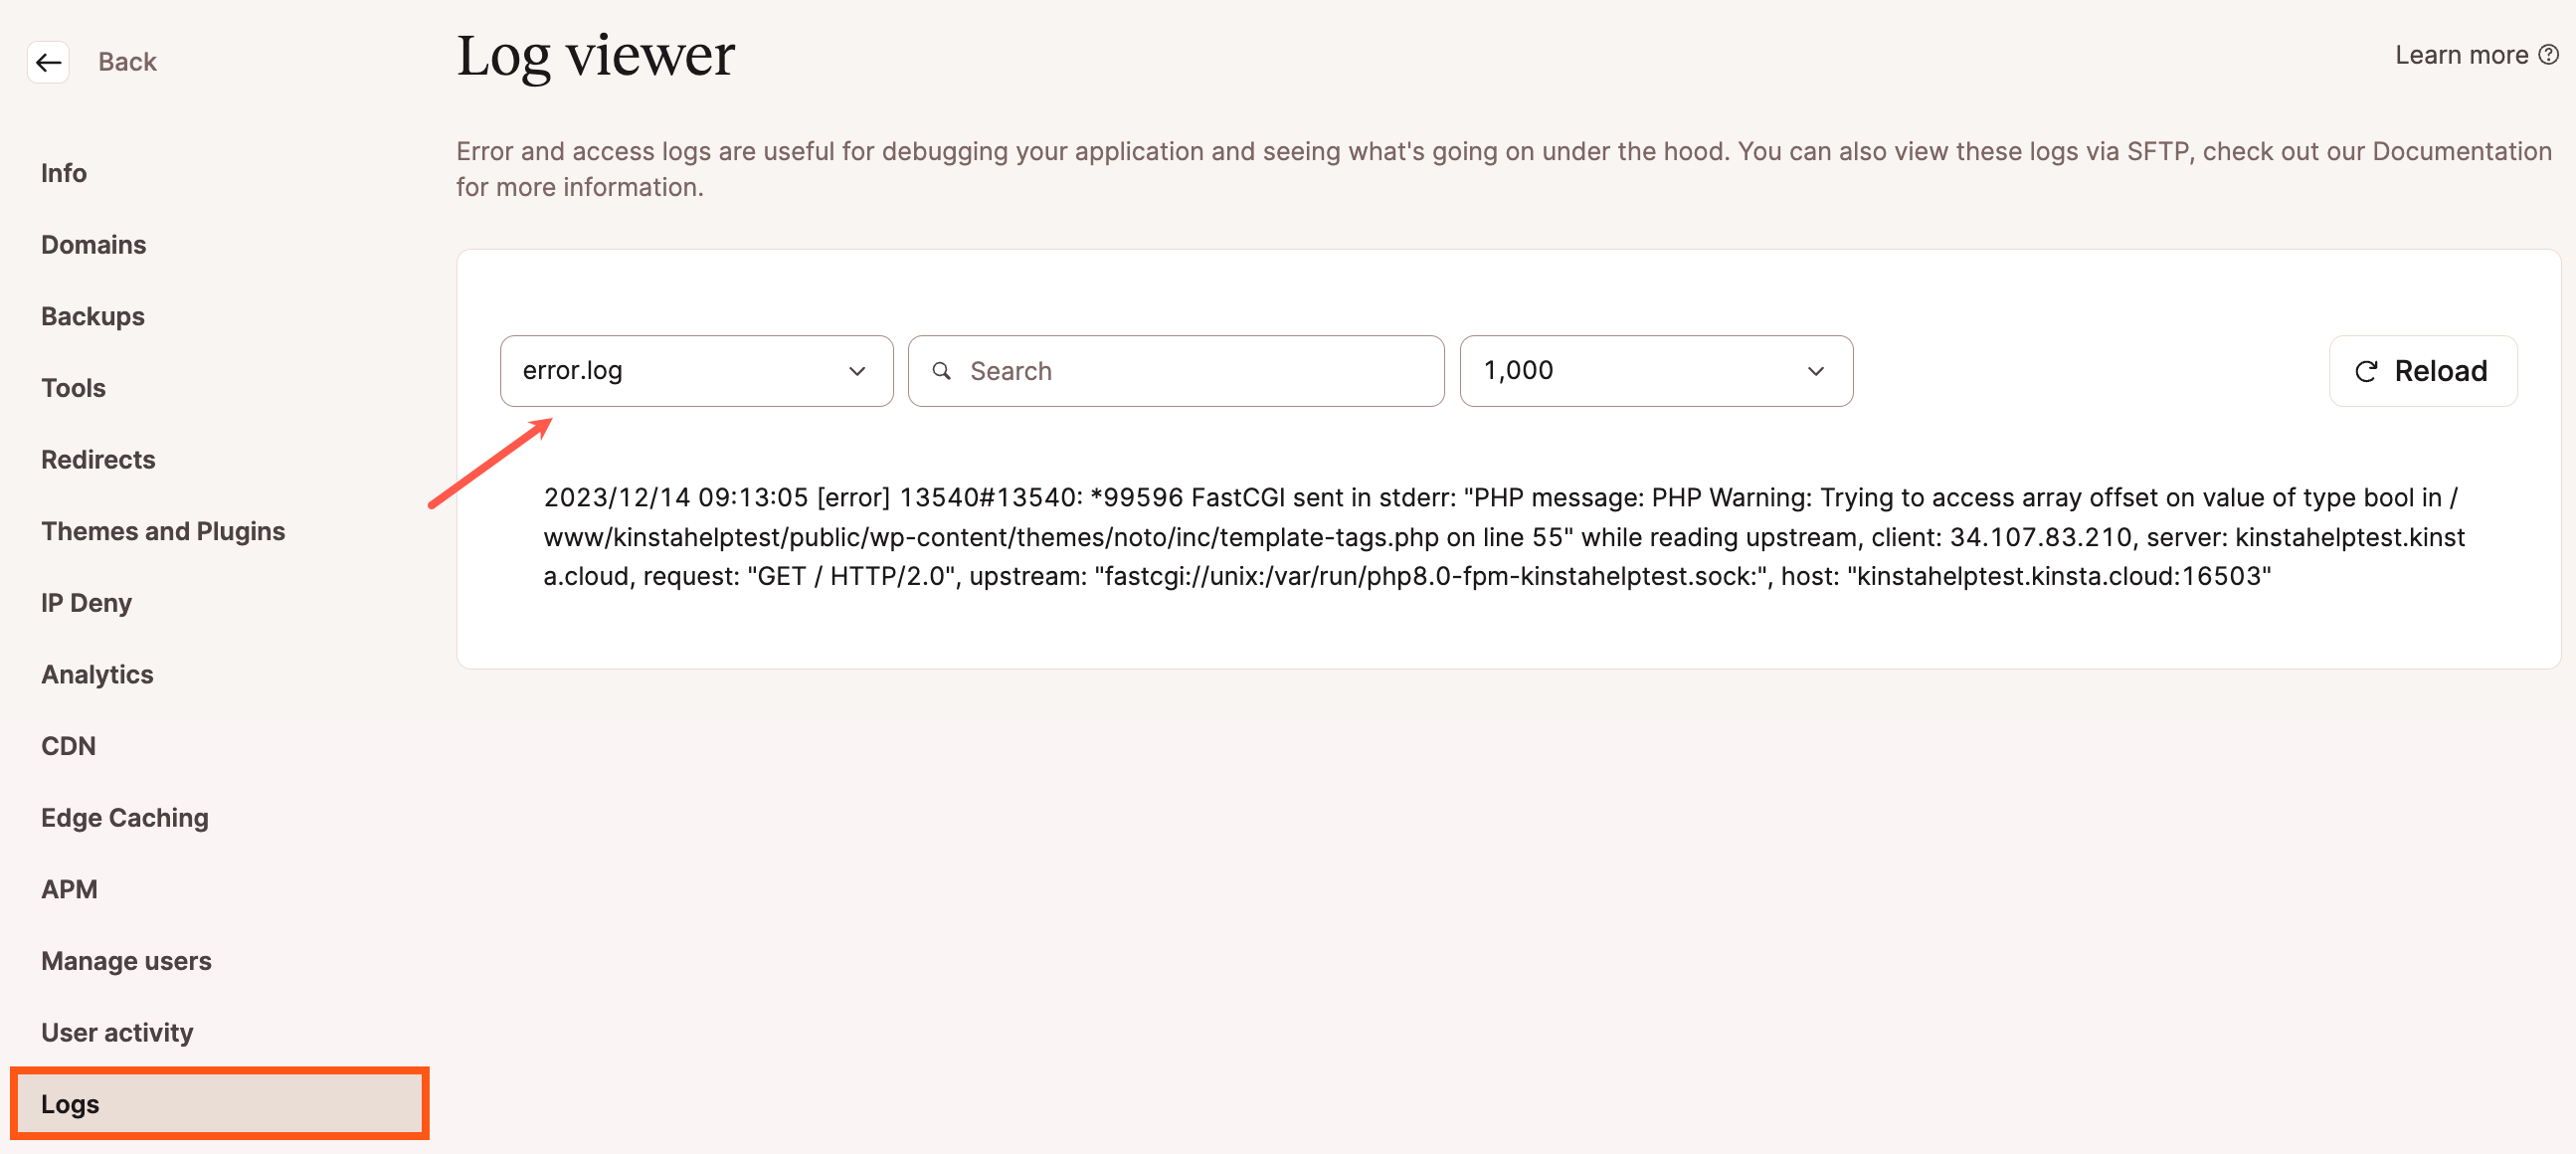
Important: The MyKinsta logs tool doesn’t show debug info. If you need to view debug information, you can enable WP_DEBUG as we’ll show you below.
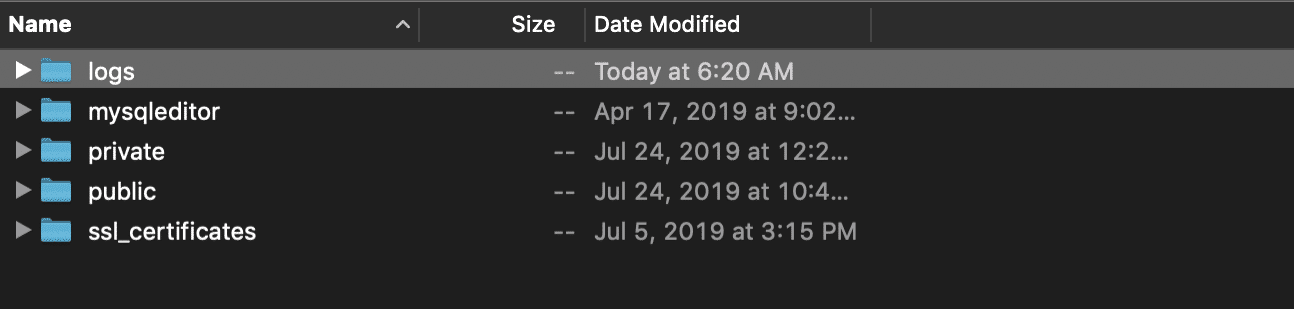
View Raw Log Files via SFTP
You can see the completely unmodified logs in /logs/ via SFTP.
Tail Your Log Files via SSH
You can tail the logs while you experiment on your site using SSH. This basically means you can watch the log update live while testing. All of Kinsta’s hosting plans include SSH access.
Show last 500 lines
tail -n 500 /www/sitename/logs/error.log
Watch the file live
Watch your error log file update on the fly.
tail -f /www/sitename/logs/error.log
For those of you with SSH access, WP-CLI can also be an invaluable tool.
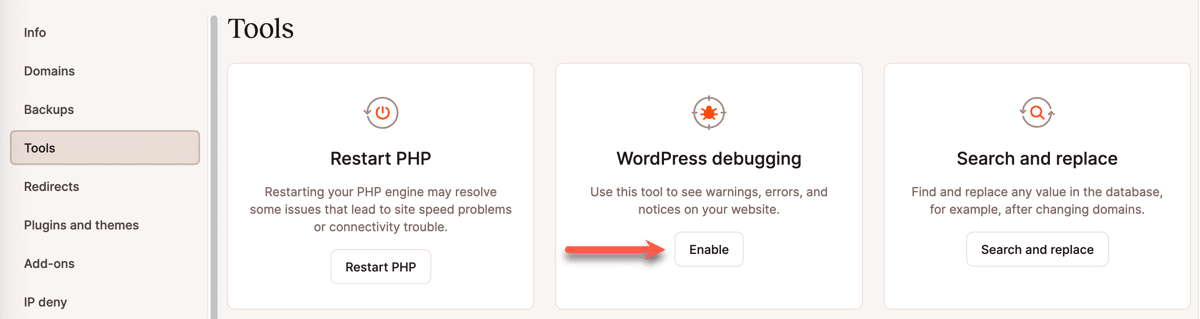
Enable Debug Mode in MyKinsta
For Kinsta users, WordPress debug mode can be enabled right in the MyKinsta dashboard. Simply navigate to WordPress site and environment for which you want to enable debugging. Click Tools on the left menu and then click the Enable button on the WordPress Debugging tool. This will allow you to see PHP errors and notices without having to enable debug mode via SSH or SFTP.
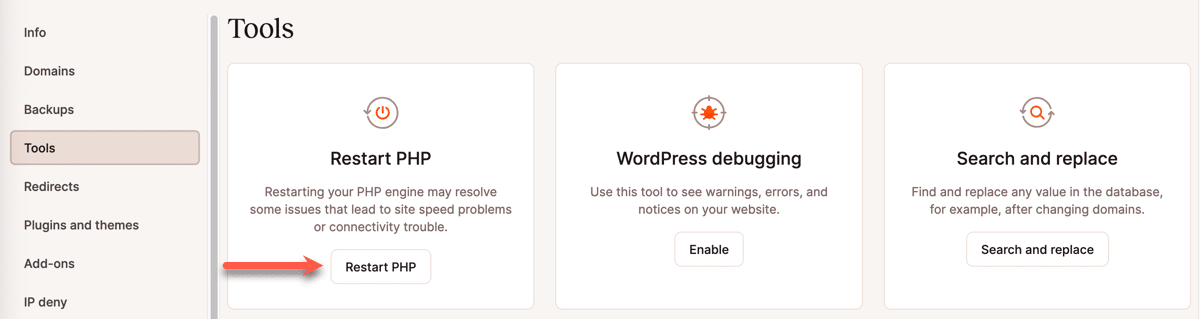
Our self-healing PHP feature automatically restarts PHP if it notices any issues. If you need to manually restart PHP for any reason, you can do so by going to your site’s Tools page and clicking Restart PHP.
Enable Debug Logging in WordPress
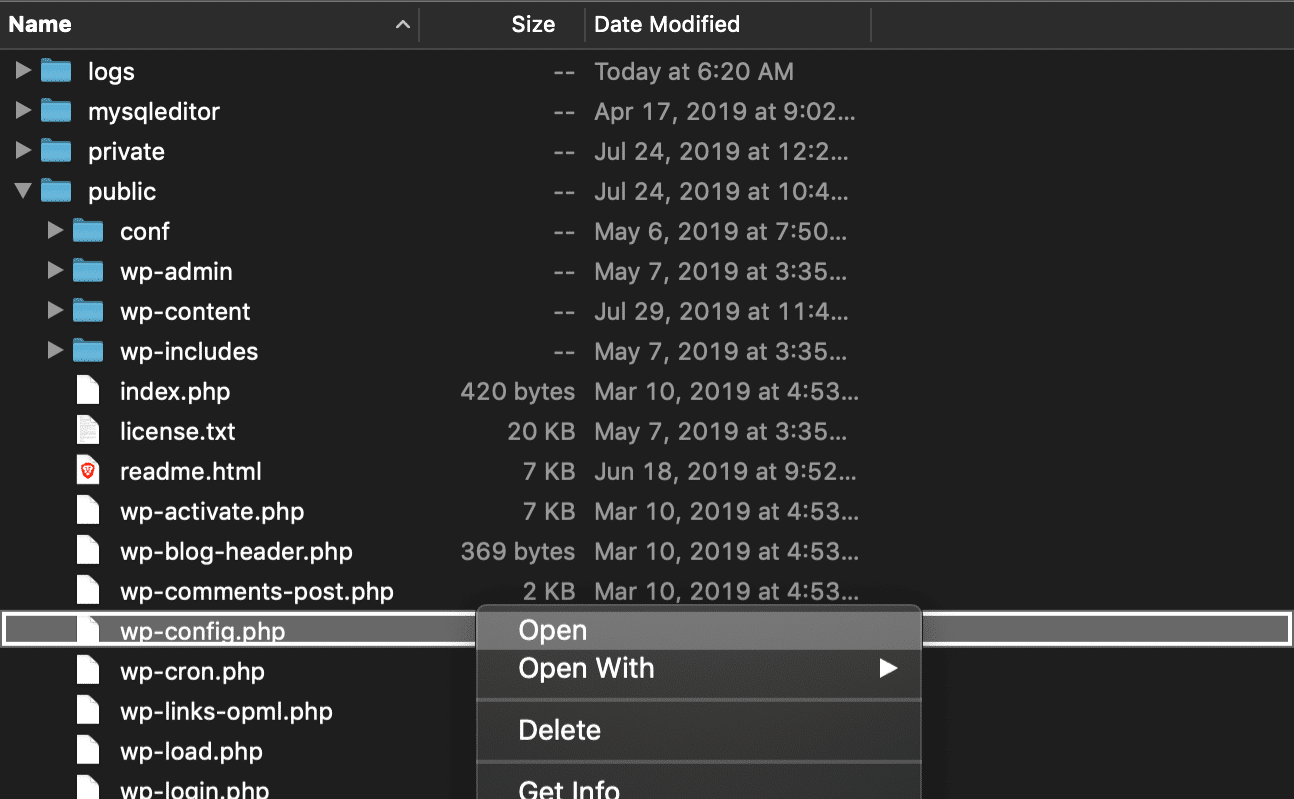
If you don’t have SSH or MyKinsta access, you can always enable debug logging in WordPress. First, you will need to connect to your site via SFTP. Then download your wp-config.php so you can edit it.
Find the line that says /* That's all, stop editing! Happy blogging. */ , and just before it, add the following (as seen below):
define( 'WP_DEBUG', true );
define( 'WP_DEBUG_LOG', true );
define( 'WP_DEBUG_DISPLAY', false );
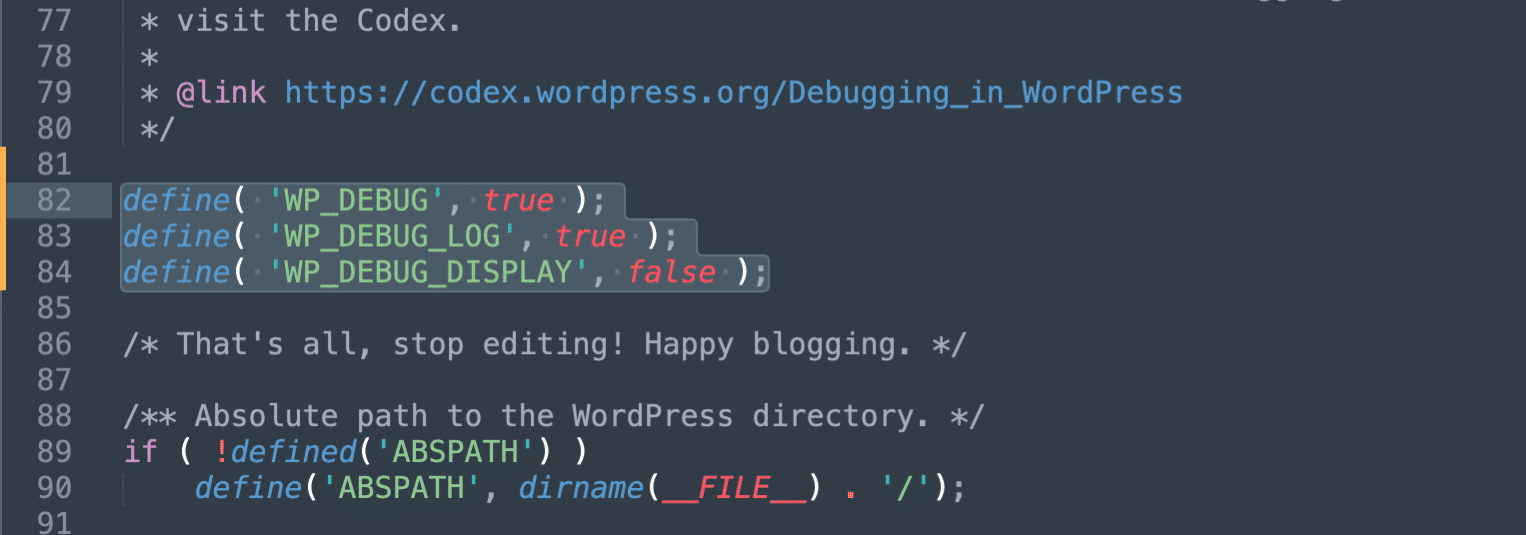
If the above code already exists in your wp-config.php file but is set to “false,” simply change it to “true.” This will enable debug mode and show everything in your /wp-content/debug.log file. You will also see warnings and errors in your WordPress admin if they exist.
Important: Don’t forget to turn it off when you’re done, as these files can get pretty huge very quickly.
Confused as to What to Look For?
There are thousands of plugins and themes out there, so, unfortunately, it’s impossible for us to list all the errors you might experience. Typically these occur due to code (functions, syntax, etc.) being incompatible with the version of PHP you’re using. However, here is an example of something you might see.
500: Fatal error: Uncaught Error: A semicolon (';') is expected here. in /www/sitename/public/wp-content/plugins/bbpress-shortcodes/bbpress-shortcodes.php:177
As you can see above, it’s pretty easy to quickly narrow down that it’s the bbPress Shortcodes plugin causing a problem.
In worst-case scenarios, you might find that you have a compatibility issue with one or two plugins. If that is the case, here is what we advise:
- Update your plugins and themes to the latest version if you haven’t already.
- Reach out to the developer of the plugin or theme and ask them to add/fix support PHP 7.4 (or the current version you’re using). This is one reason we’re giving you a heads up before the phase-out dates!
- Find an alternative plugin that can deliver the same functionality and is compatible with the PHP version.
- Hire a WordPress developer to fix the issue.
- Change your PHP engine to a lower version and see if the plugin or theme then works. If it does, you could run on a lower version of PHP until the developer updates their code. We don’t recommend this as PHP 8.0 is faster and will remain supported for a longer period of time. But if there is something you absolutely need to run and it only works on PHP 7.4, then you might have to resort to this.
Step 4 – Push Staging to Live
Once you have finished testing your site with PHP, if you had to make any changes to your plugins or themes, you can either push staging to live or make the same changes to the live site that you made to the staging site.
Some of you may find that you have to make fairly exhaustive changes in staging to get the site running on a newer version of PHP. In that case, using the push to live feature will save you a lot of time.
To do this, make sure you have your staging environment selected. Then click the Push Environment button.

Feel free to reach out to our support team 24/7 regarding concerns or issues with updating the PHP version on your WordPress site.
Step 5 – Update PHP on Your Live Site
Now that it’s ready for PHP to be updated, you can change the PHP version on your live site just as you did using the methods outlined in Step 2 above.
Summary
Updating PHP is one of the simplest ways to improve your WordPress site’s security, performance, and long-term stability.
The key is to stay on a supported version, test for compatibility issues before making changes, and make PHP updates a regular part of your maintenance routine rather than a one-time task.
Kinsta clients can handle all of this directly from MyKinsta, including bulk PHP updates across multiple environments, without touching the server or writing a single line of code.
If you’re still managing this manually, our managed WordPress hosting takes that off your plate entirely. Check our available plans.

Brian has a huge passion for WordPress, has been using it for over a decade, and even develops a couple of premium plugins. Brian enjoys blogging, movies, and hiking. Connect with Brian on Twitter.