
There are times when you’ll want to complete certain tasks without interfering with your live website. For instance, you may need to make sure you can update a theme safely or experiment with new design elements. However, performing these actions in WordPress can disrupt the User Experience (UX) and even break your site.
That’s why it can be a good idea to test your WordPress website in complete privacy. To do this, you can set up a staging site or create a local environment. Then, you’re able to run speed, functionality, and security tests before applying the changes to your live site.
In this post, we’ll take a closer look at why it’s important to test your WordPress site. Then, we’ll show you how to run three different types of tests. Let’s jump in!
Why Is WordPress Testing Important?
There are plenty of benefits to regularly testing your WordPress site. As we mentioned, it enables you to experiment with design and User Interface (UI) elements without impacting your live site.
As a result, you can preserve your current website and maintain any business operations while you explore new ideas. If anything goes wrong in the testing environment, you don’t need to worry about the effect that downtime might have on your web traffic and revenue.
On the other hand, you might also like to test your WordPress website to detect issues that visitors may have when they try to view your pages. For instance, your site may run slowly in a certain browser, or your menu might not display properly on mobile devices.
Additionally, a testing environment can be a great way to prevent security vulnerabilities. You might like to experiment with new plugins and themes before installing them on your live site. Meanwhile, you can run updates on your testing site to ensure they are safe.
And while plenty of beginners can benefit from experimenting with WordPress in a secure, private setting, testing is also super important for advanced developers. With the right tools, developers can set up a permanent staging environment to test out the functionality of products before making them available to the public.
What Are the Most Common Types of Testing?
Now that you know why it’s important to safely test WordPress, let’s take a look at some of the most common approaches.
- Functionality testing. This enables you to gain a thorough understanding of the user’s journey on your site. For example, you can check that forms, buttons, and checkout pages are all working properly.
- Performance and speed testing. Ensuring that your website delivers fast loading times can improve the UX, help Search Engine Optimization (SEO), and increase your Core Web Vitals scores.
- Security testing. This involves analyzing the security mechanisms on your site, such as SSL certificates, HTTPS, web application firewalls, and more. It helps you protect sensitive data, prevent malicious attacks, and detect WordPress vulnerabilities.
No matter what type of site you run, it’s good practice to get into the habit of regularly conducting functionality, performance, and security tests.
Best Practices for WordPress Testing
It’s important to recognize the value of testing your website in different environments. Once you know the difference between each type of environment, it’s easier to pick the right option for your needs.
A local environment is hosted on your own computer. As such, nothing that you perform there will affect your live site. For general use, it offers a great way to test out new features and functionality. Meanwhile, for developers, a local environment can be the ideal place to detect bugs and errors in your code.
On the other hand, a staging environment provides a copy of your website’s data on a server (rather than a local machine). It’s a great place to run major version updates, configuration changes, and database migrations. Plus, if you design websites for clients, a staging site works well as a demo site to show clients how the site will look.
How To Set Up Testing Environments
Now that you have a better understanding of the different types of testing environments let’s take a look at how to set them up!
How To Set Up a Testing Environment Using a Staging Site
As discussed, a staging site is essentially a complete copy of your live website. Usually, it will be hosted on the same server as your live website. The only difference is that visitors won’t be able to access it.
One of the best parts about staging is that it follows a real-world setup. Therefore, you’re able to properly understand the journey that actual customers take on your pages.
The easiest way to set up a staging site is via your web host. Not all web hosts offer staging environments with their hosting services. But, at Kinsta, it’s super simple to create and configure the built-in WordPress staging environment.
You can access your staging site by logging into your MyKinsta dashboard. Simply select your website from the list. Then, at the top of the screen, use the dropdown to change Live to Staging:
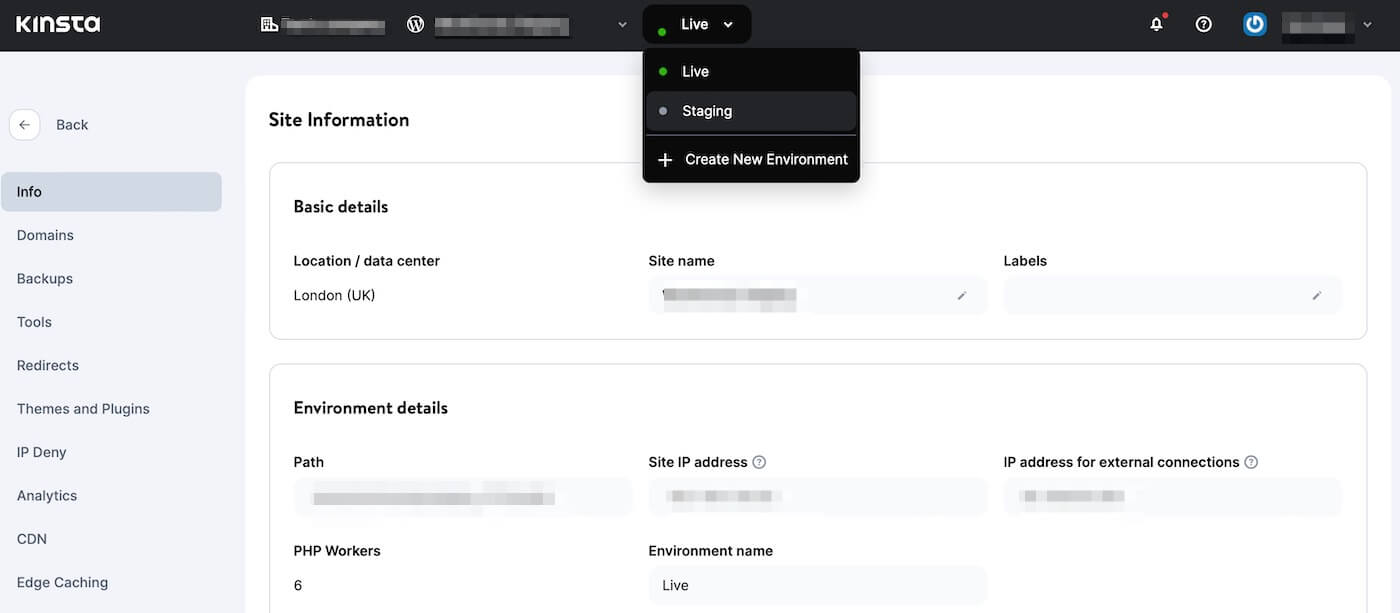
Keep in mind, it can take up to fifteen minutes to generate your staging site for the first time. Then, it will exist as a subdomain of your primary domain (both use the same server).
Once you’re ready to apply changes to your live website, you can simply use the Push environment button in your dashboard.
How To Set Up a Testing Environment Locally
While a local environment works in a similar way to a staging site, you won’t need to host the environment externally. Instead, your local environment will reside on a local machine (most often, your computer).
To install a WordPress testing environment locally, you’ll need to get an AMP stack set for your computer. This software (Apache, MySQL, and PHP) is used to mimic your live WordPress website.
Some of the most popular ways to install WordPress locally are WAMP and XAMPP. However, the easiest way is to use DevKinsta:

DevKinsta is a free local development tool for WordPress single or Multisite. With it, you’ll get access to tons of database and email management tools. Plus, it integrates seamlessly with MyKinsta (although you don’t have to be a Kinsta customer to use DevKinsta).
To get started, you’ll need to download the latest version of DevKinsta. For Mac users, you’ll then add DevKinsta to Applications and double-click on the DevKinsta app to open it.
The installation process varies slightly between operating systems, but you can consult full installation instructions for DevKinsta if necessary. Then, you can install Docker Desktop to create containers for local WordPress.
Once you’ve successfully installed DevKinsta and Docker, you can create your local site. You can either create a new WordPress site, import an existing site from Kinsta, or build a custom site:

Simply choose your preferred option. If you’re importing from Kinsta, you’ll need to select the correct website to import and enter your login details. Then, you’ll be directed to the Site Information screen, which functions like a dashboard for your local environment.
You can also use the Kinsta API to create a new WordPress site/installation without accessing DevKinsta.
How To Test the Functionality of Your WordPress Site (5 Features)
Now, let’s look at five ways to test the functionality of your WordPress website. One of the best parts about functionality testing is that you can do it directly within your local environment or using DevKinsta (unlike other types of testing that require your website to be live).
Cross-Browser Support
It’s important to test your WordPress site across multiple browsers to see what your site looks like to all visitors. That’s because different browsers use different code. Therefore, each browser handles and displays elements in its own way.
For example, a user that accesses your site on Chrome may view your website differently than a user that visits your site using Firefox. And while 3.2 billion internet users preferred Chrome as their main browser in 2021, plenty continue to use Firefox, Edge, Opera, and Safari.
You might like to find out which browsers are popular with your visitors to optimize your site specifically for these browsers. If you use Google Analytics, you can find that information in your Audience reports.
Then, you can test your site for cross-browser support using a tool like BrowserStack:

With BrowserStack, you can test your site across 3000 different browsers, including the latest versions of Edge, Safari, Firefox, and Chrome. You can also take advantage of a free trial before committing to a paid plan.
Unit Testing
Unit testing involves testing the smallest unit of an application in isolation. It might be a function, property, or method. These units are then analyzed for proper operation to ensure that the application behaves as expected.
You can run unit tests automatically using a third-party tool such as Travis CI. But, it’s quicker to conduct tests locally during development rather than applying changes and waiting for Travis CI to run them.
For example, you might like to unit test a theme or plugin. To do this, you’ll need to install Git, SVN, PHP, and Apache. Plus, you’ll need to have your plugin ready.
To get started, open DevKinsta to launch your local development environment. Then, install PHPUnit. Now, you’ll need to generate the plugin test files using the following command:
bash
wp scaffold plugin-tests my-plugin
At this point, you can initialize the testing environment locally by running the install script:
bash
bash bin/install-wp-tests.sh wordpress_test root '' localhost latest
This script installs a copy of WordPress in the /tmp directory and in the WordPress unit testing tools.
The next step is to run the plugin tests using the phpunit. For full instructions, check out this guide on unit testing.
Mobile/Desktop Responsiveness
Since over 60 percent of people use a mobile device to go online, it’s more important than ever to make sure your WordPress site is responsive. This way, you can ensure that your pages display smoothly across all screen sizes, including desktop, tablet, and mobile.
The easiest way to test the responsiveness of your site is to simply enter your site’s URL on your mobile device. However, if you want to test your site’s appearance from your desktop, you can do this using the WordPress Customizer.
Simply head to Appearance > Customize:

Depending on your theme, you’ll see different panels. But, at the bottom of your page, you can click on the mobile or tablet icon to preview your site at the specified screen size.
Additionally, you can access Google Chrome’s developer tools to see how your WordPress site appears on mobile devices. All you need to do is open a page on your site in Google Chrome.
Then, right-click on the page and select Inspect:

Now, find the Toggle device toolbar at the top of the popup (to the left of the Elements tab):

Click on it, and your screen will instantly adapt:

As you can see, you’re now able to test how your site displays in Responsive dimensions. If you click on the Dimensions dropdown menu, you can test your page on additional devices, such as different iPhone and Samsung Galaxy models.
User Interface (UI) Testing
When we talk about your website’s User Interface (UI), we’re referring to any component of your site that visitors can interact with. For instance, most websites feature links, buttons, menus, etc. At some point, users will need to engage with these elements.
Therefore, it’s super important to test your UI. If something isn’t working properly, visitors can get frustrated and leave your site.
You can set up a local environment to test your UI elements. For example, you may want to develop a new navigation menu and try it out.
In this scenario, you can open up your local admin area from your DevKinsta dashboard. Then, navigate to Appearance > Menus on the local site. Now, click on Create a new menu.
Give your menu a name and click on Save Menu. Then, add menu items from the left of your screen and select Add to Menu:

Under Menu Settings, check the box that says Primary Menu. Then, save your changes.
You can also click on Manage with Live Preview at the top of the screen to see how your menu is shaping up:

Next, open your local site in a fresh browser to view your new menu on the front end:

You can also test the navigational links by clicking on each of the menu items. For example, when we click on our Wholesale Ordering link, we’re redirected to the relevant page that we added to our menu:

In this way, you can test new design elements and ensure that your UI is working properly.
Visual Testing
Visual Regression Testing (VRT) ensures that all of your design elements and layouts appear as they’re supposed to. For that reason, VRT is often implemented following website changes, like when you switch themes or update a plugin.
This way, you can make sure that the changes haven’t disrupted your visual elements. For example, your content may be misaligned, or buttons may have disappeared.
Like UI testing, you’d often remain ignorant of these sorts of issues without visiting your website on the front end. You can find automated VRT tools to continually test your site, looking for visual abnormalities.
Or, you can simply compare your pages manually before and after you apply your changes. Say you want to switch themes. It’s safest to do this in a local environment like DevKinsta so that you can conduct visual tests before you apply the change to your live website.
Right now, we have the Twenty Twenty theme activated on our local site. As you can see, the homepage displays all buttons, text, and images aligned centrally:

However, when we switch to the Twenty Twenty-Three theme, you can see that the Shop now button is misaligned:

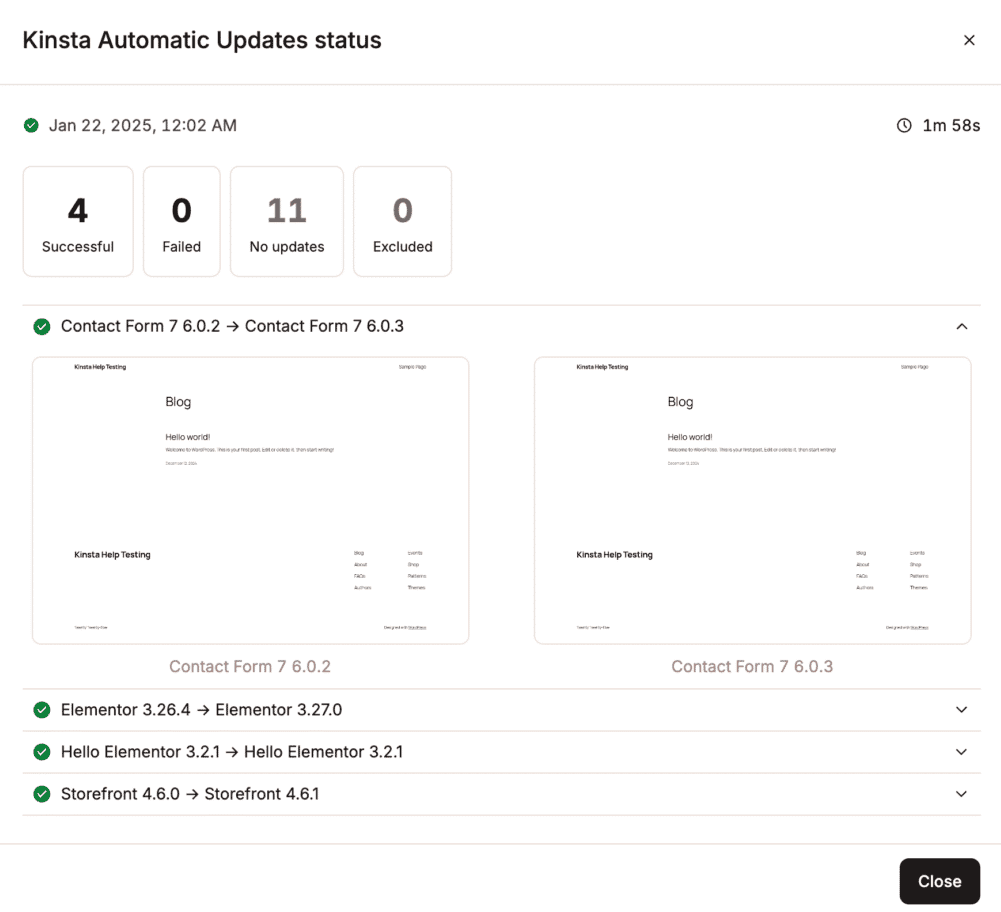
Kinsta Automatic Updates and VRT
Our Kinsta Automatic Updates add-on uses VRT to detect failures during updates of plugins and themes and — if needed — roll back installations to the most recent functioning configurations:
How To Test the Speed of Your WordPress Site (6 Considerations)
Another important way to test your WordPress site is to check your current website speed. In this section, we’ll take a look at six considerations to help you test the performance of your site.
With this in mind, it can be helpful to get started with Kinsta APM. With our application performance monitoring tool, it’s easy to identify WordPress performance issues:

For example, you can gain insight into all PHP processes, MySQL database queries, and external HTTP calls. As a result, you’ll be in a better position to detect long API calls, slow database queries, and non-optimized plugin and theme code.
Better yet, Kinsta APM is free with all Kinsta plans, and you can access the tool straight from your MyKinsta dashboard. Overall, it’s an easy-to-use solution that helps you power up your website performance and loading times.
Slow Queries or Scripts
First, to make sure your website is functioning at its highest possible level, you can test WordPress for slow queries or scripts. Slow queries and scripts have an effect on your overall page speed and make your site less efficient.
The easiest way to identify slow queries and scripts is to enable Kinsta APM. If you’re a Kinsta customer, you can access the tool free of charge. However, you’ll need to enable it from your MyKinsta dashboard.
To do this, simply login to your account and choose the website where you want to use the APM tool. Now, navigate to the APM tab and click on Enable:

You’ll then need to choose the duration for which you want to use the tool. Since the APM tool uses server resources, it can have an impact on your site’s performance. Therefore, it’s best to enable the tool only for the period of time when you’re actively troubleshooting a performance issue.
Make your choice and click on Enable monitoring time:

It can take a few minutes for the tool to gather data about your site. After that, switch to the Database tab and locate the Slowest database queries section:

Here, you’ll find the ten slowest database queries on your site. If you click on a query, you can also view the transaction samples:

This way, you can find out more information about the sample, trace timeline, span details, and stack trace.
Slow Plugins
While poorly-coded plugins can impact your WordPress site’s security, they can also affect performance. Therefore, it’s important to detect this issue as soon as possible.
Again, you can use the Kinsta APM tool to identify slow plugins. Once you’ve enabled the tool in your MyKinsta dashboard, navigate to the APM tab. Then, switch to WordPress:

The first section you’ll see is Slowest WordPress plugins. The slowest recorded plugins are listed at the top of the section.
To gain more information about the performance issues, click on one of the listed plugins. This will load the transaction samples that the plugin ran. For example, you’ll be able to view the timestamp, transaction trace timeline, span details, trace timeline, and more.
Slow Pages
It’s also important to test WordPress for slow pages since this can result in poor UX. Plus, page speed is a ranking factor for search engines like Google.
You can use a free website speed test tool like Pingdom or PageSpeed Insights to generate a quick page speed score. However, you can gain a deeper understanding of your page speed using the Kinsta APM tool.
Once you enable Kinsta APM, it will take a few seconds to load your site’s performance metrics. After that, go to the Transactions tab:

Here, you’ll be able to view some data about your site’s overall transaction time. But you can also scroll down to Slowest transactions to see the PHP processes that take the most transaction time:

If you select a transaction, you can find out the URL that generates it. Then, click on the URL to view the Transaction trace timeline:

This way, you can find the span that is taking up the maximum duration. If these spans are judged as critical for your performance, they’ll usually be highlighted in orange or red.
Caching
Caching offers an easy way to boost your loading times. It works by storing copies of your site on the server. This way, when a user requests your page, your server can display the cached version, enabling the data to be sent much faster.
At Kinsta, you get access to server-level caching that’s automatically enabled on all live websites. But if you’re using a staging environment, you’ll need to enable cache manually.
From your MyKinsta dashboard, click on WordPress Sites and choose your website. Then, navigate to Tools, and under Site cache, click on Enable:

Now, the simplest way to test your caching is to run your site through a web speed test tool like Pingdom. However, it’s important to run the test more than once. This is because if you run it just one time, the content may not yet be cached on the host’s server or CDN.
Enter your URL into the URL box on Pingdom and select a location. Now, under Response Headers, locate x-kinsta-cache. If this reads MISS, then your site is not loading from the cache.
To fix this, you’ll need to run your site through the Pingdom test a few more times. This should lead to the x-kinsta-cache and x-cache headers to register a HIT. Now, you scan the results, looking at the large yellow bar that indicates wait time or Time to First Byte (TTFB).
This number is usually high if a page hasn’t come from cache. Again, you might like to run your test once with cache disabled and then again with cache enabled to clearly see the difference.
Content Delivery Network (CDN)
A Content Delivery Network (CDN) enables you to improve your loading times by serving your web pages via a server that is physically closer to your visitors. With all Kinsta plans, you get access to a Cloudflare-powered CDN.
For new websites, the CDN is enabled by default. But you can check that your CDN is enabled by logging into your MyKinsta dashboard.
Head to WordPress Sites and select your website name. Now, click on the CDN tab and hit Enable. If you see Disable, then you know the CDN is active:

To test your CDN, it’s easiest to use a website speed test tool. But first, it can be a good idea to inspect the HTTP headers of a static asset to make sure it’s loading from the Kinsta CDN.
You can check this using your browser’s Inspect Tool or using our free HTTP status and redirect checker. Now, you’ll need to choose a website speed test tool such as Pingdom:

You might like to run the first test after disabling the CDN. Then, you can re-test your site with the CDN enabled to see the difference. You’ll also want to test your CDN from different locations.
Once your test is complete, you’ll want to look at the requests that are loading from the Kinsta CDN (xxxxkinstacdn.com). For full details on this topic, check out our post on how to run a CDN test.
Load Testing
Contrary to popular opinion, there’s a key difference between website speed testing and load testing. Essentially, speed testing measures the load time of a page, including MySQL and PHP response times.
On the other hand, load testing offers a finer level of granularity with speed tests. For instance, it can often be used to measure load times in certain situations, like when your site is affected by a high surge of traffic.
The process of setting up a load test is quite complex. That’s why it can be a good idea to ask a developer for help. If you want to run a load test on your Kinsta website, get in touch with a member of our support team.
How To Test the Security of Your WordPress Site
Lastly, when testing WordPress, it’s important to make sure all the software on your website is secure. Although this concerns the WordPress core software that the platform uses, it also extends to theme and plugin security.
In fact, testing themes and plugins can be even more important since they don’t always come from a reputable source. If you install themes and plugins from third-party websites, there’s no way to verify that the software has gone through all the required security checks.
Meaning the plugin or theme could be poorly coded or even contain malicious scripts or bugs that can break your site. On top of that, it’s important to keep all software on your site up-to-date since outdated software can be used as a backdoor for malicious actors to gain access.
Core Security
While WordPress is a secure platform, it isn’t immune to cyber attacks. Therefore, it’s important to regularly assess the security of your core software.
One of the best ways to secure your core software is to opt for a quality web host. For example, at Kinsta, you’ll get access to DDoS protection, firewalls, and malware scanning. Plus, we have a dedicated malware removal team on hand. So, even if your site gets infected, we can help restore it to its original state.
In any case, when a new WordPress update is released, you can test that it’s safe first by running the update on a staging site or in a local environment.
At Kinsta, this is super easy to do. All you need to do is navigate to WordPress Sites and choose your website from the list. Then, make sure your website is set to Staging when you run the update.
Once you’re sure the new WordPress version is safe, return to this screen and click on Push environment > Push to LIVE to apply the change:

Then, make your selection (choosing between files or database) and confirm your choice by clicking on Push to live.
Theme Security
When you find a new theme that you want to install, the best thing to do is to activate the theme in a local development environment or on your staging site. The same goes for when an existing theme on your site releases an update.
Most theme updates come with patches for security issues. However, you can also hit a bad update that conflicts with some other software on your site.
Meanwhile, if it’s a theme you’ve never used before (and you aren’t familiar with the developers), installing the theme in a local environment is much safer. This means that even if the theme breaks your site, your live website will remain unaffected.
Therefore, if you’re a Kinsta customer, you can set up a staging site. Or, if your website isn’t hosted with Kinsta, it’s free to get started with DevKinsta, where you can set up a local development environment.
Once you open up DevKinsta on your computer, go to the Site Info page. Here, click on WP Admin:

Then, install and activate the theme as you usually would in WordPress. Typically, it’s a good idea to wait at least a week before you install the theme on your live website (same goes for running a new theme update).
However, if you want to assess the security of an existing theme on your site, the easiest way to do this is with a security scanner. WPScan is a great option that will detect any vulnerabilities in your WordPress themes.
Plugin Security
Plugins can also pose a threat to your website’s security. That’s why it’s good practice to regularly assess your plugins’ security.
As we discussed above, you can install a new plugin (or run a plugin update) in a local environment or a staging site. This way, if anything goes wrong, your live site will remain intact.
However, like with themes, it can also be useful to install a vulnerability scanner like WPScan. This tool is completely free to use. All you need to do is register for an account. Then, you can add the API token to your WordPress site.
Once the scanner is linked to your website, navigate to WPScan > Settings where you can set up automated daily or hourly scans:

Or, click on the Report tab to run a test manually. Once the test concludes, scroll down to the Plugins section:

Here, you can see a full list of all plugins on your site. If your plugins are secure, you’ll see a checkmark beside each of the plugin names. Otherwise, you’ll find some information listed in the Vulnerabilities column.
Speed and Security Are Best When You Pick the Right Hosting
Of course, you can optimize your web pages and take all the necessary security measures to run a successful site. However, ultimately, the best way to make sure your site is safe and fast is to use a quality web host.
At Kinsta, we prioritize speed and security:
All of our plans are hosted on the highest-end CPUs with global availability. Plus, you’ll get access to Kinsta’s Cloudflare-powered CDN, with servers located in over 300+ locations.
For those that are concerned about web security, Kinsta offers tons of features to tighten up your site. You can expect daily backups, malware scanning, DDoS protection, and firewalls. Plus, we provide secure-login SSH access, and you can install a free SSL certificate in just one click.
Summary
Without testing your WordPress site, you can’t properly understand the way that users experience your site. For instance, those using certain browsers might have trouble with your menu. Meanwhile, mobile visitors may suffer long wait times. That’s why it’s important to test your WordPress site.
The best way to test your site is to set up a staging site or create a local environment with DevKinsta. Then, you can gain insight into the functionality, performance, and security of your site (without disrupting your live web experience).
However, it never hurts to have a little extra assurance. One of the easiest ways to ensure your site runs smoothly at all times is to opt for a high-quality web host like Kinsta. Check out our plans to get started!


