There are many reasons why you might want to clone your WordPress site. Perhaps you are launching a second site and want to use your first one as a base template to save time. Or maybe you want an exact replica for backup purposes or development, other than the typical staging environment.
Whatever the reasons, Kinsta makes cloning a breeze. Follow the steps below on how to clone your WordPress site with a few simple clicks!
Clone Your WordPress Site in MyKinsta
The clone feature at Kinsta copies your entire WordPress database, including all of your content and files. New access credentials, such as SFTP, SSH, and database username and passwords are automatically generated for the newly cloned site and can be accessed from the dashboard.
Step 1
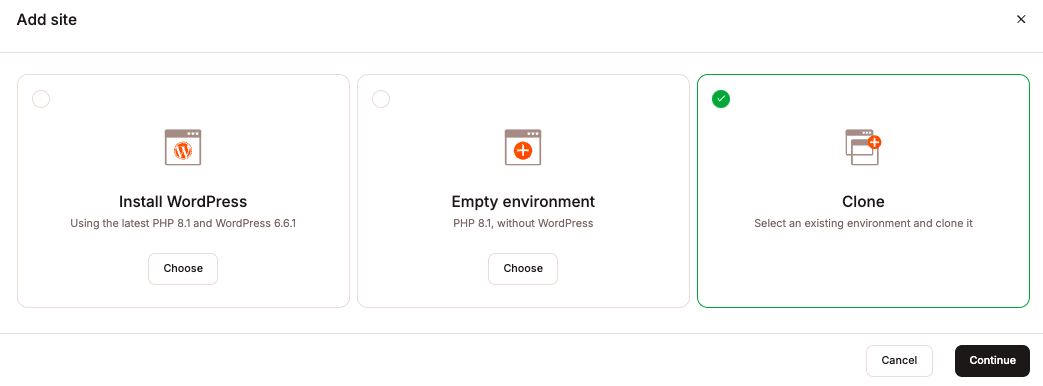
Browse to Sites in your MyKinsta dashboard and click on “Add Site” at the top right.

Step 2
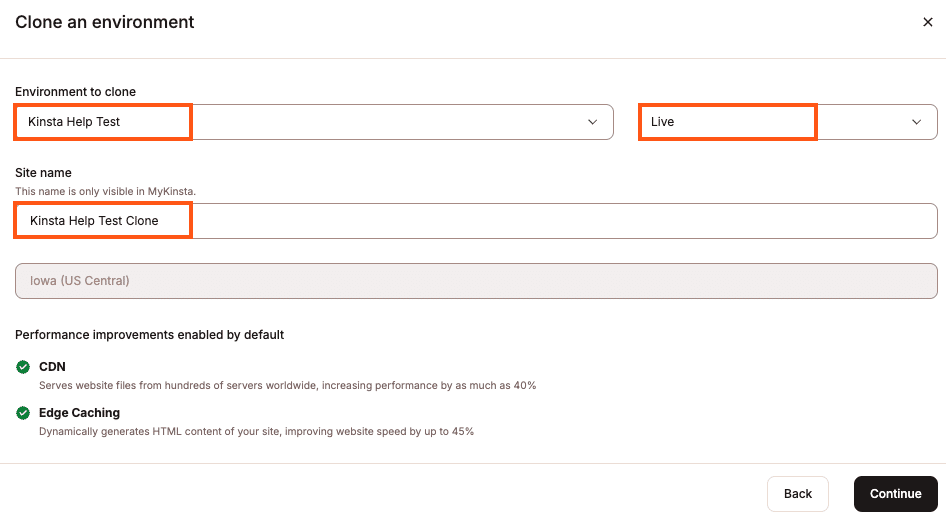
Select the “clone an existing environment” option, and choose a site to clone. Be sure to specify whether you want to clone the live or staging environment.

Specify the site environment you want to clone and provide a name for the cloned site:

And that’s it! The cloning process typically takes anywhere from 10 to 20 minutes depending on how large your WordPress site and database are. It will then appear in the list of sites in your MyKinsta dashboard. Note: If you find the cloning process taking longer than an hour, please reach out to our support team.
After Cloning Your WordPress Site
If you didn’t input a custom domain during the cloning process, then it will get automatically be assigned a temporary URL so that you can access it, such as myclone.kinsta.cloud. If you have another domain you want to use, you can click into the “Domains” section and add it.
You will then need to update your WordPress address URL and site address URL. And if you have hardcoded your address URLs in your wp-config.php file, that will also need to be updated.
After a custom domain has been assigned to the site, you can generate a free SSL certificate and deploy Kinsta CDN in MyKinsta. For more information on how to go live with a site on Kinsta, check out this post.
Additional Notes
- If you have any CDN plugins enabled or 3rd party plugins with hardcoded URLs, ensure that you update them to reflect the new site address. Otherwise content may appear broken, when in fact it is simply pointed to a wrong address.
- Unlike staging sites, cloned WordPress sites are completely separate, meaning they do count against your total number of sites allowed by your plan and will be billed for bandwidth usage. This also means that the cloning feature is only available in WP 2 or higher plans (which allow for more than one site).
- If you use social scheduling plugins such as CoSchedule or Social Networks Auto Poster, remember that they might start sharing out content from your cloned site. So ensure you update your address URLs or deactivate these plugins, otherwise, this could skew your analytics.
Clone Your WordPress Site With Kinsta API
With Kinsta API, you can programmatically clone your entire WordPress database, including content and files. This means you can perform all the actions offered by MyKinsta through the Kinsta API.
To initiate the cloning process with the Kinsta API, you’ll need the following information:
- An API key
- Your company ID, and
- The environment ID of the site you wish to clone
Let’s go through the steps to clone an existing WordPress site with Kinsta API:
Step 1: Generate an API Key
To utilize Kinsta’s API, you must generate an API key. This is used to authenticate and access your account. Here’s how you can generate an API key:
- Access your MyKinsta dashboard.
- Navigate to the API Keys page by clicking on your name, then select Company settings and finally, API Keys.
- Click on the Create API Key button.
- Choose an expiration date or set a custom start date and specify the number of hours the key will be valid.
- Give the key a unique and descriptive name.
- Click on Generate to create the API key.
When you create an API key, copy it and store it somewhere safe, as this is the only time you can see it. You can generate multiple API keys—they will be listed on the API Keys page. If you need to revoke an API key, click Revoke next to the one you want to revoke.
Step 2: Copy Your Company ID
The company ID can be found in MyKinsta under Company > Billing Details > Company ID.

Step 3: Get the Environment ID of the Site You Want To Clone
There are two methods to obtain the environment ID of a site: manual retrieval from the URL or programmatically through an API request.
To manually retrieve the environment ID, you can open the site on MyKinsta and copy the environment ID information as indicated below:

Alternatively, you can programmatically retrieve the environment ID using the Kinsta API. This involves fetching a list of all sites using the /sites endpoint. Here’s an example using the JavaScript Fetch API method:
const fetchAllSites = async () => {
  const query = new URLSearchParams({
    company: "YOUR_COMPANY_ID"
  }).toString();

  const resp = await fetch(`https://api.kinsta.com/v2/sites?${query}`, {
    method: "GET",
    headers: {
      Authorization: "Bearer <YOUR_TOKEN_HERE>"
    }
  });

  const data = await resp.json();
  console.log(data);
};

fetchAllSites();
In the code above, an asynchronous function named fetchAllSites is defined. It makes a GET request to the /sites endpoint with the specified company ID. Ensure to add your API token to handle authorization. The response data is then logged to the console.
After retrieving all the sites, you will receive an array of objects, where each object represents a site and contains details such as ID, name, status, and site labels. Here is an example of the JSON structure:
{
    "company": {
        "sites": [
            {
                "id": "YOUR_SITE_ID",
                "name": "my-test-site",
                "display_name": "Test site",
                "status": "live",
                "site_labels": []
            }
        ]
    }
}
To programmatically obtain the environment ID of a specific site using the Kinsta API, copy the site’s ID you want to clone. Then, use that ID to fetch the environments associated with that site.
Here’s an example demonstrating how to fetch the environment ID:
const fetchEnvironmentId = async () => {
  const siteId = "YOUR_site_id";
  const resp = await fetch(
    `https://api.kinsta.com/v2/sites/${siteId}/environments`,
    {
      method: "GET",
      headers: {
        Authorization: "Bearer <YOUR_TOKEN_HERE>"
      }
    }
  );

  const data = await resp.json();
  console.log(data);
};

fetchEnvironmentId();
Make sure to replace “YOUR_SITE_ID” with the actual site ID you want to clone and <YOUR_TOKEN_HERE> with your Kinsta API key.
When the fetchEnvironmentId function is executed, the response will contain the environment details of the site, including the environment ID. Here is an example of the response:
{
    "site": {
        "environments": [
            {
                "id": "54fb80af-576c-4fdc-ba4f-b596c83f15a1",
                "name": "first-site",
                "display_name": "First site",
                "is_blocked": false,
                "id_edge_cache": "54fb80af-576c-4fdc-ba4f-b596c83f15a1",
                "is_premium": false,
                "domains": [],
                "primaryDomain": {},
                "ssh_connection": {}
            }
        ]
    }
}
Step 4: Clone an Existing Site With Kinsta API
At this point, you now have all the requirements needed to clone a site with the KInsta API. Proceed to send a POST API request to the /sites/clone endpoint passing in the following data as payload:
- The site’s display name
- Company ID
- Environment ID of the site you want to clone
This is what the API request will look like:
const cloneExistingSite = async () => {
  const resp = await fetch(`https://api.kinsta.com/v2/sites/clone`, {
    method: "POST",
    headers: {
      "Content-Type": "application/json",
      Authorization: "Bearer <YOUR_TOKEN_HERE>"
    },
    body: JSON.stringify({
      company: "COMPANY_ID",
      display_name: "Copy of First WP Site",
      source_env_id: "ENVIRONMENT_ID"
    })
  });

  const data = await resp.json();
  console.log(data);
};

cloneExistingSite();
In the code above, the cloneExistingSite function sends a POST request to the /sites/clone endpoint. The request includes the necessary headers, such as the content type and your API token for authorization. The body of the request contains the required data, such as the company ID, the display name for the new site, and the source environment ID of the site you want to clone.
The response from the API is then logged to the console, which shows that the site cloning operation is in progress:
{
  "operation_id": "site:clone-54fb80af-576c-4fdc-ba4f-b596c83f15a1",
  "message": "Cloning site in progress",
  "status": 202
}
You can use the /operations endpoint to track an operation’s status and know when an operation like this is complete.
Clone Your WordPress Site With a Plugin
If your hosting provider, unlike Kinsta, doesn’t give you the option to easily clone your site from your hosting dashboard, you’ll need to use a plugin to do it.
The Duplicator plugin lets you make a duplicate of your site which you can then use to create a new site. Here’s how to do it.
Making a Duplicate of Your Site
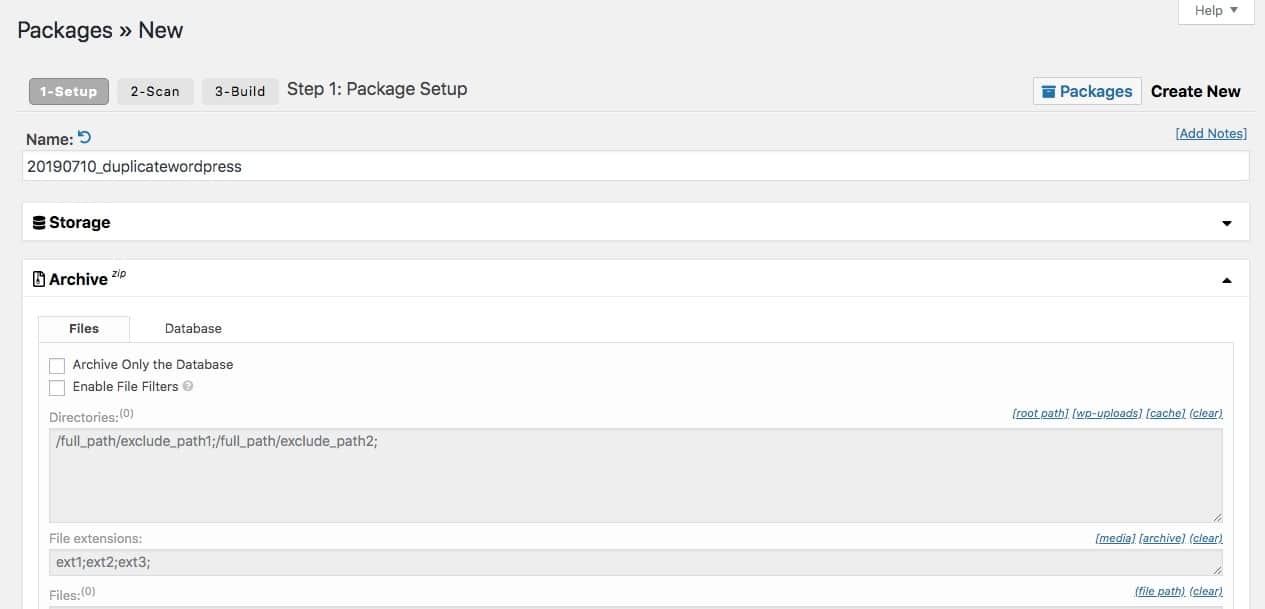
Go to Duplicator in your admin menu and click the Create New button. This will create a “package” which is a duplicate of your site.

In the Setup screen, specify which files you want to be duplicated and which database tables or leave it at the default which will include all database tables and files. Make changes in the Installer section if you want to customize the new install or leave it on the default settings. Click the Next button.
The plugin will now scan your site and provide any warnings before making the duplicate. If there are any issues, take the time to fix them now. If there is a notice, you’ll need to check the checkbox below the list of scan items before proceeding.
Click the Build button to continue. The plugin will build the “package” which contains everything in your site: your themes, plugins, uploads, and even WordPress itself. Download the package to your computer by clicking the One-click Download link. There will be two files: installer.php and archive.zip.
Installing the Duplicate in a New Location
To install the package in a new site, you’ll need to upload the two files you just downloaded to your new site, using SFTP. Upload them to the root directory of your site or to the directory where you want to install WordPress. Don’t install WordPress: the installer will do this for you.
Visit the installer file in your browser at yoursite.com/installer.php, where yoursite.com is the domain name of your new site.
You will then be guided through a series of steps to upload and install the files from your duplicate. Once you’ve finished this, you’ll have a duplicate of your site at the new domain.
Cloning a Site in a WordPress Multisite Network With a Plugin
If the site you want to clone is in a WordPress Multisite network, you won’t be able to clone it using the MyKinsta dashboard. Instead, you’ll need to use a plugin.
The two plugins below are designed to make the process of cloning a site easy.
NS Cloner – Site Copier
With the NS Cloner – Site Copier plugin, you can quickly make an exact copy of a site with one click or you can customize the way the site is duplicated in much more detail by purchasing a premium add-on.
In the network admin, install the plugin and network activate it.
You now have two ways to clone sites:
- you can go to the Sites screen and click Clone under the name of the site you want to clone.
- Or you can use the NS Cloner V3 item in your network admin menu.
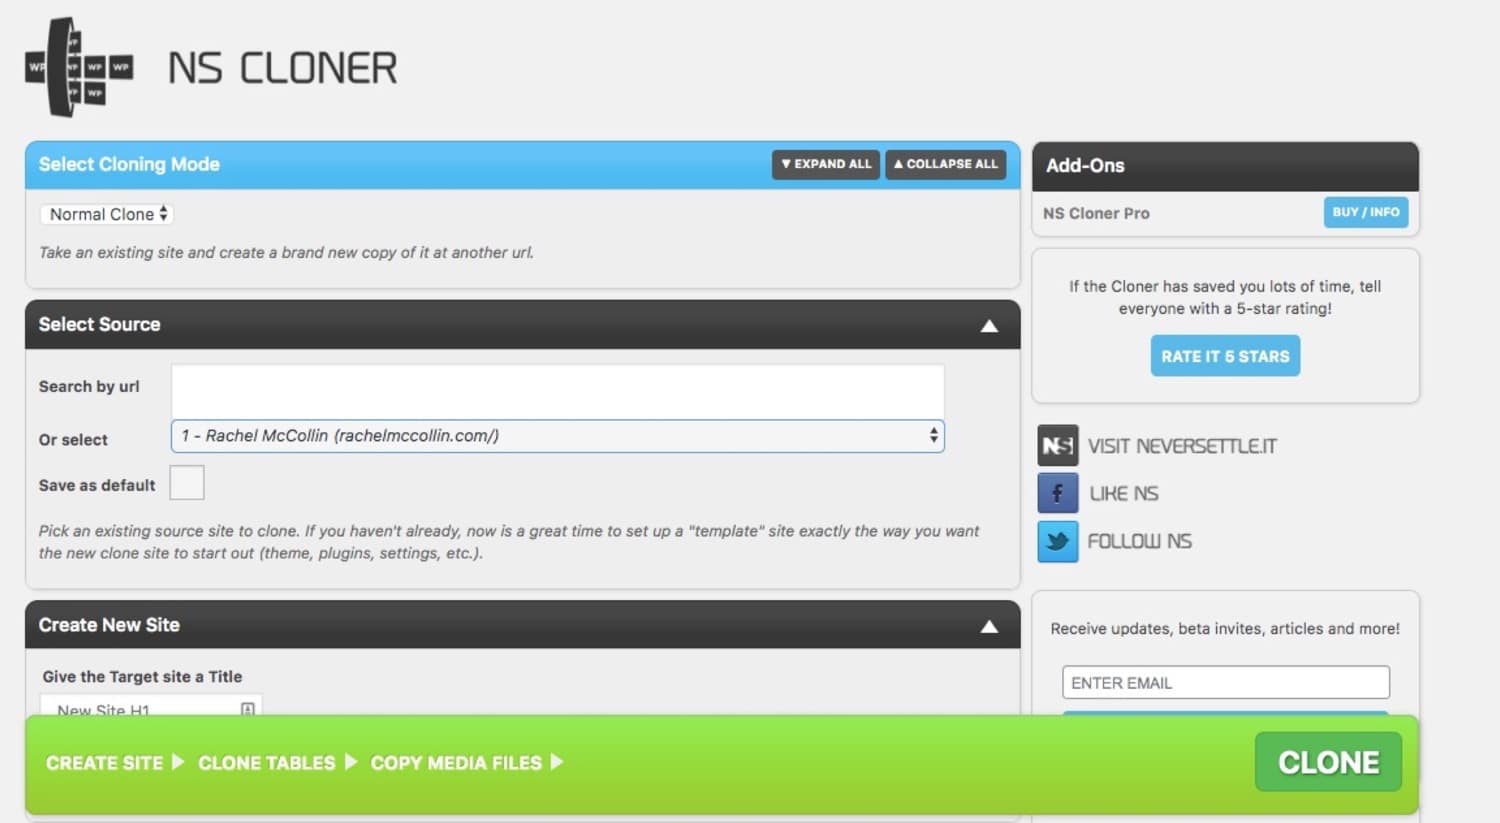
If you click Clone in the Sites screen, the site is cloned in one click exactly as it is with no customization. So if you want an exact duplicate of the site, this is a very quick way of doing it. If you want to make customizations to the new site, you click the NS Cloner V3 menu item instead.

Here you can specify exactly what is copied over to the new site:
- Select source: select the site to clone from the dropdown list.
- Create New Site: give the new site a title and URL.
- Clone Tables/Copy Users/Copy Media Files: specify which tables, files and users to clone by purchasing a premium add-on.
- Search and Replace: again with an add-on, you can search the database and replace content, such as the domain name of the site.
- Additional Settings: check this box to create a log of the clone which you can check if it doesn’t work as you expect it to.
Once you’re happy with the settings, click the Clone button in the green area at the bottom of the screen and the plugin will create the clone for you.


