
Clearing your WordPress cache is one of the simplest ways to fix issues like outdated content, broken styles, or changes that don’t appear on your site. Whether you’re running a blog, an online store, or a high-traffic business site, understanding how caching works—and how to clear it—is essential to maintaining a fast, reliable experience for your visitors.
This guide is for WordPress users of all levels, from beginners troubleshooting display issues to developers managing complex site setups. If you’ve ever asked “Why isn’t my site showing the latest changes?”, caching is often the answer.
This guide walks you through the most common ways to clear your WordPress cache: using popular caching plugins, from your hosting dashboard (like MyKinsta), via your browser, and even through CDN services.
Prefer to watch the video version?
What is caching?
Simply put, caching minimizes the amount of work required to produce a webpage for viewing.
WordPress cache achieves this more efficient environment by storing static versions of your webpages. These copies are held in the WordPress or website cache until the cache expires, content is changed, or the cache receives an order to purge.
Think of the cache as a storage area for several snapshots of your website’s history. It delivers these snapshots to the end-user instead of forcing the server to compile and deliver all site files every time they want to see a webpage.
Why would you want to clear your WordPress cache?
While caching improves website speed and performance, there are times when it gets in the way—like when recent changes don’t show up on your live site. In those moments, you need to clear or delete your WordPress cache to force the browser or server to load the most recent version.
This can happen for several reasons:
- You updated a plugin or theme.
- You added or changed content, but the old version still appears.
- A design change (like a new button or layout) isn’t showing.
- If you adjust or add to previously created pages or posts.
- Your site looks broken after edits due to cached CSS or scripts.
The reasons to clear WordPress cache files go on and on, but the idea is to ensure that you maintain a balancing act between your cache and the new content.
Let’s go over four methods to clear your WordPress cache—whether you’re using a caching plugin, your hosting provider, a CDN, or just your browser.
Method 1: Clear cache in your WordPress caching plugin
Using a caching plugin is one of the most common ways to manage cache in WordPress. In this guide, we’ll show you how to clear WordPress cache with WP Rocket, W3 Total Cache, and WP Super Cache — three of the most popular plugins out there.
If you’re using a different caching plugin, no worries. You’ll usually find a similar “Clear Cache” or “Purge Cache” button in your plugin’s settings.
Clear WordPress Cache in WP Rocket
WP Rocket is a premium caching plugin that offers simple way to clear cache from your WordPress admin bar.
To clear your cache, locate the WP Rocket tab in the upper part of the WordPress dashboard header menu. Click the tab and then a dropdown will appear which you can then click the Clear Cache option.
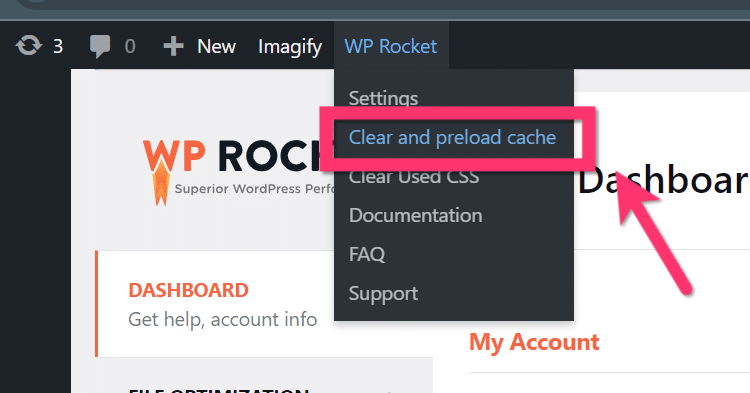
Tip: It’s a good idea to save any changes before clearing your cache, as the dashboard may refresh.
If you want more control, you can also manage cache settings. Go to Settings > WP Rocket in the WordPress sidebar. From there, you can clear the cache manually again or configure automatic clearing after updates.
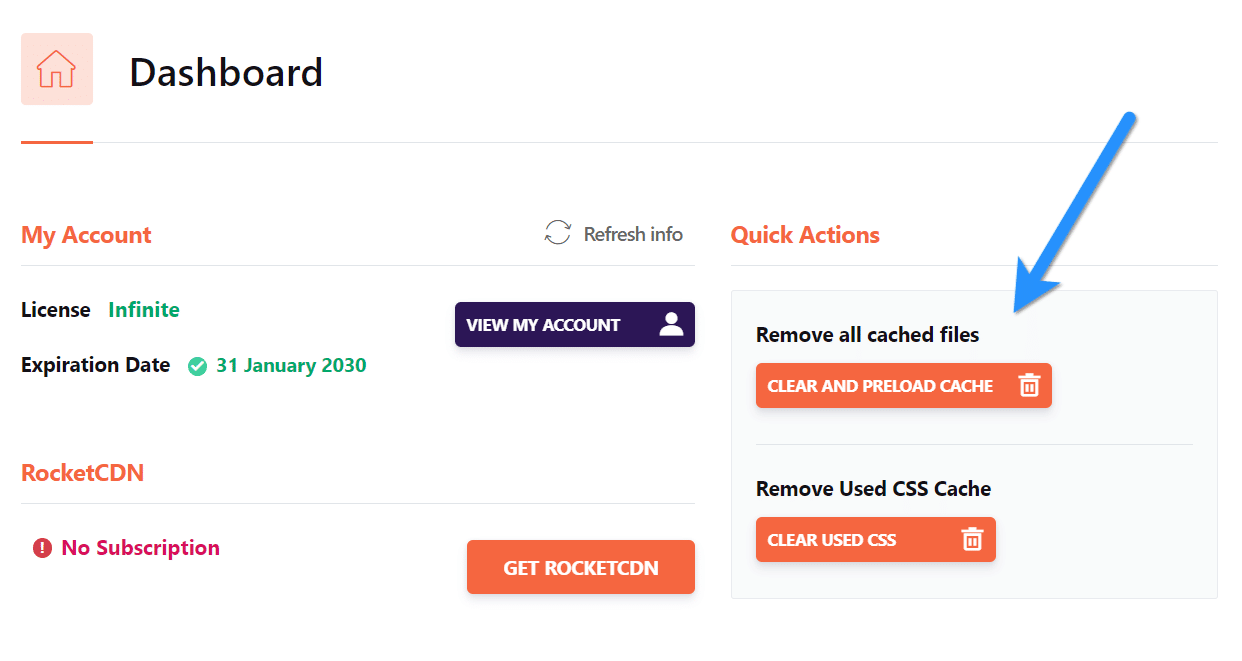
You will also see the Clear cache option for each post and page.
Clear WordPress Cache in W3 Total Cache
W3 Total Cache is one of the most popular free caching plugins for WordPress, offering support for dedicated servers, mobile environments, and CDNs.
To quickly clear the WordPress cache, click the Performance menu in your WordPress dashboard. Click Purge All Caches.

You also have the option to go to the General Settings area.

There’s an Empty All Caches button that does the same thing as the previous button. It’s simply located in a different place.

Clear WordPress cache in WP Super Cache
WP Super Cache by Automattic is a simple yet powerful caching plugin, ideal for both beginners and advanced WordPress users.
To clear the WordPress cache, look for the Delete Cache button at the top of your WordPress dashboard and click it.

Unlike other caching plugins, the cache isn’t cleared with that one step. Instead, you’ll be taken to the Cache Settings page, where you must click Delete Cache again to complete the process.

Method 2: Clear WordPress cache via hosting panel
If you’re using a managed WordPress host, you often don’t need a separate caching plugin. Many hosts, like Kinsta, offer built-in server-level caching with options to manually or automatically clear WordPress cache files. Let’s walk through how it works on Kinsta.
As a quick guide, please check out our post on how Kinsta handles caching for its users.
Clear WordPress cache in MyKinsta
At Kinsta, caching is handled automatically with four layers of optimization: bytecode caching, object caching, server caching (aka page caching), and CDN caching. This setup boosts your site’s performance without extra effort.
You can manually clear your WordPress cache anytime by opening MyKinsta. Select your site, then click on the Caching tab. This page gives you quick access to the different types of caching Kinsta supports.
Click the Clear all caches button to purge all enabled cache layers at once.
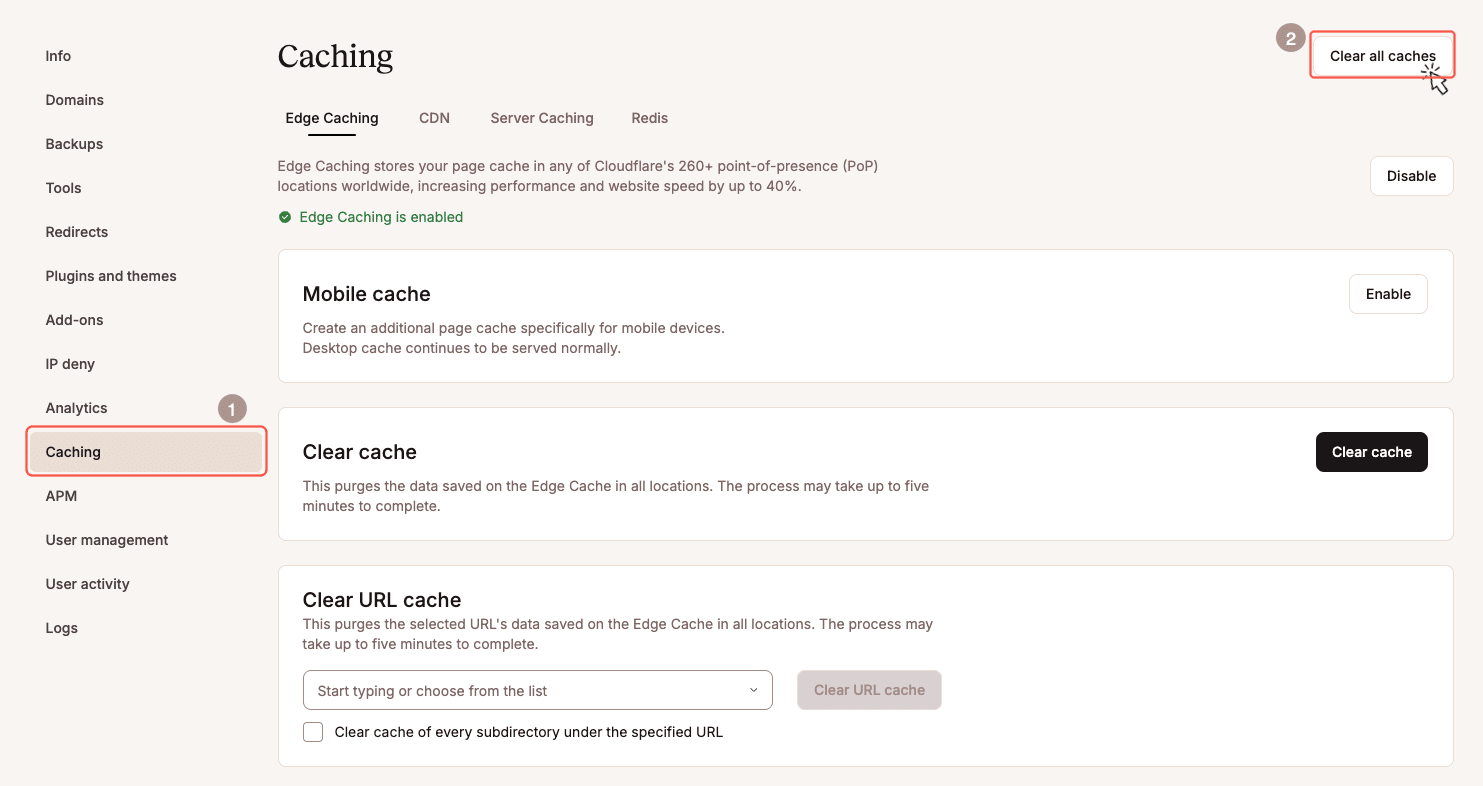
If you prefer, you can clear specific caches individually. For example, to delete static content only, open the Server Caching tab and click the Clear cache button.
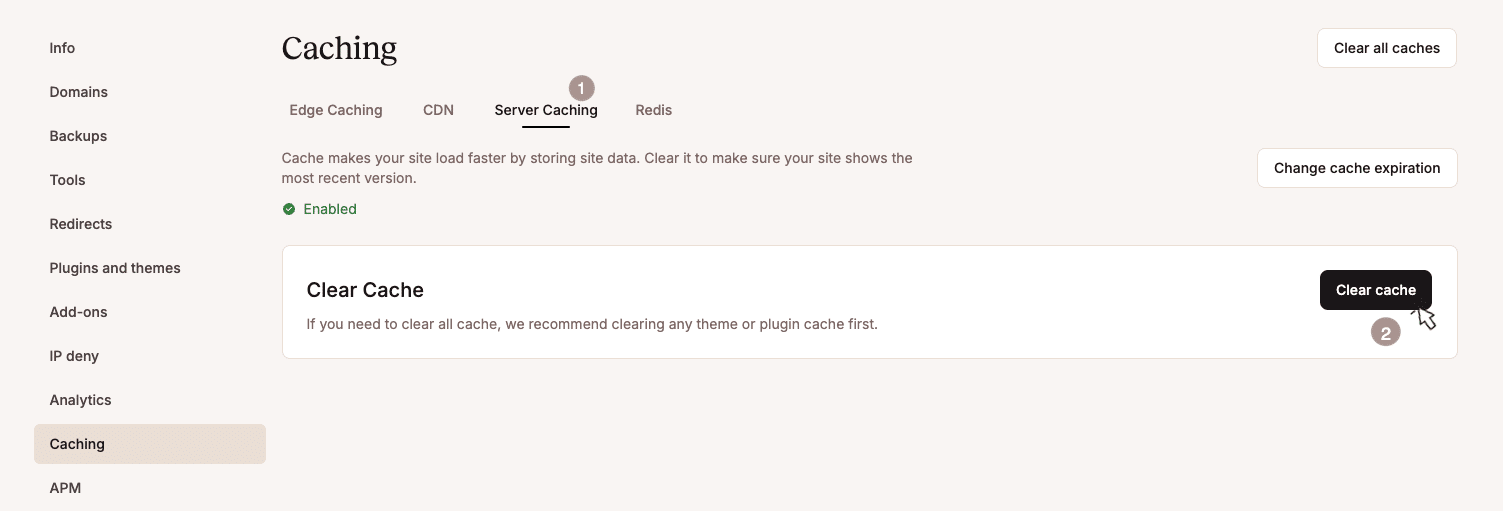
You can also control how often your WordPress cache expires automatically. Click the Change cache expiration button to choose a timeframe — from every hour up to every 7 days.
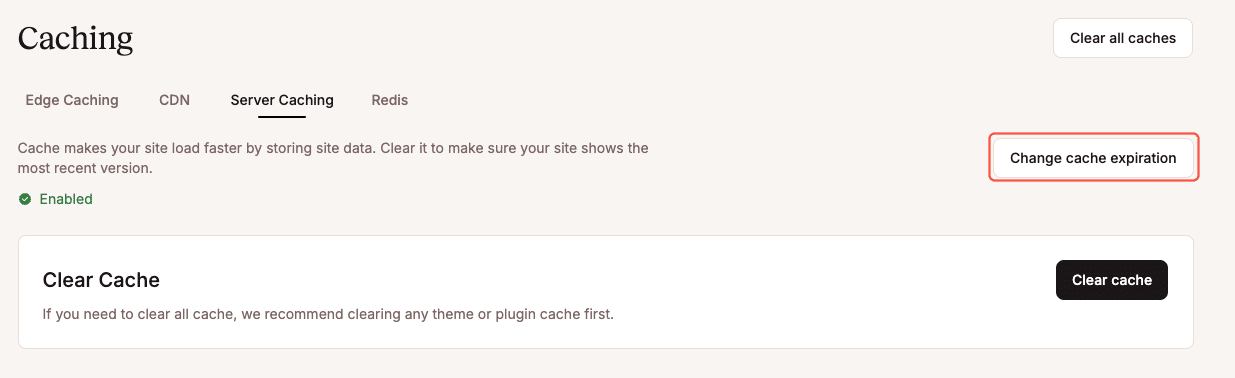
Shorter cache times are ideal if your site updates frequently. For mostly static sites, longer cache durations (like 7 days) help maximize performance without needing frequent manual clearing.
Clear WordPress cache from the WordPress dashboard
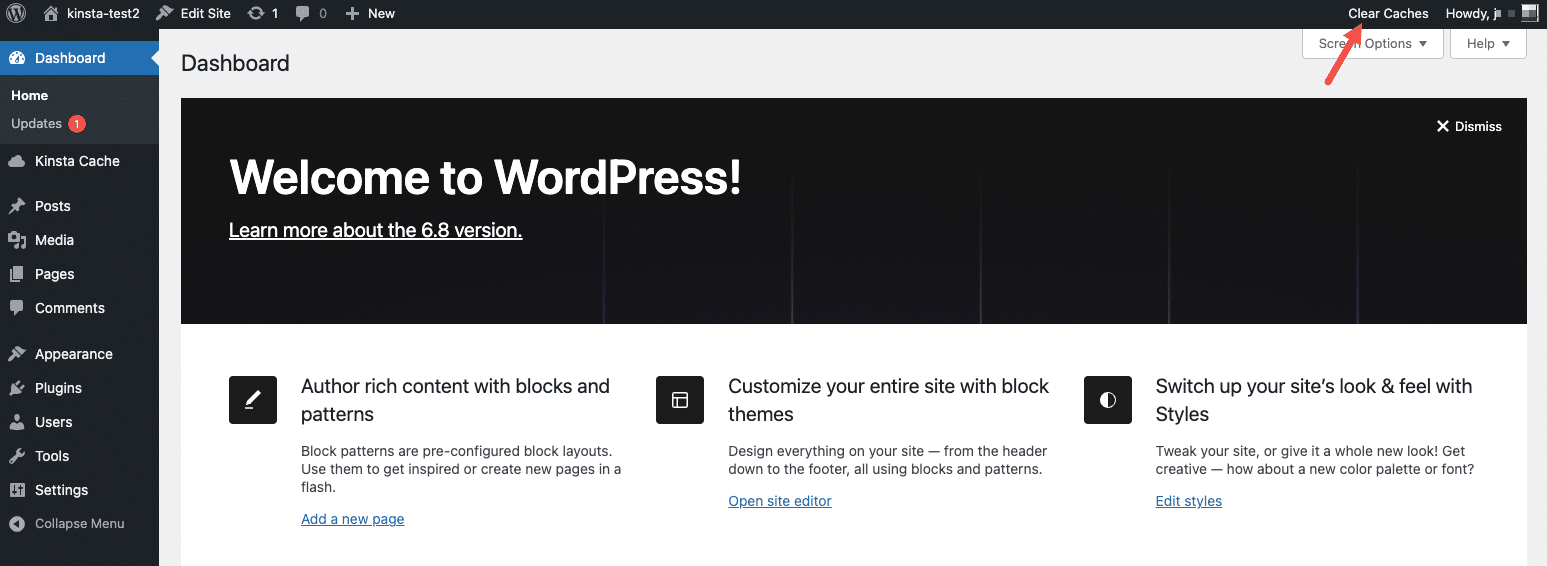
Many hosting companies extend their caching features into WordPress, allowing you to perform tasks like clearing your site’s cache directly from the dashboard.
If you’re hosting with Kinsta, you’ll already have Kinsta’s MU plugin installed and active. This adds a Clear Caches button to your WordPress admin toolbar. Clicking this button will immediately clear all active caches for your site.
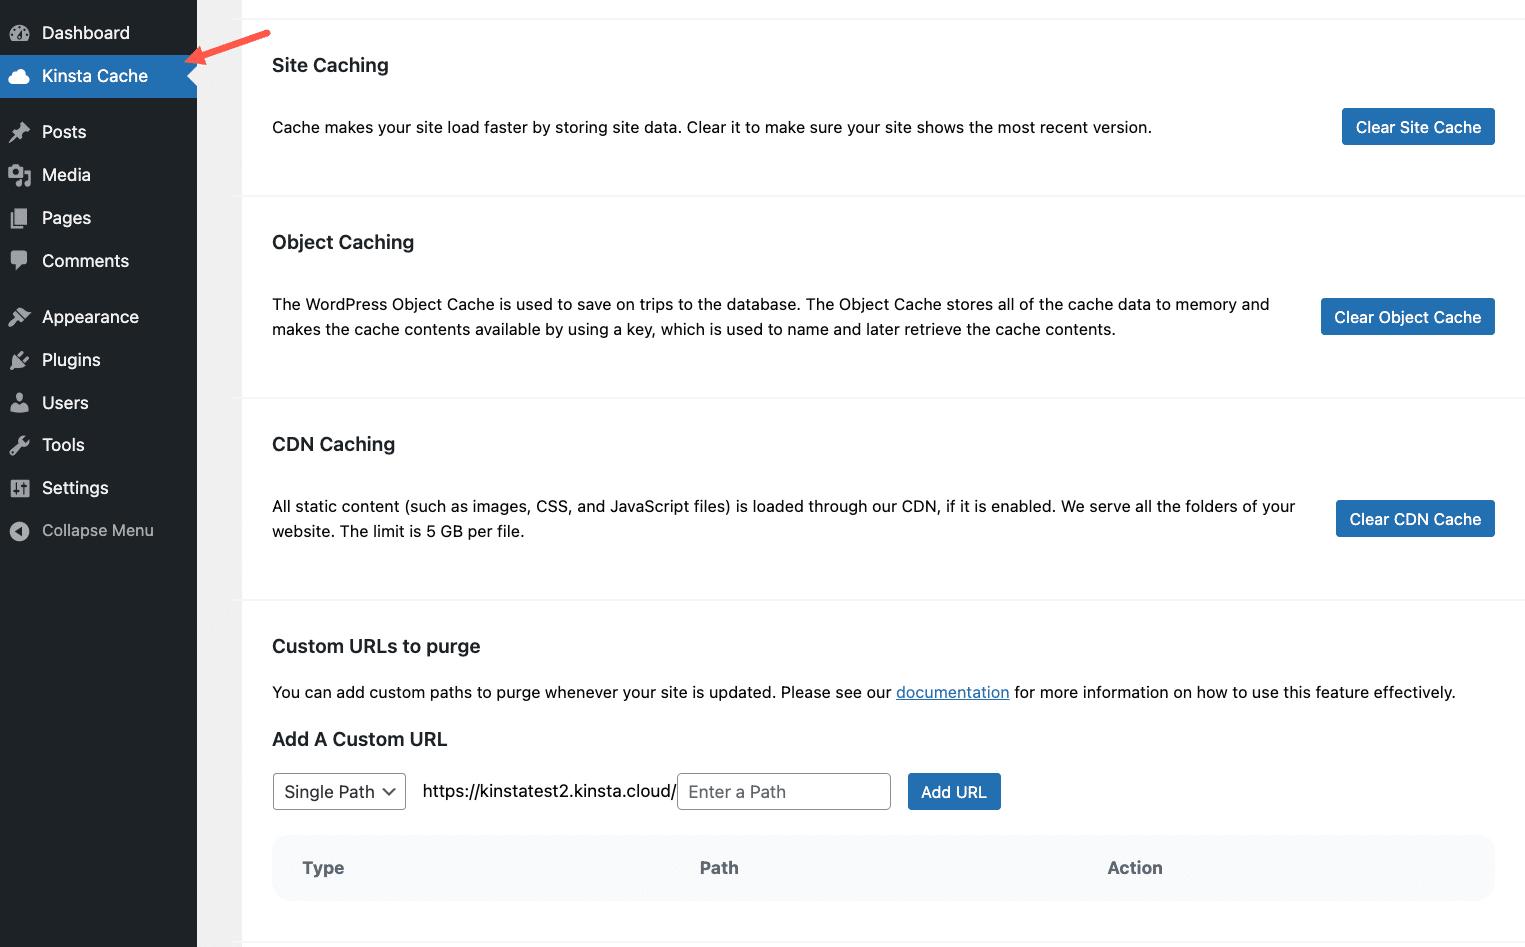
You can also access the Kinsta Cache settings page to clear individual caches manually or to add custom URLs you want purged automatically when updates are made.
Method 3: Clear your browser cache
Besides server-side caching, web browsers like Chrome, Safari, Edge, and Firefox also save cached versions of your site. If your changes aren’t showing even after clearing WordPress cache, it may be time to clear your browser cache too.
Let’s go through quick steps to clear the browser cache in four popular browsers.
How to clear cache in Google Chrome
Open Google Chrome and select the three-dot menu (⋮) button at the browser’s upper right corner.
Go to Settings > Privacy and security > Delete browsing data.
You can go with the Basic tab, but we recommend clicking on the Advanced tab to see more options.
Again, Google doesn’t have a clear cache function. You can still achieve a similar effect by selecting boxes like Browsing history, Download history, Cookies and other site data, and Cached images and files.
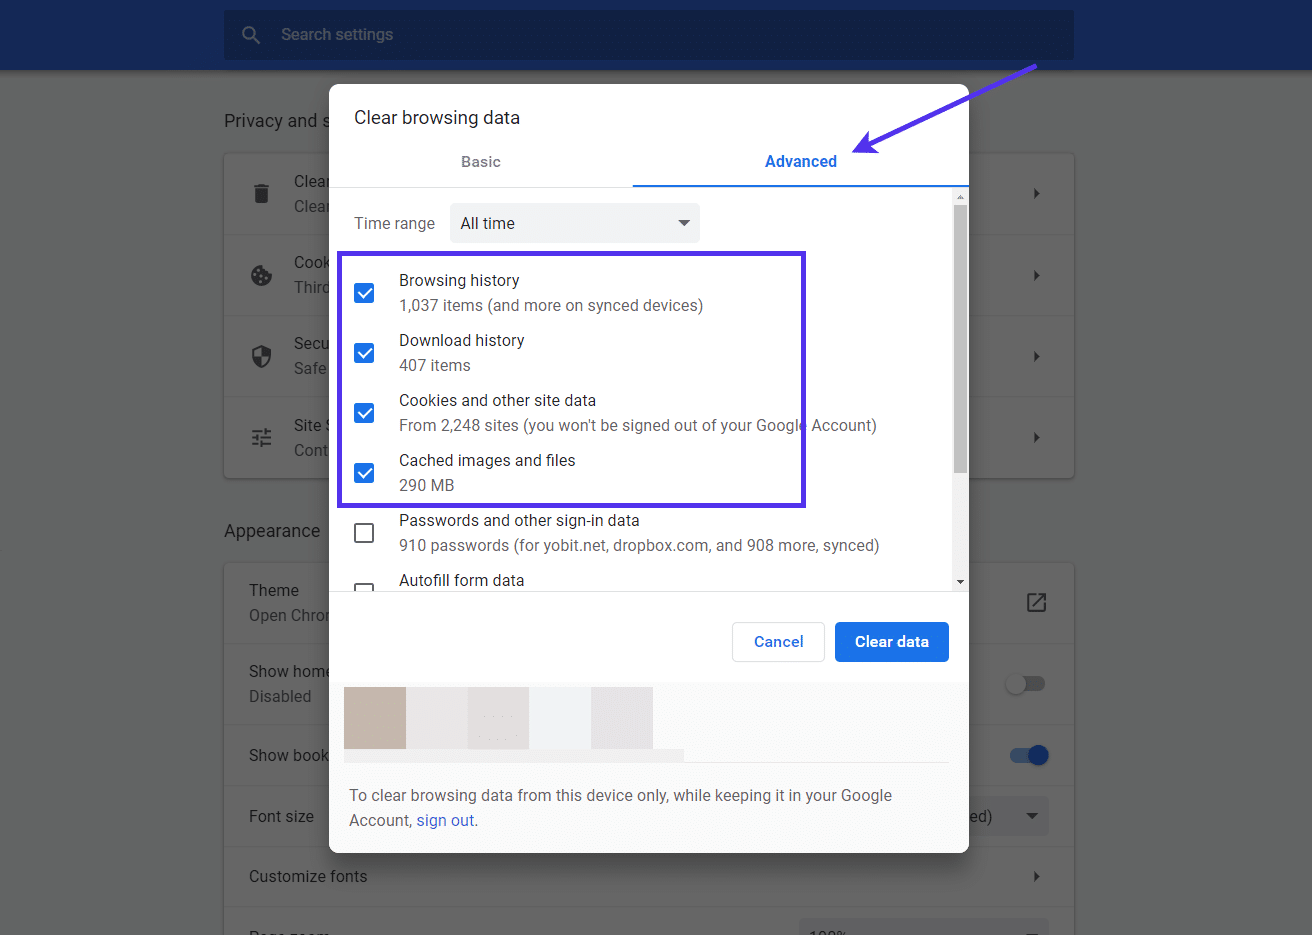
Your best bet is to leave the Passwords field unchecked since that will get rid of all saved passwords on your browser, making for a rather frustrating browser experience.
Make sure the Time range is set to All time (or however long back you’d like to clear the cache) and click the Delete data button to complete the process.
How to clear cache in Microsoft Edge
Microsoft Edge has a similar configuration as Chrome for clearing your site history and the browser cache. Open Microsoft Edge and find the three-dotted icon (⋮) in the upper right-hand corner of the browser. Click on that.
Navigate to Settings > Privacy search and services. Locate the Clear browsing data section and click the Choose what to clear button.

We recommend you select the browsing history, download history, cookies and other site data, and cached images and files. Set the Time Range to All Time and then click Clear Data.
Another interesting part about the Microsoft Edge Security and Caching section is that you can configure the browser to clear the cache whenever you close the browser.
To do so, go back to the Settings page and click on the button that says Choose what to clear every time you close the browser option.

Like the clearing of your browser cache, this module has a list of options to choose from, the same ones you saw before.
Keep in mind that clearing the browser history may not be as desirable as you may think for some people. However, the Cookies should definitely be cleared anyway, as well as the cached images and files.

How to clear cache in Safari
If you’re a macOS user, you’re most likely on the Safari browser. All you have to do is go to the History menu in your Safari browser.
This reveals a button to Clear history. The only other action to take is to select a period of time in which you’d like to clear.
So, you could go for The Last Hour, Today, Today and Yesterday, or All History.
After you choose the timeframe, click the Clear history button to finish the process.

It’s important to know that the Clear history function in Safari does far more than simply getting rid of the websites you’ve visited in the past. In addition to the history being cleared, Safari purges all cookies and the entire cache, or at least as far back as you told it to go.
Another way to only clear the cache, and not everything else like the history and the cookies, is by going to the Develop menu in your browser. There you’ll find an option to Empty Caches.
To reveal the Developer menu (if you can’t see it already), go to Preferences > Advanced and check off the option that says Show Develop Menu in Menu Bar. This is located at the bottom of the module.
How to clear cache in Mozilla Firefox
In Mozilla Firefox, find the Hamburger (☰) button in the browser’s upper right-hand corner. Click that button to reveal its options.

Find and select Options to proceed. Then, click the Privacy and Security tab.

This page shows many security and privacy tools, ranging from features to block tracking to cache clearing capabilities.
You have several options to consider when clearing the browser cache in Firefox. Since the cache isn’t always defined as we would like, you may want to clear things like the site data, cookies, and browser history.
Therefore, Firefox has all of these elements in separate areas of the Privacy and Security page. Unlike the other browsers, there’s not only one button that purges all of them together.
To begin, scroll down the page and locate the Cookies and Site Data section.
Choose the Clear Data button.

By default, two boxes should be checked: Cookies and Site Data, along with Cached Web Content. Make sure both of those are checked and click the Clear button.

After you are done, click the OK button to save everything.

Method 4: Clear your CDN cache (e.g., Kinsta CDN, Cloudflare)
If you’re using a CDN (Content Delivery Network) like Kinsta CDN or Cloudflare, your site’s static assets (images, CSS, JavaScript, etc.) are cached across global servers to speed up delivery to users worldwide.
While this boosts performance, it also means changes you make to your WordPress site might not appear immediately. Sometimes, you’ll need to manually clear your CDN cache to push updated content to visitors.
If you host with Kinsta and have Kinsta CDN enabled, clearing your CDN cache is simple. Naviagte to your site in the MyKinsta dashboard and cloick the Caching tab. Next click CDN to see all Kinsta CDN options.
Select the Clear CDN Cache button.

After a few moments, a notification appears in the MyKinsta dashboard that the Kinsta CDN Cache is cleared from the site you chose.
If you’re using another CDN provider like Cloudflare, the steps are similar as you have to log into your CDN provider dashboard, find the Caching or Purge Cache option.
Select either “Purge Everything” (for full cache clearing) or choose specific files/pages to purge.
Every CDN has slight differences, so refer to your provider’s documentation for detailed instructions.
Summary
Clearing your WordPress cache is essential for making sure your latest changes and updates appear correctly for your visitors.
Whether you’re using a plugin, your hosting dashboard, a CDN, or clearing your own browser cache, understanding when and how to purge cached files helps you maintain a fast, reliable site.
At Kinsta, caching is fully integrated into our platform — combining server-side, page, object, and CDN caching — so you get the performance benefits without the extra maintenance. You can easily clear your WordPress cache manually or automate it based on your site’s needs.
If you’re looking for faster WordPress hosting with powerful built-in caching and less technical overhead, check out Kinsta.


