
With over 1 million active installations, W3 Total Cache is one of the most popular caching and optimization plugins in the WordPress repository. Unlike other WordPress optimization plugins which offer a relatively simpler and streamlined interface, W3 Total Cache gives complete control over your WordPress site’s caching configuration.
The granularity of W3TC’s settings makes it an ideal plugin for advanced users and developers who want ultimate control over their WordPress sites. In this article, we’ll take an in-depth look at W3 Total Cache’s settings, and we’ll give you our recommended configuration to boost the performance of your WordPress site.
If you’re a Kinsta user, you won’t need to configure certain settings in W3 Total Cache because our hosting stack already has many optimizations built in.
For example, as part of our Cloudflare integration, Edge Caching saves your Kinsta site/page cache to any of Cloudflare’s global network of 300+ data centers.
Edge Caching is included free with all Kinsta plans, doesn’t require a separate plugin, and cuts the time needed to serve cached WordPress HTML by an average of more than 50%!
How to Install W3 Total Cache
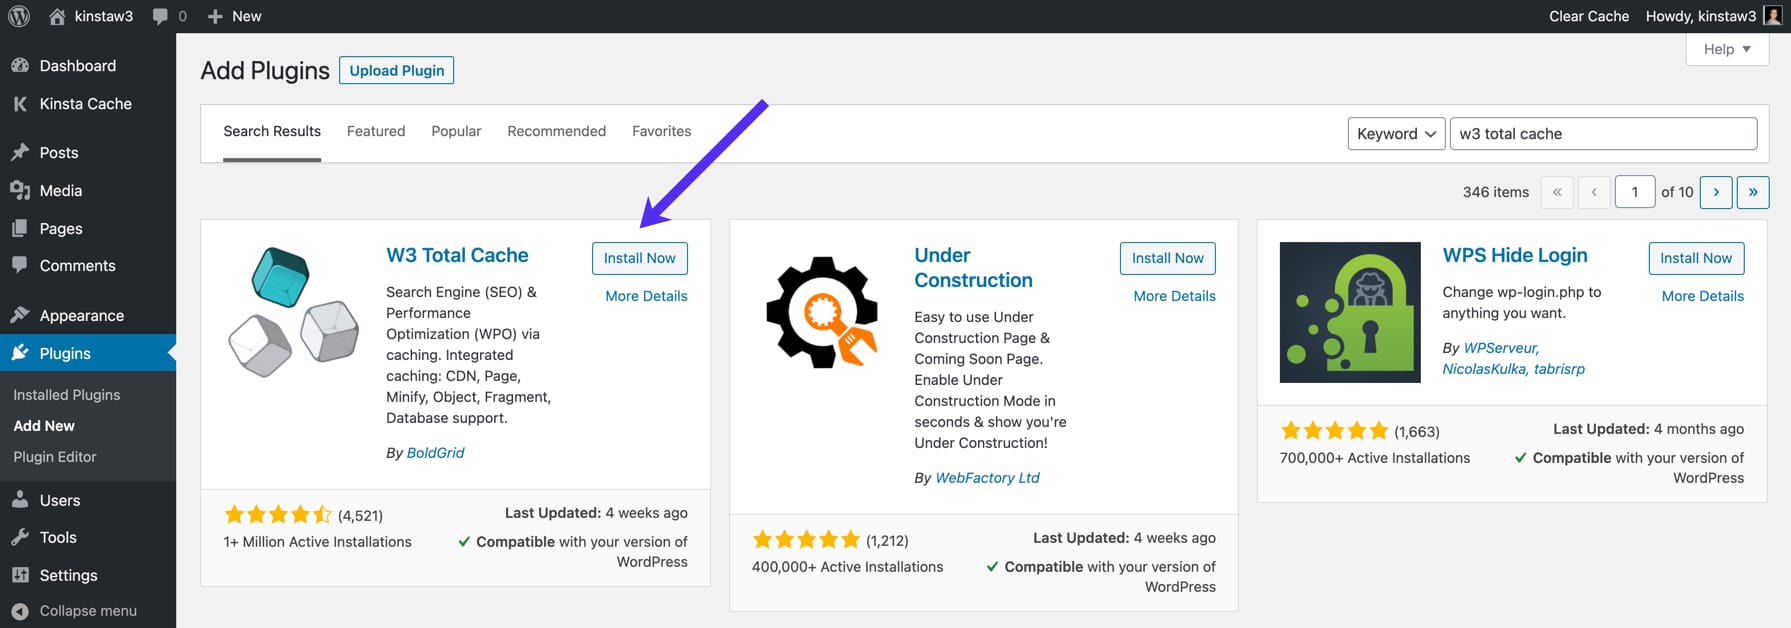
If you don’t have W3 Total Cache installed on your site, you can install it right in your WordPress dashboard. Just search for “W3 Total Cache” on the “Add Plugins” page and install it.
There is also a Pro version of W3 Total Cache, which can be purchased on BoldGrid’s website. The Pro version comes with a few additional features like REST API caching, Google Maps caching, and additional extensions. In this article, we’ll be using the free version from the WordPress plugin repository.
Where are W3 Total Cache Settings Stored?
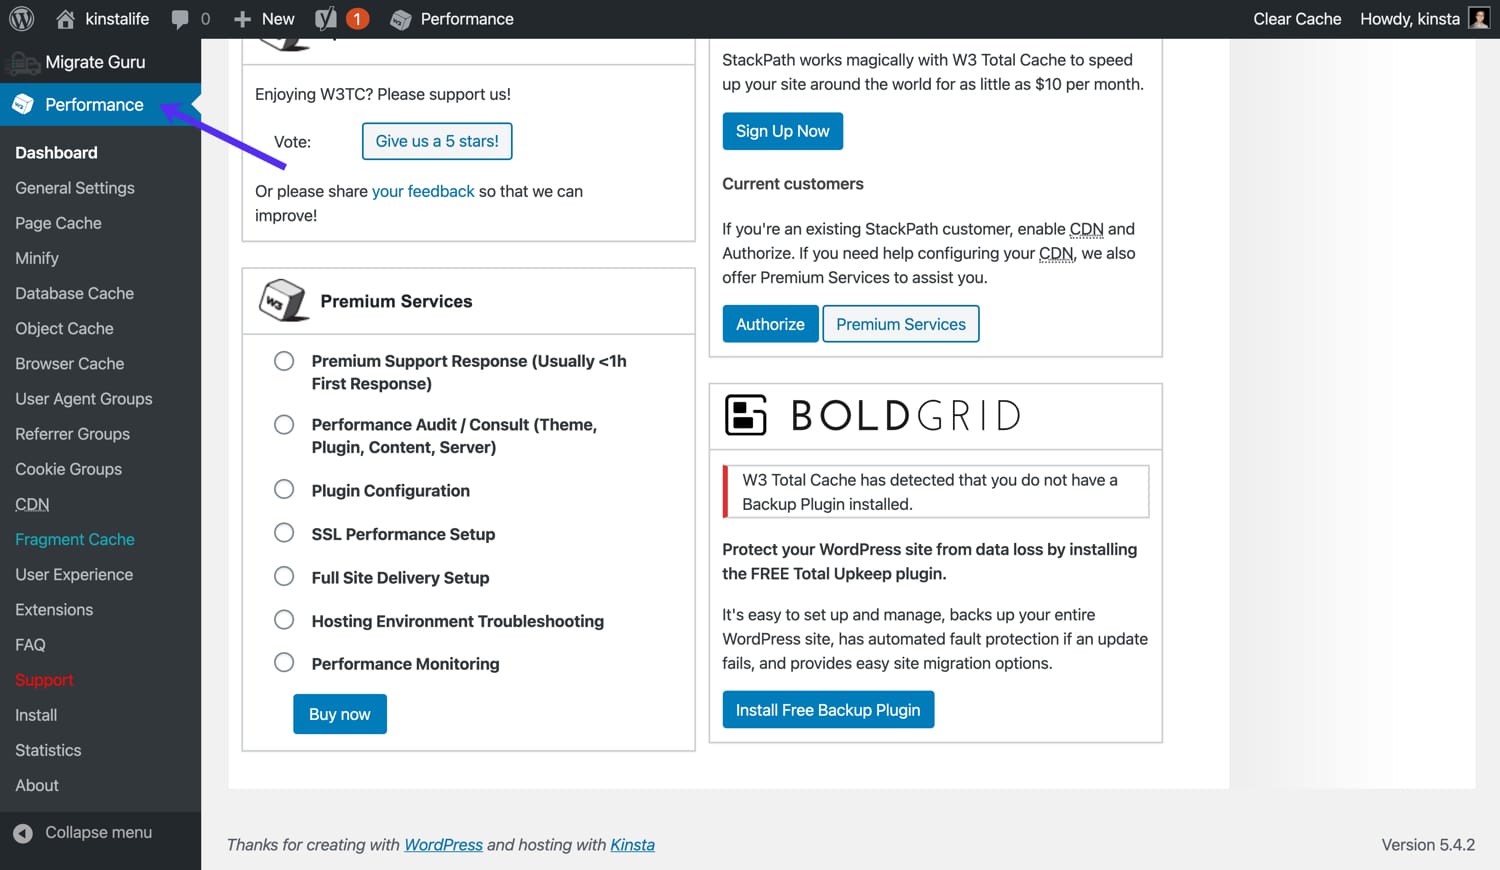
After installing W3 Total Cache, you’ll see a “Performance” tab in the sidebar of your WordPress admin dashboard. Clicking on the “Performance” tab will reveal a variety of submenus like “General Settings”, “Page Cache”, “Minify”, and more.
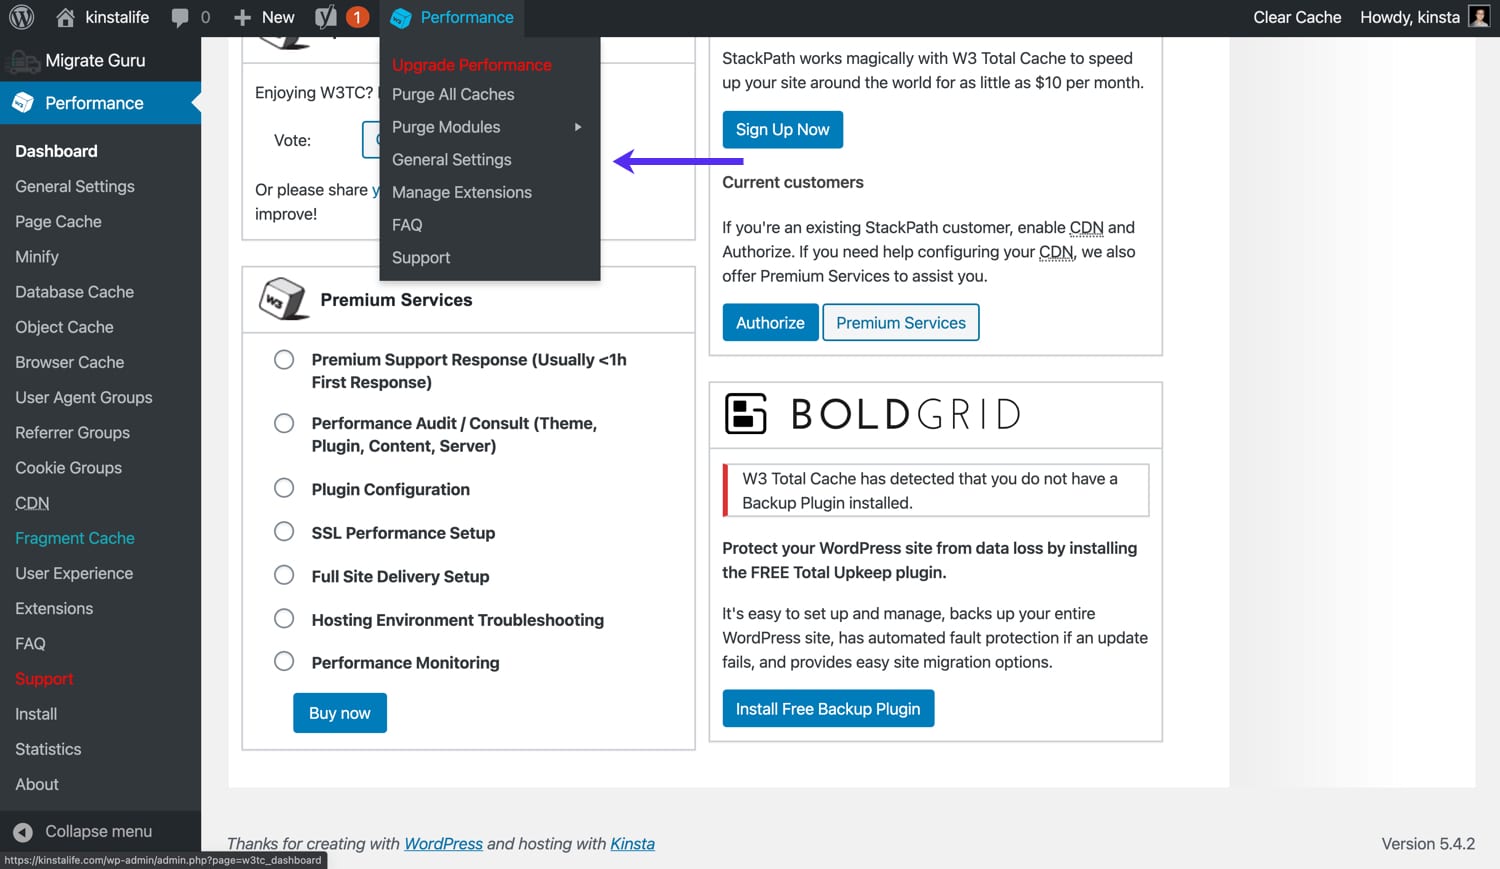
You can also access W3 Total Cache settings using the “Performance” tab in your WordPress admin toolbar.
How to Purge W3 Total Cache
Before we get into how to configure W3 Total Cache, let’s quickly go over how to purge or clear your cache. If you hover over the “Performance” tab in the admin toolbar, you’ll see two purge options.
- Purge All Caches – purge all caches at once.
- Purge Modules – purge an individual cache (e.g. minified assets, page cache, object cache, etc.).

W3 Total Cache General Settings
Let’s dive into W3 Total Cache’s “General Settings” menu to configure a few basic settings.
Page Cache
By default, every single request to your WordPress site is rendered in real-time. For certain kinds of sites like eCommerce stores or discussion forums, dynamic rendering is ideal. However, for blogs, news sites, and other sites that don’t require dynamic content, adding a page caching layer can improve performance and reduce server load.
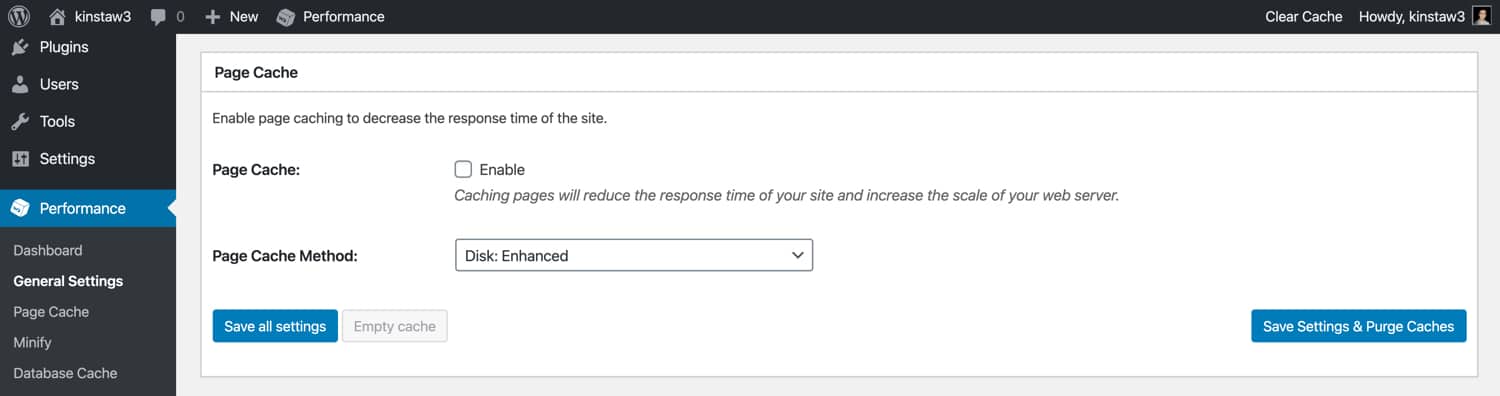
If your site is hosted on Kinsta, you don’t have to worry about page caching. We have a high-performance server-level configuration that automatically caches your site’s pages into static HTML files. If your host does not offer page caching, you can enable page caching in the W3 Total Cache plugin.
Minify
Minifying your HTML, CSS, and JavaScript assets can reduce the overall size of your site’s pages by removing unnecessary whitespace. For most WordPress sites, enabling W3 Total Cache’s “Minify” feature and selecting the “Auto” option for “Minify Mode” will be just fine.
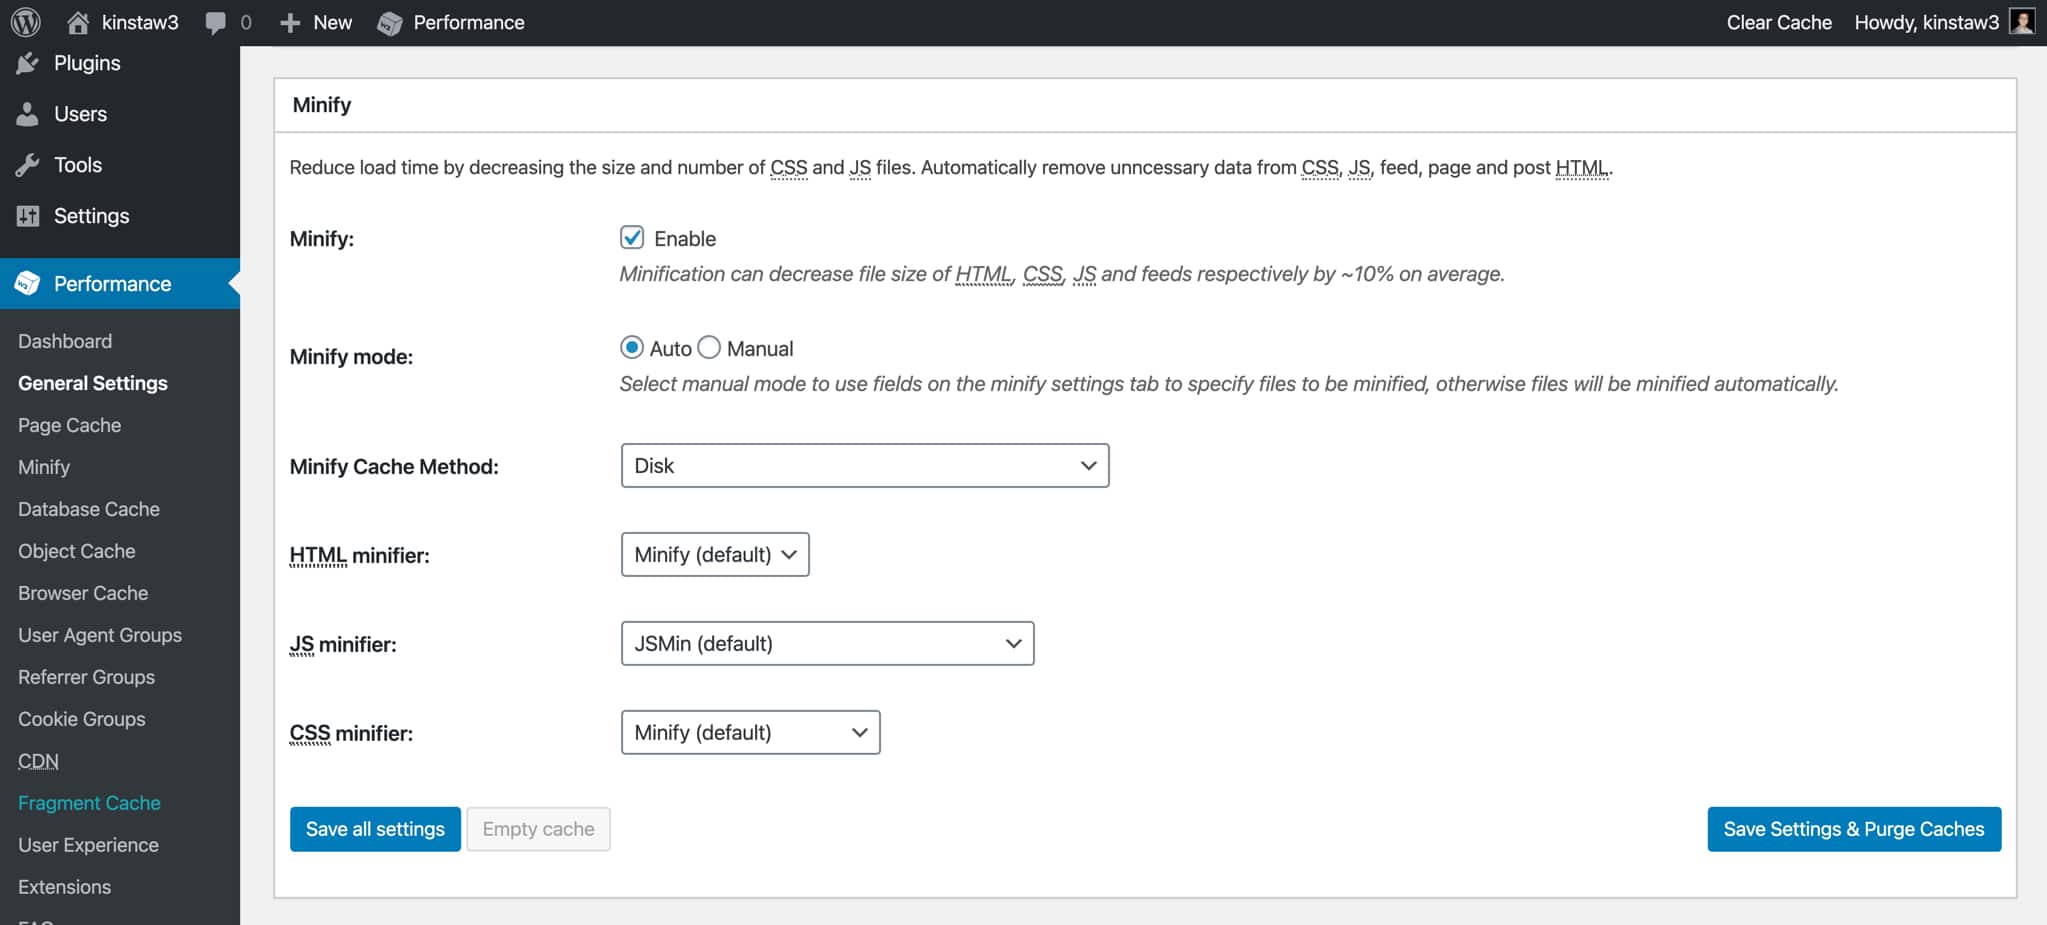
In some cases, minifying assets may cause CSS or JavaScript code to break, which often results in visible errors on the frontend. If you notice unusual issues on your site after minifying assets, we recommend working with a developer to identify the assets causing issues. After that, you can use the “Minify” feature in manual mode, which allows you to bypass minification for specific CSS and JavaScript files.
Opcode Cache
WordPress is a dynamic CMS, which means PHP threads are constantly executing code in the background. Opcode cache helps speed up your site by storing compiled PHP code, which makes subsequent requests that require the same code faster.
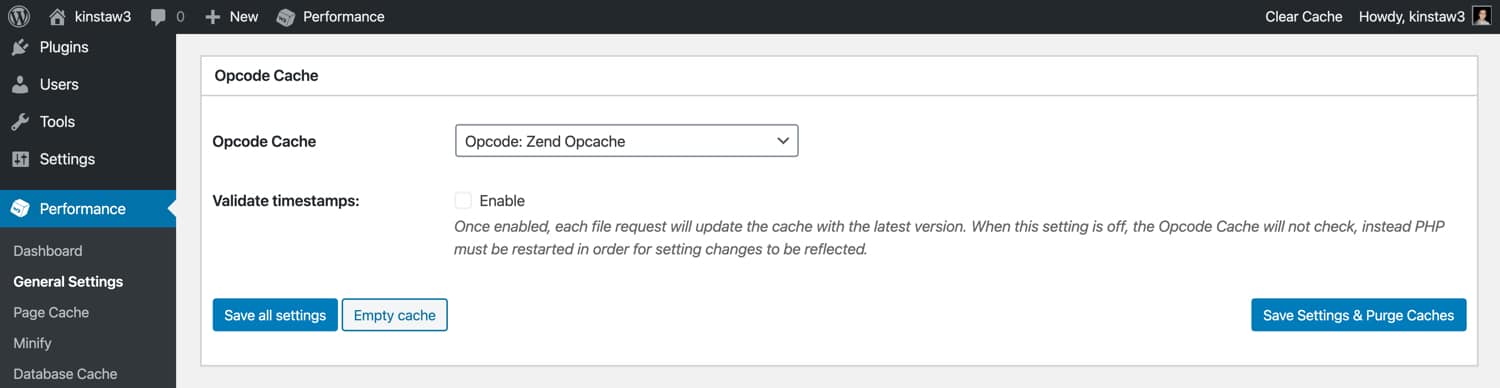
If your site is hosted on Kinsta, you don’t have to worry about enabling an opcode caching layer in W3 Total Cache. We enable OPcache, an opcode cache, on all live environments. OPcache is disabled on staging environments to ensure compiled PHP code is not cached and does not interfere with site development and debugging.
If your host does not offer opcode cache, we recommend enabling it in W3 Total Cache. Keep in mind that the opcode cache feature is only available in the Pro version of W3TC.
Database Cache
W3TC’s database stores the results of MySQL database queries. While this feature does sound useful, we recommend keeping it disabled and using an object cache instead.

We’ve found that in some cases, the database cache feature may result in high CPU usage. This means the amount of CPU saved by storing database query results could end up getting offset by the increase in CPU required for this feature.
Object Cache
In the context of WordPress, an object cache stores the results of completed database queries. WordPress actually has a built-in object cache, but it only retains data for a single page load. This allows for more efficient page rendering because it ensures a page load will not need to waste CPU resources running identical database queries.
While WordPress’ default object cache is undoubtedly beneficial for performance, an object cache that retains data across page loads is even better! W3TC’s “Object Cache” feature adds a custom caching script in your /wp-content directory, and changes the behavior of WordPress’ object cache to retain data persistently (across multiple page loads).
We recommend enabling W3TC’s object cache feature on your WordPress site to speed up requests that utilize database queries if your site is not hosted on Kinsta.
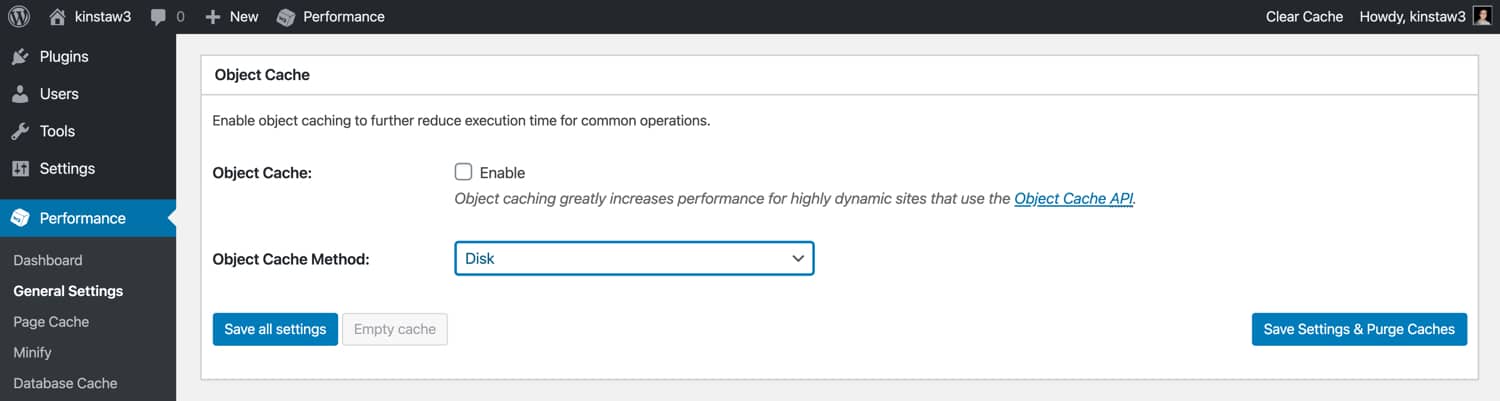
If your site is hosted on Kinsta, we offer a high-performance object caching layer powered by our Redis add-on. Redis is an open-source in-memory data structure store that’s often used for database and message broker applications.
Since Redis caches data in RAM, it allows WordPress to access cached data from a persistent object cache that is much faster than traditional object cache configurations.
Browser Cache
Browser caching can speed up your WordPress site considerably by storing static assets like CSS, JavaScript, images, and fonts locally. Browser caching uses an expiration period to determine how long to cache assets for. On the modern web, most developers specify an expiration period of 1 year for static assets.
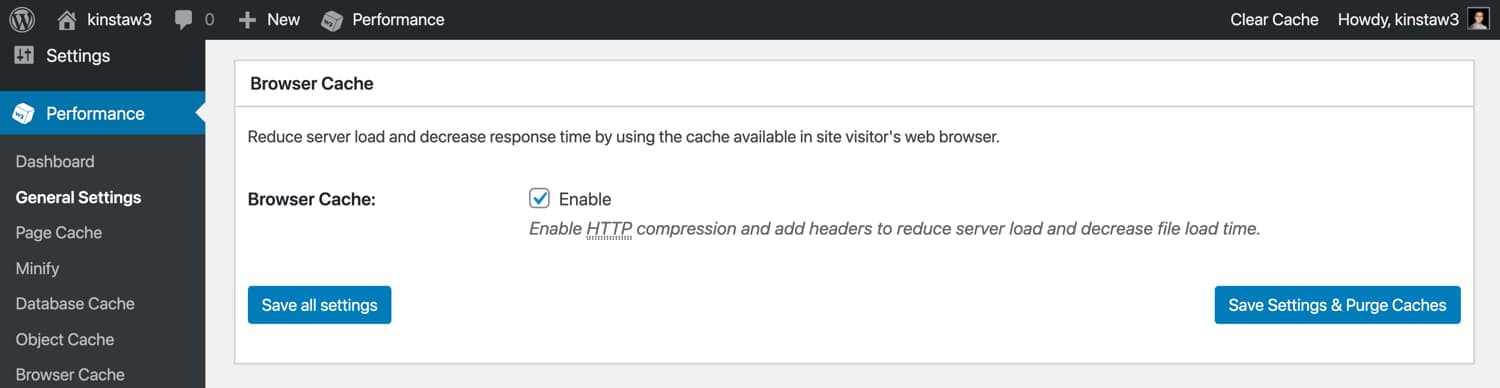
For sites hosted on Kinsta, we enforce a 1 year cache period for static files. This can be verified by checking the cache-control header for a static file hosted on Kinsta. If your web host does not enforce a “far-future expiry time” for browser caching, you can enable the “Browser Cache” feature in W3 Total Cache and configure the expiration period.
CDN (Content Delivery Network)
If you’re using a CDN, or content delivery network, to offload static files to data centers around the world, you can configure W3 Total Cache to rewrite URLs for “theme files, media library attachments, CSS, JS” and more with your CDN hostname.
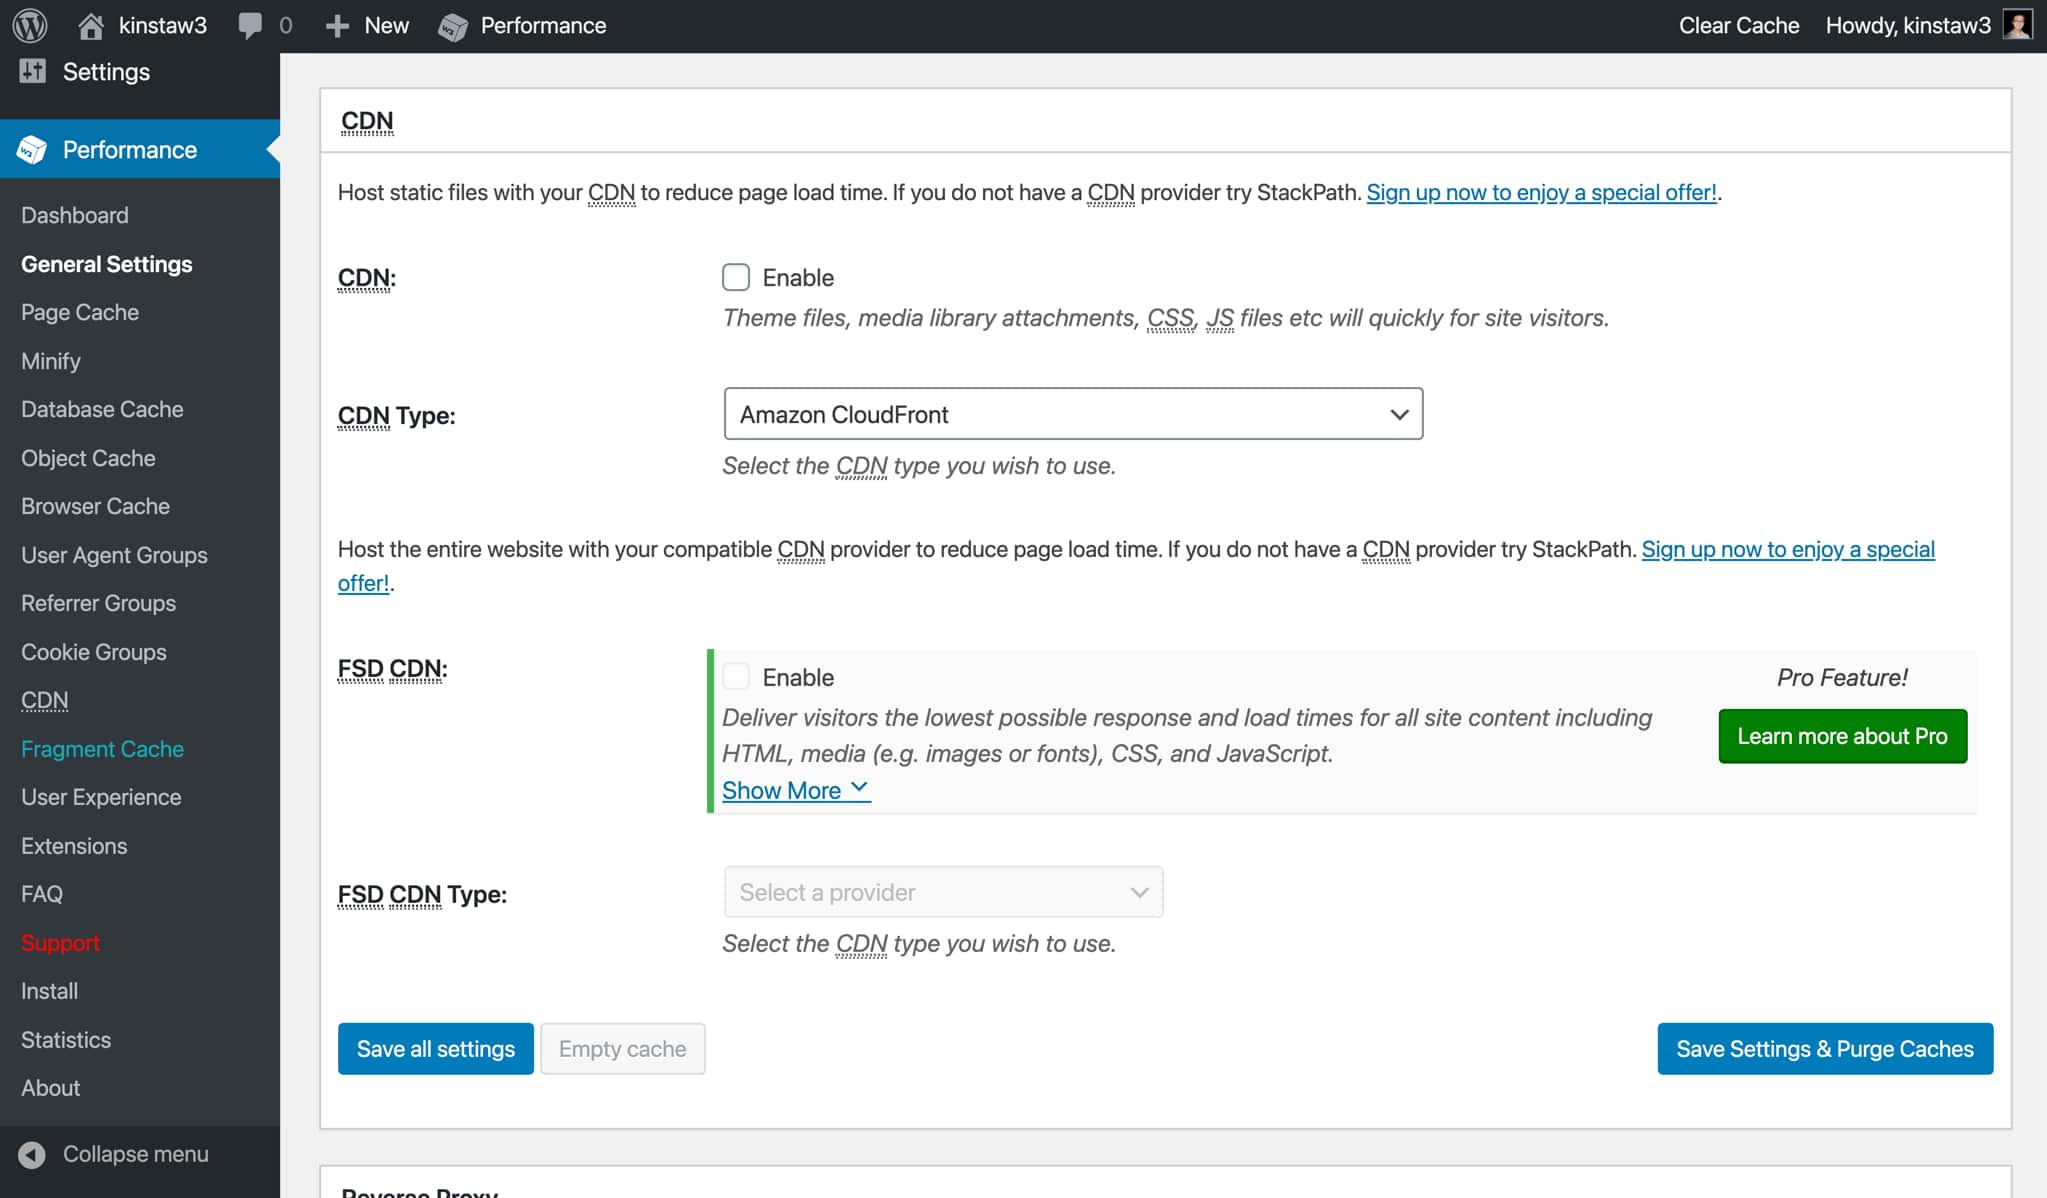
If your site is hosted on Kinsta, we recommend using Kinsta CDN, our high-performance content delivery network powered by Cloudflare. When Kinsta CDN is enabled, static file URLs will be automatically rewritten to be served from Kinsta CDN.
If you prefer to use another CDN provider or if your site is not hosted on Kinsta, you can enable the “CDN” feature in W3 Total Cache and add your CDN URL.
Reverse Proxy
A reverse proxy sits between your web server and WordPress, and can be used to perform various logic-based manipulations on incoming requests. W3TC supports Varnish, which is a popular “HTTP accelerator” for caching and serving data with the goal of reducing backend load.
In order to use Varnish, the Varnish package must first be installed by your host. If you’re a Kinsta customer, do not enable the reverse proxy option as our infrastructure is not designed to work with Varnish.
User Experience
W3TC’s “User Experience” optimization lets you enable lazy loading, disable emojis, and disable the wp-embed.js script. We recommend enabling lazy loading on your WordPress site to speed up page loads. If you’re not already using browser-native or plugin-based lazy loading, we recommend using W3 Total Cache for lazy loading.
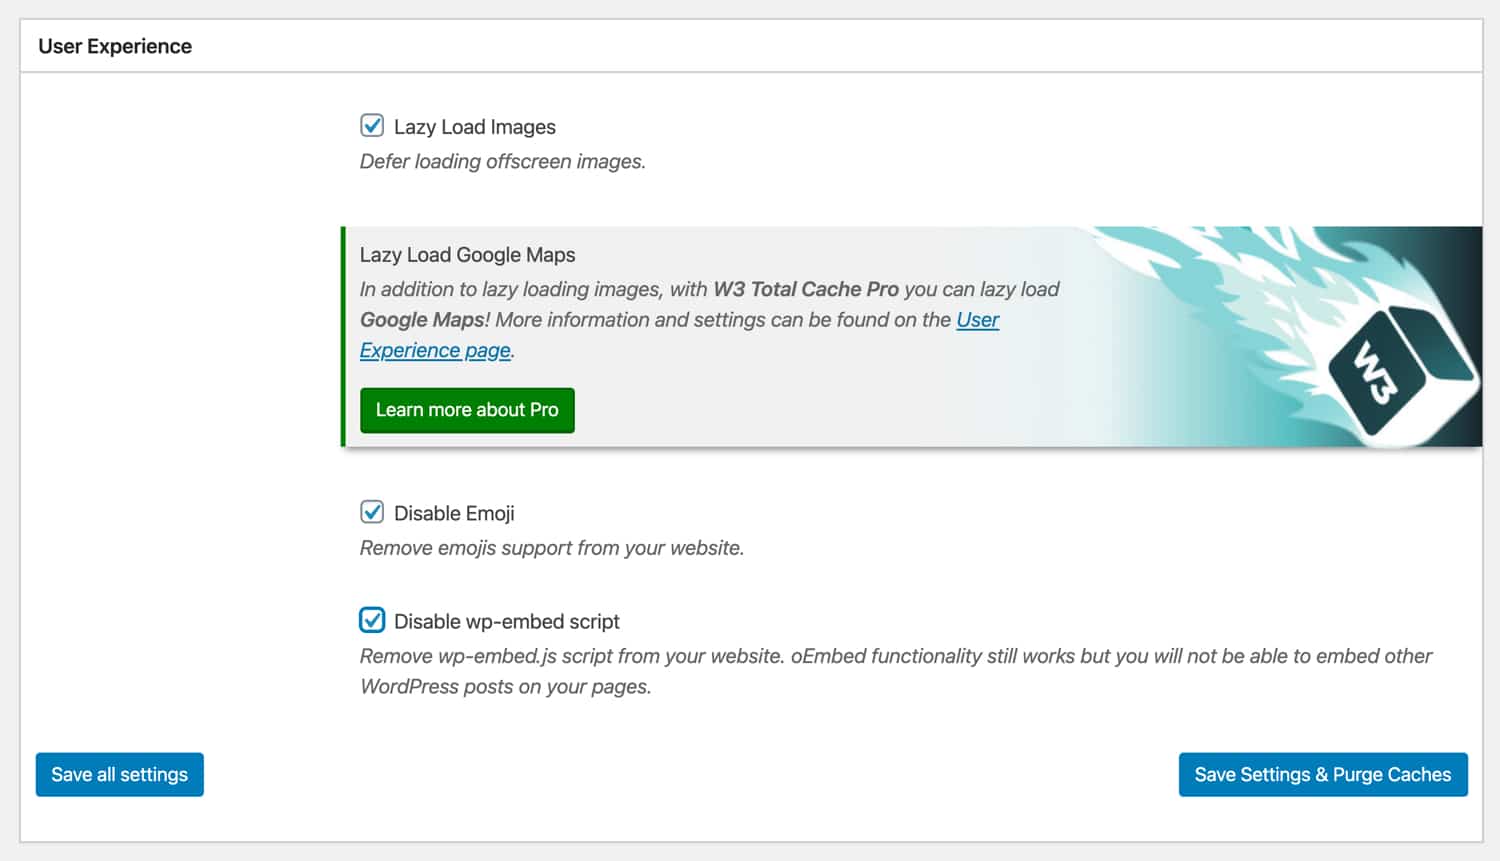
In today’s world, most operating systems have built-in support for emojis. Thus, you may want to disable WordPress’ included emoji script if you’re not a heavy emoji user. Using W3TC to remove wp-emoji-release.min.js will help you shave an HTTP request and remove ~10KB from your page loads.
Similarly, if you don’t embed WordPress posts, you can disable the wp-embed.js with W3 Total Cache. Disabling this script will not affect oEmbed functionality for embedding YouTube videos, SoundCloud streams, etc.
Miscellaneous
W3 Total Cache has a few miscellaneous settings that you can configure as well. If you want to display a Google Page Speed dashboard widget in WordPress, you can input your Page Speed API key. There is also an option to display the Page Speed rating in the menu bar for each page on your WordPress site.
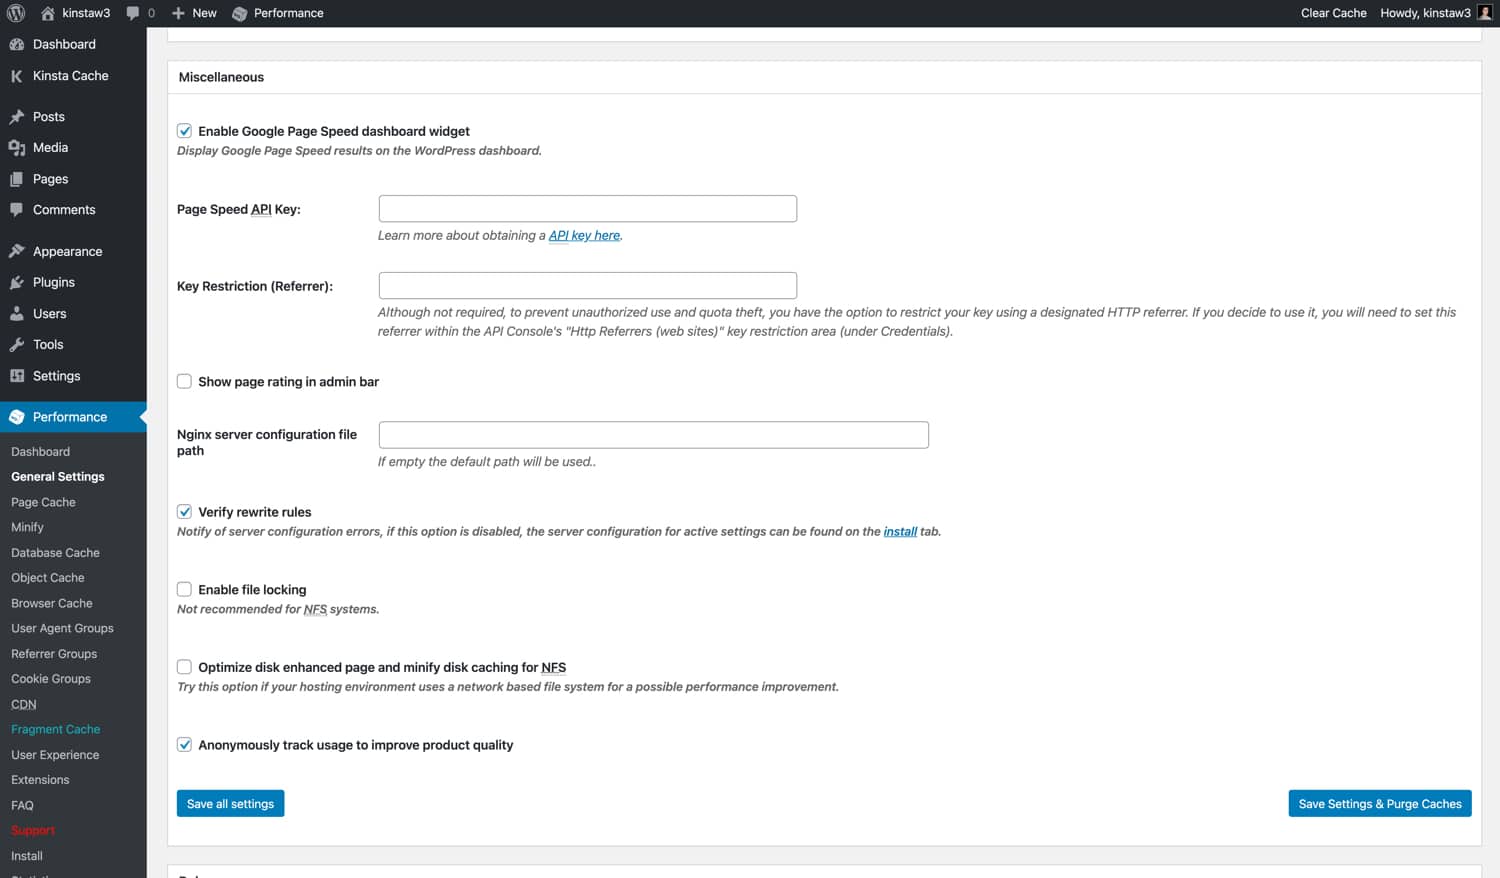
For the other settings like “NGINX server configuration file path”, “enable file locking”, “optimize disk enhanced page and minify disk caching for NFS”, we recommend leaving them in their default settings unless you have a specific reason to change them.
Debug
If you’re troubleshooting an issue on your site, W3 Total Cache has a handy “Debug” menu that lets you disable specific caching layers and optimization settings. For example, if you notice a visual glitch on your site, you can enable debug mode for the “Minify” option, which will insert HTML comments into your page’s source code to help you troubleshoot.
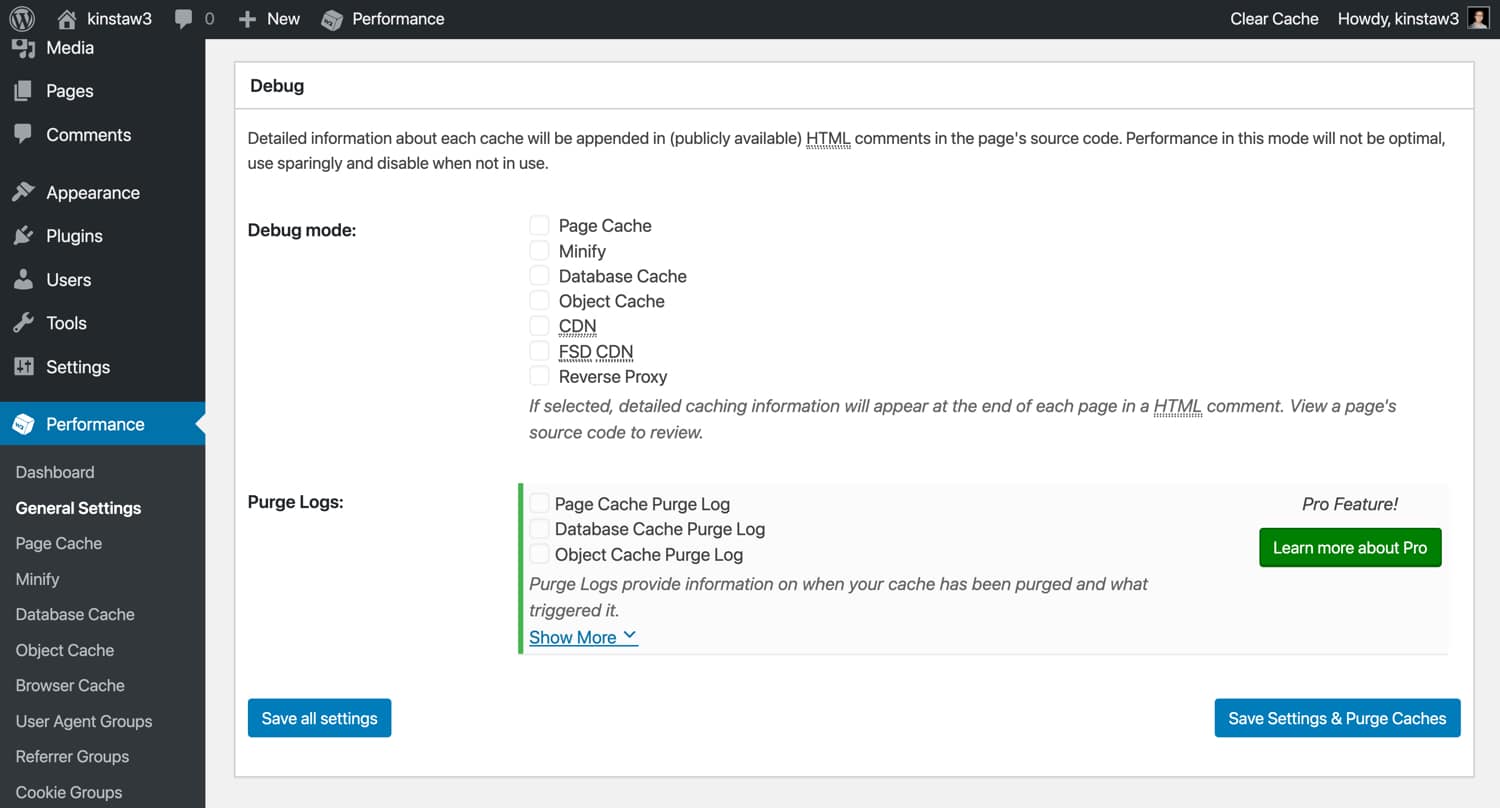
Since the debug mode feature puts additional load on your server resources, we recommend only using it in a staging environment or during low-traffic hours. Furthermore, be sure to disable debug mode after you’re finished with your troubleshooting!
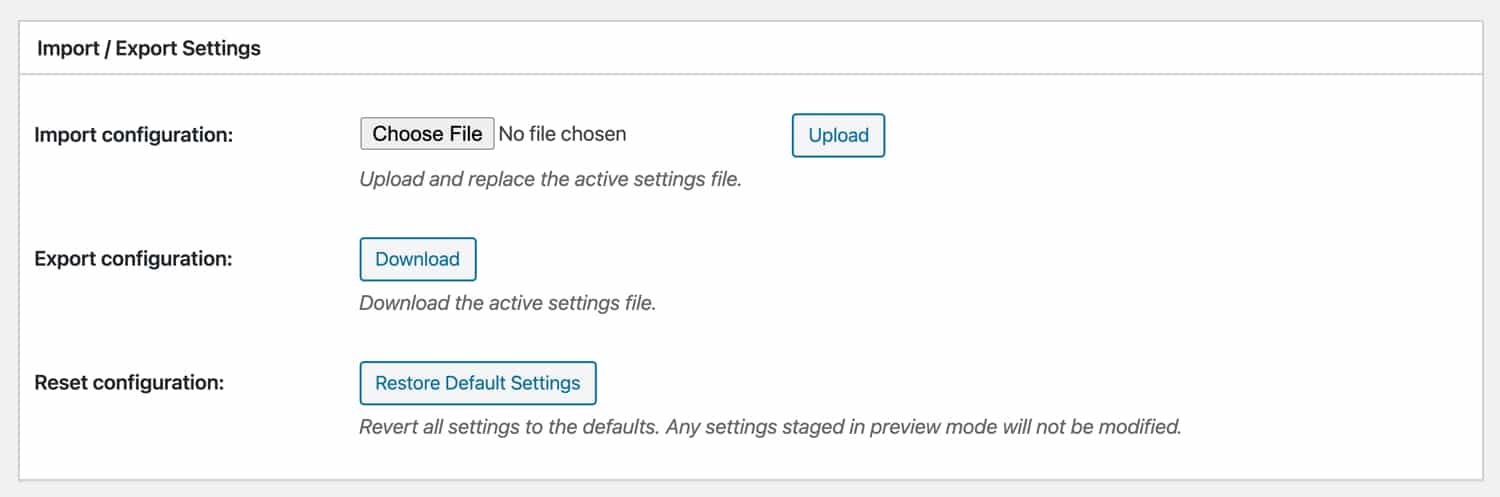
Import/Export Settings
After you’ve finished configuring your settings, you can use W3TC’s “Import/Export” function to create a backup of your configuration. W3 Total Cache has a lot of settings, so being able to export a full backup is great for peace of mind. Furthermore, it allows you to easily replicate your custom W3TC configuration across multiple sites without having to manually configure anything.
W3 Total Cache Settings — Page Cache
Let’s dive into W3 Total Cache’s “Page Cache” settings. Remember if your site is hosted on Kinsta, you don’t need to worry about page caching – so feel free to skip this section.
- Cache Front Page – For most sites, the front page is typically the page that receives the most traffic. Thus, we recommend enabling this setting.
- Cache Feeds – WordPress generates various RSS feeds, which allow external apps and services like Feedburner to display your site’s content. While RSS isn’t as popular nowadays as it used to be, we still recommend enabling this setting.
- Cache SSL (HTTPS Requests) – If your web server doesn’t force HTTPS for all incoming requests, enabling this setting may have a positive impact on performance. If you’re already forcing HTTPS at the web server level, there is no need to enable this.
- Cache URIs with Query String Variables – A query string is a parameter that’s added at the end of the URL (e.g. /?version=123). Query strings are often used to request and display specific data from your WordPress database. In general, the purpose of a query string is to request a unique version of a page, so we recommend keeping this disabled unless you have specific query strings you’d like to cache.
- Cache 404 (Not Found) Pages – By default, W3TC keeps this option disabled. The reason for this is likely due to the caching behavior if you’re using the “Disk Enhanced” page caching method. With that option selected, 404 pages return a 200 response code. Ideally, 404 pages should return 404 response codes, so we recommend testing this setting with your caching configuration to see if it’s compatible.
- Don’t Cache Pages for Logged In Users – We recommend enabling this option. Logged in users are typically working on updating pages. With caching enabled, users would need to clear the cache constantly in order to see page updates.
- Don’t Cache Pages for Certain User Roles – This option allows you bypass cache for certain WordPress user roles. If the “don’t cache pages for logged in users” option is already enabled, this option will have no effect on cache behavior.
Aliases
W3 Total Cache’s “Aliases” feature allows you to cache identical WordPres content that’s available on different domains. We do not recommend enabling this feature. If your WordPress site is accessible over different domains (e.g. domain.com and www.domain.com), it’s best to set up a 301 redirect rule to forward requests to your primary domain to avoid duplicate content penalties from Google and other search engines.
Cache Preload
The “Cache Preload” feature crawls through your sitemap and makes requests to your site’s pages to preload the page cache. For most sites, we recommend disabling cache preload because it can cause server resource spikes that offset the potential performance benefits.
If you do want to enable cache preloading, W3TC lets you specify a sitemap URL, update interval, and pages per interval. Make sure you don’t set the “update interval” and “pages per internal” too high to reduce the chance of CPU spikes.
Purge Policy
W3TC’s “Purge Policy” lets you specify the pages and feeds you want to automatically purge after posts are published or edited. For most sites, the default settings (front page, posts page, and blog feed) should be enough. If you want to add additional pages to the purge policy, there are a variety of options you can configure.
REST API
WordPress’ included REST API lets you query for JSON-formatted data. REST API is used by a variety of plugins, and is crucial for headless WordPress setups. Depending on your exact use case for the REST API, caching the query results may be a good idea. REST API caching falls under the “if you need it, you’ll know it” category, so if you’re unsure whether or not to enable REST API caching, we recommend leaving it on “Don’t Cache”.
Advanced
In W3TC’s “Advanced” page cache options, you can customize a variety of settings including “accepted query strings”, “rejected user agents”, granular cache bypass settings, and more. For example, if you need to configure your W3 Total Cache to never cache posts under a certain category or tag, you’ll be able to do so in the “Advanced” options.
Since these settings can be very site-specific, there are no “recommended settings” that we can provide. With that said, if you’re looking to customize a very specific aspect of your site’s page caching behavior, definitely give the advanced options a look.
W3 Total Cache Settings — Minify
Next, let’s go over W3 Total Cache’s “Minify” settings.
- Rewrite URL Structure – This setting affects the URL structure of minified assets. We recommend keeping it enabled so your URLs look “pretty”.
- Disable Minify for Logged In Users – If you’re doing some troubleshooting or debugging, disabling minification for logged in users may be helpful. Otherwise, we recommend keeping this option disabled.
HTML & XML
In the “HTML & XML” section, you can configure HTML minification settings.
- Inline CSS minification – We recommend enabling this option to remove whitespace in inline CSS.
- Inline JS minification – We recommend enabling this option to remove whitespace in inline JavaScript. In some cases, JS minification may result in a code error. If enabling this option breaks your site functionality, disable it.
- Don’t minify feeds – We recommend keeping this option disabled. Feeds are only used by RSS readers and other similar services, so minifying feeds isn’t necessary.
- Line break removal – This option is disabled by default, and we don’t recommend enabling it to ensure your site renders correctly.
JS
In the “JS” section, you can configure JavaScript minification settings.
- Operations in Areas – This option lets you select the “embed type” for minified JavaScript. For JS files before
</head>and after<body>, you can choose between “blocking”, “non-blocking”, “non-blocking using async”, and “non-blocking using defer”. While non-blocking loading methods typically result in better performance, they’re not always 100% compatible with all JavaScript code. Furthermore, “async” and “defer” have very different use cases. Thus, we recommend using the default “blocking” method unless you are aware of the quirks of non-blocking JavaScript. - Minify or Combine Only – You can choose between two optimization modes for JavaScript. When “Minify” is selected, your JS files will be combined and minified. If you select “Combine Only”, then the resulting combined JS file will not be minified. If you’re experiencing minification-related issues and don’t want to debug to find out which script is causing the problem, selecting the “Combine Only” option may fix the error.
- HTTP/2 Push – If your server supports HTTP/2 Server Push, enabling this option may help you reduce page load time. HTTP/2 Server Push pushes files to visitors before they’re requested. We recommend doing adequate testing before enabling this option in a production environment because Server Push is often misused. Server Push is not ideal for larger JavaScript files, and you’ll want to make sure the benefits outweigh loading JS files directly from a visitor’s browser cache.
CSS
In the “CSS” section, you can configure CSS minification settings.
- Combine Only – Unlike JavaScript files, CSS typically doesn’t suffer from minification-related issues. Thus, we don’t recommend enabling “Combine Only”.
- Preserved Comment Removal – This setting removes comments from CSS files. We recommend enabling this option to reduce file size as much as possible.
- Line Break Removal – This setting removes line breaks from CSS files. We recommend enabling this option as well. If you notice any display issues after enabling “Line Break Removal”, disable it.
Advanced
The “Advanced” section contains a few additional settings to customize minification behavior.
- Update External Files Every – W3TC lets you specify the amount of time between CSS and JS file updates. With the default setting of 86400 seconds, your assets will be downloaded and minified every 24 hours. If your site doesn’t change frequently, feel free to set a longer time period.
- Garbage Collection Interval – This time period setting specifies how frequently expired cache data is deleted. The default setting is 24 hours. If your site is low on storage space, we recommend lowering the “Garbage Collection Interval”.
The rest of the “Advanced” section includes input fields that allow you to specify asset files that should never be minified. There is also a “Rejected User Agents” field that lets serve non-minified files to certain user agents. Lastly, you can add external asset files to be included in W3 Total Cache’s minification process.
W3 Total Cache Settings — Object Cache
Next up on the list is W3TC’s “Object Cache” settings. For most sites, the default settings will work just fine, but let’s go over them regardless.
- Default Lifetime of Cache Objects – The expiration time for unchanged cache items. A longer time period results in a larger object cache. If you’re concerned about your server’s storage capacity, we recommend keeping the default value or lowering it.
- Garbage Collection Interval – This setting specifies how frequently expired cache data is trashed. The default value of 3,600 seconds (1 hour) should be fine for most sites.
- Global Groups – This setting allows you to configure shared caching groups between sites in a single multisite network. We recommend leaving this setting in its default state unless you have a specific reason to change it.
- Non-Persistent Groups – This setting lets you select which object groups to never cache. Again, we recommend sticking with the default configuration.
- Enable Caching for wp-admin Requests – This option is disabled by default, and we don’t recommend enabling it because it can cause side effects. Furthermore, visitors to most WordPress sites never interact with the wp-admin dashboard.
W3 Total Cache Settings — Browser Cache
Most WordPress hosts, including Kinsta, already implement proper browser caching headers at the web server level. If your host does not, or if you want to customize browser caching behavior further, you can do so with W3 Total Cache.
In “Browser Cache” settings, the default settings for the “General”, “CSS & JS”, and “HTML & XML” and “Media & Other Files” sections are adequate for most WordPress sites. Since there are so many settings on this page, we recommend consulting with a developer before making any changes to browser caching behavior. With that said, below are a few key settings to pay attention with regard to browser caching.
- Expires Headers Lifetime – Configuring a long “expires headers lifetime” is important for efficient browser caching. At Kinsta, we enforce a 1 year lifetime for static assets like CSS, JS, images, and fonts. If you’re using W3TC to configure browser caching, be sure to set this value to
31536000(1 year). - Cache Control Policy – To ensure your static assets are cacheable by browsers, be sure the “cache control policy” is set to “public, max_age=EXPIRES SECONDS”.
- Enable HTTP (gzip) Compression – GZIP compression dramatically reduces the file size of HTML pages and assets before they are sent to visitors, so be sure to enable this option if your host’s server configuration supports GZIP. If your site is hosted on Kinsta, there is no need to enable GZIP compression in W3TC because it is already enabled as part of our default configuration.
- Remove query strings from static resources – A query string is an additional string that is added to the end of a URL path to specify request parameters or force a web server to deliver a fresh asset. Query strings start with a
?, and most web servers are configured to bypass cache for requests with query strings. Removing query strings from page requests is helpful for reducing server load because these requests use PHP to render pages. We don’t recommend removing query strings from static resources in W3 Total Cache because they help ensure the latest version of CSS and JS files are delivered to your visitors.
The “Browser Cache” settings page also contains a variety of settings related to security headers like Content Security Policy (CSP) and X-XSS Protection. We always recommend working with a qualified developer to go through these settings because incorrect configurations can directly impact your site’s user experience. For example, enabling the HSTS header without a proper SSL certificate and HTTPS configuration may render your site inaccessible.
W3 Total Cache Settings — User Agent Groups
W3 Total Cache’s “User Agent Groups” feature is very powerful if you need to redirect traffic based on a user’s device type. For example, you can configure your site to render with a different theme if a user visits your site from a mobile phone. Similarly, you can redirect users to a completely different site if your mobile site lives on a unique subdomain.
In the age of responsive web design, we don’t see too many use cases for this particular feature. Nowadays, the best practice is to make your site responsive from the start instead of relying on multiple themes or a mobile-only subdomain.
W3 Total Cache Settings — Referrer Groups
An HTTP referrer is an optional HTTP header that provides information about where a request originated from. For example, if a visitor clicks on your site from a Google Search listing, the HTTP referrer would be google.com.
In W3 Total Cache, you can define custom caching behavior based on a request’s HTTP referrer with “Referrer Groups”. For example, you could create a referrer group that consists of search engines, and customize caching behavior for requests from those domains only.
Similar to the “User Agent Groups” mentioned above, you can also redirect requests to a different domain with the “Referrer Groups” feature. Most WordPress sites won’t need to set up referrer groups, so we don’t recommend configuring any.
W3 Total Cache Settings — Cookie Groups
The latest caching group that W3 Total Cache supports is “Cookie Groups”. This feature lets you create unique caching buckets and behaviors based on a request’s cookies. Similar to the “User Agent Groups” and “Referer Groups”, most sites will not need to set up a custom cookie-based caching configuration. If your site requires cookie-based caching, we recommend working with a developer to configure it correctly.
W3 Total Cache Settings — CDN
Now, let’s move on to W3 Total Cache’s CDN settings.
- Host Attachments – Enable this to serve assets in your WordPress media library from your CDN.
- Host wp-includes/ Files – Enable this to serve files in the
wp-includesfolder from your CDN. - Host Theme Files – Enable this to serve your theme files from your CDN.
- Host Minified CSS and JS Files – Enable this to serve W3TC’s minified CSS and JS files from your CDN.
- Host Custom Files – If you have files that are not in your media library or your theme folder, you can add the file paths in W3TC to serve them from your CDN.
- Add Canonical Header – A
rel=”canonical”tag helps search engines identify the original source or URL. Since CDNs typically use a different domain, adding a canonical tag notifies search engines of the original asset’s location. With that said, it’s okay to keep this setting disabled because modern search engines are smart enough to identify CDNs without impacting your site’s SEO rankings.
Advanced
- Only Purge CDN Manually – We recommend keeping this option disabled to let W3TC handle cache purges automatically.
- Disable CDN on SSL Pages – Keep this setting disabled. If you’re using a CDN, it’s best to have it active on both HTTP and HTTPS pages.
- Use CDN Links for Media Library on Admin Pages – We don’t recommend enabling this option because it will rewrite URLs in your media library.
- Add CORS Header – Keep this setting enabled to allow your CDN assets to be displayed on other domains.
- Disable CDN for the Following Roles – This option allows you to disable CDN for certain WordPress user roles. In most cases, it’s best to keep this option disabled.
- wp-includes File Types to Upload – This field specifies the file formats in the
wp-includesthat will be served from your CDN. The default list of file formats should be fine for most sites. If you have custom files in yourwp-includesfolder, feel free to add additional formats as needed. - Theme File Types to Upload – This field specifies the file formats in your WordPress theme folder that will be served from your CDN. The default list contains all the popular asset, image, and font formats. Feel free to add additional formats if needed.
- Custom File List – If you enabled “Host Custom Files”, you can add a list of files in this field to serve from your CDN.
- Rejected User Agents – This field allows you to specify user agents that will not be served assets from your CDN. We recommend keeping this field empty to ensure your CDN is being utilized properly.
- Rejected Files – This field allows you to specify files that should not be served from your CDN. If a service you’re using requires assets to be served from your root domain, you can add the file path to the “Rejected Files” field.
W3 Total Cache Settings — User Experience
Next, let’s customize the “User Experience”, or lazy loading, settings in W3 Total Cache.
- Process HTML Image Tags – Enable this to ensure images are lazy loaded.
- Process Background Images – If you’re using `background` to display an image in CSS, enabling this option will allow those images to be lazy loaded.
- Exclude Words – In this field, you can specify text to bypass lazy loading. For example, if you add
no-lazy-loadto this field, an image displayed with<img src="image.jpg">will not be lazy loaded. - Script Embed Method – This setting allows you to customize the loading method for the lazy loading script. The default
asyncmethod is the best option for most sites. If your site only consists of a single landing page, theinlinemethod can be used to reduce the number of HTTP requests to load the page.
Available Extensions for W3 Total Cache
W3 Total Cache offers various extensions to integrate with third party services. W3TC currently has extensions for the following services.
- AMP
- Cloudflare
- Google Feedburner
- Fragment Cache
- Genesis Framework
- New Relic
- Swarmify
- Yoast SEO
- WPML
If you are using any of these services on your site, we recommend setting up the relevant extension to ensure proper compatibility with W3 Total Cache. In this section, we’ll take a look at Cloudflare extension for W3 Total Cache.
How to Set Up W3 Total Cache with the Cloudflare Extension
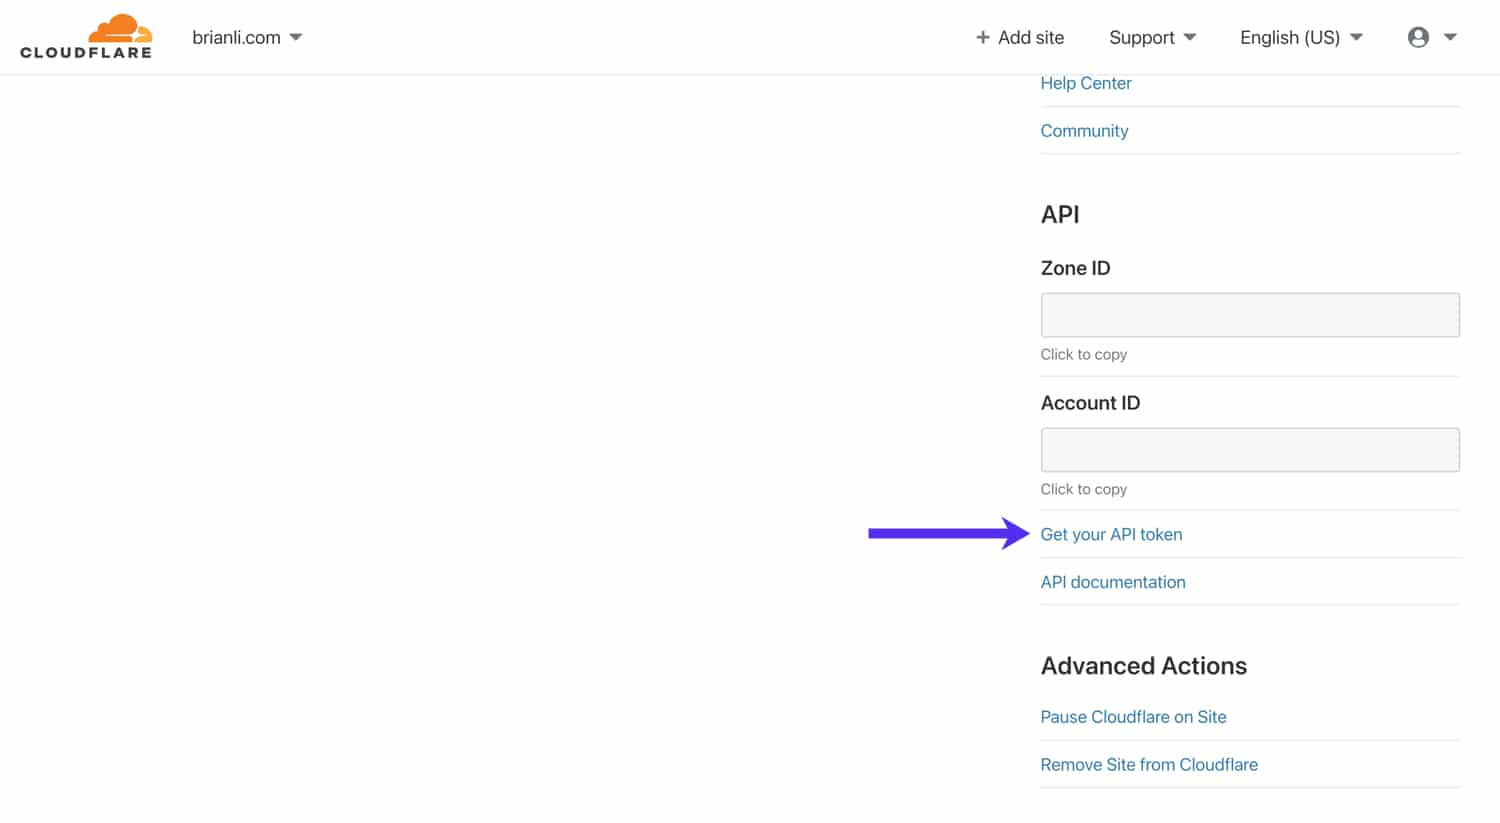
To integrate Cloudflare with W3 Total Cache, you’ll need two pieces of information from your Cloudflare dashboard – account email and API key. The account email is the email address you use to log in to Cloudflare. Let’s take a look at how to set up a Cloudflare API key.
In the Cloudflare dashboard, click on the “Overview” tab. Next, scroll down and click Get Your API Token in the right sidebar.
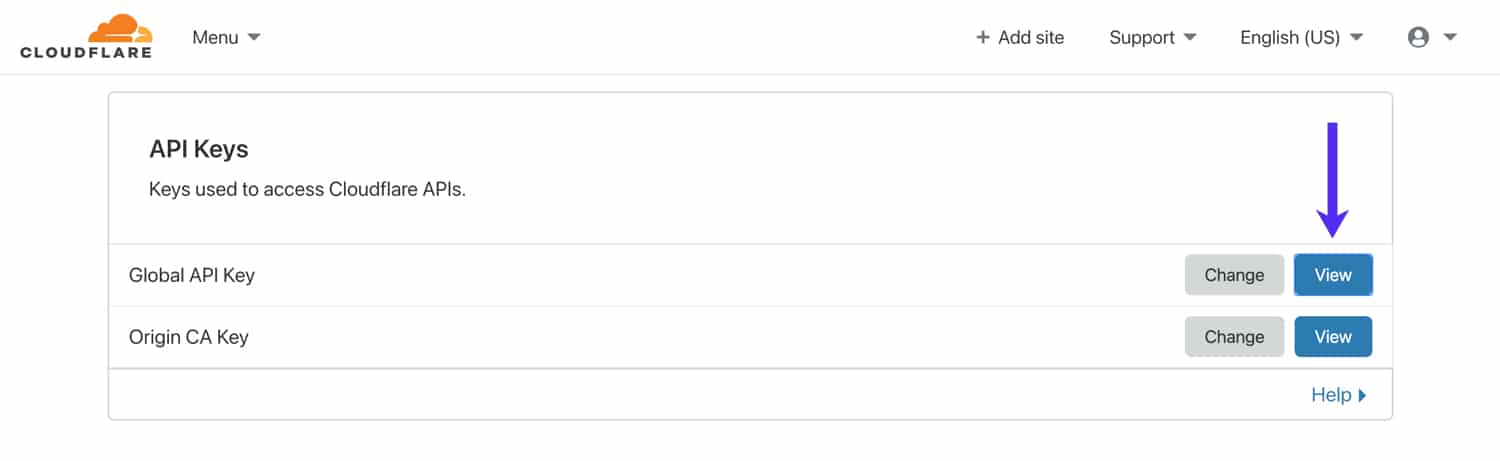
Scroll down, and click View next to “Global API Key” to get your Cloudflare API key. Be careful not to share this API key anywhere outside W3 Total Cache because it can be used to control your Cloudflare account.
Next, activate the Cloudflare extension in W3 Total Cache’s “Extensions” page and click “Settings”. In the “Credentials” section, click on the Authorize button.
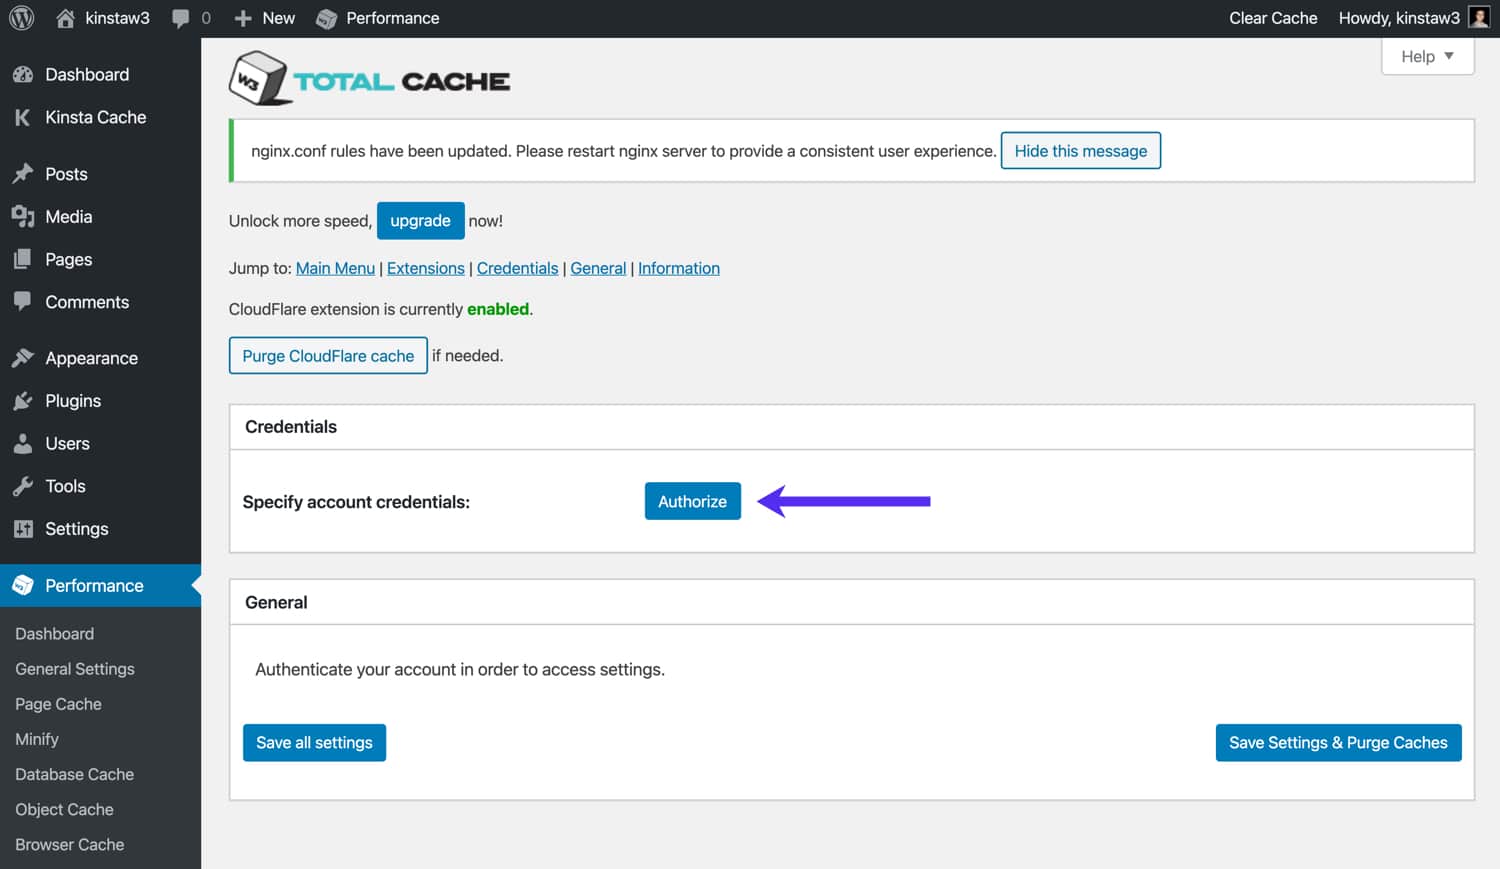
In the subsequent popup, input your Cloudflare account email and API key. If you receive an error message, double-check to make sure your email address and API key are correct. After the credentials are authorized, you should see additional Cloudflare settings on the page.
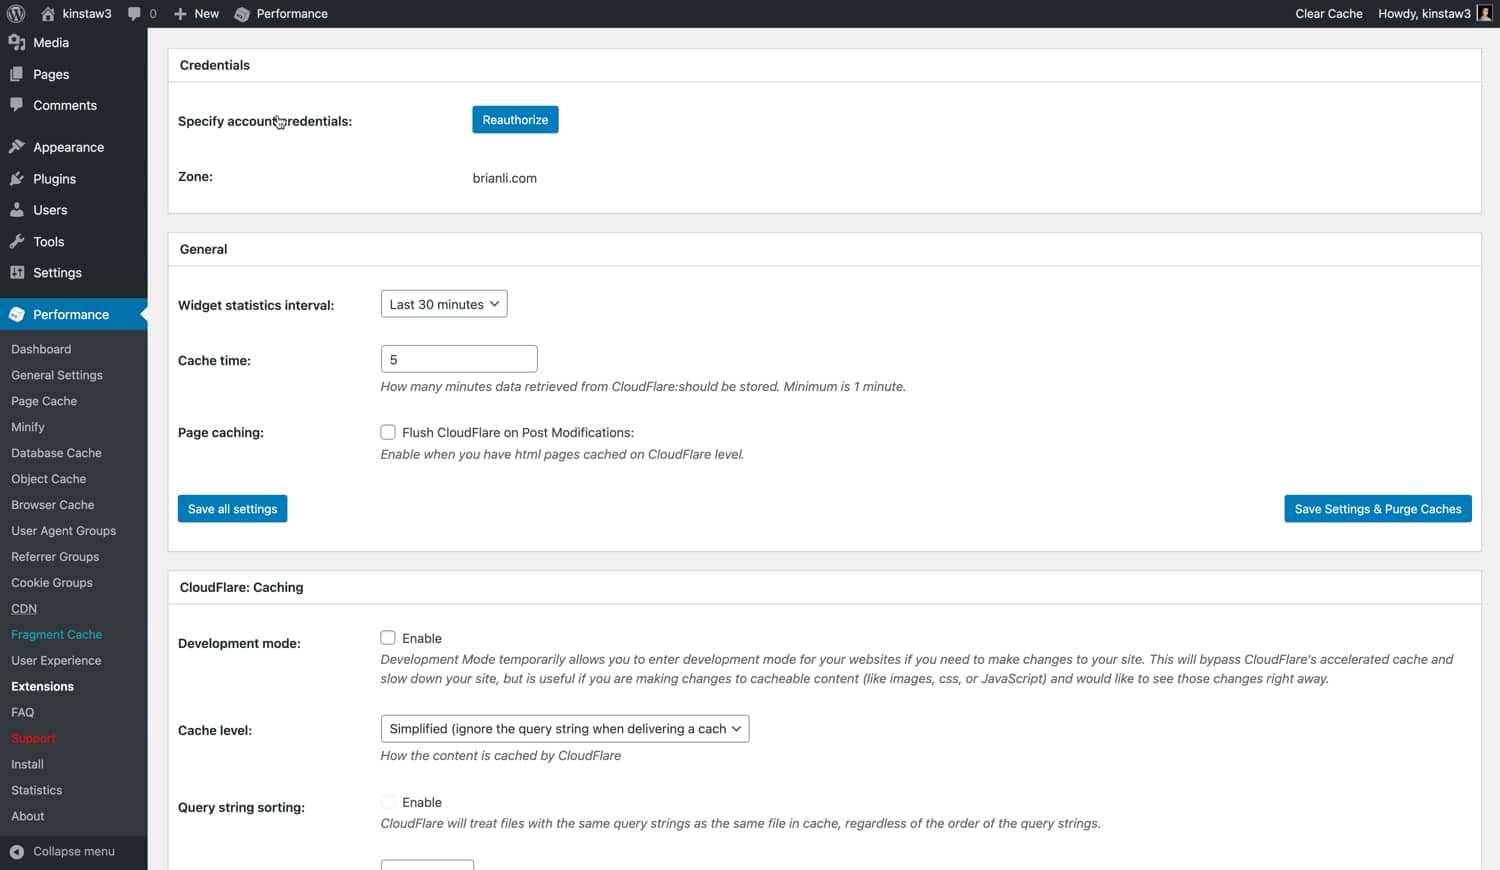
Let’s go over the Cloudflare settings in W3 Total Cache.
- Widget Statistics Interval – This specifies the time period covered for W3TC’s Cloudflare widget. The default setting is 30 minutes. If you’d like to see a longer time period, feel free to increase it.
- <strong>Cache Time – This specifies the amount of time that widget data from Cloudflare is cached. If you don’t plan on using the widget much, we recommend increasing this number to reduce the number of requests to Cloudflare from your site.</stron
- Page Caching – If you’ve configured Cloudflare to cache HTML pages for your WordPress site, enable this option to automatically clear the Cloudflare cache after post modifications and updates.
Cloudflare Caching
This section lets you customize Cloudflare’s caching settings.
- Development Mode – Keep this option disabled unless you need to put Cloudflare in Development Mode. When Cloudflare is in Development Mode, edge caching, minification, and image optimization is disabled for three hours. This allows you to see updates to CSS and JS files immediately and is useful for troubleshooting.
- <strong>Cache Level – For most sites, we recommend using the “Standard” cache level, which serves a different resource each time the query string changes. If you’re 100% sure that your WordPress site does not make use of query strings to serve dynamic content, you can also use the “Ignore Query String” setting as well.</stron
- Browser Cache TTL – We recommend setting Cloudflare’s browser cache TTL to 31536000 seconds, which is equal to 1 year.
- Challenge TTL -> Cloudflare offers a variety of security-related services, and visitor challenges is one of them. If Cloudflare detects a malicious user or strange behavior, it will serve a challenge message in the form of a Captcha. The “Challenge TTL” setting specifies how long a user will have access to your site after completing a challenge. With the default setting of 3600 seconds, a visitor who was subject to a challenge will be able to use your site for 1 hour before another challenge.
- Edge Cache TTL – This setting controls how long assets will be cached at Cloudflare’s edge servers. We recommend setting this to the maximum value of 31536000 seconds, or 1 year.
Cloudflare Content Processing
Let’s dive into the Cloudflare content processing settings in W3 Total Cache.
- Rocket Loader – Cloudflare’s Rocket Loader speeds up JavaScript loading for your WordPress site. We recommend enabling Rocket Loader if your site has a lot of JS.
- <strong>Minify JS/CSS/HTML – If you’ve already enabled minification for HTML, CSS, and JavaScript in W3 Total Cache, feel free to keep these options in the Cloudflare extension settings disabled, as there is no need to minify assets that have already been minified.</stron
- <strong>Server Side Exclude (SSE) – This option allows you to hide sensitive information from suspicious visitors (deemed by Cloudflare). Server-side excludes are useful for hiding information like email address, phone numbers, and other personal information on your site. To use SSE, enable it and wrap sensitive information in
<!--sse--><!--/sse-->tags in your HTML code or PHP theme template.</stron - Email Obfuscation – When this option is enabled, Cloudflare will automatically obfuscate email addresses on your WordPress site with JavaScript. While obfuscation is not going to get rid of email spam completely, we recommend enabling this option because it does deter basic bots from scraping email addresses from your site.
Cloudflare Image Processing
Let’s go over Cloudflare’s image processing settings.
- Hotlink Protection – Enabling hotlink protection will prevent other sites from embedding your images. If you’re running into bandwidth limits due to unauthorized external embeds, enabling “Hotlink Protection” can help you reduce bandwidth usage.
- Mirage (Pro Only) – Mirage optimizes image delivery to low-bandwidth devices and networks. This feature is only available on Cloudflare Pro plan and above.
- Polish (Pro Only) – Polish optimizes your site’s images, and can be configured to serve WEBP images to supported browsers. This feature is only available on Cloudflare Pro plan and above.
Cloudflare Protection
Cloudflare’s primary feature is a sophisticated firewall that can help protect you against DDoS attacks and malicious actors. Let’s go over Cloudflare’s security settings.
- <strong>Security Level – </stronThis setting controls the sensitivity of Cloudflare’s firewall and security rules. We recommend setting the “Security Level” to “Medium” for most sites.
- Browser Integrity Check – This feature looks out for bad behavior and suspicious user agents. If it detects a potentially malicious user or spammer, Cloudflare will automatically serve a challenge. We recommend enabling this feature.
- Always Online – This option will serve static HTML pages of your site if your origin goes down. We recommend enabling it if you’ve configured Cloudflare to cache HTML.
- <strong>Web Application Firewall – Cloudflare’s WAF, or web application firewall, will scan incoming traffic and filter out “illegitimate traffic” from reaching your site. We recommend enabling this feature.</stron
- Advanced DDoS Protection – This feature is enabled by default, and cannot be disabled as long as Cloudflare’s proxy is active. DDoS protection helps shield your site from “distributed denial of service” attacks.
- Max Upload – This sets the maximum allowed file size for uploads to your site. You’ll want to make sure that this setting is either equal to or greater than your upload file size setting in WordPress.
Cloudflare SSL
Lastly, you’ll want to make sure your Cloudflare SSL settings are configured correctly. Let’s go over the right configuration in this section.
- <strong>SSL – If your site is hosted on Kinsta, we recommend using either the “Full” or “Full (Strict)” SSL option. The “Flexible” option is not compatible with our infrastructure. “Full Strict” requires an SSL from a valid certificate authority, while the “Full” option also supports self-signed SSLs. The “Flexible” option does not require an SSL certificate on the origin server – we don’t recommend this option because it is the most insecure.</stron
- <strong>TLS 1.2 Only – TLS, or Transport Layer Security, is a secure protocol for transferring data over a network. Some PCI compliance standards require dropping support for TLS 1.1 and below. If that is a requirement for your site, you can enable the “TLS 1.2 Only” setting in Cloudflare to set the minimum TLS version to 1.2.</stron
Suggested reading: How to Set up Cloudflare APO for WordPress.
W3 Total Cache WooCommerce Settings
WooCommerce is the most popular eCommerce platform for WordPress sites. If you’re using W3 Total Cache with your WooCommerce-powered store, you’ll want to make sure your configuration is correct to avoid caching customer details.
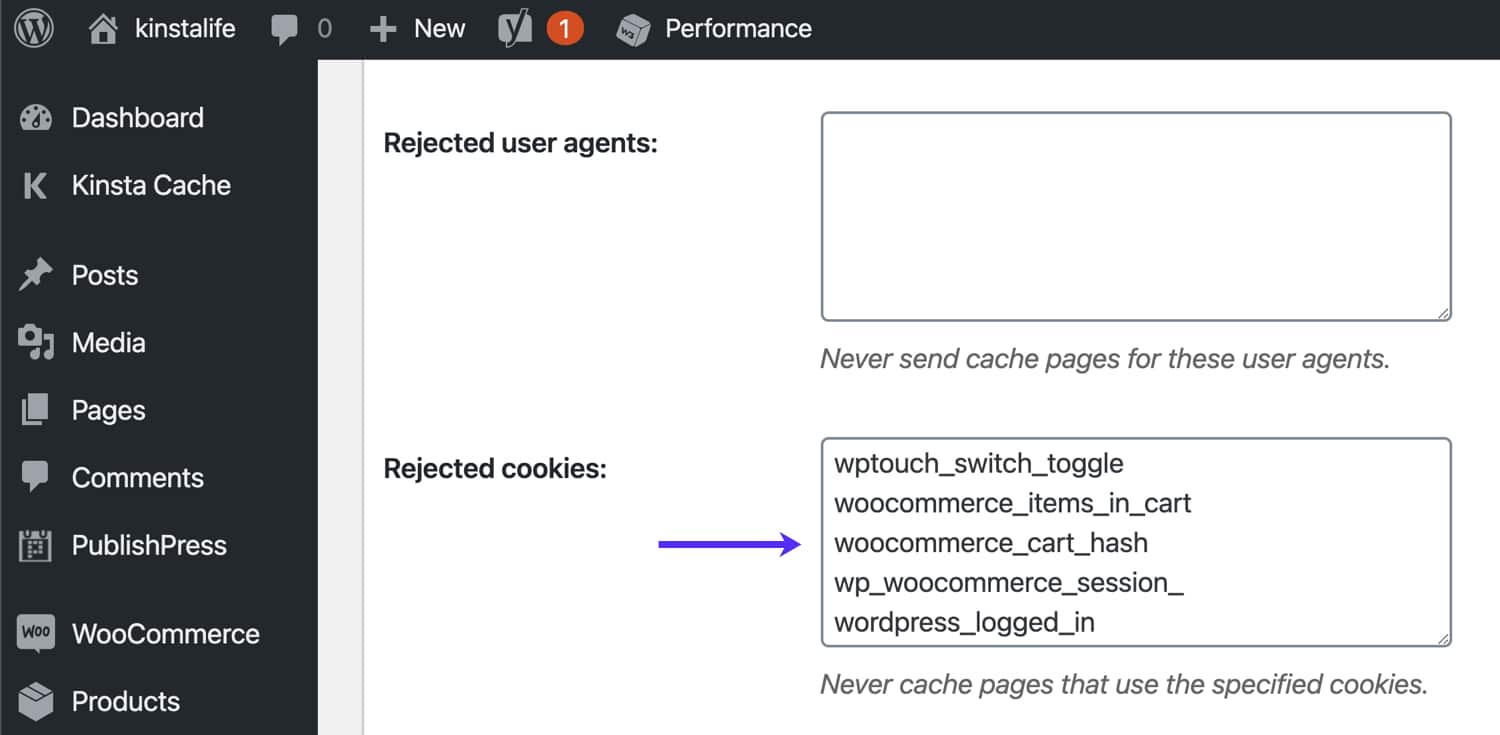
Bypass WooCommerce Cookies
To bypass page caching for pages that have WooCommerce-specific cookies, go to W3TC’s “Page Cache” settings, scroll down to “Rejected Cookies”, and add the four items below.
- woocommerce_items_in_cart
- woocommerce_cart_hash
- wp_woocommerce_session_
- wordpress_logged_in
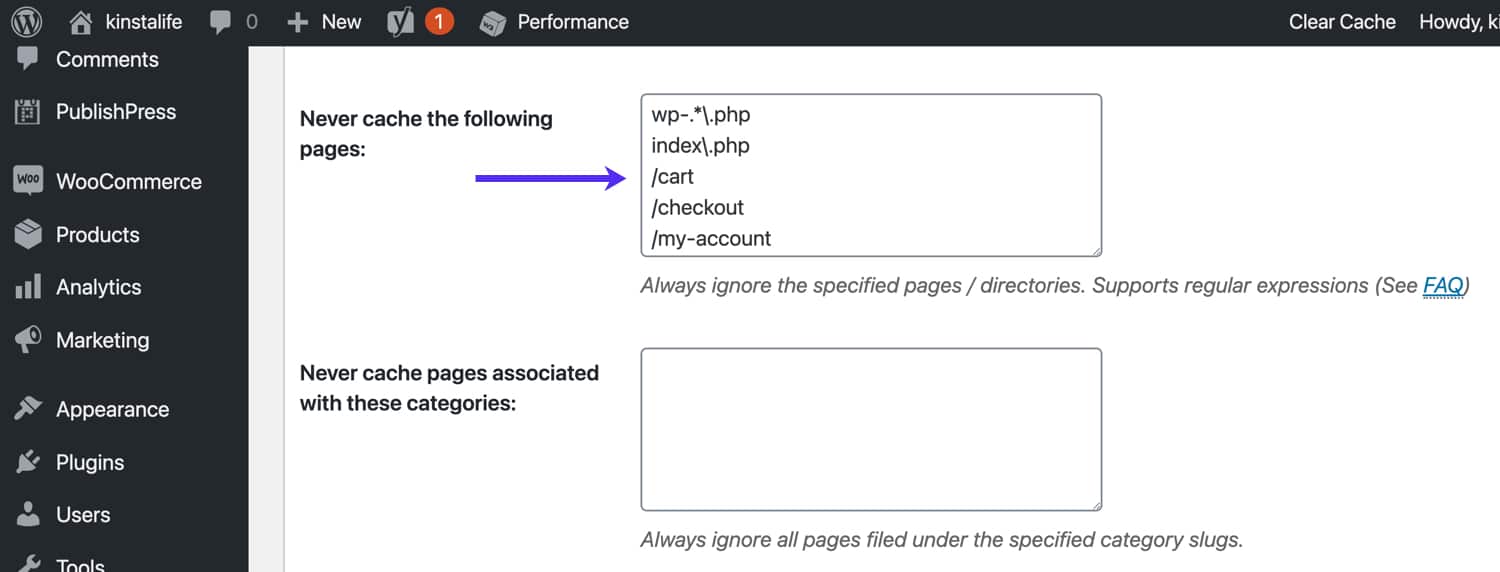
To be safe, we also recommend bypassing WooCommerce-specific URLs like the cart page, checkout page, and account page. To bypass these pages from caching, go to W3TC’s “Page Cache” settings, and add the URLs to the “Never Cache the Following Pages” section.
How to Reset All Settings in W3 Total Cache
In some cases, you may need to start over with your W3TC configuration. Here’s how to revert W3 Total Cache to default settings. Go to W3TC’s “General Settings” menu, scroll down to the “Import/Export Settings” section, and click Restore Default Settings.

Summary
As you can see, the W3 Total Cache plugin is jam-packed with features and settings. From page caching, to asset minification, to Cloudflare integration, W3TC has everything you need to boost the performance of your WordPress site!
In this article, we went through our recommended configuration plugin for W3TC. Do you have a favorite WordPress optimization plugin? Let us know in the comments below!

Brian has been a WordPress user for over 10 years, and enjoys sharing his knowledge with the community. In his free time, Brian enjoys playing the piano and exploring Tokyo with his camera. Connect with Brian on his website at brianli.com.

