If you run a WordPress site you have probably contemplated already at some point whether or not you should implement the hot new Google AMP for mobile. We had the same dilemma here at Kinsta and ended up testing it for a while. In the end, we didn’t see good results and it ended up hurting our conversion rate on mobile devices.
So today we are going to dive into how to disable Google AMP on your blog, and how to safely do it without 404 errors or harming your SEO. Simply deactivating the AMP plugin alone could end up really harming your site, so be careful. The good news is that both methods mentioned below don’t require a WordPress developer and can be done in a few minutes!
Google AMP
Google AMP (Accelerated Mobile Pages Project) was originally launched back in October 2015. The project relies on AMP HTML, a new open framework built entirely out of existing web technologies, which allows websites to build light-weight web pages. To put it simply, it offers a way to serve up a stripped down version of your current web page. You can read more about it in our in-depth post on Google AMP, as well as compare all the pros and cons.

Why Google AMP Didn’t Work For Us
Due to all the hype around Google AMP, we decided to give it a try on our Kinsta site. You never really know what will happen until you test something. So we let it run for two months and here are the conclusions we came to. Note: This could vary in almost every industry, so we highly recommend testing it on your own site before drawing conclusions. A couple of ways to test this include:
- Looking at data in Google Search Console before and after.
- Comparing data from Google Analytics on your /amp/ URLs vs original URLs from organic traffic before and after.
Here is some data from during the time AMP was enabled on our site.
Google AMP Positions
As you can see, after enabling Google AMP and allowing them time to index we definitely saw a decrease in average positions in SERPs on mobile.

Google AMP CTR
After enabling Google AMP we saw a decrease in CTR on mobile.

Google AMP Impressions
After enabling Google AMP we did see a higher number of impressions.

Google AMP Clicks
After enabling Google AMP we saw a slight increase in total clicks.

So for us, there was good and bad in the data above. However, the most important part was looking at the data in Google Analytics for the time AMP was enabled:
- Our mobile leads dropped by 59.09%.
- Our newsletter email sign-ups from mobile dropped by 16.67%.
- Our account creations from mobile devices dropped 10.53%.
Because of this, we decided that Google AMP was not working for our business model. So why did we not see good results, when others do? Well, probably one of the biggest reasons is that our site is already pretty fast on mobile. So we didn’t see a huge increase in speed, as some other ad-heavy sites might have. According to Google, 70% of cellular network connections globally will occur at 3G or slower speeds through 2020. So while it is super important to optimize for mobile, those that already have a well-optimized site probably won’t notice huge differences.
Another reason is that we don’t publish news. A lot of big publications are using AMP and taking advantage of the carousel in SERPs. A lot of big companies like The Washington Post, Gizmodo, and Wired all saw big improvements with Google AMP, but these are all news-oriented and ad-heavy content sites. We, of course, publish a lot of content, but our primary focus is still on generating leads and signing up customers.
Could we have done more conversion rate optimization to our AMP install? Probably yes. There are ways to add CTAs, newsletter signups, etc. We did optimize for some of this. But after seeing the conversion data above it wasn’t worth managing Google AMP separately, which can be a pain, just to have a slightly faster mobile site. Also, a lot of our traffic and audience to the Kinsta blog is not from mobile to begin with, so we decided to disable Google AMP.
Also, currently there are no SEO benefits from AMP yet unless you are a news site trying to score the carousel in SERPs. We analyzed our mobile rankings and after AMP was fully removed, our rankings actually went up. Again, this could just be from natural progress. But we saw no increases in SERPs from running AMP. If your site is slow to begin with though you might, so we always advise testing on your own site.
Other brands have also seen no harmful impact from removing AMP, and like us, actually saw improvements. Outside Magazine increased pageviews per visit 13 percent after ditching Google AMP.
How to Disable Google AMP
There are a couple of different ways you disable Google AMP. Google has their official documentation on how to remove AMP from Google Search. A big problem with this though is that it usually requires a developer and their instructions are not very WordPress friendly. Their very first step is to remove the rel=”amphtml” link from the canonical non-AMP page, while still leaving the AMP page in place. Thankfully though there are a few different ways to approach this without harming your SEO. You don’t want to simply disable the Google AMP plugin as this will result in 404 pages.
Option 1 – Search and Replace (Regex)
The first option involves using a search and replace plugin to remove the rel=”amphtml” code while no-indexing the AMP pages. We can thank Gulshan Kumar who originally posted this strategy. This assumes you are utilizing the free AMP for WP plugin.
Step 1
First, you will need to download and install the free WordPress Real-Time Find and Replace plugin. One of the great things about this plugin is that it doesn’t modify your WordPress database or site, so it is very safe to use on your site without worrying about breaking anything. Basically, it finds and replaces rules that are executed AFTER a page is generated by WordPress, but BEFORE it is sent to a user’s browser.
If you are a developer, you could, of course, do a normal search and replace. And we normally we would recommend doing changes in the database long-term, but in this scenario, it works great to temporarily remove the AMP code while things are re-indexing. It also means you can easily do this without a developer. Although we always recommend still taking a backup!

The plugin currently has over 90,000+ active installs with a 4.5 out of 5-star rating. You can download it from the WordPress repository or by searching for it within your WordPress dashboard under “Add New” plugins.
Step 2
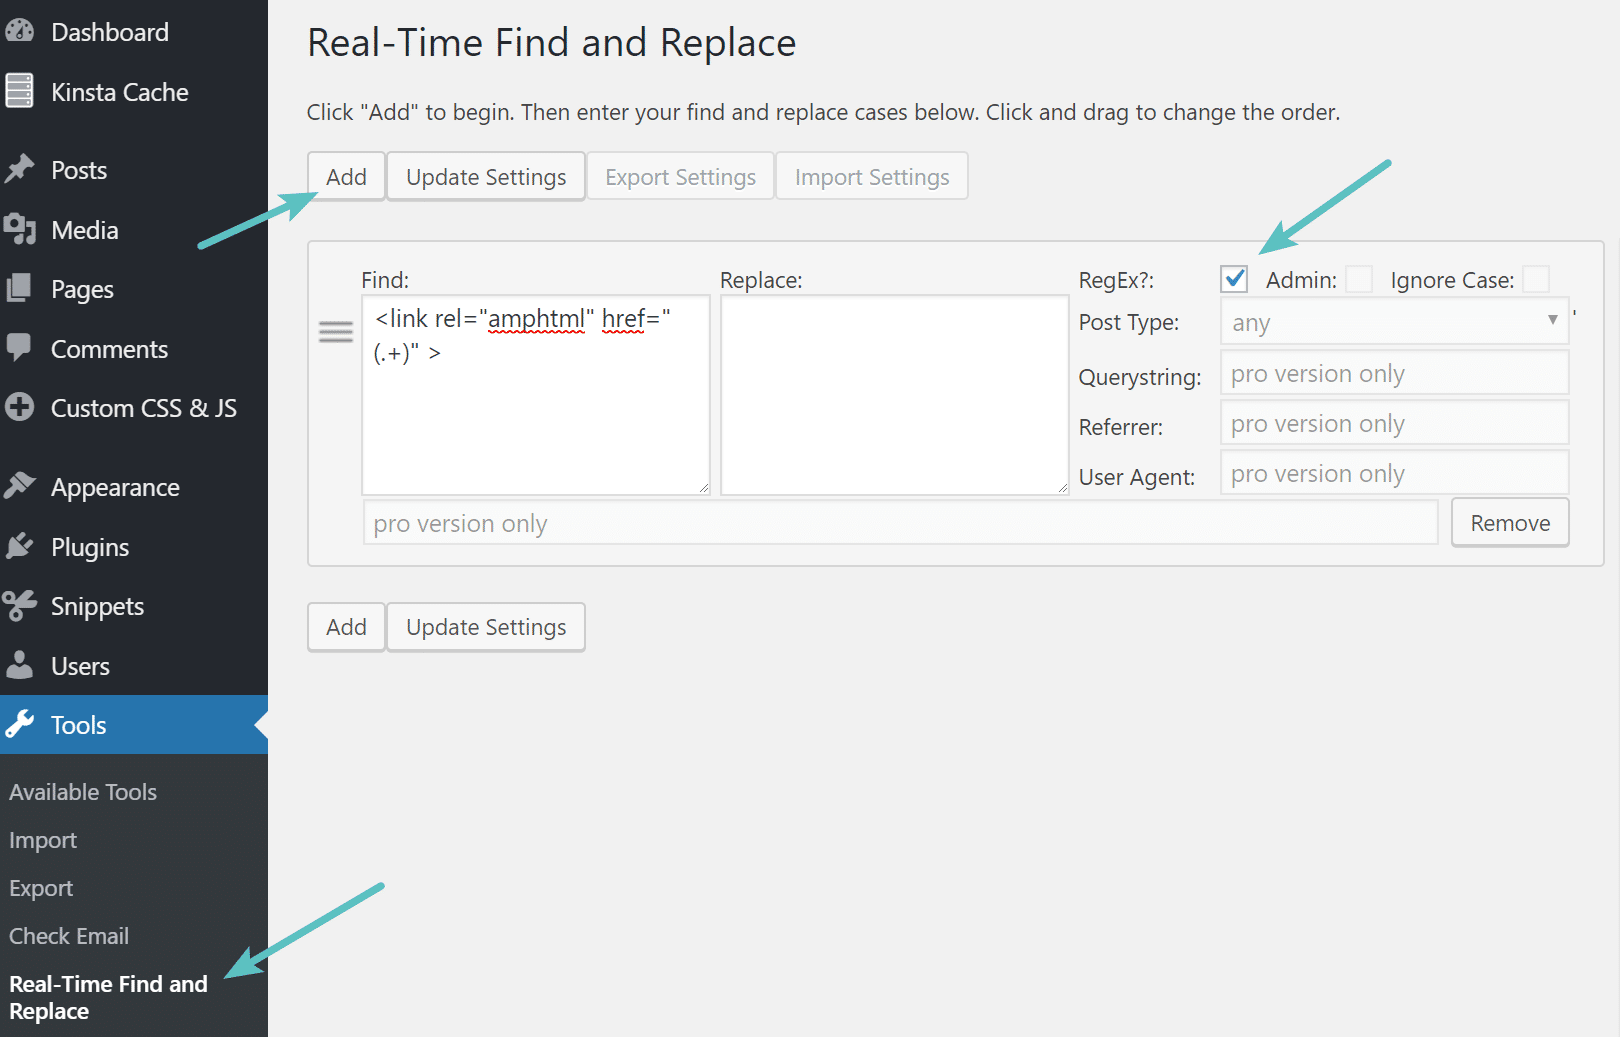
Click on Real-Time Find and Replace under tools in your WordPress dashboard. Click on “Add” and add the following code into the Find: field:
<link rel="amphtml" href="(.+)" >Click on the box next to “RegEx” and then click on “Update Settings.” This will replace/remove that important AMP tag as Google recommends on your canonical non-AMP pages and or posts.
Step 3
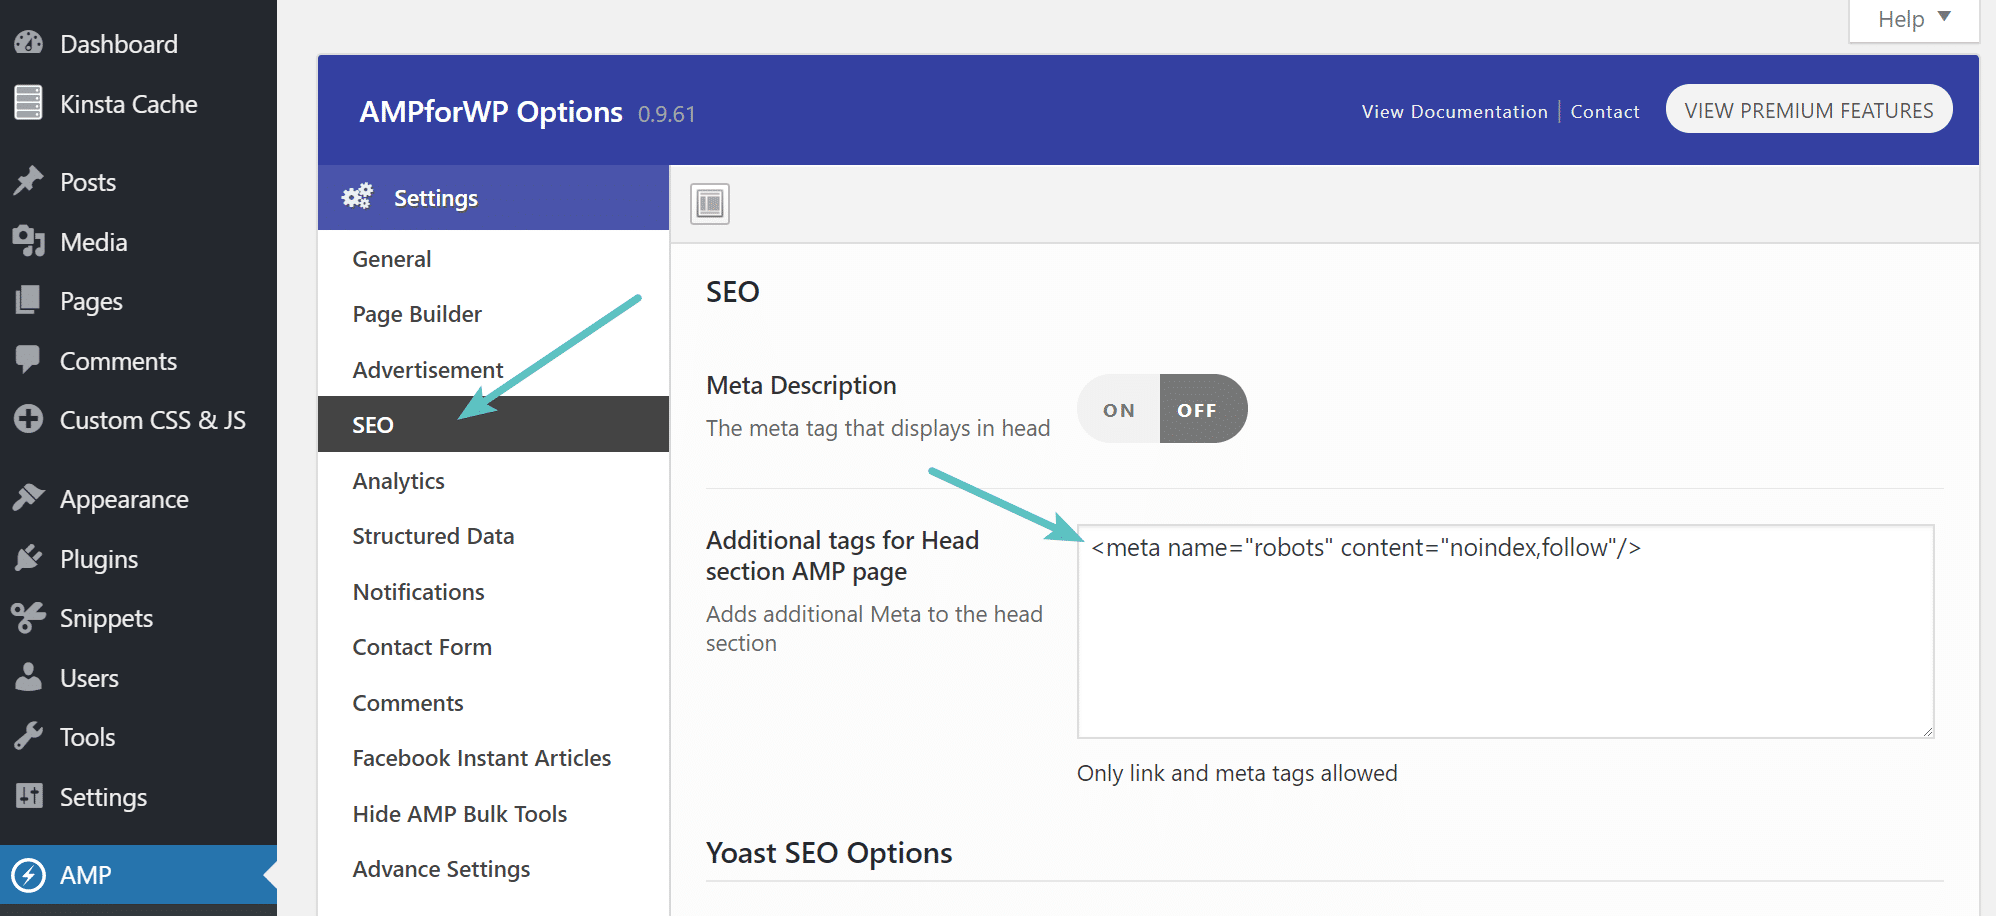
The next step is to mark the AMP pages as no-index. Click into the AMP for WP options panel and on the “SEO” section. In the Additional tags for Head section input the following code and hit “Save Changes.”
<meta name="robots" content="noindex,follow"/>This will tell Google to no longer index your AMP pages in search and therefore it will start re-indexing your original URLs for mobile.
We recommend leaving the AMP plugin enabled until all of your AMP posts/pages have re-indexed over to the original URLs.
Step 4
We also recommend following the 301 redirects in option 2 below just to be safe!
Option 2 – Disable and Add Redirects
The second option is a little messier, but we’ve also seen this work fine. We recommend this option only if you have any issues implementing the method above. This involves simply disabling the AMP plugin and adding 301 redirects. Thanks to the AMP for WP for originally posting this.
Step 1
The first step is to simply add 301 redirects for everything that has an AMP URL. First, you will need to download and install the free WordPress Redirection plugin. You could use your own redirect solution or plugin, but the reason we recommend this one is because you will need one that supports regular expressions. You can always uninstall the plugin after everything has re-indexed.

The plugin currently has over 1 million active installs with a 4 out of 5-star rating. You can download it from the WordPress repository or by searching for it within your WordPress dashboard under “Add New” plugins.
Step 2
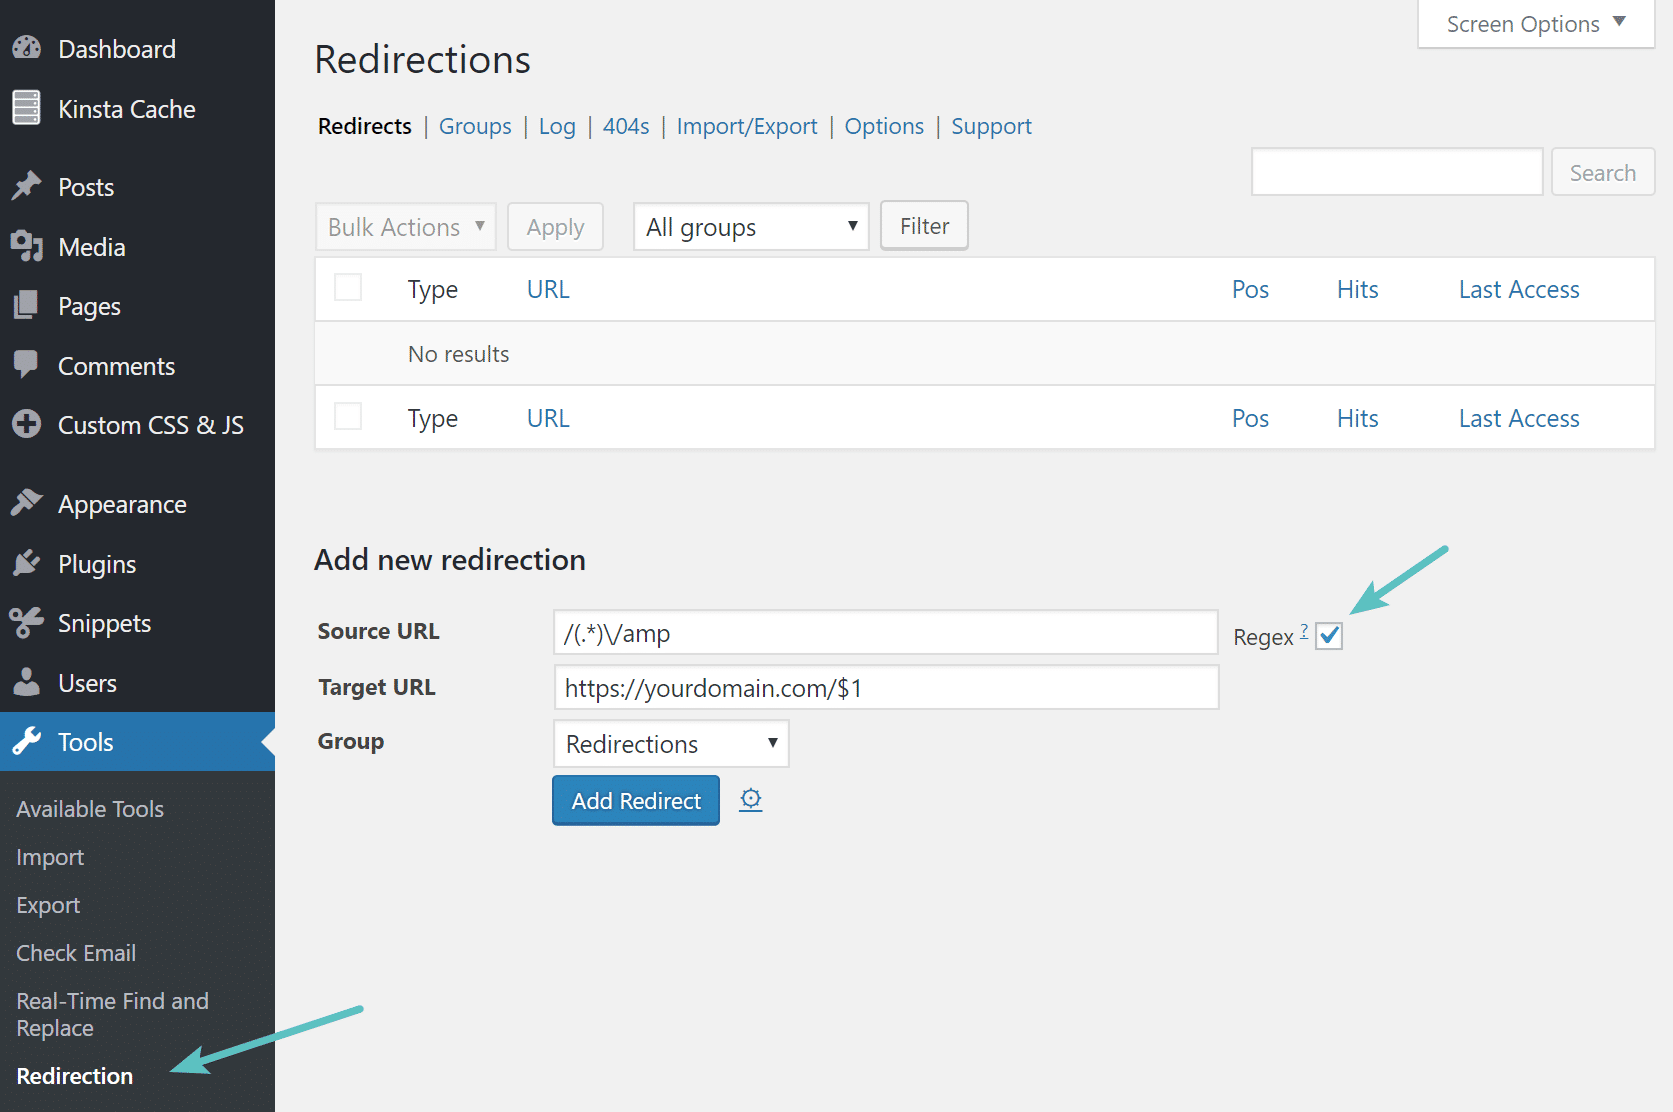
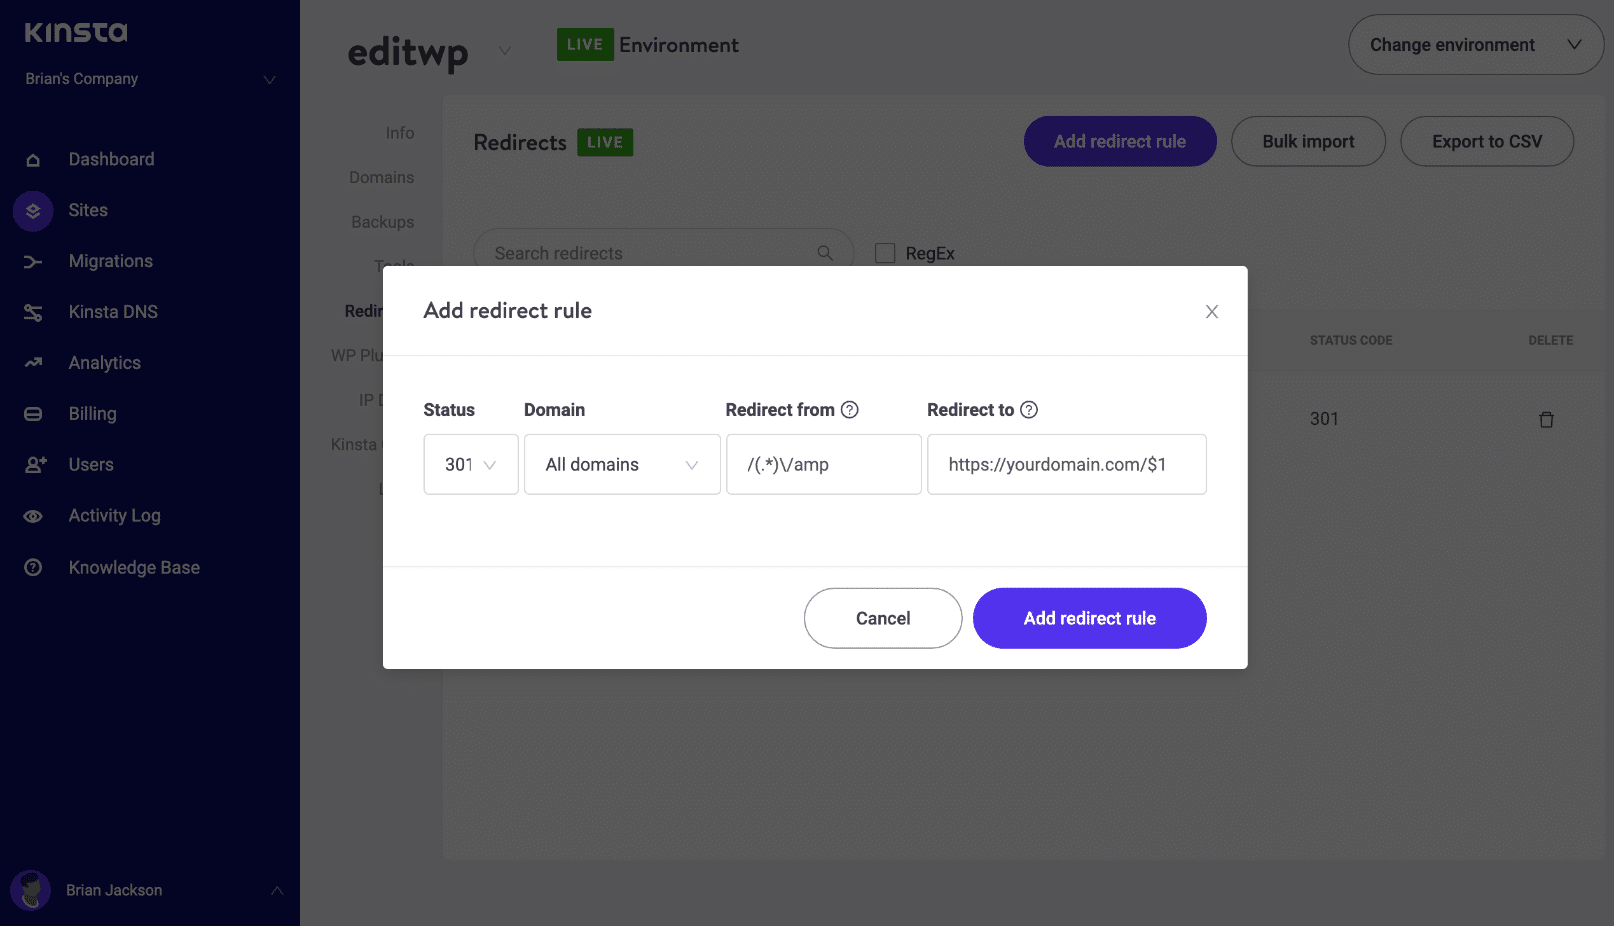
Click on Redirection under tools in your WordPress dashboard. Then add the following code into the Source URL field and ensure you check the “Regex” box:
/(.*)\/ampThen add the following to the Target URL field (updating the domain with your own):
https://yourdomain.com/$1Ensure Redirections is selected and click on “Add Redirect.”
After adding this we recommend browsing to a couple of your AMP blog posts or pages and test to make sure they are redirecting properly. Also, if you are a Kinsta customer, you can skip installing the above plugin and simply add the global redirect from the redirects tool in your MyKinsta dashboard. Our tool supports regular expressions.
Alternatively, if you are running Apache, you could also add the following to the top of your .htaccess file:
# Redirect from AMP to non-AMP path
RewriteEngine On
RewriteCond %{REQUEST_URI} (.+)/amp(.*)$
RewriteRule ^ %1/ [R=301,L]
Step 3
You can then deactivate and uninstall the AMP for WP plugin.
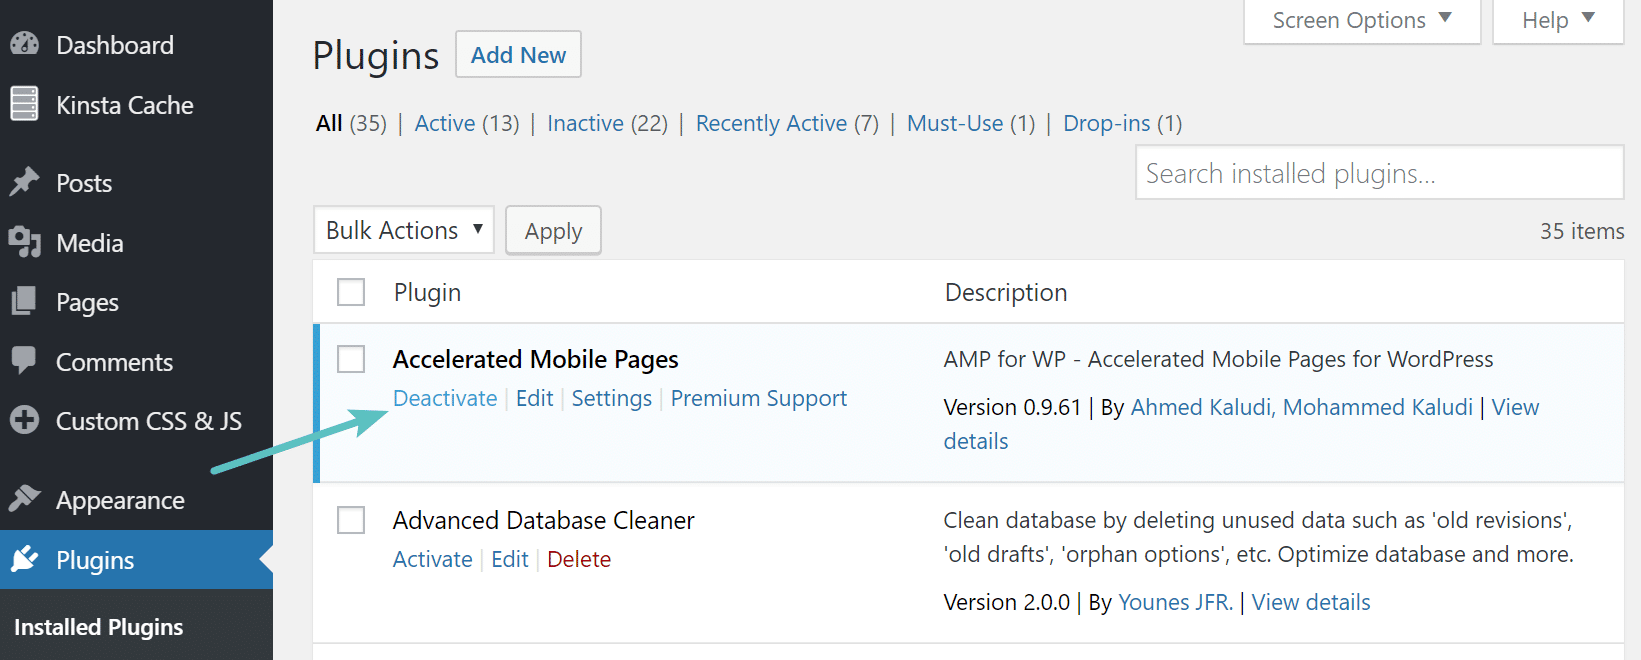
Make sure to check out our additional tips further below to monitor the re-indexing process.
Monitoring Reindexing
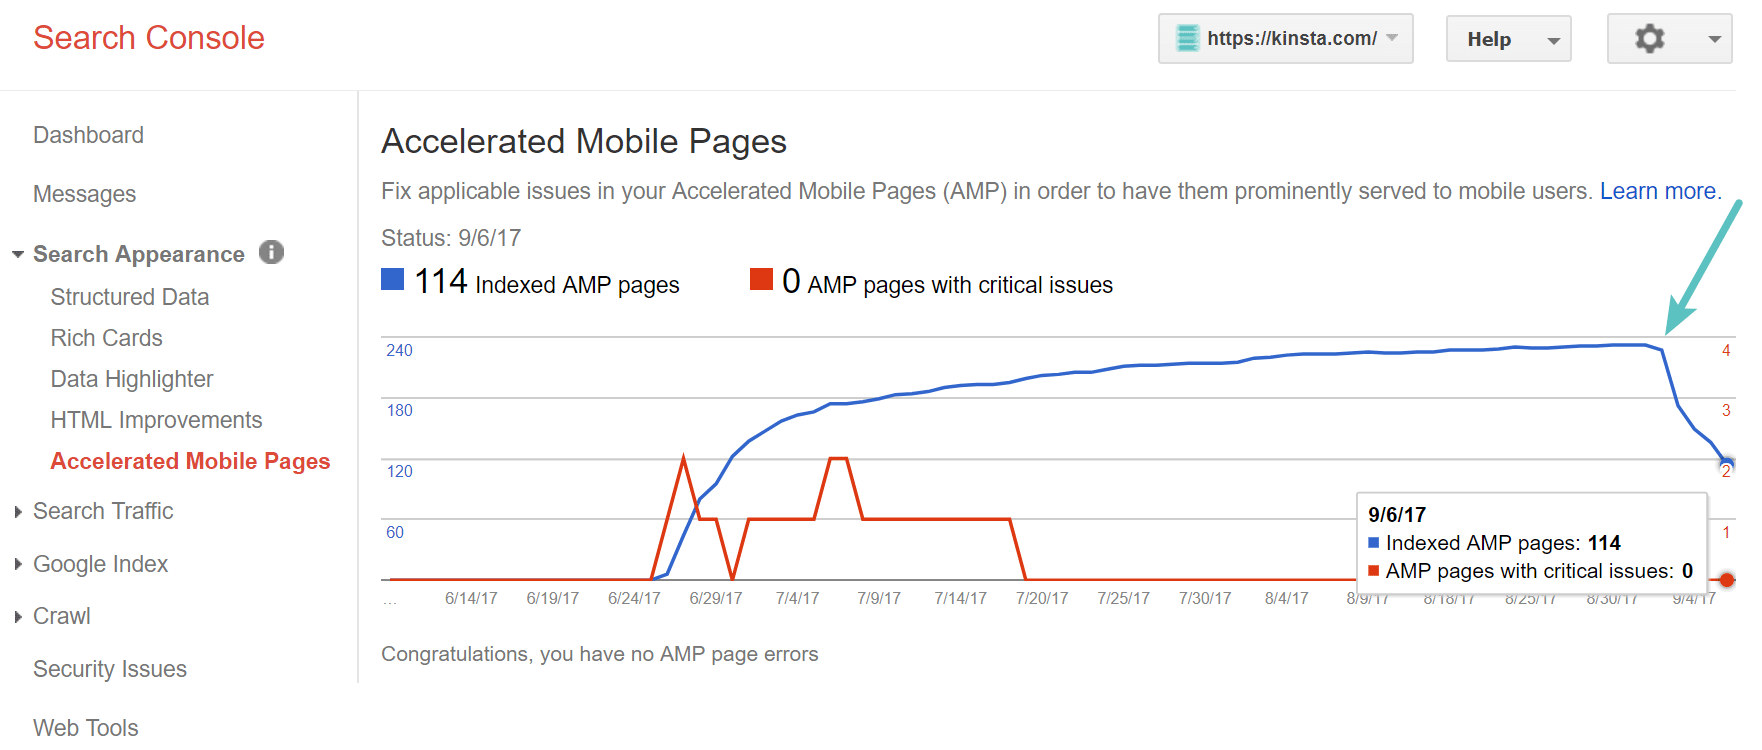
You can monitor the progress of removing Google AMP in Google Search Console under “Search Appearance > Accelerated Mobile Pages.” As you can see below, the moment we implemented the above strategy our AMP URLs started to de-index. You can also try resubmitting your sitemap file to speed up the process. Depending upon the number of AMP pages you have indexed this process could take anywhere from a couple of days to a couple of weeks.
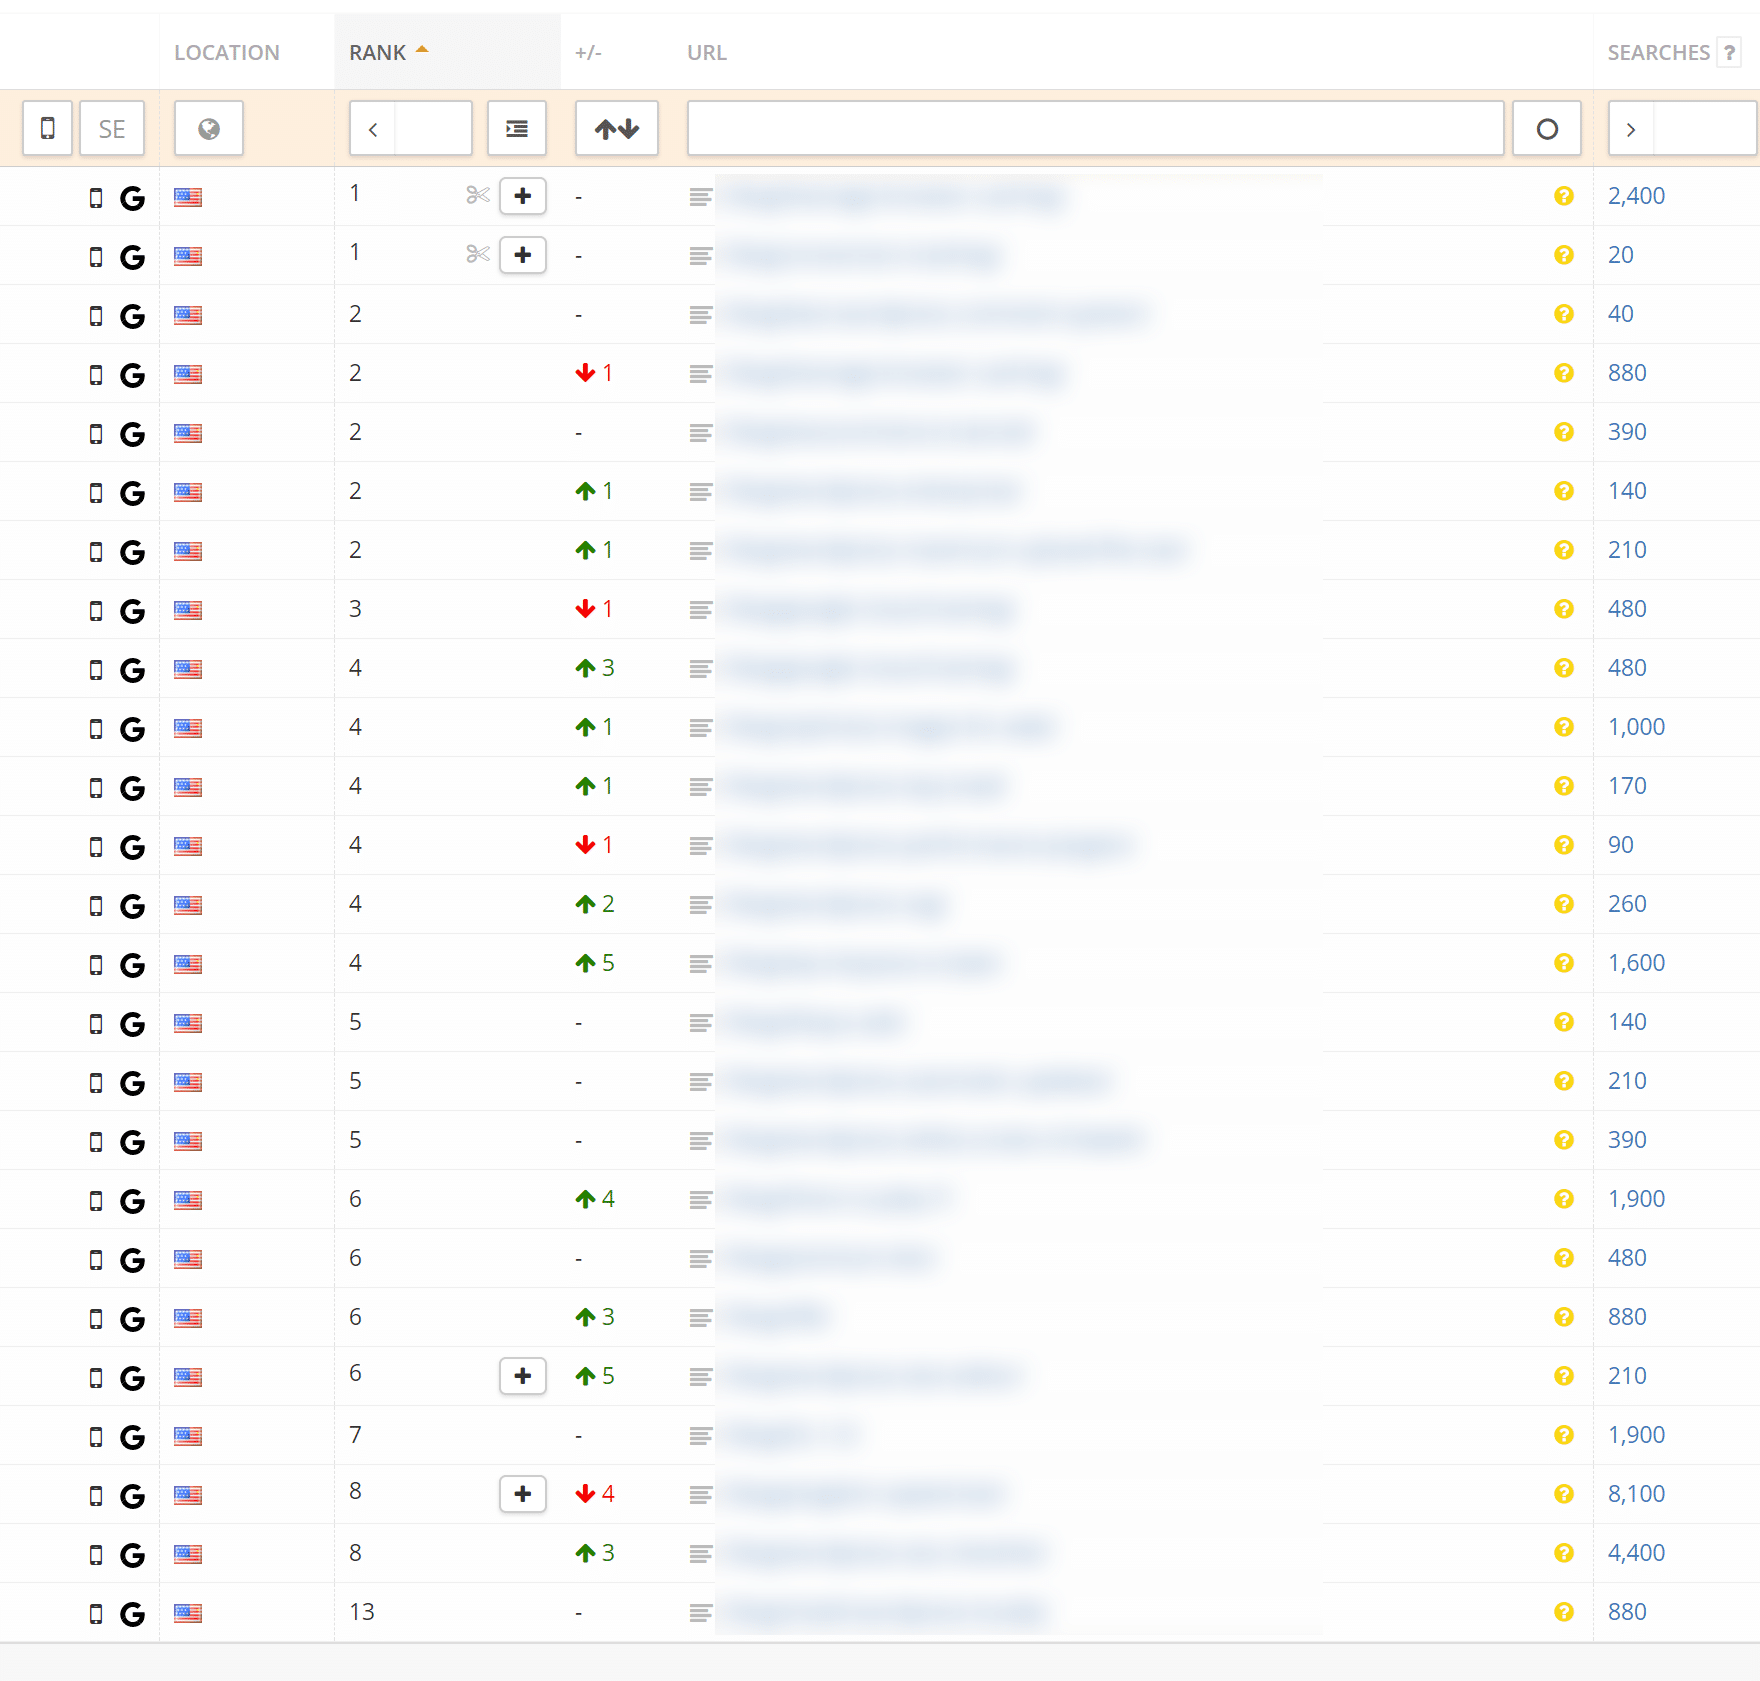
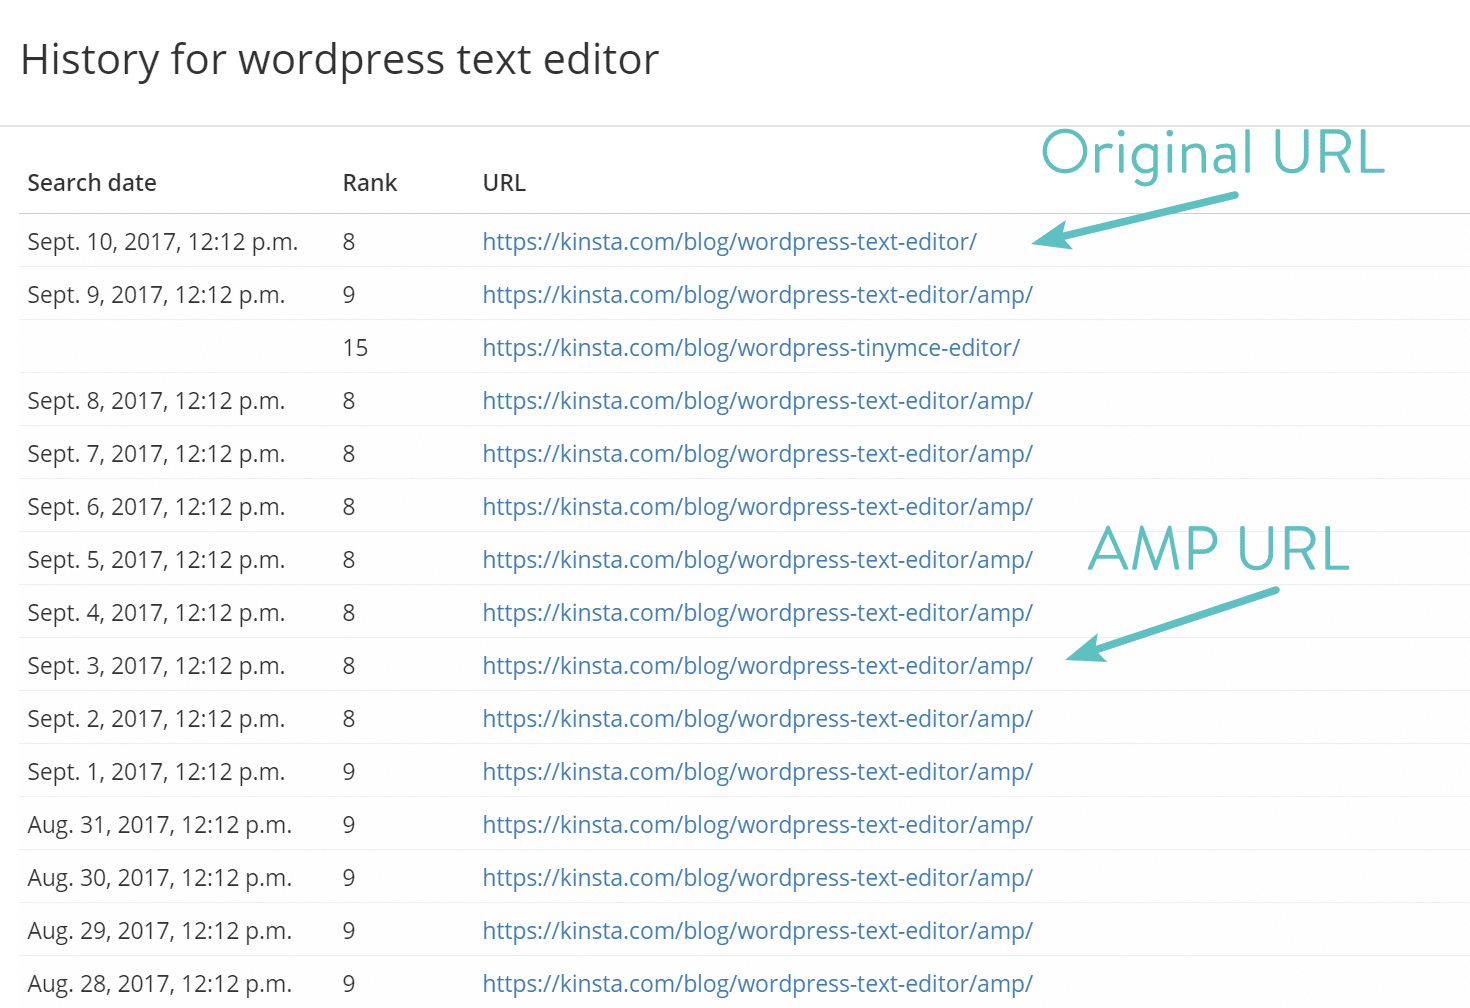
We also recommend utilizing a keyword rank tracking tool. For example, we monitor our desktop and mobile keywords here at Kinsta using Accuranker. It allowed us to easily see the history of each keyword and that the /amp/ URLs on mobile were re-indexing over to the original URL. This can be a quick and easy way to verify that everything goes smoothly.
Summary
We all love faster mobile sites, and we applaud Google for trying to make the web a better place. But as we discussed above, perhaps you aren’t seeing the results you hoped for with Google AMP. We always recommend testing it as it could vary per industry. The amount of mobile traffic your site gets could also greatly impact your results.
We aren’t the only ones that have had issues with AMP. Rock Star Coders saw a 70% drop in their conversion rate after testing AMP on their sites.
Thankfully there are easy ways to disable Google AMP if you want to resort back to your original setup. Both of the options above don’t require a developer and will ensure your visitors don’t see nasty 404 errors, while retaining your rankings in SERPs.
Have any questions or have you encountered your own issues when trying to disable Google AMP? If so, we would love to hear about them below in the comments.


