
One of the best SEO tools available is Google Search Console. It is also one of the most overlooked.
Google Search Console (previously known as Webmaster Tools) is a collection of tools to help make sure your website is healthy and Google-friendly. But it does so much more than that.
Not only it can help you diagnose any technical SEO issues, it can also help you understand your most popular pages, see where you are ranking, and help you increase your organic traffic.
Google Search Console (or GSC) is completely free and any website, regardless of the platform it is built on, can use it. And to get the most from it, you need to set it up correctly, understand what the metrics mean, and know how to access its features.
So, if you want to get the most out of Google Search Console, this is the guide for you.
What Is Google Search Console?
Google Search Console is a collection of tools and reports that allow webmasters (and anyone who operates a website really) to monitor, manage, and improve their websites. It is a web service provided by Google free of charge, that gives you information about your website and the people who visit it.
Using Google Search Console (and the data provided) can make optimizing your website a lot easier.
Ready to get started?
How Do I Access the New Google Search Console?
Google Search Console (GSC) is a collection of free tools and reports that allow webmasters to monitor and manage their websites’ presence in Google Search results. To access the new Search Console, follow these steps:
- Sign in to your Google Account
- Open up Google Search Console at https://search.google.com/search-console/
- Add your website as a property to GSC by choosing one of the different ways allowed
- Verify your account using HTML file, HTML tag, Google Analytics, Google Tag Manager
If you haven’t already signed up for Google Search Console, it’s time to do so and set it up for your site.
Getting Started With Google Search Console
In this section, you will learn:
- How to set up Google Search Console for your site
- How to verify your site
- The differences between Old and new Google Search Console
- How to link Google Search Console with Google Analytics
- How to add a sitemap
- What the different types of permissions are
- How to add and remove users
Sounds good? Let’s go.
Setting Up Google Search Console in 5 Steps
Step 1 — Sign In to Your Google Account
First things first: make sure you are signed in to your Google account. If you have separate business and personal account, make sure you use the Google account you want associated with your website.
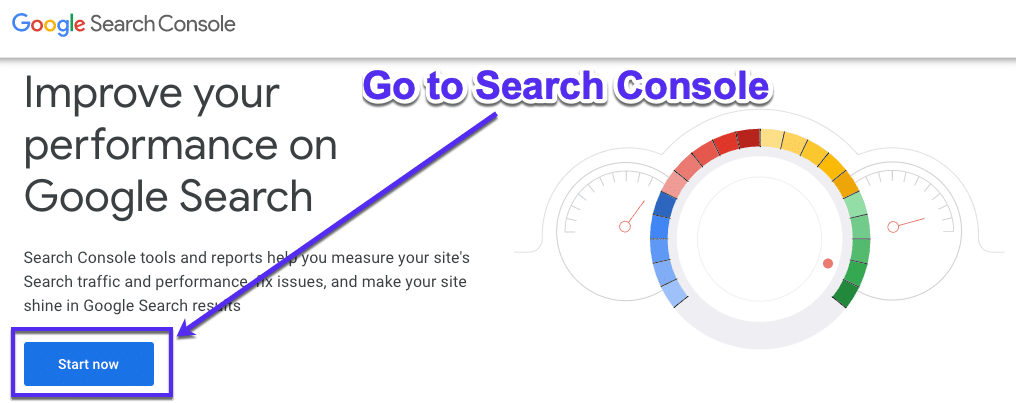
Step 2 — Open Up Google Search Console
Go to Google Search Console and hit “Start now”:
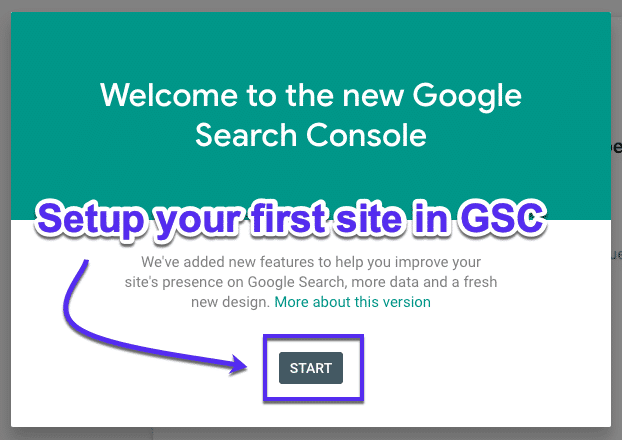
Step 3 — Add a New Website to Google Search Console
If this is the first website you have set up in Google Search Console, you should see this welcome message (just hit “Start“):
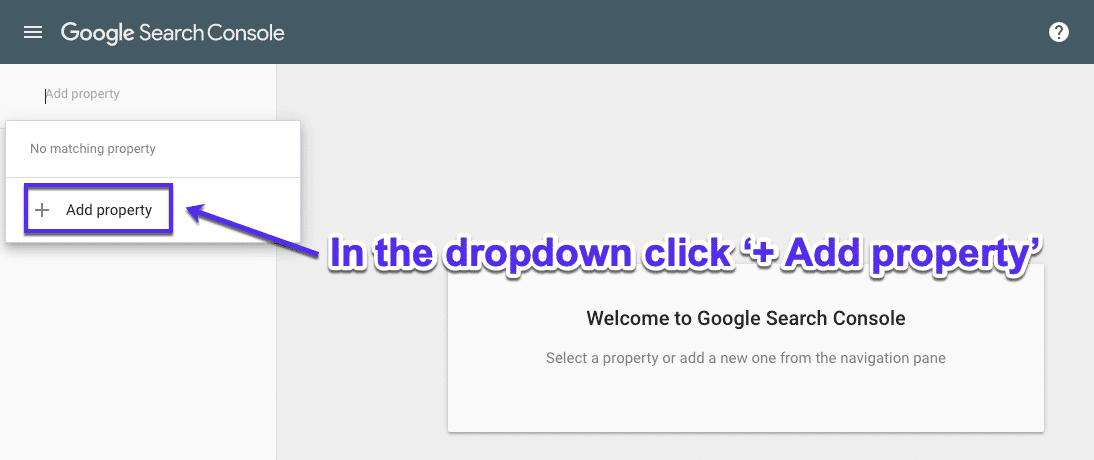
Or alternatively, in the dropdown, click “+ Add property”:
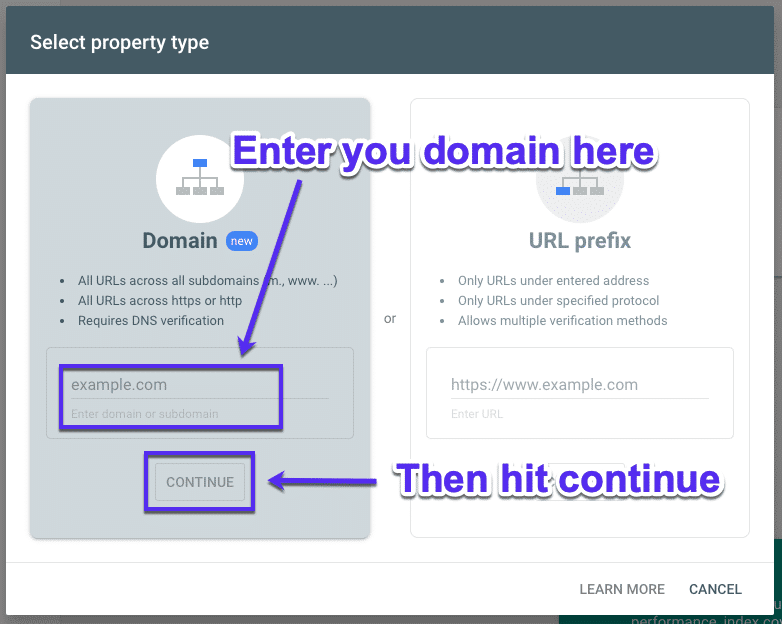
Step 4 — Add Your Domain
As your property type, choose Domain and then enter the URL of your site. Just make sure to use the exact URL (Check how it appears in your browser’s bar for that). Once you’ve done that, hit continue.
Step 5 — Verify Your Account (+ Alternative Methods)
Now you need to verify your website. Copy the Google Search Console tokenized DNS TXT record and add it to your domain name provider to verify domain ownership.

If you don’t want to (or can’t) verify your domain this way don’t worry. Head back to the select property type and choose URL prefix:
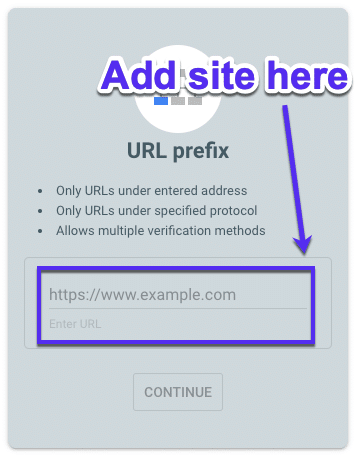
Note: If you’re trying to register a new domain on the old Google Search Console, you have to use the URL prefix option above. Domain properties only work in the new one.
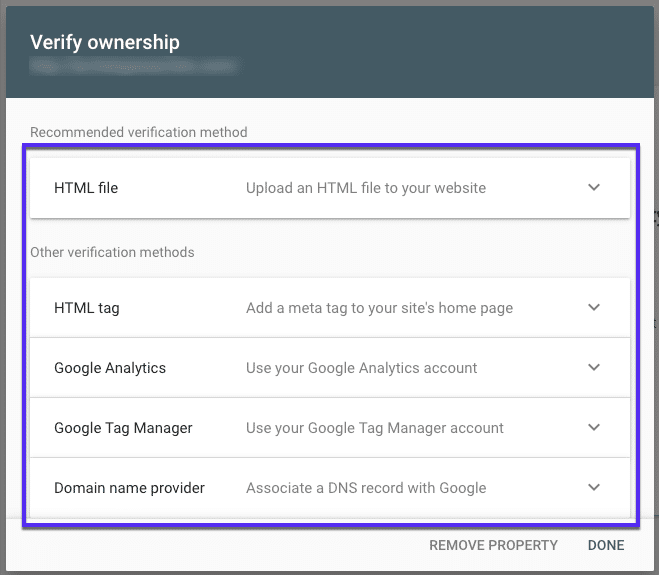
Now you’ll be able to verify ownership in a couple of ways:
- HTML file: upload an HTML file to your website
- HTML tag: add a meta tag to your site’s homepage
- Google Analytics: use your Google Analytics account
- Google Tag Manager: Use your Google Tag Manager account
There you go, now Search Console is all set up.
Sidenote: Old Search Console vs New Search Console
In 2018, Google launched a new Google Search Console. Most of the data and features from the old version have been switched over to improve how you access data in the new version.
However, some bits have been removed.
New Reports & Tools
Here’s a quick overview of what’s new:
- Performance report: this is a new tool and replaces Search Analytics in the old Google Search Console.
- Index Coverage Report: this is a new tool and replaces the Index Status and Crawl Errors.
- URL Inspection: a new feature that replaces Fetch as Google, Crawl Errors and Blocked Resources.
Updated/Replaced Features
Not all of the Search Console features and reports were new. Here’s what’s been updated in the new version:
- Links to your site and Internal links > Links.
- Sitemaps report > Sitemaps.
- Accelerated Mobile Pages > AMP status.
- Mobile usability stays the same
- Security Issues > Security Issues report.
Removed
Some of the reports from the old version of Search Console were just removed completely:
- HTML Improvements
- Property Sets
- Android Apps
In Limbo
At the time of writing, there are still some features that haven’t been updated or removed, they are just kind of stuck in Google-limbo until they are released. Google admitted they are yet to decide how the following tools and tasks will be added to the new Google Search Console:
- Crawl Stats data
- Robots.txt tester
- Managing URL parameters in Google Search
- International targeting
- Data highlighter tool
- Reading and managing your messages
- Change of address tool
- Setting a preferred domain
- Associating your Search Console property with an Analytics property
- Disavow links
- Removing outdated content from the index
- Blocked resources report
- Structured data report
How to Use the Old Google Search Console (Webmaster Tools)
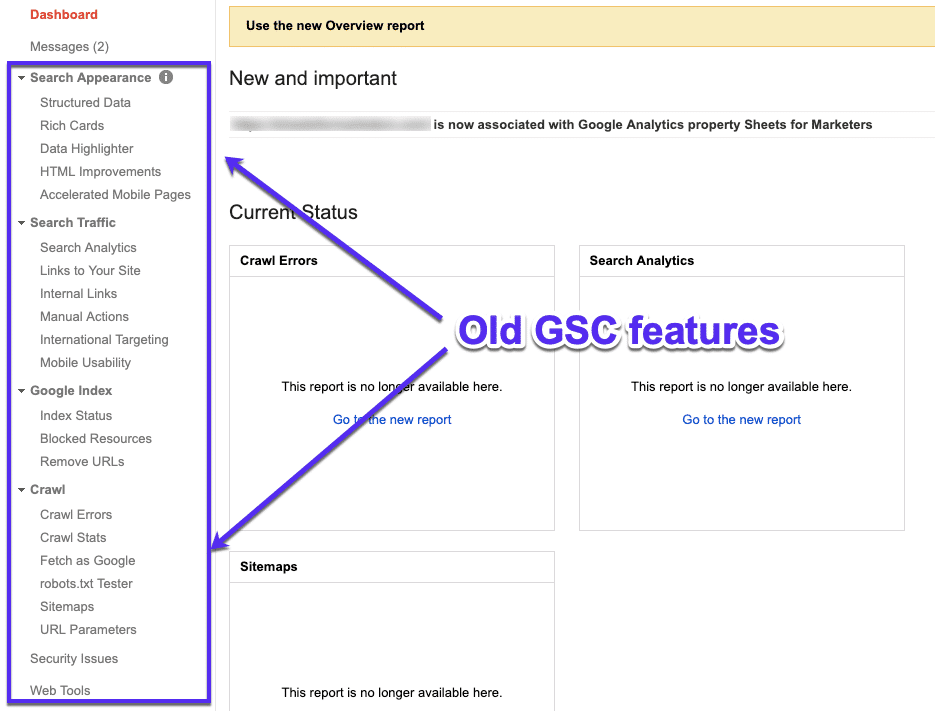
The new Google Search Console, although well-designed, doesn’t have all the features of the old version. If you want to use them, it’s pretty simple.
Just click “Go to the old version” in the menu to the left.

Now you’ll be able to see all the features missing from the new Google Search Console:
How to Link Google Analytics With Search Console
Linking Search Console with your Google Analytics allows you to grab keyword data right inside of Analytics.
Obviously, you need to make sure that Google Analytics is set up correctly on your site first. If it is, here’s how to link it with Google Search Console:
Step 1
Open up Google Analytics and go to the property you want to link up to Google Search Console.
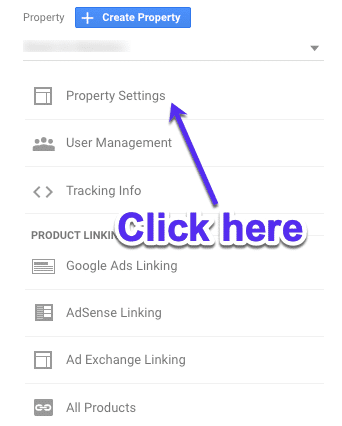
Step 2
Click the “Admin” button at the bottom of the left menu, and then select the “Property Settings” link:
Step 3
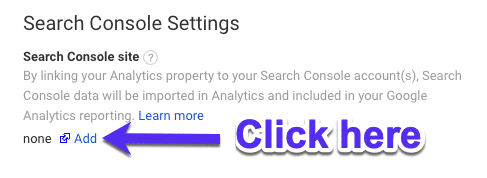
Scroll down and you will see the “Adjust Search Console” button. Click it.
Step 4
Now select “Add”:
Step 5
Now just select your website, make sure to check the box, and hit “Save”. You should see this popup box, so just press OK:

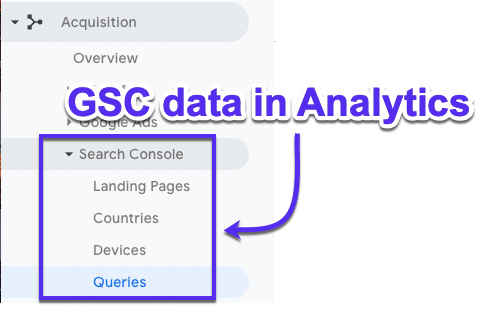
And that’s it, you are all set up. Analytics and Search Console are now successfully linked up.
You’ll need to give it some time to pass the data through. To see Google Search Console data in Analytics, in the left-hand menu, just head to Acquisition and then go to the Search Console dropdown:
How to Add a Sitemap in Google Search Console
Search engines use sitemaps to help crawl your website. They act as a map of your website to guide crawlers to all your pages.
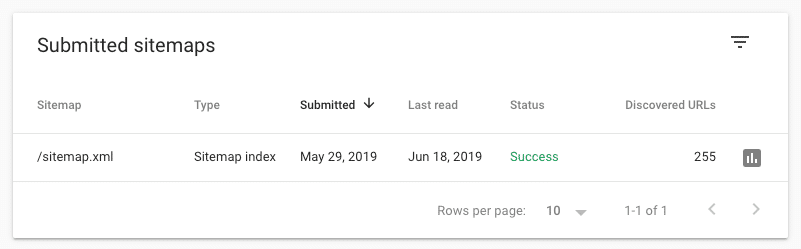
Sitemaps have to be in an XML file type and have few errors (or no errors ideally), otherwise you risk crawlers ignoring it and not crawling your pages.
Thankfully, Search Console tells you if your sitemap has any errors. In the left-hand panel under Index, click on Sitemaps and you’ll see a list of your submitted XML sitemaps:
Creating and submitting a sitemap is even easier.
First up, you need to actually create an XML sitemap. Creating a sitemap on WordPress is easy using something like the Yoast plugin.
Note: you can check to see if you already have an existing sitemap by going to yoursite.com/sitemap.xml. If you have one, it is usually there.
Once created, you need to submit it to Google via Google Search Console. It’s pretty easy to do this:
Go to the Sitemaps tool from the left sidebar and simply paste the XML page. Hit submit.

Google Search Console Permissions: Users and Owners Explained
There are two types of roles with different levels of permissions in Google Search Console: Users and Owners.
Let’s take a quick look at them in more detail.
Owner
An owner has full control over all of their properties in Google Search Console. They have the ability to:
- add and remove other users
- change the settings
- see all data
- access every tool
There are two types of owners: verified owners and delegated owners, both have subtle differences. Verified owners have completed the Google Search Console property verification setup process, while delegated owners have been added (by a verified owner).
Note: Delegated owners can add other delegated owners.
User
A user can see all Search Console data but they can’t add any new users to the property. Full users can see almost all the data, but restricted users can only view select data.
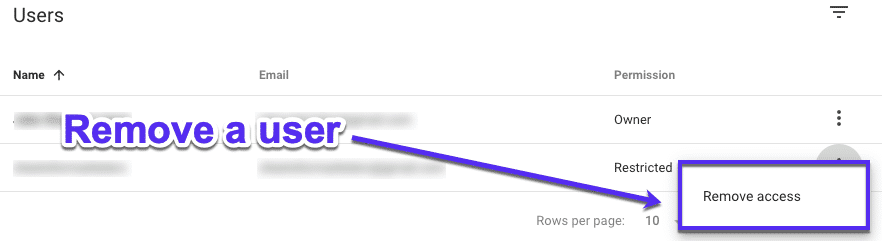
How to Add and Remove Owners/Users in Google Search Console
Now you know the difference between owners and users, here’s how to add (and remove them) in Google Search Console:
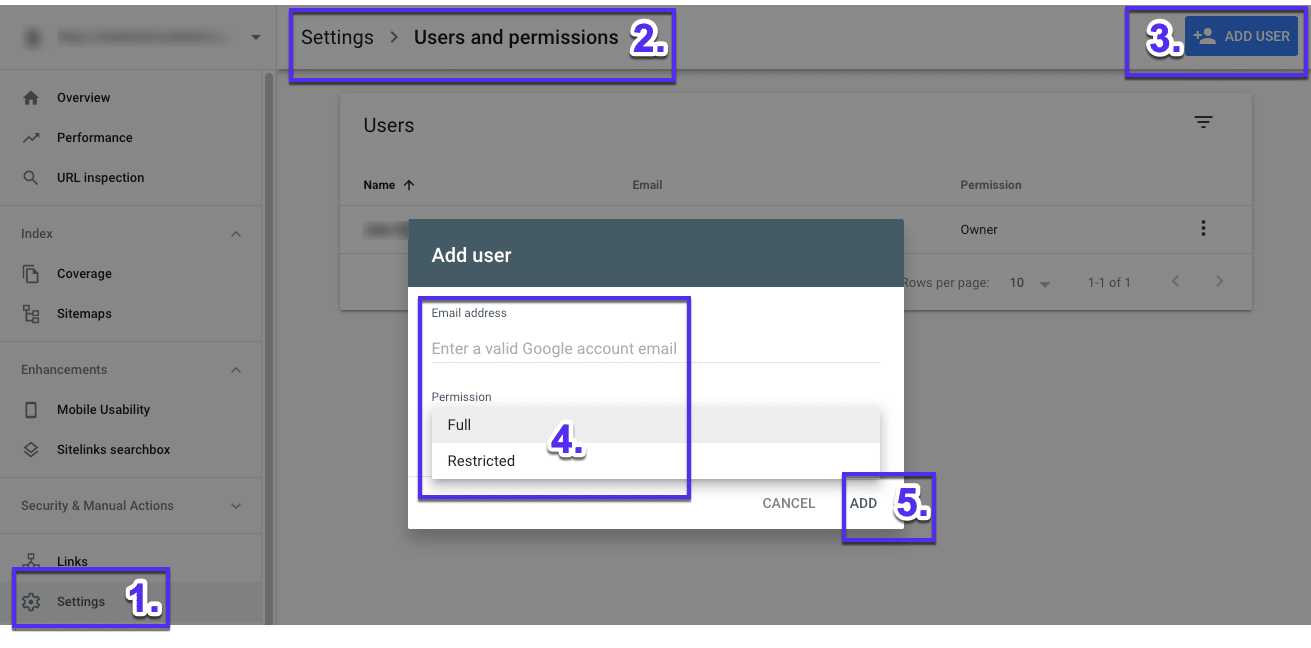
- Go to Settings in the left panel
- Then click “Users and permissions”
- Providing the account you are using has the right permissions, you’ll be able to add a user by clicking “Add User”
- And then add their email and choose their permission level (Full or Restricted)
- Finally, click “Add“.
To remove a User, just click the three dots next to their profile and click “Remove access” (if you have the right permissions).
Features in Google Search Console
Now that you’ve set up Google Search Console, what’s the next step?
Examining your data to improve your SEO. Here are the reports available in the new Google Search Console:
- Index report: how well is Google indexing your site
- Overview report: the overall performance of your site.
- URL inspection: how specific pages are performing from a technical standpoint.
- Performance report: how your pages are performing
- Link report: your external and internal links
But before we jump into using these reports, you need to understand the metrics and data in them.
What Data Can You Get in Google Search Console?
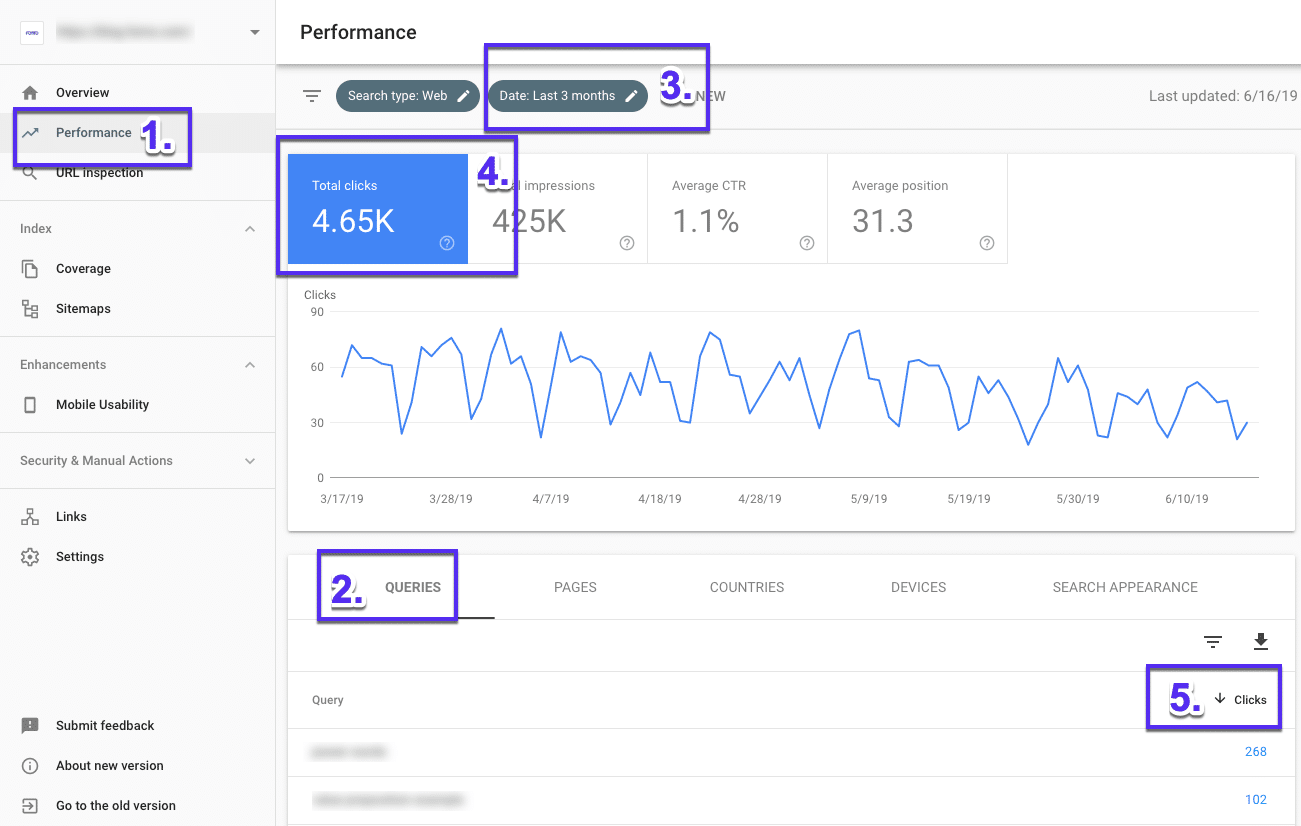
Before you jump in and start using Google Search Console, it is important to understand a few of the terms and metrics. Go to the performance tab and you should see four metrics and some colorful graphs.
Note: each of the metrics boxes is clickable so you can toggle on and off what you see.
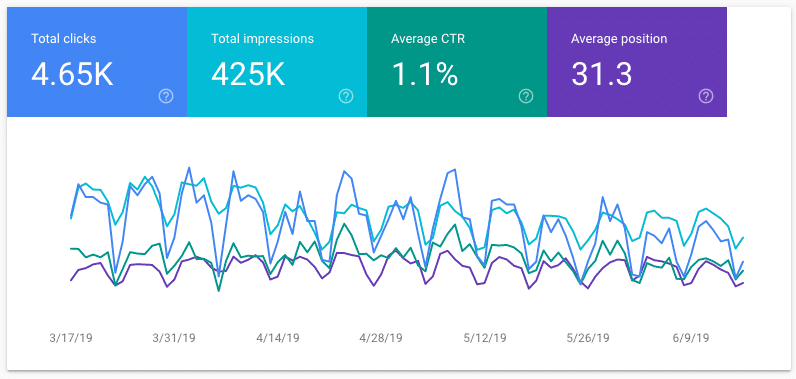
This performance tab shows you data for your queries and pages. Here’s what each means:
Queries
If you scroll slightly down the page, you’ll see a table with queries in it. This is basically a search term (or keyword) that got some impressions for your site/page on a Google search engine results page. Just to let you know, this data is exclusive to Search Console and so you won’t be able to find it in Google Analytics.
Pages
Pretty simple one here: this is the page that shows up in Google results.
Impressions
Each time your website link URL appears in a search result, it will generate an impression. A user doesn’t have to scroll down to actually see your result in order for the impression to be counted.
Clicks
If a user selects a link that takes them from Google Search to your site, then that counts as one click. If however, the user clicks a link, then clicks the back button, and then clicks the same link again, it is still only counted as one click. If they click a different link though, then that’s counted as two clicks. Also, this doesn’t include paid Google results.
Average position
This is the average ranking position of your page for a query (or queries).
Average CTR
CTR stands for click-through rate and is the number of users that click on your result and come through to your website. It is calculated as Clicks divided by Impressions, multiplied by 100 and represented as a percentage.
Using Search Console Metrics
To get the most from Google Search Console performance report, you’ll want to change the groupings to find data you are looking for. And don’t forget, you can always export the data into a spreadsheet for more data crunching.
Don’t worry, there are more steps on how you can get your hands on useful data later in the guide.
How to Use Google Search Console
You now understand what all the different Google Search Console metrics mean, you successfully set up your property and verified it, now what? Well, now you can actually use Google Search Console to improve your website (and your SEO).
You can actually do lots of things with the Search Console to improve your site.
Let’s dig in.
Checking the Health of Your Website With Google Search Console
So you want to understand how Google is crawling your site and whether there are any issues stopping you from getting your pages indexed?
Enter the index coverage report.
This report tells you if Google is having any issues when it comes to indexing your website’s content.
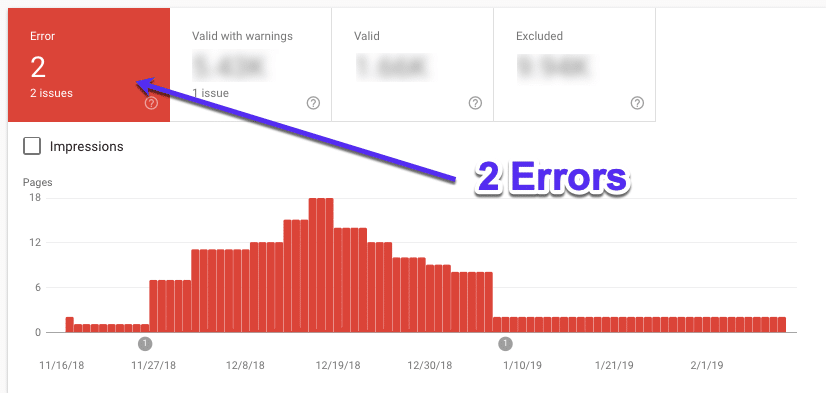
When logging in to the report, you’ll see a colorful chart showing how the number of indexed pages has changed over the last 90 days.
Note: just like the Performance report, all these metrics can be toggled on and off with just a click.
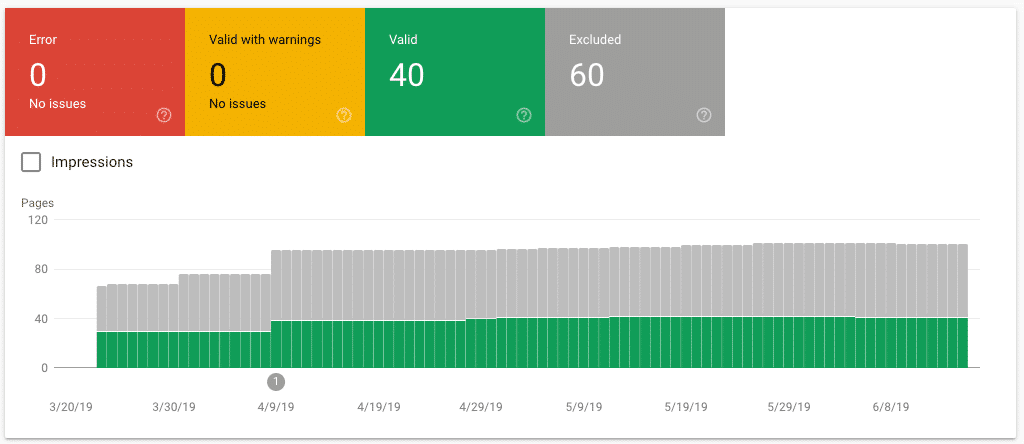
Each bar chart (representing the status on each tracked day) is colored as such:
- Error (in red)
- Valid with Warning (in yellow)
- Valid (in green)
- Excluded (in grey)
Further details into each status are then provided below. It’s recommended to tackle the Errors (in red) first. These generally will be the biggest problems preventing your pages from getting indexed.
Causes of Errors
When it comes to Google Search Console errors, the most common ones are:
- Redirect Error: This is when a redirect to a page isn’t working properly. Examples of redirect errors include redirect loops and redirect chains. Check your .htaccess file and your redirect rules to sort these errors.
- Submitted URL Not Found (404): When a page is not accessible. If you try to access it, you’ll see a 404 error.
- Submitted URL seems to be a Soft 404: This is when the webpage could not be found. Sometimes it is worth checking to see if a temporary bug is to blame.
- Submitted URL has crawl issue: Sometimes a page can be blocked from crawlers in your Robot.txt. Although this isn’t always the reason why. Sometimes it can be something completely different, so go to the page and investigate.
- Server Errors (5XX): Google’s crawlers couldn’t reach your web server, usually happening during server maintenance hours. Keep an eye on this to ensure you don’t have a problem with your hosting provider.
How to Fix 404 Errors
So you’ve got some 404 errors showing in Google Search Console. 404 error messages usually appear when a URL is no longer accessible. Often this occurs when a page no longer exists, or the URL has been changed. It happens.
Here’s how to find 404 errors in Google Search Console and how you can fix them:
Go to “Index” and then “Coverage” and you’ll see a list of any issues found on your site. If you click on an issue, you will see the affected URLs.
Google Search Console reports on all 404 pages on your website past and present. So make sure that any 404’ing pages still exist as they may just be old pages you already know about their removal.
Also, due to the way Google crawls sites, 404 errors that have been corrected can continue to show up here in this report.
The simplest way to fix a 404 is just to either fix the issue that is causing it to break or redirect the page. When redirecting, make sure to point it to content on your website that is similar to the page that has been removed. Use 301 permanent redirects and not the 307 temporary redirects. This is the best solution as you will be sending users to an alternative page that will still fulfill their needs (hopefully).
See How Google Views a URL
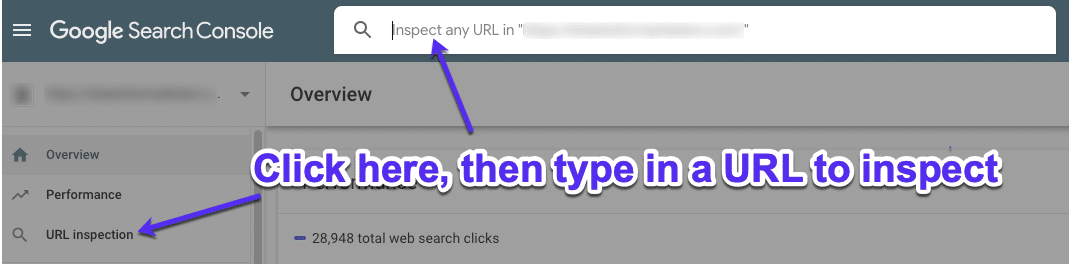
Using the URL inspection tool, you can see how Google actually sees your page. You can use this to troubleshoot if your page isn’t appearing at all or maybe isn’t appearing properly in search results.
Enter the page URL and hit enter. Just make sure it belongs to the property you are currently viewing:
Now you’ll be able to see the results for the page and whether the URL is indexed and can appear in Google search:
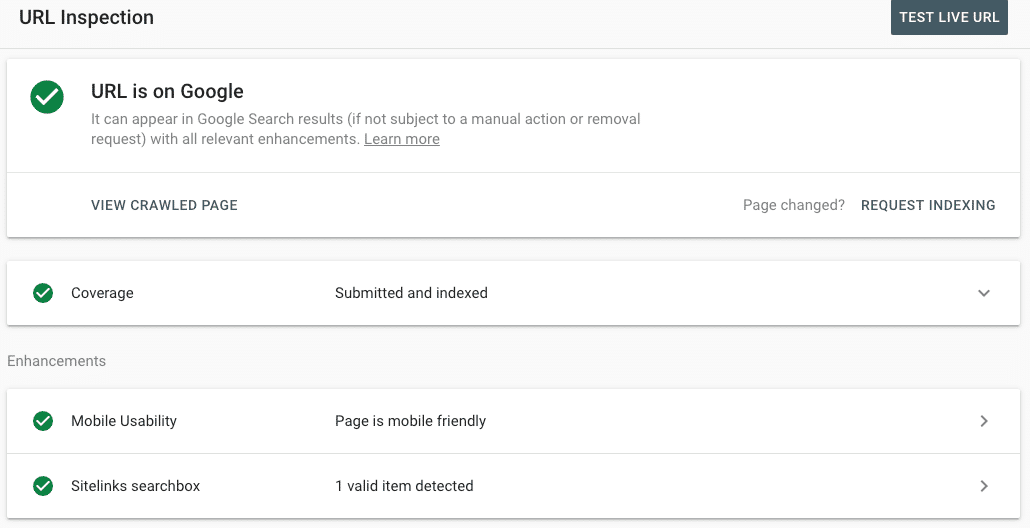
You can click on the dropdown arrow to open up the Index coverage report to learn more about the URL on Google, including:
- Sitemaps that point to this URL
- Referring page that led Googlebot to this URL
- Last time Googlebot crawled this URL
- If Googlebot is allowed to crawl this URL
- If Googlebot can actually fetch this URL
- Does the page disallow indexing,
- Canonical URL set for this page
- Canonical URL Google has selected for this page.
Using the Overview Report
The Overview report is useful for getting a snapshot of how your website is performing technically in search engines, and whether there is anything holding it back which can be fixed.
See How Many Pages Have Been Indexed
Here’s how to see how many of your pages have been indexed and how many have errors:
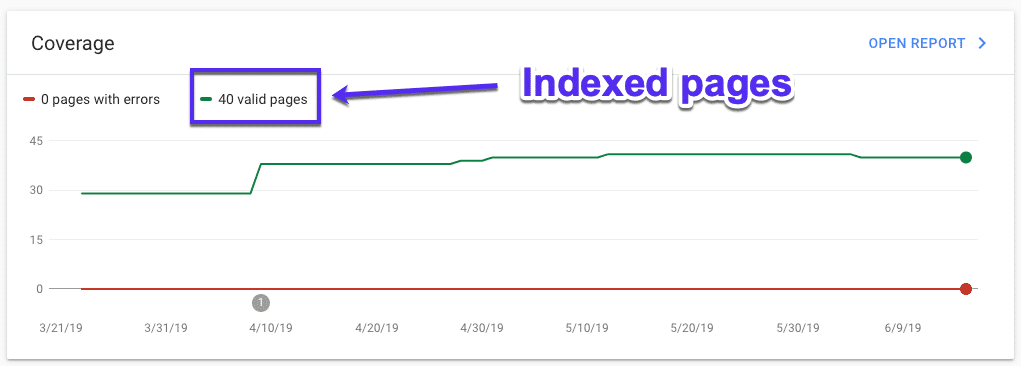
- Go to “Overview” in the left panel
- Scroll down to the Index summary, labeled “Coverage”.
- Look at the number of “Valid pages“.
How to Check for Indexing Errors
You can also click on the Open Report link to see more details about your coverage:
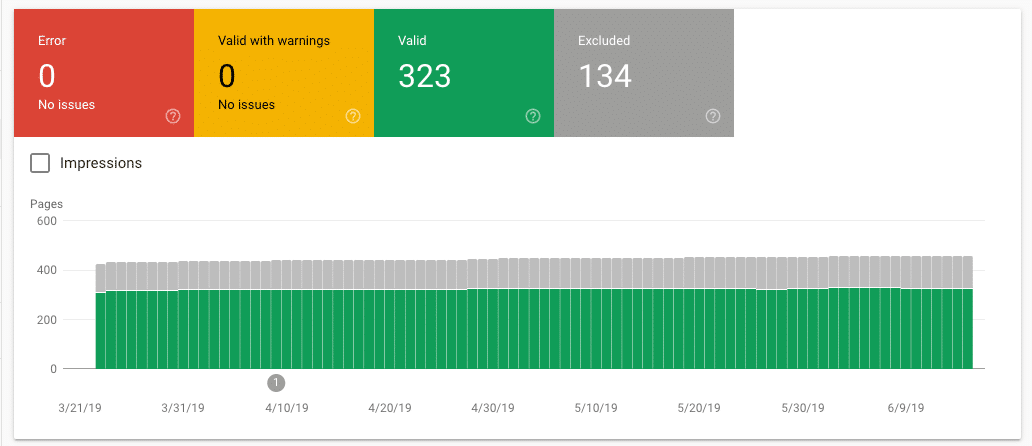
You want to make sure “Error”, “Valid with warnings”, “Valid”, and “Excluded” are all selected so you can see them.
The total number of indexed pages for your site should gradually increase over time as you publish new blog posts, create new pages, and fix any indexing errors.
What you want to keep an eye on is a large and sudden increase in indexing errors. This could be down to site template changes or maybe a sitemap error preventing Google from crawling certain URLs.
Try to diagnose the issue as soon as possible by looking at excluded pages in these reports.
How to Find Mobile Usability Issues
With Google’s push towards mobile-first indexing, you really want to make sure your website works well for users on smartphones. Here’s how to find mobile usability issues in Google Search Console:
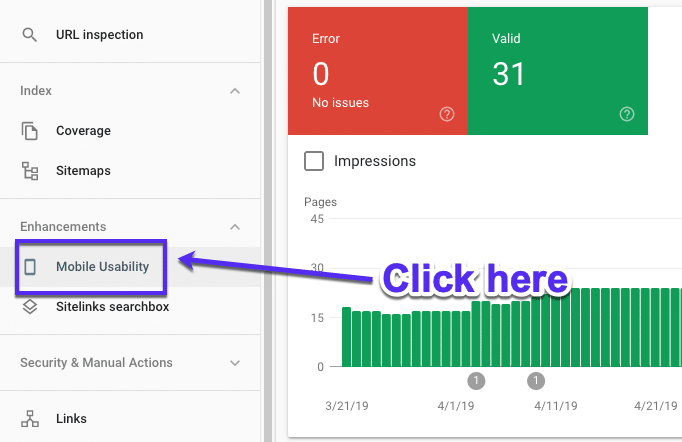
- Click “Mobile Usability” (under Enhancements).
- Make sure that “Error” is selected.
- If there are any errors, you’ll be able to go to the Details box and learn which Errors are causing mobile issues.
- You can also double-click on any Error type to see the affected page URL.
Using the Performance Report
The Performance report shows important metrics about how your site is performing in Google such as how often it appears, it’s average position and click-through rates.
How to Find Your Highest Traffic Pages
Here’s how to find pages on your site that get the most clicks in Google:
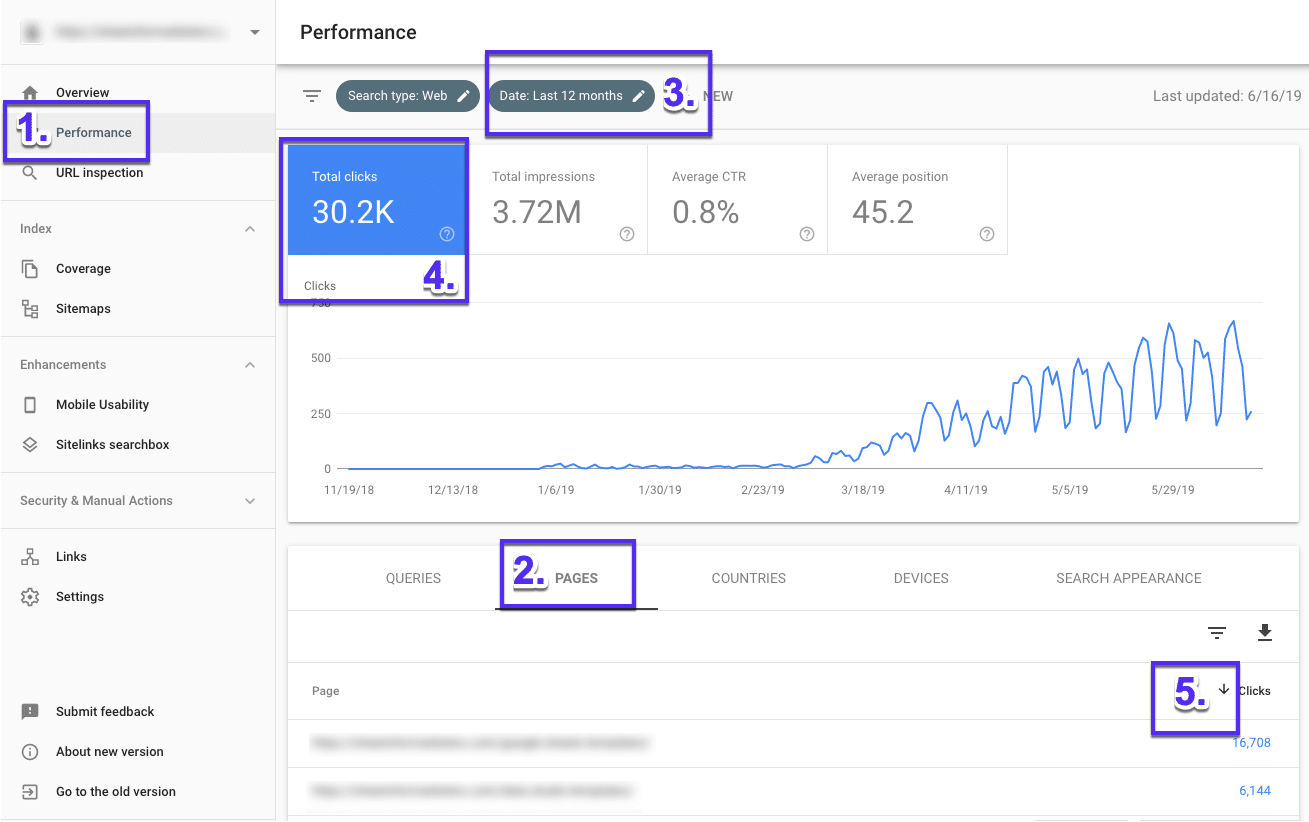
- Click on “Performance“
- Then go to the “Page tab” (just to the right of next to Queries)
- Change the date range to “Last 12 months” to get a better overview of your traffic.
- Make sure that “Total clicks” is selected.
- Now click on the small downward arrow next to “Clicks” to sort your pages from highest to lowest
How to Find Queries With the Highest CTR
Here’s how to find queries on your site with the highest click-through-rates:

- Click on Performance
- Go to the “Queries” tab
- Change the date range to “Last 12 months“
- Make sure that the “Average CTR” metric is visible
- Now select the small arrow (next to “CTR”) to sort from high to low
How to Find Your Highest (and Lowest) Ranking Pages
Here’s how to find the highest and lowest ranking pages on your site:
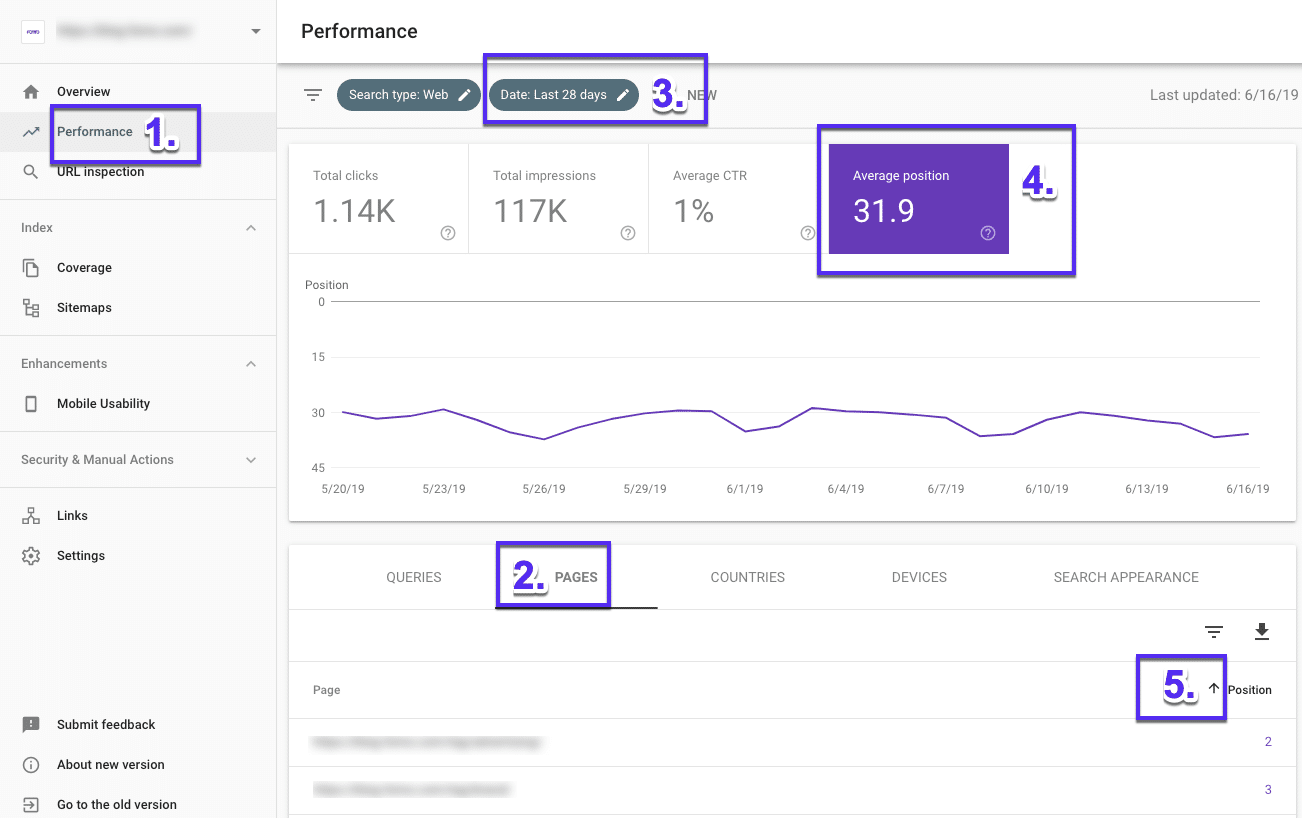
- Click on Performance
- Go to the “Page” tab
- Change the date range to “Last 28 days”
- Select “Average position”
- Now you’ll be able to use the small arrow next to “Position” to toggle rankings from low to high and vice versa. Remember: when it comes to rankings, low = good and high = bad.
How to Find and Compare Ranking Increases and Decreases
Here’s how to compare how rankings have performed over two time periods:
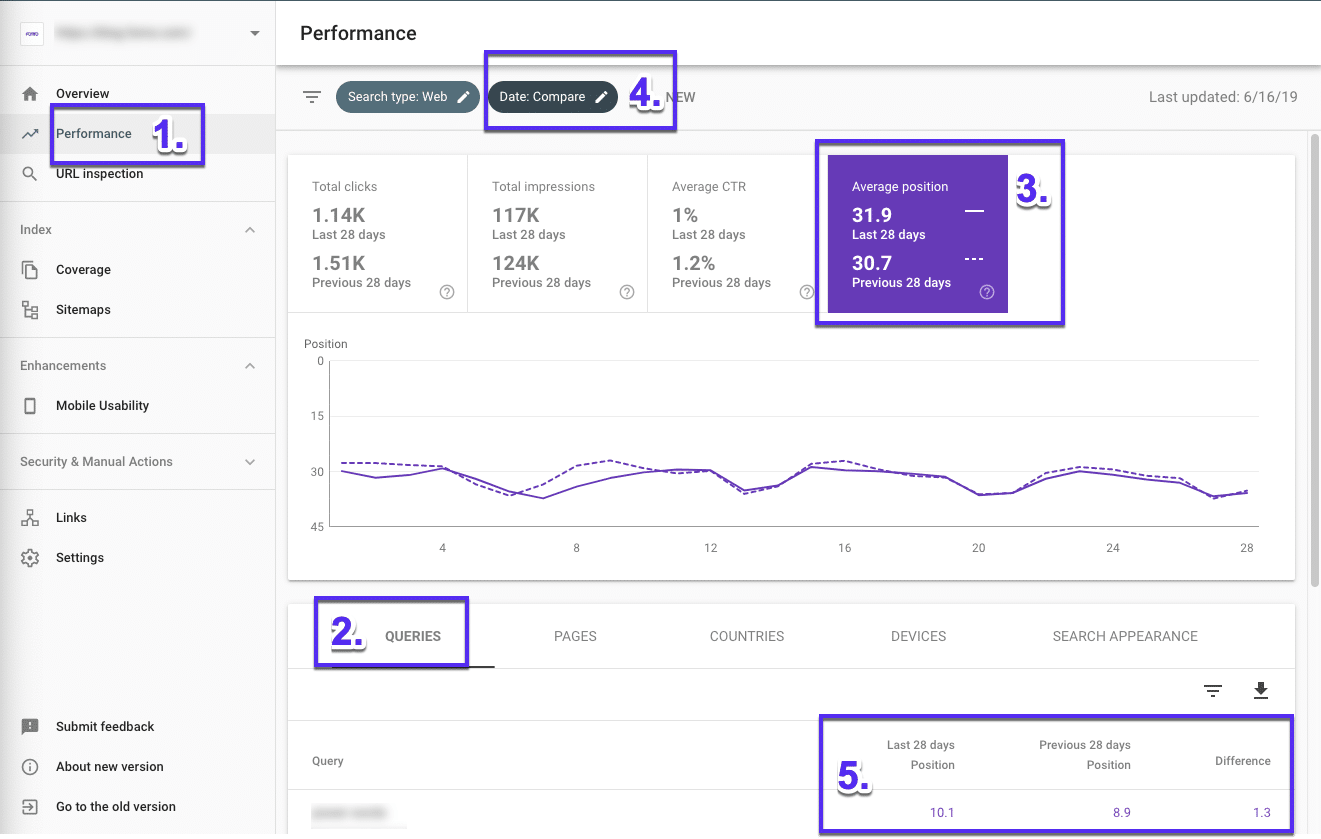
- Click “Performance“
- Go to the “Query” tab
- Make sure Average position is selected
- Now click on “Date range”, change the dates, and then hit the “Compare” tab to choose two time periods, then click “Apply”
- Look at how rankings have changed.
How to Find Your Highest Traffic Queries
Here’s how to find the queries that bring in the most traffic to your site:
- Go to the “Performance” report
- Click the “Query” tab
- Choose your “Date range“
- Make sure you have “Total clicks” selected
- Click the small downward arrow next to “Clicks” to sort from highest to lowest.
Compare Site Performance Across Devices
Here’s how to compare your site’s search performance across desktop, mobile, and tablet:
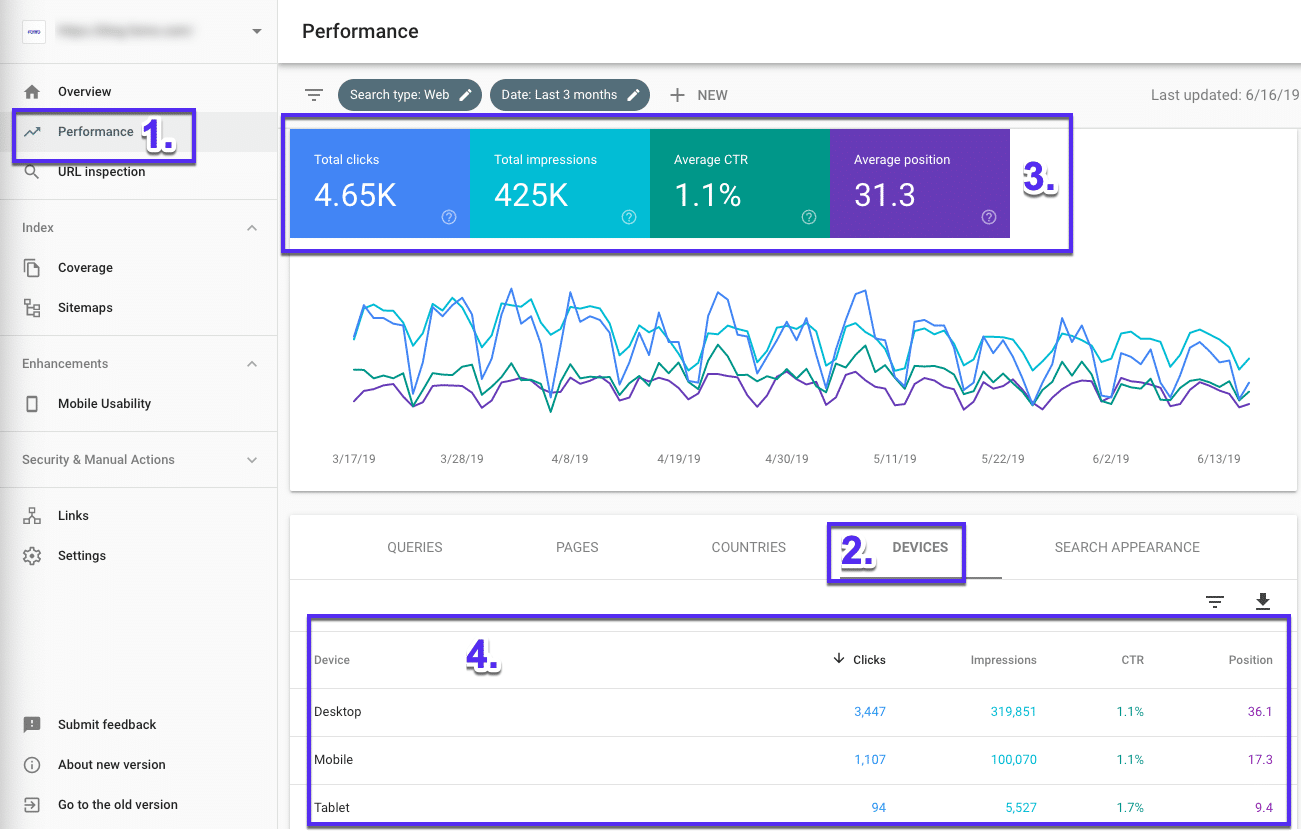
- Click “Performance”
- Then go to the “Devices” tab.
- Make sure all metrics are selected
- Now compare your performance across all devices.
Compare Site Performance Across Different Countries
Here’s how to compare your site’s search performance across countries:
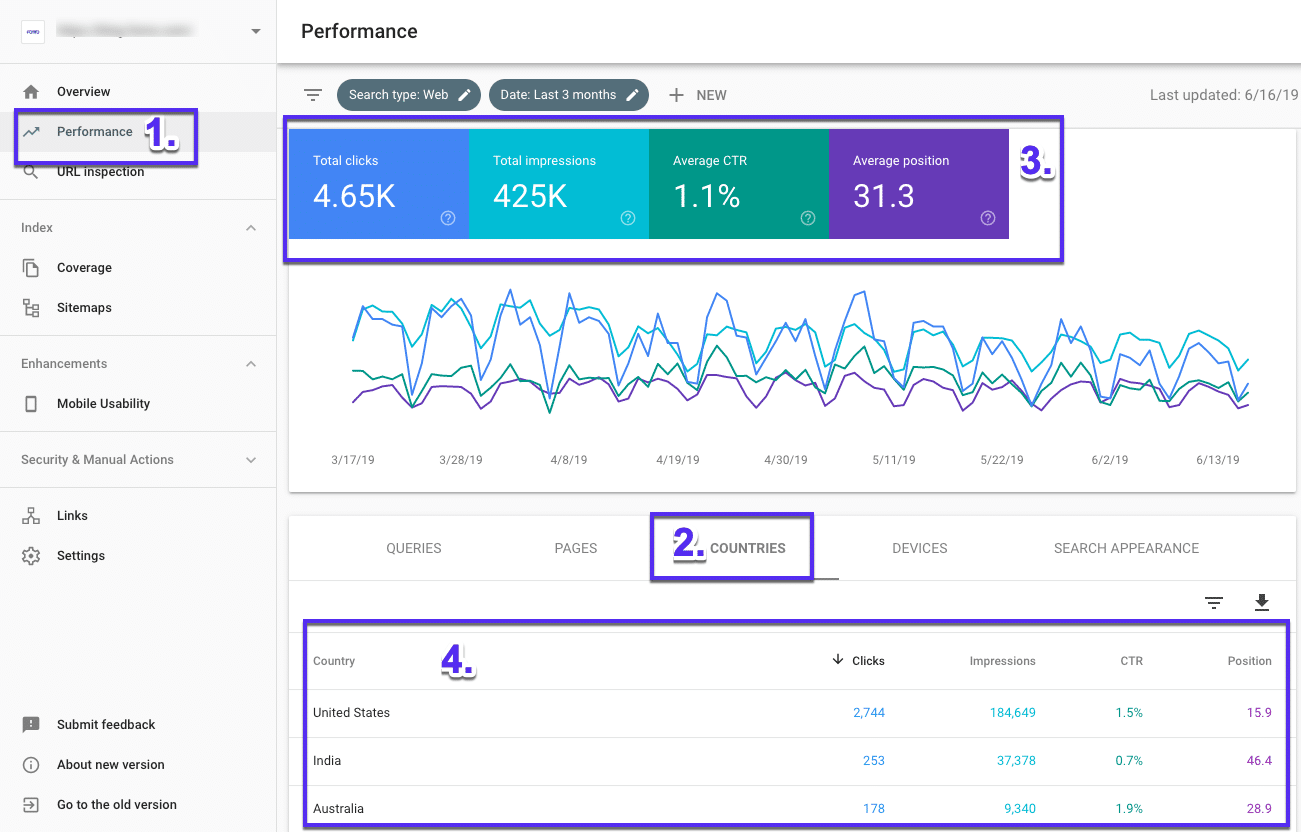
- Click “Performance“
- Go to the “Countries” tab
- Make sure all metrics are selected
- Now compare your performance across all countries
Using the Link Report
As well as helping you diagnose technical SEO issues and find top performing pages, Google Search Console is also useful for seeing your internal links and backlink data, i.e. which sites link to yours and what link text they use.
Find How Many Backlinks Your Site Has in Google Search Console
Here’s how to see the total number backlink/external links your site has:
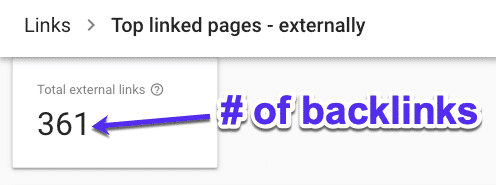
- Click “Links” in the left panel
- Then, open the “Top linked pages” report under “External links“
- Look for the box labeled “Total external links“
- You can click the small arrow next to “Incoming links” to sort from highest to lowest backlinks as well as export them to a spreadsheet
Backlinks are signals to Google indicating that your site content is trustworthy. Think of them as ‘votes’ for your website. The more backlinks, the better. However, quality and relevancy are very important when it comes to backlinks. One link from an authority site in your niche is always better than lots of links from low quality and unrelated sites.
To see which sites are linking to a page, just double-click that URL in the report.
Find Which URL Has the Most Links
Here’s how to see your top linked pages:
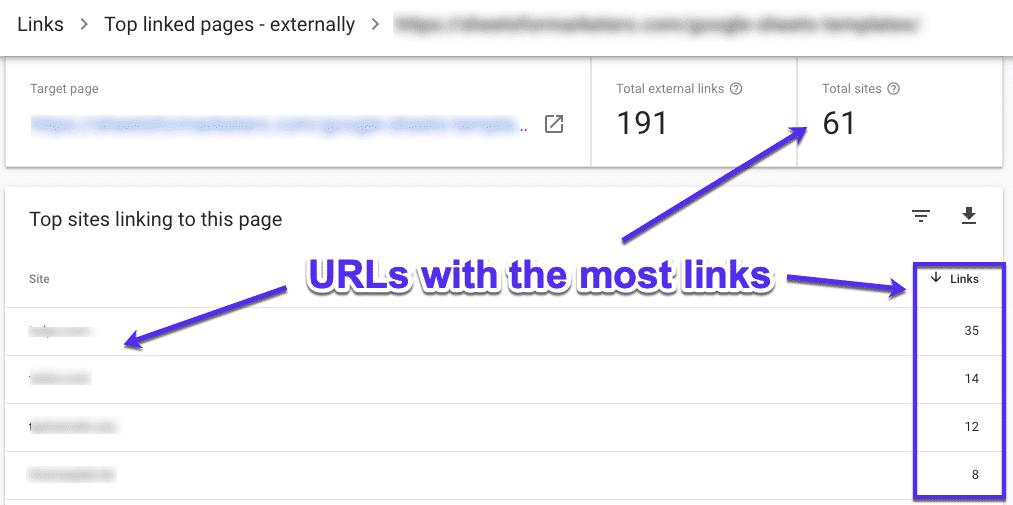
- Click “Links” in the left panel
- Open the “Top linked pages” report under External links again
- Click the downward arrow next to “Incoming links” to sort from highest to lowest backlinks
- Click on any of the links to find out what sites link to them
A good SEO tip here is adding internal links from a page with a lot of backlinks to other pages you want to rank higher. Those backlinks giving the URL page authority can be passed on to another page on your site via internal linking.
Find URLs With the Most Internal Links
Here’s how to see which page on your site has the most internal links:
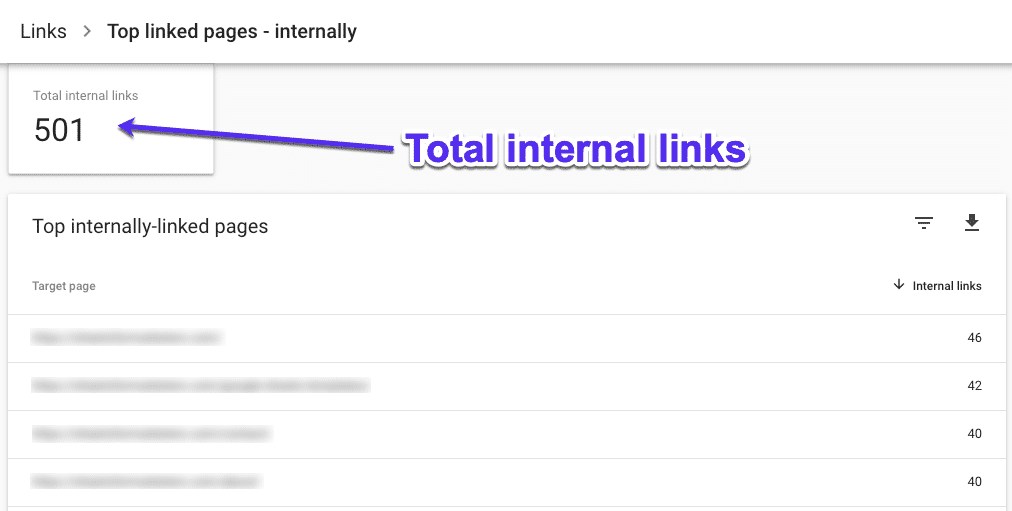
- Click on “Links” in the left panel
- Go to “Top linked pages” (under the Internal links heading)
- Click on “More” at the bottom of this list
Internal links are hyperlinks from one page on your site to another and are helpful for directing users and search engines around your site.
It’s normal for some URLs to have more internal links than others. However, keep an eye out for pages that are getting a lot more links than the rest, as there may be an opportunity to add some inbound links and pass some link juice around.
Summary
If you’ve made it this far: congratulations! That was a long guide.
Hopefully, now you can see just how Google Search Console can help to improve your site’s SEO. No matter the size of your site, having it set up is a must.
Google Search Console is a tool and needs to be used often in order to be useful. Having it set up is only half the battle. Using it regularly is where you will see the most benefit from it. Want to push your SEO even further? Check out our in-depth guide on Bing Webmaster Tools!


