Do you want to add your site to Google Search Console? Before Google lets you add your site, view its analytics, or submit its sitemap, it asks you to verify your site ownership.
Essentially, Google site verification is about proving that you own the site. Hence, you need to complete the Google Search Console verification process before managing your sites through Google tools.
Thankfully, this process is pretty simple, and there’s a variety of ways to verify your website with Google Search Console. This post will cover nine different Google site verification methods, including manual ones and WordPress plugins.
Let’s get started!
5 Manual Methods for Google Site Verification
These manual Google site verification methods work for all websites, including WordPress sites.
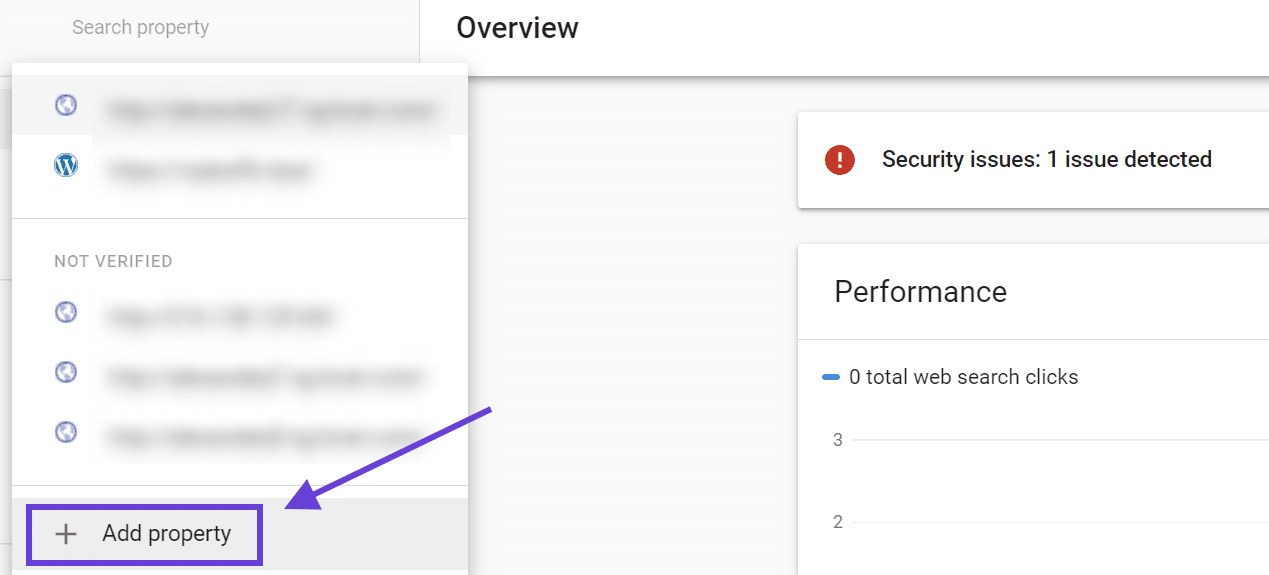
To get started, access your Google Search Console dashboard. From here, you can open your property list to the left and click Add property to verify a new website:
Search Console will ask you to select a property type. You can enter a domain or a URL prefix. If you enter a domain name, you’ll be able to verify your website via DNS. The URL prefix method will let you choose between four verification methods:
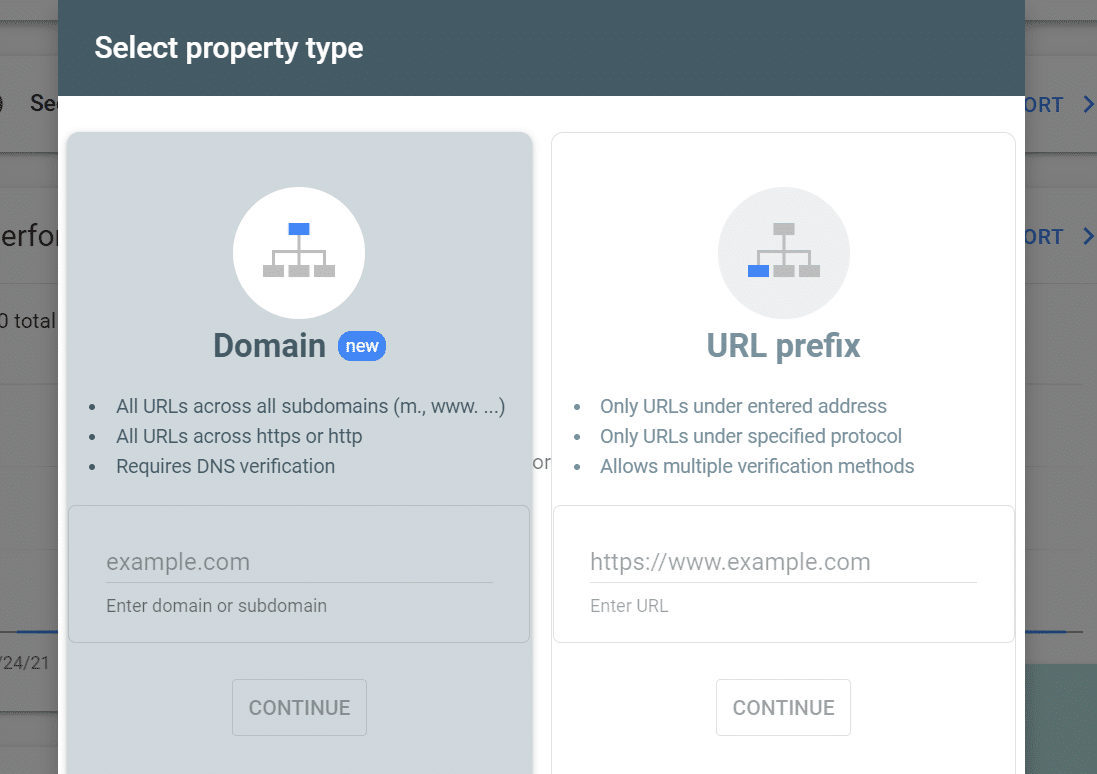
Either approach works just fine when it comes to site verification. However, we recommend the URL prefix method because it gives you more options.
The following section will explore the four verification methods you can use to select the URL prefix property type. Then we’ll show you how to verify your website via DNS at the end (the Domain option). Go ahead and enter your site’s URL under the URL prefix and click on CONTINUE.
1. HTML Verification File
With this method, you need to upload an HTML file to the root directory of your website. It’s simple, but the downside is that you will need access to your server to upload the file, either via FTP/SFTP clients or something like cPanel File Manager.
Step 1: Download the Verification File
After you add your site to Google Search Console, you should see an option to download an HTML verification file in the Recommended verification method tab:
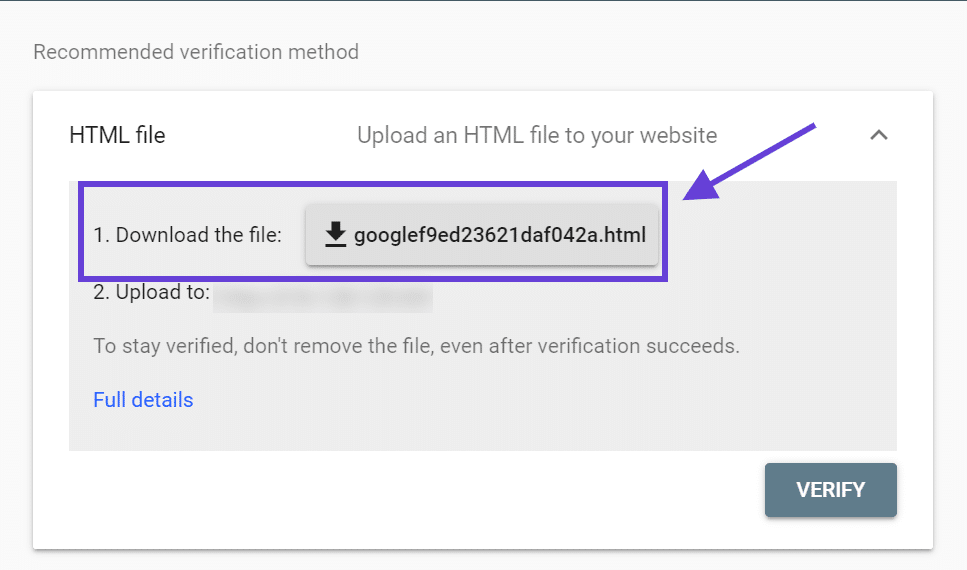
Click on the button next to Download the file. Save this file somewhere you’ll remember — you’ll need it in a minute.
Step 2: Upload the File via SFTP
Next, you’ll need to connect to your website via FTP/SFTP. Here are instructions for how to use SFTP at Kinsta.
Once you’ve successfully connected, upload the file that you downloaded from Google to the root folder of your site (this is the folder that contains the wp-content folder, wp-config.php, etc.) At Kinsta, this folder is named public.
After uploading the file, it should look something like this:
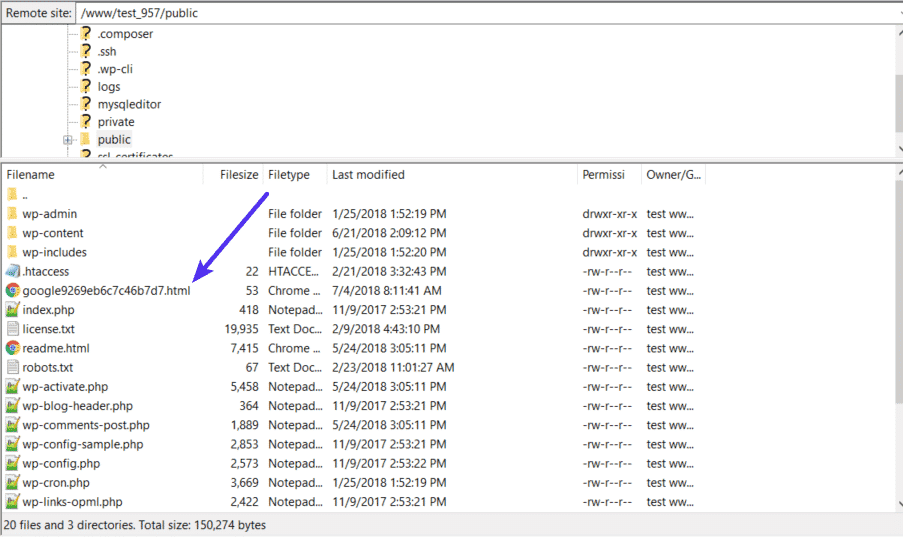
Once the file is in your site’s root folder, return to Google Search Console. It’s time to verify your property.
Step 3: Click the Verify Button in Google Search Console
Once you’ve uploaded the file to your site, go back to Google Search Console and click on the VERIFY button to complete the process. Google Search Console will locate the file on your server and verify that you own the website.
You can use that same method to verify the Kinsta Content Delivery Network (CDN) with Google Search Console. Verifying your CDN on Google Search Console will enable the search engine to crawl and index your images.
2. HTML Tag
With the HTML tag method, you need to add a simple meta tag to your site’s <head> section. If you’re using WordPress, you can do this by:
- Adding the tag directly to your child theme’s header.php file
- Using a plugin to inject it into the header
We’ll show you how to do this using the plugin method, but it’s also OK to add it directly to your theme as long as you’re using a child theme (if you don’t use a child theme, you’ll lose your Google site verification every time you update your theme).
Step 1: Copy the Meta Tag
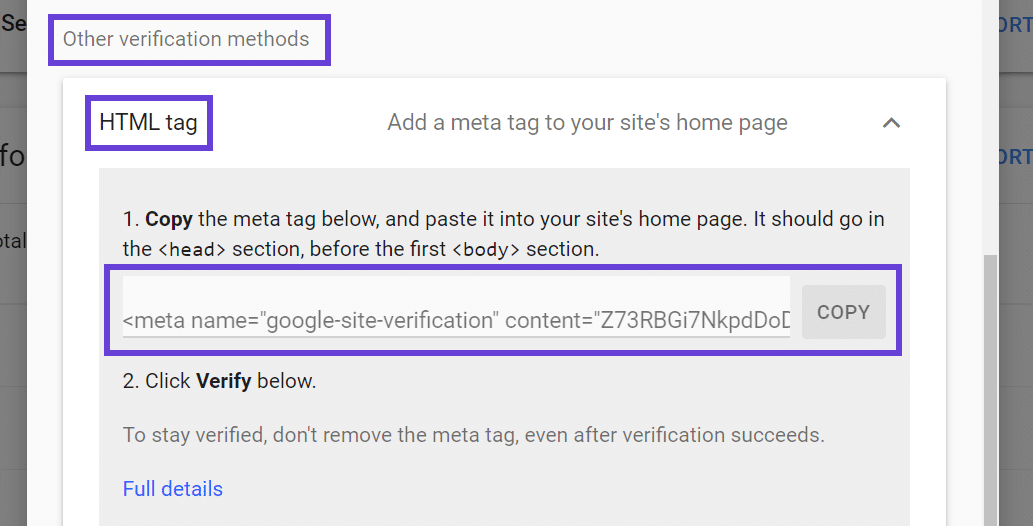
To find the meta tag, you can go to the Other verification methods section in the Google Search Console interface:
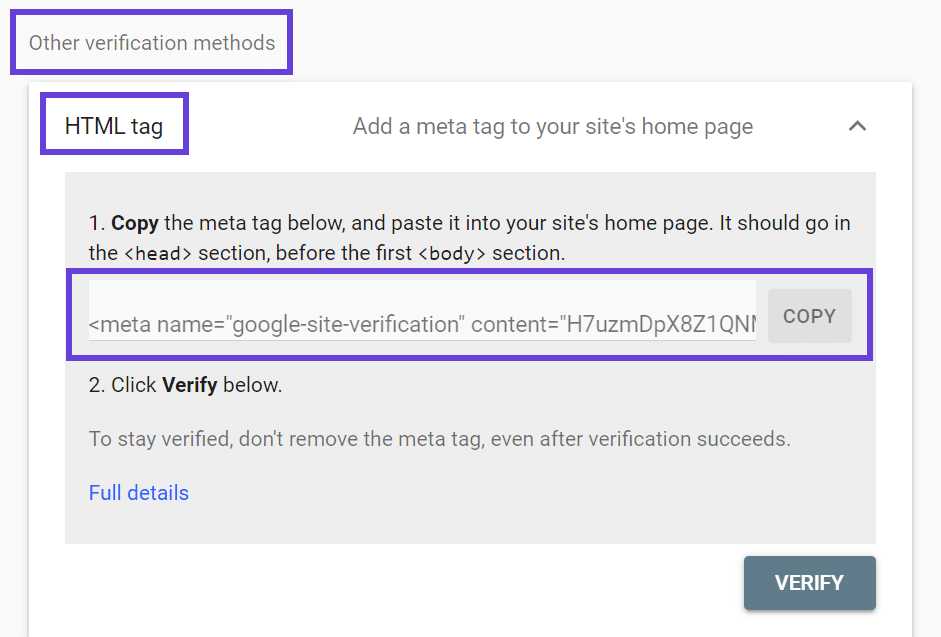
Use the COPY button to copy the meta tag in the box. Now, let’s go ahead and add it to your WordPress website.
Step 2: Add the Meta Tag Using Insert Headers And Footers
Next, you can install the free Insert Headers and Footers plugin on your site. Navigate to Settings > Insert Headers and Footers and paste the meta tag in the Scripts in Header box:
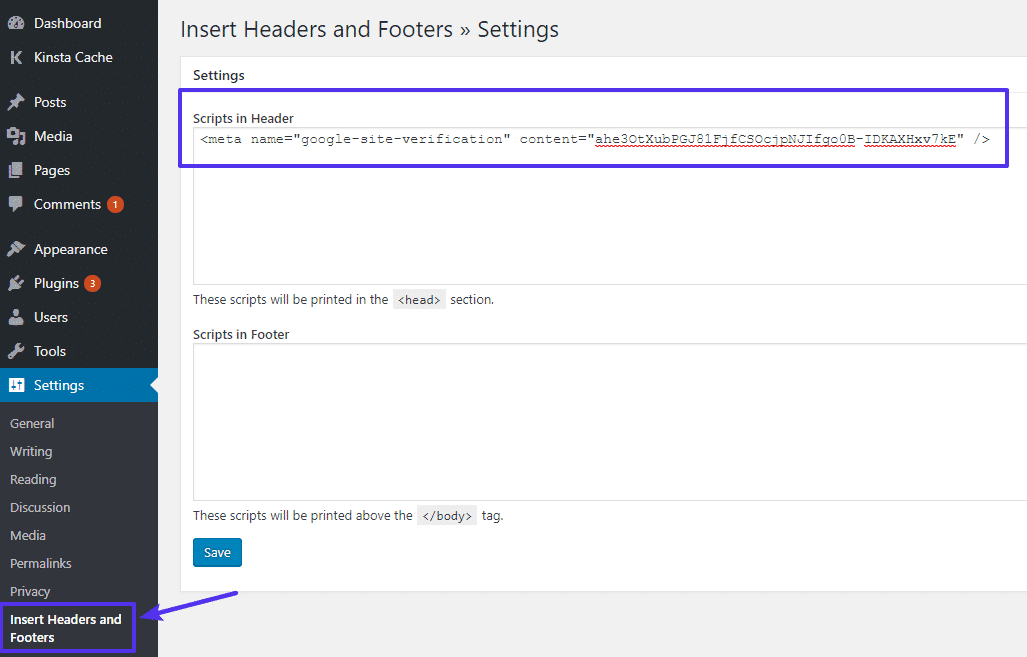
Click on Save to save the changes to your website’s header, and that’s it. You can also add the meta tag manually, but we recommend the plugin approach if you’re not comfortable editing WordPress core files.
To finish the process, go back to the Google Search Console interface and click on the VERIFY button. If you added the code to your website, Google Search Console would be able to identify it.
3. Google Analytics
If you already have the Google Analytics asynchronous tracking code installed on your site, you can easily verify your site using Google Analytics. This process boils down to two simple steps:
- Select Google Analytics under Other verification methods.
- Click on VERIFY.
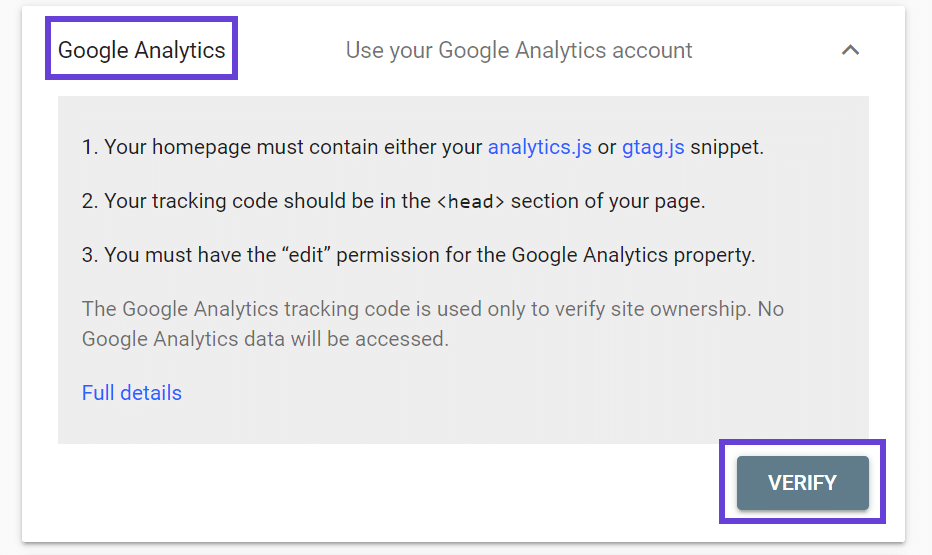
If you added Google Analytics to WordPress using a plugin, the tracking code should be on your homepage. That means that you can go ahead and use this method.
4. Google Tag Manager
Just like Google Analytics, if you’re already using Google Tag Manager, you can verify your site with just a single click. You’ll need to have the Google Tag Manager container snippet active on your site.
Again, there’s no deep or involved process necessary. Here’s all you need to do:
- Select Google Tag Manager under Other verification methods.
- Click on VERIFY.
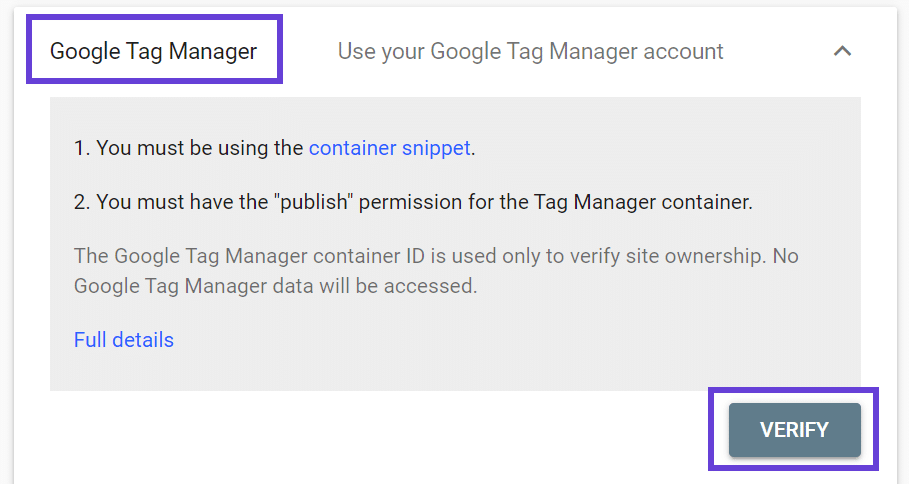
If you’re using Google Tag Manager, this method will enable you to verify your website on Search Console almost immediately.
5. DNS Verification
If you want to verify your website using the Domain method, you’ll need to add a TXT record to your domain’s DNS configuration. Here’s what that verification window looks like:
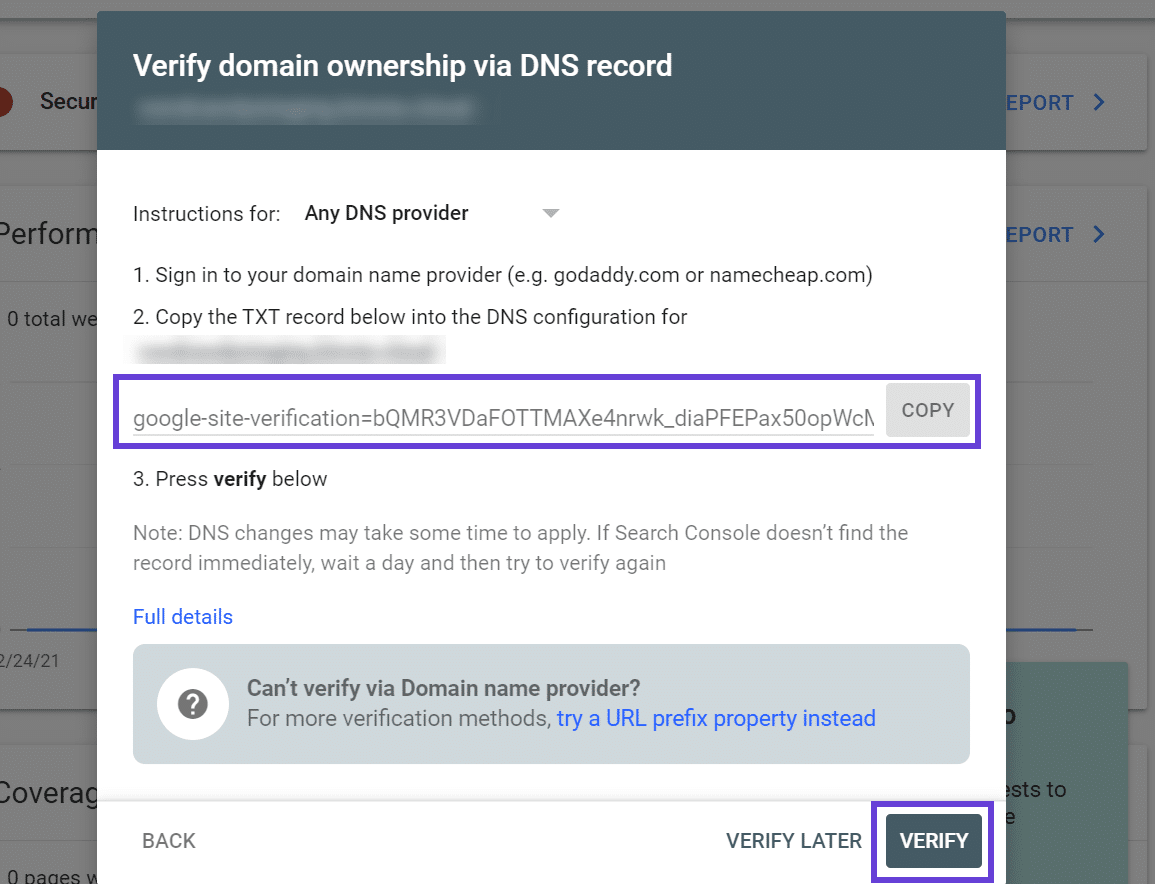
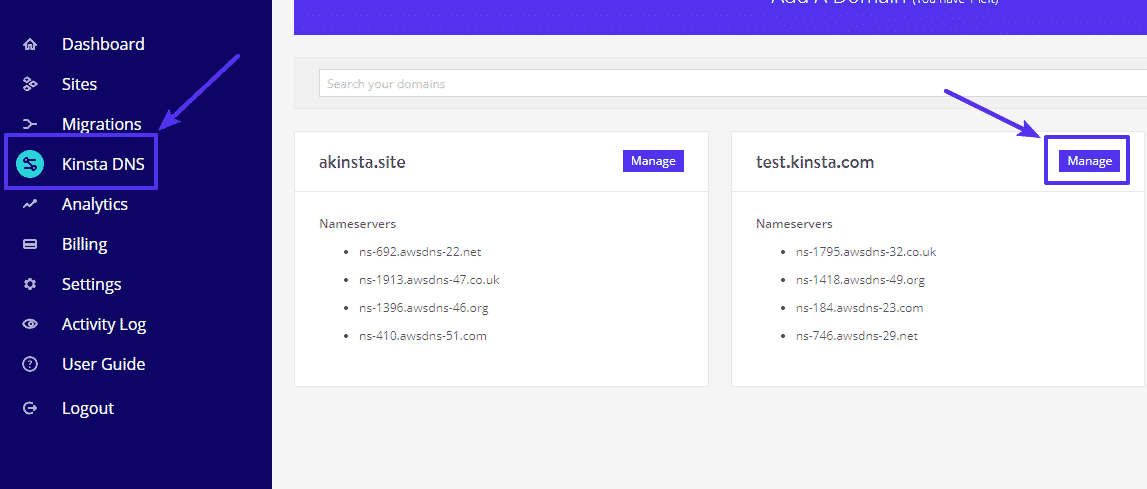
If you’re using Kinsta DNS, you can add this TXT record directly from your MyKinsta dashboard.
First, click on the Kinsta DNS option. Then, select Manage for the site that you want to verify with Google Search Console:
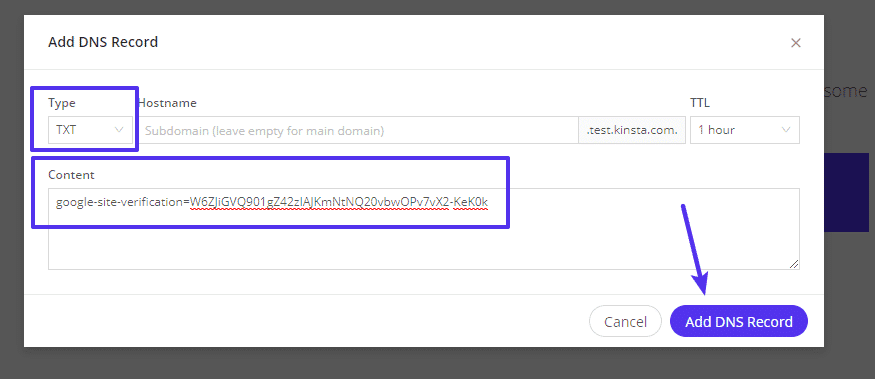
Next, you can click on Add DNS Record and select the TXT option under Type. Add your Google Search Console TXT record under Content:
Keep in mind that this process will vary depending on which domain provider you’re using. If you want to transfer your domain name to Kinsta to manage it using our DNS, you can follow these instructions.
4 WordPress Plugins to Help With Google Site Verification
If you’re using a WordPress SEO plugin, there’s a good chance that your plugin of choice offers an easy tool to help with Google site verification. We’ll show you how to do it with the three popular WordPress SEO tools and one plugin directly from Google.
6. Yoast SEO
To complete the Google Search Console verification process with Yoast SEO, you can start by going to SEO > General in your WordPress dashboard and selecting the Webmaster Tools tab.
Next, find the Google verification code field and add the code that you can get from Google Search Console:
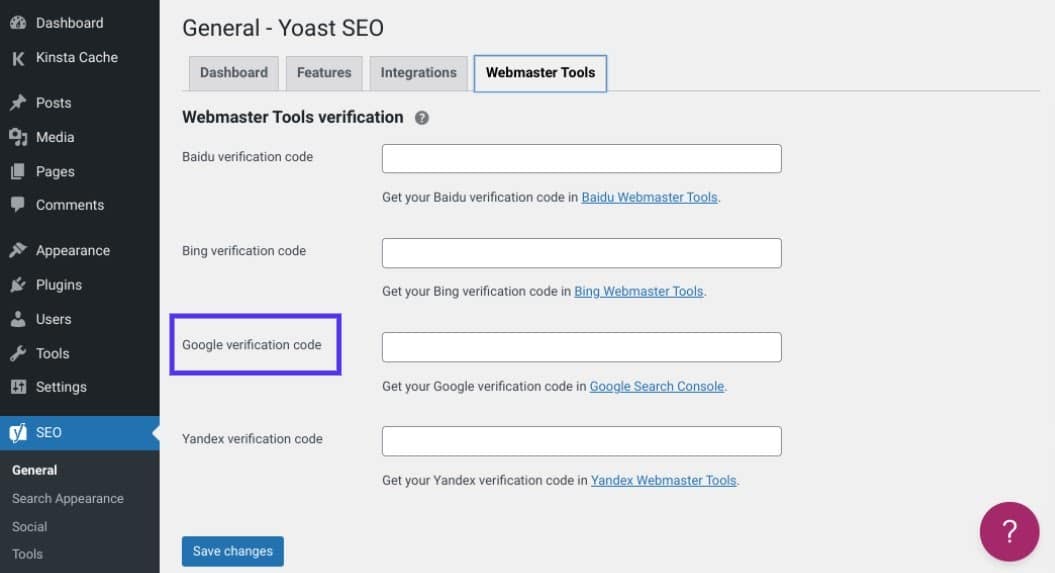
To find your Google Search Console verification code, you can follow these three steps:
- Navigate to the Other verification methods section in the Google Search Console interface.
- Select the HTML tag option.
- Copy the entire tag. Yoast SEO will automatically strip out the extra details, leaving just the code.
Now you can add the code to your Yoast SEO settings page and save the changes to it. Return to the HTML tag tab in Google Search Console and click on the VERIFY button.
7. SEOPress
To verify your site in Google Search Console with the SEOPpress plugin, go to the SEOPress > Advanced section in your WordPress dashboard. Here, scroll down to find the Google search verification entry.
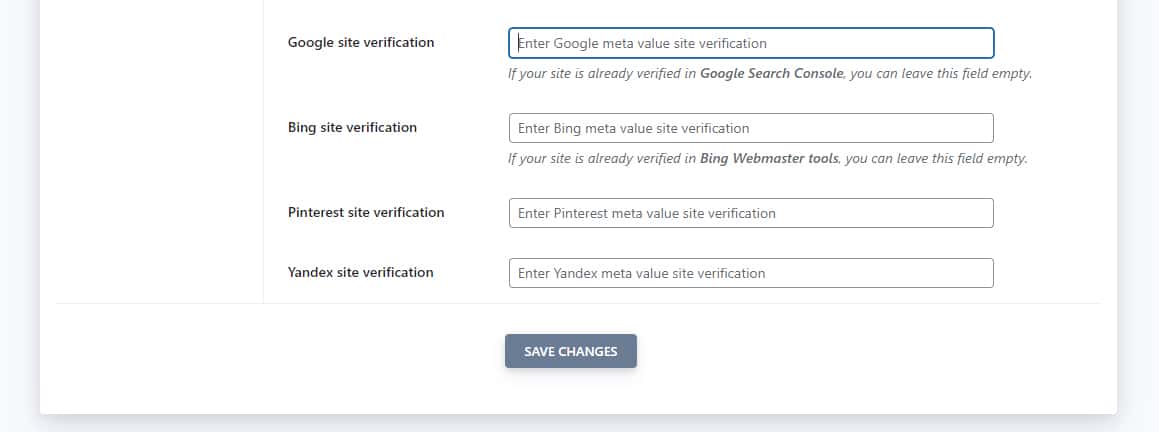
You need to enter your Google site verification HTML meta tag here. It’ll look something like this: <meta name="google-site-verification" content="......." />. Add your site verification meta tag and save the changes.
We’ve discussed how to get this meta tag for your site (or “property” as Google calls it) in the HTML Tag section above.
Now, the plugin will automatically add this HTML tag to all your site’s pages.
Finally, click on the VERIFY button under the HTML tag section in Google Search Console.
8. Rank Math SEO
If you’re using the Rank Math SEO plugin, you can verify your website in Google Search Console by going to Rank Math > General Settings > Webmaster Tools in your dashboard. Here, you’ll see a field that reads Google Search Console, which is where your Search Console verification code goes:
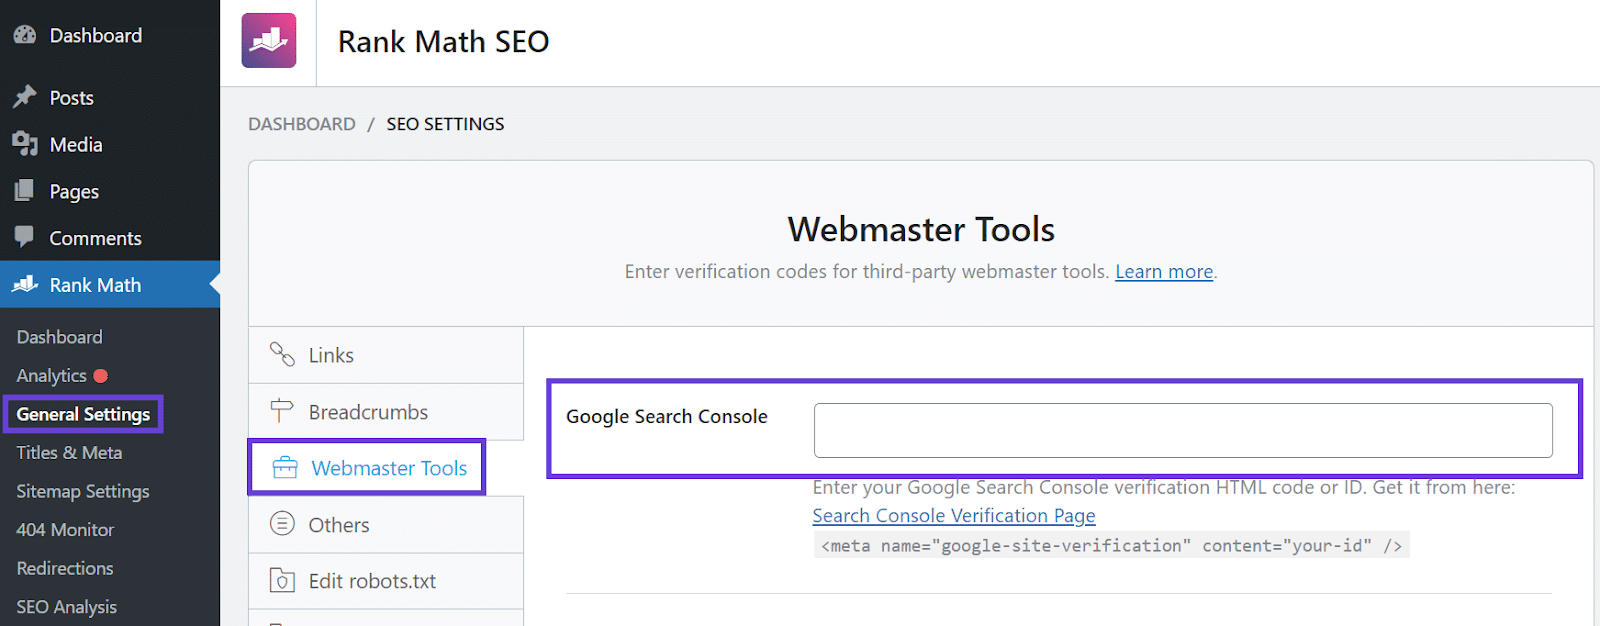
To find that verification code, you can follow the exact instructions as with other WordPress SEO plugins. Navigate to the Other verification methods section in the Google Search Console interface, and then select the HTML tag option. After you copy the entire tag, Rank Math will automatically identify the verification code.
Next, return to Google Search Console and click the VERIFY button under the HTML tag. Search Console should recognize your website now.
9. Site Kit by Google
The Site Kit by Google plugin enables you to connect your WordPress website with Google services with only a few clicks. It’s an official plugin, and you can use it for free.
Once you install and activate the plugin, navigate to Site Kit > Dashboard in your dashboard and select the SIGN IN WITH GOOGLE option:
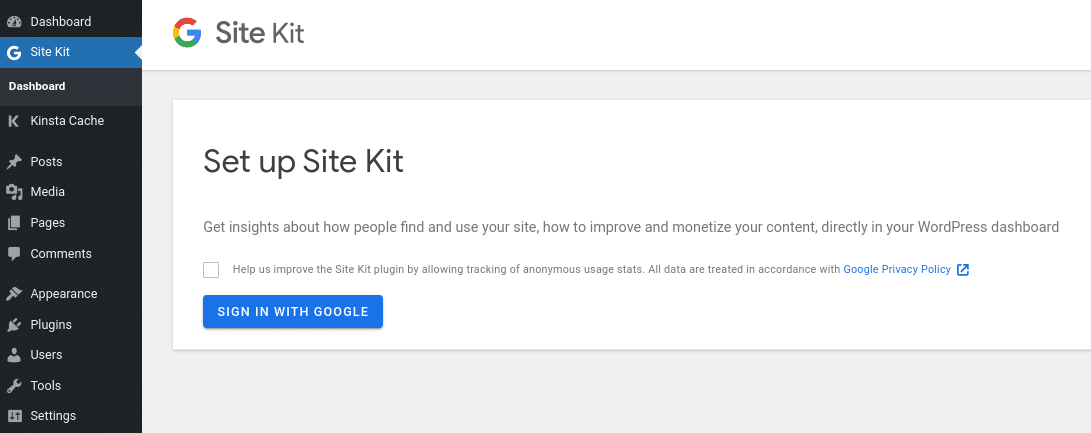
Google will prompt you to verify website ownership and to connect it with Search Console. To proceed, click on Sign in with Google once more:
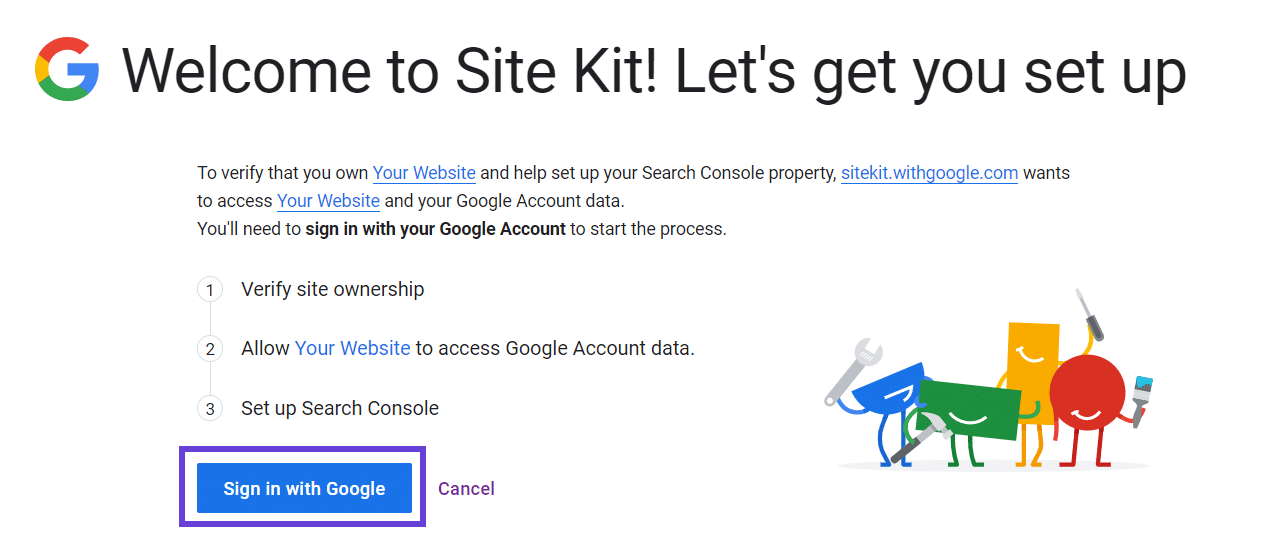
If you have multiple Google accounts, you’ll be able to choose which one you want to use for the Search Console account connected with your website. Google will ask you to confirm that you’re comfortable with Site Kit having access to the following types of data:
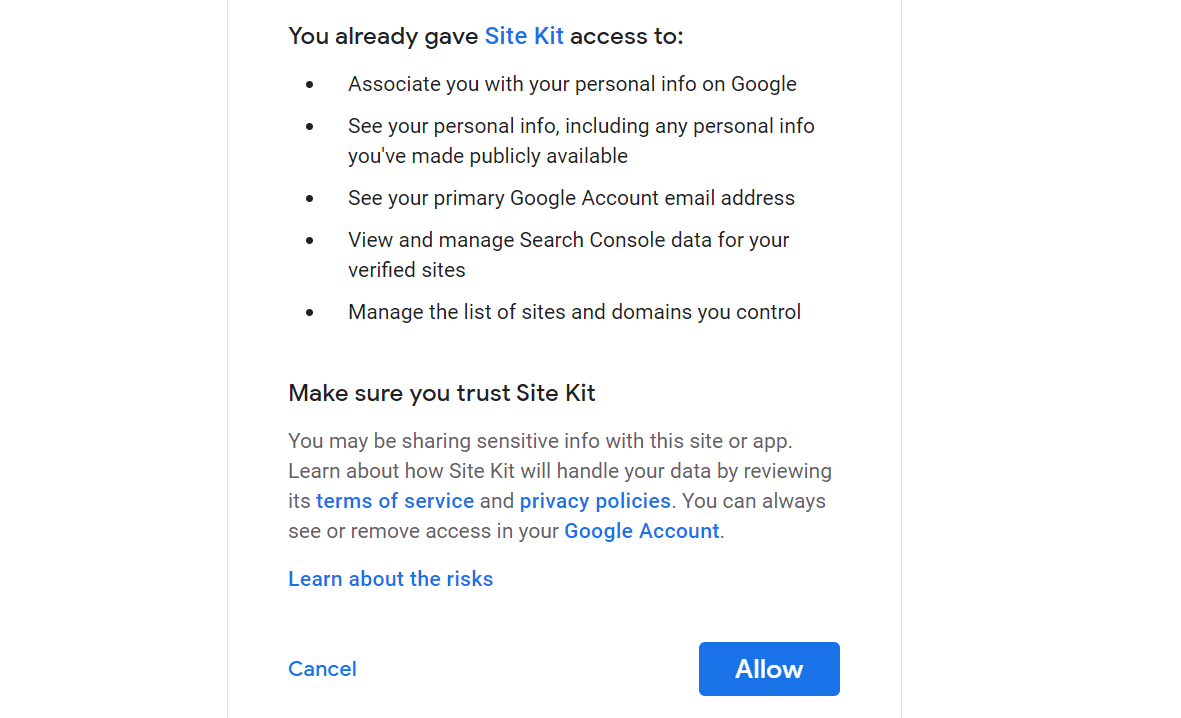
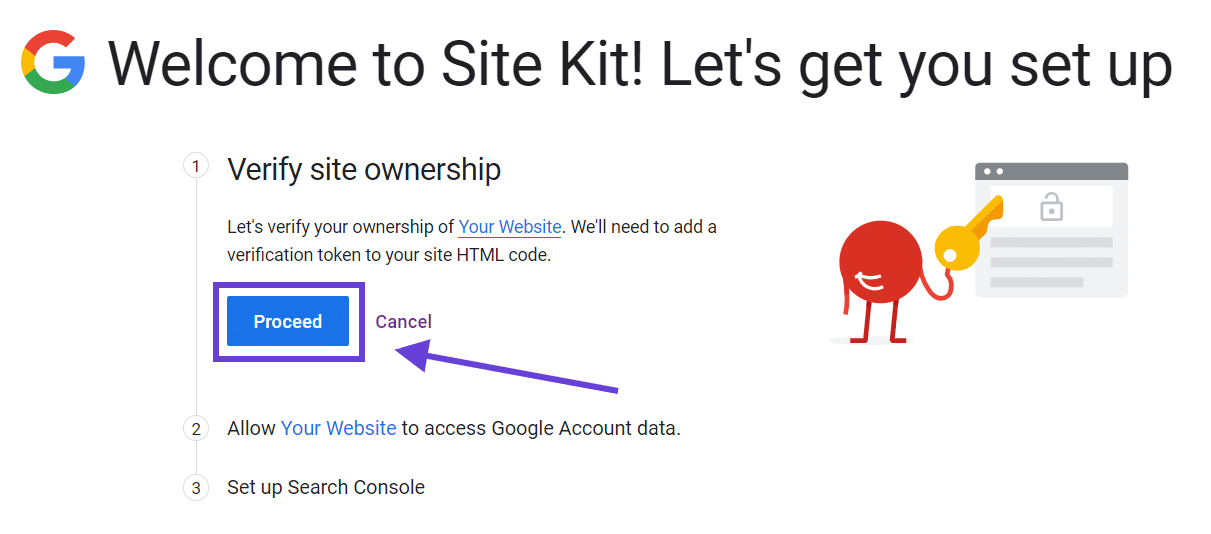
After you click on Allow, Site Kit will ask you to confirm site ownership for Google Search Console. Site Kit does this by adding a bit of HTML code to your website. All that you have to do is select Proceed:
Moving on, Site Kit will ask you for permission to and your Google account data and display it on your dashboard. Click the Allow button once more. Then you’ll see a success message telling you that your website is verified on Google Search Console:
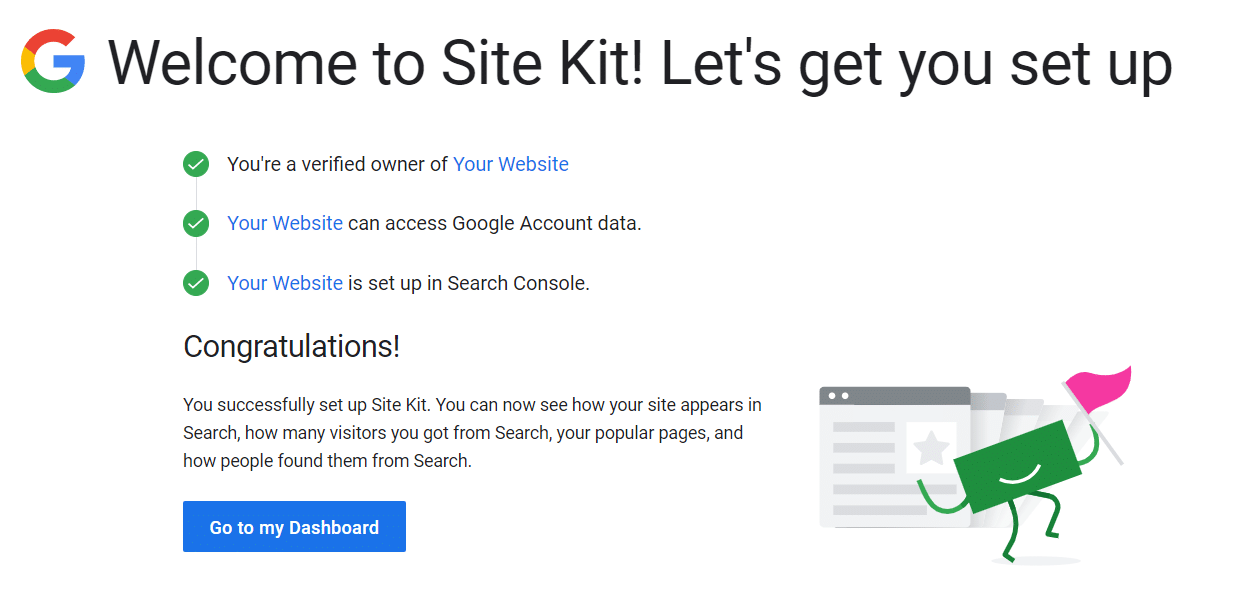
When you return to your Site Kit dashboard in WordPress, you’ll see that it’s connected to Google Search Console. A new Site Kit > Search Console tab will appear in your dashboard, giving you access to data from within your website.
Which Method Should You Use?
Adding a website to Google Search Console takes only seconds. However, it would help if you verified that you own the site, which can vary in complexity depending on your chosen verification method.
If you’re using Google Analytics or Tag Manager, you already have some Google code on your site. Google Search Console should identify that code and verify your website without you needing to add anything else to it. Alternatively, you can add an HTML file, include a tag, or use DNS verification (the best approach if you don’t want to add more code to your site).
Finally, if you’re using a WordPress SEO plugin, the most popular options include Google Search Console verification features. Those will help you verify your website. All you have to do is enter a verification code.
Summary
Congratulations! You now know all you need to get started with your Google site verification.
Just remember that Google will periodically check on your site’s verification. No matter which method you choose, it’s essential to leave that method in place — you cannot remove it after confirmation.
It’s now time to start scaling your website traffic.
Do you have any other questions about the Google Search Console verification process? Leave a comment, and we’ll try to help!


