Adding and configuring your domain correctly is a key step in going live with your WordPress site. To make your site accessible, you need to point your domain to Kinsta by adding the required DNS records.
DNS (Domain Name System) acts like a directory that maps your domain name (e.g., example.com) to the server where your site is hosted. Adding DNS records serves two main purposes:
Verification: Confirms that you own or control the domain
Pointing: Directs traffic from your domain to Kinsta
When you add a domain in MyKinsta, we provide the DNS records you need to correctly configure and connect your domain.
Your Domains list shows all domains that can be used to access your site. The primary domain is the main domain you want visitors to use.
Every custom domain you add is automatically secured with a free SSL certificate. Kinsta provisions and renews these certificates automatically, regardless of the domain setup method you use, so you don’t need to manage renewals yourself.
Your temporary domain (e.g. sitename.kinsta.cloud) is covered by a wildcard SSL certificate for the kinsta.cloud domain.
If you haven’t already, we also recommend reviewing our go-live checklist to make sure you have everything ready to make your site live.
Within your site’s Info page, you can view the Domains your site is using and if the SSL certificate is valid.
Domain information on your site’s Info page.
Cloudflare domains
If your domain already uses your own Cloudflare account, you’ll need to follow a slightly different setup process to ensure compatibility between your Cloudflare configuration and Kinsta’s free Cloudflare integration.
If your domain is connected to your own Cloudflare account (for DNS or proxying), it is considered a Cloudflare domain.
If your domain is not connected to Cloudflare in any way, it is considered a non-Cloudflare domain.
When you add your domain in MyKinsta, we automatically detect whether it is a Cloudflare or non-Cloudflare domain and guide you through the appropriate setup.
If your domain uses your own Cloudflare account, you can continue using Cloudflare’s proxy, WAF, bot protection, caching, and other Cloudflare services with Kinsta.
Before adding the new DNS records, remove any conflicting records for the same hostname. In most cases, conflicts occur on the root domain (@).
For Cloudflare domains, the required verification records must initially be set to DNS only (proxy disabled) so the domain can be verified successfully. After verification is complete, you can re-enable proxying on your primary site records if you want traffic to continue passing through your Cloudflare account and retain Cloudflare protections.
If you use Cloudflare Pro or higher, the CNAME Flattening feature may interfere with domain verification. To avoid issues, temporarily disable CNAME Flattening until verification is complete.
If verification still fails, you can also temporarily disable Universal SSL in Cloudflare and re-enable it after the domain has been verified.
Add a domain
In MyKinsta, go to Sites > sitename > Domains, and click Add domain.
Add a new domain in MyKinsta.
Complete Add domain as follows:
Domain name: Enter your domain name.
Add www. subdomain: This option is enabled by default to ensure both the www and non-www versions of your domain are correctly configured with Kinsta’s Cloudflare integration. You can disable this if you don’t want to include the www version. However, we recommend configuring both versions in your DNS to ensure consistent accessibility and compatibility. Some browsers, systems, or integrations may default to one version over the other, and having both configured helps prevent unexpected issues. You can then choose your preferred version and redirect the other to it, providing a consistent experience for visitors.
Select Advanced settings to select the following:
Add domain with wildcard: This option allows you to include all subdomains of your domain (e.g., *.example.com) in a single configuration. Enabling this ensures that verification, DNS pointing, and SSL certificate issuance are automatically applied to all current and future subdomains, without needing to add them individually. This is especially useful if you use multiple or dynamic subdomains, as it saves time and reduces the risk of configuration issues.
Use my own SSL certificate with this domain: Kinsta provides a free SSL certificate for every domain by default. Select this option if you want to use a custom SSL certificate instead. When enabled, you can paste the contents of your .key and .cert files. If there are any errors with the certificate, you’ll need to resolve them before continuing, or you can disable this option and add your custom SSL certificate later.
When you add a domain, you need to add DNS records to verify the domain and point it to Kinsta. Select the type of setup from the following:
Quick setup: We recommend this option if your domain is new and not currently receiving traffic. If your site is already live, this method may cause downtime during the transition. With this option, you don’t need to add TXT or CNAME records to verify domain ownership. Only A records are required to point your domain. After updating your DNS records, your site may experience 1-3 minutes of downtime. However, this can be longer depending on your DNS TTL settings; for example, if your TTL is set to several hours (e.g., 24 hours), the changes may take that long to fully propagate.
Avoid downtime: We recommend this option if you’re migrating a live site that already receives traffic, as it avoids downtime during the transition. With this method, you first verify domain ownership by adding TXT and CNAME records. Once verified, you can update your DNS with the required A records to point your domain to Kinsta. Although this approach prevents downtime, it may take up to 1.5 hours for your site to go live. This can take longer depending on your DNS TTL settings, especially if they are set to several hours.
Click Add domain.
Add a domain in MyKinsta.
The next steps differ depending on whether you choose Quick setup or Avoid downtime.
Quick setup
When you select this option, Kinsta provides the DNS records you need to add to your DNS to point your domain.
If you select Add www. subdomain, two DNS records are shown. These are CNAME records if you’re using a Cloudflare account and A records if it’s non-Cloudflare.
If you select Add domain with wildcard, additional TXT and CNAME records are required.
Your DNS provider is where your domain’s DNS records are managed. This is often your domain registrar (for example, GoDaddy), but it may also be a separate DNS provider (such as Cloudflare).
Refer to Kinsta’s DNS if you’re using this to manage your DNS records, or for more detailed information on updating DNS at some popular registrars and DNS managers, check out these articles:
Once you’ve added your DNS records, click OK, I’ve done it.
Add the A records to your DNS records to point your domain.
Once the DNS has propagated:
You’ll receive a confirmation email.
A check mark will appear next to the domain in MyKinsta to indicate it is pointed correctly.
A checkmark next to your domain in MyKinsta indicates it’s pointed correctly.
Once you’ve added your custom domain, you must ensure it is set up correctly as your site’s primary domain. We also recommend forcing your site to load over HTTPS for added security.
Avoid downtime
When you select this option, Kinsta first provides you with the CNAME and TXT records required to verify your domain. If you select Add www. subdomain, two CNAME and two TXT records will be shown.
Your DNS provider is where your domain’s DNS records are managed. This is often your domain registrar (for example, GoDaddy), but it may also be a separate DNS provider (such as Cloudflare).
Refer to Kinsta’s DNS if you’re using this to manage your DNS records, or for more detailed information on updating DNS at some popular registrars and DNS managers, check out these articles:
This TXT record allows your domain registrar to verify that you own the domain and are authorized to use their services for that domain. Once the domain is fully validated, you can remove this record from your DNS if necessary.
Name: _cf-custom-hostname
Value: Unique UUID value from MyKinsta (xxxxxxxx-xxxx-xxxx-xxxx-xxxxxxxxxxxx)
CNAME record
Kinsta uses this DNS entry to update the domain with the necessary tokens for your SSL certificate. As long as this record exists in your DNS, you won’t need to manually renew your SSL certificate; Kinsta manages it for you. We don’t recommend removing this DNS entry, as you will need to re-add it each time the SSL certificate requires renewal.
Name: _acme-challenge
Domain name: example.com.kinstavalidation.app
Add the TXT and CNAME records to your DNS records to verify your domain ownership.
After you’ve added the records, click Verify to confirm that the record exists in your DNS and matches the value provided by Kinsta. Alternatively, click OK, I’ve done it to close the verification window and allow the checks to run in the background.
Once DNS propagates (usually within a few minutes, but it may depend on the TTL set when adding the record), you’ll receive a notification email to let you know you can continue with pointing your domain.
After your domain has been successfully verified, click Point domain to start the domain pointing process.
Point your domain to Kinsta.
Kinsta provides the DNS records you need to add to your DNS to point your domain. These are CNAME records if it’s a Cloudflare domain and A records if it’s non-Cloudflare. Go to your domain registrar to add these records.
Once you’ve added your DNS records, click OK, I’ve done it.
Add the A records to your DNS records to point your domain.
Once the DNS has propagated, you will receive an email to confirm this, and a check mark will show against the domain in MyKinsta.
A checkmark next to your domain in MyKinsta indicates it’s pointed correctly.
Once you’ve added your custom domain, you must ensure it is set up correctly as your site’s primary domain. We also recommend forcing your site to load over HTTPS for added security.
Change your primary domain
Every site hosted on Kinsta is assigned a primary domain. The primary domain is the “main domain” of the site and is automatically assigned when a site is created. If you don’t add a custom domain during site creation, your site’s primary domain will be set to a kinsta.cloud domain.
If you’ve added a custom domain and you’re ready to make your site live, you’ll want to ensure it’s set up correctly as your site’s primary domain.
To view your site’s primary domain, navigate to Sites > sitename > Domains. In the screenshot below, our Kinsta Help Testing site is configured with kinstahelptesting.kinsta.cloud as the primary domain.
Kinsta temporary URL.
To update your primary domain, scroll down to the Domains list section, click on the dropdown menu next to a domain, and select Make primary domain.
Make a domain the primary domain in MyKinsta.
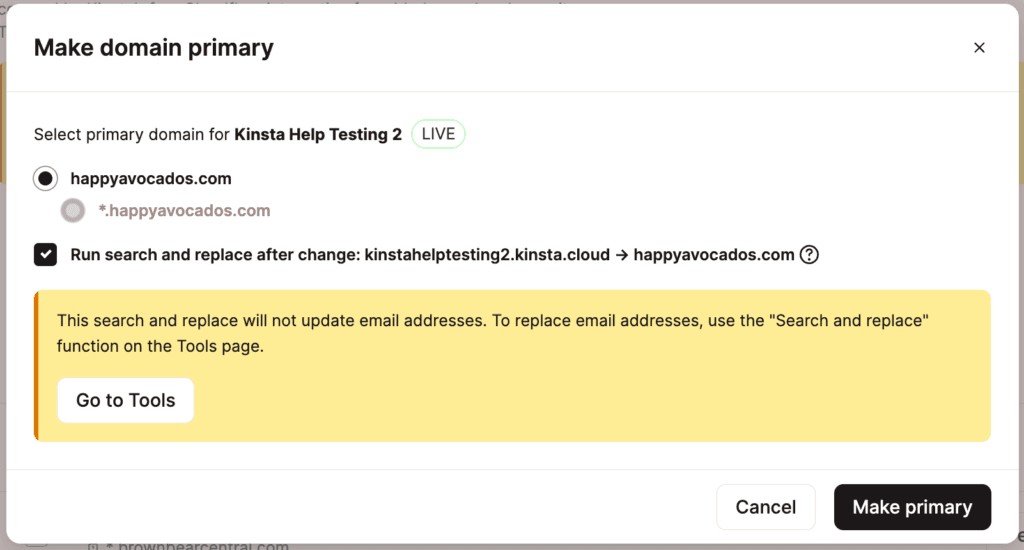
On the Make domain primary modal/pop-up, you have the option of choosing to run a search and replace. This search and replace will automatically update instances of your old domain to your new domain in your WordPress database. We recommend checking this option to prevent unexpected redirects caused by old URLs in your database. If you don’t perform the search and replace here, you can always do it manually with our search and replace tool later on.
Search and replace primary domain.
After clicking the Make primary button, it’ll take a few minutes to update the primary domain. Once it’s finished, you should see your new domain listed under Primary domain.
New primary domain in MyKinsta.
Force HTTPS (optional)
While technically optional, forcing your site to load over HTTPS is recommended. With our Cloudflare integration, once your domain is verified, a free SSL certificate (with wildcard support) is automatically added to your site. The only thing you’ll need to do is head over to your site in MyKinsta, then go to Tools and click on the Enable button under Force HTTPS.
Enable Force HTTPS in MyKinsta.
Linked DNS zone
If you’re using Kinsta’s DNS and you have linked a DNS zone to a site, the zone is shown here. You can click on the DNS zone to open the DNS records page. This does not add the required DNS records; it gives Site Administrators access to manage the DNS records for the site.
DNS zones that are linked to this site.
Troubleshooting
Pointing check suspended
If a domain has been pointing for 14 days or more, the pointing check process is automatically suspended. We recommend checking that the correct DNS records are in place, then clicking Restart pointing check to try again.
Pointing check suspended on your domain.
Verification suspended
If your domain has been verifying for 7 days or more, the verification process is automatically suspended. We recommend checking that the correct DNS records are in place, then clicking Restart verification to try again.
Verification suspended on your domain.
Domain resolution failed
If Kinsta’s monitoring service cannot resolve your domain, you’ll receive a Domain resolution failed email notification.
This error typically occurs for one of the following reasons:
Incorrect DNS records.
Misconfigured or incorrect nameservers.
A temporary DNS resolution issue.
To resolve this issue:
Verify that your domain’s DNS records are correctly configured and point to your Kinsta site.
Confirm that your domain is using the correct nameservers for your DNS provider.
If the DNS configuration appears correct, wait a few minutes and check again, as temporary DNS resolution issues can sometimes resolve on their own.
If the problem persists, contact your domain registrar or DNS provider to verify that your nameservers and DNS records are configured correctly.
Fix domain error
During the domain verification process, if a Fix domain error button appears next to the domain, this means a CAA record conflict is occurring.
A CAA record is an optional DNS record that lets you specify which certificate authorities (CAs) are allowed to issue SSL certificates for your domain. If a domain has no CAA records, any CA can generate an SSL certificate for it if requested. If a domain has a CAA record, only the CA(s) specified in the CA record can generate an SSL certificate for the domain.
To resolve this error, click the Fix domain error button, then visit your domain’s DNS provider to either add missing CAA records (marked as Pending) or, if you do not need a CAA record on your domain, remove existing records that are causing conflicts (marked as Detected).
Fix domain error showing conflicting CAA DNS records.
Troubleshoot Cloudflare domain pointing
If you have pointed your domain (allowing up to 24 hours for DNS to propagate) but you’re still seeing either of the following, there are a couple of places to check in your Cloudflare account:
a banner or warning that your site isn’t pointed to Kinsta and is subject to service interruption.
a status of “Confirming that you have pointed your domain to Kinsta.”
First, check the Page Rules in your Cloudflare account. If the root domain is redirected to the WWW domain or vice versa, the domain that is being redirected cannot be verified in MyKinsta. To resolve this issue, you’ll need to remove the redirect in Cloudflare Page Rules. This will allow the domain to be verified in MyKinsta. The redirect to the primary domain will now be handled at Kinsta.
Next, in your Security – Firewall rules, allow the user agent kinsta-bot and the IP addresses 35.194.36.163 and 34.135.149.39, so the firewall doesn’t block the bot that confirms your domain is verified and pointed to Kinsta.
Existing DNS zone record at Cloudflare
When adding and pointing a domain to your site in MyKinsta, under certain circumstances, you may see a warning that the domain has an existing zone record at Cloudflare, and continuing may cause your site to go offline.
Warning about existing DNS record at Cloudflare.
If you’re sure that you do not need to remove the existing zone record at Cloudflare, you can choose to continue without removing it. Select I confirm that I may experience problems using the domain, and click Continue.
If you do need to remove the existing zone record at Cloudflare, this is the message you can send to them, replacing YOURDOMAIN.com with your actual domain name.
Hi,
I am writing to you about the domain YOURDOMAIN.com.
My host, Kinsta, has detected an old, unused Cloudflare DNS zone for my domain. Would you please remove it from your system?
I confirm that I have access to DNS for the domain and am willing to add a TXT record to prove domain ownership. Please send the TXT record you would like me to use.
Thanks!
If you’re not sure whether or not you need to remove the existing zone record, contact our Support Team, and we will review your setup and let you know how to proceed.