 Add as a preferred source on Google

If you’re ready to host your business website with Kinsta, the next steps are to choose a plan, create your account, and get your WordPress site running. The process is straightforward, but there are a few decisions worth making before entering payment details, especially if you’re moving an existing website.
For example, a small business running one WordPress website may not need the same resources as a growing online store or a company managing several websites. You’ll also need to decide whether to pay based on website visits or bandwidth, and whether to start with monthly or annual billing.
This guide walks you through the process, from choosing your hosting plan and signing up to creating your first WordPress site or requesting a migration.
Before you buy Kinsta hosting
You don’t need to know every technical detail about your website before purchasing hosting. However, having a few things ready can make choosing a plan easier.
Start by answering these questions:
- Do you already have a WordPress website? If you do, you can request a migration after creating your Kinsta account. If you’re starting from scratch, you can install WordPress directly in MyKinsta.
- How many websites do you need to host? A business running one website may only need a single-site plan. If you operate several independent websites, consider a multiple-site plan or the available site add-on.
- How much traffic does your website receive? Check your current hosting usage if you’re moving an existing site. You’ll use this information to compare plans based on visits or bandwidth.
- How much storage are you using? Your website’s files, uploaded images, themes, plugins, and database contribute to its storage requirements.
- Does your website take orders, bookings, or memberships? These sites may need additional planning during migration because their data changes frequently.
If you’re moving from another hosting provider, make sure you can access your current hosting control panel and WordPress dashboard. You’ll need some of those details later when requesting a migration.
You don’t have to move your domain to Kinsta or cancel your existing hosting before signing up. Those steps come later.
Step 1: Visit Kinsta’s hosting page and choose a plan
Start at Kinsta’s small-business hosting page or go directly to the WordPress hosting pricing page.
The small-business page introduces the managed hosting service and provides a pricing section where you can configure a plan. The main pricing page gives you a more detailed comparison of available plans and resources.
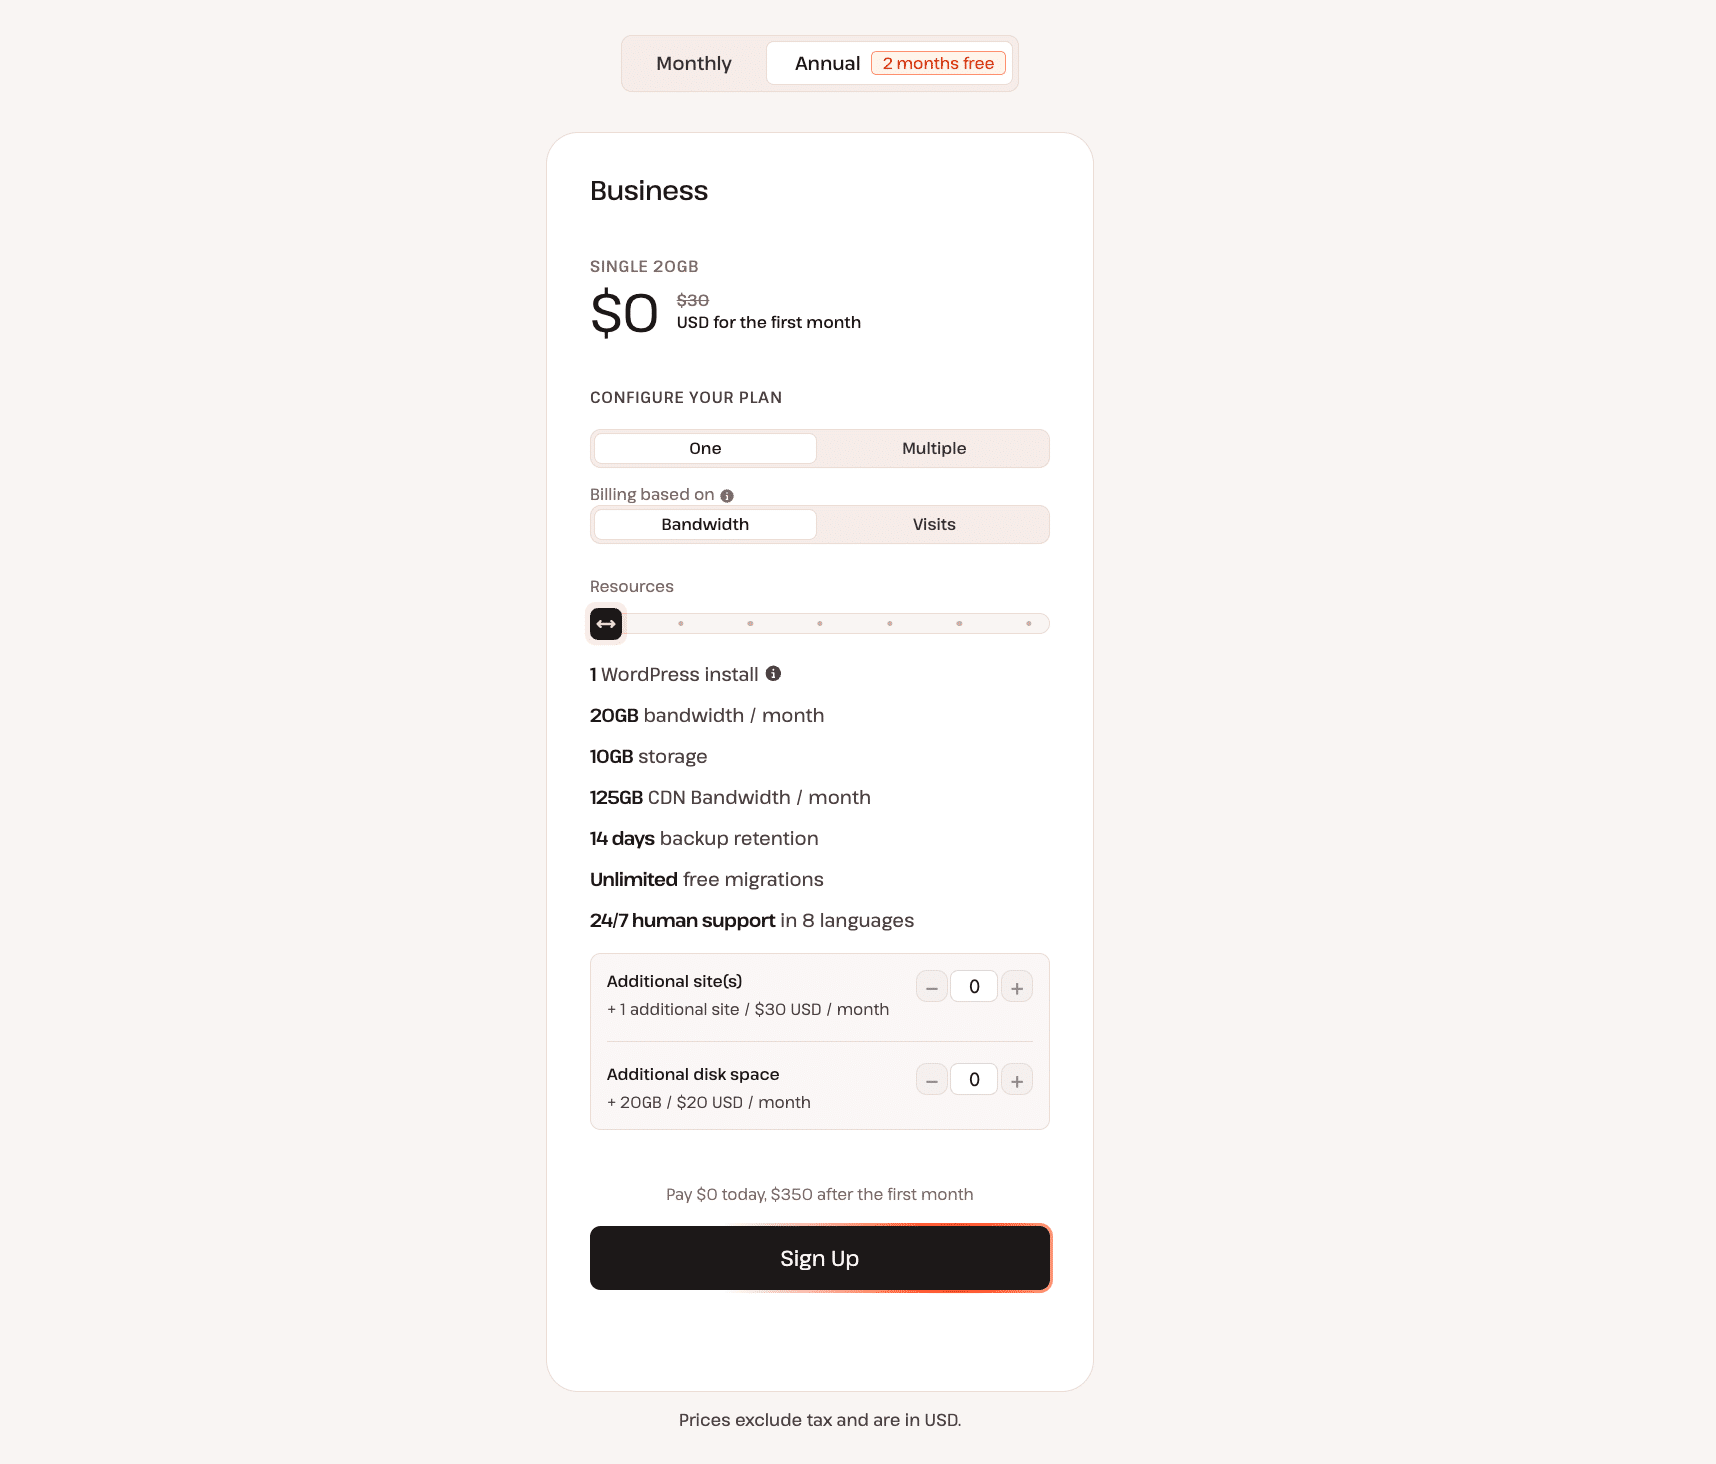
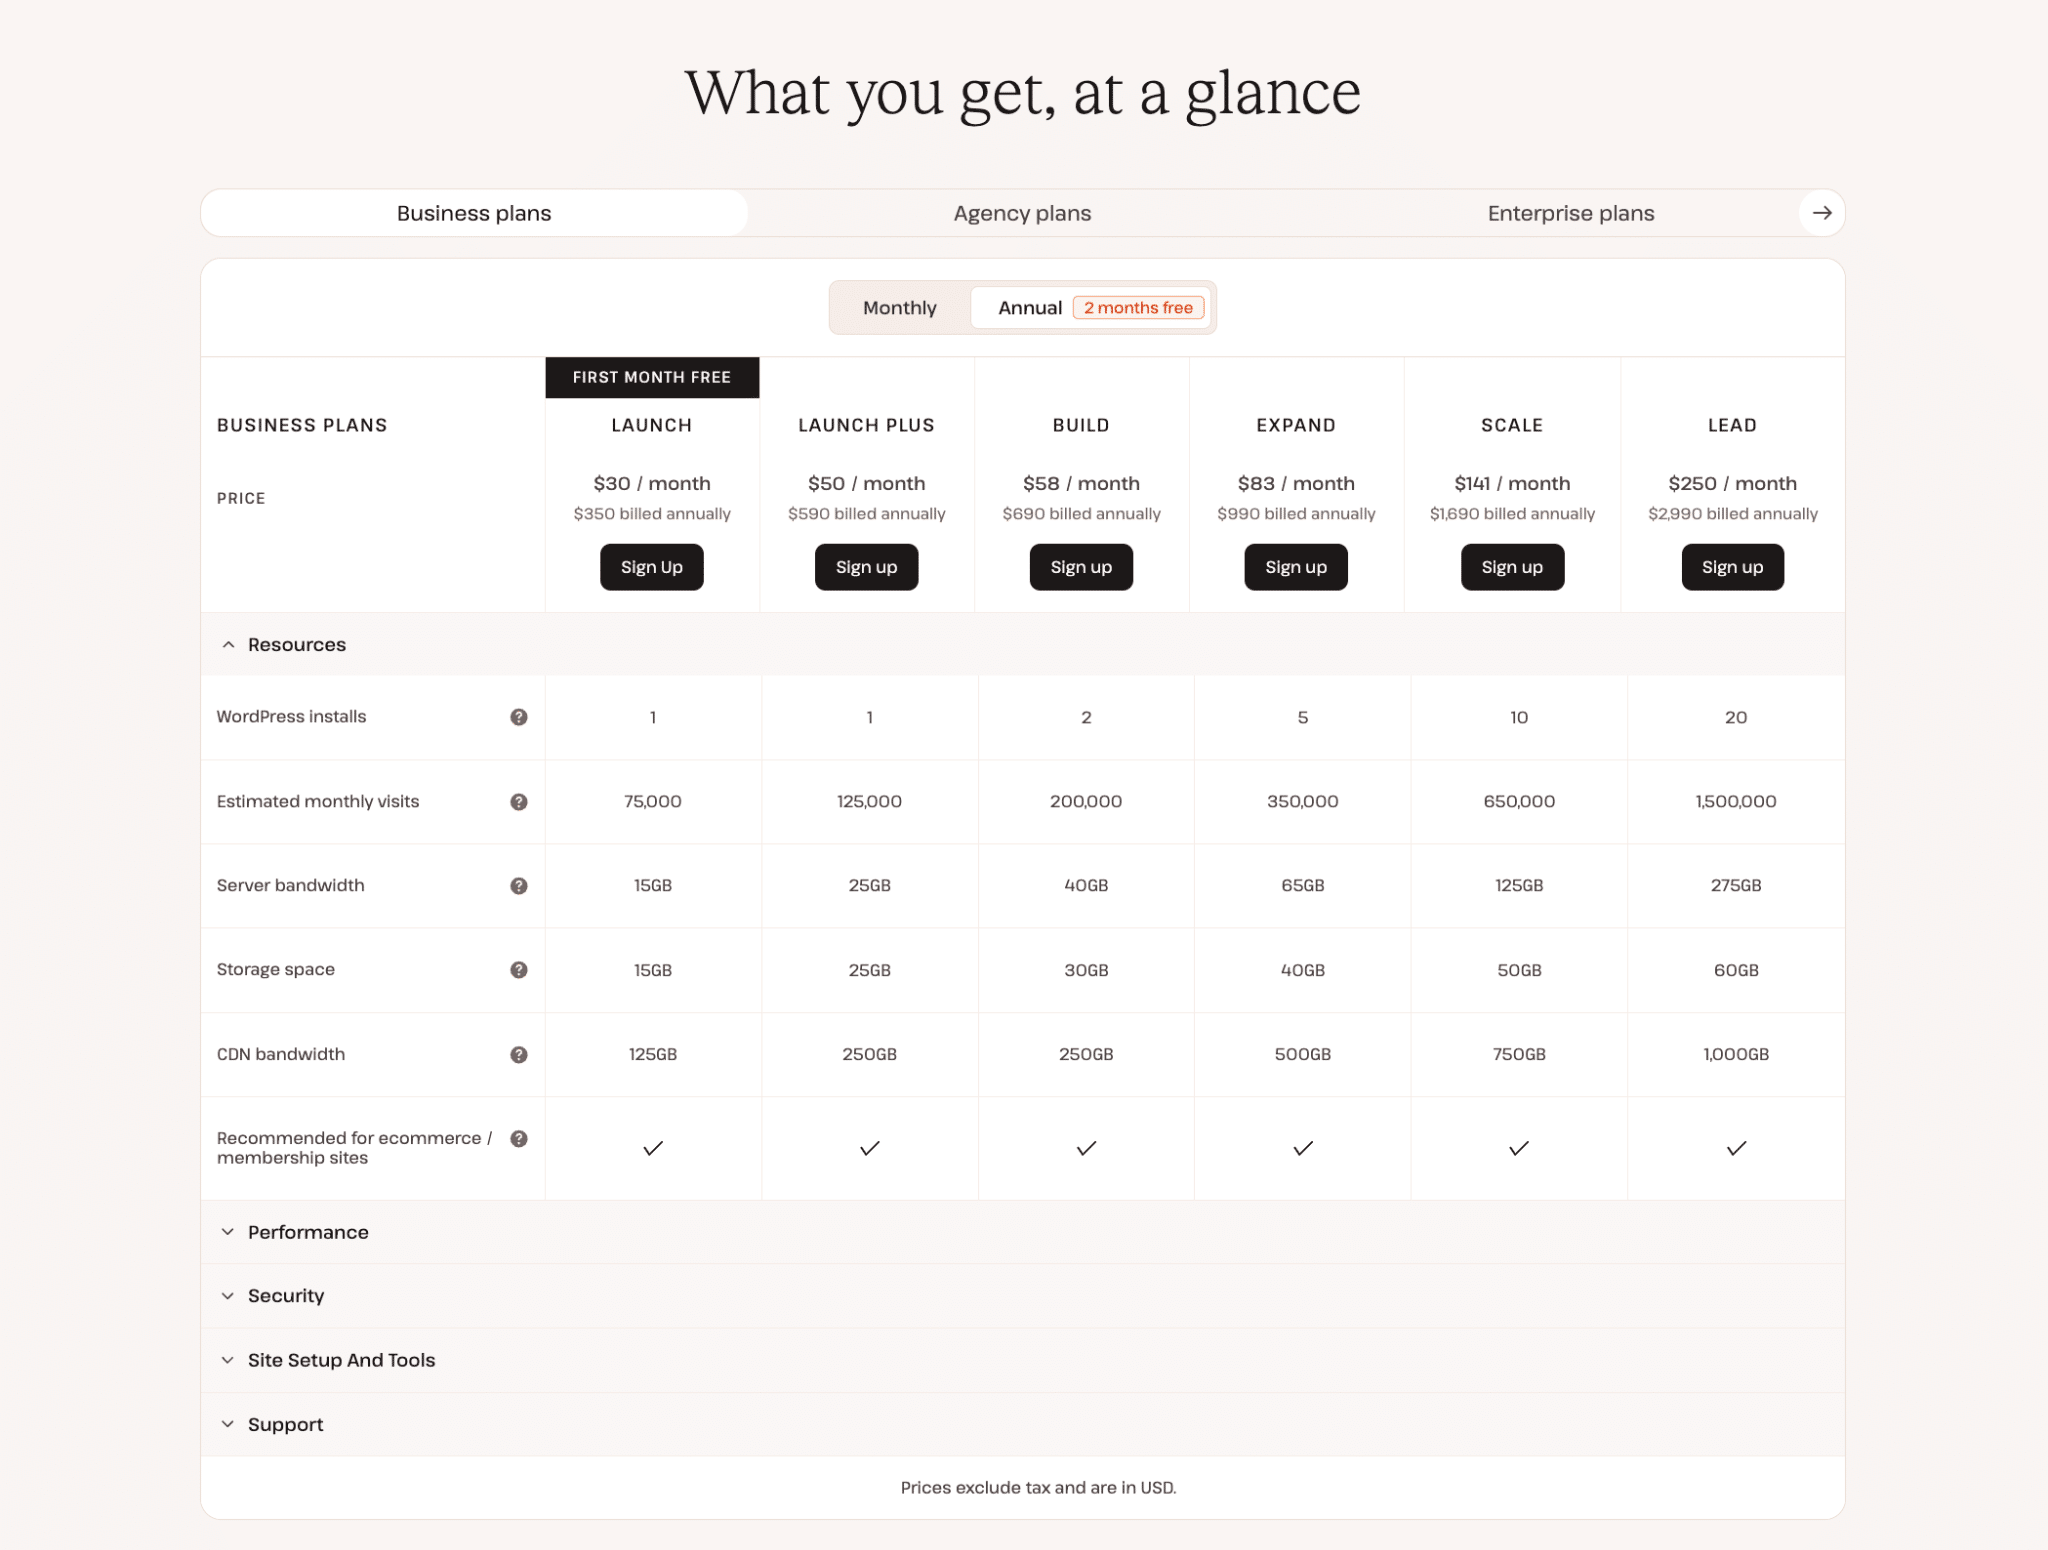
On the pricing page, you’ll find Business plans alongside options for agencies and larger organizations. For most small businesses evaluating their first Kinsta subscription, the Business plans are the appropriate place to begin comparing options.
The pricing configuration lets you choose your billing period and, depending on the plan family, the number of WordPress installations and how usage is measured.
Choose how many WordPress sites you need
If your business operates one independent WordPress website, start by comparing the single-site plans.
If you manage several websites, such as separate WordPress installations for different businesses or brands, compare the multiple-site plans.
Kinsta counts WordPress installations rather than every domain connected to a website. For example, using both example.com and www.example.com for the same installation doesn’t automatically mean you need two website slots.
You can also add site capacity through the WordPress site add-on. Each additional site includes a staging environment, but it shares the hosting plan’s other resources, including bandwidth or visits, storage, and CDN bandwidth.
If you’re unsure whether to choose a larger plan or add an individual website slot, compare the total resources you need, not just the number of websites.
Choose between visits and bandwidth billing
Kinsta offers plans that measure usage through either monthly visits or server bandwidth.
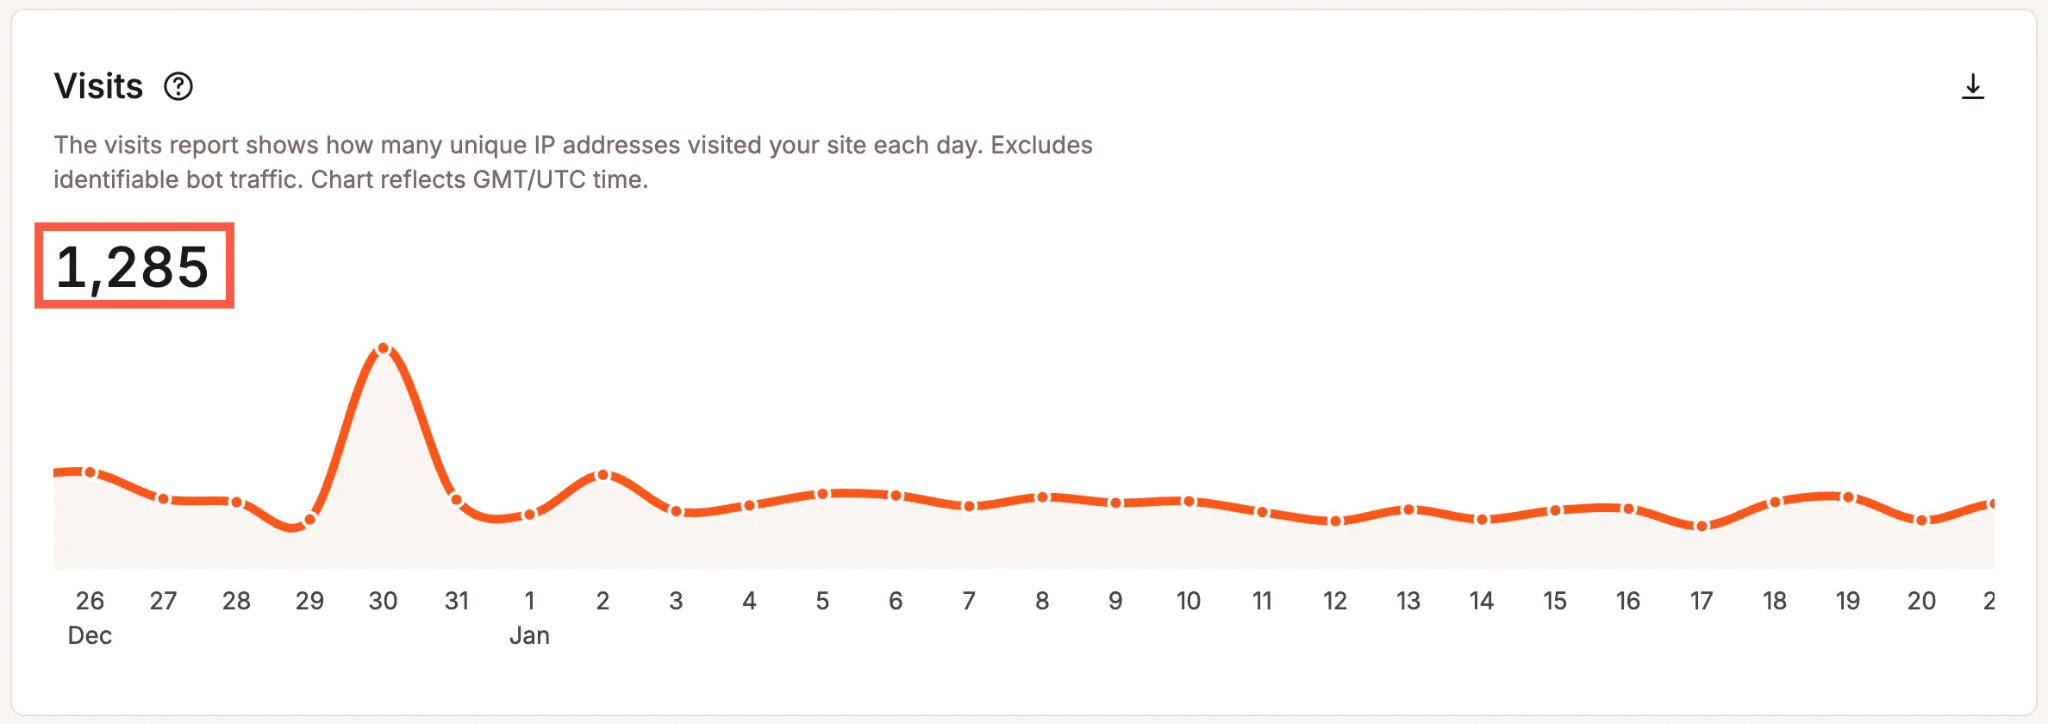
With visits-based billing, your allowance is based on visits recorded by Kinsta’s infrastructure. These figures can differ from what you see in Google Analytics because the services measure traffic differently.
With bandwidth-based billing, we calculate usage from the data your origin server delivers. Content served through Kinsta’s CDN or edge cache doesn’t count toward server bandwidth, although CDN bandwidth has its own allowance.
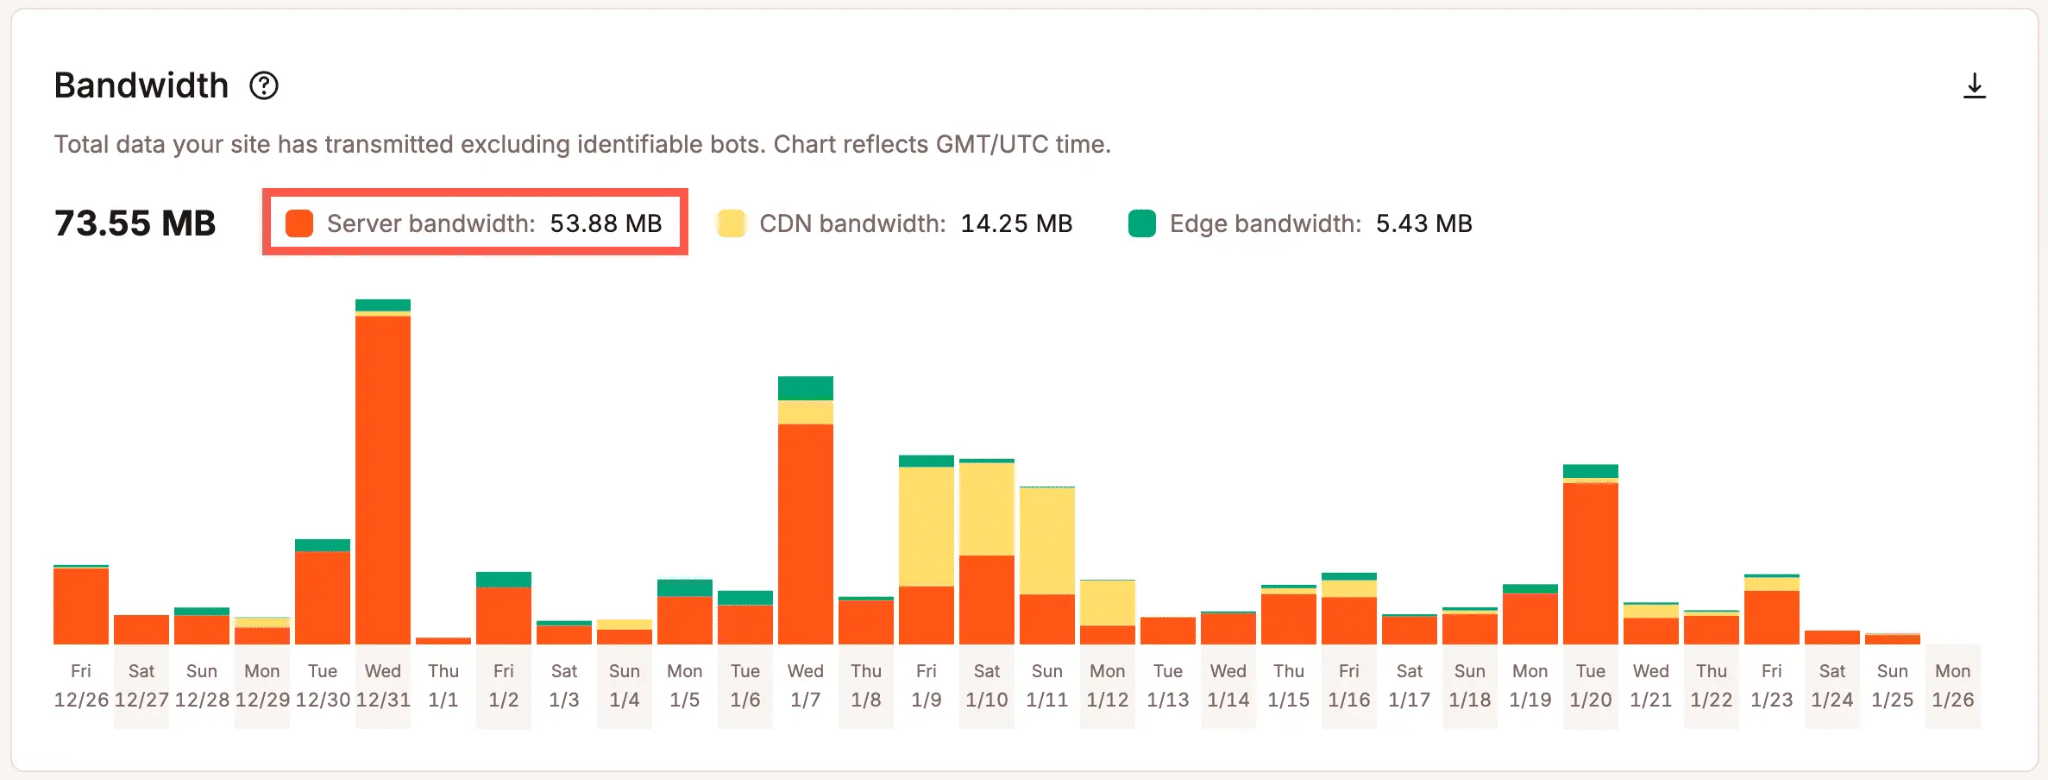
Neither option is automatically cheaper for every website. The better choice depends on how people and automated systems access your site, how much data those requests transfer, and how your content is cached.
If your current provider gives you relevant usage information, use it as a starting point. Remember that traffic and bandwidth figures from different hosting platforms may not be calculated the same way.
For more detail, see our guide to choosing the right hosting plan.
Check storage and other resources
Every hosting plan includes a storage allowance for your live WordPress sites.
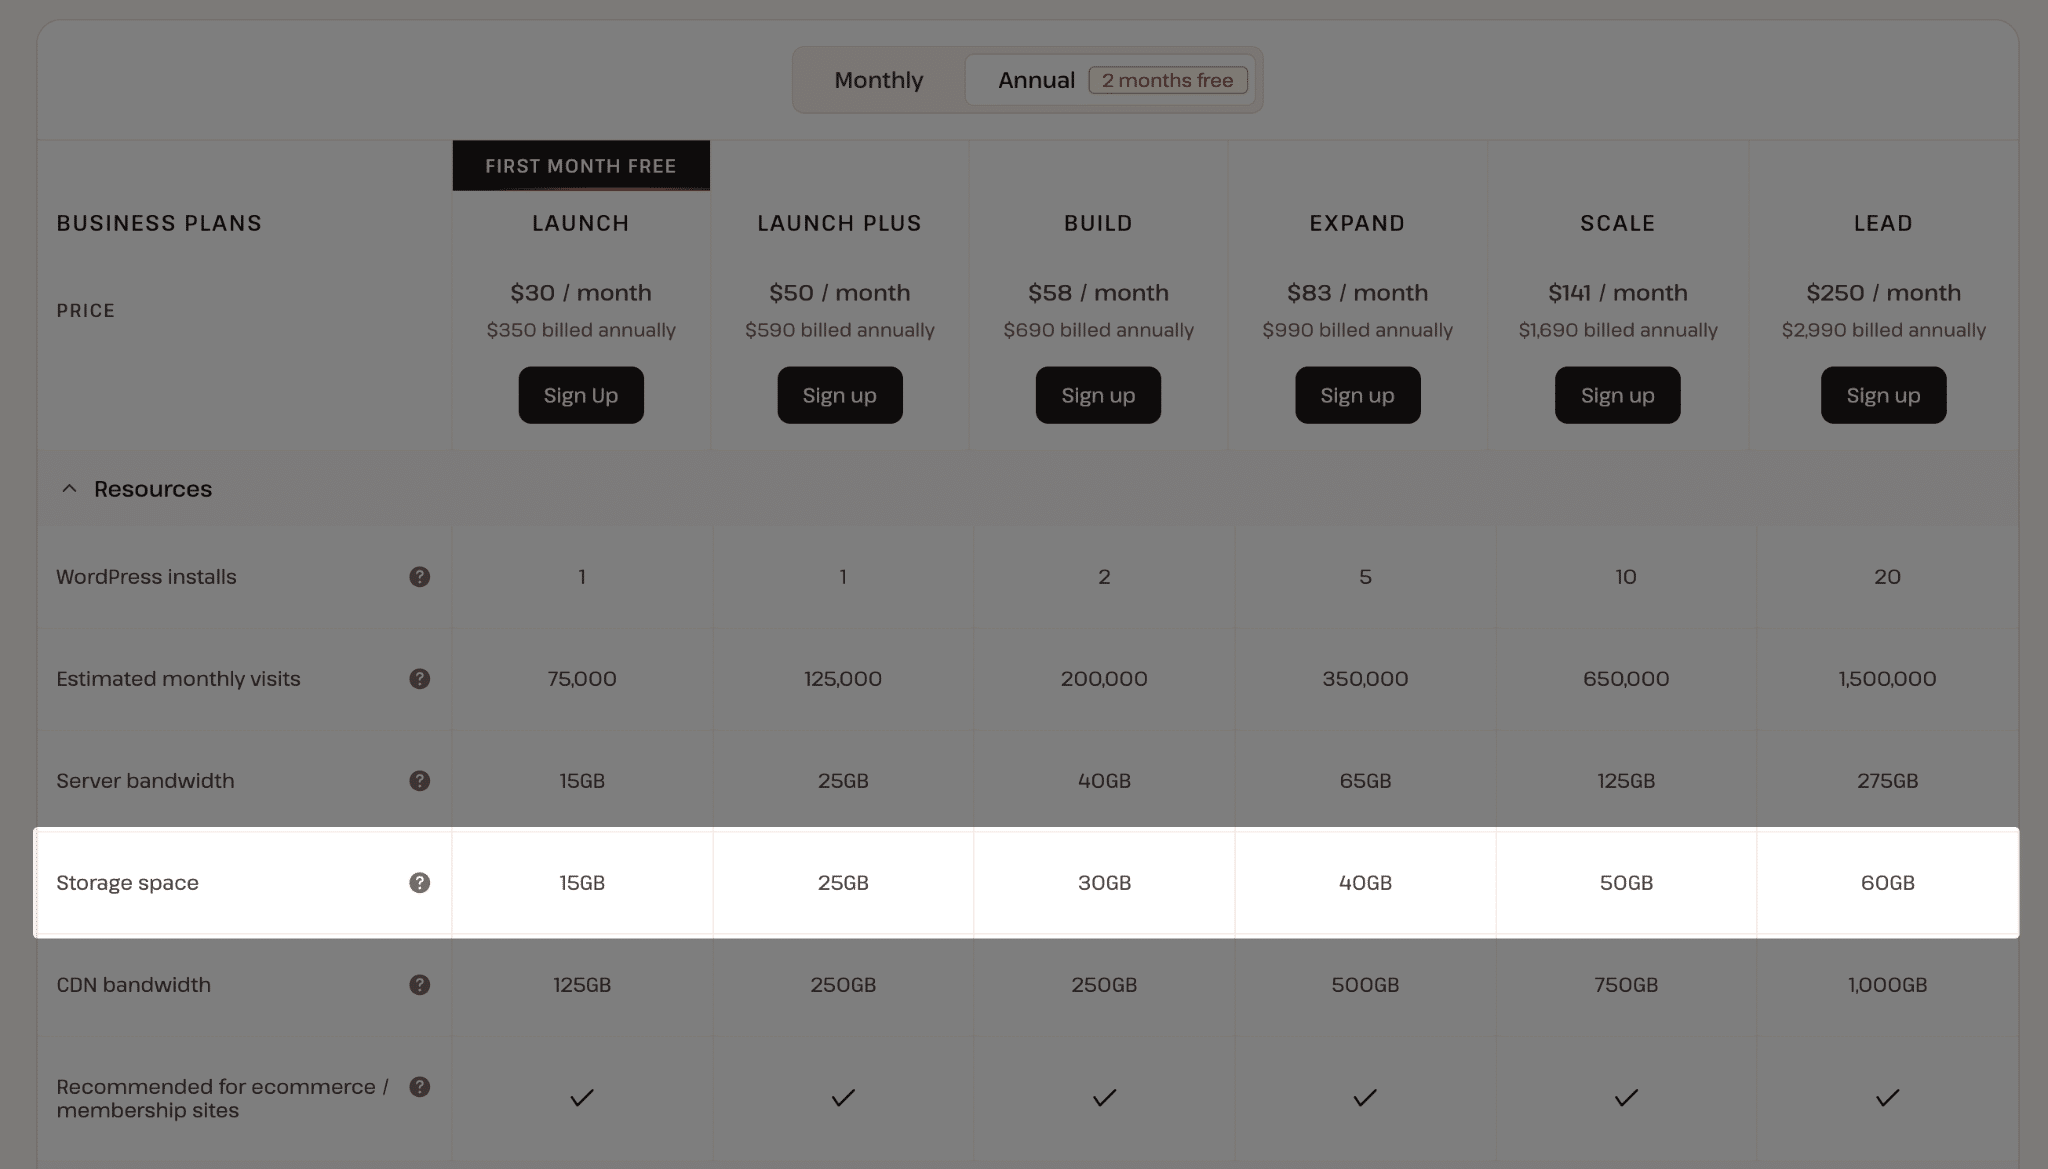
Consider your current disk usage, whether your website stores substantial media files, and how quickly those files are growing. A photography business with a large image library may have very different storage needs from a simple company website.
You don’t necessarily need to purchase a larger plan solely to add storage. Kinsta offers additional disk space in increments, which you can select separately.
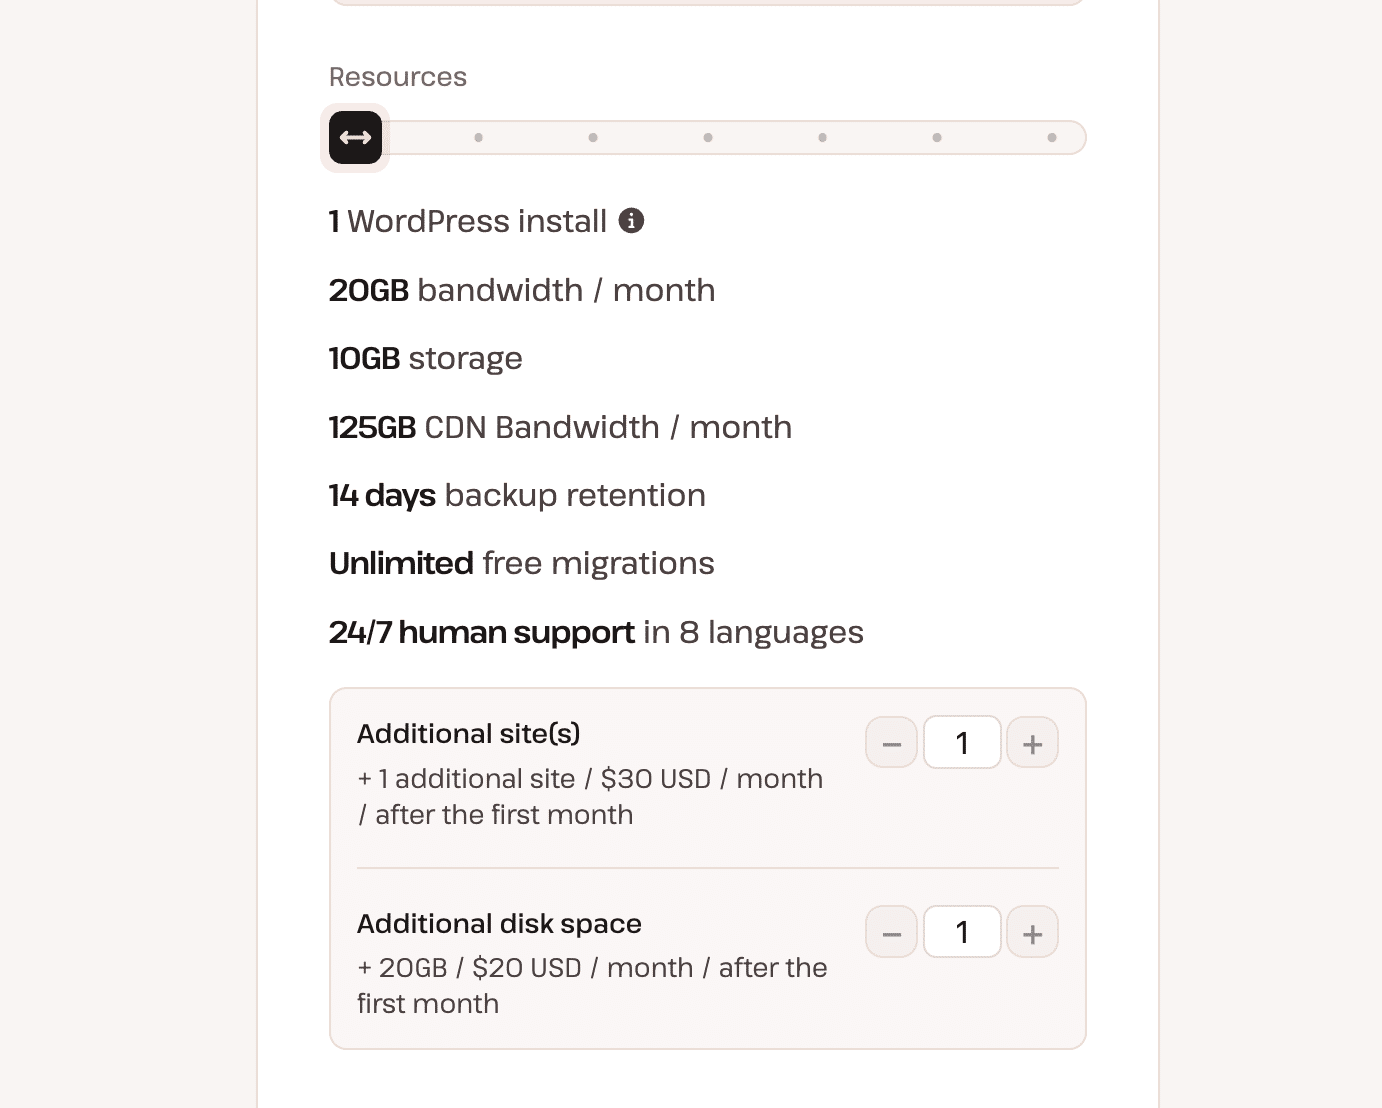
However, increasing storage won’t increase your plan’s other limits. If you’re also approaching your bandwidth, visit, or site limits, compare the cost of a larger plan before deciding.
Decide between monthly and annual billing
Kinsta lets you compare monthly and annual pricing on the pricing page. Annual billing provides the equivalent of two months’ hosting for free. Monthly billing requires a smaller upfront commitment.
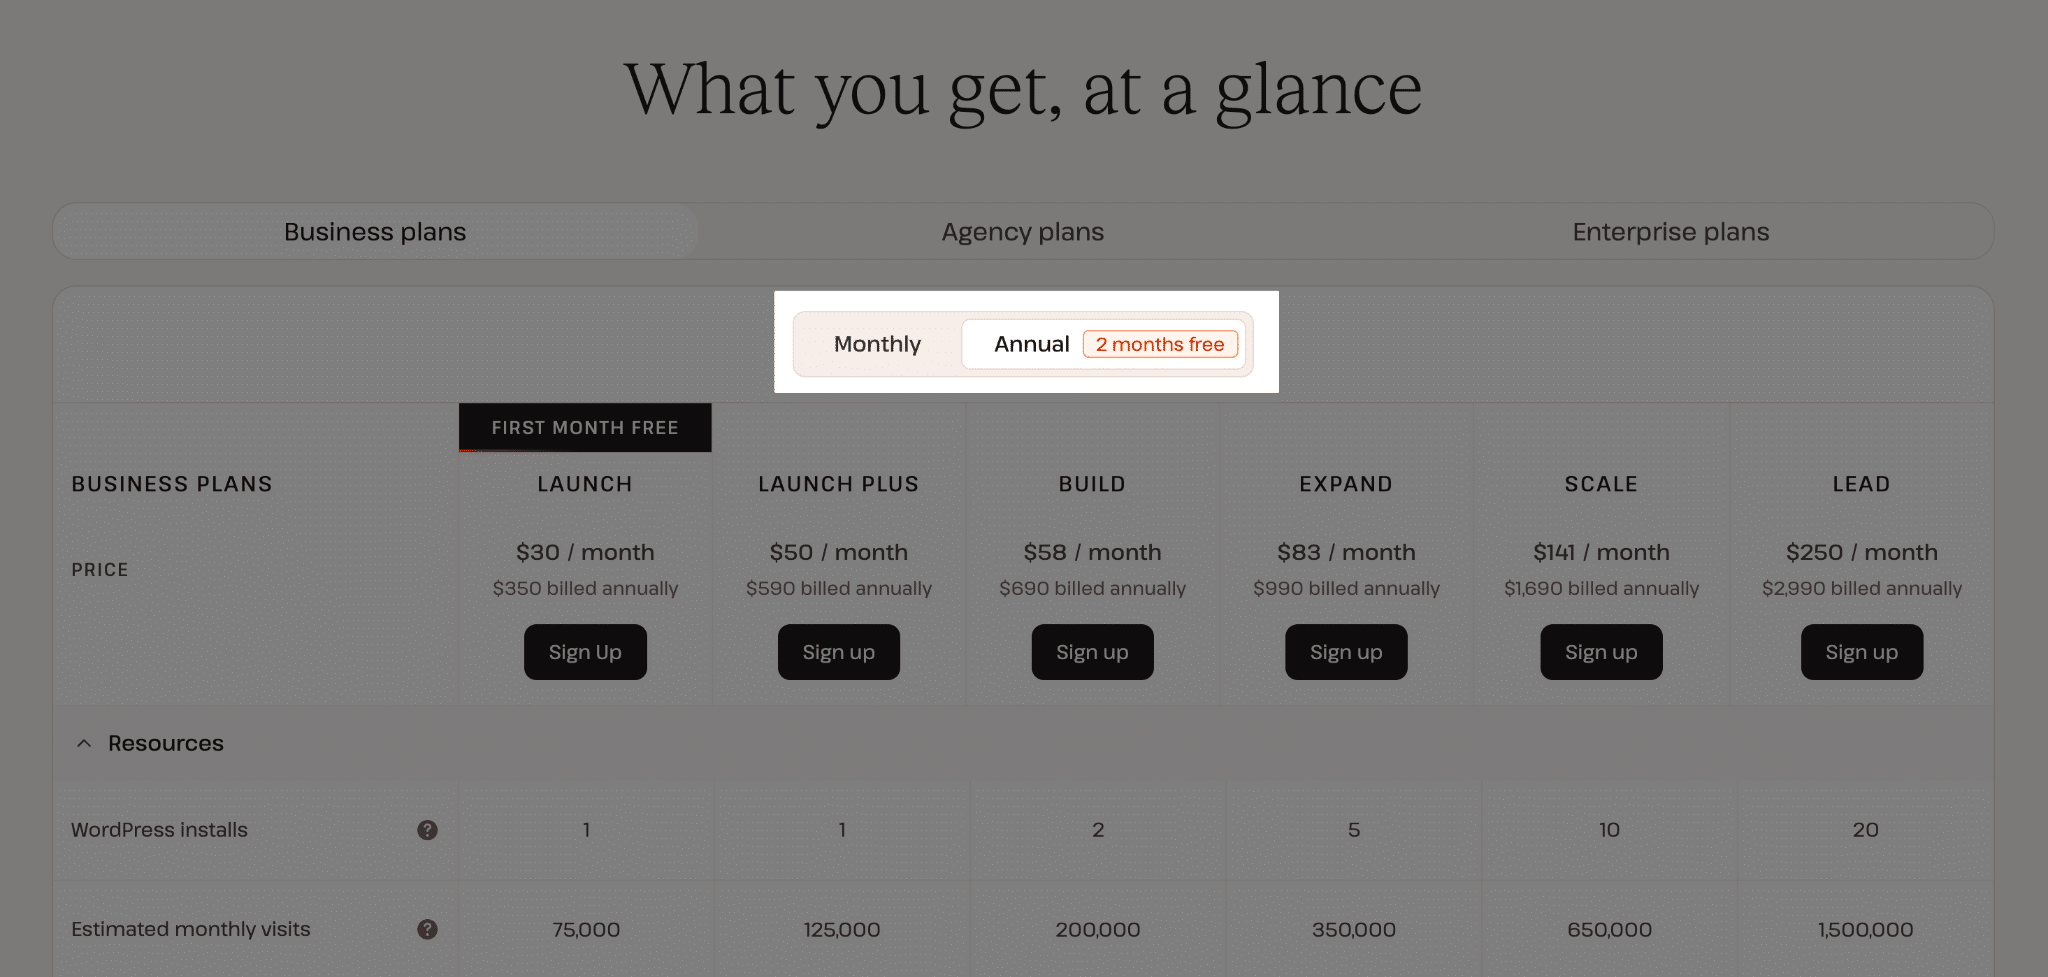
If you’re moving an established website and know you’ll need hosting for the foreseeable future, annual billing may be worth considering. If you prefer a monthly subscription while you evaluate the service, you can choose that instead.
Review the current checkout summary before committing because the amount due, introductory offers, taxes, and applicable add-ons depend on your selected configuration.
Step 2: Review your plan and any add-ons
Before signing up, review the resources included in the selected plan. For example, the current Single 20GB bandwidth configuration includes one WordPress installation, a monthly server bandwidth allowance, SSD storage, CDN bandwidth, backups, migration assistance, and access to Kinsta support.
The pricing page also lets you add more WordPress sites and disk space. These options can be a cost-effective way to add only the additional resources you need.
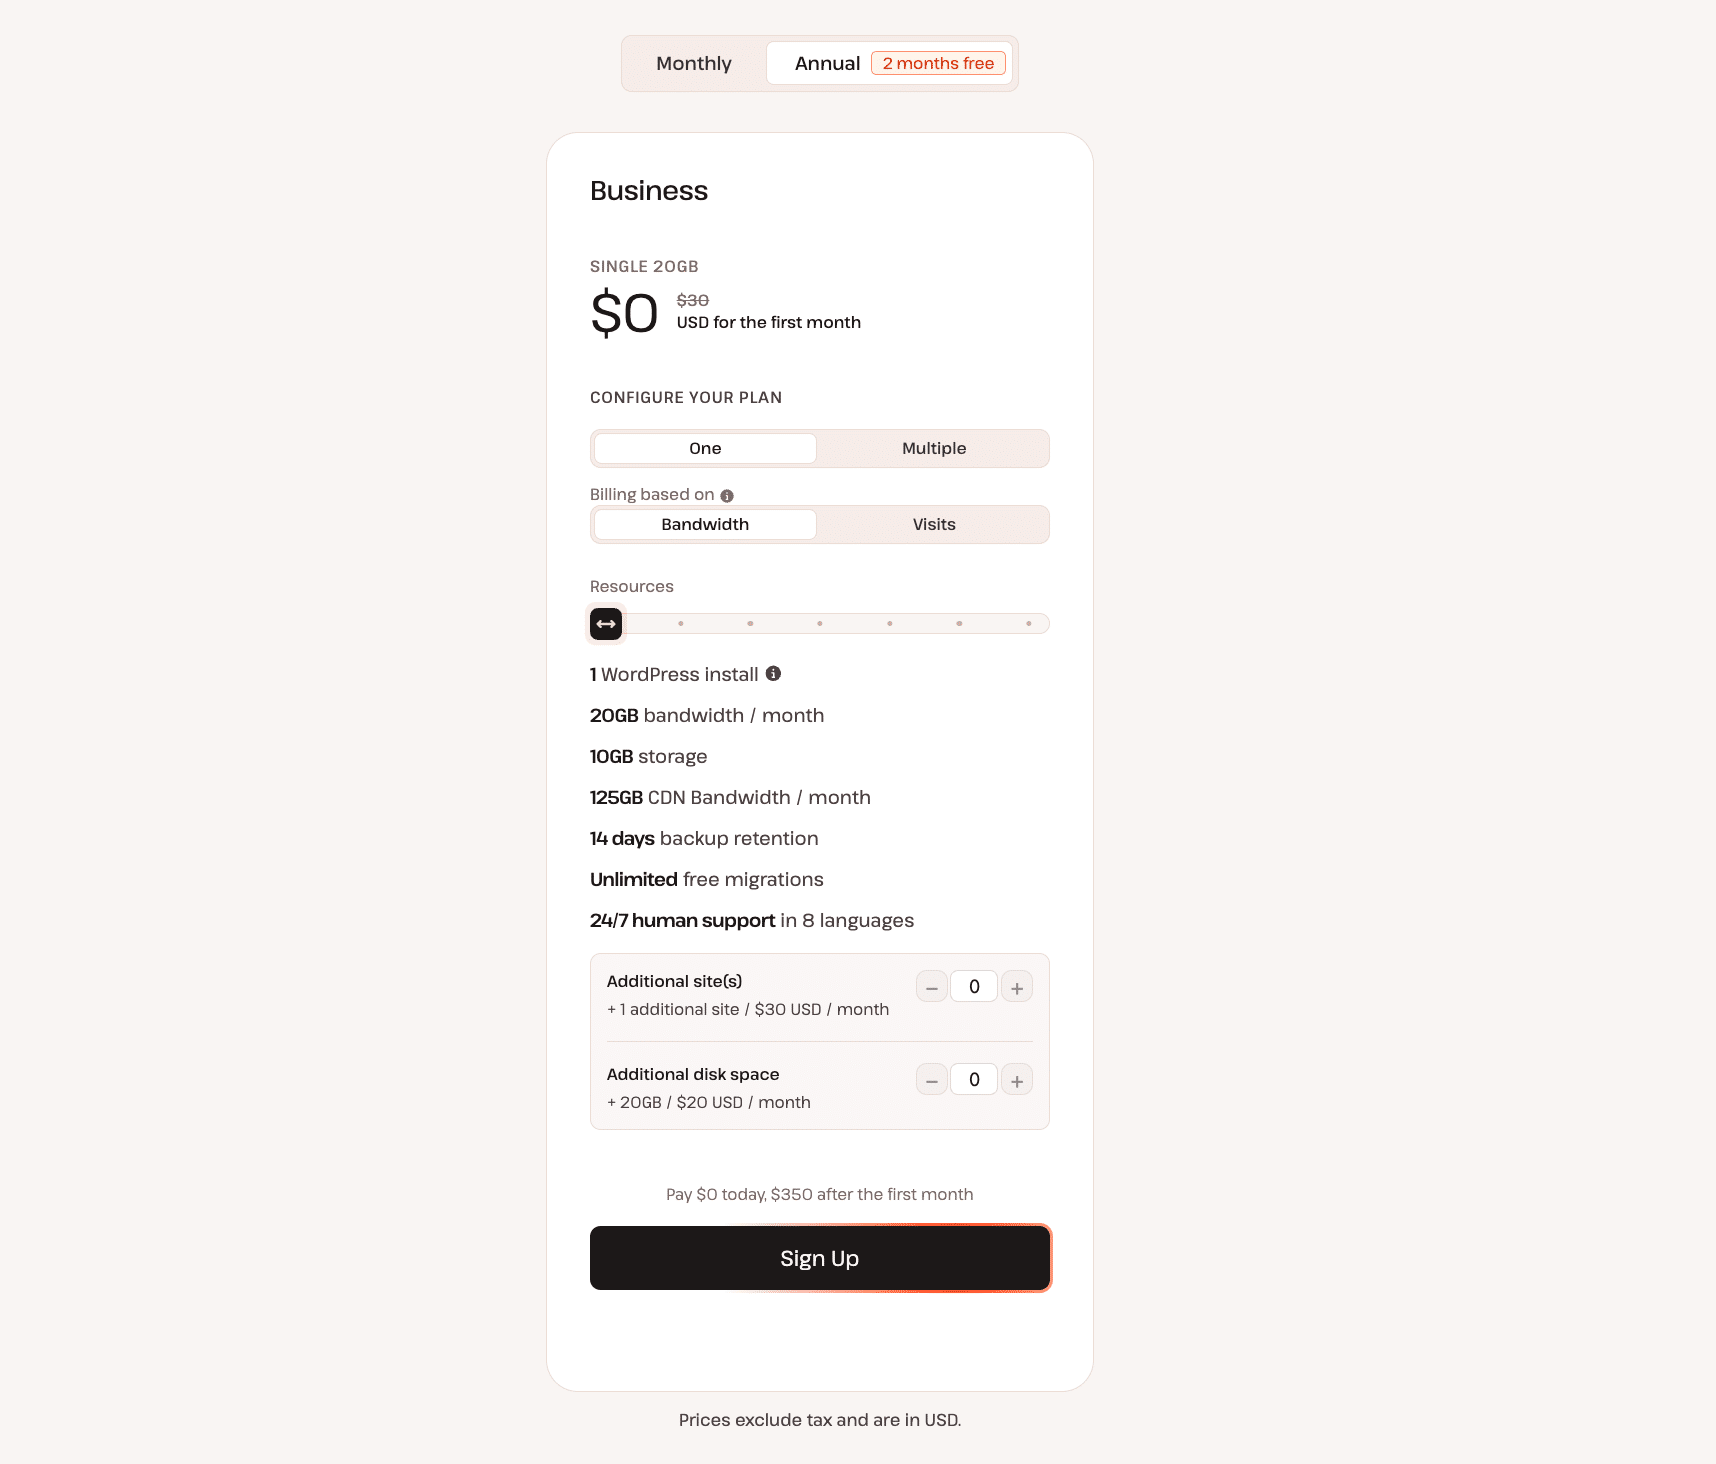
Pay attention to the billing summary, particularly the amount payable today and the recurring cost after any introductory offer expires.
Kinsta currently offers the first month free on selected plans for eligible new customers, including Single 35k visits, Single 20GB bandwidth, WP 2, and Launch plans.
The offer applies to qualifying first-time WordPress subscriptions and has conditions. Some add-ons are included within specified limits during the free period, but overages may still incur charges.
If you’re choosing a plan primarily because of a promotion, read the current billing and introductory-offer terms before continuing.
Once you’re satisfied with your selection, click Sign Up.
Step 3: Create your Kinsta account
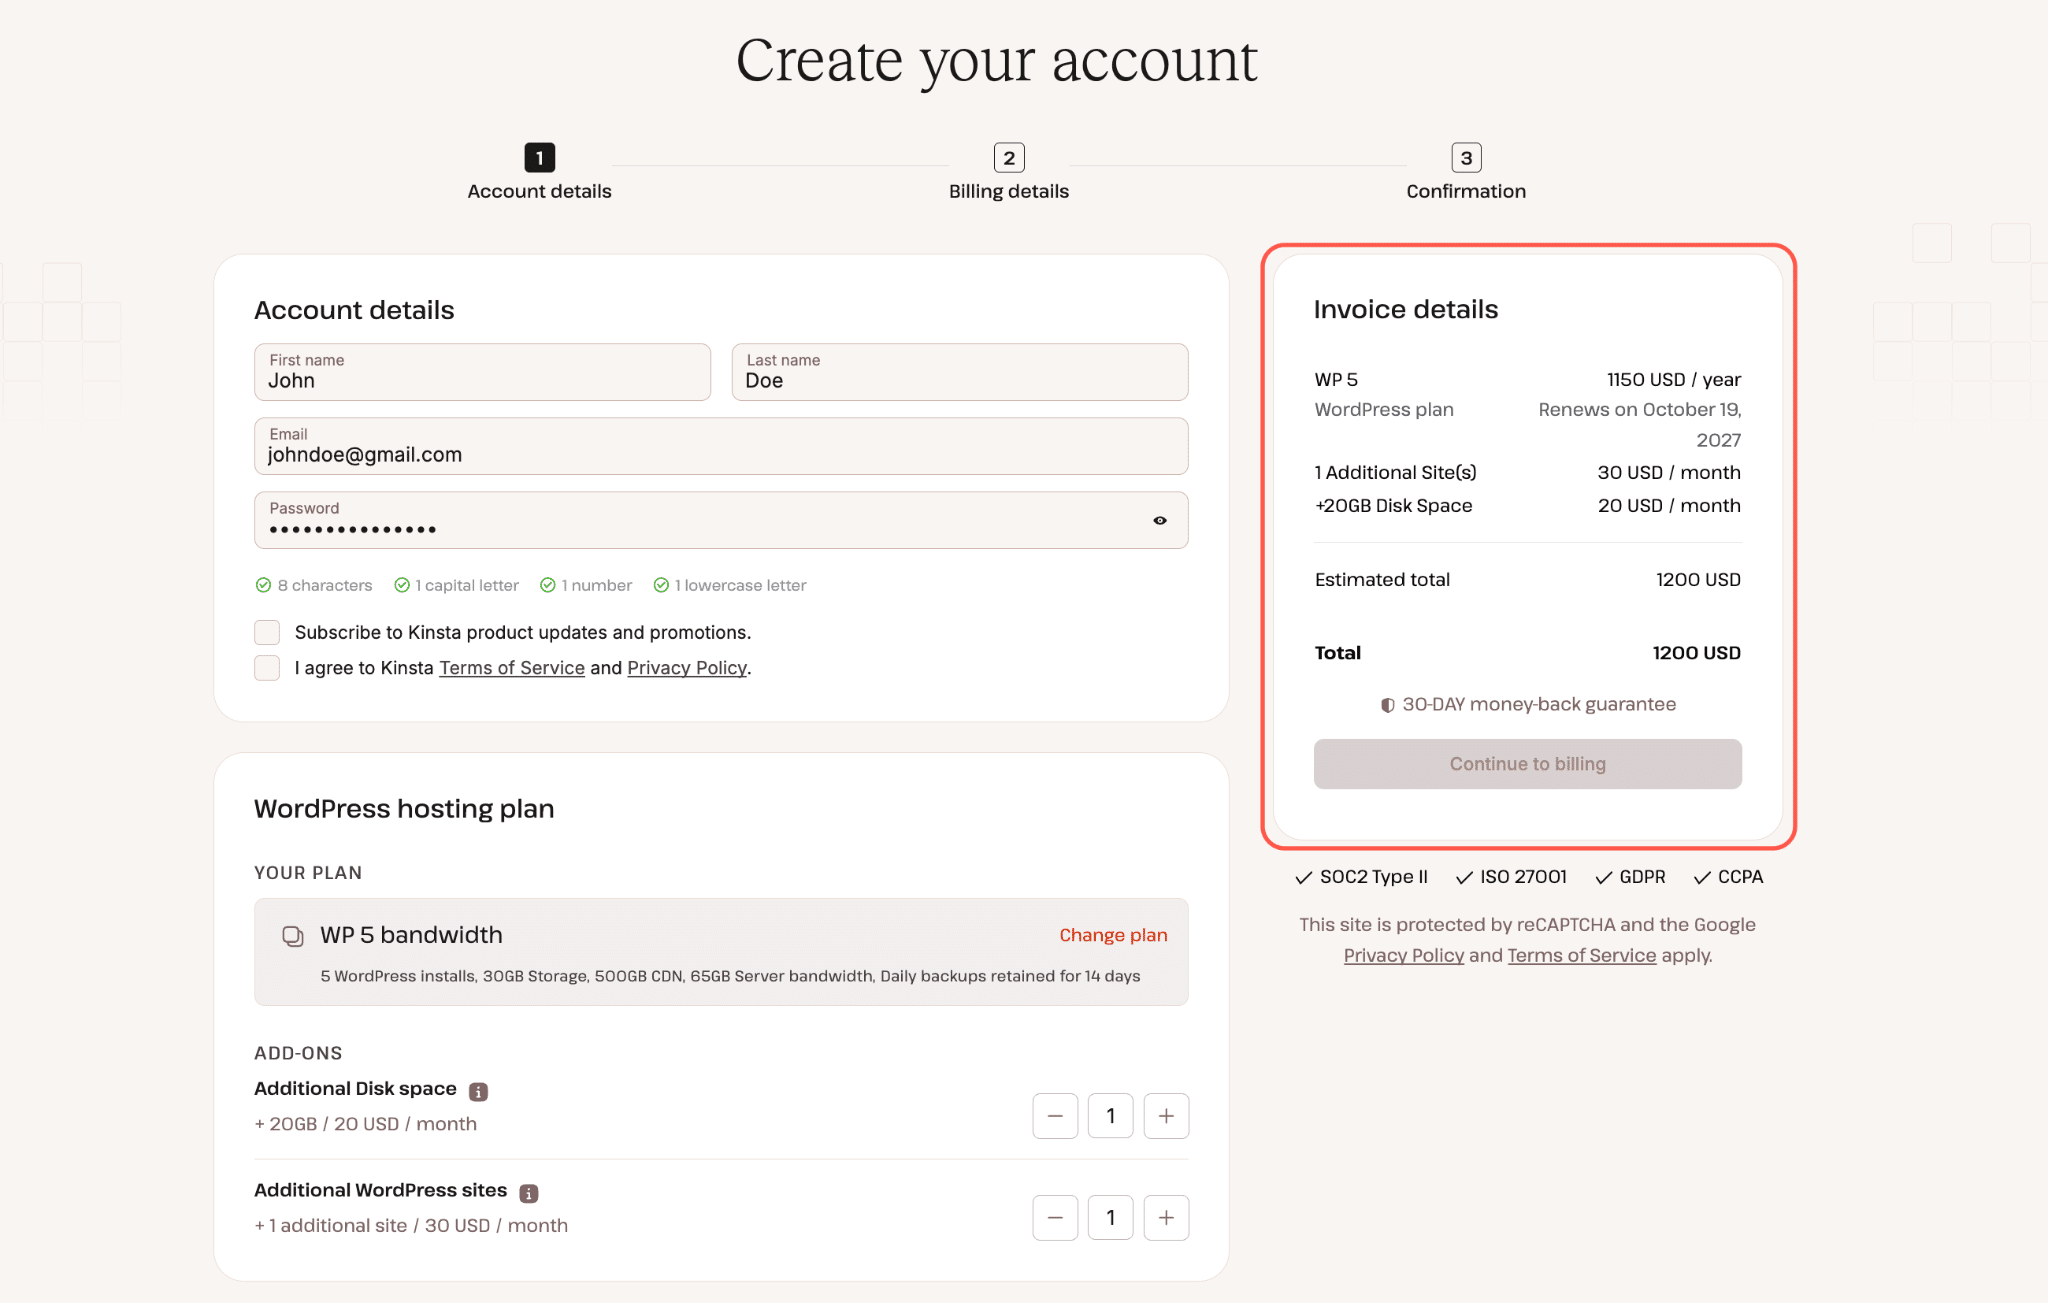
The sign-up page opens with a three-stage process, as we have seen in the screenshot above:
- Account details.
- Billing details.
- Confirmation.
The first page also shows the WordPress plan you’ve selected, the available add-on options, and an invoice summary.
Under Account details, enter your first name, last name, email address, and a password for your new Kinsta account.
You can also choose whether to subscribe to product updates and promotions. Review and accept the required terms before continuing.
Your selected hosting configuration remains visible on the page. If you notice you’ve selected the wrong plan, use the Change plan option before continuing.
Review the invoice summary again, especially the amount payable now and the future renewal amount. For qualifying introductory plans, these may be different.
When you’re ready, click Continue to billing.
Step 4: Complete the billing details and confirm your purchase
The next stage is Billing details. Follow the fields displayed in the checkout to provide the required billing and payment information. Kinsta supports major credit and debit cards, including Visa, Mastercard, American Express, and Discover.
Kinsta also supports bank transfer and ACH arrangements for eligible annual subscriptions through its Billing team.
Even if your selected plan includes a free introductory month, Kinsta requires an eligible payment method for card-based sign-up. Your card may receive a temporary authorization hold to verify that it is valid.
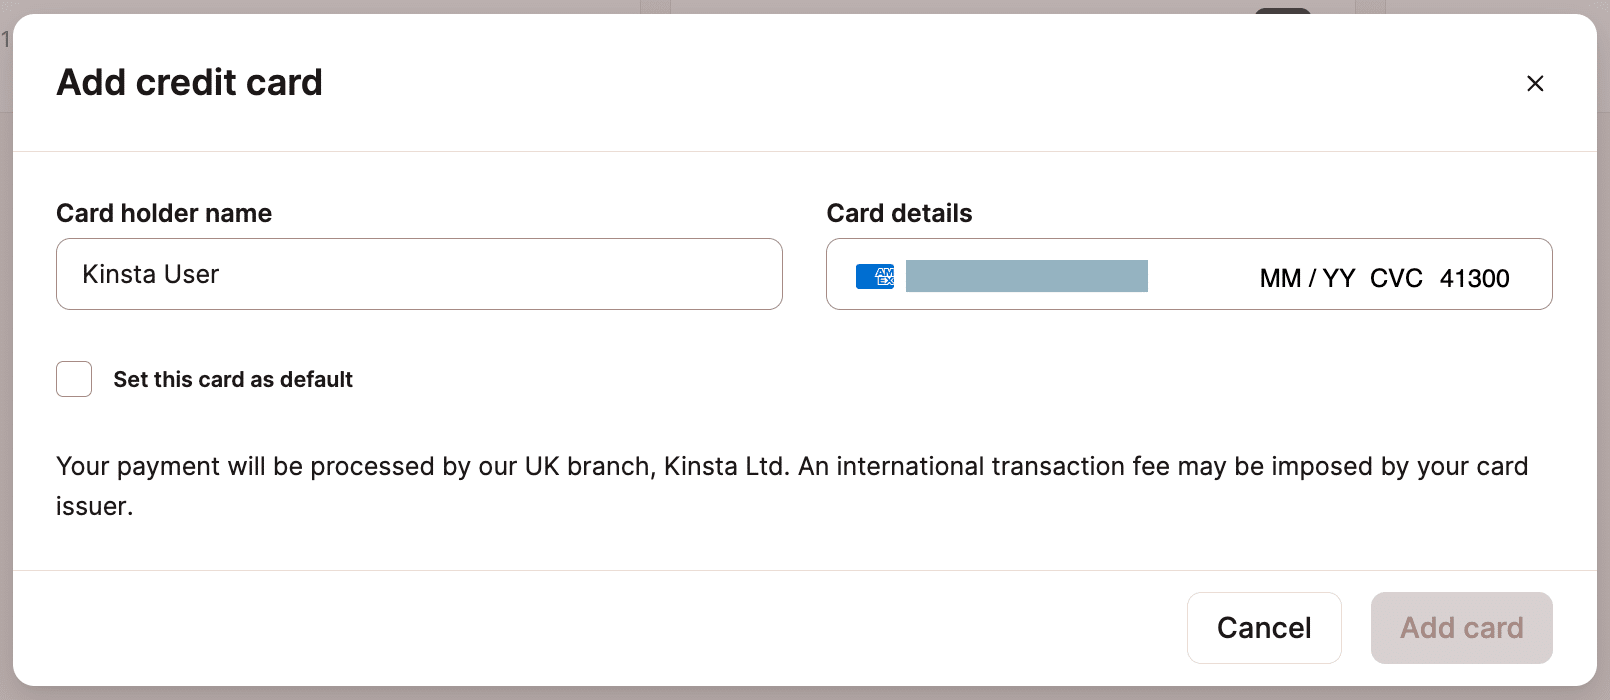
Before finalizing, check the recurring price, selected plan, any additional resources, and applicable tax.
Once you accept the billing information, complete the checkout confirmation stage.
At this point, your hosting subscription and Kinsta account are set up. Your next task is to get your WordPress website running on the platform.
Step 5: Get started in MyKinsta
MyKinsta is the dashboard where you manage your websites, hosting resources, domains, backups, and other account settings.
What you do next depends on whether you are launching a new WordPress website or moving an existing one.
Option A: Create a new WordPress website
If you’re starting a new business website, go to Sites, click Add site, and select Create new site.
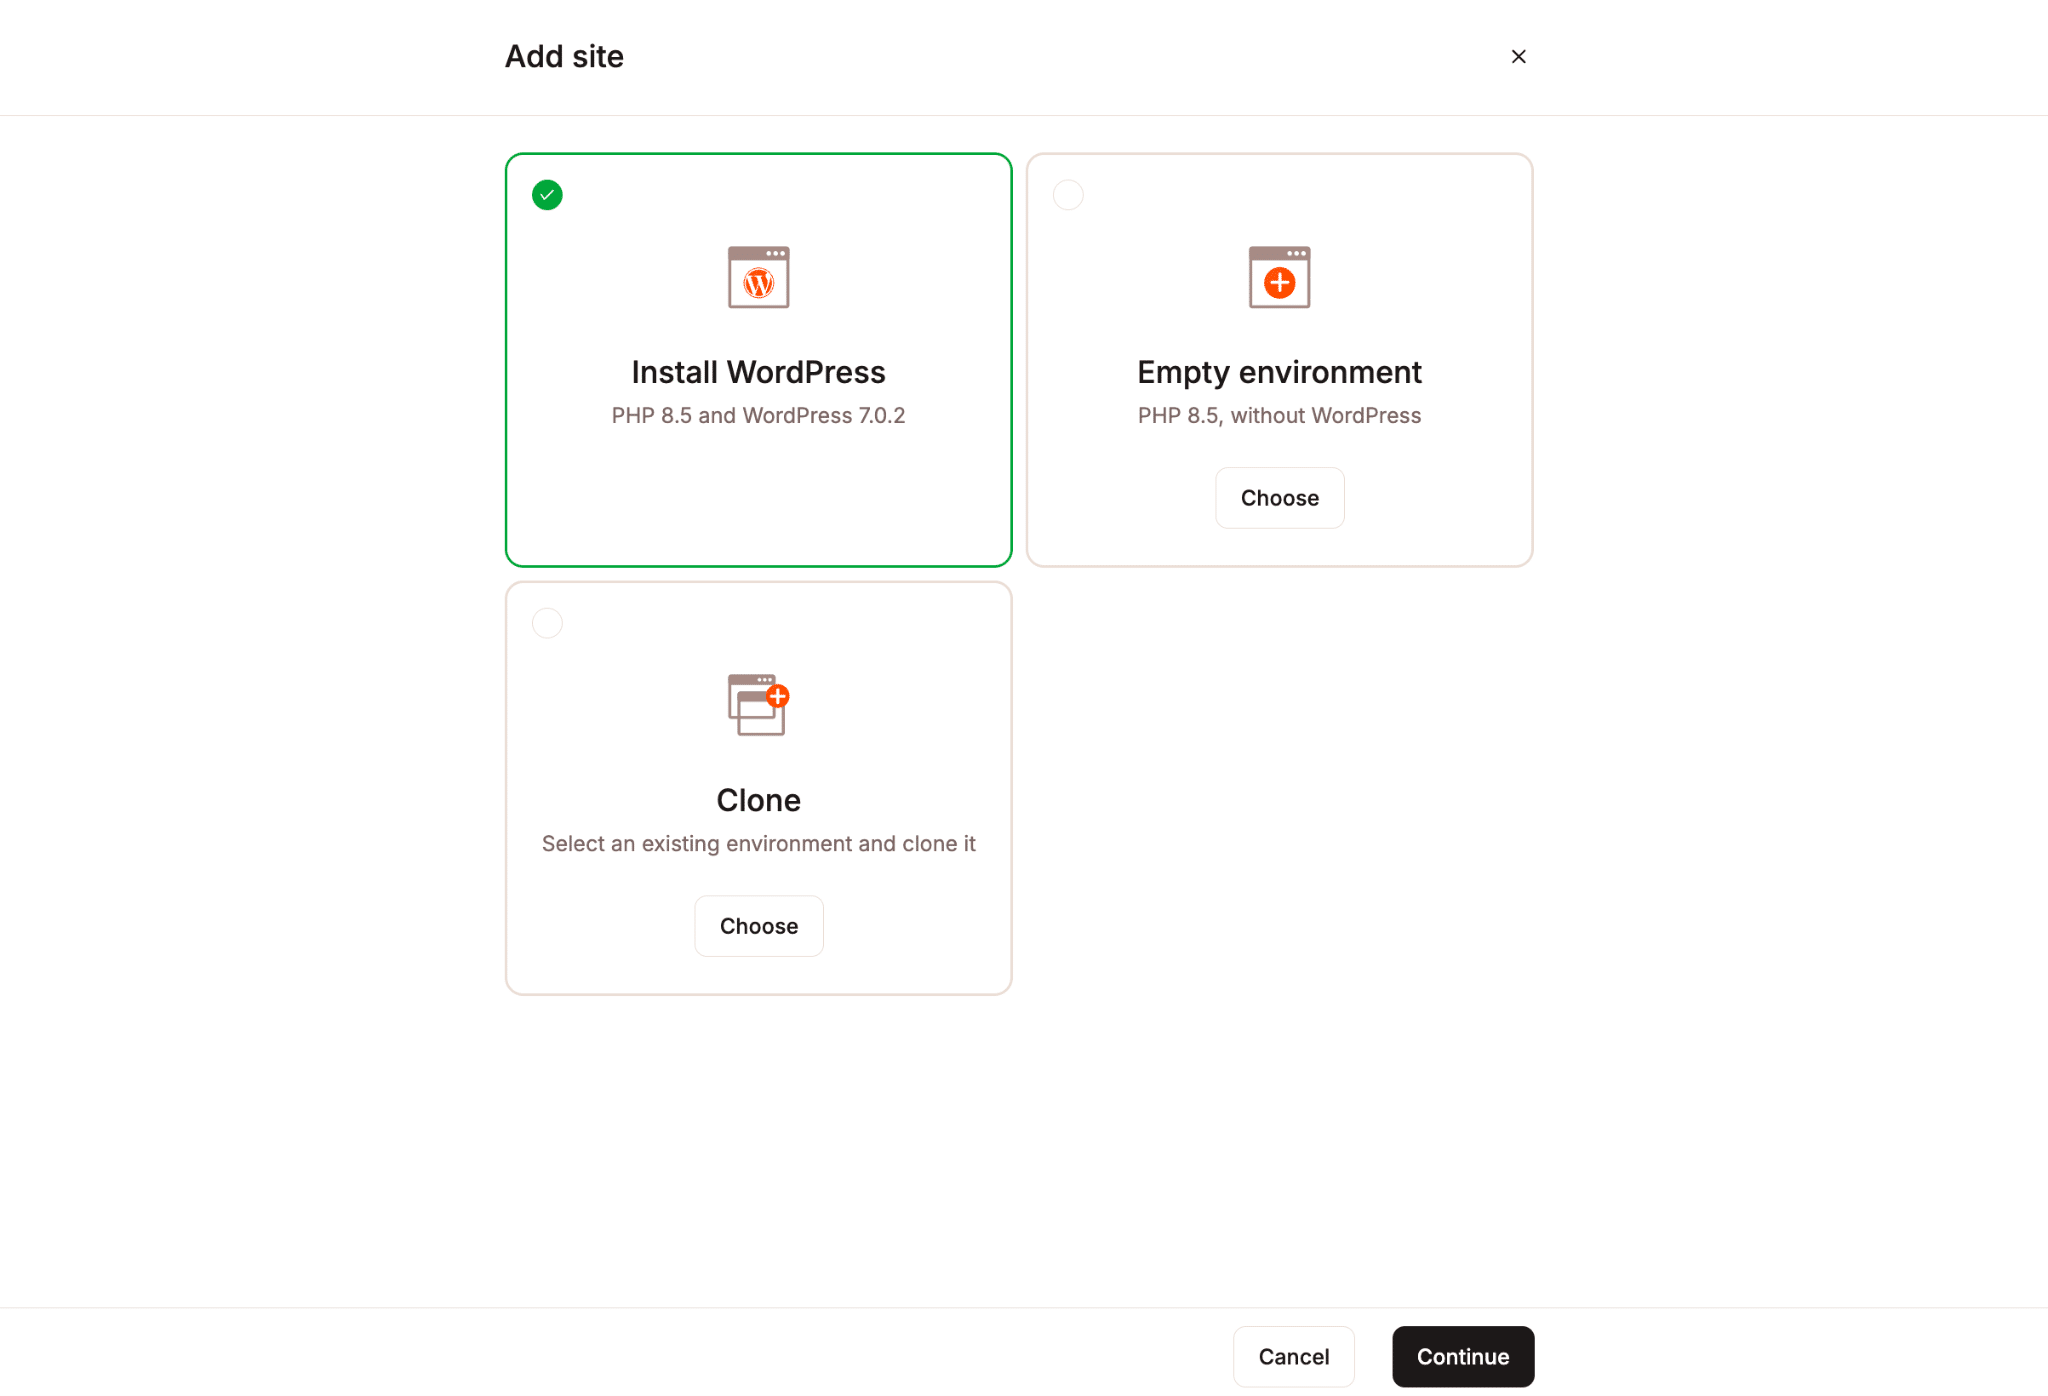
Kinsta provides three types of site creation:
- Install WordPress: Creates a WordPress installation you can begin using.
- Empty environment: Prepares the hosting environment without installing WordPress. This is intended for more specialized setups.
- Clone: Copies an existing Kinsta environment into a new site.
For most small businesses creating their first website, Install WordPress is the appropriate choice.
Follow the installation wizard to provide the requested information, including your site name, preferred data center location, WordPress administrator details, site title, and language.
The site name appears in MyKinsta and contributes to the website’s temporary domain. Your WordPress site title is separate and can appear publicly, depending on your theme.
Choose an administrator username and a strong password, and store those credentials securely. These are the credentials you’ll use to manage the WordPress installation itself.
You can also select your site’s data center location. In general, choosing a location near your primary audience can help reduce latency.
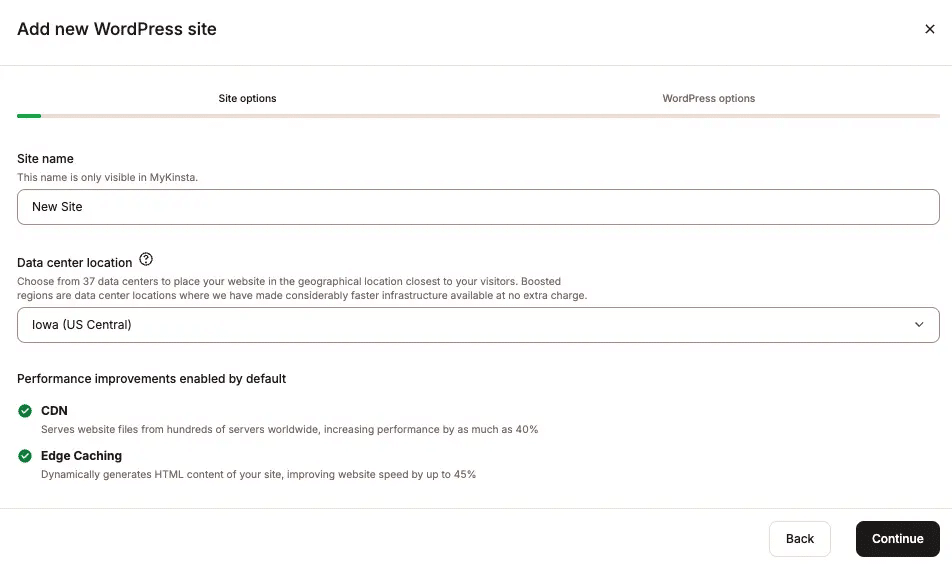
After completing the wizard, Kinsta creates the installation and notifies you when it’s ready.
You can then begin working on your WordPress website.
Access your website before connecting your domain
Every new site created on Kinsta receives a temporary URL in this format: https://sitename.kinsta.cloud
You can use that URL to access and test your WordPress website before connecting your business domain.
Temporary domains are configured to discourage search-engine indexing, so they can be useful while you prepare the website.
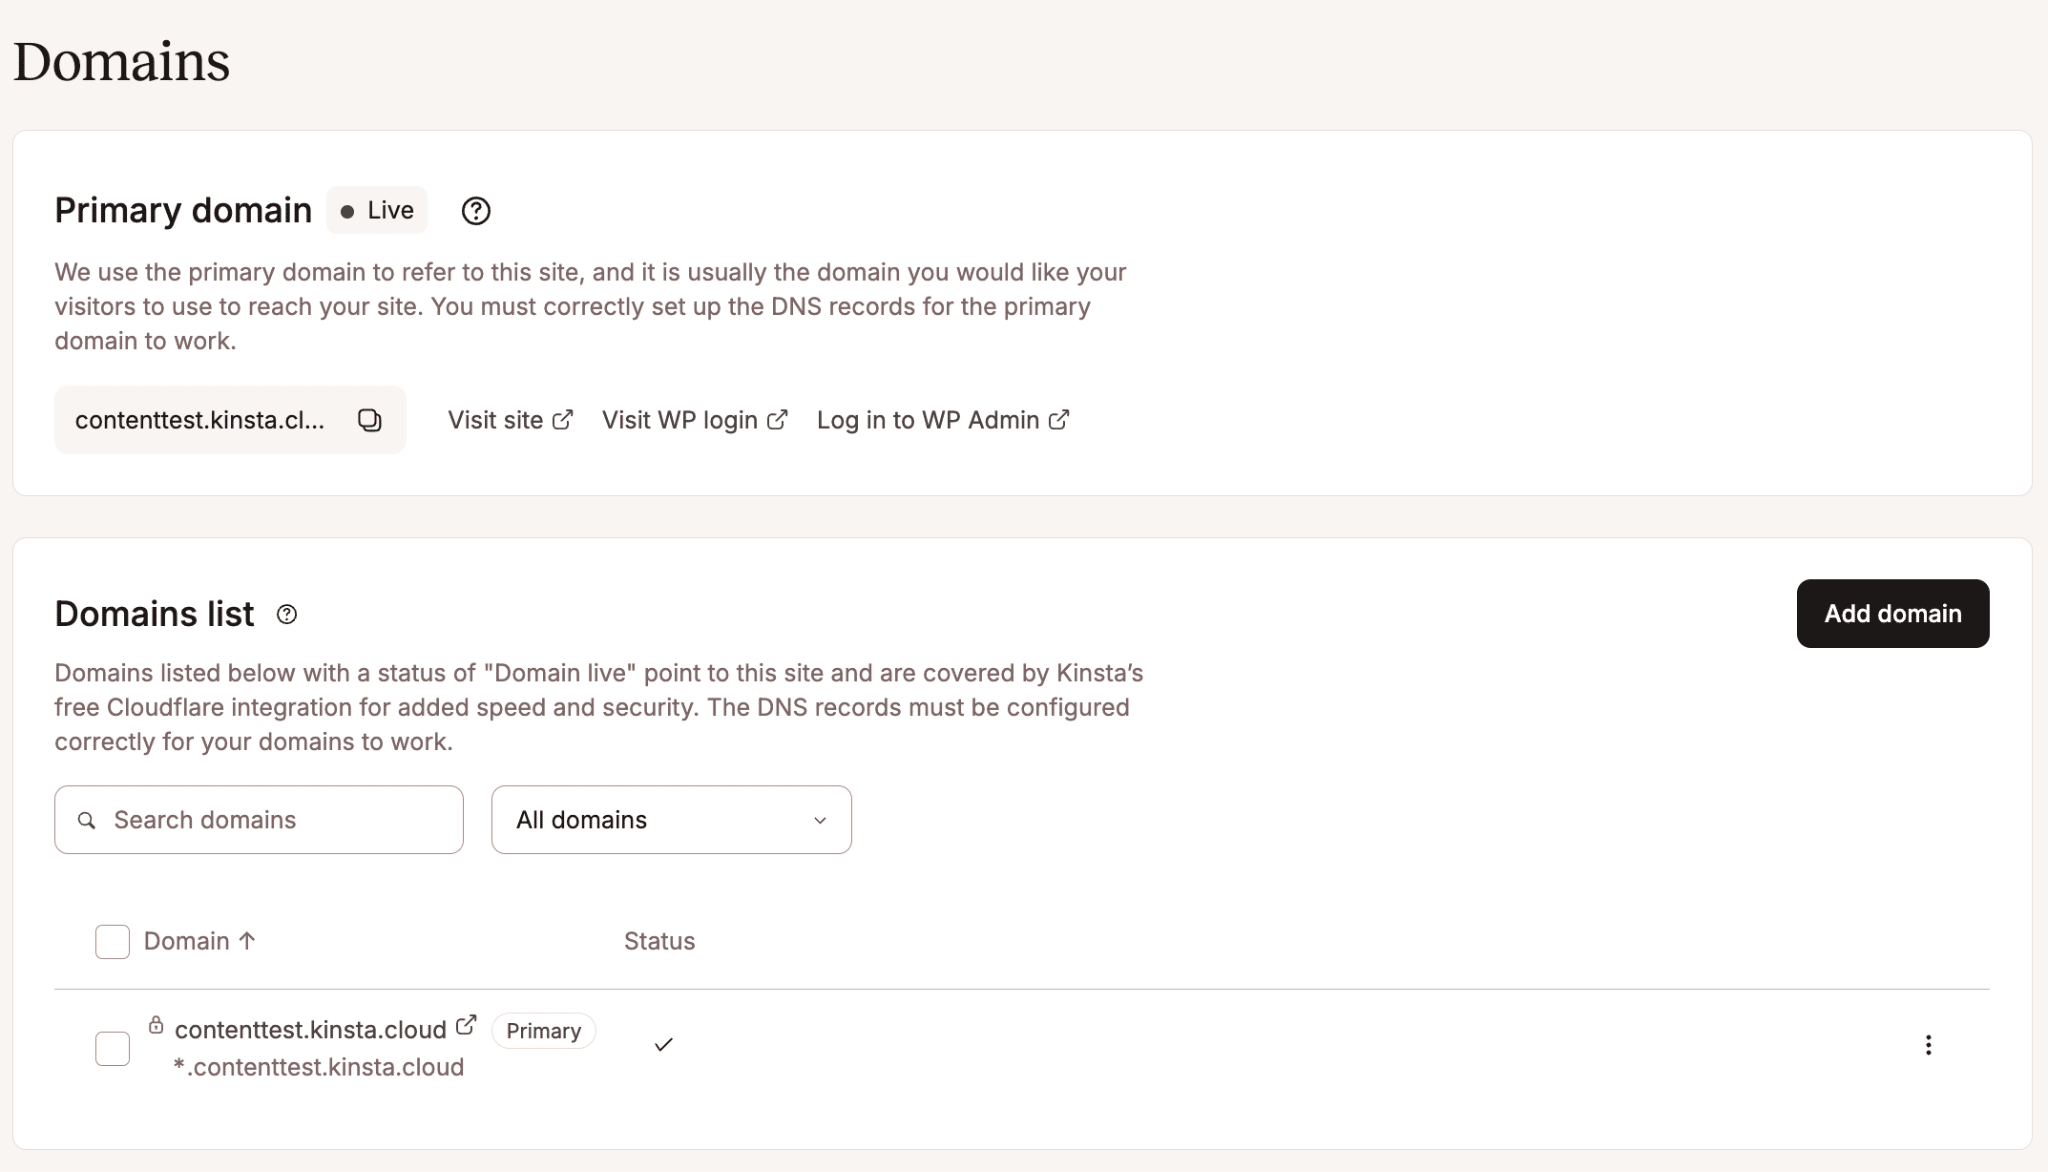
Once your website is ready to launch, you’ll add your own domain and point it to Kinsta.
Option B: Move your existing WordPress website to Kinsta
If your business already has a WordPress site with another hosting provider, you don’t have to rebuild it.
Kinsta provides free migrations for supported WordPress websites. Its migration team can move your existing website to Kinsta after you submit the required information.
In MyKinsta, go to Sites > Add site > Request migration. If you haven’t added any sites yet, you may see a Request a migration button directly on the Sites page.
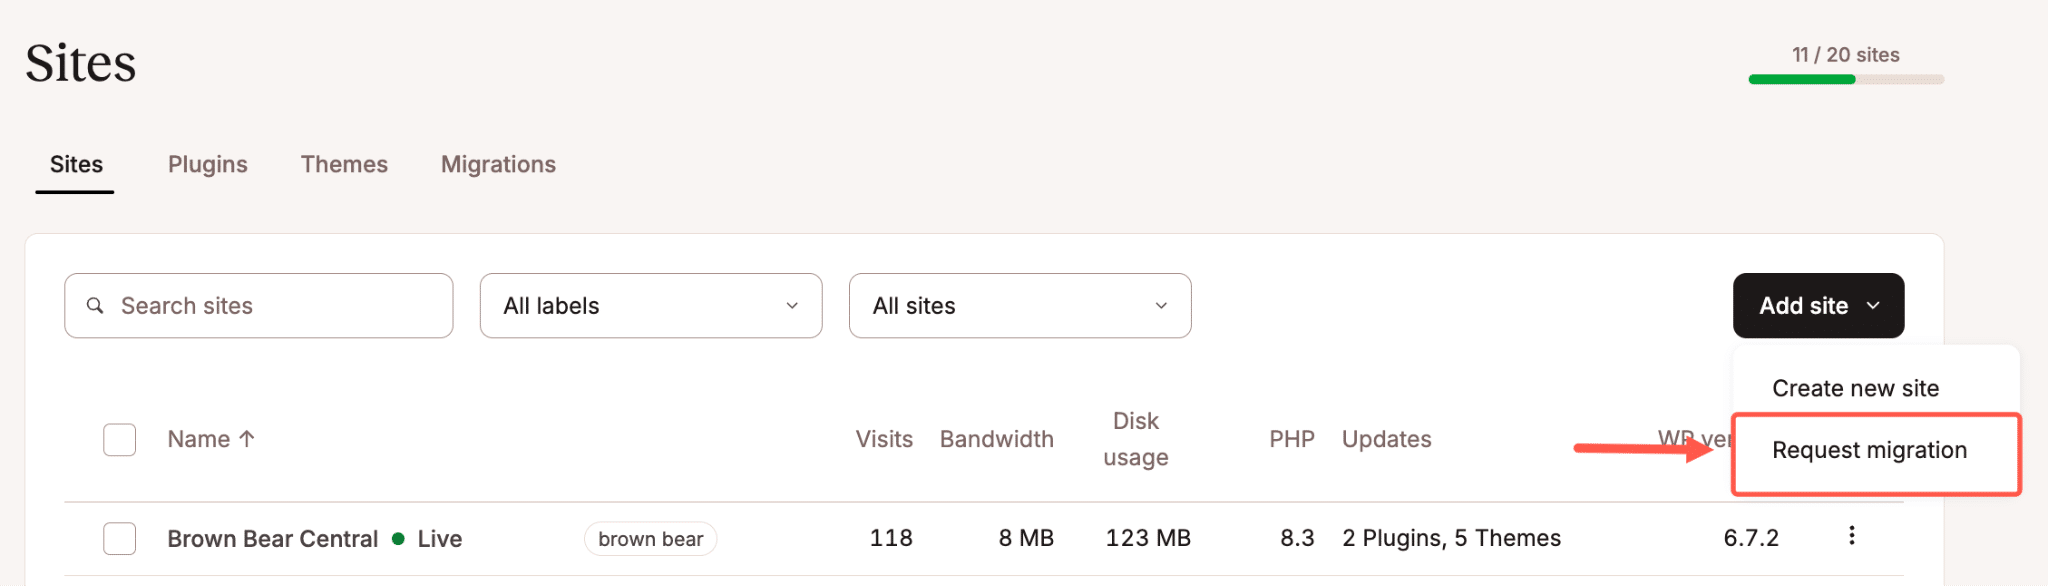
You’ll be guided through a migration request that includes your preferred timing, details about your current hosting provider, website information, and the configuration you want to use at Kinsta.
Before starting, check that your plan has an available WordPress site slot.
You’ll also need access to your existing hosting account. Depending on the provider and migration method, Kinsta may request hosting login details, SFTP or SSH credentials, WordPress administrator access, or a website backup.
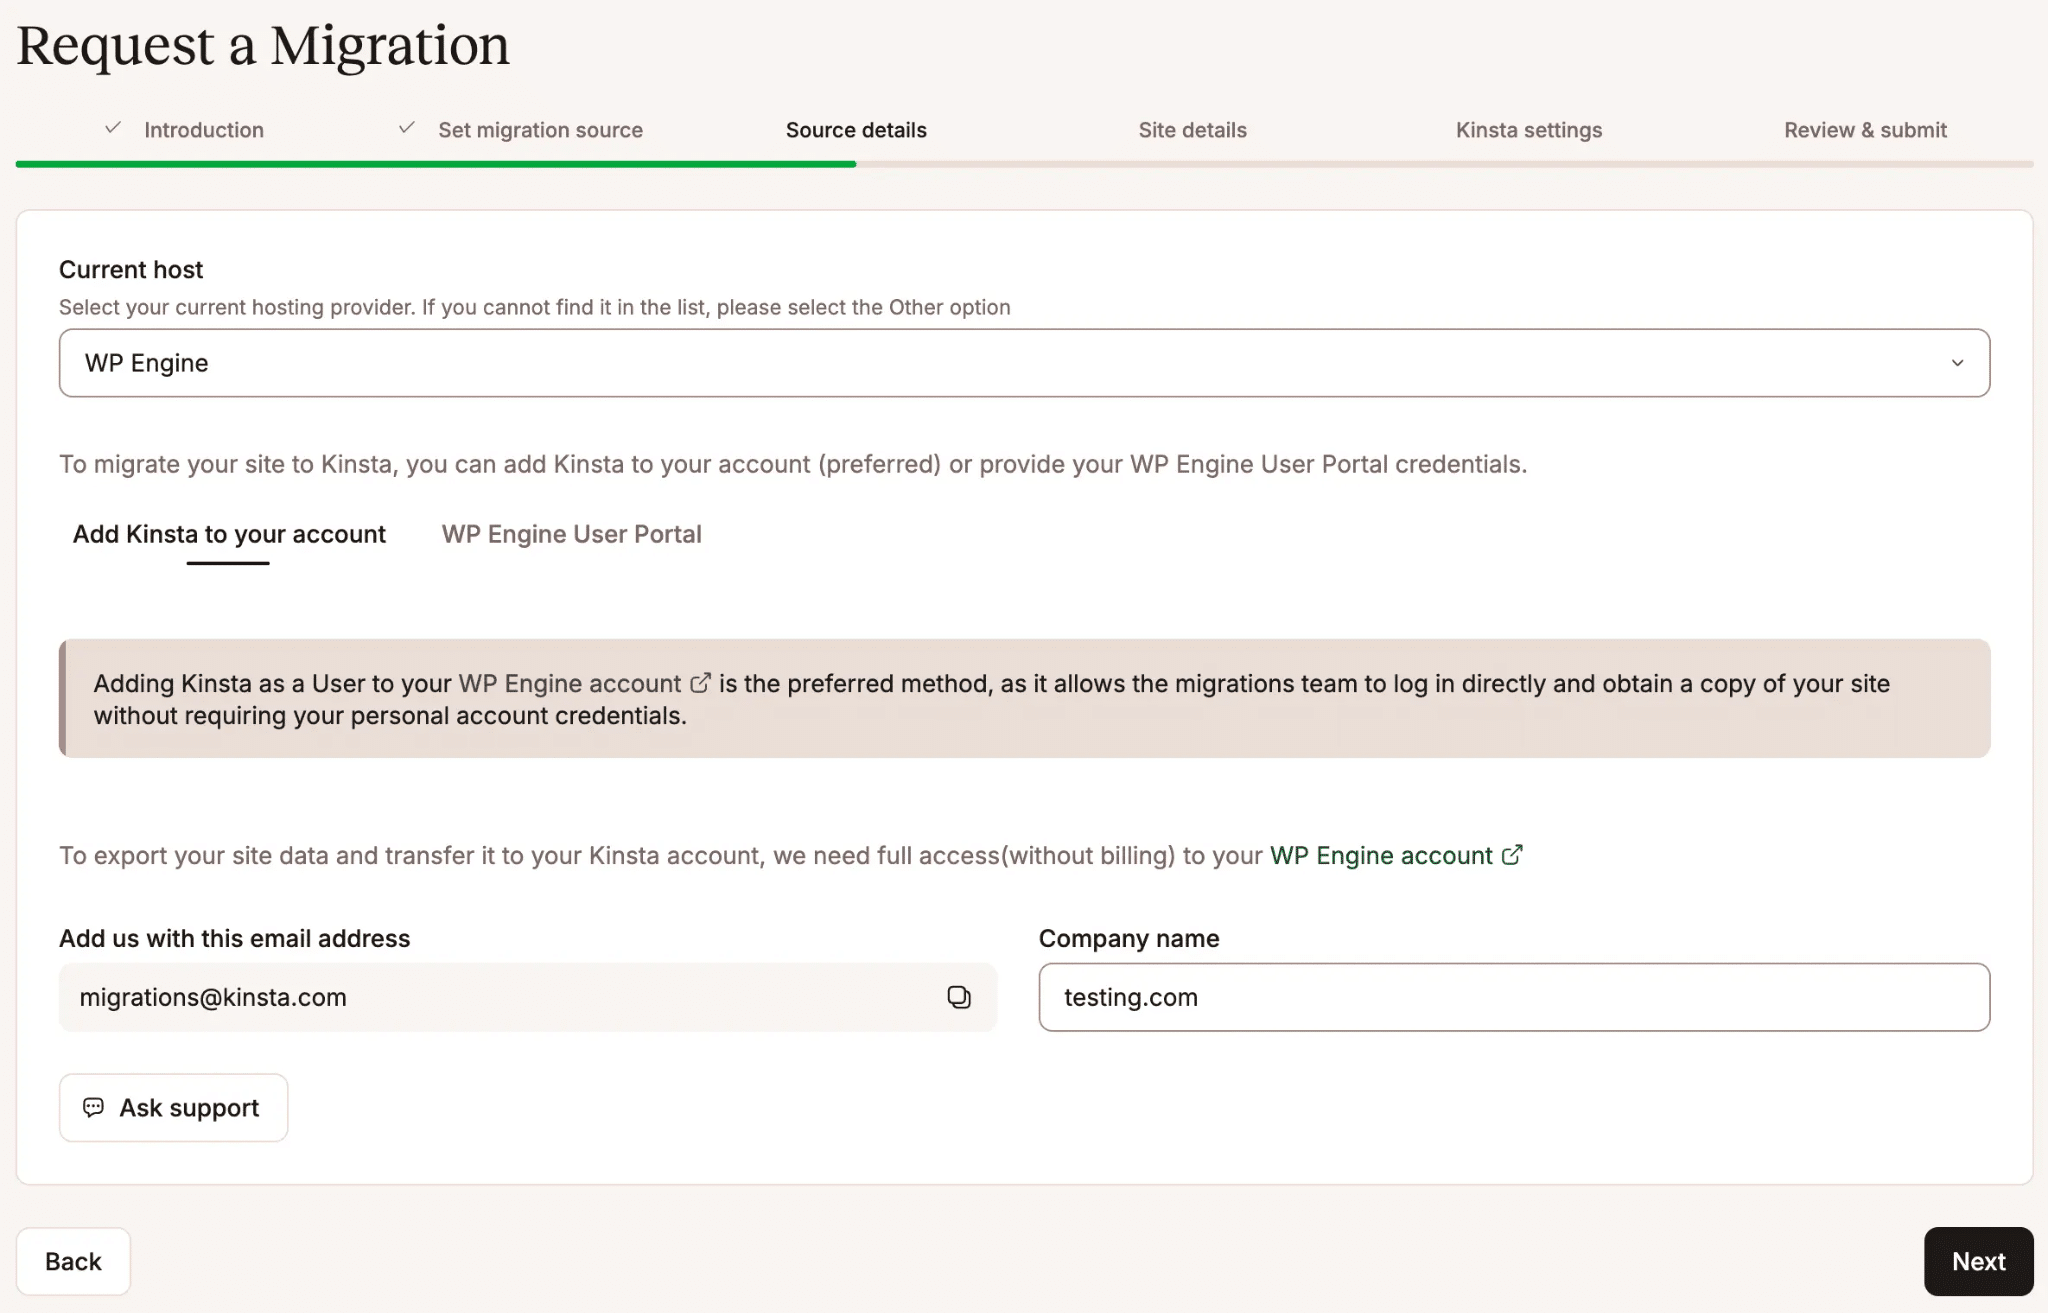
After you complete the form, review the information and submit the request.
You can track the progress under Sites > Migrations. The migration team will also contact you if they need additional information.
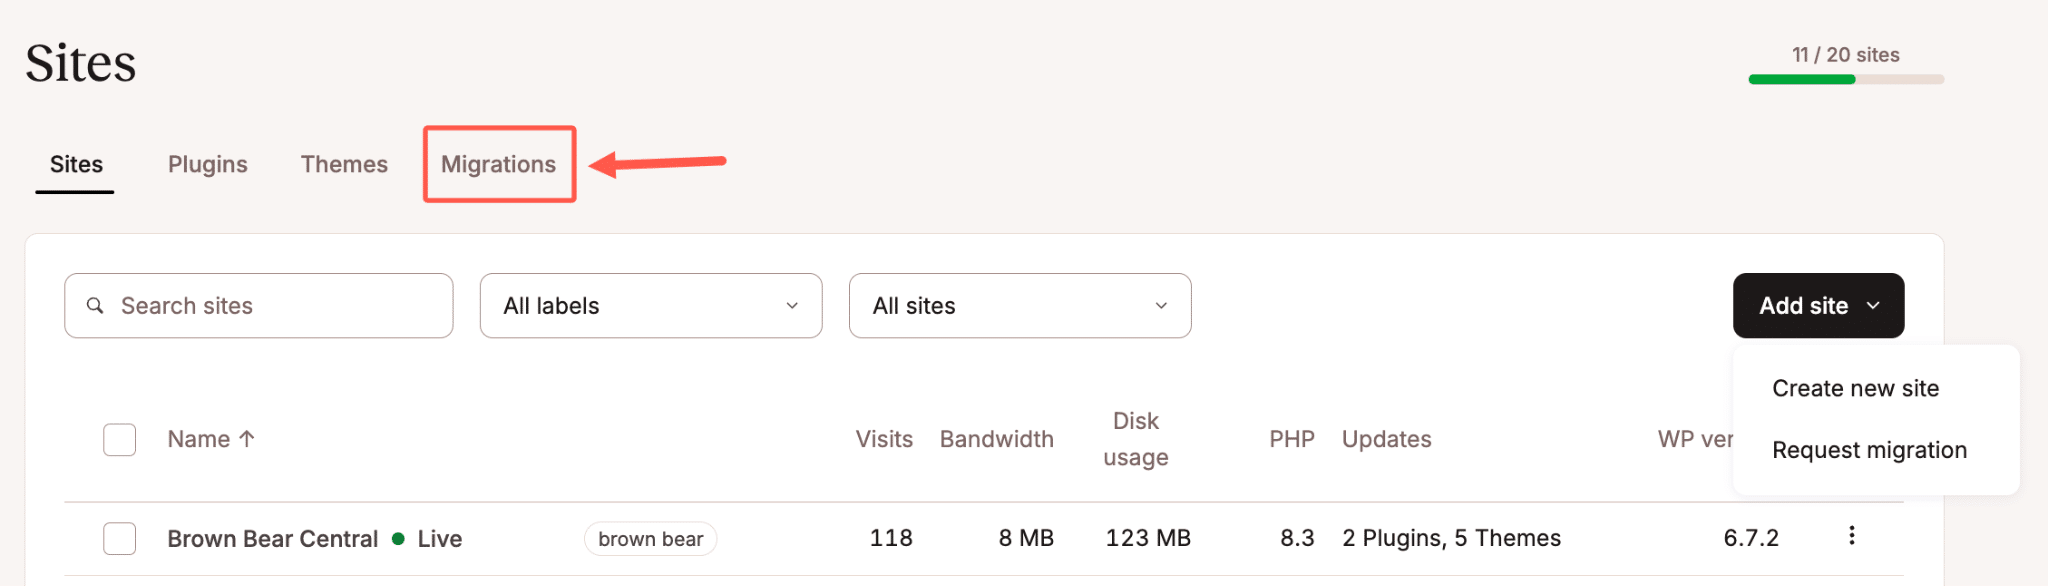
For a detailed explanation of what Kinsta needs, see the WordPress migration documentation.
Will your website go offline during migration?
Not necessarily, but it depends on what your website does and how frequently its data changes.
For a relatively static business website, Kinsta can usually create a copy while your original site keeps running with your current hosting provider.
Once the migration is complete, you review the migrated copy before changing your domain’s DNS records. Until you update those records, your existing hosting provider continues serving your live domain.
However, there’s an important consideration: changes made to the original website after migration starts won’t automatically appear on the migrated copy.
This matters for an online store, membership website, community platform, or any site that receives frequent orders and user updates. If the database changes aren’t handled correctly, new transactions or registrations could be lost.
Kinsta recommends coordinating a maintenance window for frequently updated websites to prevent those changes from being lost during migration.
During maintenance mode, customers may be unable to place orders or complete certain actions. The duration depends on the website and the migration process.
You can reduce the disruption by preparing your access credentials in advance, scheduling the migration during a suitable period, and being ready to review the site as soon as the team finishes.
Don’t cancel your previous hosting account until you’ve tested the migrated website and confirmed it’s serving visitors correctly from Kinsta.
Step 6: Test your website before making it live
Whether you’re creating a new website or migrating an existing one, test it before directing visitors to the new hosting environment.
For a business website, that means checking more than whether the homepage loads.
Open important pages, including your contact page, services or products, and any pages used to generate leads or sales.
Submit a test contact form and confirm it reaches the right destination. If your site takes bookings or orders, test the relevant customer journey using an appropriate test setup.
Also check the website on a mobile device, verify key images and links, and confirm you can log into WordPress.
For migrated sites, Kinsta provides a Site Preview feature that lets you test the website on Kinsta before changing the domain’s DNS records.
You can find Site Preview under Sites > your site > Tools. Enable it and follow the displayed instructions to preview the website.
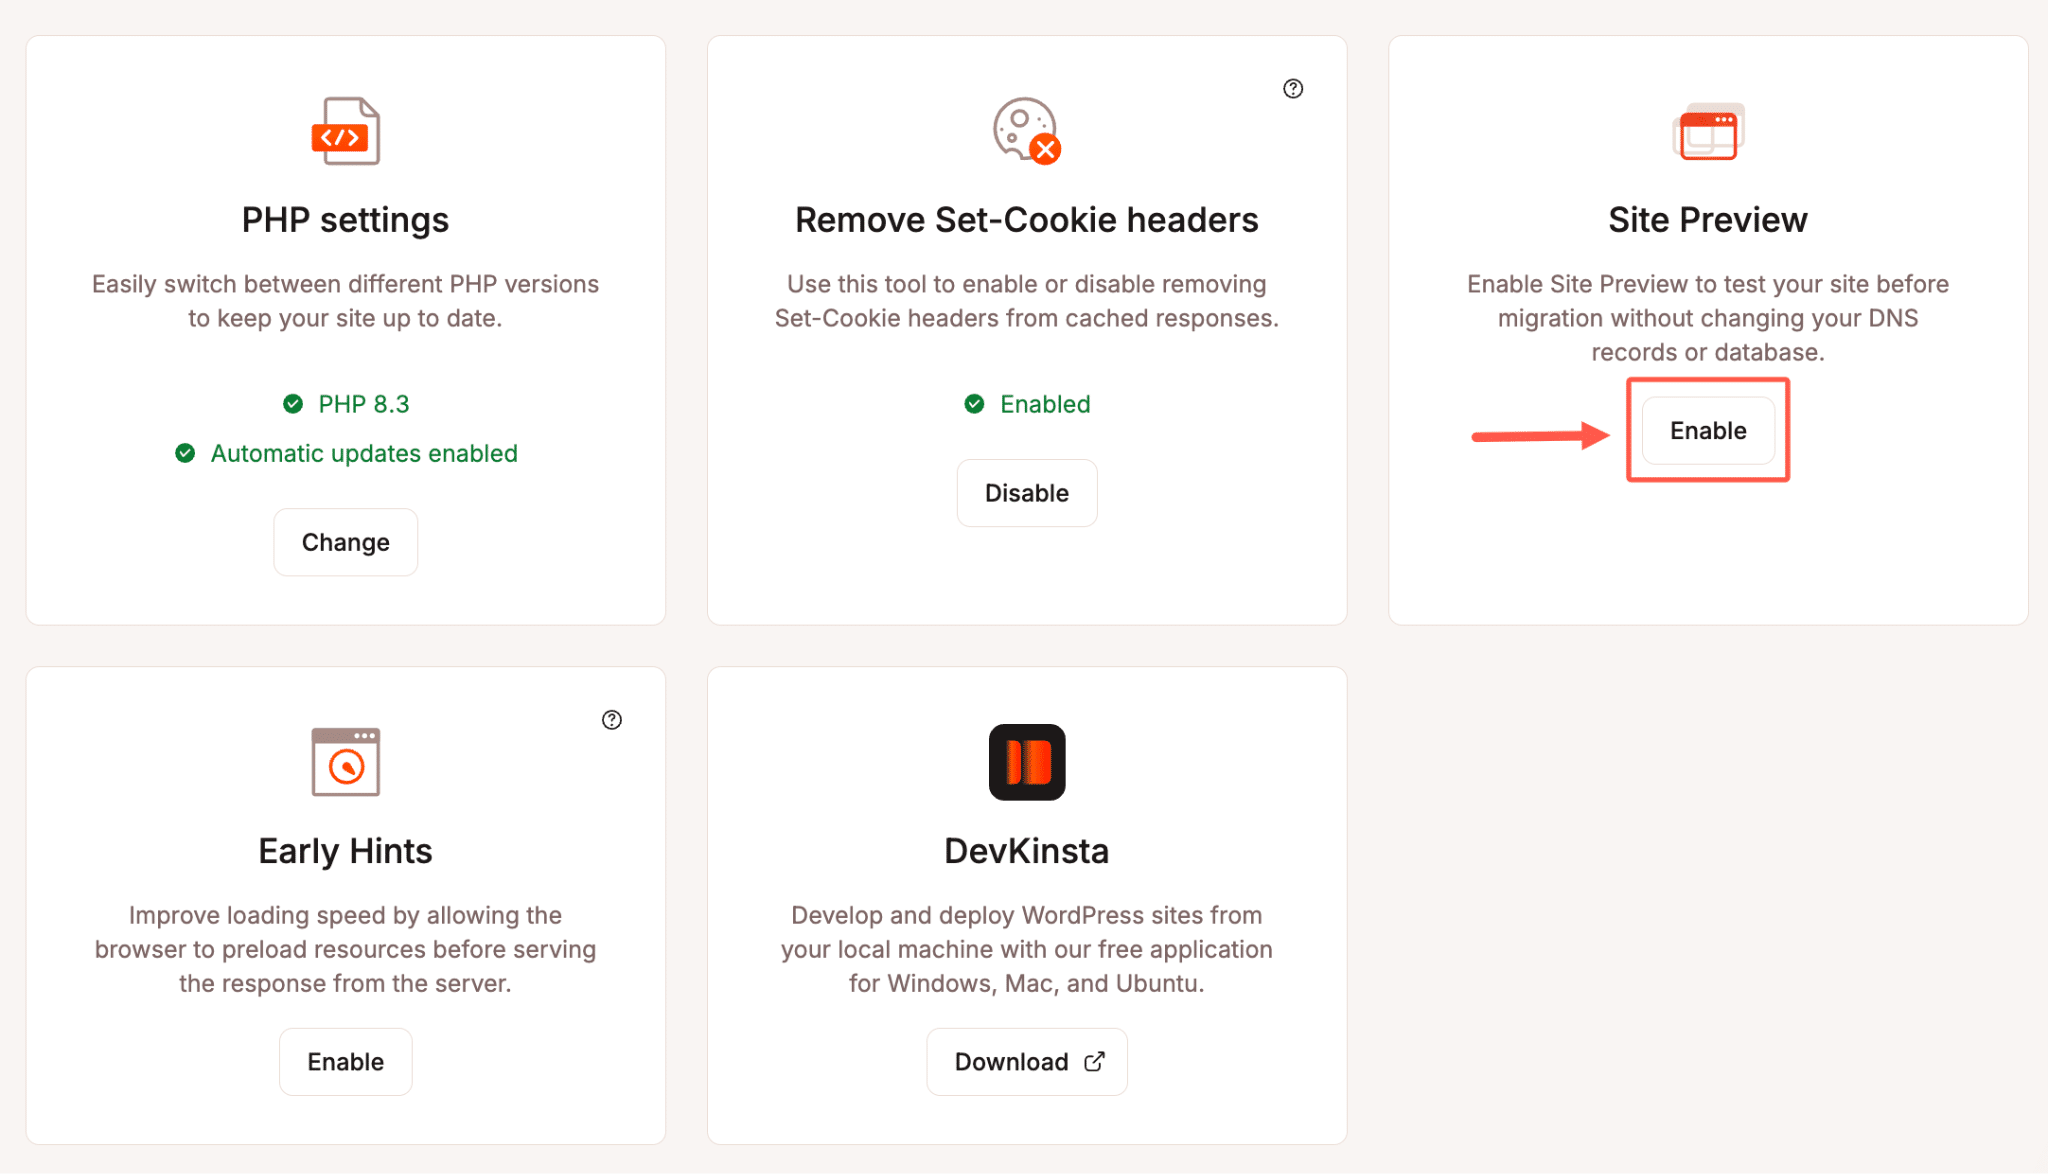
This step matters because you can catch problems while your existing website is still running at the previous hosting provider.
Step 7: Connect your domain and launch your website
When you’re ready to make your new or migrated website publicly accessible, you’ll need to connect your business domain to Kinsta.
In MyKinsta, go to Sites > your site > Domains and click Add domain.
Enter the domain name you want to use. Kinsta provides the DNS records required to point that domain to your website.
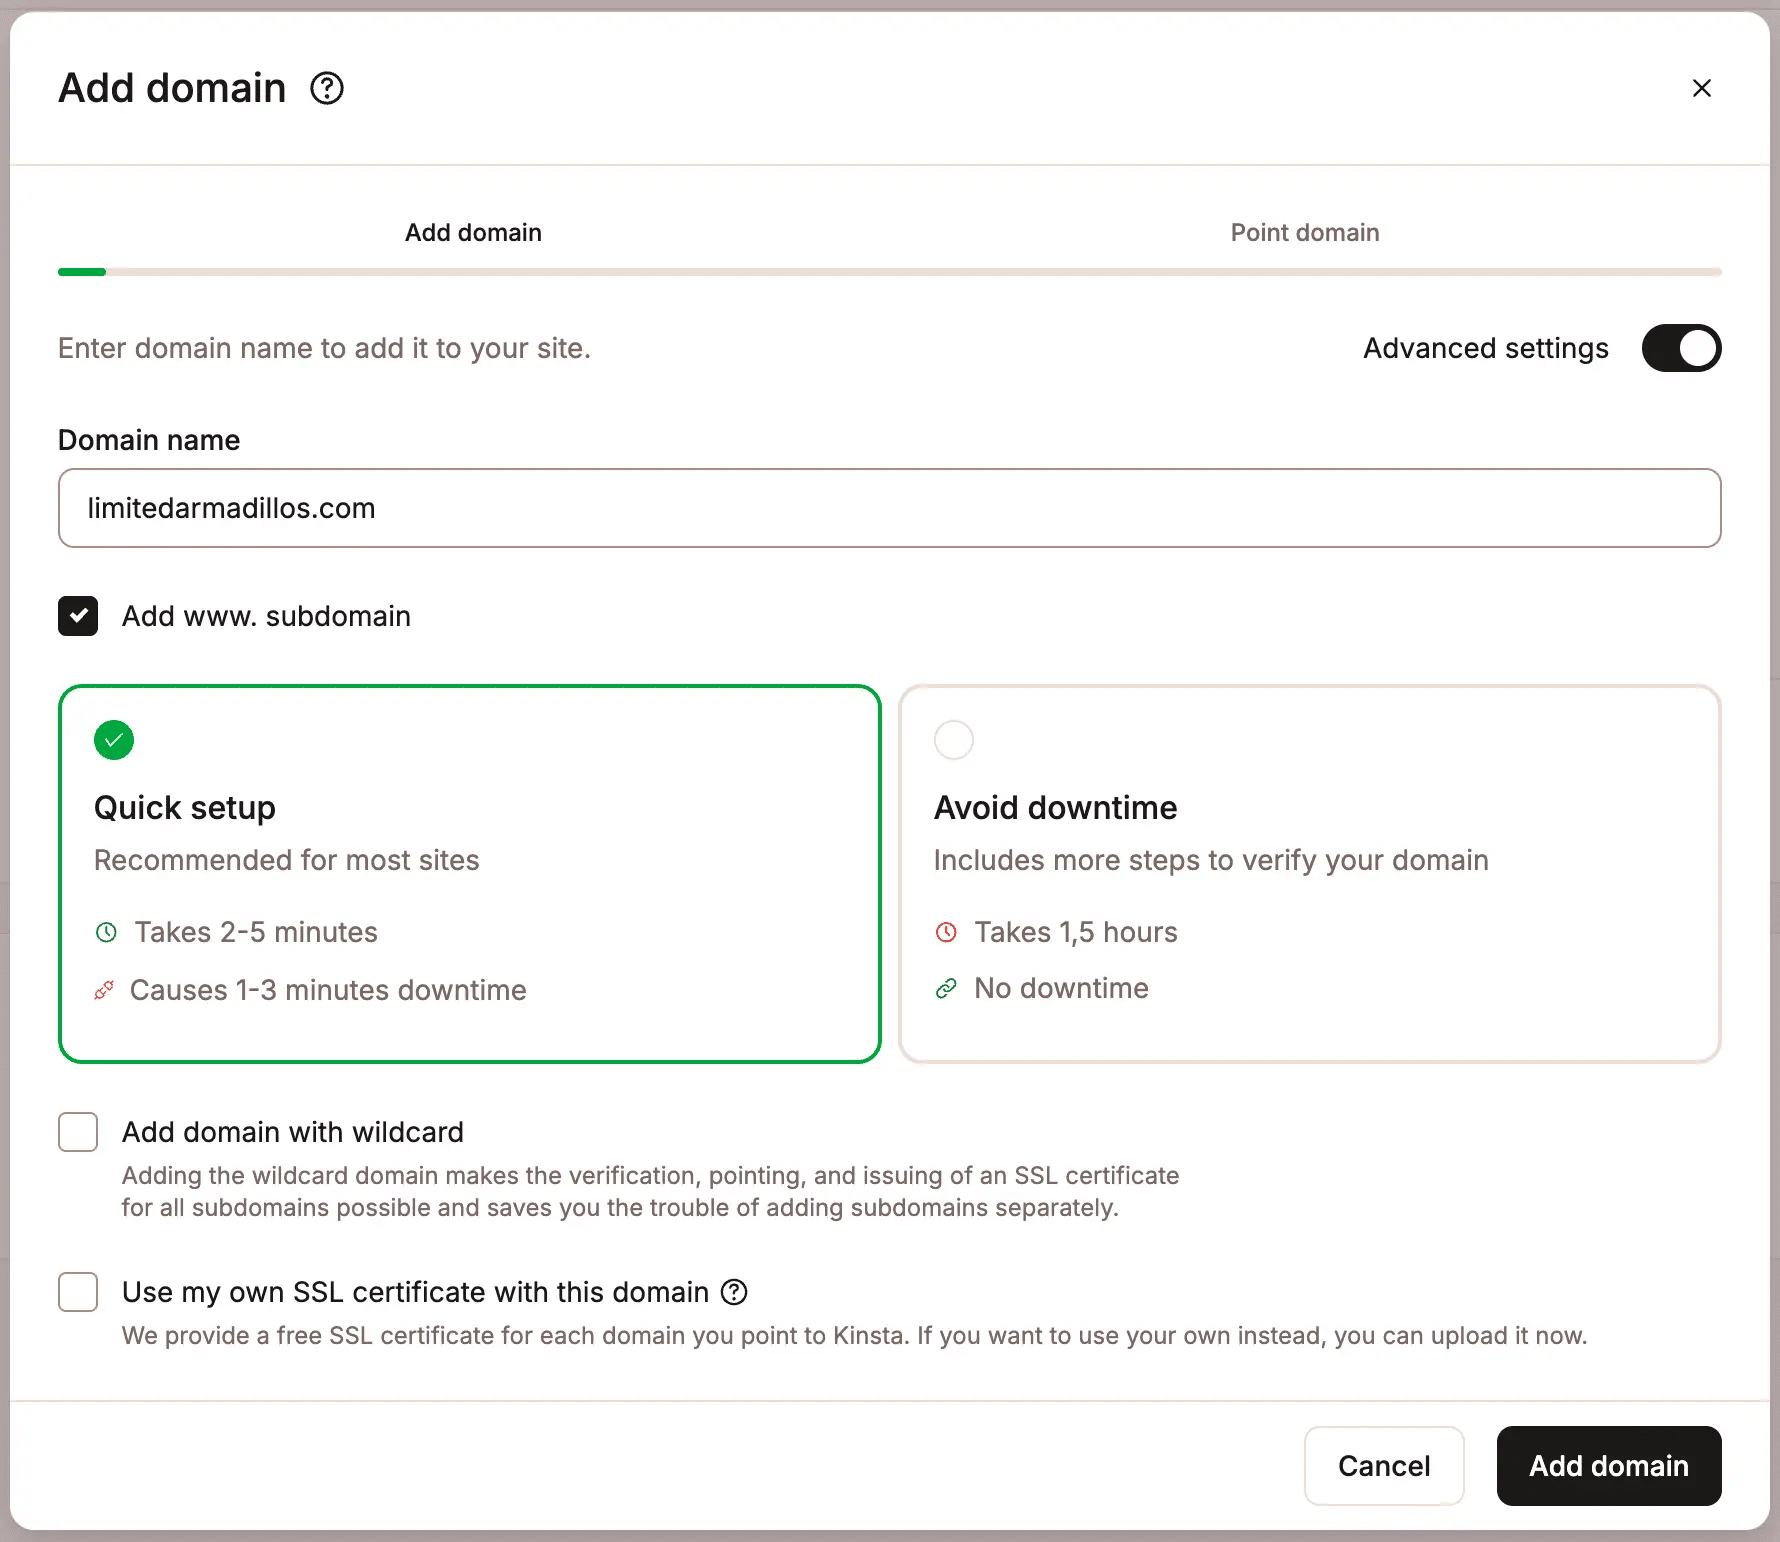
You’ll then update the relevant DNS records wherever your domain’s DNS is currently managed.
For example, if you registered your domain with a third-party provider and manage its DNS records there, you’ll need to make the required changes in that provider’s dashboard.
Adding a domain to Kinsta and changing its DNS records are separate actions. Your website won’t begin receiving traffic through the new domain configuration until those changes take effect.
Follow Kinsta’s domain setup instructions for the correct records and verification process.
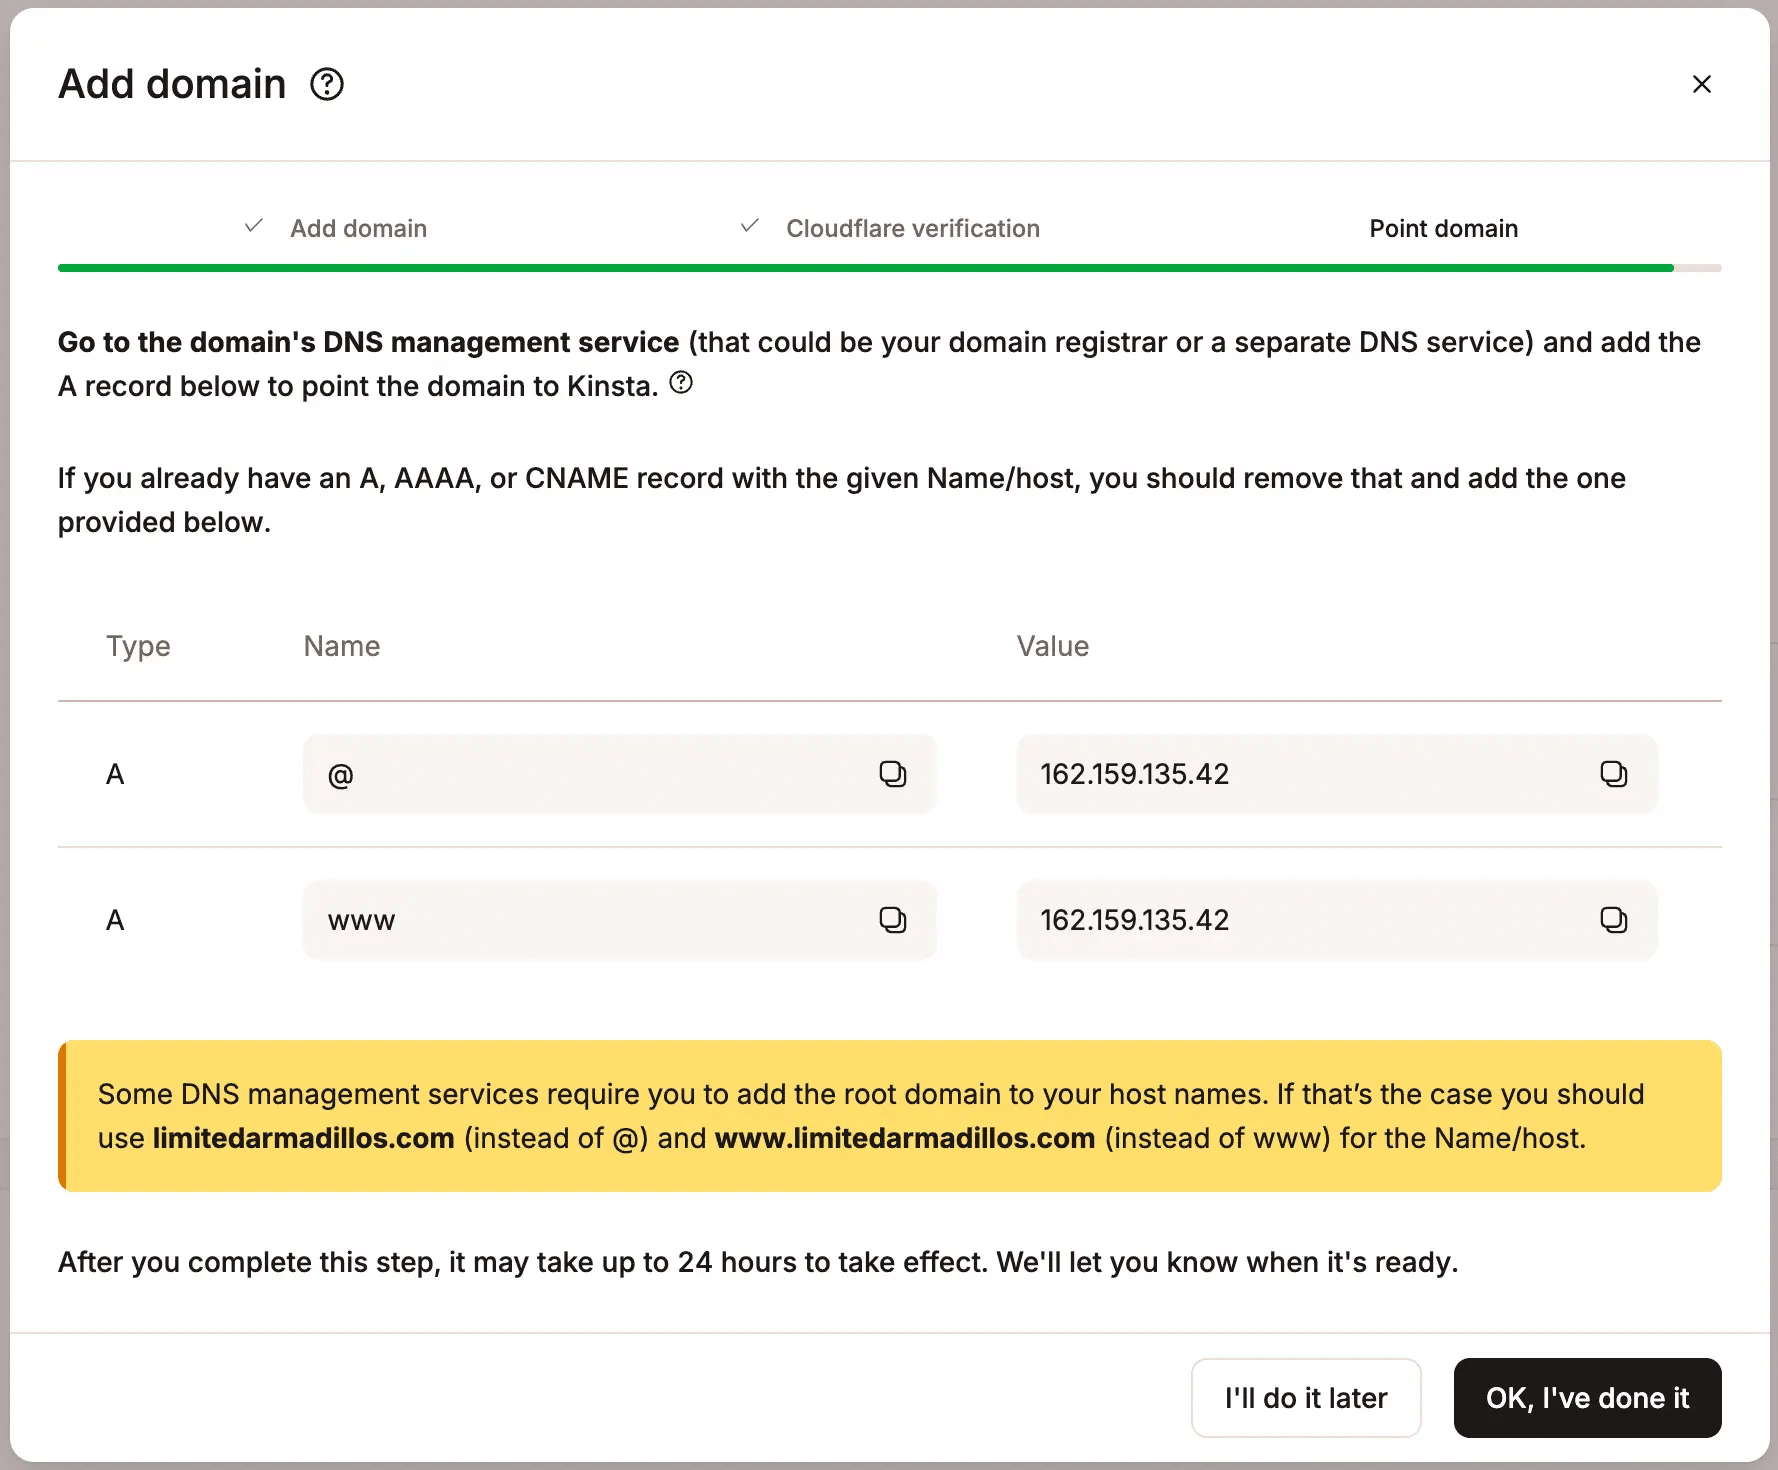
Once the DNS changes take effect, confirm your website loads through the correct domain and uses HTTPS.
If you’re moving an existing website, verify that visitors are reaching the Kinsta-hosted version before canceling your old hosting subscription.
Be careful with email during this step. Website hosting and email delivery aren’t the same service, and changing DNS incorrectly can affect business email. Keep the required mail records and check any other services tied to your domain.
What happens if you choose the wrong plan?
Choosing a hosting plan isn’t permanent. If your business grows, attracts more visitors, or launches additional websites, you can change your hosting plan through MyKinsta.
Go to your company settings and open My Plan to review your subscription and available plan changes.
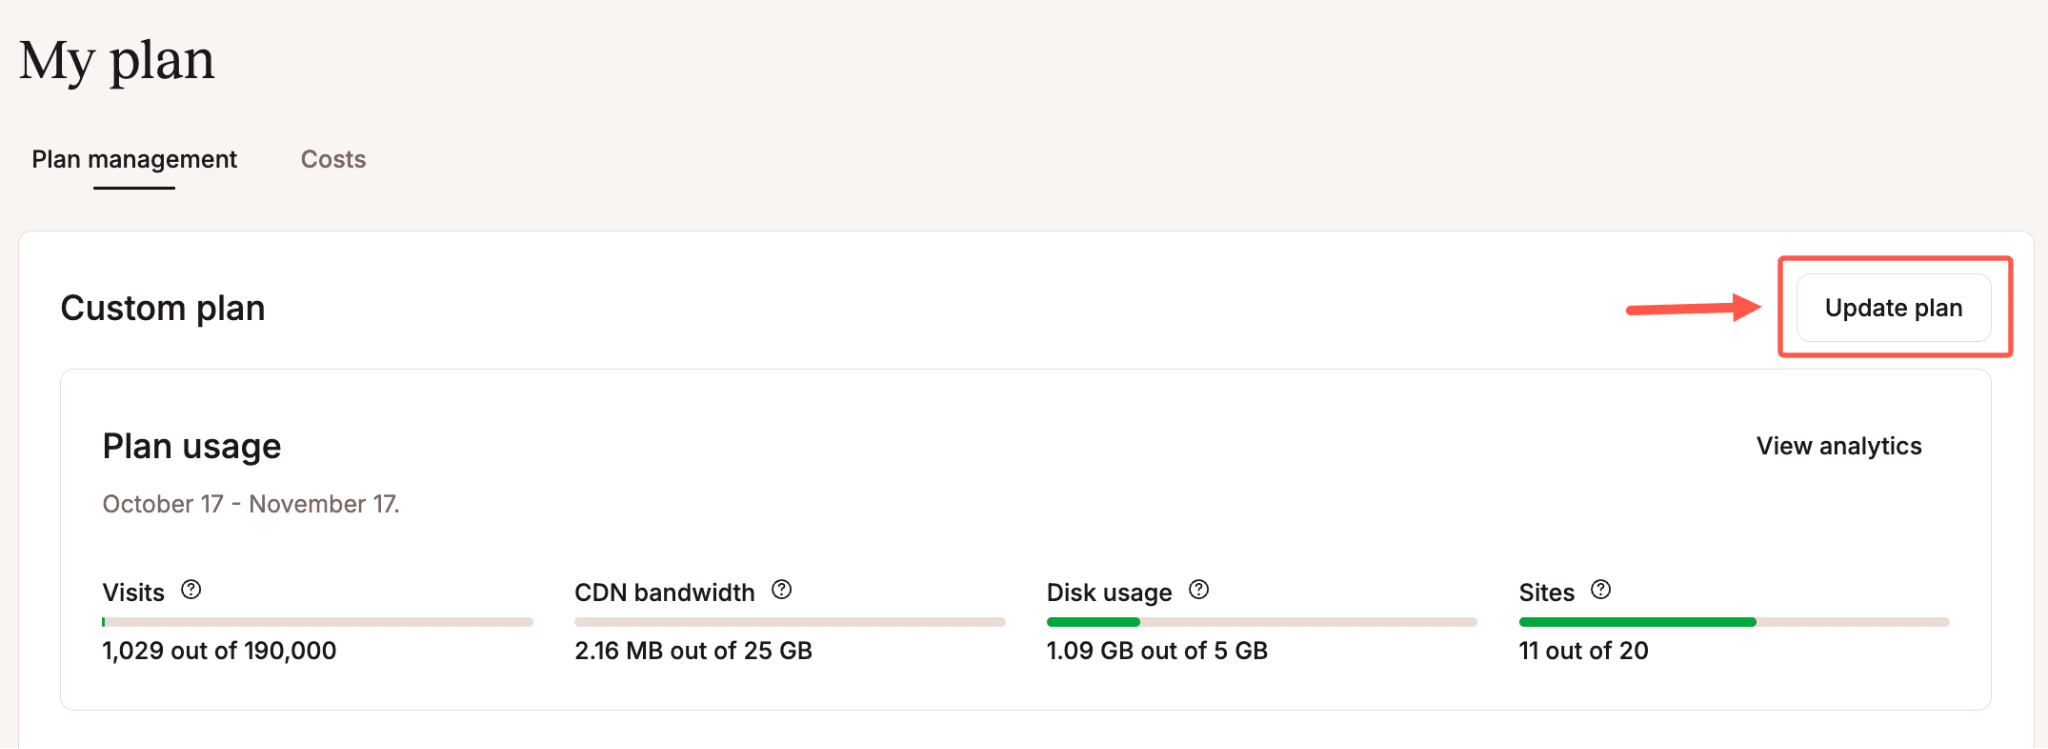
Kinsta supports upgrading or downgrading plans, with billing adjustments based on the applicable subscription terms.
You may also be able to increase individual resources using add-ons instead of changing your entire plan.
For example, if your main concern is running out of storage, adding disk space may be more suitable than upgrading solely for that reason. If you’re adding a second website, compare the price of an additional site with a multiple-site plan.
Keep in mind that switching plans during an introductory free period can affect when billing starts. Check the current plan-change and free-period conditions before making a change.
What about support, refunds, and the first month free?
If you’re not sure which plan to choose, contact Kinsta’s Sales team before purchasing.
After you sign up, Kinsta provides access to WordPress hosting support through MyKinsta.
Kinsta also offers a 30-day money-back guarantee for qualifying first-time customers. The terms exclude certain charges, such as overages, one-time fees, and dedicated-server fees.
For eligible plans that start with a free introductory month, the guarantee period begins according to Kinsta’s published free-period and refund terms.
Read the money-back guarantee policy if that protection is important to your buying decision.
For first-month-free plans, remember the offer doesn’t waive every possible charge. Your plan limits and applicable billing conditions still matter.
Your next step: Choose your plan and get your website ready
If you already know you want to move your small business website to Kinsta, compare the resources you need and complete sign-up.
You don’t have to migrate your website immediately after purchasing. You can request a migration, review the new copy, and make the switch when you’re ready.
If you’re creating a new website, MyKinsta lets you install WordPress and work on it using a temporary domain before launching it under your business’s domain.
Start with Kinsta’s WordPress hosting plans, choose the configuration that fits your website, and follow the sign-up process. If you’re unsure about your requirements, the Sales team can help you work through the options before you commit.