
Unit testing is crucial in software development, ensuring your application’s components work as expected in isolation. By writing tests for specific code units, you can identify and fix errors early in development, leading to more reliable and stable software.
In a continuous integration/continuous delivery (CI/CD) pipeline, you can run these tests automatically after making codebase changes. This ensures that new code doesn’t introduce errors or break existing functionality.
This article highlights the importance of unit testing in Laravel applications, detailing how to write unit tests for a Laravel application deployed using Sevalla’s Application Hosting service.
Introduction to PHPUnit
PHPUnit is a widely used testing framework within the PHP ecosystem designed for unit testing. It has a robust suite of tools for creating and running tests, making it a critical resource for ensuring your codebase’s reliability and quality.
Laravel supports testing with PHPUnit and ships with convenient helper methods that let you test your application.
Setting up PHPUnit in a Laravel project involves minimal configuration. Laravel provides a preconfigured testing environment, including a phpunit.xml file and a dedicated tests directory for your test files.
Alternatively, you can modify the phpunit.xml file to define custom options for a tailored testing experience. You can also create a .env.testing environment file in the project’s root folder instead of using the .env file.
Default tests layout in Laravel
Laravel provides a structured default directory layout. The root directory of your Laravel project contains a tests directory with the Feature and Unit subdirectories. This layout makes it simple to separate different test types and maintain a clean and organized testing environment.
The phpunit.xml file in a Laravel project is crucial in orchestrating the testing process, ensuring consistency in test runs, and allowing you to customize PHPUnit’s behavior according to project requirements. It lets you define how to run tests, including defining the test suites, specifying the test environment, and setting up database connections.
This file also specifies that the session, cache, and email should be set to the array driver, ensuring no data session, cache, or email data persists when running tests.
You can perform several types of testing on your Laravel application:
- Unit testing — focuses on individual components of your code, such as classes, methods, and functions. These tests remain isolated from the Laravel application and verify that specific code units work as expected. Note that tests defined in the tests/Unit directory don’t boot the Laravel application, meaning they can’t access the database or other services the framework offers.
- Feature testing — validates the broader functionality of your application. These tests simulate HTTP requests and responses, letting you test routes, controllers, and the integration of various components. Feature tests help ensure that different parts of your application work together as expected.
- Browser testing — goes further by automating browser interactions. The tests use Laravel Dusk, a browser automation and testing tool, to simulate user interactions, such as filling out forms and clicking buttons. Browser tests are crucial for validating your application’s behavior and user experience in real-world browsers.
Test-driven development concepts
Test-driven development (TDD) is a software development approach emphasizing testing before implementing code. This approach follows a process known as the red-green-refactor cycle.
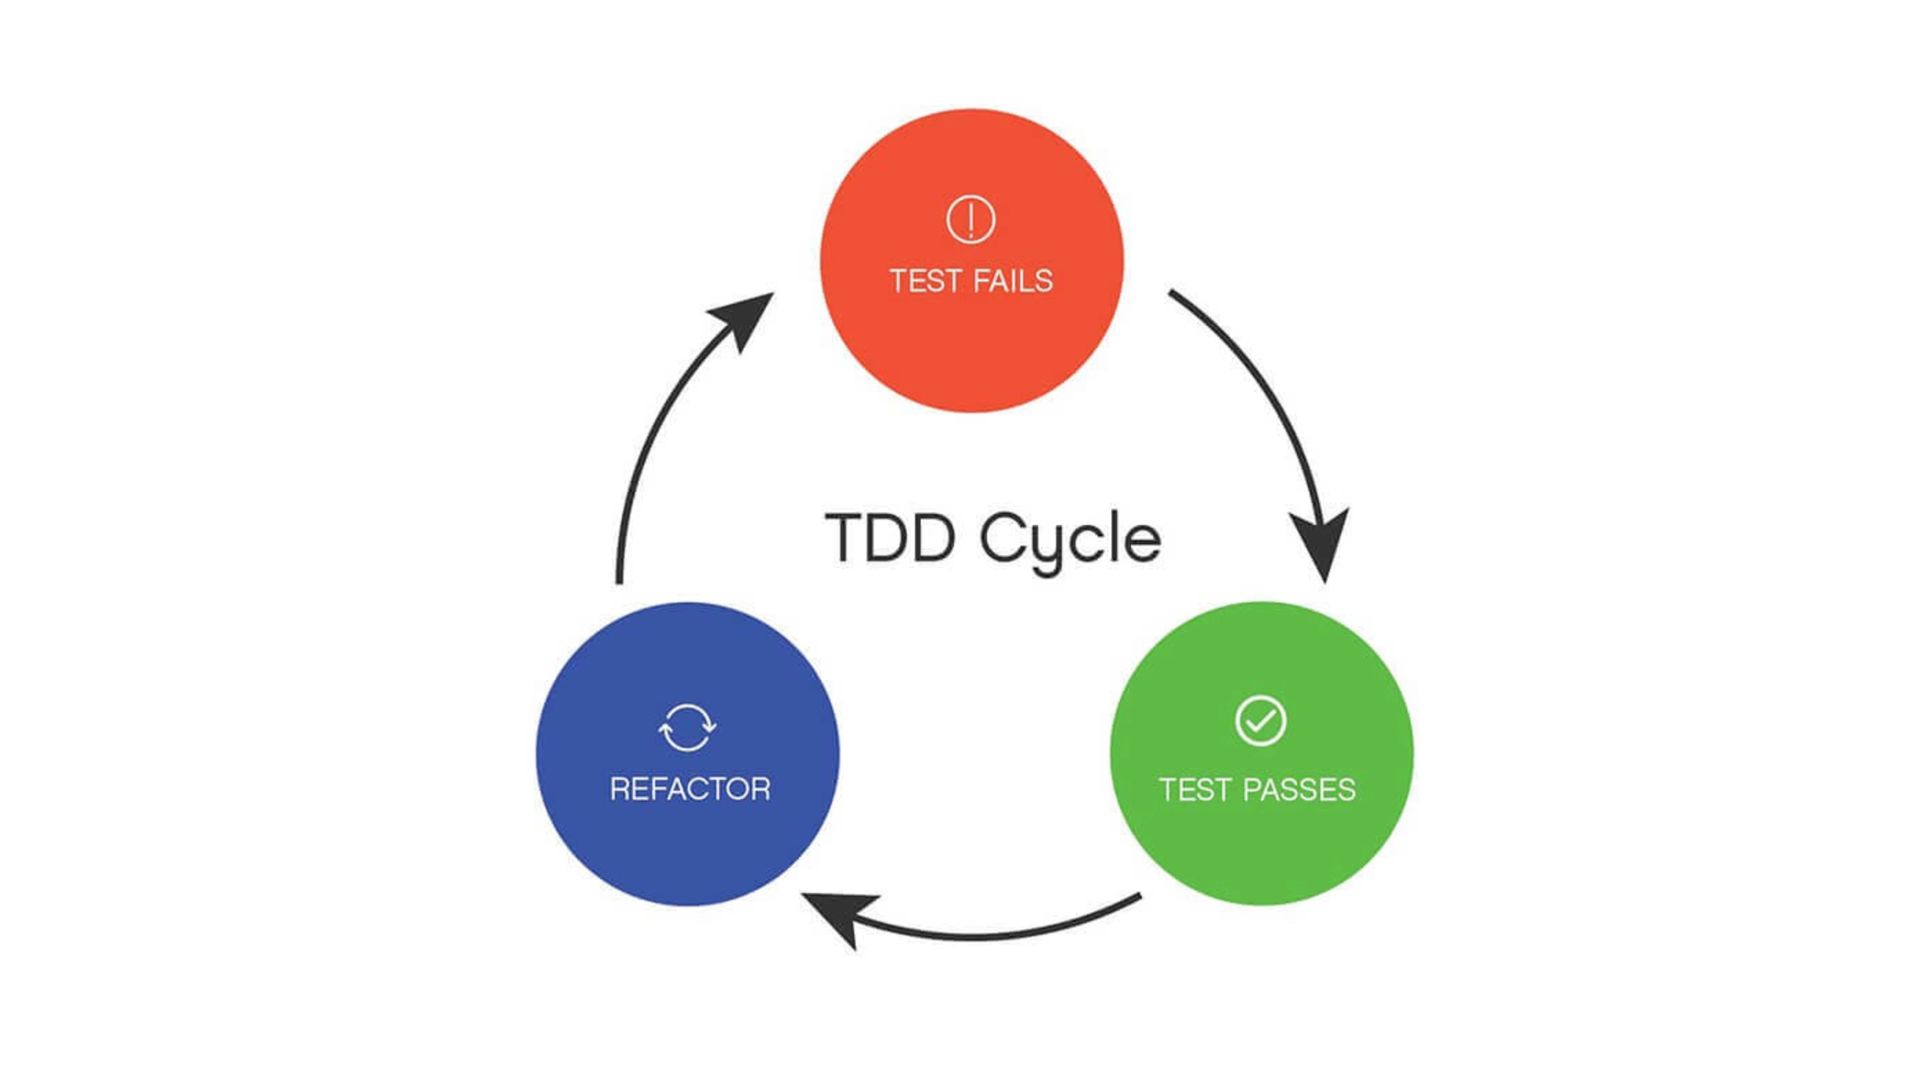
Here is an explanation of this cycle:
- Red phase — Write a new test to define functionality or an improvement on an existing one before implementing the actual code. The test should fail (as “red” signifies) because there’s no corresponding code to make it pass.
- Green phase — Write just enough code to make the failing test pass, turning it from red to green. The code won’t be optimal, but it fulfills the requirements of the corresponding test case.
- Refactor phase — Refactor the code to improve its readability, maintainability, and performance without changing its behavior. At this stage, you can comfortably make changes to the code without worrying about any regression issues, as the existing test cases catch them.
TDD has several benefits:
- Early bug detection — TDD helps catch bugs early in the development process, helping reduce the cost and time of fixing problems later in the development cycle.
- Improved design — TDD encourages modular and loosely coupled code for better software design. It encourages you to think about the interface and component interactions before implementation.
- Confidence in refactoring — You can confidently refactor code, knowing that existing tests quickly identify any regressions introduced during refactoring.
- Living documentation — Test cases serve as living documentation by providing examples of how the code should behave. This documentation is always up to date since failing tests indicate issues in the code.
In Laravel development, you apply TDD principles by writing tests for components like controllers, models, and services before implementing them.
Laravel’s testing environment, including PHPUnit, provides convenient methods and assertions to facilitate TDD, ensuring you can create meaningful tests and follow the red-green-refactor cycle effectively.
Basic examples of unit testing
This section explains how to write a simple test to check your model’s functionality.
Prerequisites
To follow along, you need the following:
- Meet the prerequisites listed in the Laravel blog guide.
- A Laravel application. This tutorial uses the application created in the guide linked above. You can read it and create the blog application, but if you only need the source code to implement the tests, follow the steps below.
- Xdebug installed and configured with coverage mode enabled.
Set up the project
- Execute this command in a terminal window to clone the project.
git clone https://github.com/VirtuaCreative/kinsta-laravel-blog.git - Move into the project folder and execute the
composer installcommand to install project dependencies. - Rename the env.example file to .env.
- Execute the
php artisan key:generatecommand to generate an app key.
Create and run tests
To begin, ensure you have the project code on your machine. The model you’ll be testing is the Post model defined in the app/Http/Models/Post.php file. This model encompasses several fillable attributes, such as title, description, and image.
Your task involves crafting straightforward unit tests for this model. One verifies that the attributes are properly set, while another examines mass assignment by attempting to assign a non-fillable attribute.
- Execute the
php artisan make:test PostModelFunctionalityTest --unitcommand to create a new test case. The--unitoption specifies that this is a unit test and saves it in the tests/Unit directory. - Open the tests/Unit/PostModelFunctionalityTest.php file and replace the
test_examplefunction with this code:public function test_attributes_are_set_correctly() { // create a new post instance with attributes $post = new Post([ 'title' => 'Sample Post Title', 'description' => 'Sample Post Description', 'image' => 'sample_image.jpg', ]); // check if you set the attributes correctly $this->assertEquals('Sample Post Title', $post->title); $this->assertEquals('Sample Post Description', $post->description); $this->assertEquals('sample_image.jpg', $post->image); } public function test_non_fillable_attributes_are_not_set() { // Attempt to create a post with additional attributes (non-fillable) $post = new Post([ 'title' => 'Sample Post Title', 'description' => 'Sample Post Description', 'image' => 'sample_image.jpg', 'author' => 'John Doe', ]); // check that the non-fillable attribute is not set on the post instance $this->assertArrayNotHasKey('author', $post->getAttributes()); }This code defines two test methods.
The first creates a
Postinstance with specified attributes and, using theassertEqualsassertion method asserts that you set thetitle,description, andimageattributes correctly.The second method attempts to create a
Postinstance with an additional non-fillable attribute (author) and asserts that this attribute is not set on the model instance using theassertArrayNotHasKeyassertion method. - Ensure you add the following
usestatement in the same file:use App\Models\Post; - Run the
php artisan config:clearcommand to clear the configuration cache. - To run these tests, execute the following command:
php artisan test tests/Unit/PostModelFunctionalityTest.phpAll tests should pass, and the terminal should display the results and total time to run the tests.
Debug tests
If tests fail, you can debug them by following these steps:
- Review the error message in the terminal. Laravel provides detailed error messages that pinpoint the problem. Carefully read the error message to understand why the test failed.
- Inspect the tests and code you are testing to identify discrepancies.
- Ensure you properly set up the data and dependencies required for the test.
- Use debugging tools like Laravel’s dd() function to inspect variables and data at specific points in your test code.
- Once you have identified the issue, make the necessary changes and rerun the tests until they pass.
Tests and databases
Laravel provides a convenient way to set up a testing environment using an in-memory SQLite database, which is fast and doesn’t persist data between test runs. To configure the testing database environment and write tests that interact with the database, follow the steps below:
- Open the phpunit.xml file and uncomment the following lines of code:
<env name="DB_CONNECTION" value="sqlite"/> <env name="DB_DATABASE" value=":memory:"/> - Execute the
php artisan make:test PostCreationTest --unitcommand to create a new test case. - Open the tests/Unit/PostCreationTest.php file and replace the
test_examplemethod with the code below:public function testPostCreation() { // Create a new post and save it to the database $post = Post::create([ 'title' => 'Sample Post Title', 'description' => 'Sample Post Description', 'image' => 'sample_image.jpg', ]); // Retrieve the post from the database and assert its existence $createdPost = Post::find($post->id); $this->assertNotNull($createdPost); $this->assertEquals('Sample Post Title', $createdPost->title); } - Ensure you add the following
usestatement:use App\Models\Post;Currently, the
PostCreationTestclass extends thePHPUnitFrameworkTestCasebase class. The base class is commonly used for unit tests when working with PHPUnit directly, outside of Laravel, or when writing tests for a component not tightly coupled with Laravel. However, you need to access the database, meaning you must modify thePostCreationTestclass to extend theTestsTestCaseclass.The latter class tailors the
PHPUnitFrameworkTestCaseclass to Laravel applications. It provides additional functionality and Laravel-specific setup, such as database seeding and test environment configuration. - Ensure you replace the
use PHPUnitFrameworkTestCase;statement withuse TestsTestCase;.Remember that you set the testing environment to use an in-memory SQLite database. So, you must migrate the database before running the tests. Use theIlluminateFoundationTestingRefreshDatabasetrait to do this. This trait migrates the database if the schema is not up to date and resets the database after each test to ensure that the data from the previous test does not interfere with subsequent tests. - Add the following
usestatement to the tests/Unit/PostCreationTest.php file to incorporate this trait in your code:use Illuminate\Foundation\Testing\RefreshDatabase; - Next, add the following line of code just before the
testPostCreationmethod:use RefreshDatabase; - Run the
php artisan config:clearcommand to clear the configuration cache. - To run this test, execute the following command:
php artisan test tests/Unit/PostCreationTest.phpThe tests should pass, and the terminal should display the test results and the total testing time.
Feature testing
While unit tests check individual application components in isolation, feature tests check larger portions of the code, such as how several objects interact. Feature testing is vital for several reasons:
- End-to-end validation — Confirms that the entire feature works seamlessly, including the interactions among various components like controllers, models, views, and even the database.
- End-to-end testing — Covers the entire user flow from initial request to final response, which can uncover issues that unit tests might miss. This ability makes them valuable for testing user journeys and complex scenarios.
- User experience assurance — Mimics user interactions, helping verify a consistent user experience and that the feature functions as intended.
- Regression detection — Catches regressions and code-breaking changes when introducing new code. If an existing feature starts failing in a feature test, it signals that something broke.
Now, create a feature test for the PostController in the app/Http/Controllers/PostController.php file. You focus on the store method, validating the incoming data and creating and storing posts in the database.
The test simulates a user creating a new post through a web interface, ensuring that the code stores the post in the database and redirects the user to the Posts Index page after creation. To do this, follow these steps:
- Execute the
php artisan make:test PostControllerTestcommand to create a new test case in the tests/Features directory. - Open the tests/Feature/PostControllerTest.php file and replace the
test_examplemethod with this code:use RefreshDatabase; // Refresh the database after each test public function test_create_post() { // Simulate a user creating a new post through the web interface $response = $this->post(route('posts.store'), [ 'title' => 'New Post Title', 'description' => 'New Post Description', 'image' => $this->create_test_image(), ]); // Assert that the post is successfully stored in the database $this->assertCount(1, Post::all()); // Assert that the user is redirected to the Posts Index page after post creation $response->assertRedirect(route('posts.index')); } // Helper function to create a test image for the post private function create_test_image() { // Create a mock image file using Laravel's UploadedFile class $file = UploadedFile::fake()->image('test_image.jpg'); // Return the path to the temporary image file return $file; }The
test_create_postfunction simulates a user creating a new post by making aPOSTrequest to theposts.storeroute with specific attributes, including a mock image generated using Laravel’sUploadedFileclass.The test then asserts that the code successfully stored the post in the database by checking the count of
Post::all(). It verifies that the code redirects the user to the Posts Index page after post creation.This test ensures that the post-creation functionality works and the application correctly handles the database interactions and redirects after post-submission.
- Add the following
usestatements to the same file:use App\Models\Post; use Illuminate\Http\UploadedFile; - Run the command
php artisan config:clearto clear the configuration cache. - To run this test, execute this command:
php artisan test tests/Feature/PostControllerTest.phpThe test should pass, and the terminal should show the test results and the total time to run the test.
Confirm test coverage
Test coverage refers to how much of the codebase your unit, feature, or browser tests check, expressed as a percentage. It helps you identify untested areas in your codebase and the under-tested areas potentially containing bugs.
Tools like PHPUnit’s code coverage feature and Laravel’s built-in coverage report generate reports showing which parts of your codebase your tests cover. This process provides critical information about your tests’ quality and helps you focus on areas that might require additional testing.
Generate a report
- Delete the tests/Feature/ExampleTest.php and tests/Unit/ExampleTest.php files, as you have not modified them, and they might cause errors.
- Execute the
php artisan test --coveragecommand in a terminal window. You should receive an output like the following:
Executing the command php artisan test –coverage. The code coverage report shows the test results, the total number of tests passed, and the time to execute the results. It also lists each component in your codebase and its code coverage percentage. The percentages represent the proportion of the code your tests cover.
For example,
Models/Posthas 100% coverage, meaning that all the model’s methods and lines of code are covered. The code coverage report also displays the Total Coverage — the overall code coverage for the entire codebase. In this case, the tests cover only 65.3% of the code. - To specify a minimum coverage threshold, execute the
php artisan test --coverage --min=85command. This command sets a minimum threshold of 85%. You should receive the following output:
Test with a minimum threshold of 85%. The test suites fail because the code doesn’t meet the set minimum threshold of 85%.
While achieving higher code coverage — often 100% — is the goal, it’s more important to test your application’s critical and complex parts thoroughly.
Summary
By embracing the best practices outlined in this article, such as writing meaningful and comprehensive tests, adhering to the red-green-refactor cycle in TDD, and leveraging the testing features provided by Laravel and PHPUnit, you can create robust and high-quality applications.
Furthermore, you have the option to host your Laravel application with Sevalla’s swift, secure, and dependable infrastructure. Additionally, you can utilize the Sevalla API to initiate deployments within your CI/CD pipelines through platforms such as GitHub Actions, CircleCI, and more.


