In the fast-paced world of web development, continuous integration and continuous deployment (CI/CD) have become indispensable practices for delivering high-quality software efficiently. CI/CD allows developers to automate the process of building, testing, and deploying code changes, reducing the risk of human error, and enabling faster iterations.
This article explains the importance of CI/CD, how to create a CI pipeline, and how to set up continuous deployment in your CI pipeline for Application Hosting with the Kinsta API programmatically — all with GitHub Actions in your GitHub repository.
Why Use CI/CD?
Application hosts like Sevalla, the PaaS provider founded by Kinsta, typically offer an option for automatic deployment, triggered whenever there is a change to a specific branch on your hosted Git repository. However, this might not be ideal for large projects with multiple team members. Many developers tend to avoid enabling automatic deployment for a variety of reasons.
One reason is that, in a collaborative environment where multiple developers are working on the same project, automatic deployments triggered by one developer’s change to the repository can lead to instability and unforeseen issues. Without proper testing and validation, even a small code change could disrupt the live site, potentially causing downtime and negative user experiences.
This is where a CI/CD pipeline comes into play. By creating a carefully orchestrated CI/CD workflow, developers can ensure that code changes undergo testing and validation before being deployed to the live site. There are many tools available for implementing CI/CD in software development, we will use GitHub Actions for this tutorial.
What Is GitHub Actions?
GitHub Actions is a powerful automation tool provided by GitHub. It offers developers the ability to automate various tasks, processes, and workflows within their software development projects. It integrates with GitHub repositories, making it easy to use.
With GitHub Actions and the Kinsta API, you can define custom workflows that suit your project requirements. You can set up a CI pipeline that tests your application and triggers deployment on Kinsta.
Getting Started With GitHub Actions
GitHub Actions operates on the concept of workflows, which are sets of automated tasks that are triggered by specific events or scheduled at regular intervals. These events can include code pushes, pull requests, issue creation, and more. When one of these events occurs, GitHub Actions automatically runs an associated workflow, executing a series of predefined steps.
Each step in the workflow represents a particular action, such as building the code, running tests, deploying, or sending notifications. Let’s create a workflow with three tasks:
- Check syntax with ESLint
- Run tests
- Re-deploy your application
Step 1: Set Up Your GitHub Repository
To get started with GitHub Actions, you need a GitHub repository.
Here, we are using this GitHub repository, developed for the tutorial How To Build and Deploy a ChatGPT Clone Application With React and OpenAI API.
Feel free to use the repository yourself by navigating to it on GitHub and selecting: Use this template > Create a new repository.
In this React application, unit tests are created to test each component. ESLint is also used to enforce perfect syntax and code formatting. The CI pipeline will block a deployment if a pull request or merged code pushed to the repository fails the workflow tests.
Step 2: Create a Workflow File
Define your workflow by creating a YAML file in your repository’s .github/workflows directory. This directory should be at the root level of your repository. The naming convention for workflow files is name-of-the-workflow.yml.
- In your repository, create a .github directory.
- Inside the .github directory, create a new directory called workflows.
- Inside the workflows directory, create a new file with a name like build-test-deploy.yml.
Step 3: Write the CI/CD Workflow
Now that you have created your workflow file, define a workflow with the necessary steps to check syntax with ESLint, run tests, and deploy the application.
Create CI Event
When creating a CI pipeline, the first step is to give the workflow a name and then set the event that would trigger the workflow. For this example, two events are a pull request and a push to the main branch.
name: Build, Test, and Deploy

on:
  push:
    branches: "main"
  pull_request:
    branches: "main"
If you’d like to schedule periodic jobs (CRON jobs) for specific tasks, you can add them to the workflow. For example, you might want to run certain tasks like database backups, data cleaning, or other periodic maintenance tasks.
Here’s an example of how you can add a CRON job to the workflow:
on:
  # Existing event triggers for push and pull_request

  # Add a schedule for CRON jobs
  schedule:
    - cron: "0 0 * * *"
The above example will trigger the workflow every day at midnight (UTC time) since the cron schedule is set to 0 0 * * *. You can customize the cron schedule to meet your specific needs.
As another example, suppose you want to schedule the CI/CD workflow to run every Monday at 8 a.m. We can set up a CRON job using the schedule event:
name: Build, Test, and Deploy

on:
  push:
    branches: "main"
  pull_request:
    branches: "main"

  # Schedule the workflow to run every Monday at 8 a.m. (UTC time)
  schedule:
    - cron: "0 8 * * 1"

jobs:
 # Add jobs
The schedule syntax used in the schedule event for GitHub Actions workflows is based on the UNIX cron syntax. It allows you to define specific times or intervals for your workflow to run automatically. The syntax consists of five fields that represent different aspects of the schedule. Each field is separated by a space. The general format of the schedule syntax is as follows:
* * * * *
┬ ┬ ┬ ┬ ┬
│ │ │ │ │
│ │ │ │ └─ Day of the week (0 - 7) (Sunday to Saturday, where both 0 and 7 represent Sunday)
│ │ │ └─── Month (1 - 12)
│ │ └───── Day of the month (1 - 31)
│ └─────── Hour (0 - 23)
└───────── Minute (0 - 59)
Now, let’s break down each field:
- Minute (0 – 59): The minute at which the cron job will trigger. For example,
15means the workflow will trigger at the 15th minute of the hour. - Hour (0 – 23): The hour at which the cron job will trigger. For example,
8means the workflow will trigger at 8 a.m. - Day of the month (1 – 31): The day of the month on which the cron job will trigger. For example,
1means the workflow will trigger on the 1st day of the month. - Month (1 – 12): The month on which the cron job will trigger. For example,
6means the workflow will trigger in June. - Day of the week (0 – 7): The day of the week on which the cron job will trigger. Here,
0and7both represent Sunday, while1represents Monday, and so on. For example,4means the workflow will trigger on Thursday.
Special characters:
*(asterisk): Matches any value for that field. For example,*in the minute field means the workflow will trigger every minute.*/n(slash): Specifies an interval. For example,*/5in the minute field means the workflow will trigger every 5 minutes.,(comma): Specifies multiple specific values. For example,1,15,30in the minute field means the workflow will trigger at the 1st, 15th, and 30th minutes of the hour.-(hyphen): Specifies a range of values. For example,1-5in the day of the week field means the workflow will trigger from Monday to Friday (1 to 5).?(question mark): Used to specify no specific value. It is commonly used in the day of the week field when the day of the month is specified. For example,?in the day of the week field and15in the day of the month field means the workflow will trigger on the 15th day of the month, regardless of the day of the week.
Create a CI Job To Check Syntax With ESLint
To set up the CI process, we will create the necessary jobs or tasks. Each job should have a clear and understandable name. Let’s name the first job eslint since it will involve checking the code syntax using ESLint.
Additionally, we can provide a human-readable description, although this part is optional. Next, we specify that the job should run on an Ubuntu environment and utilize a matrix strategy to test the code against two Node.js versions: 18.x and 20.x.
jobs:
  eslint:
    name: Check Syntax with ESLint
    runs-on: ubuntu-latest

    strategy:
      matrix:
        node-version: [18.x, 20.x]
Next, define the steps that the “ESLint” job will run. These steps include checking out the code, setting up the specified Node.js version to run ESLint, caching npm packages, installing project dependencies, and finally running ESLint to check the code syntax.
    steps:
      - name: Checkout code
        uses: actions/checkout@v3

      - name: Use Node.js ${{ matrix.node-version }} to Check Lint
        uses: actions/setup-node@v3
        with:
          node-version: ${{ matrix.node-version }}
          cache: 'npm'

      - name: Install Dependencies
        run: npm ci

      - name: Run ESLint
        run: npm run lint
In the workflow above, each step is given a description with a name to make it easy to identify the source of errors or bugs when inspecting the workflow from GitHub Actions. Notably, in the third step, we use the npm ci command to install dependencies, which is preferred over npm install as it performs a clean installation. Additionally, the last step, running ESLint using npm run lint, assumes you have configured this command in your package.json file.
Below is the complete job for checking code syntax with ESLint:
jobs:
  eslint:
    name: Check Syntax with ESLint
    runs-on: ubuntu-latest

    strategy:
      matrix:
        node-version: [18.x, 20.x]

    steps:
      - name: Checkout code
        uses: actions/checkout@v3

      - name: Use Node.js ${{ matrix.node-version }} to Check Lint
        uses: actions/setup-node@v3
        with:
          node-version: ${{ matrix.node-version }}
          cache: 'npm'

      - name: Install Dependencies
        run: npm ci

      - name: Run ESLint
        run: npm run lint
Create CI Job To Run Tests
To add the CI job to run tests, start by defining the job and providing a descriptive name, such as tests. We’ll also specify that this job depends on the eslint job, meaning the eslint job will run first before the tests job is executed. This dependency ensures that the code is checked for syntax errors before running the tests.
  tests:
    name: Run Tests
    needs: eslint
    runs-on: ubuntu-latest
Next, define the steps for the tests job. Similar to the previous job, we’ll check out the code, set up Node.js version 18.x to run the tests, install project dependencies using npm ci, and then execute the tests using the npm run test command.
    steps:
      - name: Checkout code
        uses: actions/checkout@v3

      - name: Use Node.js 18.x to run Test
        uses: actions/setup-node@v3
        with:
          node-version: 18.x
          cache: 'npm'

      - name: Install Dependencies
        run: npm ci

      - name: Run Tests
        run: npm run test
Create CI Job To Deploy With Kinsta API
To create the CI job for deploying to Kinsta using the Kinsta API, we’ll define the job and name it deploy. This job will have dependencies on the eslint and tests jobs, ensuring that the deployment is executed only after the code has been checked for syntax errors and passed the tests. We’ll set up the job to run on an Ubuntu environment using the latest available version.
  deploy:
    name: Re-Deploy Application
    needs: [eslint, tests]
    runs-on: ubuntu-latest
Next, define the steps. In this case, you will run a cURL command to interact with the Kinsta API programmatically and trigger a re-deployment. Let’s first understand the Kinsta API, the various information needed to interact with the API, and how to get/store important information associated with the API — like the API key — safely on GitHub.
Understanding the Kinsta API
The Kinsta API is a powerful tool that allows you to interact with Kinsta’s services programmatically. To use the API, you must have an account with at least one WordPress site in MyKinsta. You also need to generate an API key to authenticate and access your account through the API.
To generate an API key:
- Go to your MyKinsta dashboard.
- Navigate to the API Keys page (Your name > Company settings > API Keys).
- Click Create API Key.
- Choose an expiration or set a custom start date and number of hours for the key to expire.
- Give the key a unique name.
- Click Generate.
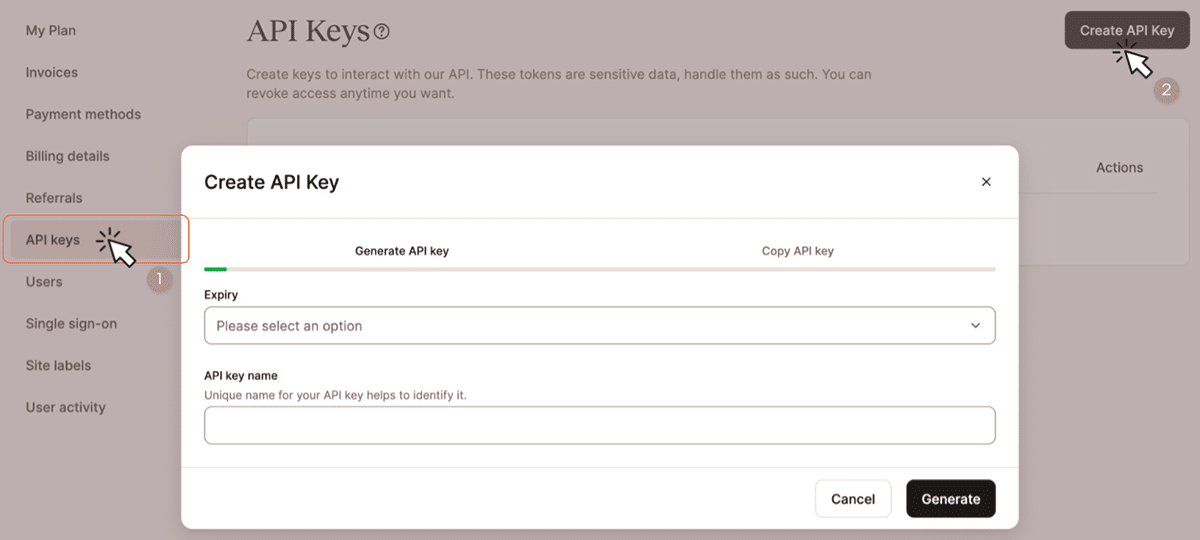
After creating an API key, copy it and store it somewhere safe (we recommend using a password manager), as this is the only time it is revealed within MyKinsta.
How To Trigger Deployment With Kinsta API
To deploy an application to Kinsta using the API, you need two required parameters: the application ID and the branch. You can programmatically retrieve your application’s ID by first fetching the list of your applications, which will provide details about each application, including its ID.
After obtaining the necessary information, you can make a POST request to the API’s /applications/deployments endpoint. For the CI pipeline, we will use cURL, a command-line tool for interacting with URLs.
curl -i -X POST \
  https://api.kinsta.com/v2/applications/deployments \
  -H 'Authorization: Bearer <YOUR_TOKEN_HERE>' \
  -H 'Content-Type: application/json' \
  -d '{
    "app_id": "<YOUR_APP_ID>",
    "branch": "main"
  }'
Trigger Deployment With cURL in CI/CD Pipeline
To trigger deployment with the Kinsta API, add the cURL command to the run command for your CI pipeline. However, it’s important to store your API key and application ID securely.
To store secrets on GitHub and use them in GitHub Actions, follow these steps:
- Navigate to the repository where you want to set up the secret.
- Click on the Settings tab in the repository’s menu.
- On the left sidebar, select Secrets under the Options category.
- Click on New repository secret.
- Provide a name for your secret (like
KINSTA_API_KEY) and enter your Kinsta API key in the Value field. - After entering the name and value, click on the Add secret button to save it.
- Repeat the process for other secrets.

Once you have added the secrets, you can reference them in your GitHub Actions workflow using the ${{ secrets.SECRET_NAME }} syntax.
Let’s now complete the deploy job for your GitHub Actions CI/CD pipeline. Define the steps just like before, with a single step to deploy to Kinsta. First, define the secrets in the env command, and then add the cURL command to execute the deployment.
    steps:
      - name: Deploy to Kinsta
        env:
          KINSTA_API_KEY: ${{ secrets.KINSTA_API_KEY }}
          APP_ID: ${{ secrets.APP_ID }}
        run: |
          curl -i -X POST \
            https://api.kinsta.com/v2/applications/deployments \
            -H "Authorization: Bearer $KINSTA_API_KEY" \
            -H "Content-Type: application/json" \
            -d '{
              "app_id": "'"$APP_ID"'",
              "branch": "main"
            }'
In the cURL command, you will notice that the environment variables are added within the command, allowing the secrets to be securely accessed during the deployment process.
This is what your final CI/CD workflow will look like:
name: Build, Test, and Deploy

on:
  push:
    branches: "main"
  pull_request:
    branches: "main"

jobs:
  eslint:
    name: Check Syntax with ESLint
    runs-on: ubuntu-latest

    strategy:
      matrix:
        node-version: [18.x, 20.x]

    steps:
      - name: Checkout code
        uses: actions/checkout@v3

      - name: Use Node.js ${{ matrix.node-version }} to Check Lint
        uses: actions/setup-node@v3
        with:
          node-version: ${{ matrix.node-version }}
          cache: 'npm'

      - name: Install Dependencies
        run: npm ci

      - name: Run ESLint
        run: npm run lint

  tests:
    name: Run Tests
    needs: eslint
    runs-on: ubuntu-latest

    steps:
      - name: Checkout code
        uses: actions/checkout@v3

      - name: Use Node.js 18.x to run Test
        uses: actions/setup-node@v3
        with:
          node-version: 18.x
          cache: 'npm'

      - name: Install Dependencies
        run: npm ci

      - name: Run Tests
        run: npm run test

  deploy:
    name: Re-Deploy Application
    needs: [eslint, tests]
    runs-on: ubuntu-latest

    steps:
      - name: Deploy to Kinsta
        env:
          KINSTA_API_KEY: ${{ secrets.KINSTA_API_KEY }}
          APP_ID: ${{ secrets.APP_ID }}
        run: |
          curl -i -X POST \
            https://api.kinsta.com/v2/applications/deployments \
            -H "Authorization: Bearer $KINSTA_API_KEY" \
            -H "Content-Type: application/json" \
            -d '{
              "app_id": "'"$APP_ID"'",
              "branch": "main"
            }'
Copy the given workflow and paste it into your build-test-deploy.yml file. Next, initiate a pull request to add this file to the main branch of your repository. Remember, this pull request will automatically trigger the workflow.
This allows you to review changes made to your repository and ensure that any new change in the pull request meets the specified checks before deciding whether to merge it into your codebase.
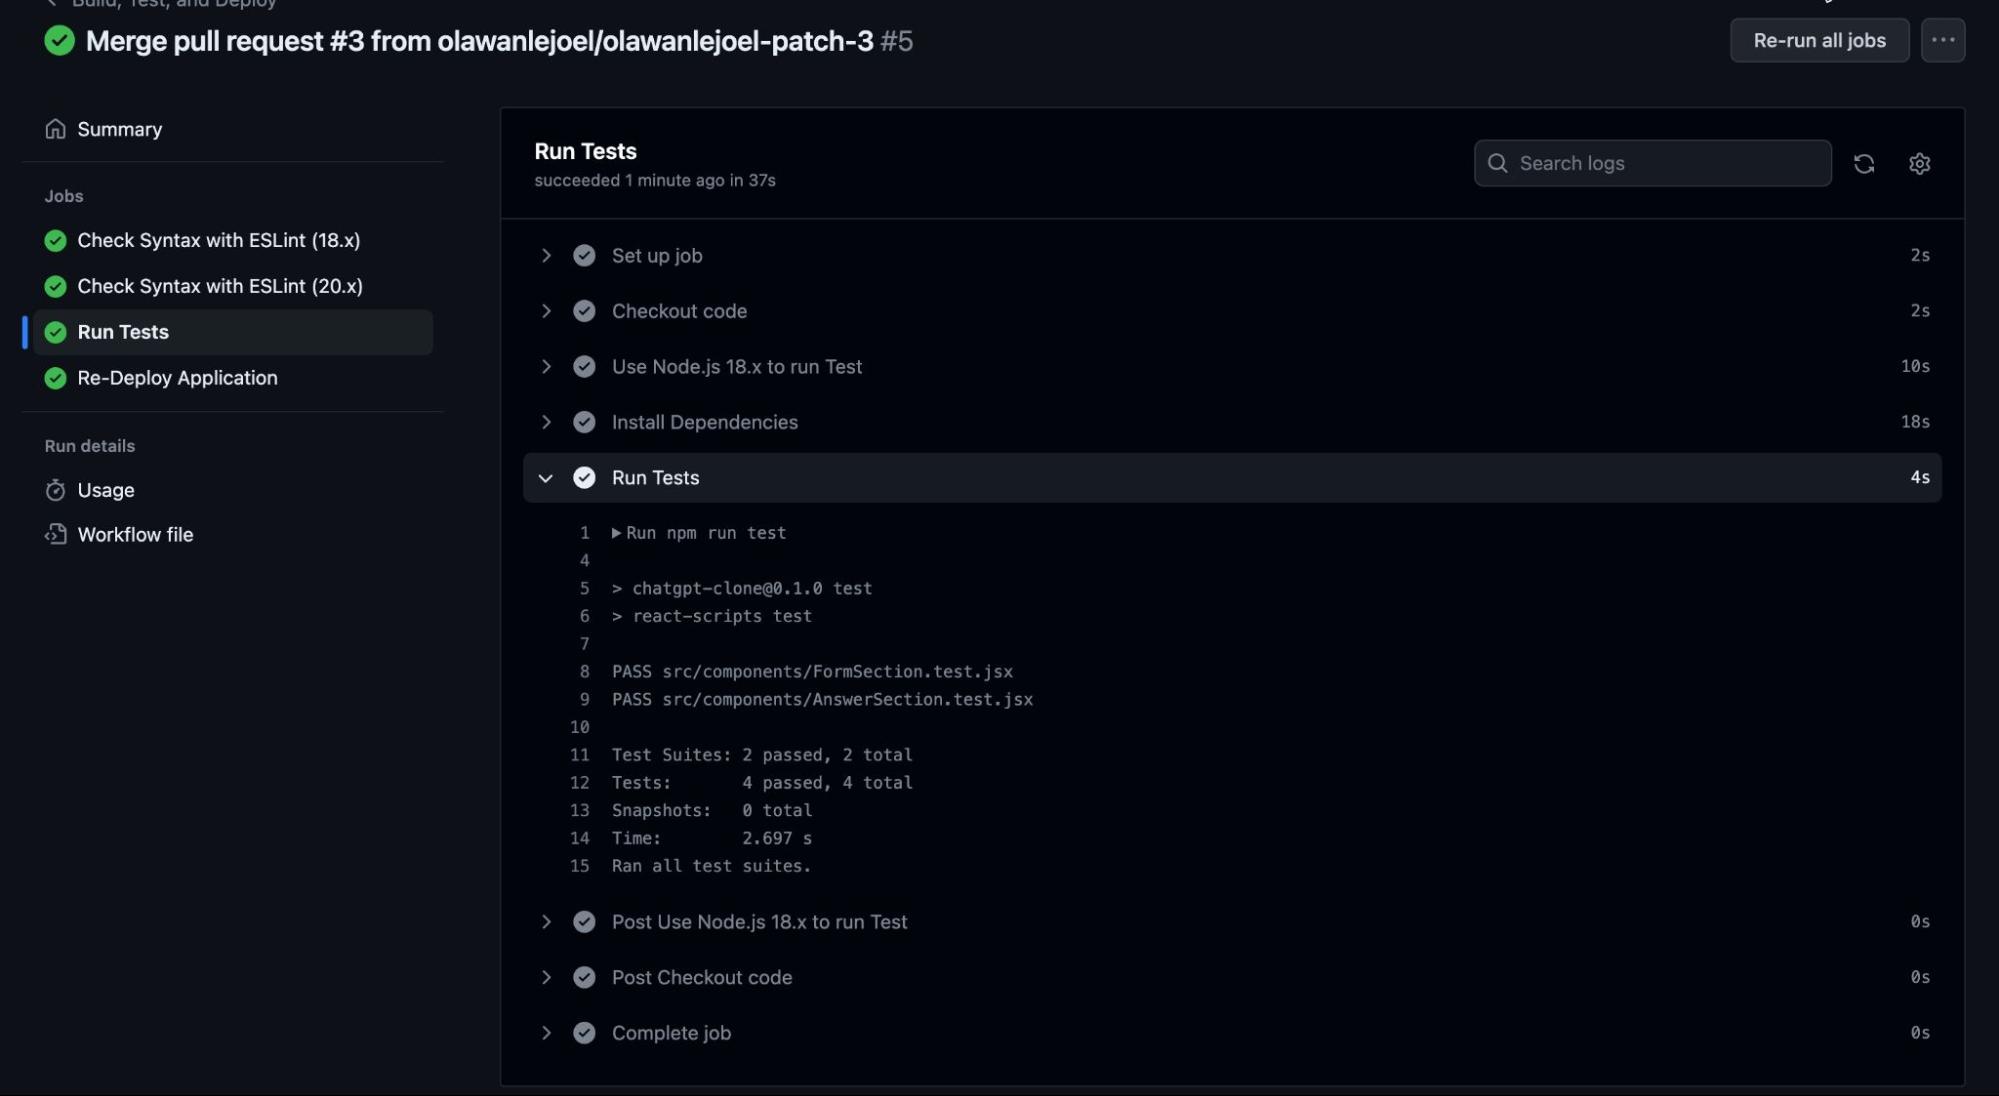
When you merge the pull request. Navigate to the Actions tab of your GitHub repository and then you will see the CI/CD workflow running.
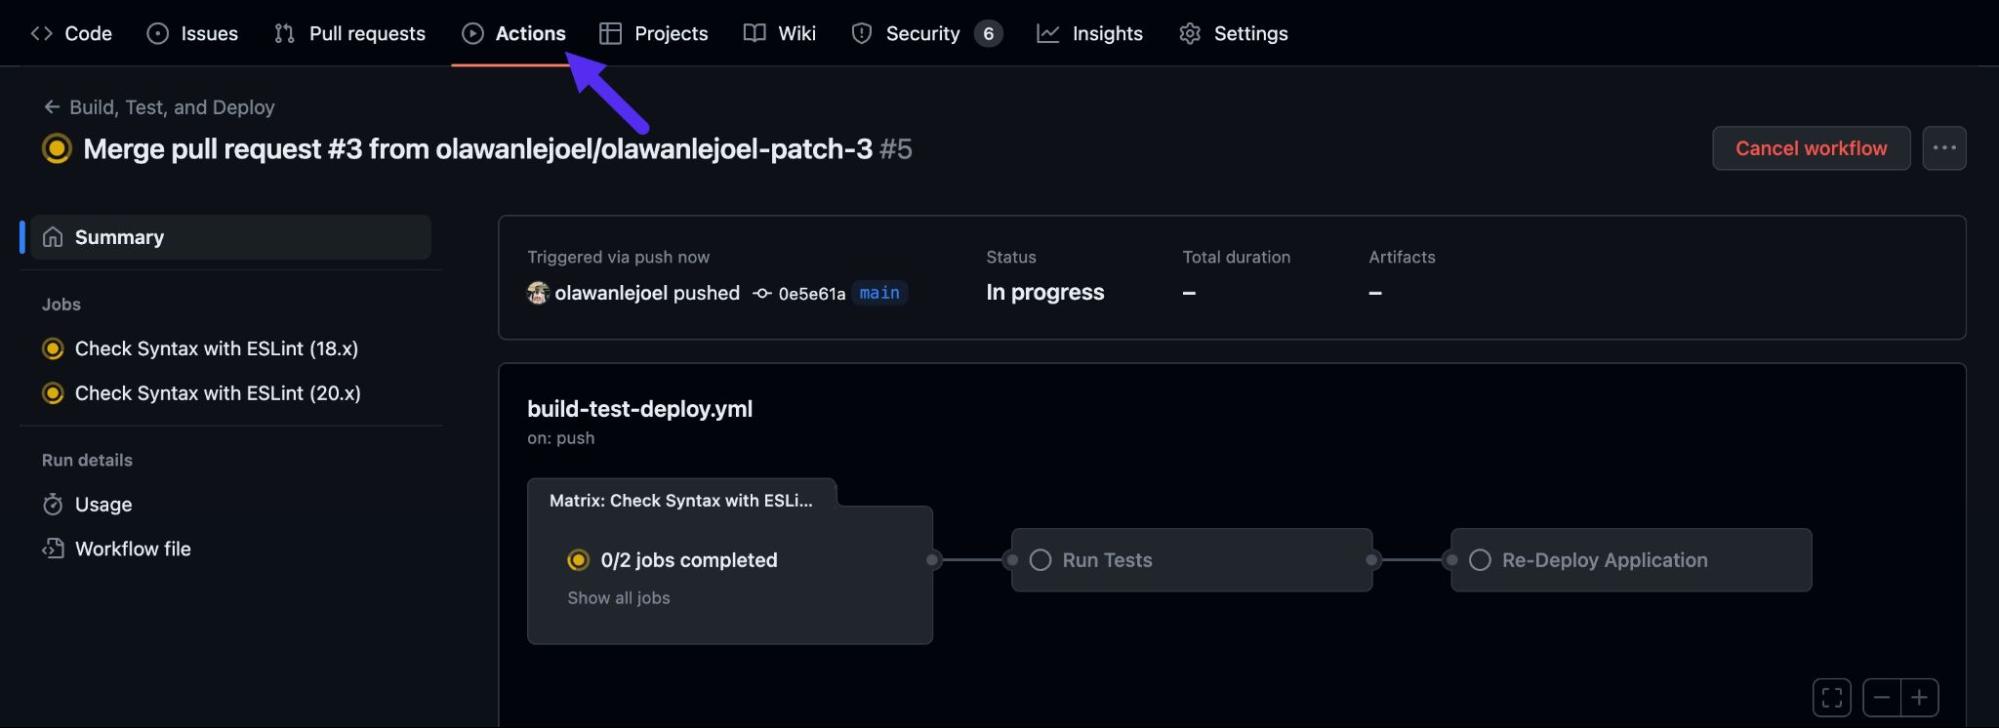
You can click each job to see more details about the job (this is why you need to give each step of your job a meaningful description).
Enforcing Pull Request Workflow on GitHub
To ensure effective code management and collaboration in GitHub repositories, it is useful to enforce a pull request workflow and block direct commits to the main branch. This approach establishes a controlled and organized development process, requiring all changes to undergo pull requests and reviews before merging into the main branch.
By adopting this practice, development teams can improve code quality, minimize the risk of introducing bugs, and maintain a transparent history of changes.
Here’s how to set up pull request workflow enforcement:
- Click the Settings tab in your GitHub repository.
- Under Code and Automation, select Branches from the sidebar options.
- If no rules exist, click Add branch protection rule.
- Provide a name for the rule, then check the box for Require a pull request before merging. This will display more options for configuration.
- Also, check the box for Require status checks to pass before merging.
- Customize additional options based on your preferences and requirements.
- Click the Create button to save the rule.
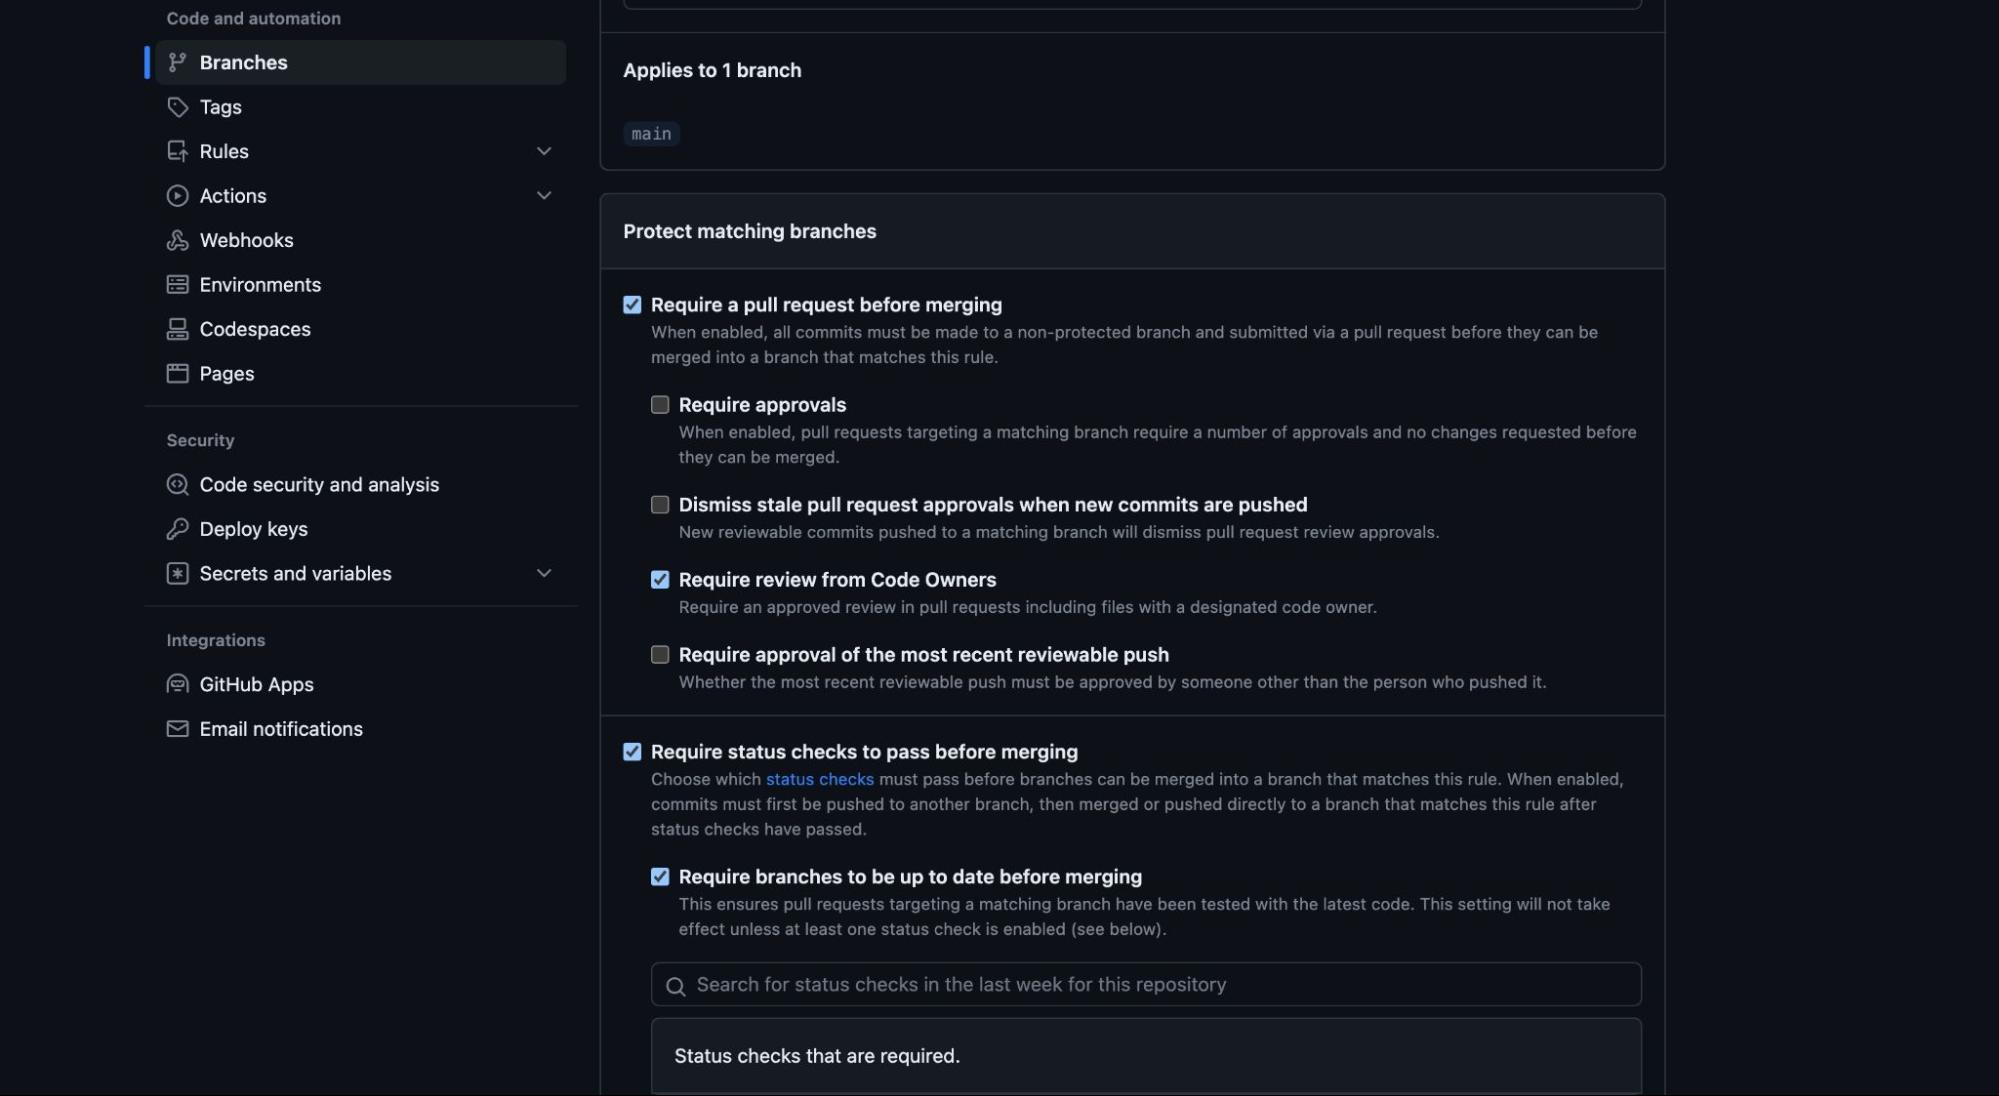
By following these steps, you have successfully set up a rule to enforce the pull request workflow in your GitHub repository. This ensures that all changes are subjected to review and automated checks before being merged into the main branch, fostering a more reliable and collaborative development environment.
Summary
By combining the power of GitHub Actions and the Kinsta API, you can streamline your development workflow and foster a collaborative and efficient environment for your development team.
Developers can confidently contribute code, knowing that it will be thoroughly tested before reaching production, and stakeholders can have peace of mind knowing that the deployment process is well-controlled and error-resistant.
How are you using Kinsta API? What endpoints would you like to see added to the API? What Kinsta API-related tutorial would you like to read next?


