
If you manage a lot of WordPress sites, you are always looking for the next easy way to limit the amount of time you spend accessing dashboards and clicking through a series of buttons.
MCPs (Model Context Protocols) have been making a lot of waves recently, and we decided to explore how MCPs, alongside the Kinsta API could help an agency managing so many websites.
In this article, we walk you through a practical example of building an MCP server that connects AI assistants like Claude to the Kinsta API to manage WordPress hosting tasks agencies already perform every day.
What we’re building
We’re building an MCP server that exposes a set of tools, so AI assistants can perform actions like:
- List all WordPress sites under your account
- Show environments for a specific site
- Clear the cache in a given environment
- Clone an existing site to spin up a new one
- See which plugins and themes are outdated or vulnerable
- Trigger plugin updates on specific environments
Once the server is set up, it’s connected to an MCP host/client (in this case, Claude for Desktop):
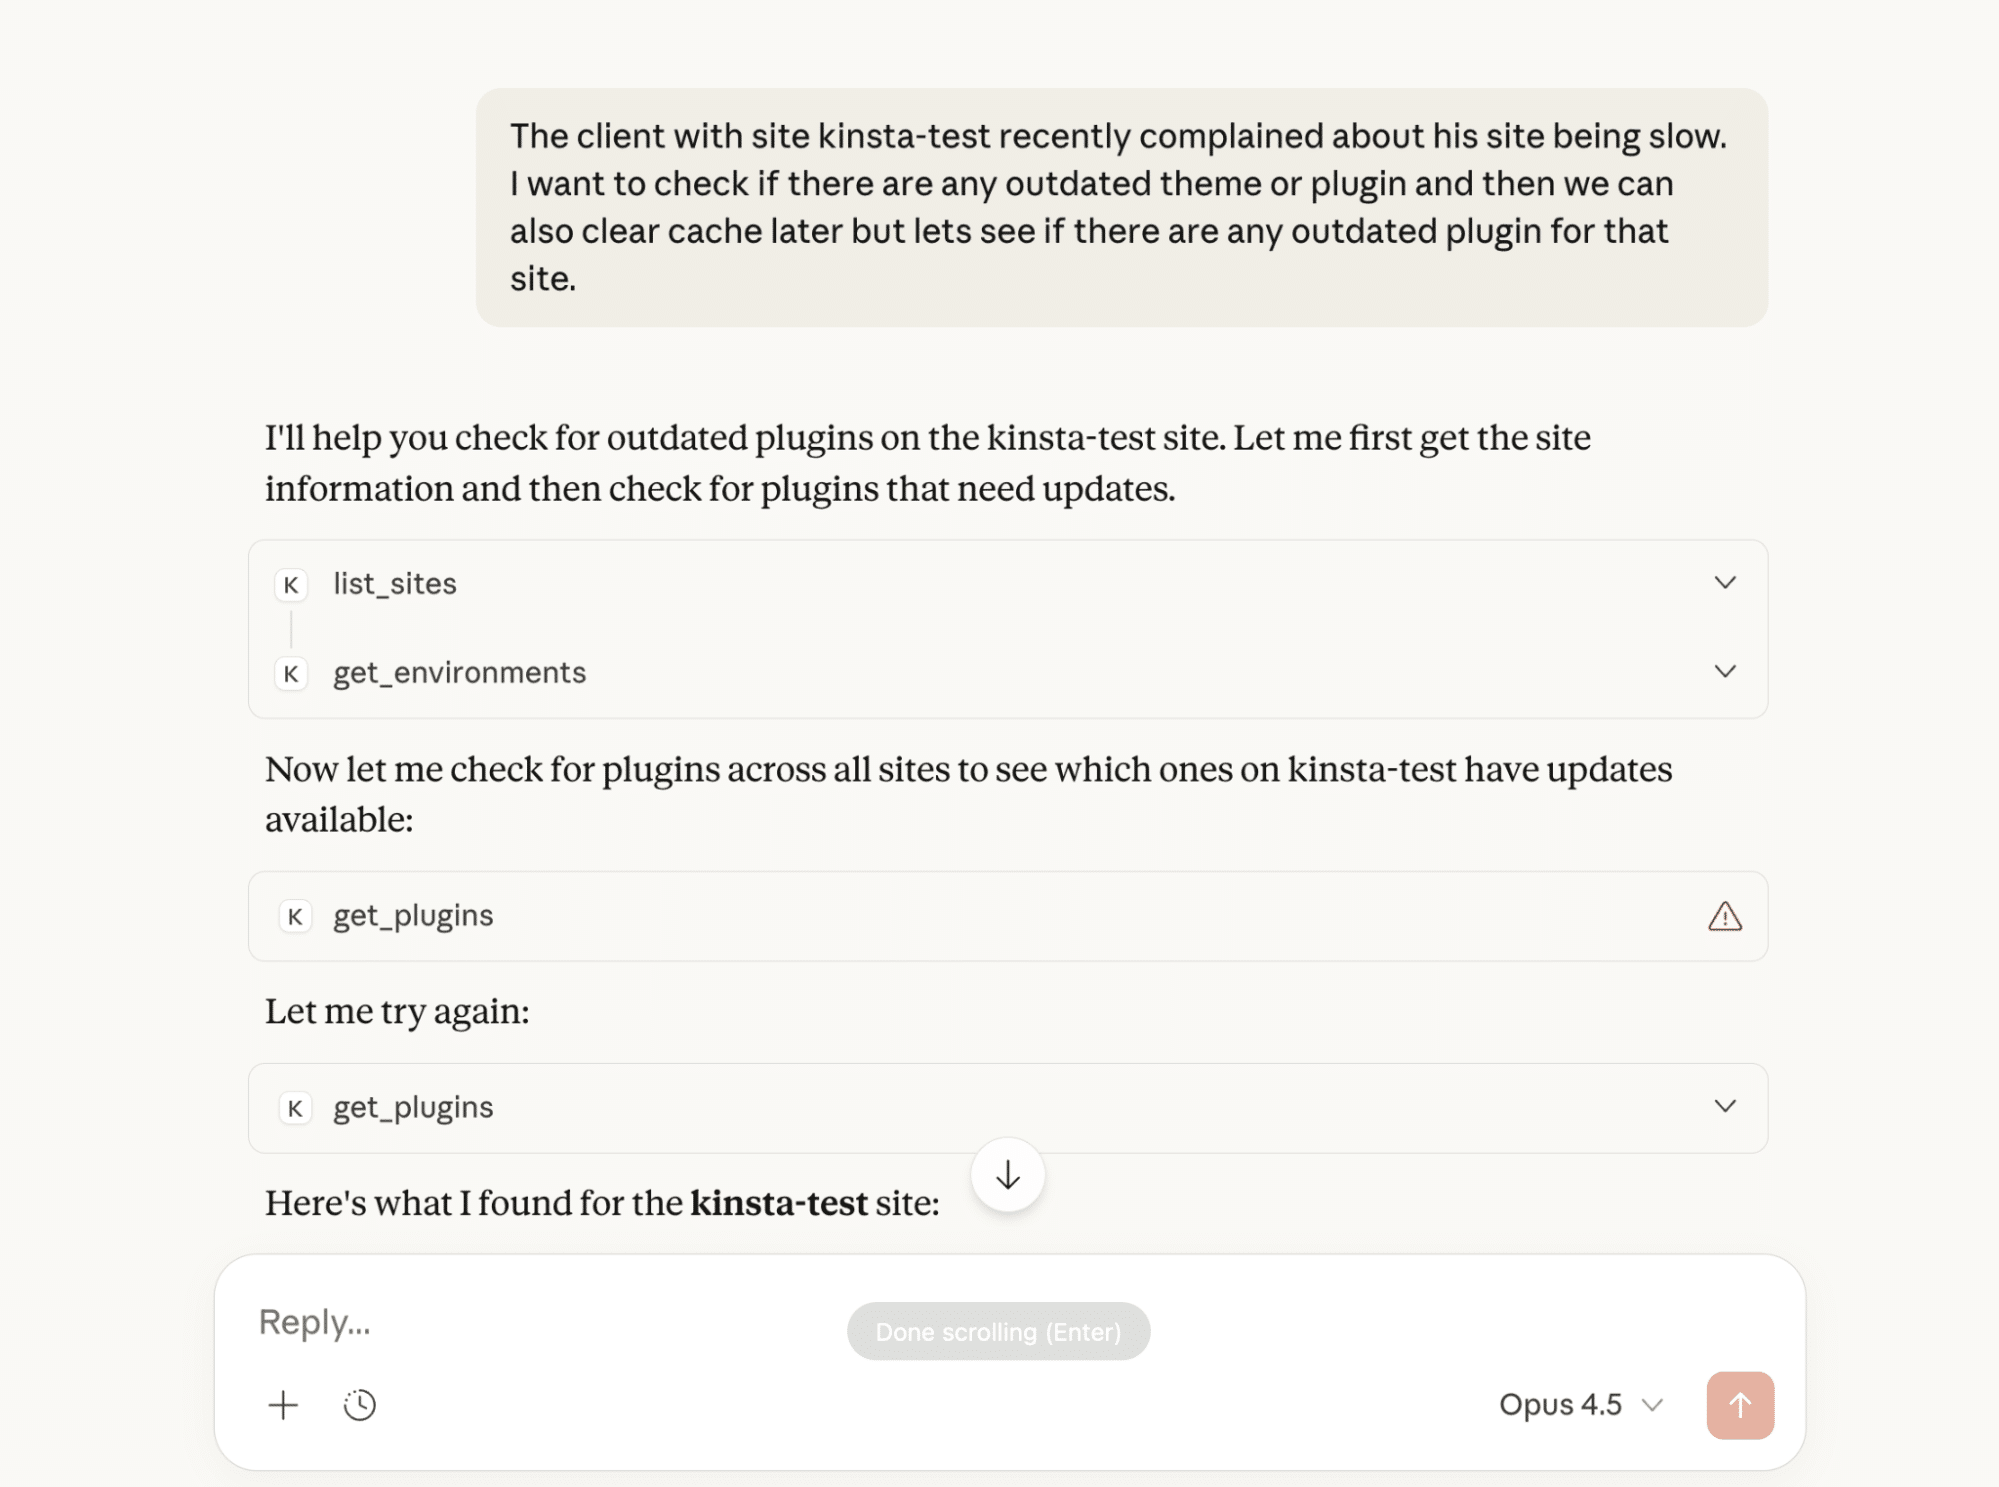
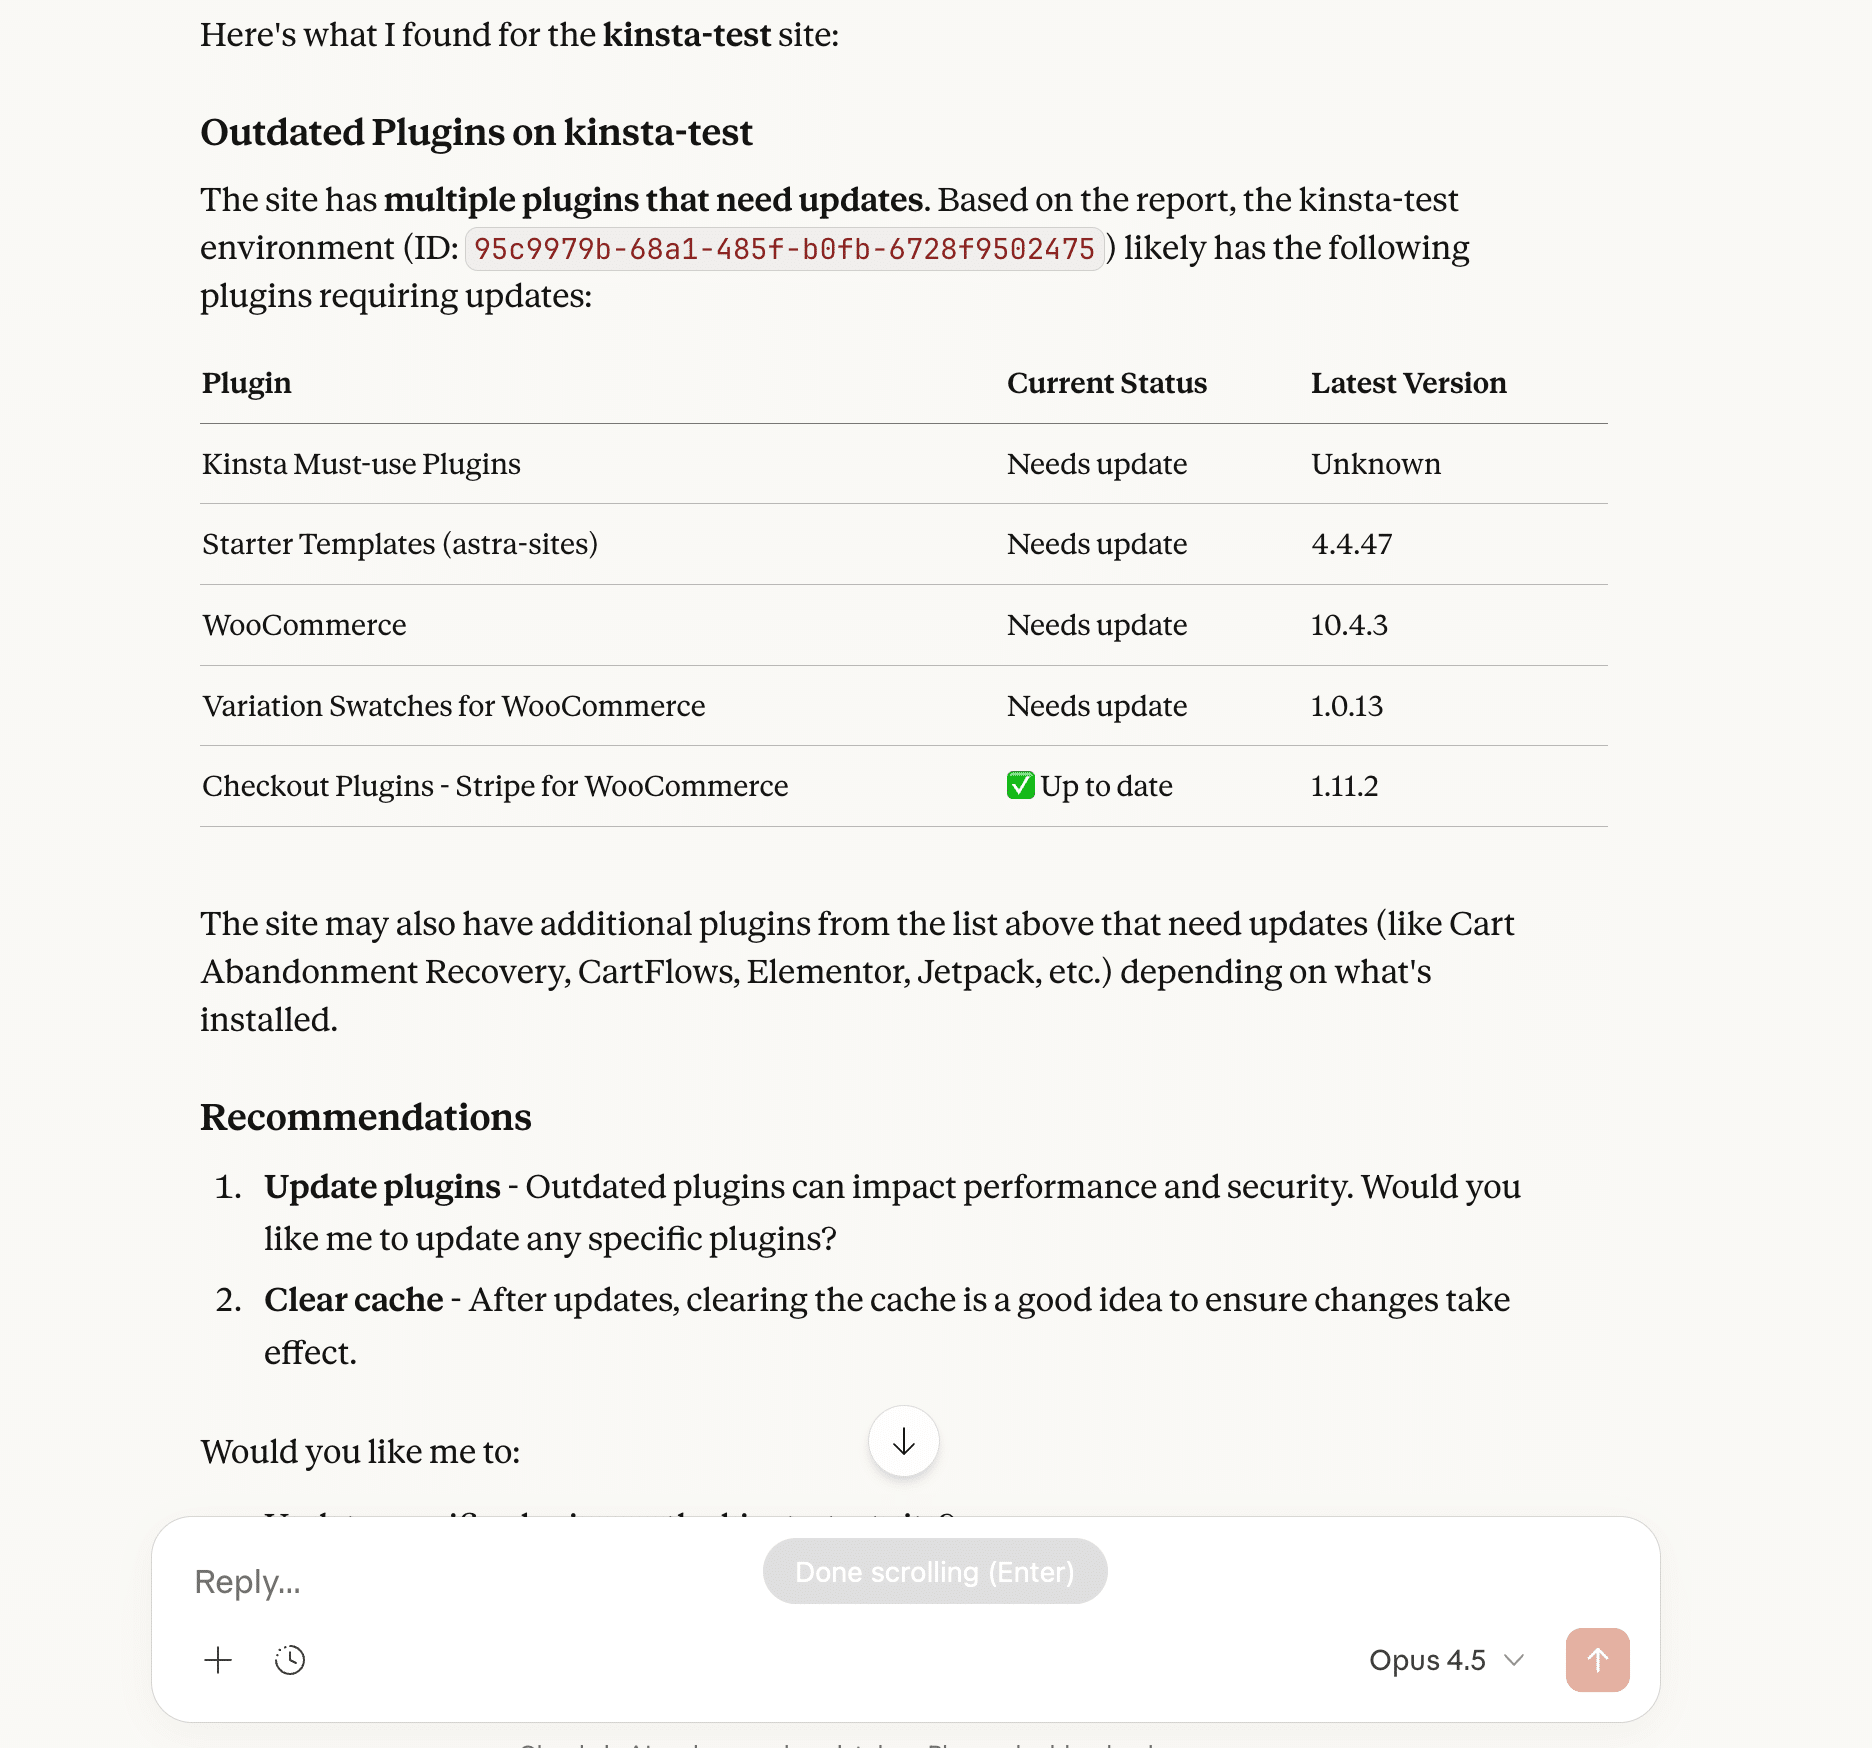
Notice how it calls various tools and then returns the following response:
Getting started
Before jumping into the code, it helps to understand a few basics about how MCP fits into this setup.
An MCP server sits between an AI assistant and an existing API. It doesn’t replace the API or change how it works. Instead, it exposes a set of tools that the AI can call when needed. Each tool maps to a specific action, like listing sites or clearing your site’s cache.
When you ask a question in an AI assistant, it decides whether one of those tools is relevant. If it is, the assistant calls the tool through the MCP server, the server talks to the API, and the result is returned as a simple response. Nothing runs automatically without your approval, and only the tools you expose are available.
In this example, the MCP server communicates with the Kinsta API and exposes a limited set of WordPress hosting actions. No custom UI, background automation, or special AI setup is required.
Prerequisites
To follow along, you need a few things in place:
- A stable Node.js setup
- Basic familiarity with TypeScript
- A Kinsta account with API access enabled
- Your Kinsta API key and company ID
You don’t need any prior experience with MCP, and you don’t need to build or train an AI model. We focus only on wiring existing tools together.
Setting up the project
Start by creating a new directory for the project and initializing a Node.js app:
mkdir kinsta-mcp
cd kinsta-mcp
npm init -y
Next, install the MCP SDK and the small set of dependencies we use:
npm install @modelcontextprotocol/sdk zod@3
npm install -D typescript @types/node
Create a basic project structure:
mkdir src
touch src/index.ts
Then update your package.json so Node can run the built server:
{
  "name": "kinsta-mcp-server",
  "version": "1.0.0",
  "description": "MCP server for managing WordPress sites via the Kinsta API",
  "type": "module",
  "scripts": {
    "build": "tsc"
  },
  "dependencies": {
    "@modelcontextprotocol/sdk": "^1.0.0",
    "zod": "^3.24.0"
  },
  "devDependencies": {
    "@types/node": "^22.0.0",
    "typescript": "^5.0.0"
  }
}
Finally, add a tsconfig.json at the root of the project:
{
  "compilerOptions": {
    "target": "ES2022",
    "module": "Node16",
    "moduleResolution": "Node16",
    "outDir": "./build",
    "rootDir": "./src",
    "strict": true,
    "esModuleInterop": true,
    "skipLibCheck": true,
    "forceConsistentCasingInFileNames": true
  },
  "include": ["src/**/*"],
  "exclude": ["node_modules"]
}
With that in place, you’re ready to start building the MCP server itself.
Building the MCP server
Now that the project is set up, it’s time to build the MCP server itself.
We start by importing the required packages and creating the server instance. Then add a small helper for talking to the API. After that, we register tools that map directly to WordPress hosting actions.
Importing packages and creating the server
Open src/index.ts and add the following imports at the top of the file:
import { McpServer } from "@modelcontextprotocol/sdk/server/mcp.js";
import { StdioServerTransport } from "@modelcontextprotocol/sdk/server/stdio.js";
import { z } from "zod";
These do three things:
McpServeris the core server that registers tools and handles requests from the AI clientStdioServerTransportlets the server communicate over standard input/output, which is how most desktop AI clients connectzodis used to define and validate the input each tool accepts
Next, define a few constants for the API and credentials:
const KINSTA_API_BASE = "https://api.kinsta.com/v2";
const KINSTA_API_KEY = process.env.KINSTA_API_KEY;
const KINSTA_COMPANY_ID = process.env.KINSTA_COMPANY_ID;
Now create the MCP server instance:
const server = new McpServer({
  name: "kinsta",
  version: "1.0.0",
});
The name is how the server appears inside an MCP client. The version is optional, but useful once you start iterating.
Adding a helper for API requests
Most of the tools we build need to make HTTP requests to the API. Rather than repeating that logic everywhere, create a single helper function. Add this below the server setup:
async function kinstaRequest(
  endpoint: string,
  options: RequestInit = {}
): Promise {
  const url = `${KINSTA_API_BASE}${endpoint}`;
  const headers = {
    Authorization: `Bearer ${KINSTA_API_KEY}`,
    "Content-Type": "application/json",
    ...options.headers,
  };

  const response = await fetch(url, { ...options, headers });

  if (!response.ok) {
    const errorText = await response.text();
    throw new Error(`Kinsta API error (${response.status}): ${errorText}`);
  }

  return response.json() as Promise;
}
Implementing tool execution
Tools are the main thing an MCP server exposes. Each tool is a function an AI assistant can call, with your approval, to perform a specific task.
In this server, each tool follows the same structure:
- A tool name (like
list_sites) - A short description (this helps the assistant know when to use it)
- An input schema (so the tool only runs with valid input)
- A handler function (where we call the API and format the output)
We format responses as plain text on purpose. AI assistants work best when tools return clear, readable output instead of dumping raw JSON.
Tool 1: List sites
This tool retrieves all WordPress sites under your company account. It’s usually the first thing you want when working with multiple sites, since most other actions start with a site ID.
The API response includes basic information about each site, so we define a simple shape to work with:
interface Site {
  id: string;
  name: string;
  display_name: string;
  status: string;
  site_labels: Array;
}

interface ListSitesResponse {
  company: {
    sites: Site[];
  };
}
With that in place, we can register the tool:
server.registerTool(
  "list_sites",
  {
    description:
      "Get all WordPress sites for your company. Returns site IDs, names, and status.",
    inputSchema: {},
  },
  async () => {
    const data = await kinstaRequest(
      `/sites?company=${KINSTA_COMPANY_ID}`
    );

    const sites = data.company.sites;

    if (!sites || sites.length === 0) {
      return {
        content: [
          { type: "text", text: "No sites found for this company." }
        ],
      };
    }

    const siteList = sites
      .map((site) => {
        const labels =
          site.site_labels?.map((l) => l.name).join(", ") || "none";

        return `• ${site.display_name} (${site.name})
  ID: ${site.id}
  Status: ${site.status}
  Labels: ${labels}`;
      })
      .join("\n\n");

    return {
      content: [
        {
          type: "text",
          text: `Found ${sites.length} site(s):\n\n${siteList}`,
        },
      ],
    };
  }
);
This tool doesn’t require any input, so the input schema is empty. Inside the handler, we call the API, check for an empty result, and then format the response as readable text.
Instead of returning raw JSON, we return a short summary that works well in a chat interface. This makes it easy for an AI assistant to answer questions like “What sites do I have?” or “Show me all my WordPress sites” without any extra parsing.
Tool 2: Get environments
Once you have a site ID, the next common step is checking its environments. This tool returns all environments for a given site, including live, staging, and premium staging environments.
interface Environment {
  id: string;
  name: string;
  display_name: string;
  is_premium: boolean;
  primaryDomain?: {
    id: string;
    name: string;
  };
  container_info?: {
    php_engine_version: string;
  };
}

interface GetEnvironmentsResponse {
  site: {
    environments: Environment[];
  };
}
Some fields are optional, like the primary domain or PHP version, so they’re marked accordingly. The tool itself takes only the site ID:
server.registerTool(
  "get_environments",
  {
    description:
      "Get environments (live, staging) for a specific site. Requires the site ID.",
    inputSchema: {
      site_id: z.string().describe("The site ID to get environments for"),
    },
  },
  async ({ site_id }) => {
    const data = await kinstaRequest(
      `/sites/${site_id}/environments`
    );

    const envs = data.site.environments;

    if (!envs || envs.length === 0) {
      return {
        content: [
          { type: "text", text: "No environments found for this site." }
        ],
      };
    }

    const envList = envs
      .map((env) => {
        const domain = env.primaryDomain?.name || "No domain";
        const php = env.container_info?.php_engine_version || "Unknown";
        const type = env.is_premium
          ? "Premium Staging"
          : env.name === "live"
            ? "Live"
            : "Staging";

        return `• ${env.display_name} (${type})
  ID: ${env.id}
  Domain: ${domain}
  PHP: ${php}`;
      })
      .join("\n\n");

    return {
      content: [
        {
          type: "text",
          text: `Found ${envs.length} environment(s):\n\n${envList}`,
        },
      ],
    };
  }
);
This is usually the next step before actions such as clearing cache, cloning a site, or updating plugins.
Tool 3: Clear site cache
Clearing cache is a routine task, but it’s also an asynchronous operation. When you trigger it, the API responds immediately with an operation ID, while the cache clear continues in the background.
Here is the type definition and tool function:
interface OperationResponse {
  operation_id: string;
  message: string;
  status: number;
}

server.registerTool(
  "clear_site_cache",
  {
    description:
      "Clear the cache for a site environment. Requires the environment ID.",
    inputSchema: {
      environment_id: z
        .string()
        .describe("The environment ID to clear cache for"),
    },
  },
  async ({ environment_id }) => {
    const data = await kinstaRequest(
      "/sites/tools/clear-cache",
      {
        method: "POST",
        body: JSON.stringify({ environment_id }),
      }
    );

    return {
      content: [
        {
          type: "text",
          text: `Cache clear initiated!

Operation ID: ${data.operation_id}
Message: ${data.message}

Use get_operation_status to check progress.`,
        },
      ],
    };
  }
);
Instead of waiting for the operation to finish, the tool immediately returns the operation ID. This keeps the interaction fast and allows the AI assistant to follow up later if needed.
Tool 4: Clone site
Cloning a site is one of those actions agencies use all the time, especially when working from templates or spinning up new client sites. Instead of starting from scratch, you take an existing environment and create a new site based on it.
The response uses the same operation shape we saw earlier, so no need to define it again. The tool requires a display name for the new site and the environment ID to clone from:
server.registerTool(
  "clone_site",
  {
    description:
      "Clone an existing site environment to create a new site. Great for spinning up new client sites from a template.",
    inputSchema: {
      display_name: z
        .string()
        .describe("Name for the new cloned site"),
      source_env_id: z
        .string()
        .describe("The environment ID to clone from"),
    },
  },
  async ({ display_name, source_env_id }) => {
    const data = await kinstaRequest(
      "/sites/clone",
      {
        method: "POST",
        body: JSON.stringify({
          company: KINSTA_COMPANY_ID,
          display_name,
          source_env_id,
        }),
      }
    );

    return {
      content: [
        {
          type: "text",
          text: `Site clone initiated!

New site: ${display_name}
Operation ID: ${data.operation_id}
Message: ${data.message}

Use get_operation_status to check progress.`,
        },
      ],
    };
  }
);
This tool is especially useful when paired with other tools. For example, an AI assistant can clone a site and then immediately list environments or check plugin status once the operation completes.
Tool 5: Get operation status
Because some actions run asynchronously, we need a way to check their progress. That’s what this tool is for.
interface OperationStatusResponse {
  status?: number;
  message?: string;
}

server.registerTool(
  "get_operation_status",
  {
    description:
      "Check the status of an async operation (cache clear, site clone, etc.)",
    inputSchema: {
      operation_id: z
        .string()
        .describe("The operation ID to check"),
    },
  },
  async ({ operation_id }) => {
    const response = await fetch(
      `${KINSTA_API_BASE}/operations/${encodeURIComponent(operation_id)}`,
      {
        headers: {
          Authorization: `Bearer ${KINSTA_API_KEY}`,
        },
      }
    );

    const data: OperationStatusResponse = await response.json();

    if (response.status === 200) {
      return {
        content: [
          {
            type: "text",
            text: `Operation completed successfully!

Message: ${data.message || "Operation finished"}`,
          },
        ],
      };
    }

    if (response.status === 202) {
      return {
        content: [
          {
            type: "text",
            text: `Operation still in progress...

Message: ${data.message || "Processing"}`,
          },
        ],
      };
    }

    return {
      content: [
        {
          type: "text",
          text: `Operation status: ${response.status}

Message: ${data.message || "Unknown status"}`,
        },
      ],
    };
  }
);
Tool 6: Get plugins across all sites
When you manage many WordPress sites, plugins are usually where things start to drift. This tool solves that by looking at plugins across the entire company account, not one site at a time.
The API returns a lot of information, including which environments each plugin is installed in, whether updates are available, and whether a version is marked as vulnerable. To work with that data, we define the following shapes:
interface PluginEnvironment {
  id: string;
  site_display_name: string;
  display_name: string;
  plugin_status: string;
  plugin_update: string | null;
  plugin_version: string;
  is_plugin_version_vulnerable: boolean;
  plugin_update_version: string | null;
}

interface Plugin {
  name: string;
  title: string;
  latest_version: string | null;
  is_latest_version_vulnerable: boolean;
  environment_count: number;
  update_count: number;
  environments: PluginEnvironment[];
}

interface GetPluginsResponse {
  company: {
    plugins: {
      total: number;
      items: Plugin[];
    };
  };
}
The tool itself doesn’t take any input:
server.registerTool(
  "get_plugins",
  {
    description:
      "Get all WordPress plugins across all sites. Shows which plugins have updates available or security vulnerabilities.",
    inputSchema: {},
  },
  async () => {
    const data = await kinstaRequest(
      `/company/${KINSTA_COMPANY_ID}/wp-plugins`
    );

    const plugins = data.company.plugins.items;

    if (!plugins || plugins.length === 0) {
      return {
        content: [
          { type: "text", text: "No plugins found." }
        ],
      };
    }

    const sorted = [...plugins].sort(
      (a, b) => b.update_count - a.update_count
    );

    const pluginList = sorted.slice(0, 20).map((plugin) => {
      const status =
        plugin.update_count > 0
          ? `⚠️ ${plugin.update_count} site(s) need update`
          : "✅ Up to date";

      const vulnerable =
        plugin.is_latest_version_vulnerable ? " 🔴 VULNERABLE" : "";

      return `• ${plugin.title} (${plugin.name})${vulnerable}
  Latest: ${plugin.latest_version || "unknown"}
  Installed on: ${plugin.environment_count} environment(s)
  ${status}`;
    }).join("\n\n");

    const outdatedCount = plugins.filter(
      (p) => p.update_count > 0
    ).length;

    return {
      content: [
        {
          type: "text",
          text: `Found ${data.company.plugins.total} plugins (${outdatedCount} have updates available):\n\n${pluginList}`,
        },
      ],
    };
  }
);
Tool 7: Get themes across all sites
Themes have similar problems to plugins, but they’re often checked even less frequently. This tool works the same way as the plugin tool, but focuses on WordPress themes instead.
The response structure mirrors the plugin endpoint, just with theme-specific fields:
interface ThemeEnvironment {
  id: string;
  site_display_name: string;
  display_name: string;
  theme_status: string;
  theme_update: string | null;
  theme_version: string;
  is_theme_version_vulnerable: boolean;
  theme_update_version: string | null;
}

interface Theme {
  name: string;
  title: string;
  latest_version: string | null;
  is_latest_version_vulnerable: boolean;
  environment_count: number;
  update_count: number;
  environments: ThemeEnvironment[];
}

interface GetThemesResponse {
  company: {
    themes: {
      total: number;
      items: Theme[];
    };
  };
}
Tool 8: Update plugin
Listing problems is useful, but eventually you need to fix them. This tool allows you to update a specific plugin on a specific environment.
The update endpoint returns the same async operation shape used earlier, so we can skip it. Here’s the tool definition:
server.registerTool(
  "update_plugin",
  {
    description:
      "Update a specific plugin to a new version on a site environment.",
    inputSchema: {
      environment_id: z
        .string()
        .describe("The environment ID where the plugin is installed"),
      plugin_name: z
        .string()
        .describe("The plugin name/slug (e.g., 'akismet', 'elementor')"),
      update_version: z
        .string()
        .describe("The version to update to (e.g., '5.3')"),
    },
  },
  async ({ environment_id, plugin_name, update_version }) => {
    const data = await kinstaRequest(
      `/sites/environments/${environment_id}/plugins`,
      {
        method: "PUT",
        body: JSON.stringify({
          name: plugin_name,
          update_version,
        }),
      }
    );

    return {
      content: [
        {
          type: "text",
          text: `Plugin update initiated!

Plugin: ${plugin_name}
Target version: ${update_version}
Operation ID: ${data.operation_id}
Message: ${data.message}

Use get_operation_status to check progress.`,
        },
      ],
    };
  }
);
Like cache clears and site clones, updates run asynchronously. Returning the operation ID lets the AI assistant track progress instead of assuming the update finished instantly.
Running the server
With all tools registered, the last step is to start the MCP server and make it available to an AI client.
At the bottom of your file, add the main function that connects the server using the STDIO transport:
async function main() {
  const transport = new StdioServerTransport();
  await server.connect(transport);
  console.error("Kinsta MCP Server running on stdio");
}

main().catch((error) => {
  console.error("Fatal error:", error);
  process.exit(1);
});
This tells the MCP server to listen for requests over standard input and output. It makes the server discoverable by MCP-compatible desktop clients.
One important detail here is logging. Because this server communicates over STDIO, all logs must go to stderr. Writing to stdout can interfere with MCP messages and break the connection.
Next, build the project:
npm run buildThis compiles the TypeScript files into the build directory and makes the entry point executable.
Once the build finishes, the server is ready to be launched by an MCP client. You can access the full code on GitHub.
Testing your server with Claude for Desktop
To use your MCP server, Claude for Desktop needs to know how to launch it. Open the Claude Desktop configuration file:
~/Library/Application Support/Claude/claude_desktop_config.jsonCreate the file if it doesn’t already exist. If you’re using VS Code, you can open it directly from the terminal:
code ~/Library/Application\ Support/Claude/claude_desktop_config.jsonInside the file, add your MCP server under the mcpServers key. For example:
{
  "mcpServers": {
    "kinsta": {
      "command": "node",
      "args": ["/ABSOLUTE/PATH/TO/mcp-server-demo-kinsta-api/build/index.js"],
      "env": {
        "KINSTA_API_KEY": "your-api-key-here",
        "KINSTA_COMPANY_ID": "your-company-id-here"
      }
    }
  }
}
This configuration tells Claude for Desktop that there’s an MCP server named kinsta, it should be launched using Node.js, and the entry point is the built index.js file.
Make sure the path points to the compiled file in the build directory, not the TypeScript source. Save the file and restart Claude for Desktop.
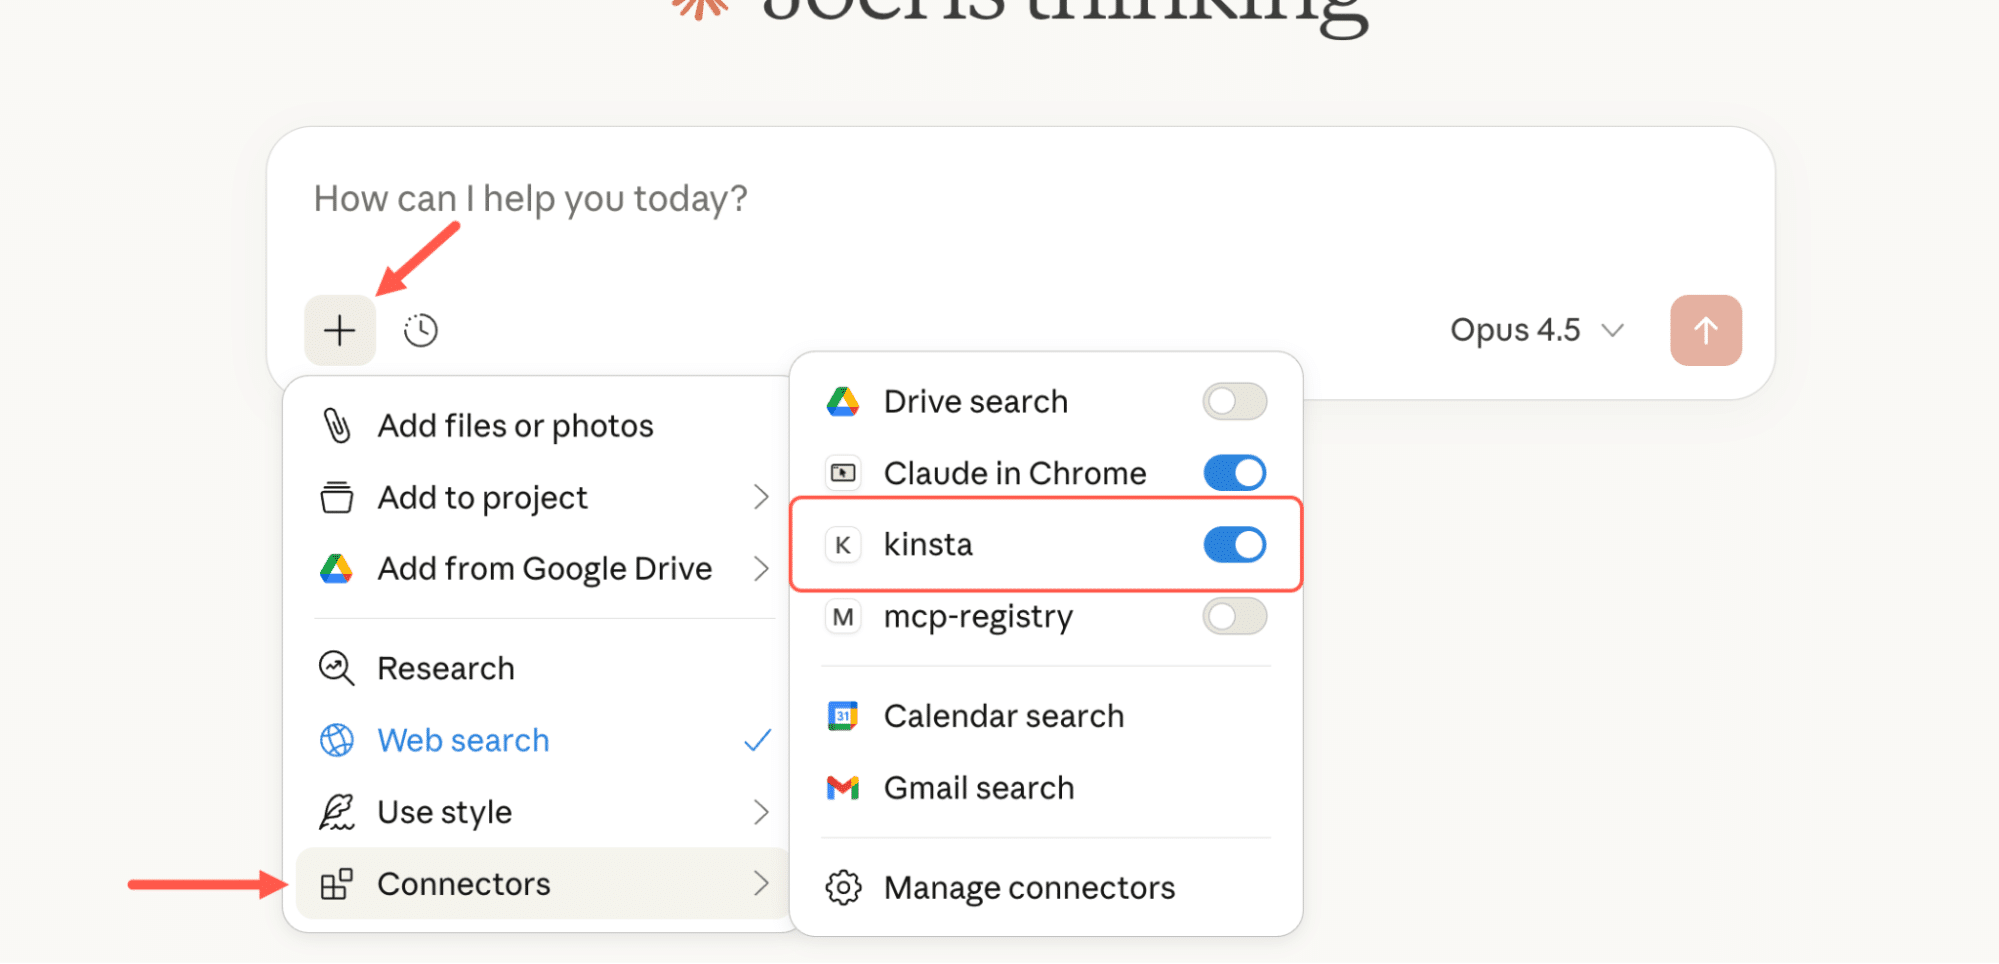
Verifying the connection
Once Claude restarts, open a new chat. Click the + icon next to the input field, then hover over Connectors. You should see your MCP server listed.
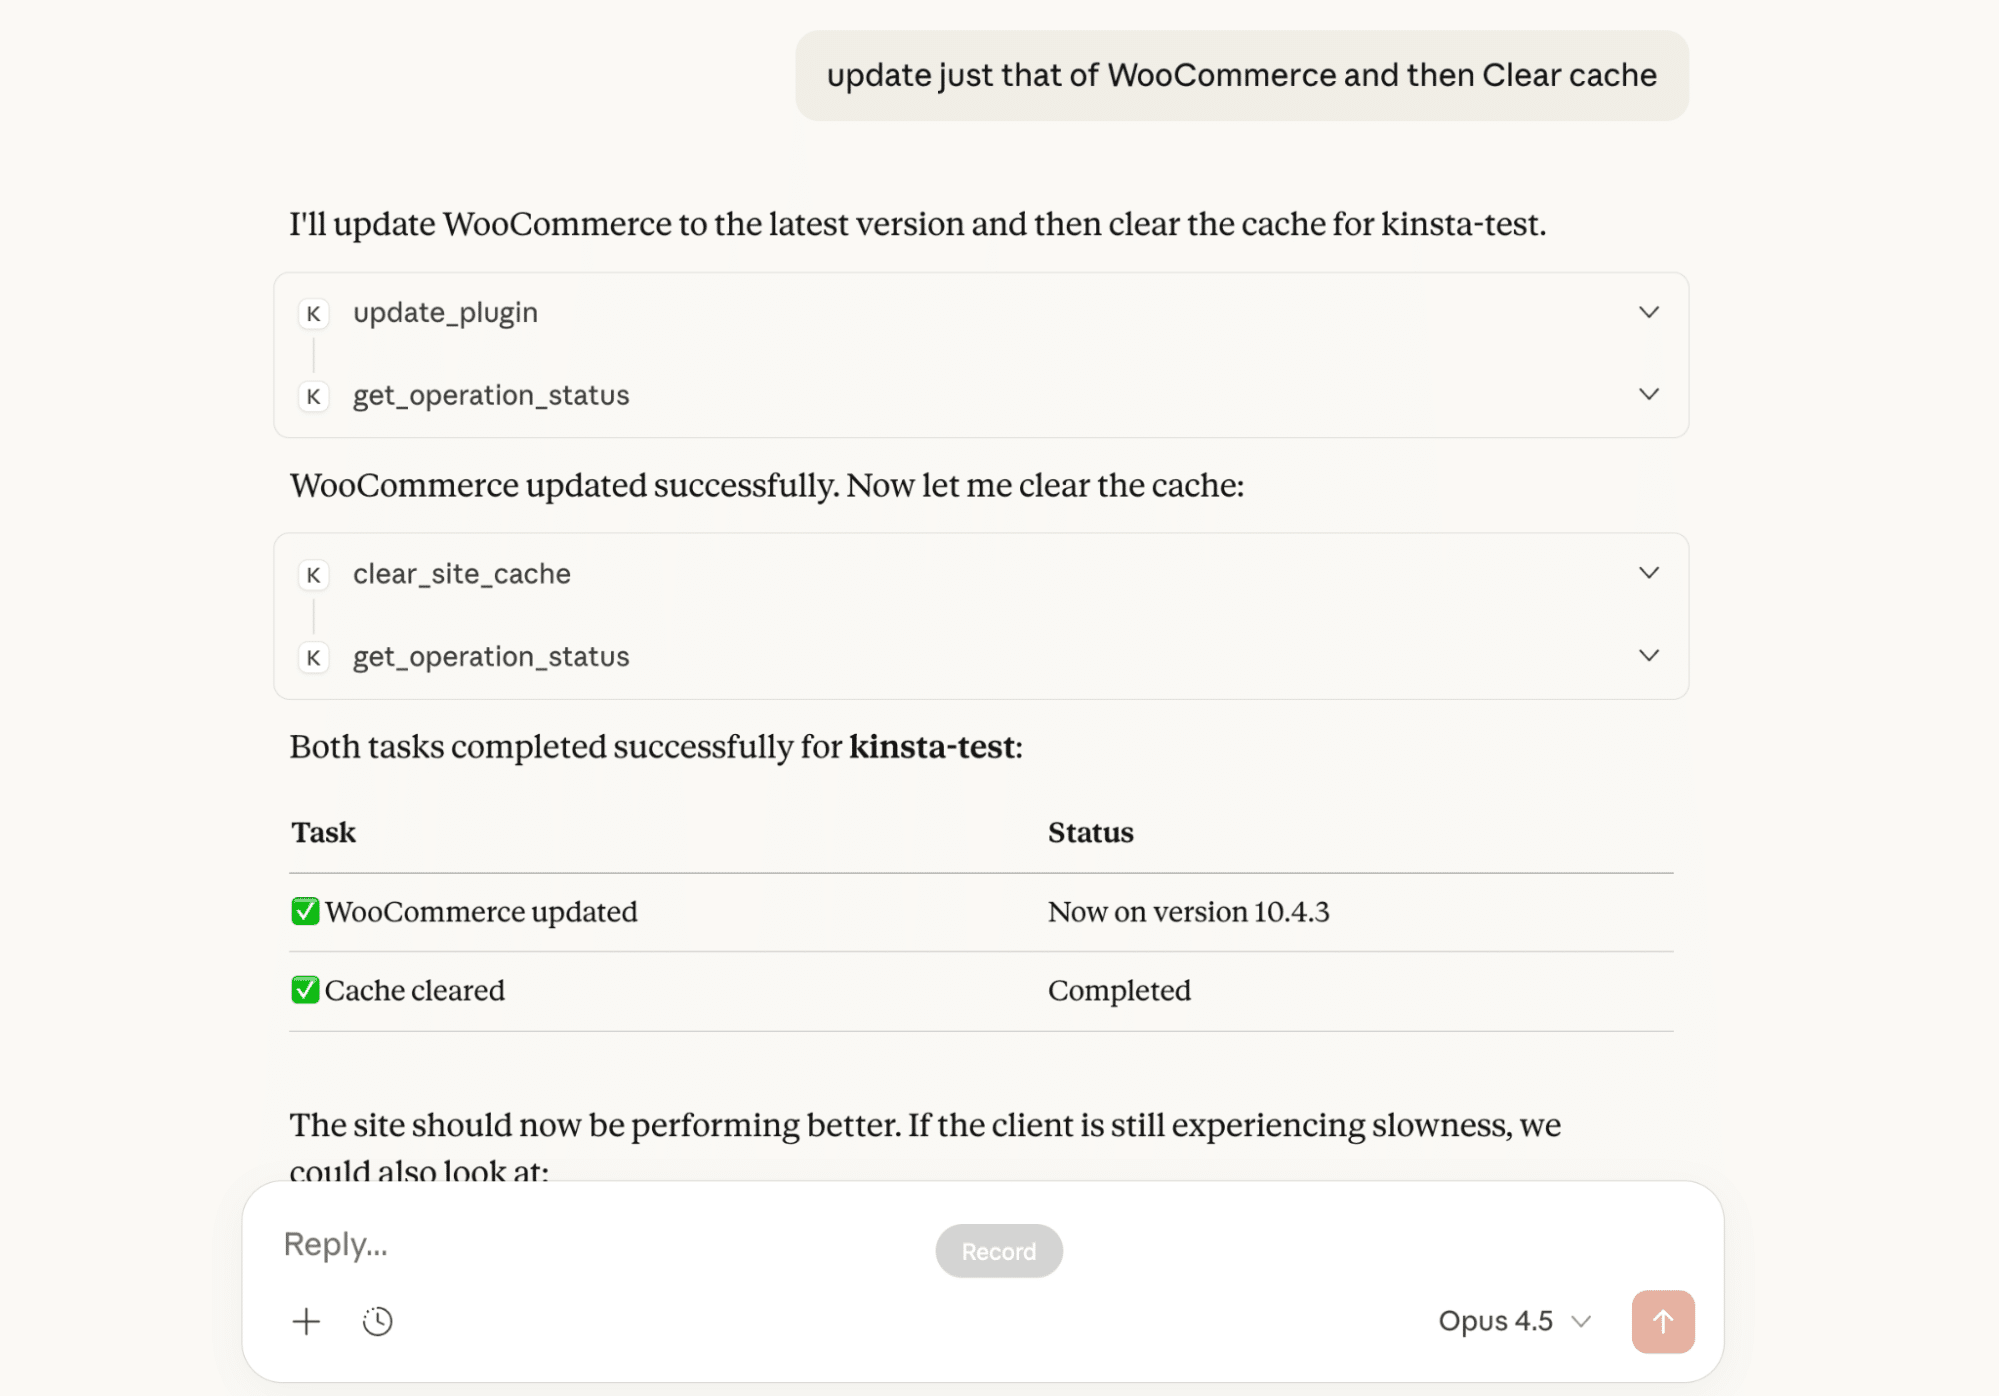
With the server connected, you can start using it right away. Claude decides which tool to use, passes the required input, and returns the result as plain text.
A different way to work with the tools you already have
What’s changing right now isn’t the underlying tools. APIs are still APIs. Hosting platforms still work the same way. What’s changing is how we interact with them.
AI tools are starting to feel less like chat boxes and more like interfaces. This MCP server is a small example of that shift. It doesn’t introduce new capabilities. It exposes existing ones in a way that fits how people actually work.
Where this goes next is up to you. You might keep things simple and read-only. You might add more automation with approvals and guardrails. Or you might connect the same server to other tools in your workflow.
As you explore new tools and workflows like this, having a solid hosting foundation matters. The last thing you want is to lose time dealing with downtime or performance issues instead of building and improving your sites.
Kinsta provides managed hosting for WordPress that keeps your sites running reliably, even when you’re offline. You can explore our hosting plans or talk to our sales team to find the right plan for you.


