
WordPress 6.3 “Lionel” is out! It is the final major release of Phase 2 of the WordPress roadmap.
During the second phase, development mainly focused on the Site Editor, increased its functionality, and improved interface and usability.
Now site creators can design layouts and manage content within the same interface, without having to jump from one admin area to another and without having to write a single line of code.
With WordPress 6.3, 10 versions of the Gutenberg plugin are merged into the core, and if you don’t use Gutenberg on your website, you will see a lot of changes in the Site Editor’s interface.
With WordPress 6.3, the editing experience has been significantly improved. Several technical changes affected the Site Editor resulting in a new way of exploring block themes and using the Site Editor itself. Improved navigation, distraction-free mode, block theme previews, style and template revisions, a new Command palette, and so much more.
There’s much to say about WordPress 6.3. So, don’t wait any longer, and let’s figure out what’s new with the final release of Phase 2.
Check Out Our Video Guide On WordPress 6.3:
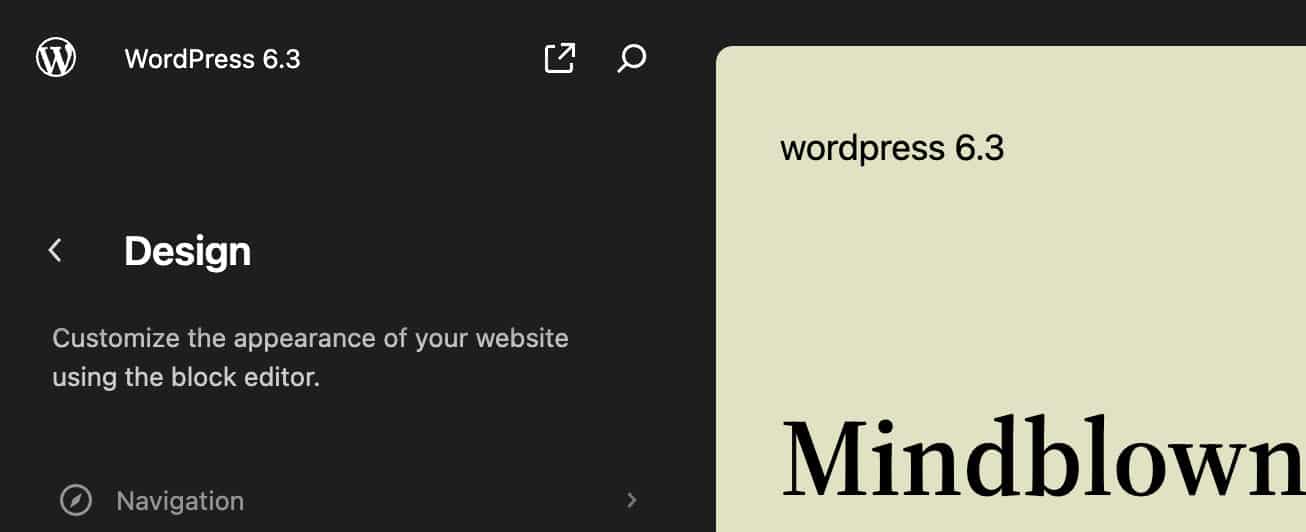
Enhanced Navigation in the Site Editor
With WordPress 6.3, the Site Editor navigation has been significantly improved with the addition of new entry points to different areas of the editor. Before 6.3, these admin sections were reachable from points of access placed in different admin menus and screens. The result of these changes is an easier and more consistent editing experience.
The following image compares the editor’s Navigation menu in WordPress 6.2 and 6.3.
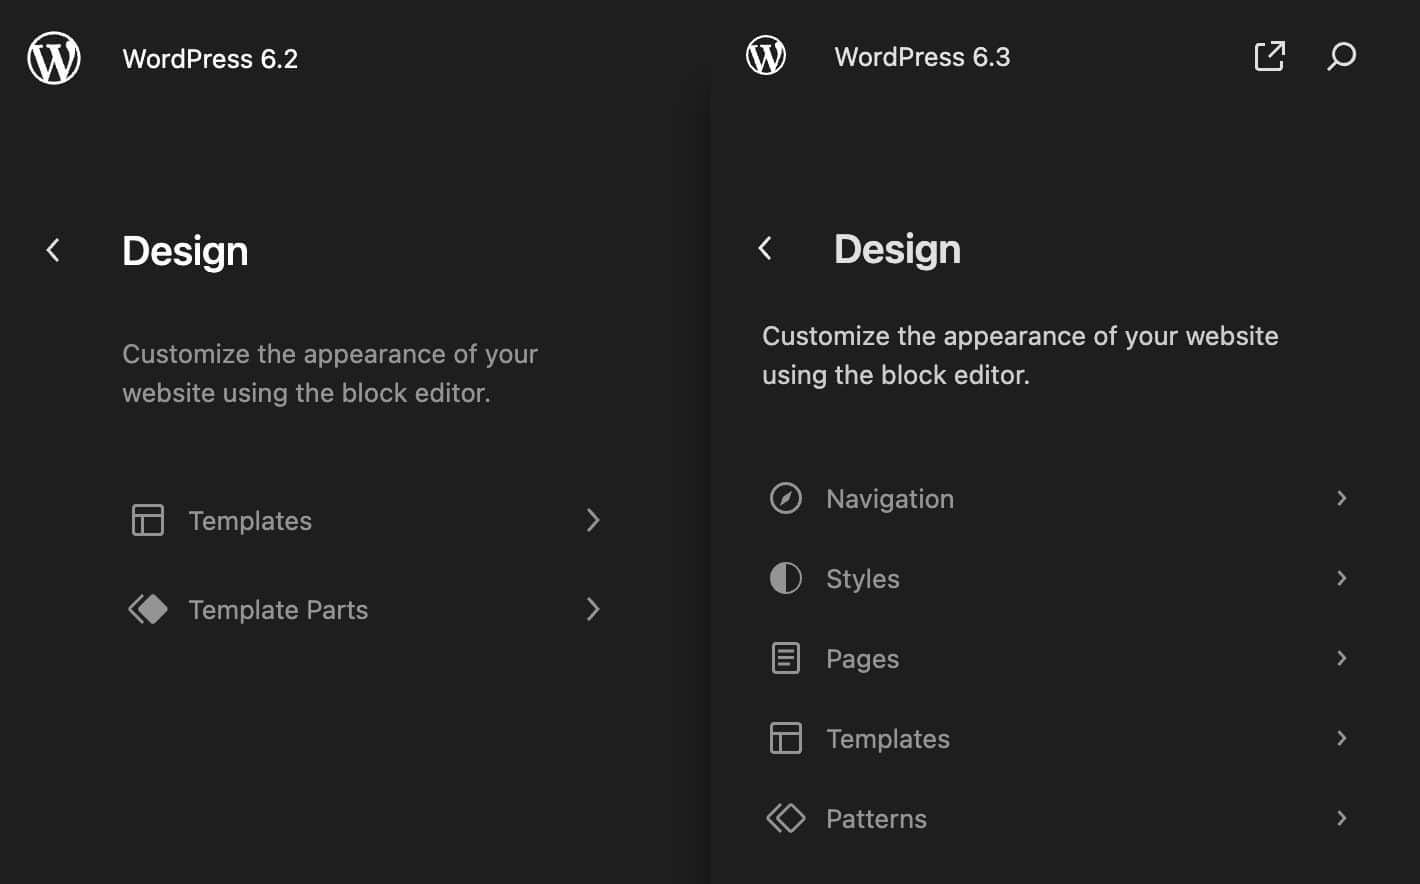
The first thing you will notice in the image above are the two buttons showing in the upper right corner of the editor sidebar. The View site button appears on mouseover and provides quick access to the front end of your WordPress website. This is a small but useful addition allowing you to quickly access site pages regardless of where you are in the site editor when the Navigation menu is open.
The Open command palette button (the lens icon) provides access to a new WordPress 6.3 feature, the Command Palette (more on this below).
The new editor Navigation includes the following items.
Navigation
Once you have created a navigation menu, it appears in the Site Editor’s Navigation menu. Here, you can move the menu items up or down or delete them from a drop-down. You can also drag and drop items to arrange the menu order.
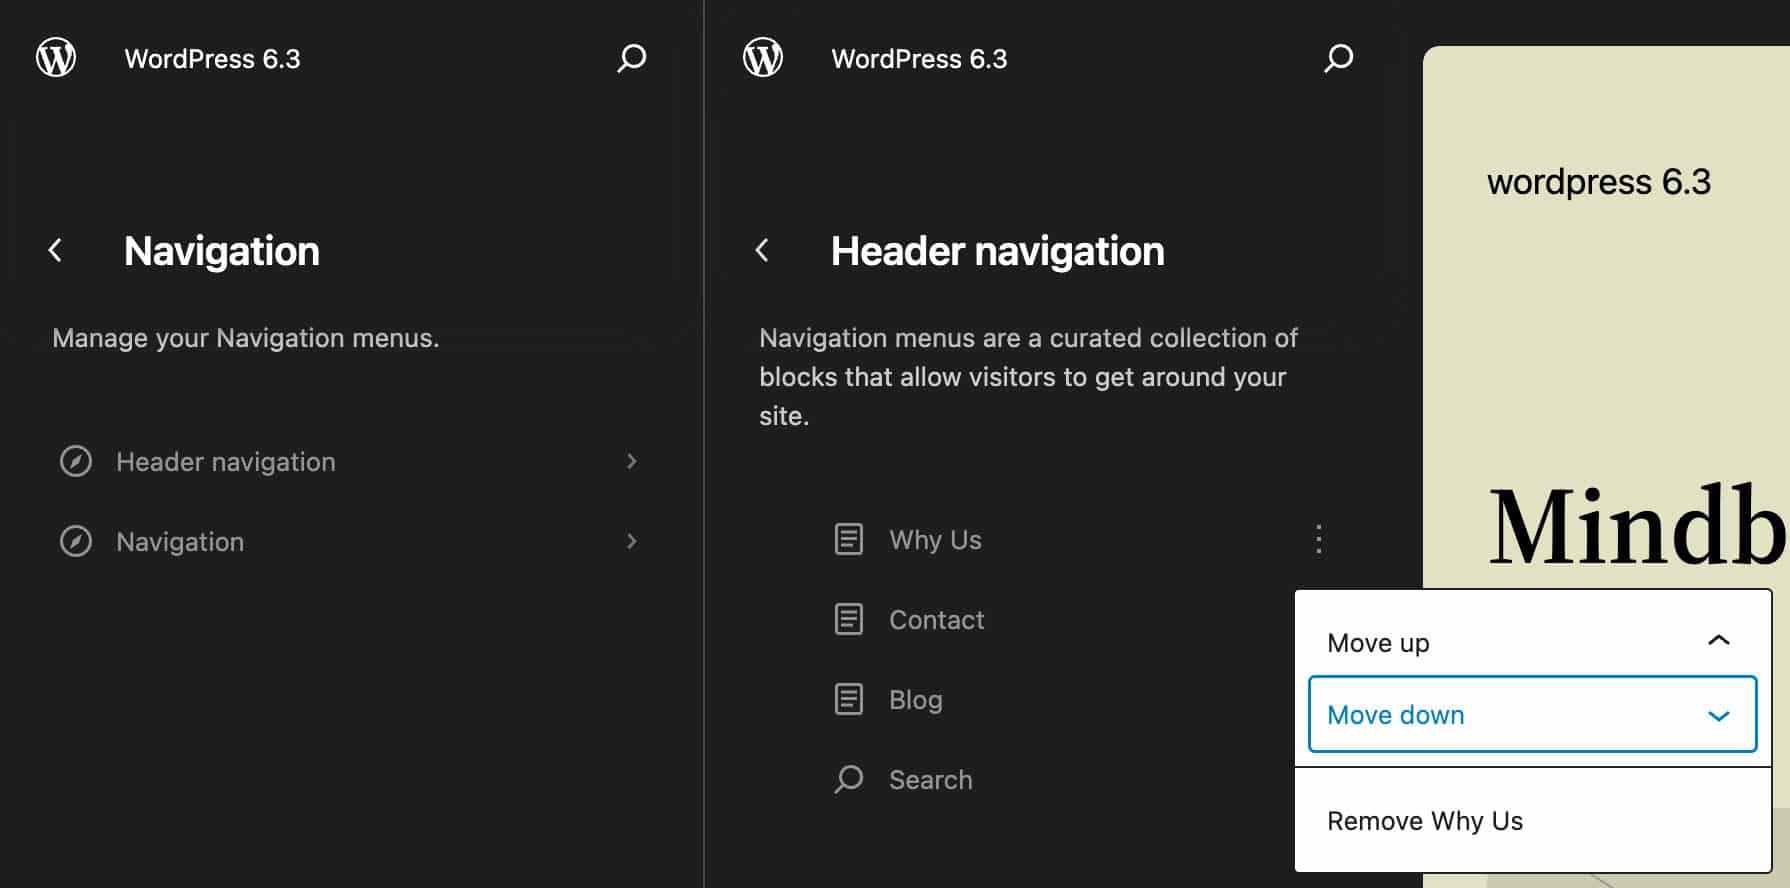
Clicking on a menu item brings you to the page details. Here you can also edit page content and layout (see below).
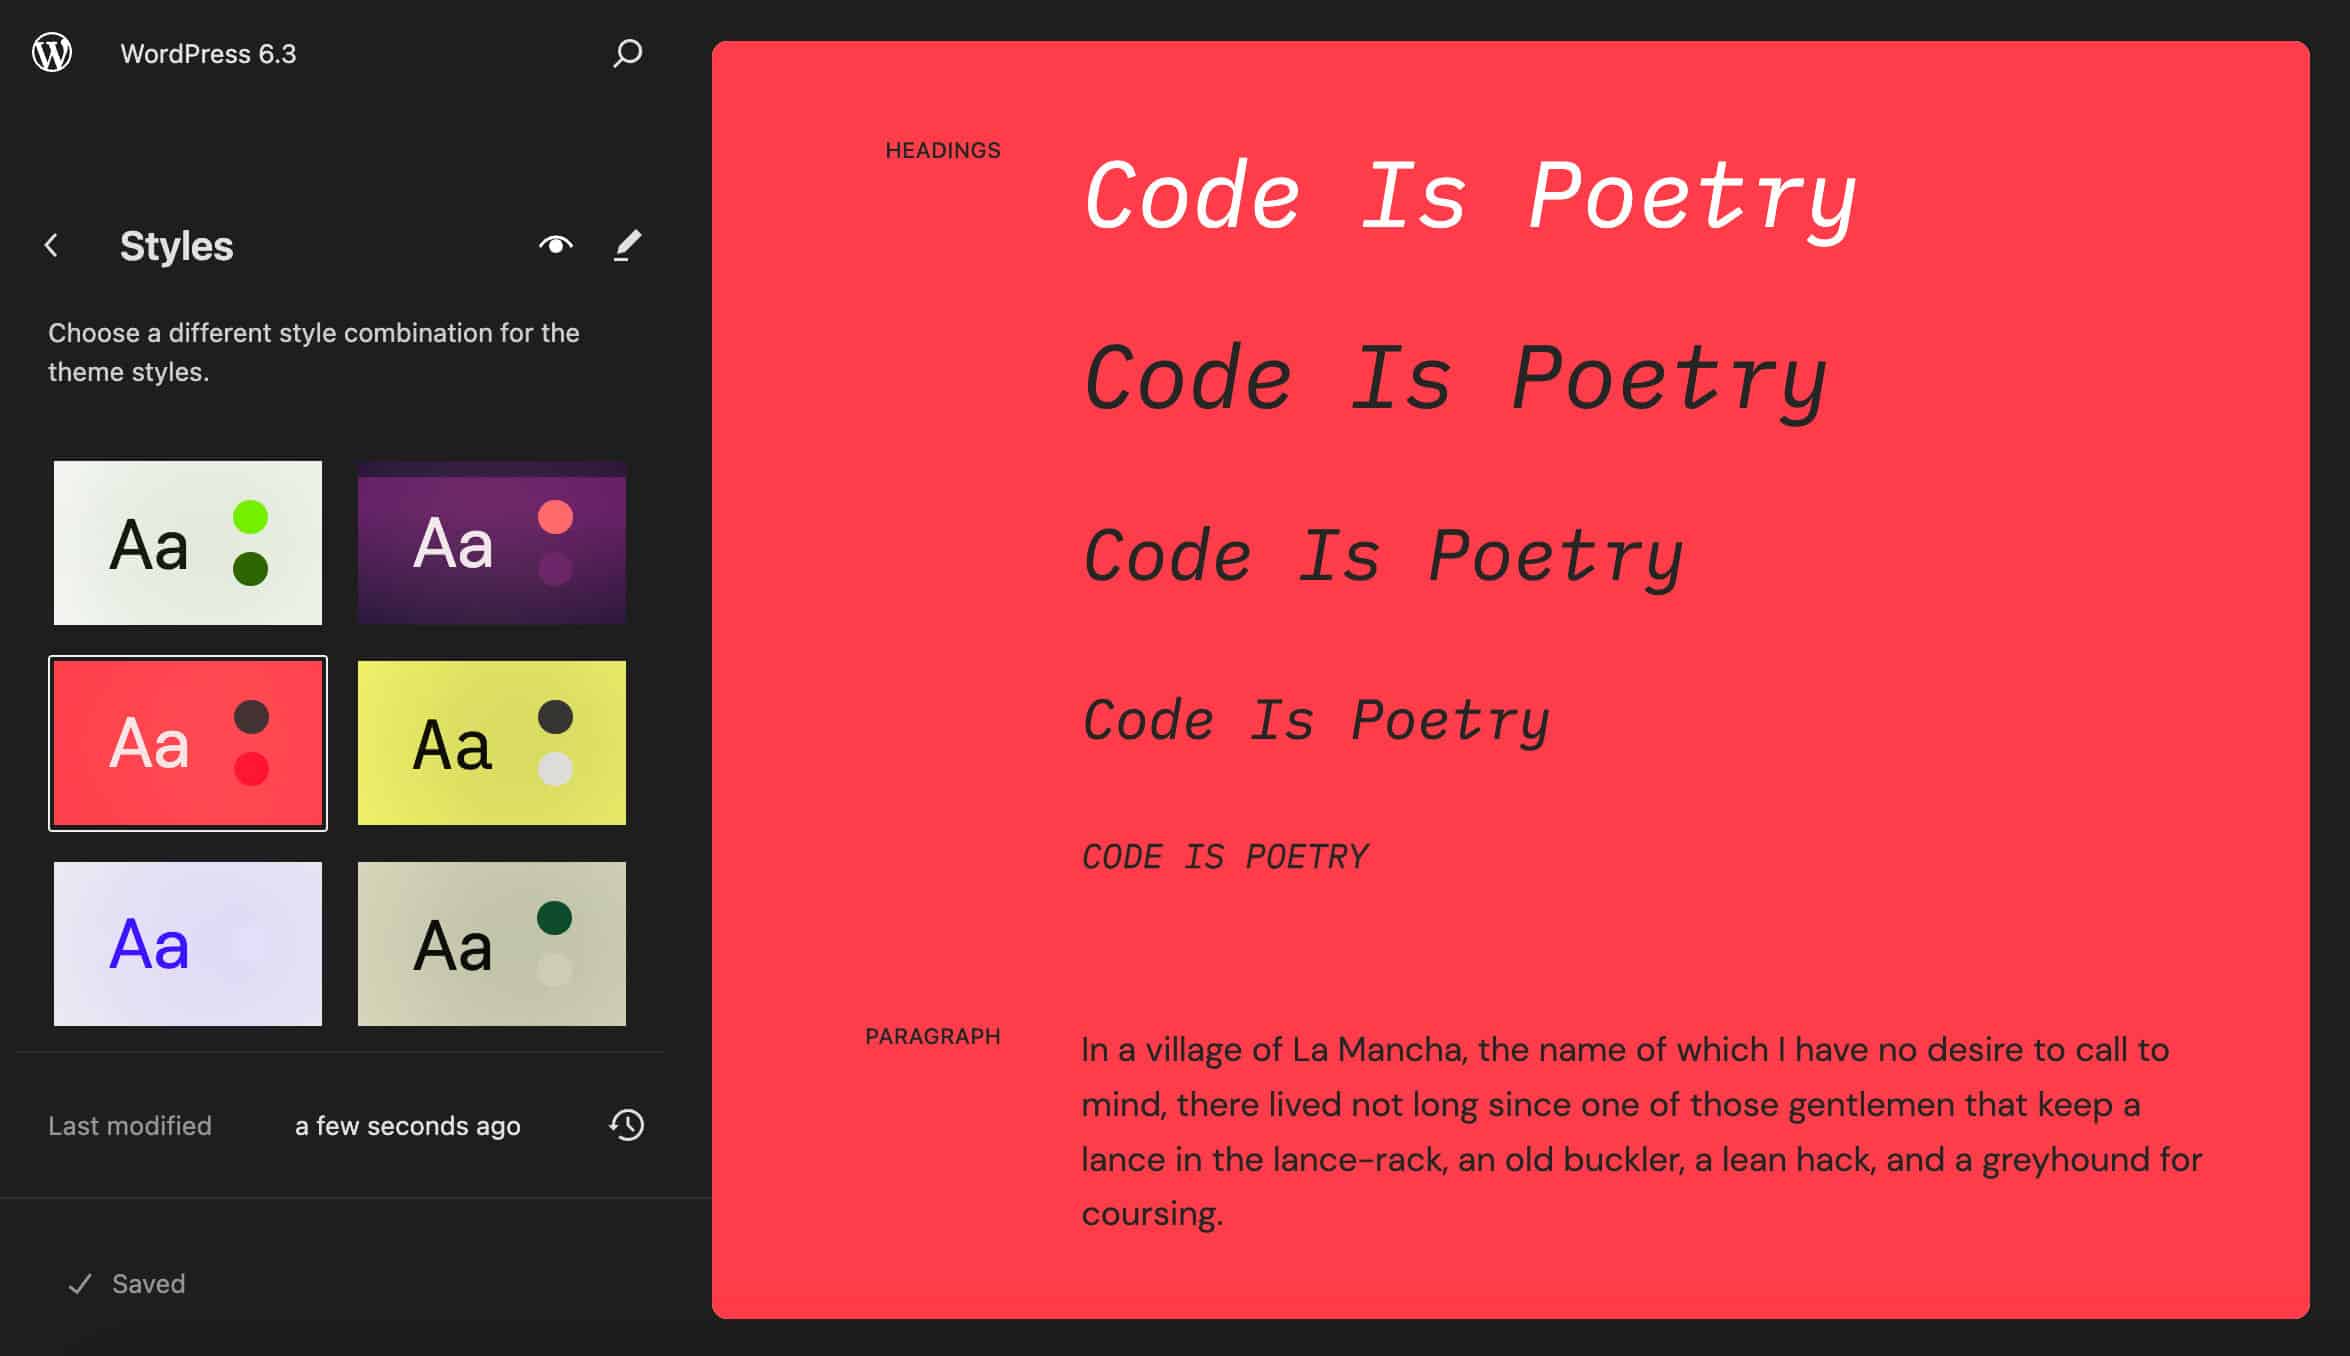
Styles
From the Styles menu, you can access style variations in browse mode. Here you can preview the available styles, apply one and make your customizations.
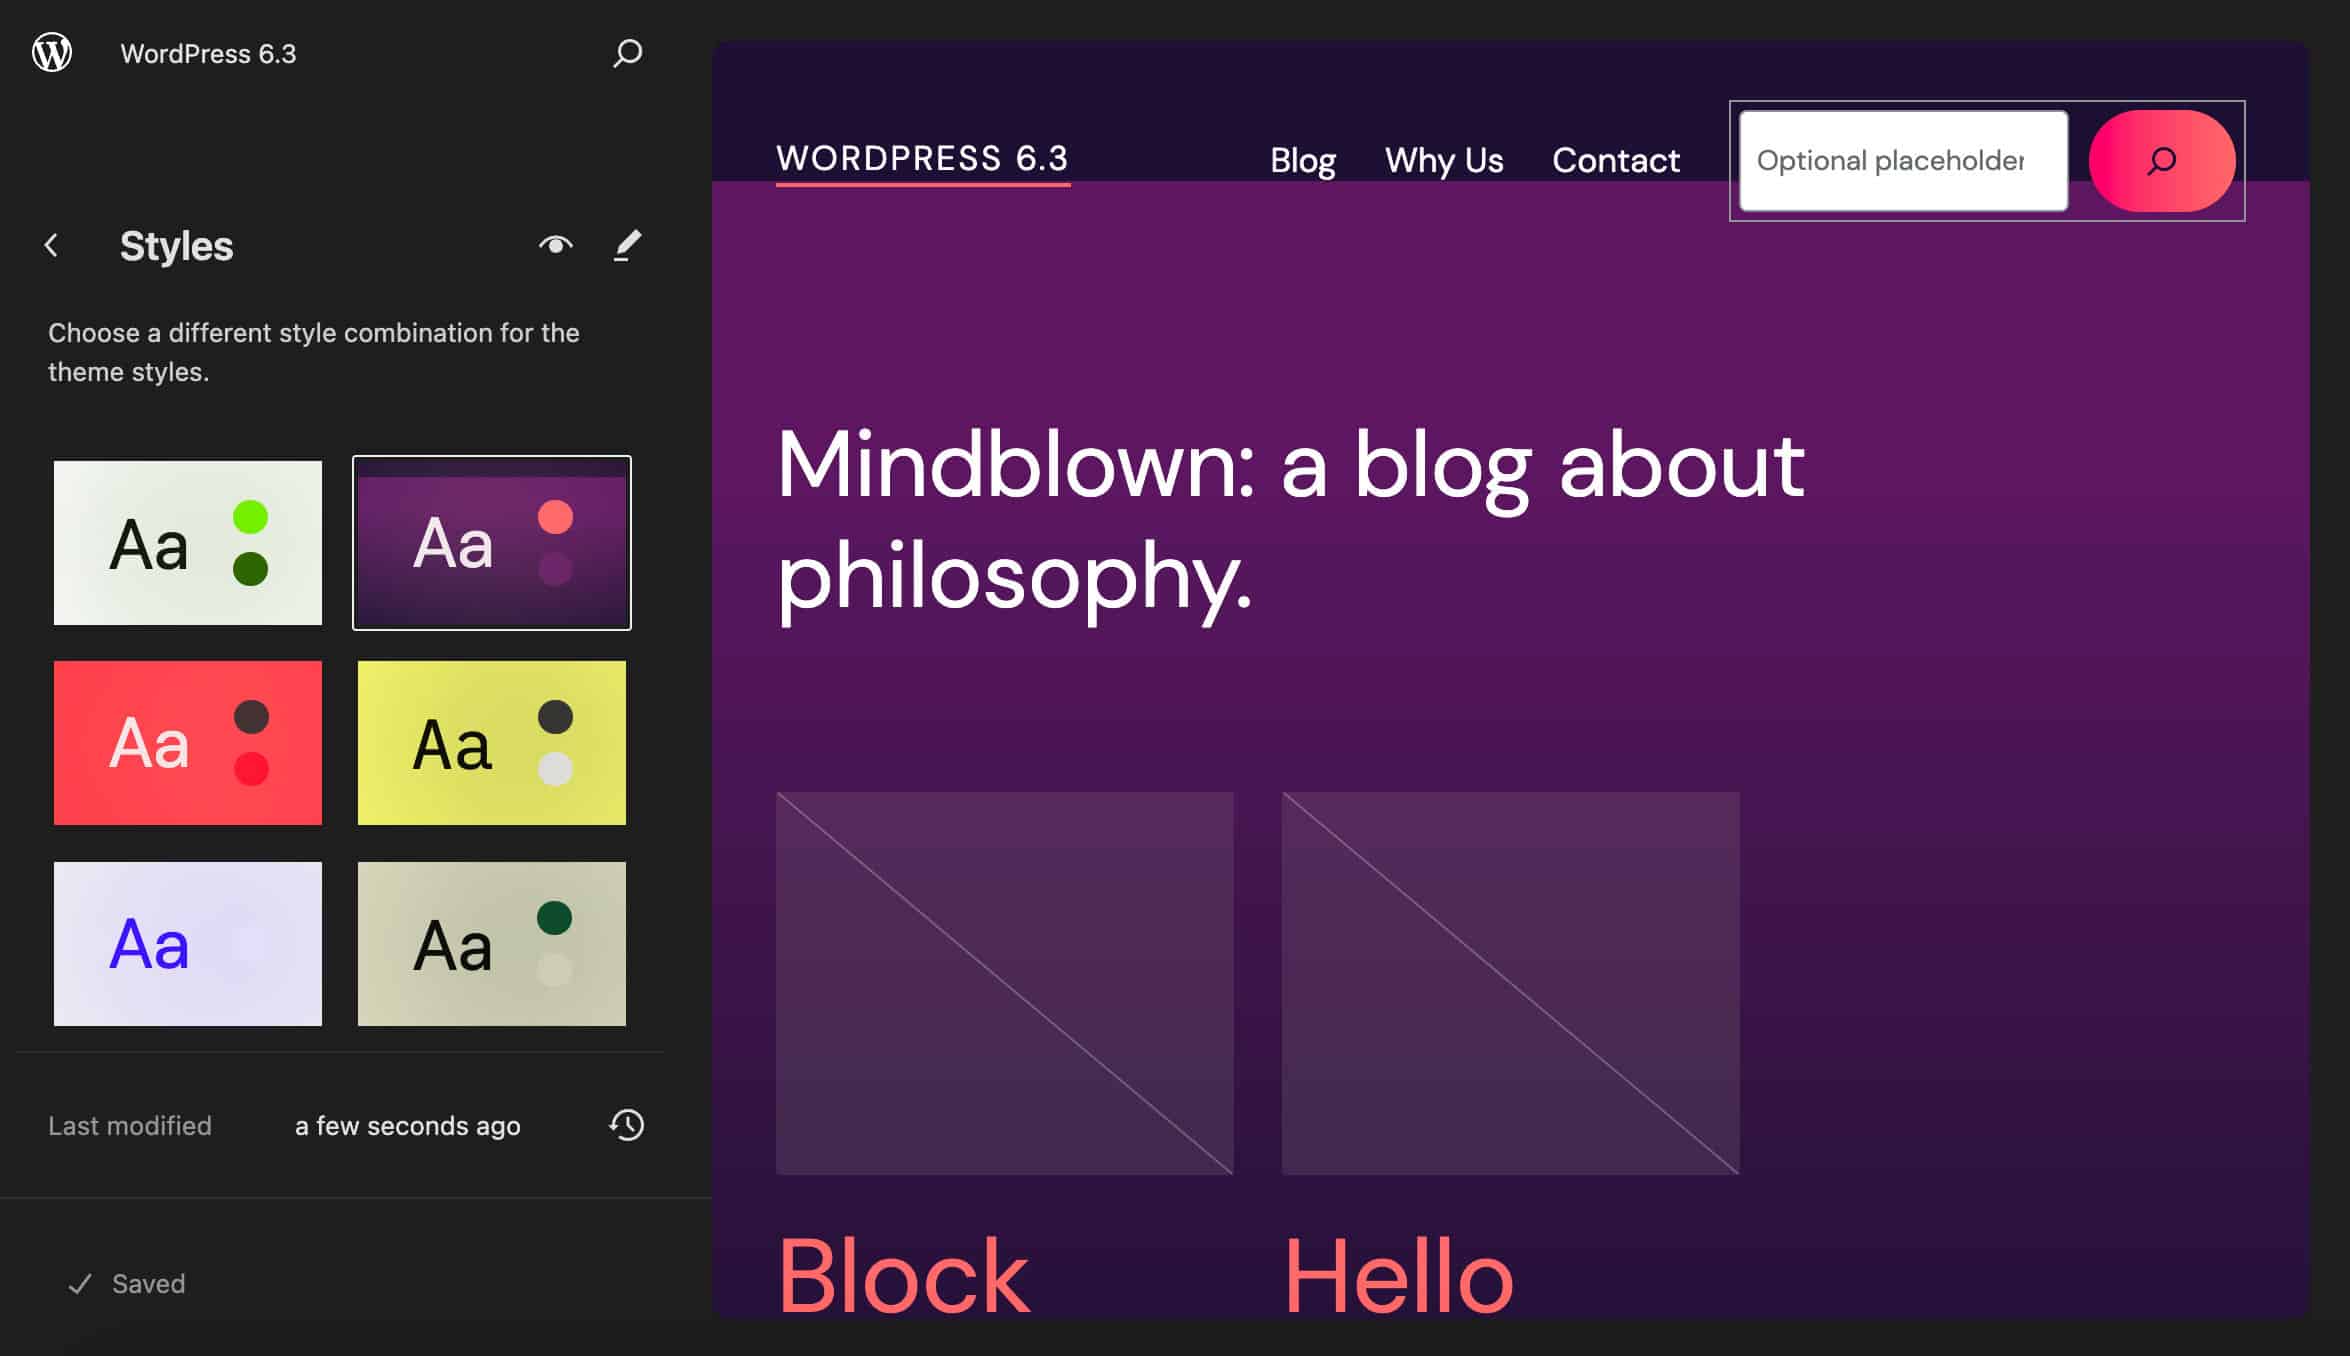
The eye icon launches the Style Book, a feature introduced with 6.2 that provides a preview of the available blocks with the different styles applied without leaving the editor’s interface.
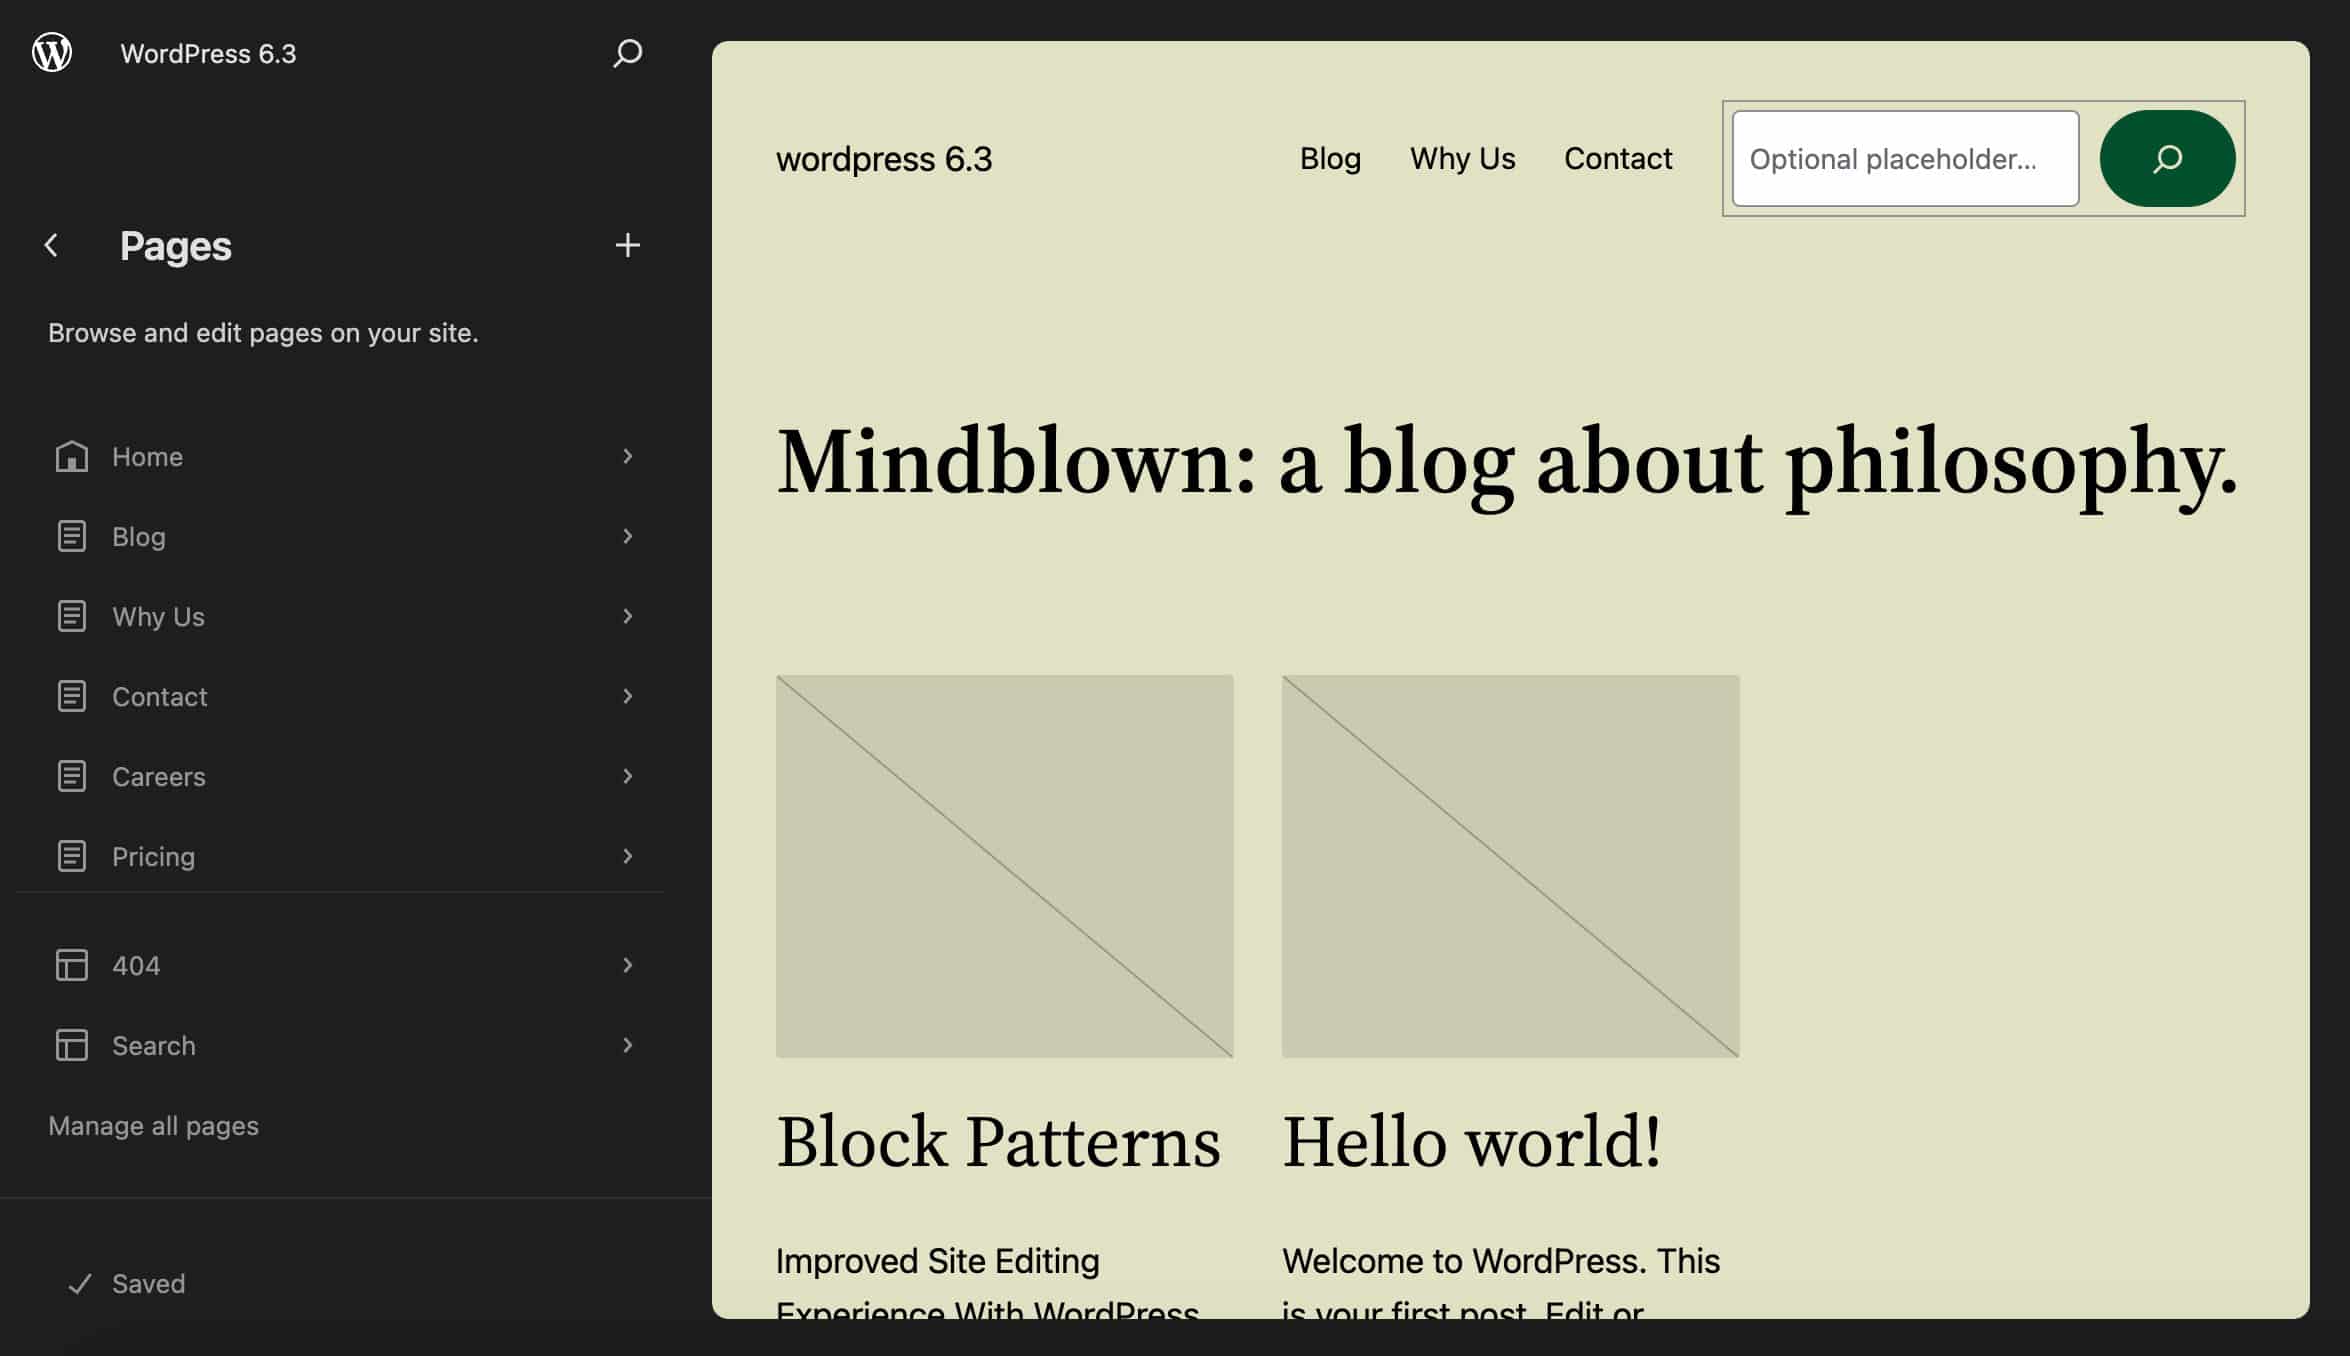
Pages
The Pages menu item gives you access to the 10 last updated site pages plus several editing features. In this section, you can create new pages, edit content and layout for existing pages, access page details, and more.
The most interesting addition here is that it is now possible to create new pages without leaving the editor’s interface.
When you click on the + icon in the Navigation panel, a new modal in the middle of the page allows you to set a title for the new page, also showing a tooltip with suggestions for your title.
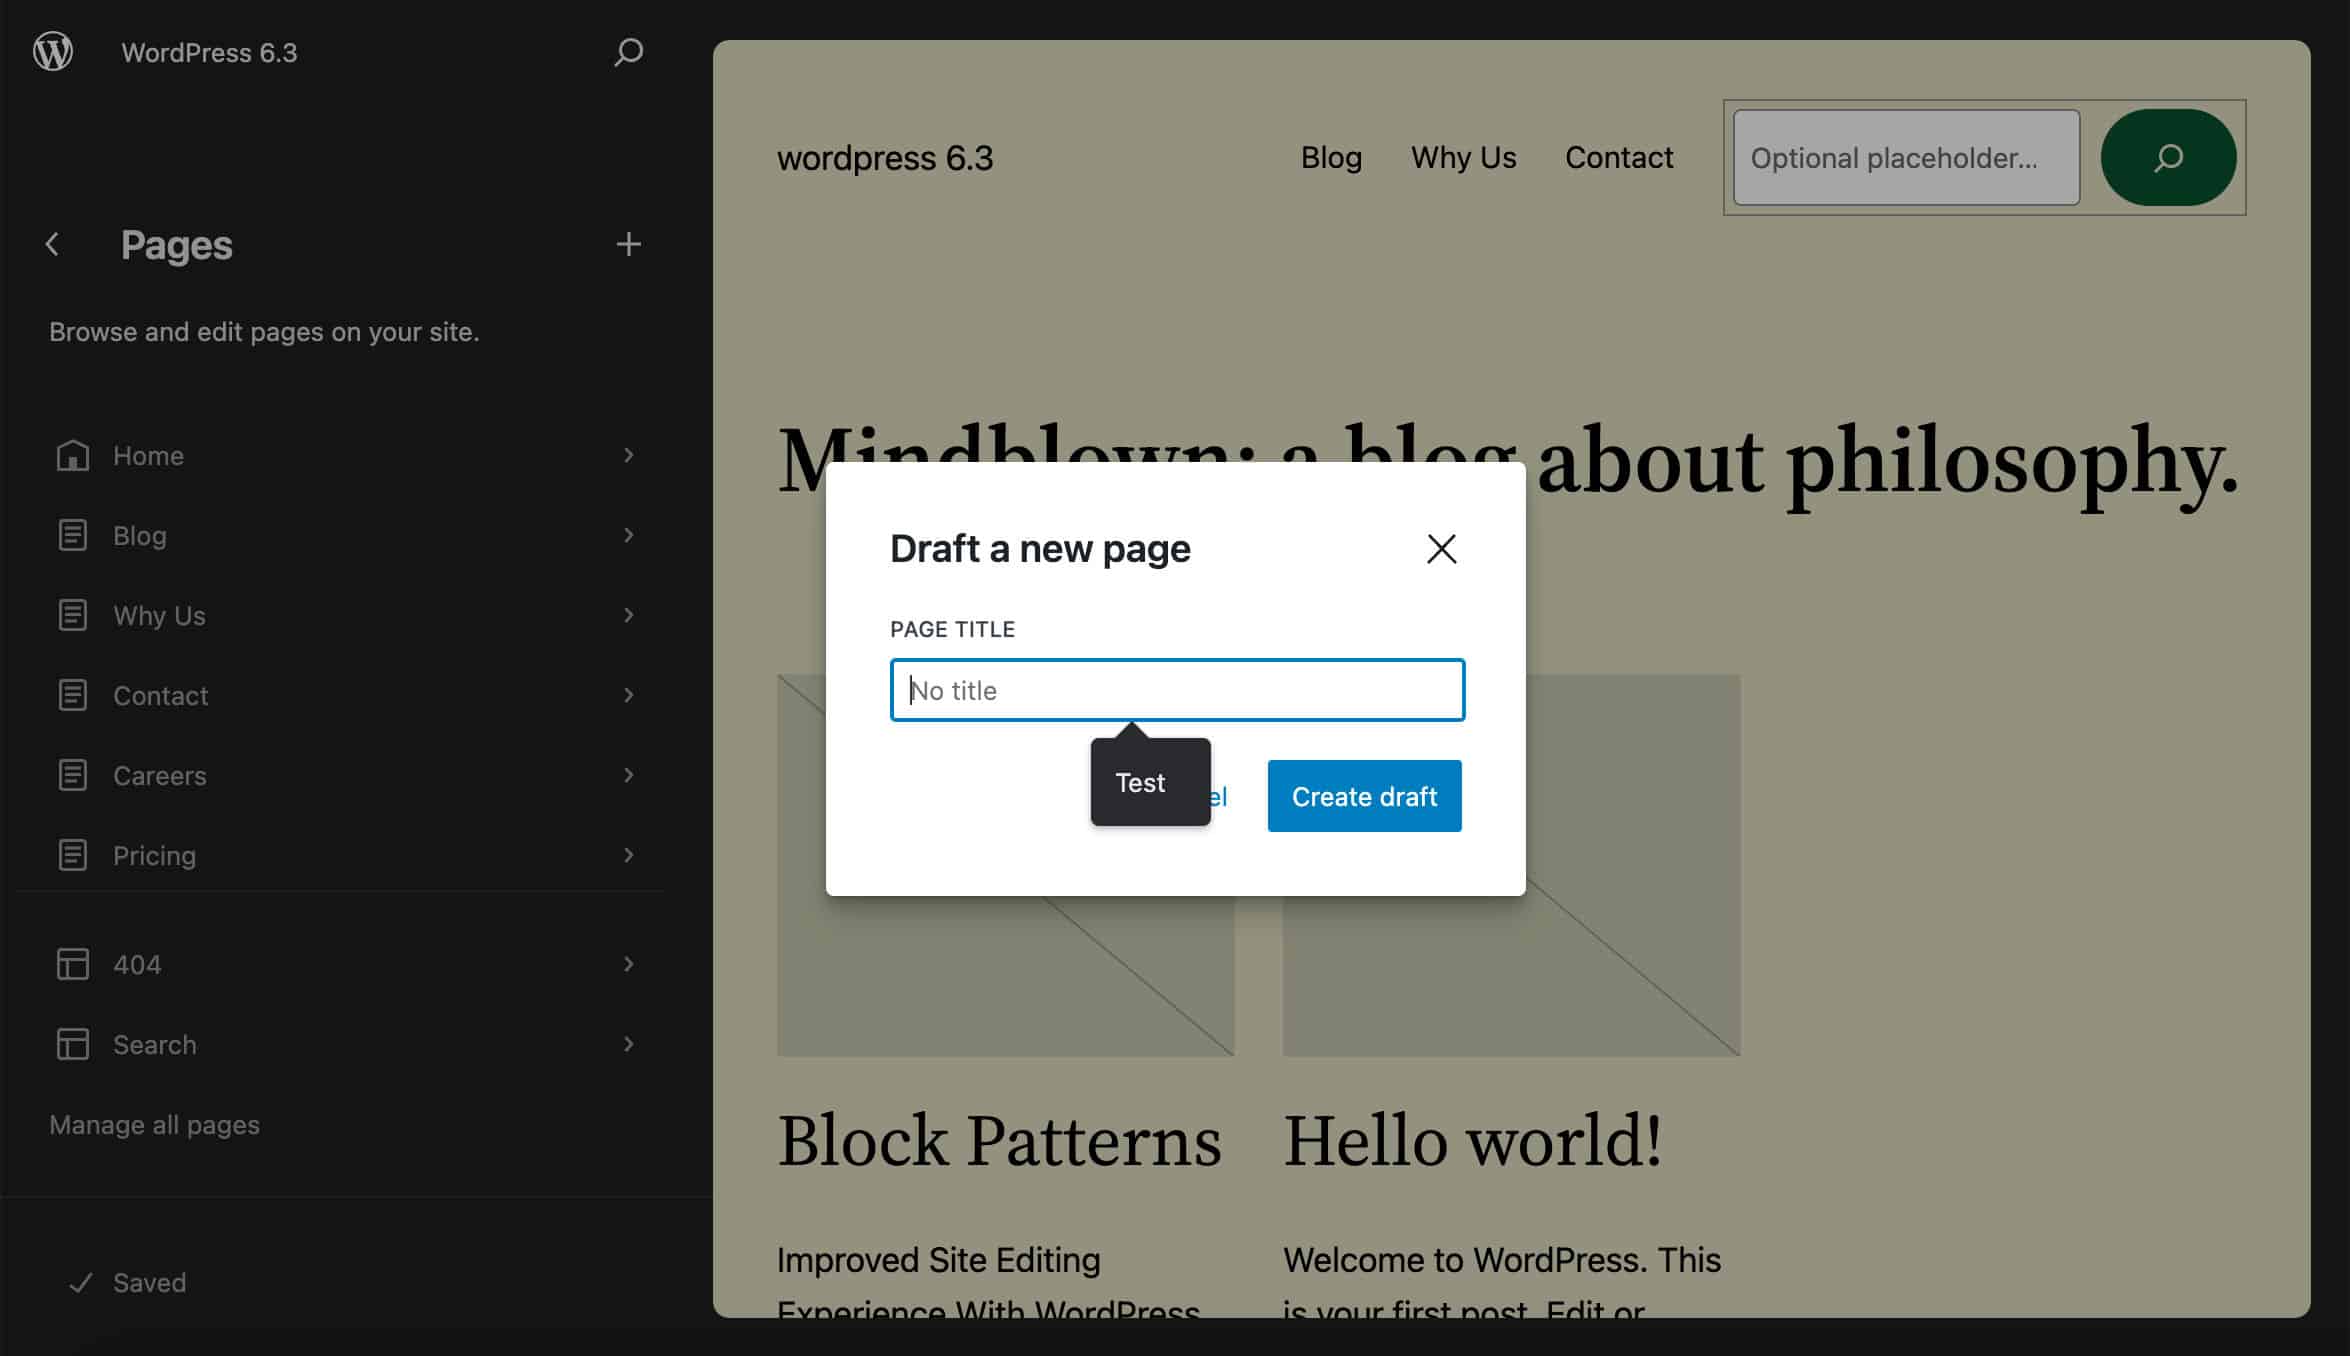
When you click on Create draft, you are redirected to the post editor with a new page loaded.
Under Pages, you can also edit page content directly from the Site Editor.
You can now edit both page content and style in the same place. This gives you greater control over all aspects of the page and should significantly improve the editing experience.
In editing mode, you have the ability to easily switch between the page editor and the template editor. This should prevent any confusion about what you are editing and let you determine whether your changes should only affect the current page or also apply to the other pages that are using the same template.
The same screen also displays page details.
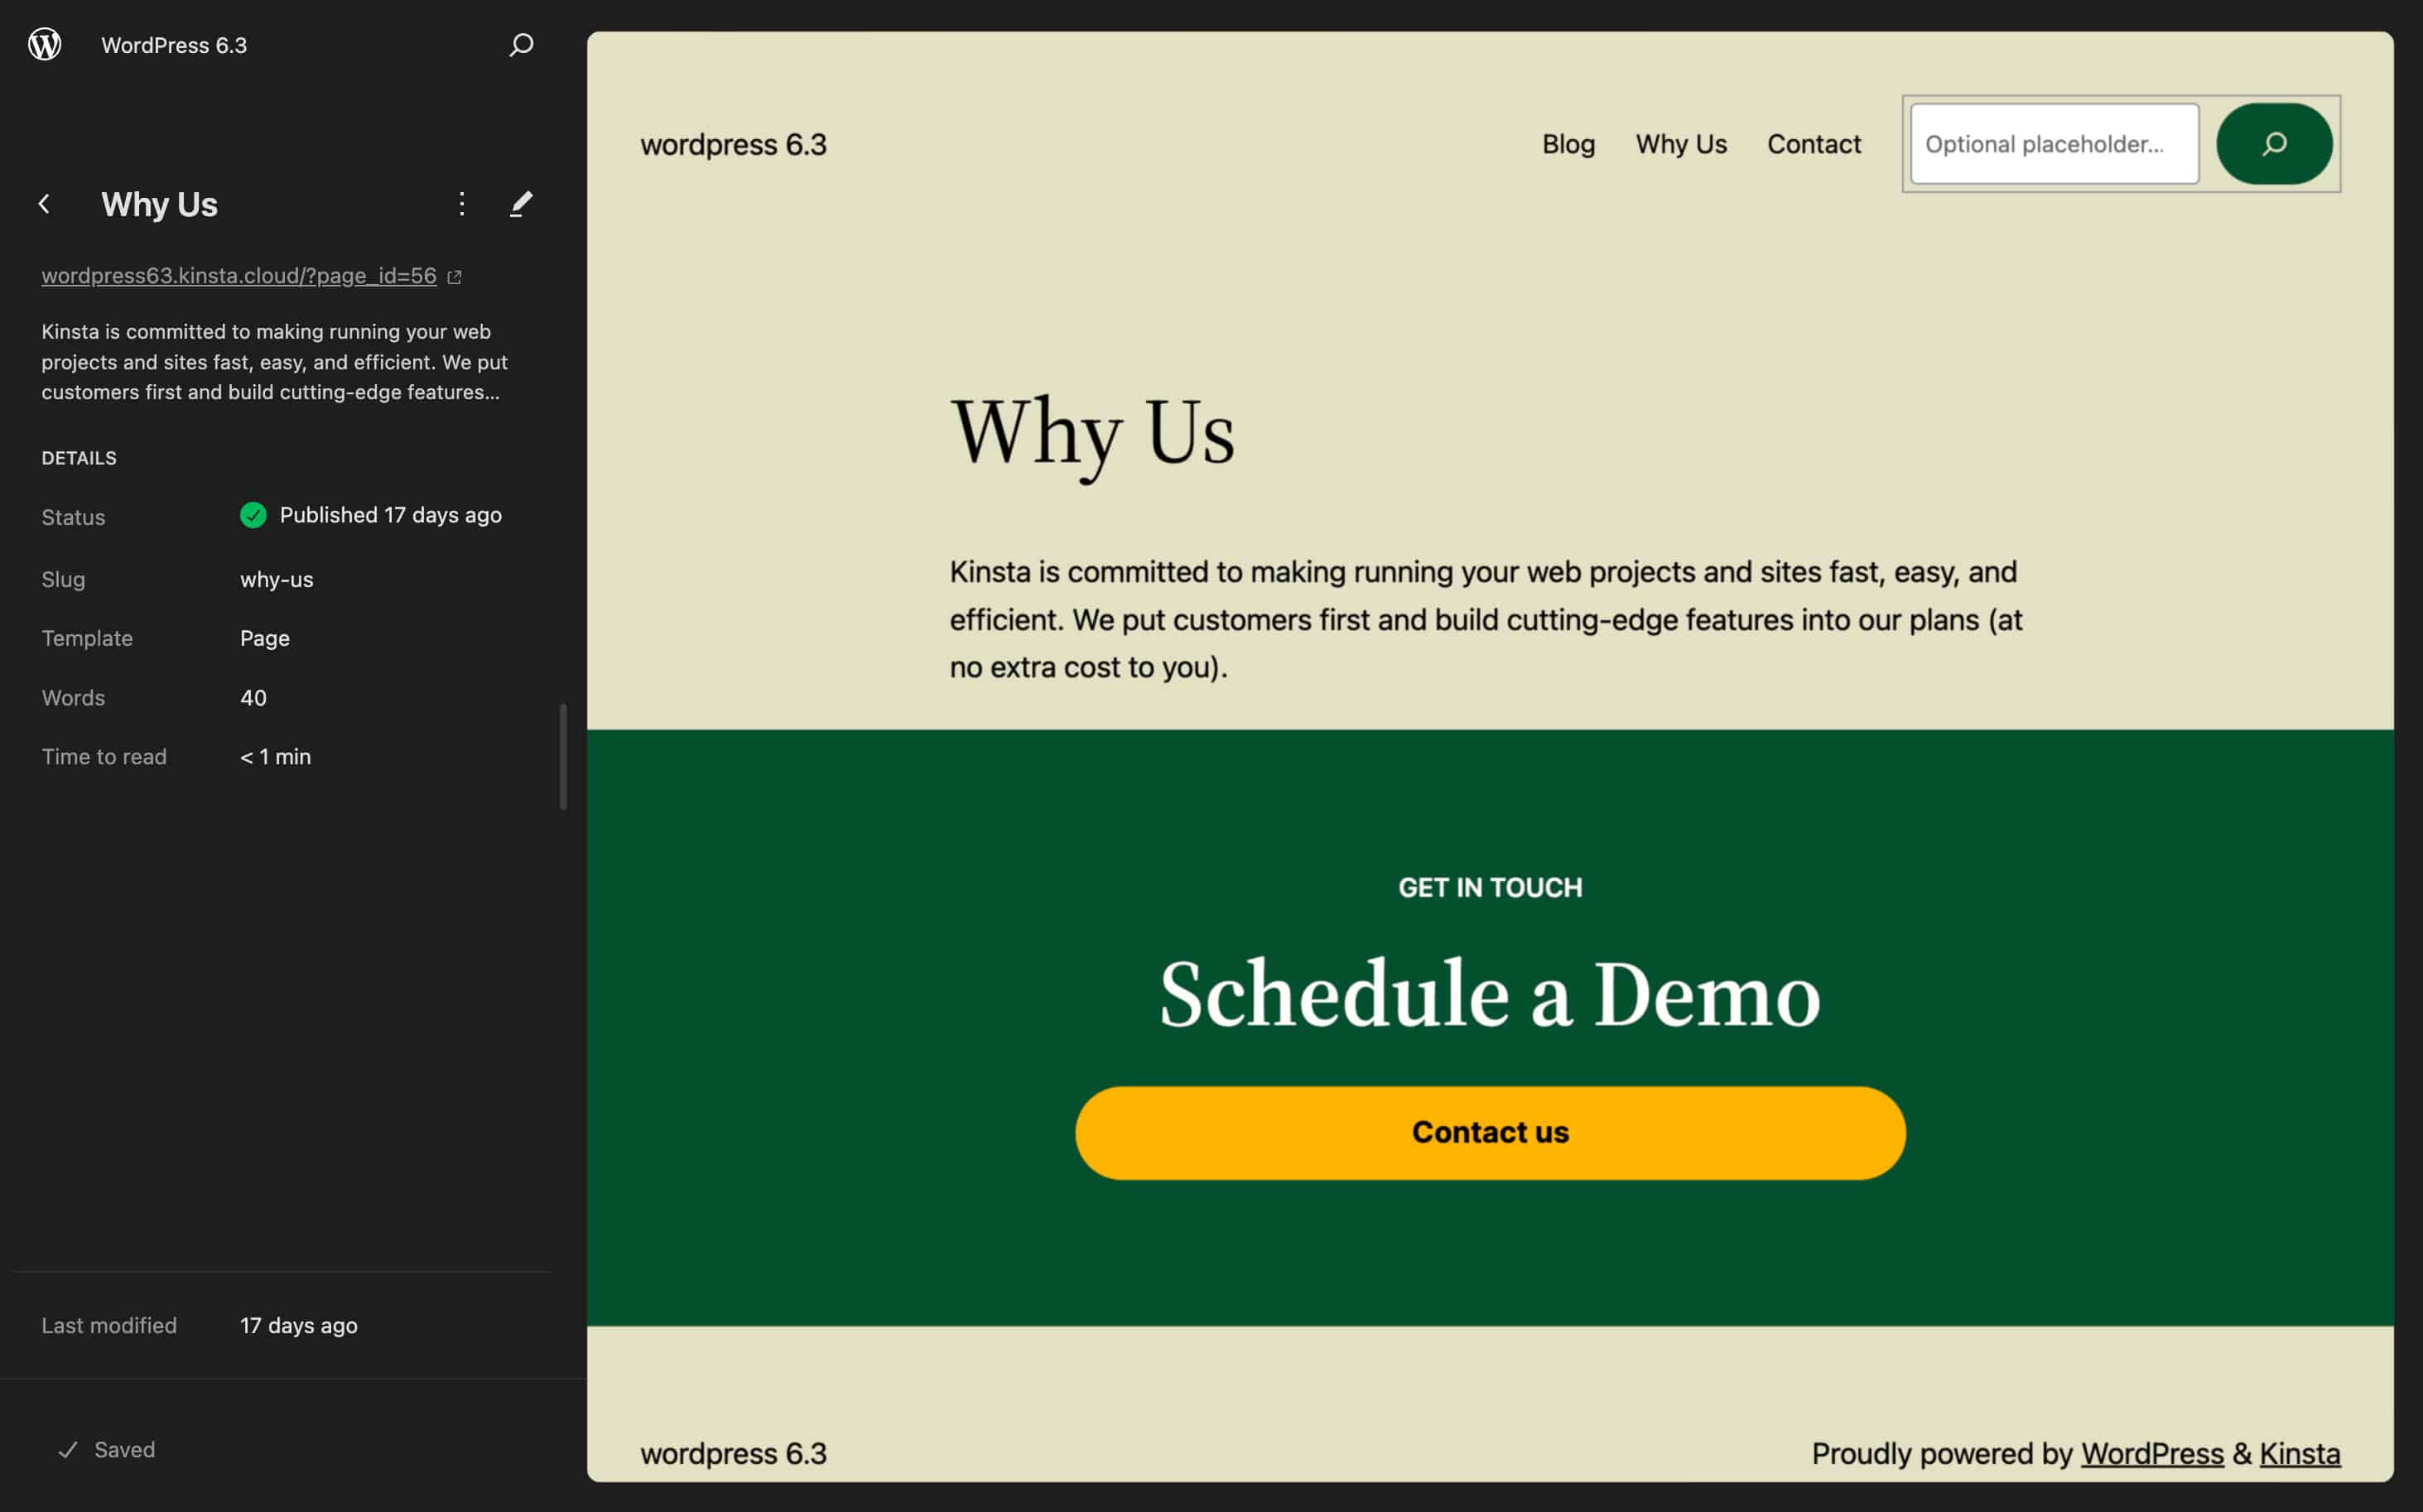
Details currently include:
- Status
- Slug
- Template
- Parent
- Words
- Time to read
- Last modified
Templates
Here you can access page templates. The structure of the Templates screen does not change a lot. However, with WordPress 6.3, when you create a new template, a new modal overlay provides a list of pages for you to choose for your template.
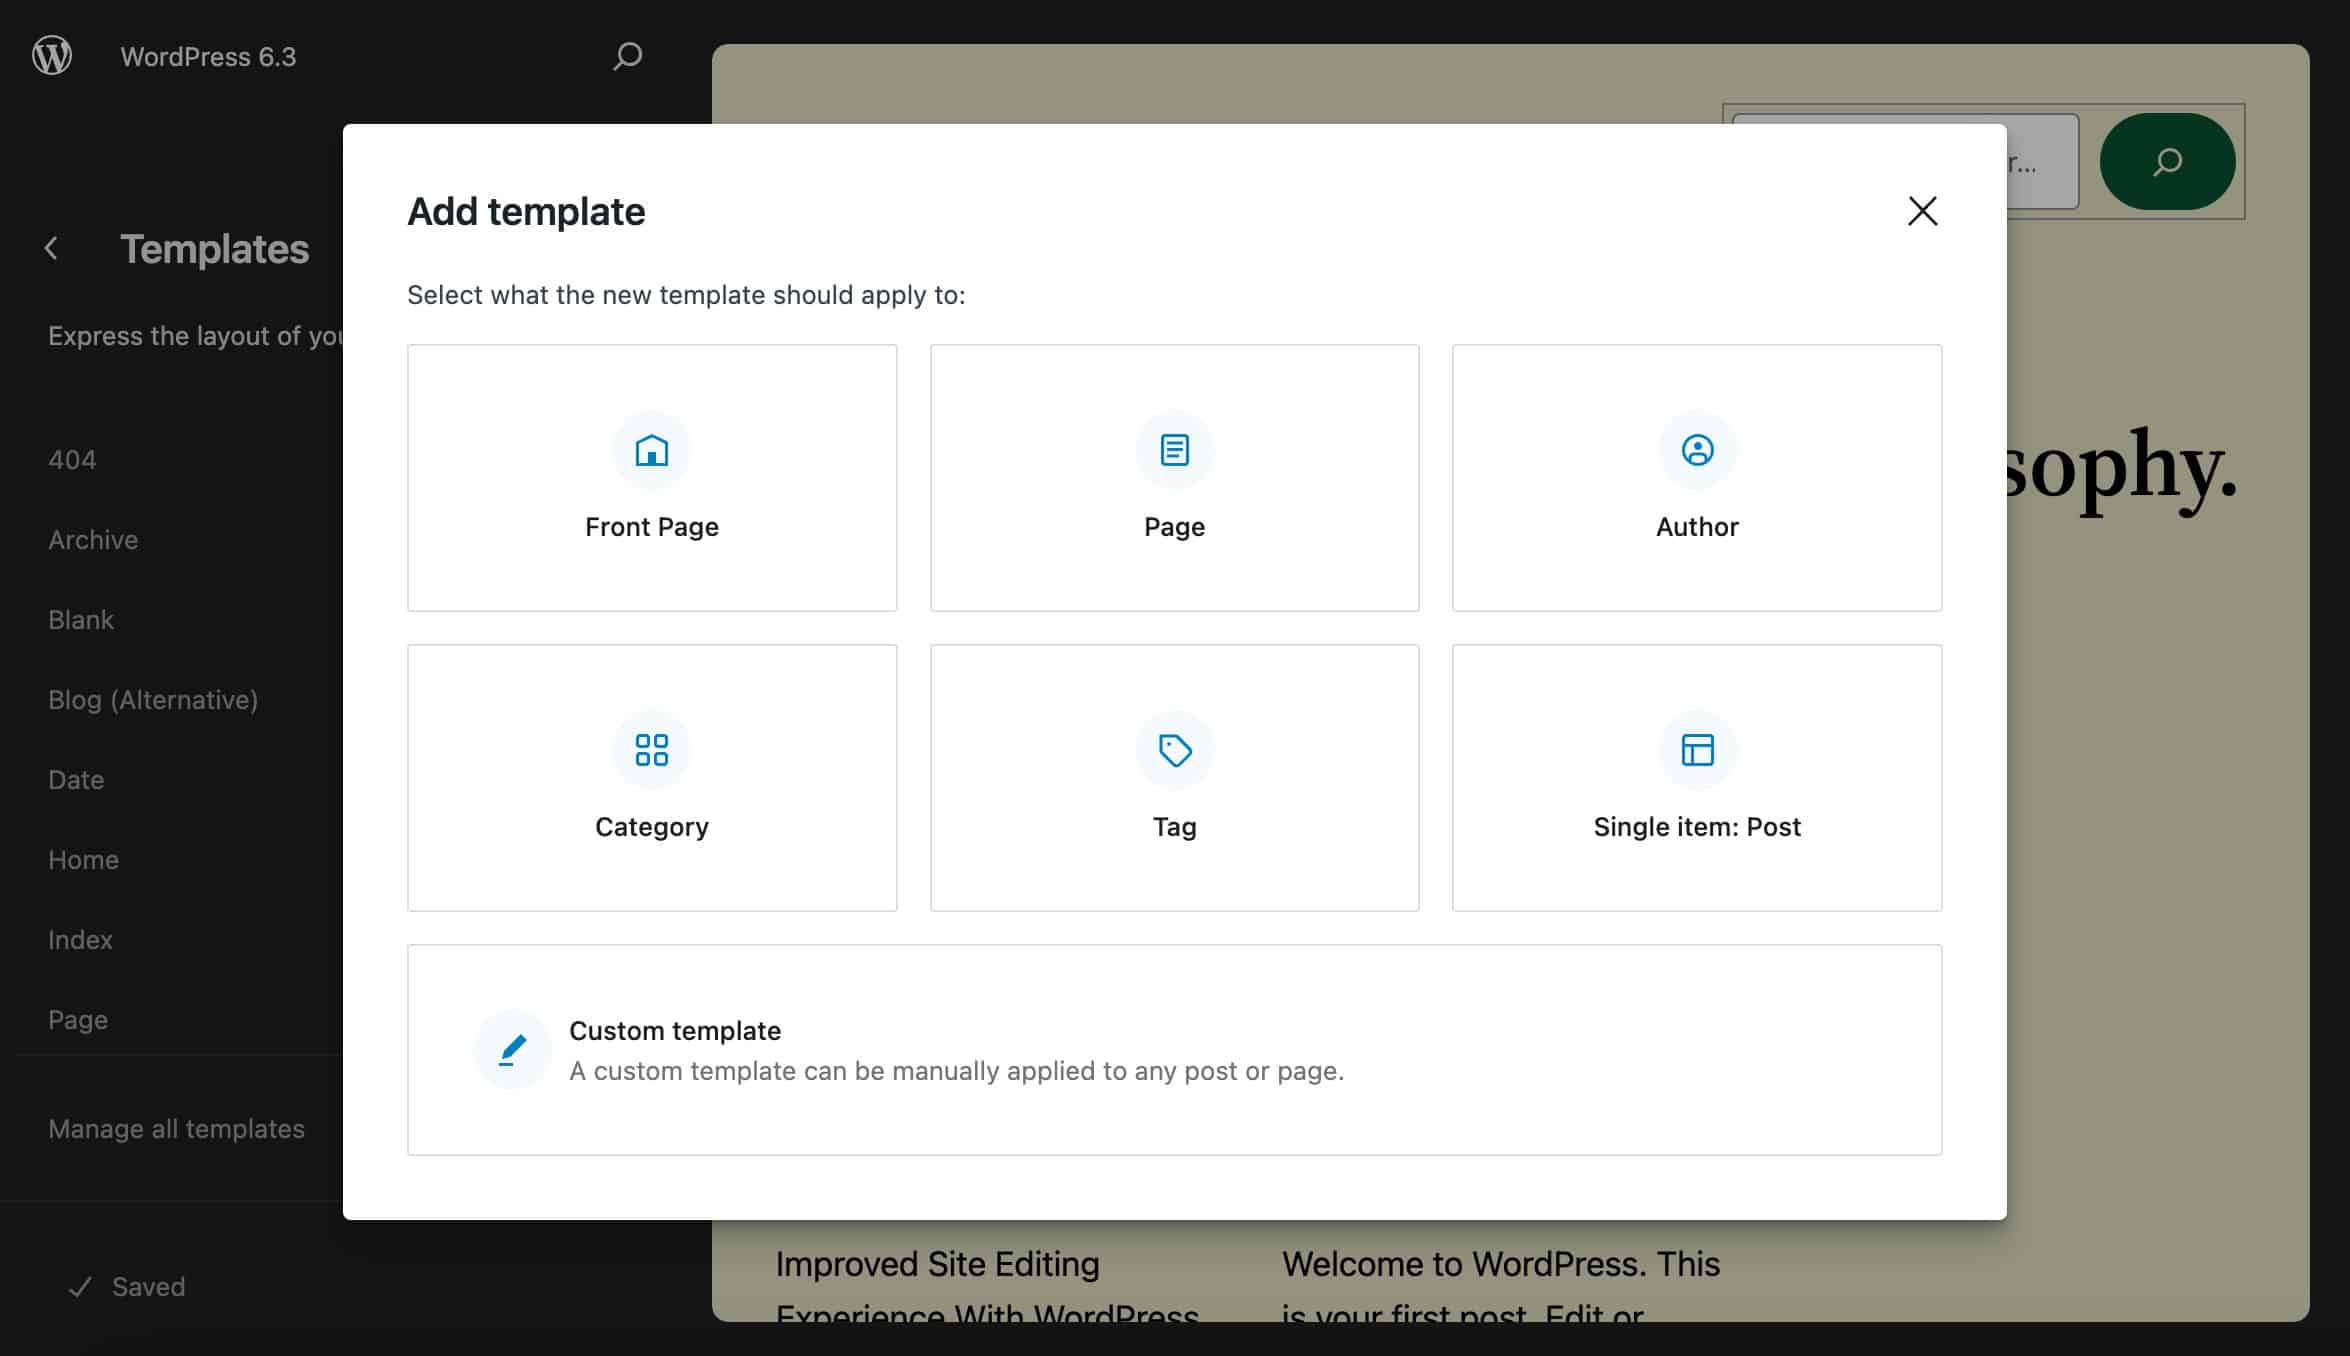
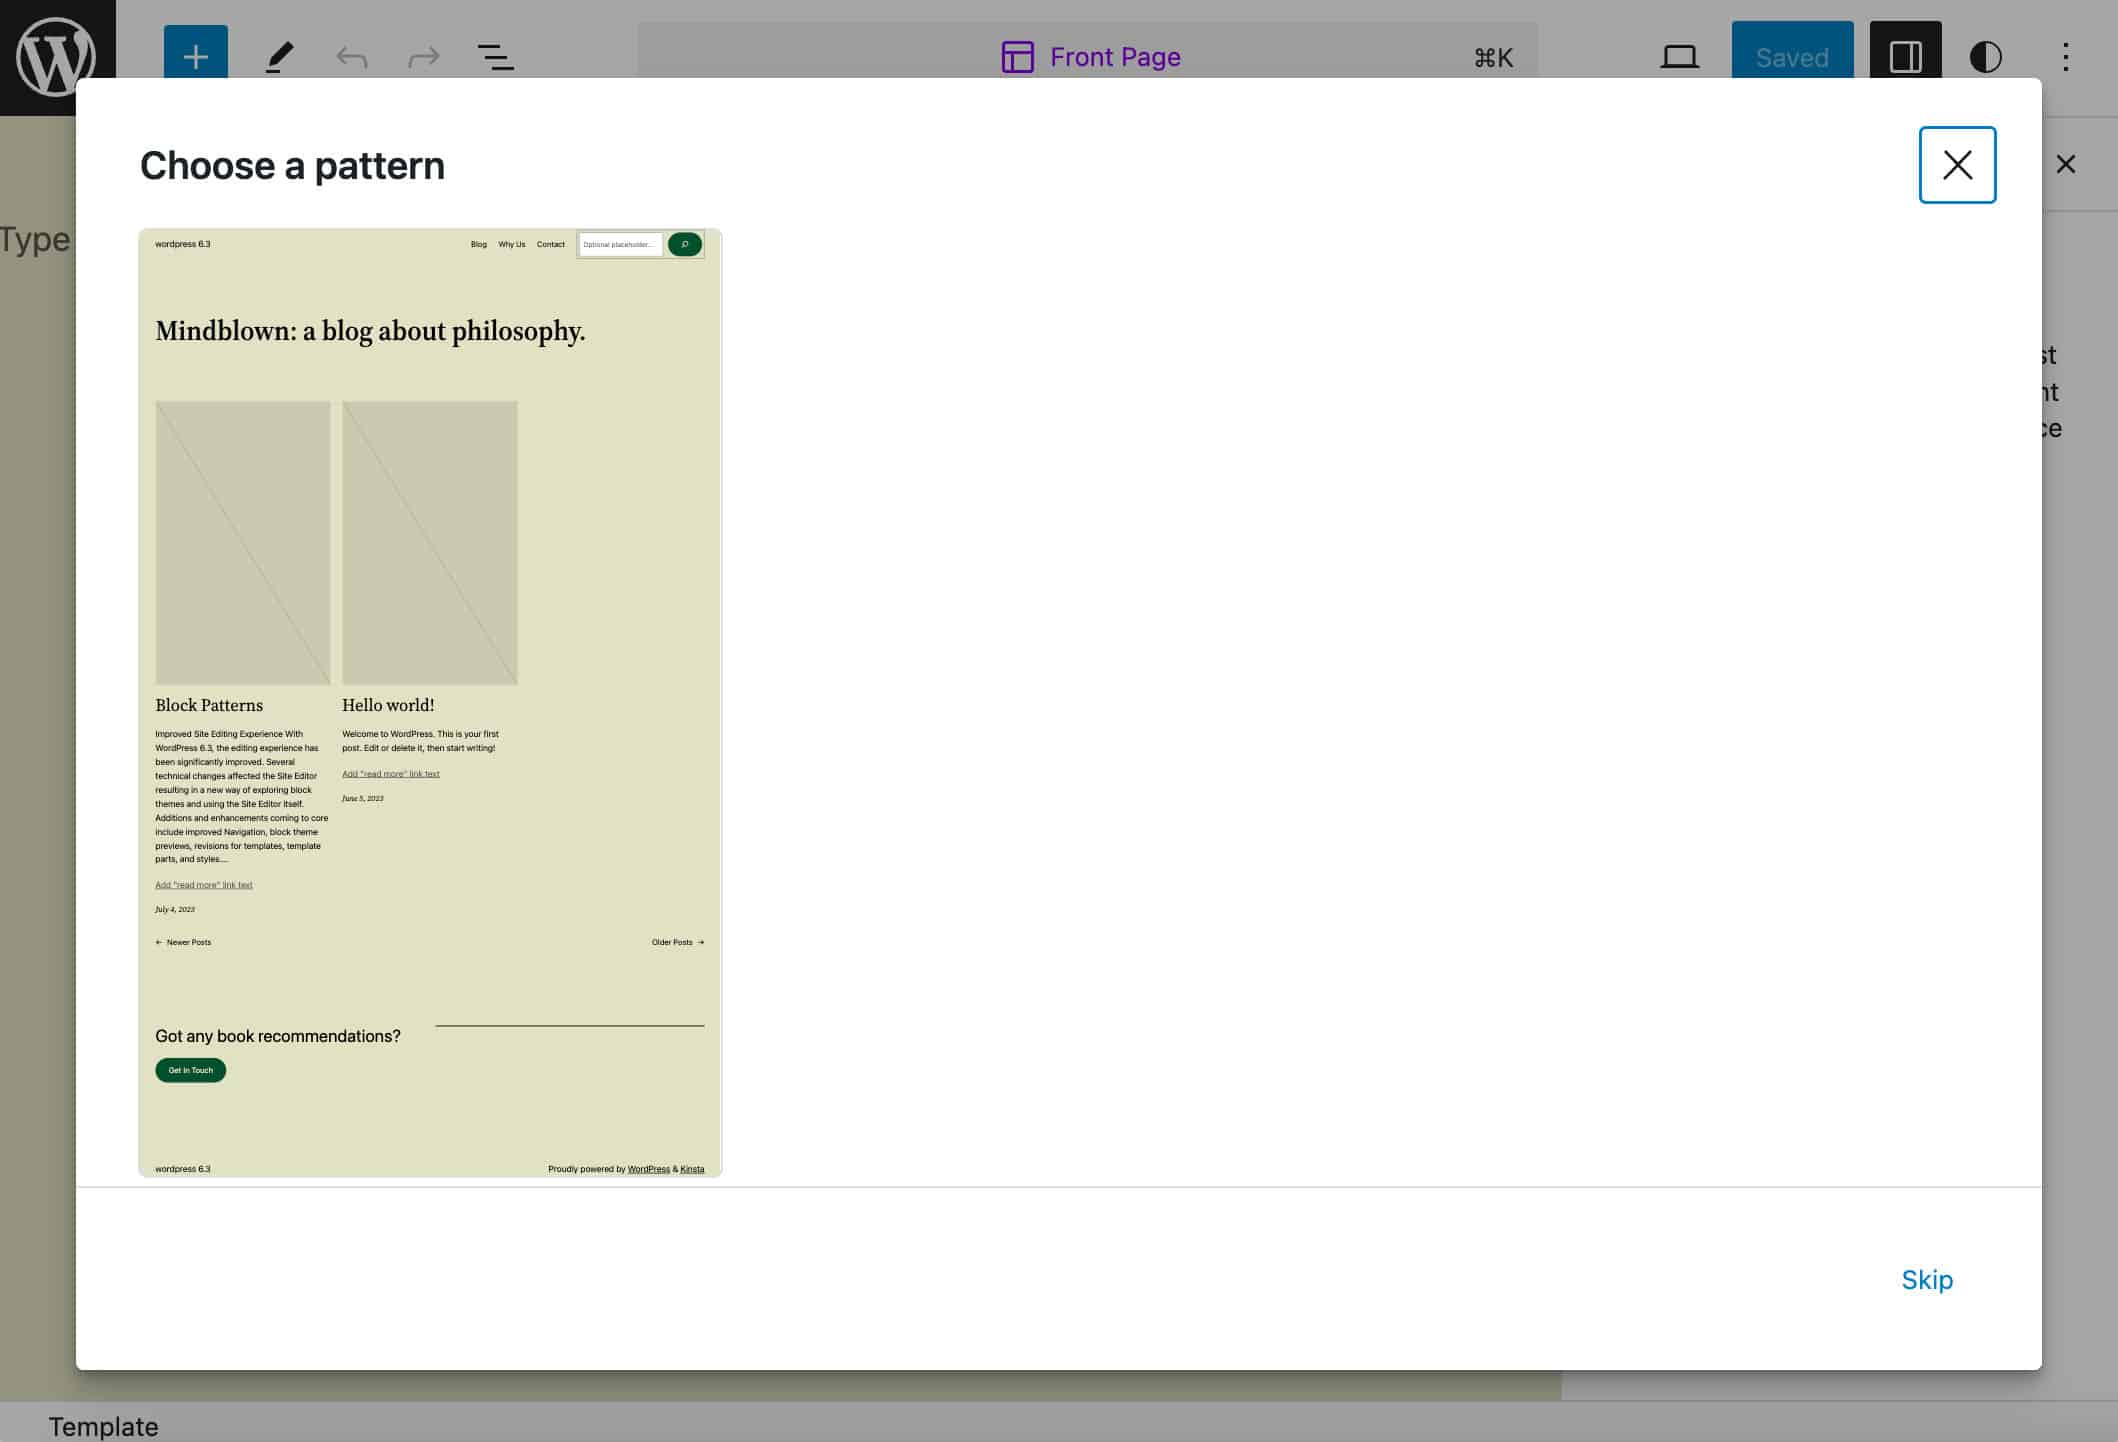
As a second step, a new modal provides a list of block patterns that you can use to build your template.
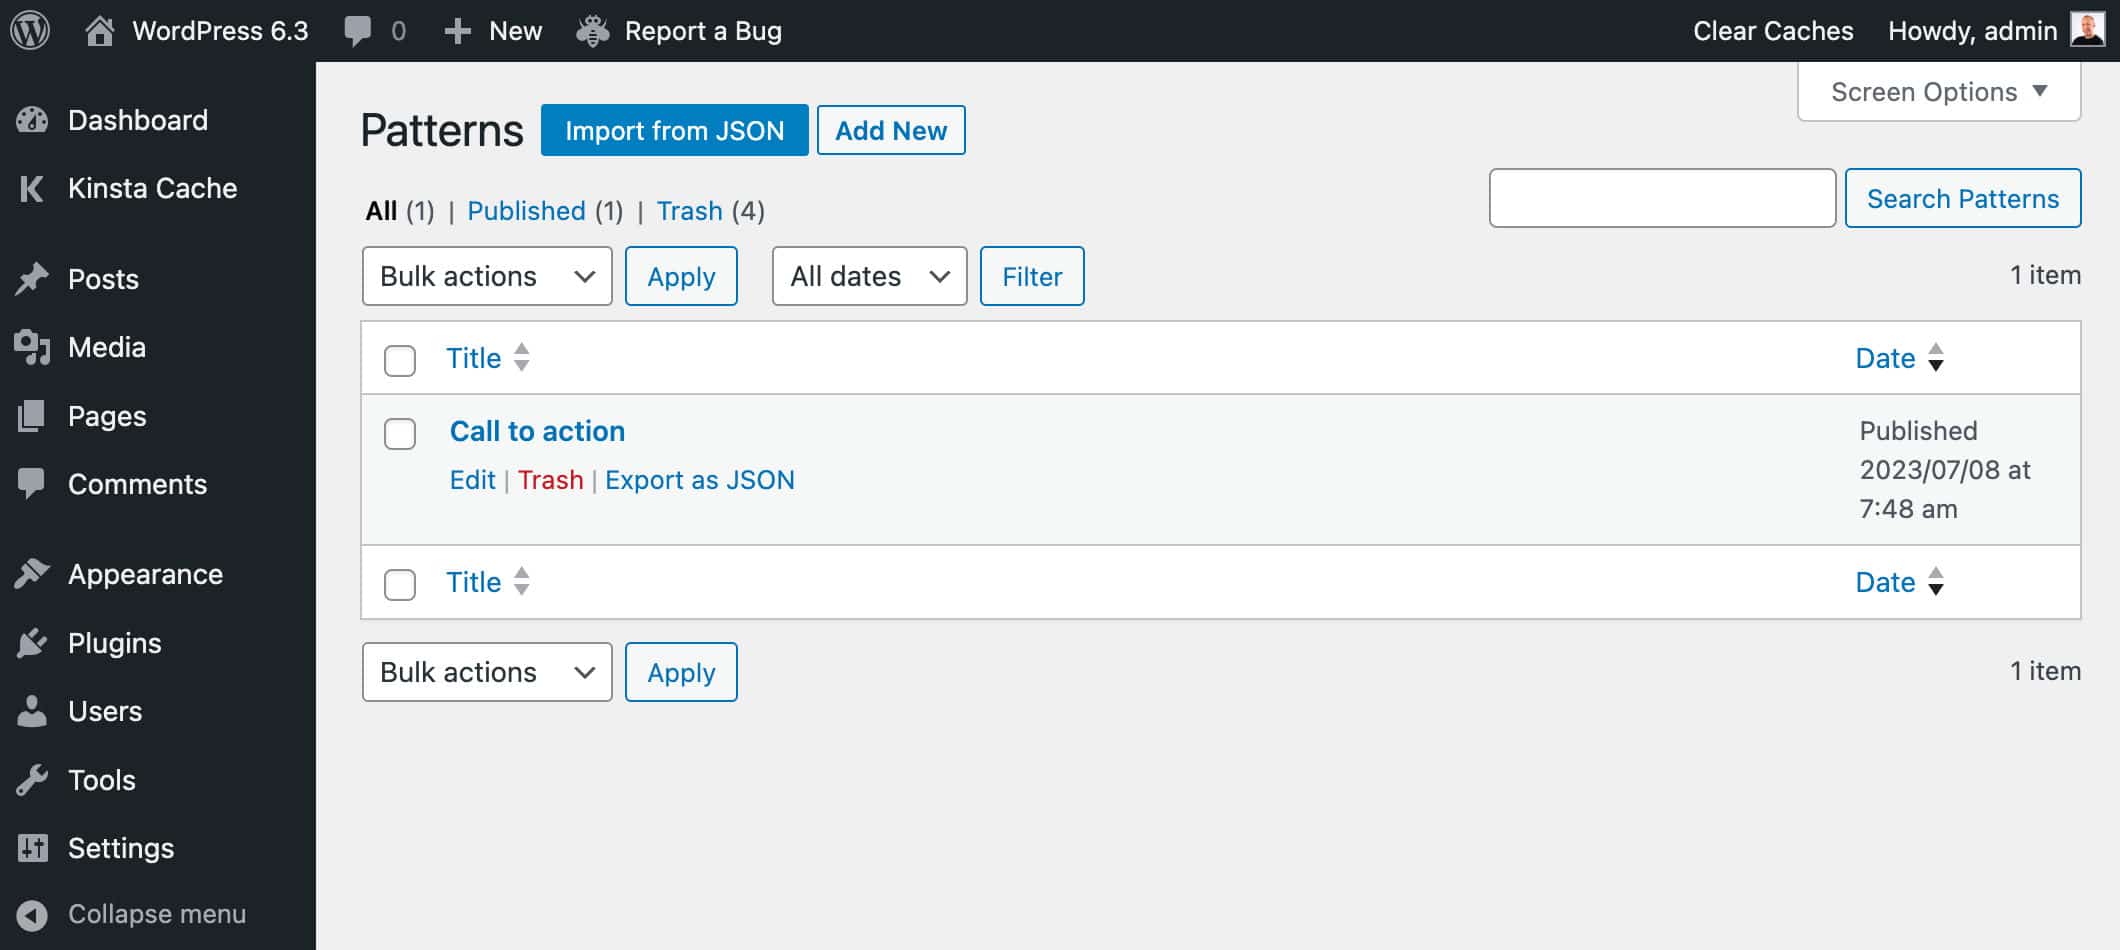
Patterns
Named Library in a previous iteration, the Patterns admin section reflects a number of notable changes that involve the block pattern system. These are not just changes to the UI. It’s a general overhaul of the entire block pattern architecture.

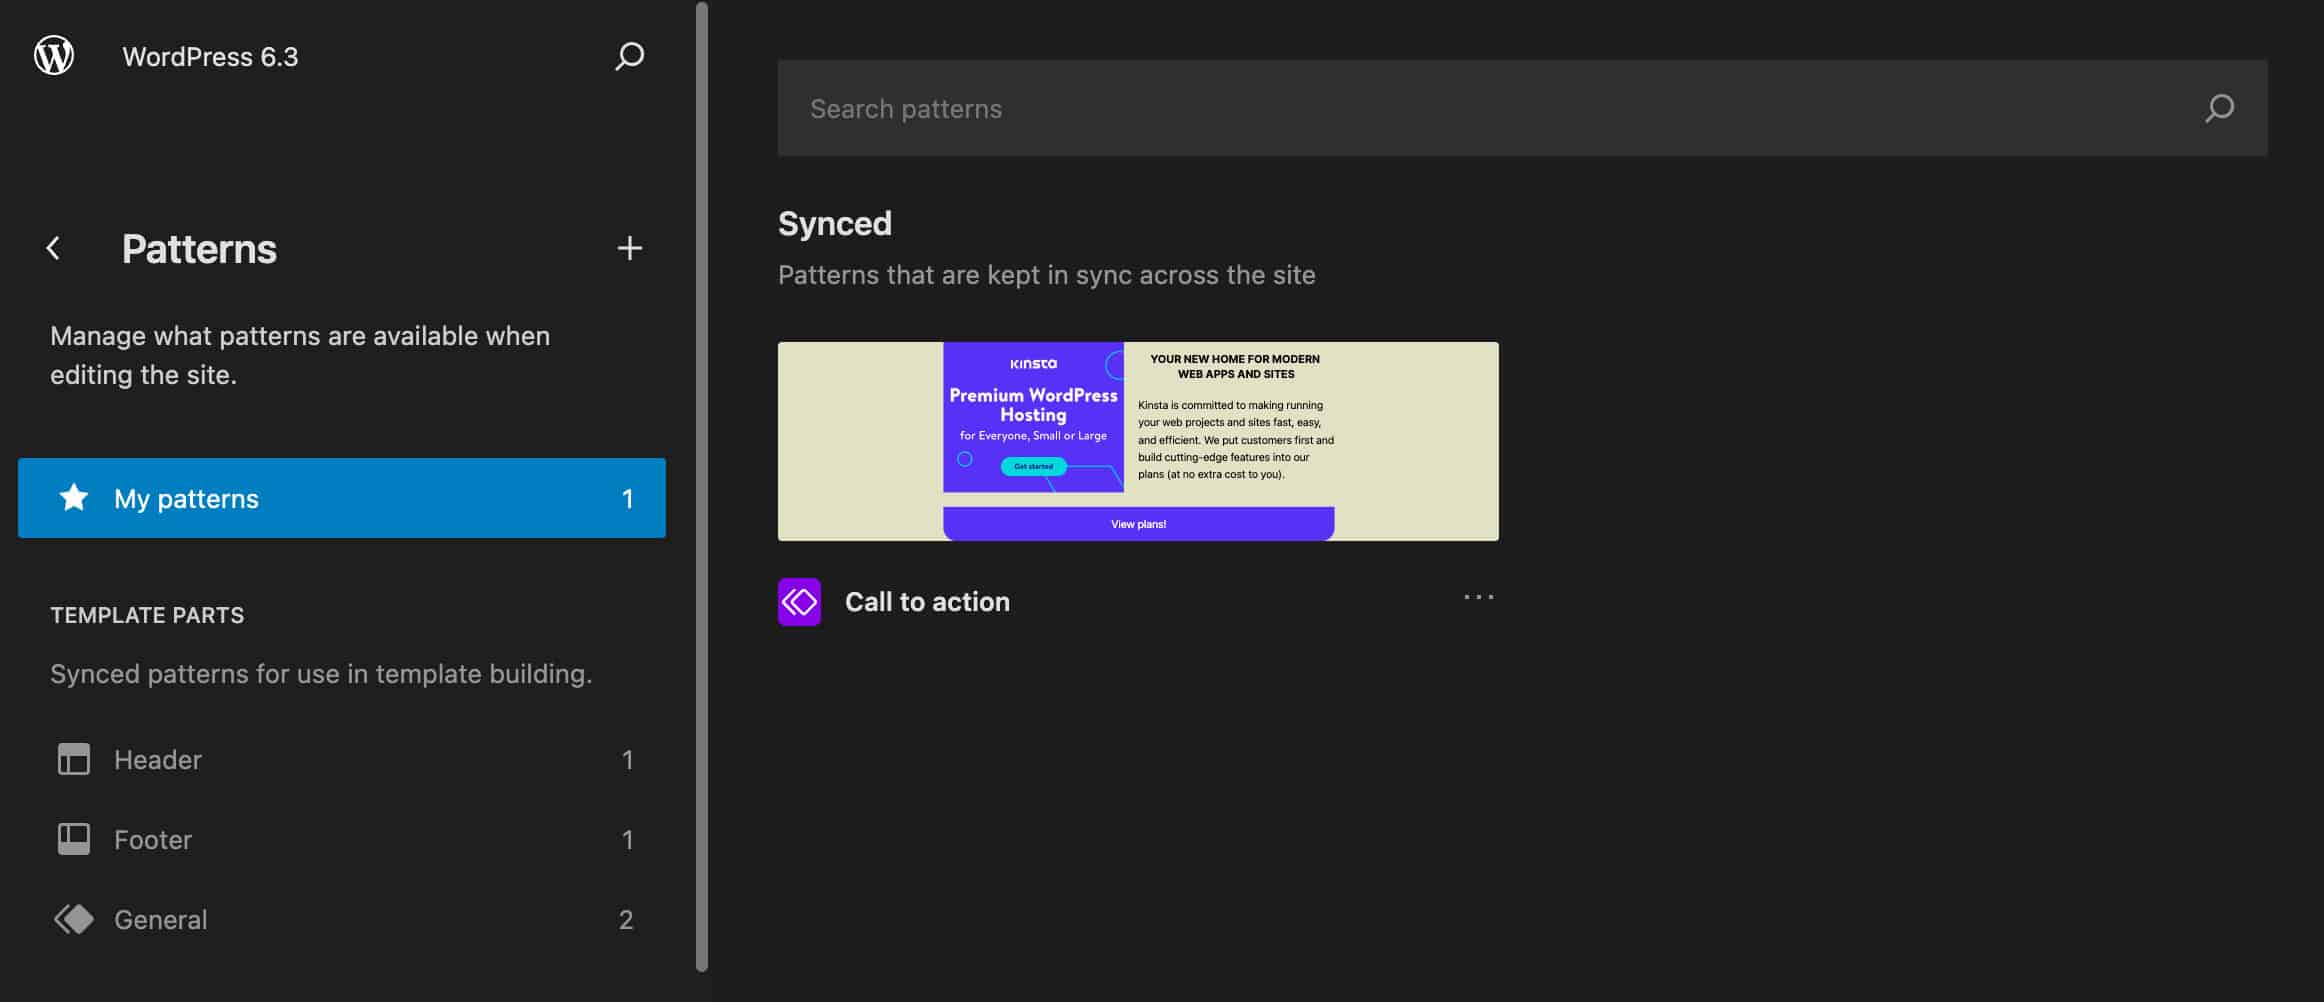
In the Patterns admin section, you’ll be able to manage template parts and patterns. Here you’ll find a menu that gives you access to Template parts and Block patterns divided by category. A lock icon identifies theme patterns that cannot be modified by the user.
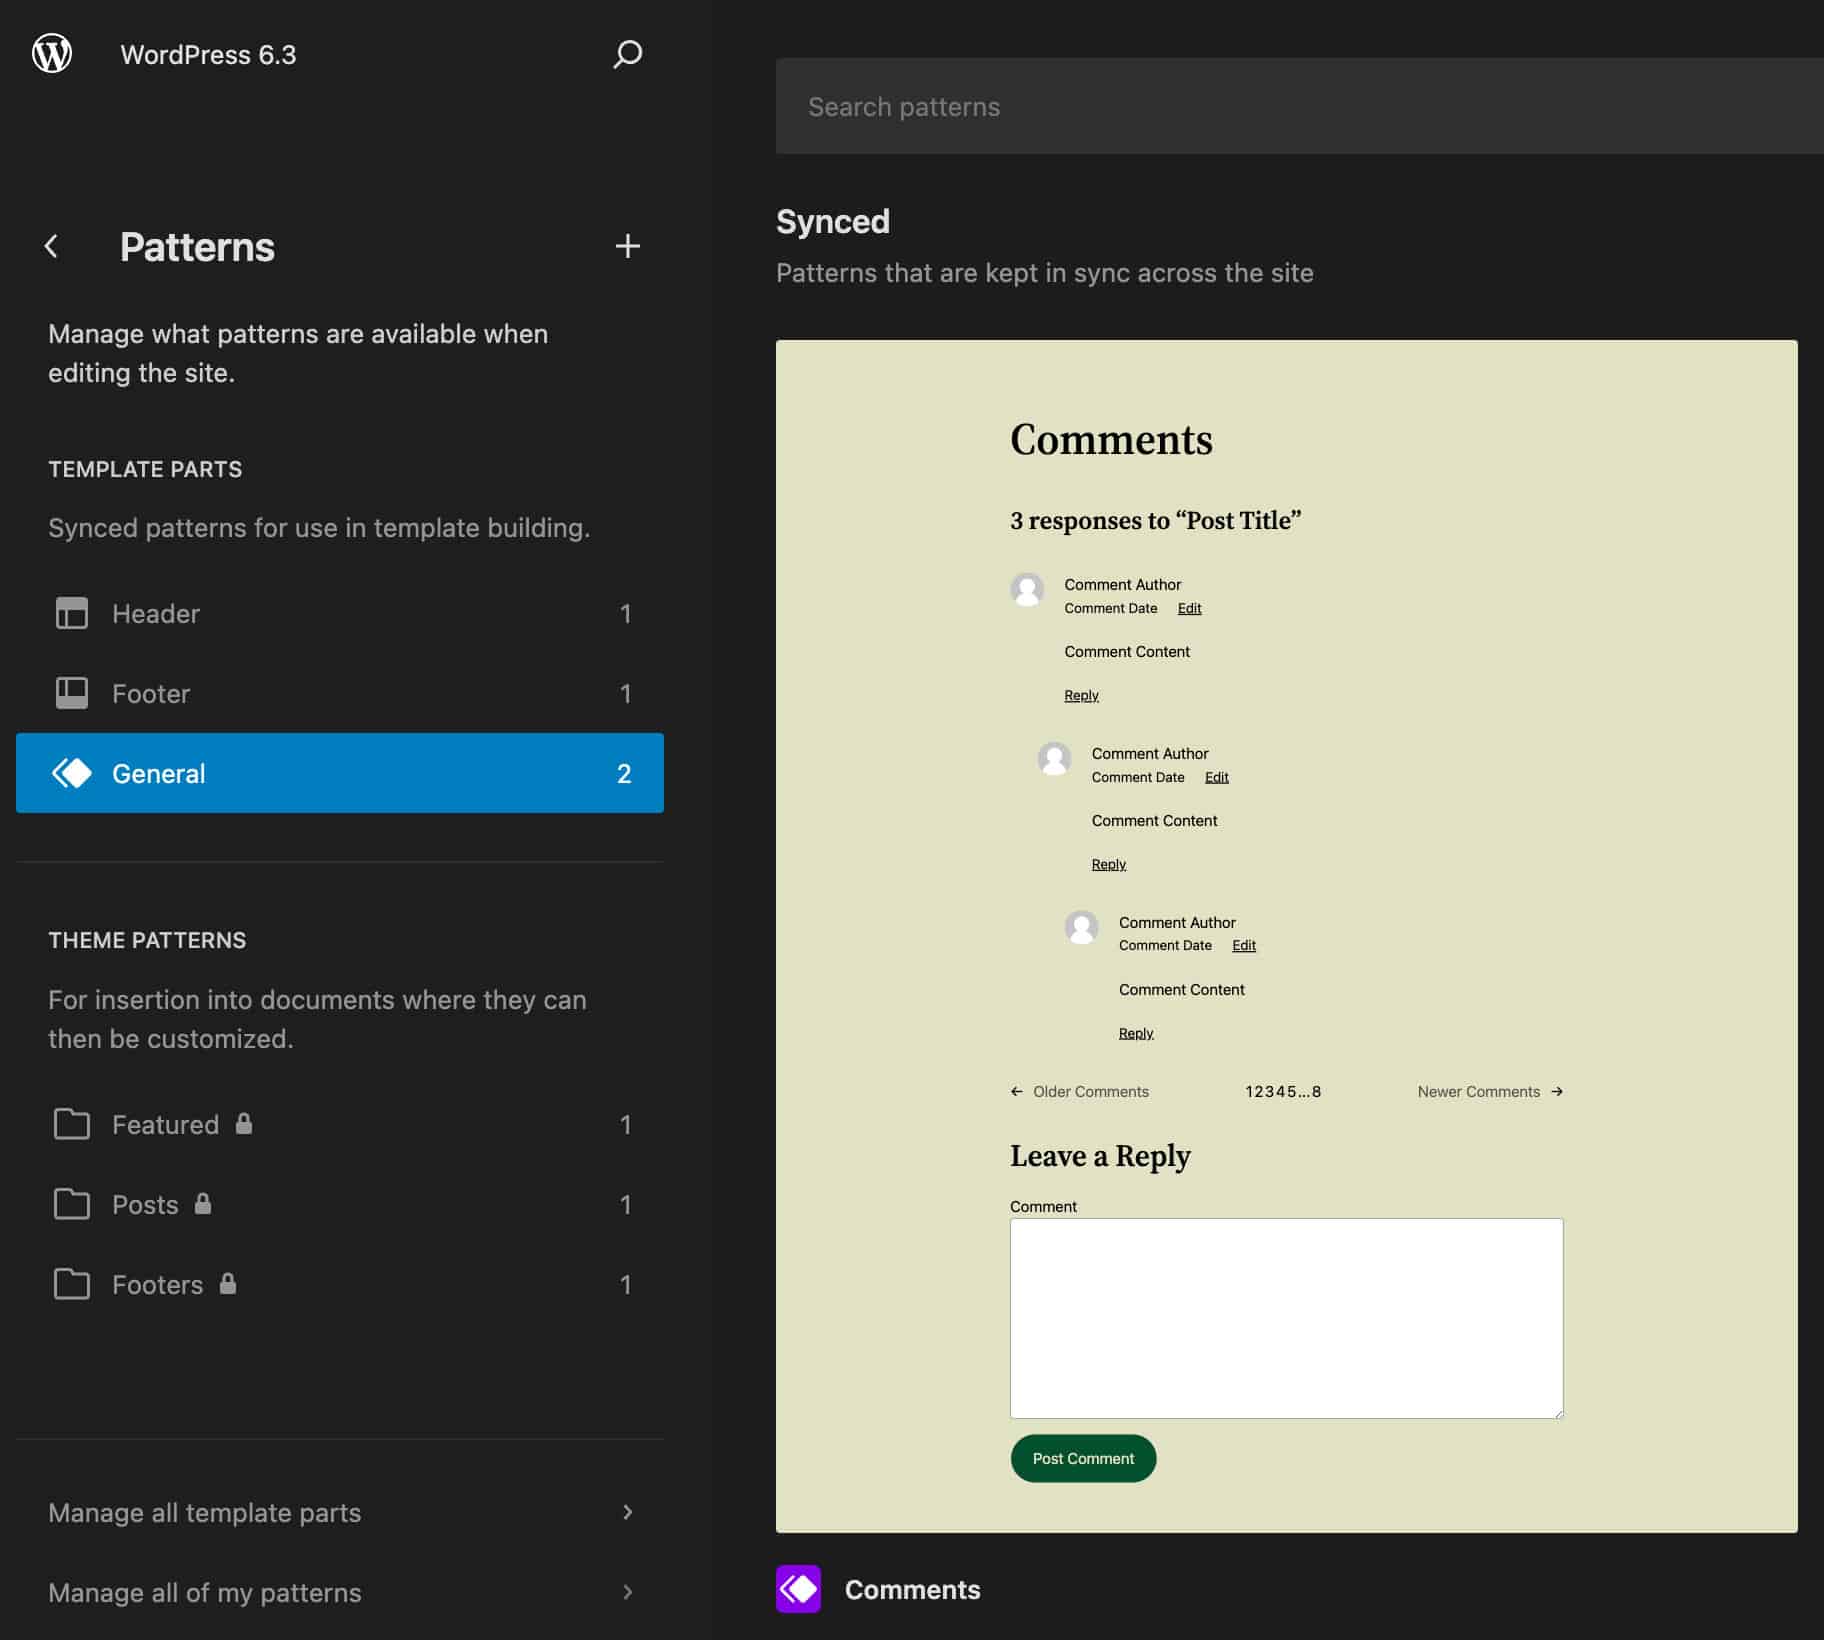
In this section, you can create new template parts and custom block patterns and manage them alongside your theme’s patterns.
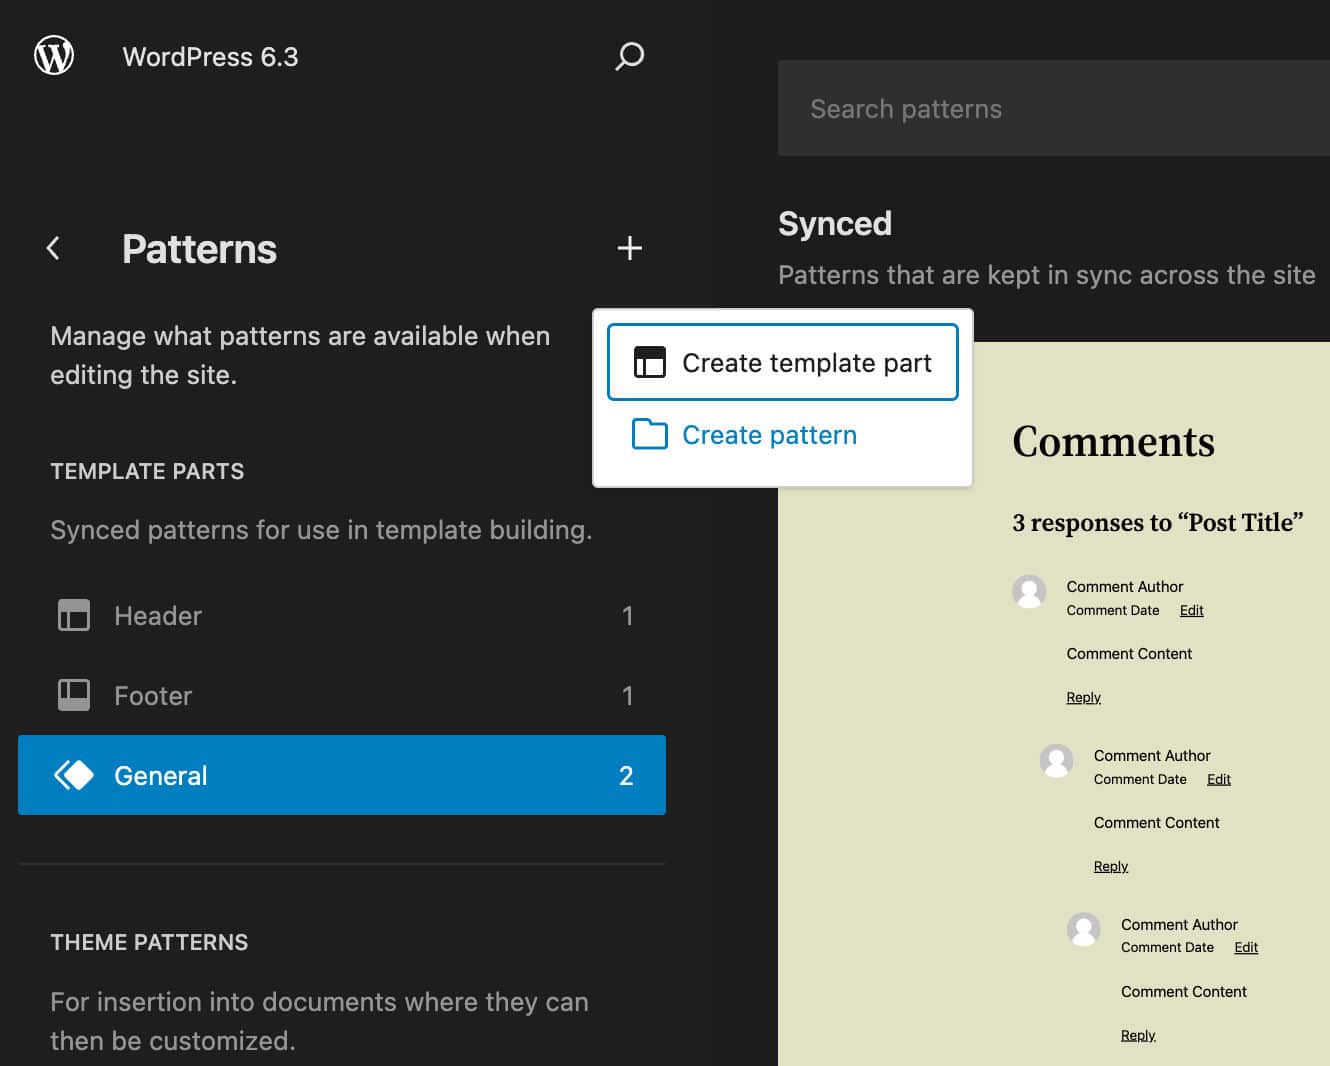
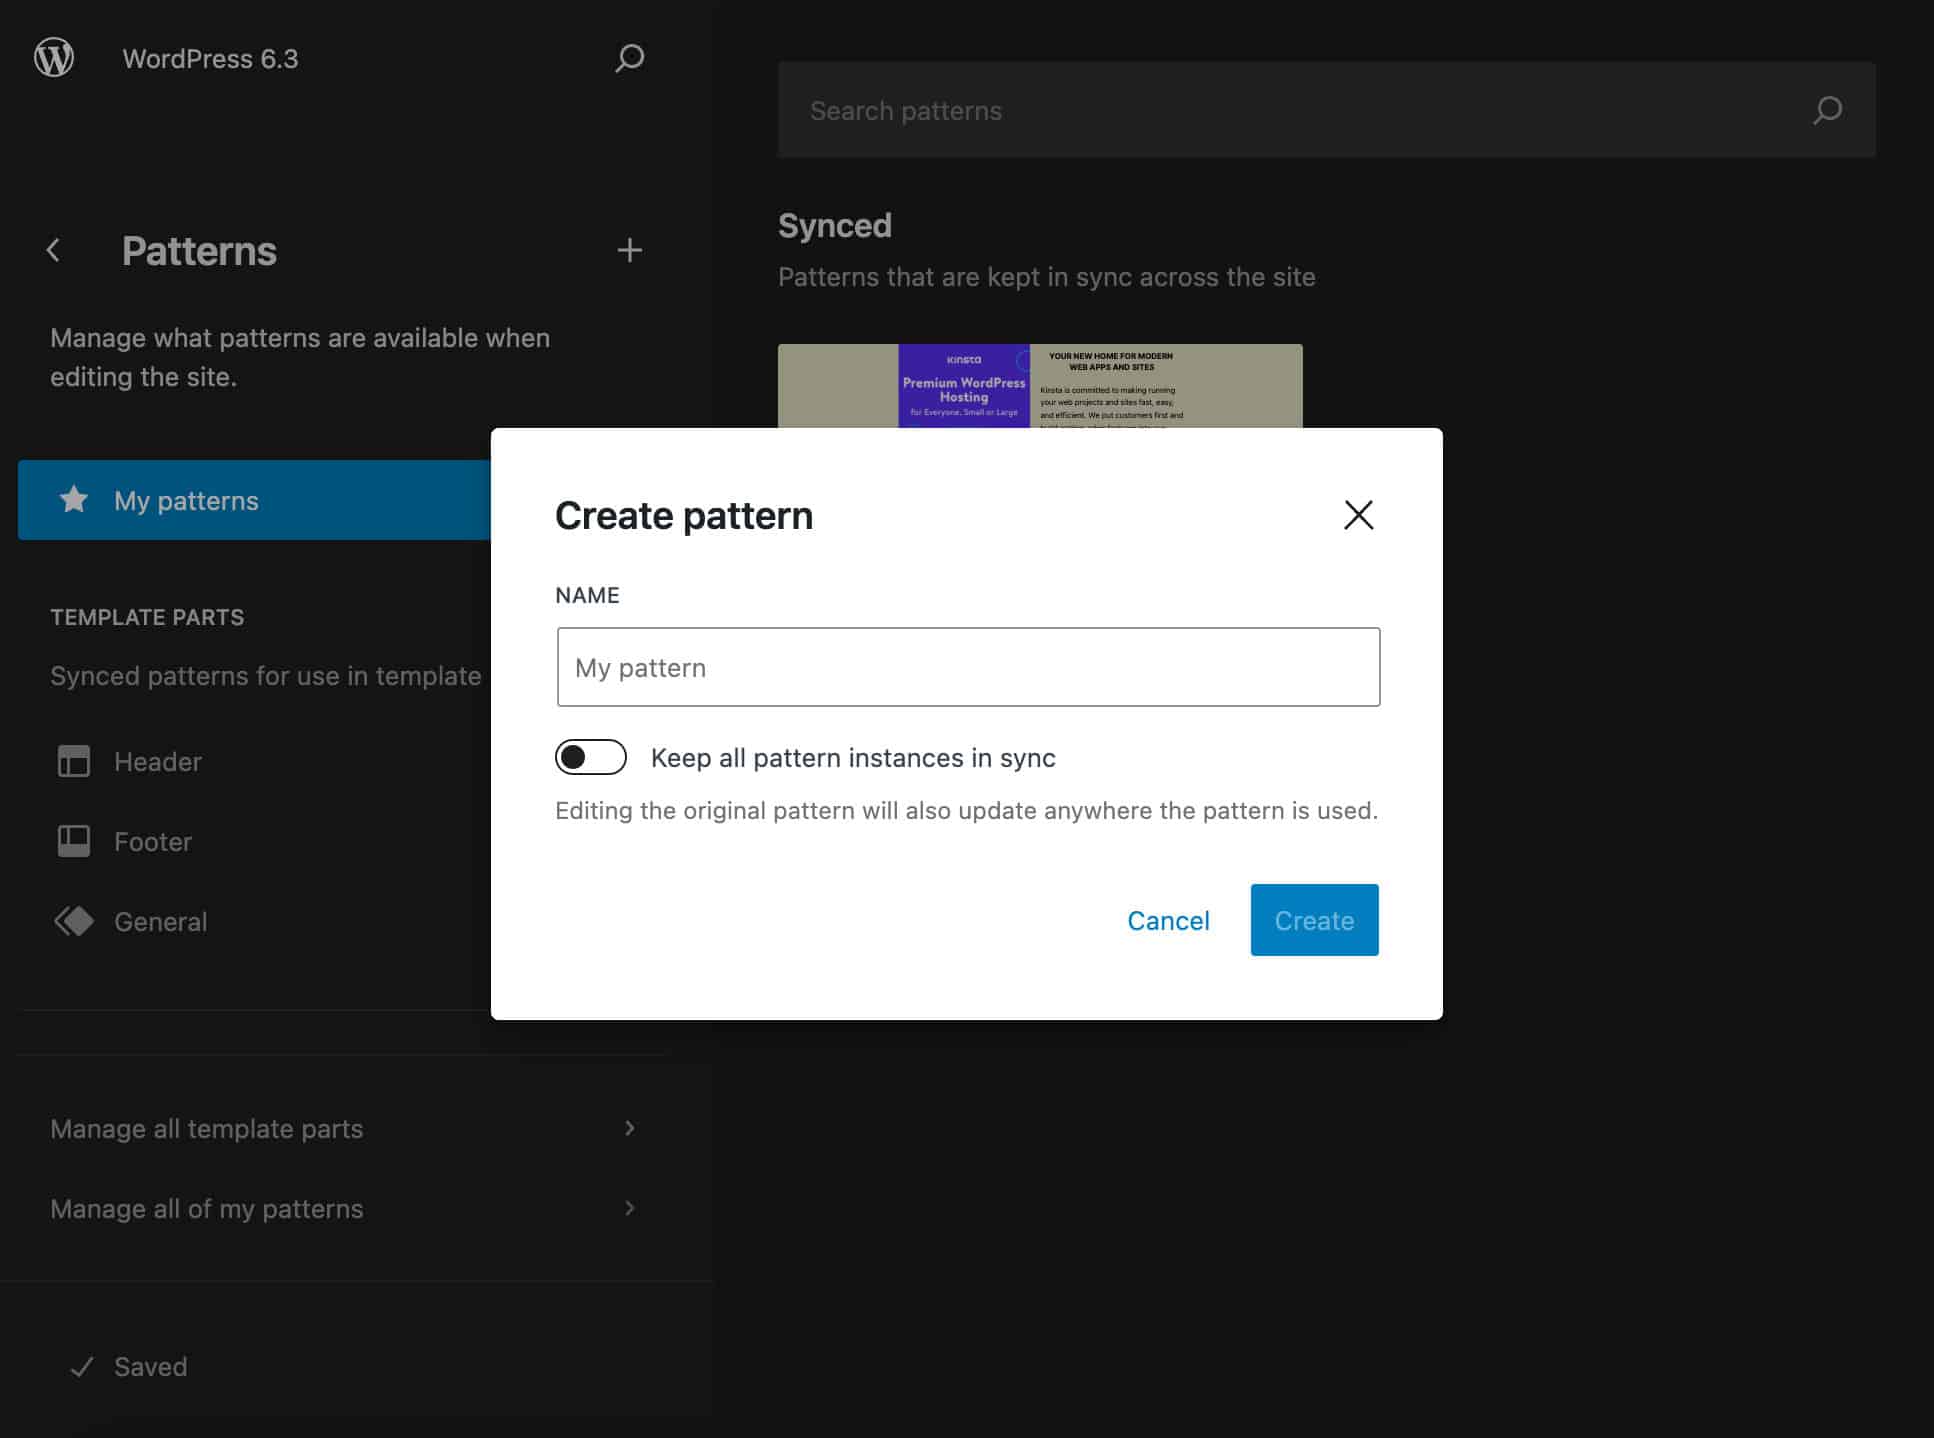
When you click on the Create pattern button, a new modal popup allows you to assign a name to your pattern and set the type of pattern you are going to build, synced or not synced.
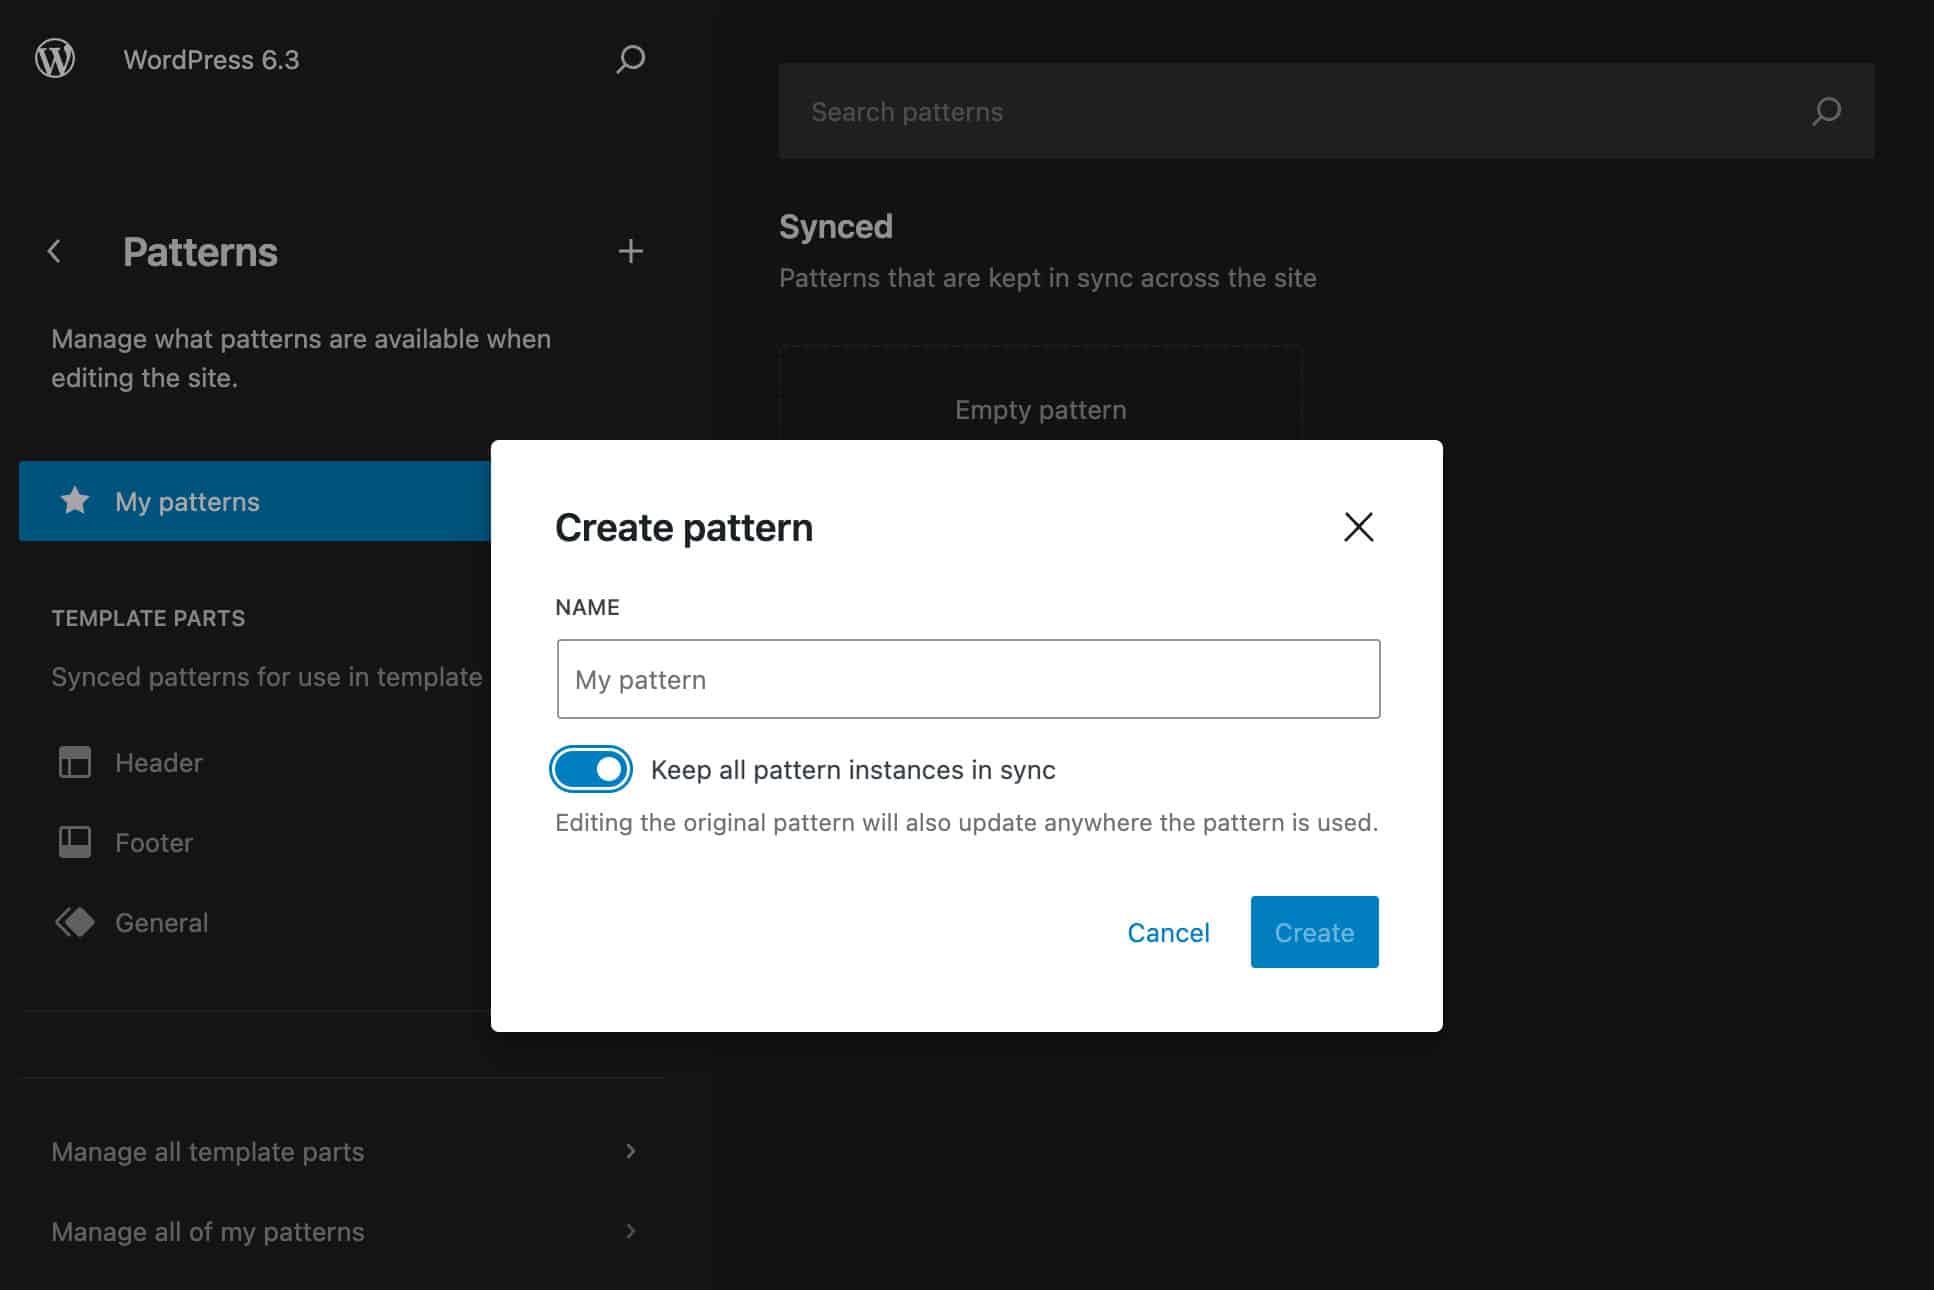
Once you have created at least one custom block pattern, you can access it from My patterns, which will appear at the top of the Patterns menu.
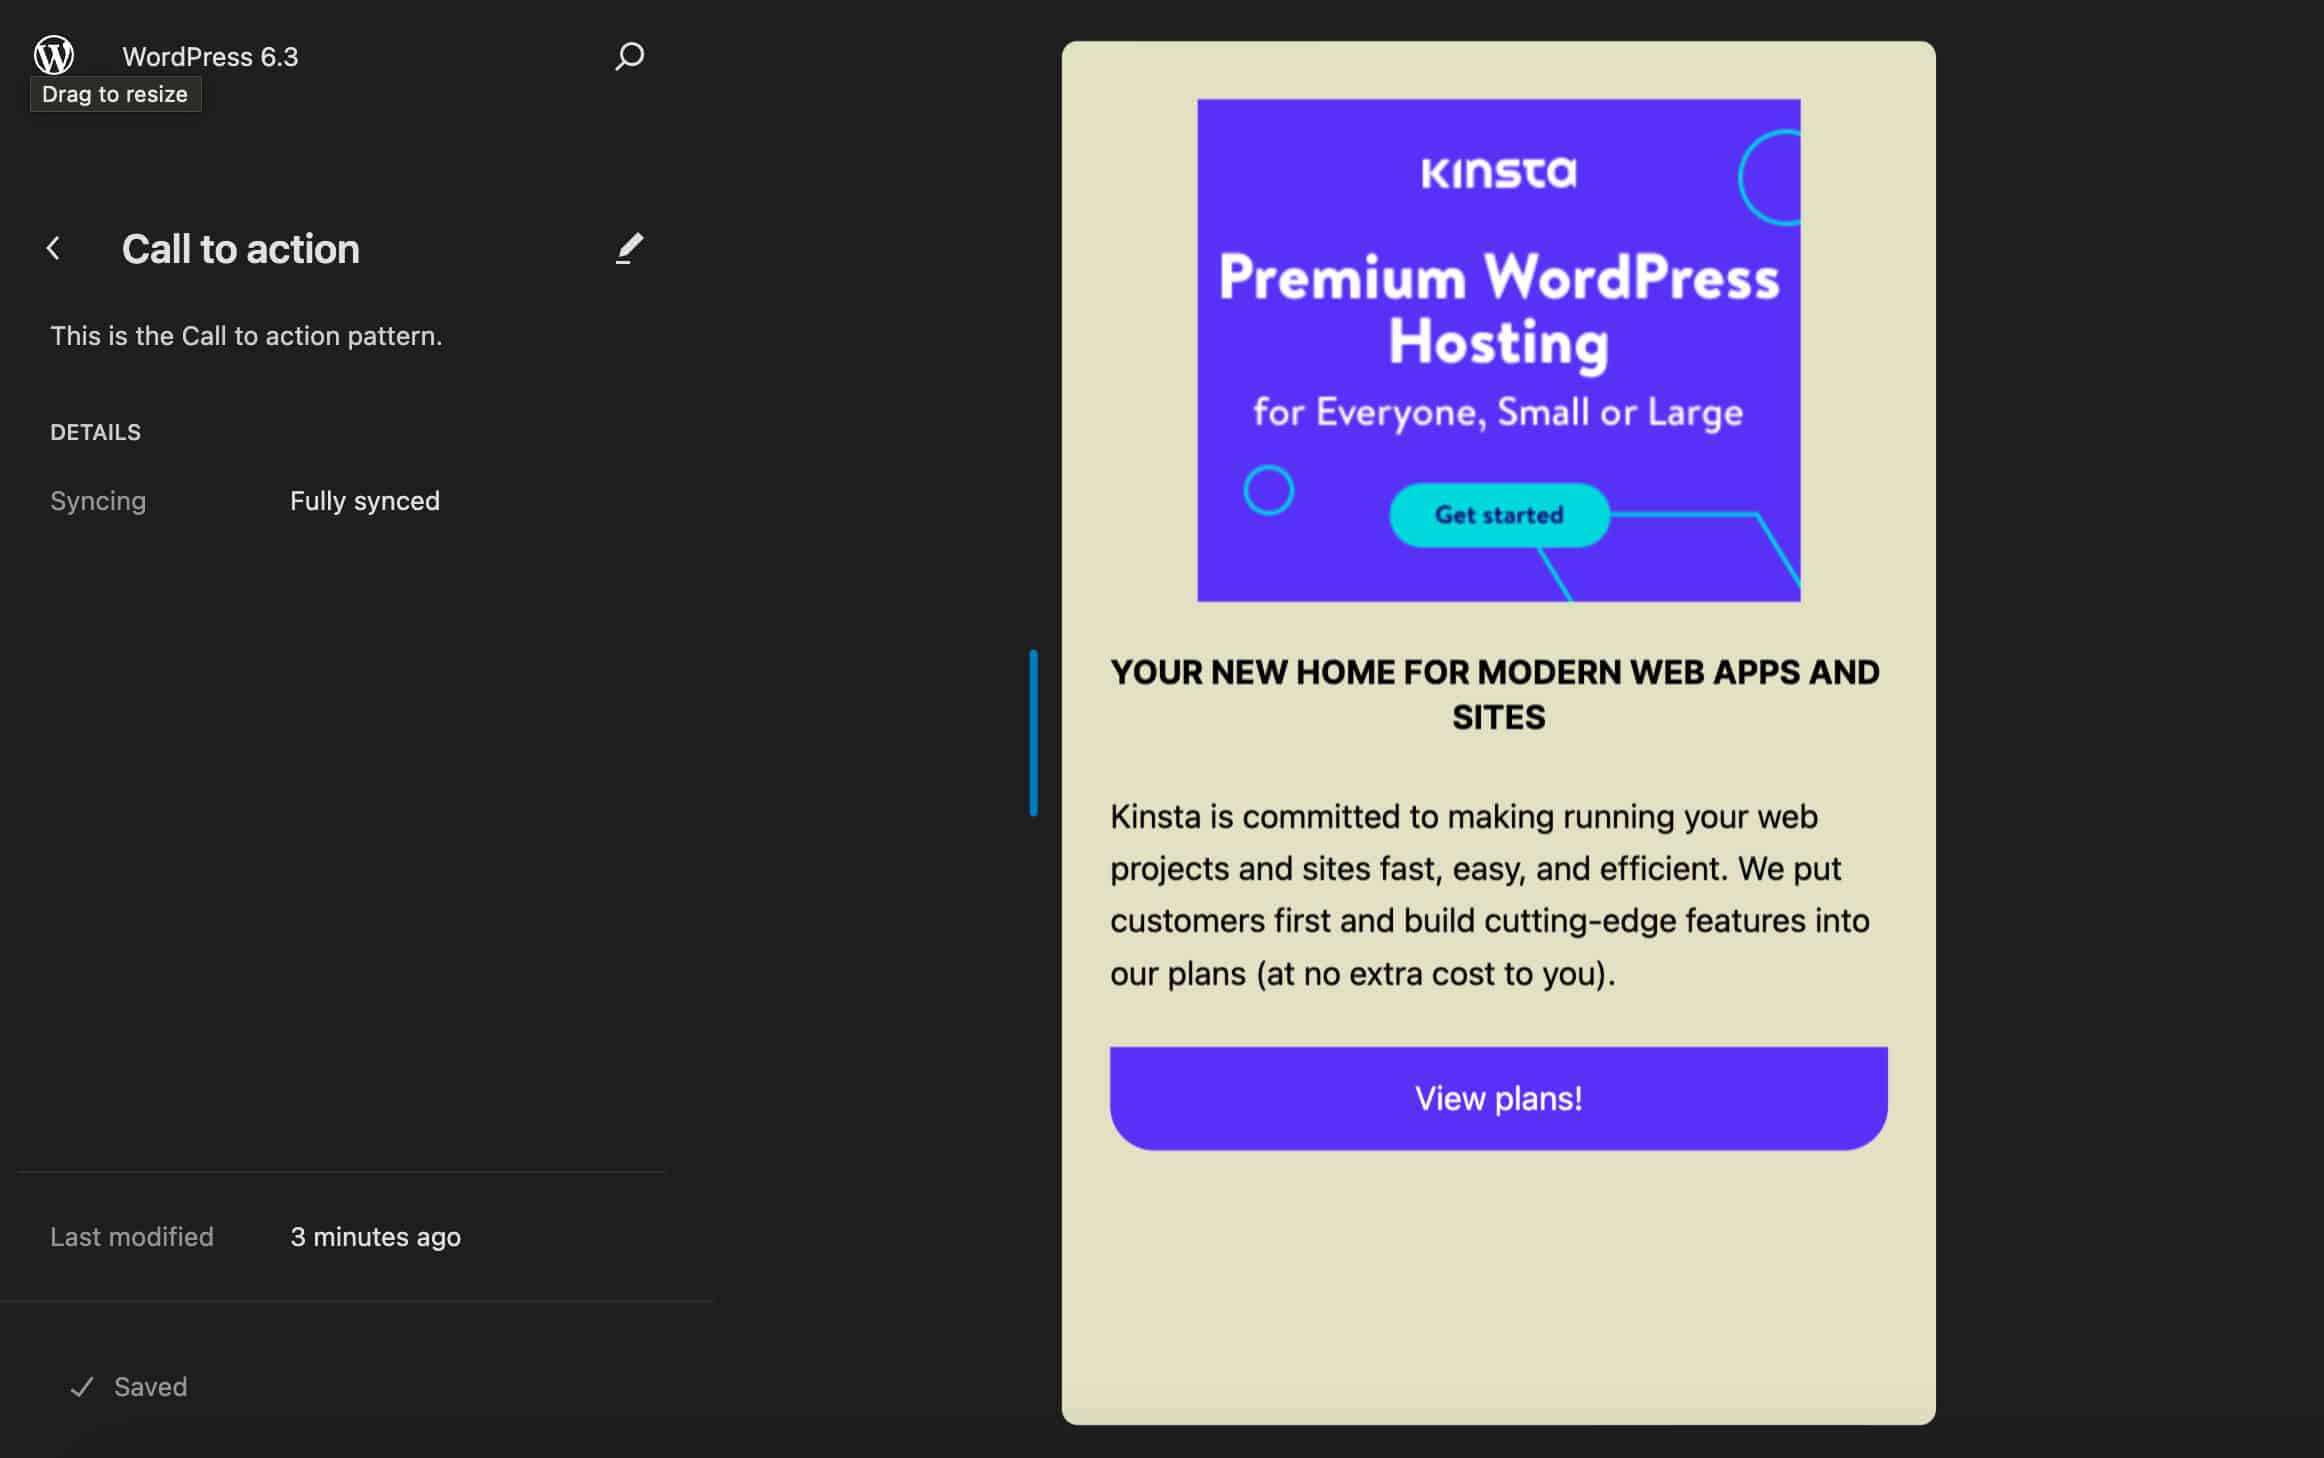
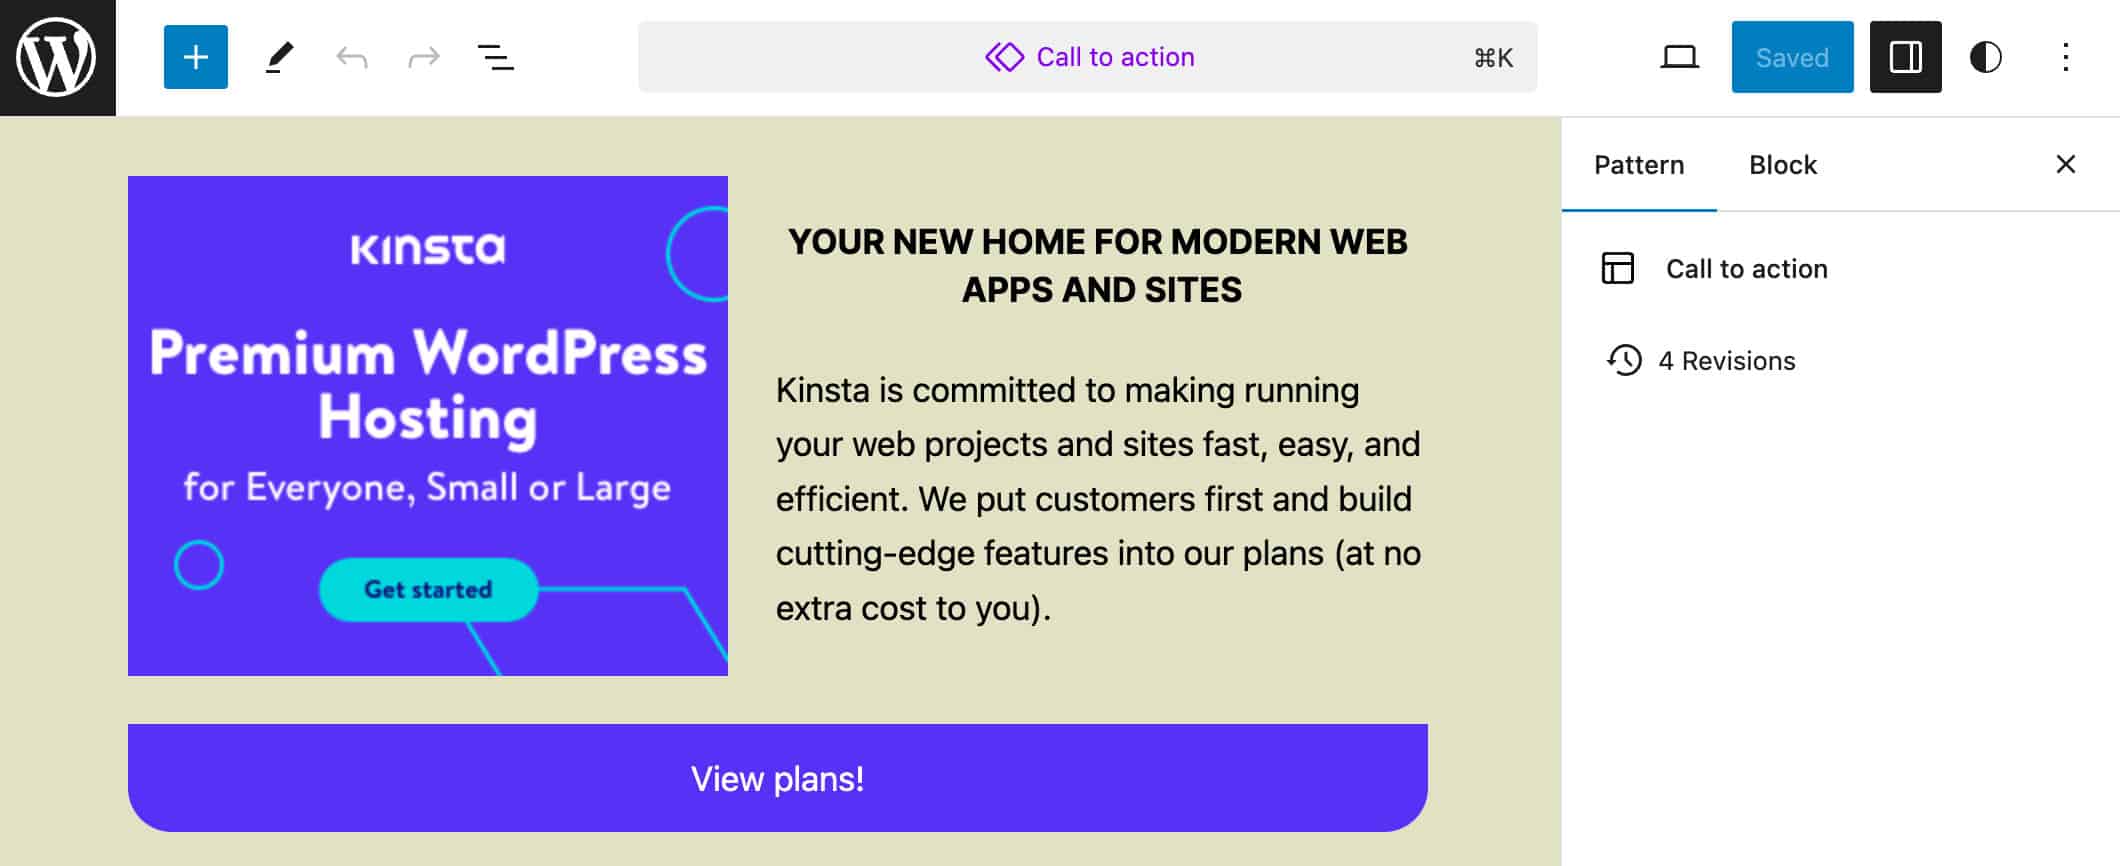
You can select your block pattern and access a new panel where you can see the details of the pattern. By moving the handle to the right or left, you can preview the pattern at different resolutions and check its responsiveness.
The Details section displays the sync status of the current pattern.
At the bottom of the Patterns menu, you’ll also find a couple of links: Manage all template parts and Manage all of my patterns. These links provide direct access to Template parts and custom Patterns.
This is about the new Pattern admin interface in the Site Editor. Now let’s find out what changes in the structure and functionality of the block pattern system.
A New Block Pattern System
Starting with WordPress 6.3 (and Gutenberg 16.1):
- Reusable blocks have been renamed to Synced patterns,
- regular block patterns are now named Not synced pattern,
- the
wp_blockcustom post type has been extended to support custom fields and a newwp_block_sync_statusmeta field has been added to store the sync status of a pattern, - a
sourceproperty has been added to the block patterns schema and response to distinguish core and user patterns, - the REST API has been extended with a new attribute

wp_block_sync_status meta field is used to store the sync status of a block patternIt is now clearer that all changes made to a synced pattern will be applied to every occurrence of that block on your entire website.
Conversely, changes made to a non-synced block pattern will only affect that specific instance of the pattern and won’t be applied to any other instance you may have added to other posts or pages of your website.
Thanks to the new pattern management system, you can now create synced and not synced block patterns directly from the site or post editor, where previously it was only possible to create reusable blocks (now Synced patterns).
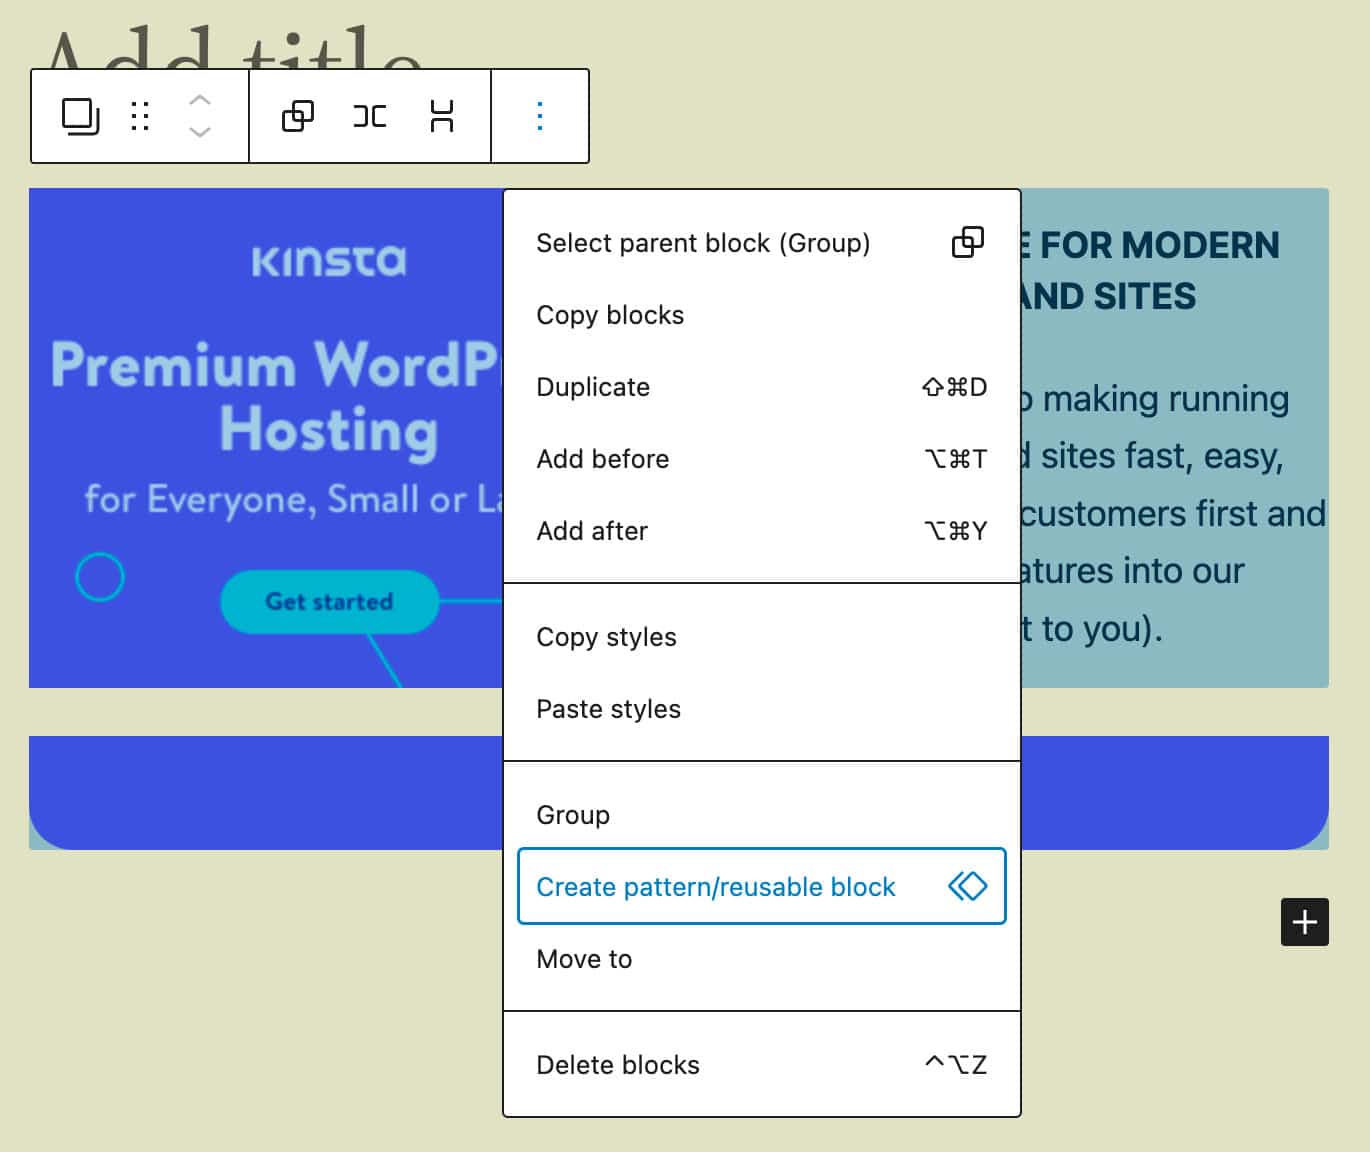
To try this new feature in the Post editor, open your WordPress dashboard and go to Posts -> Add New. Once there, create a new group of blocks or simply select the blocks you want to add to your block pattern. Then select Create pattern/reusable block from the pop-up menu of the block toolbar.
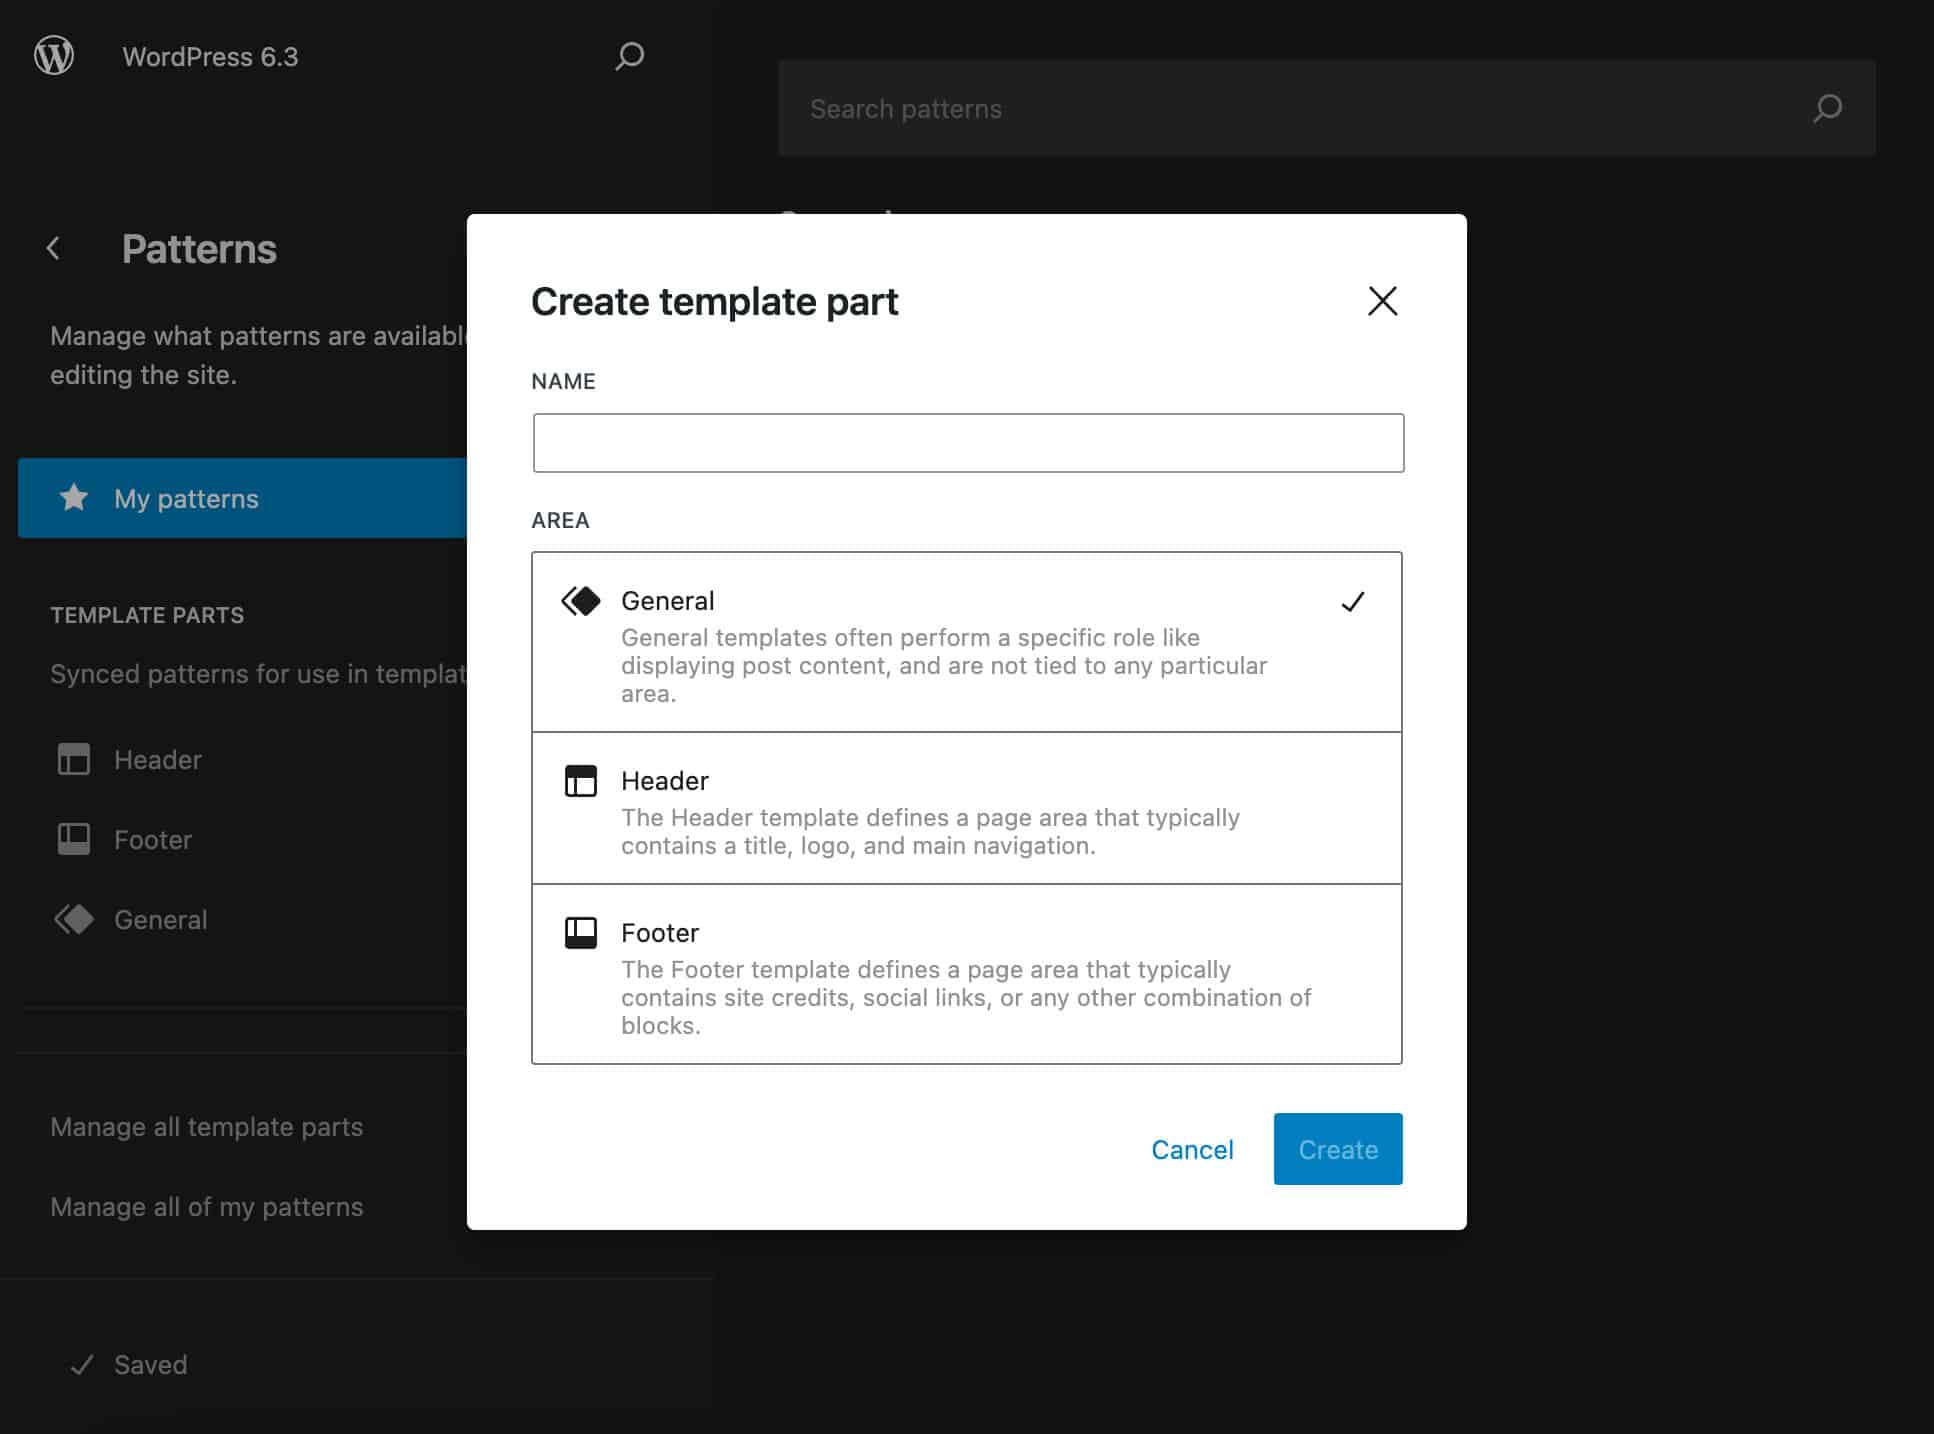
In addition, in the Site editor, a Create pattern button allows you to create a new template part or pattern.
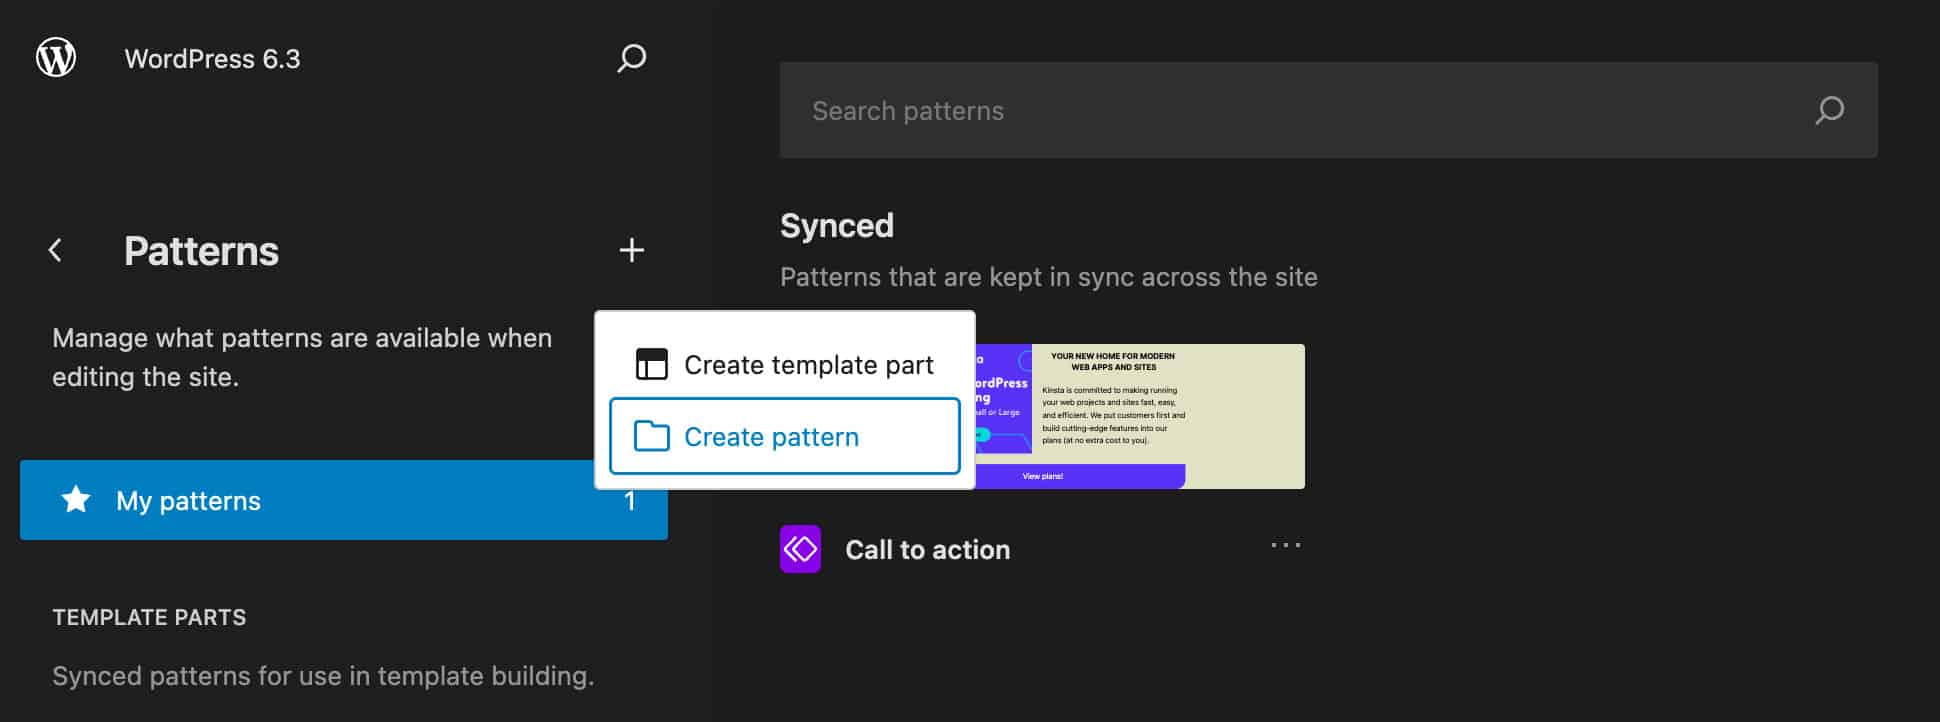
Clicking on Create template part opens a modal/pop-up for you to add a name for your template part and the area of the page the template part is meant for.
When you click on Create pattern, a different modal/pop-up allows you to set a name for your pattern and chose whether to create a synced or not synced pattern.
Confirm and build your pattern or template part in the Site editor.
Once you’re happy with your edits, save the block pattern and go back to the Site editor. Open the Patterns section and click on Manage all of my patterns. The Patterns screen will show up your new custom block pattern.
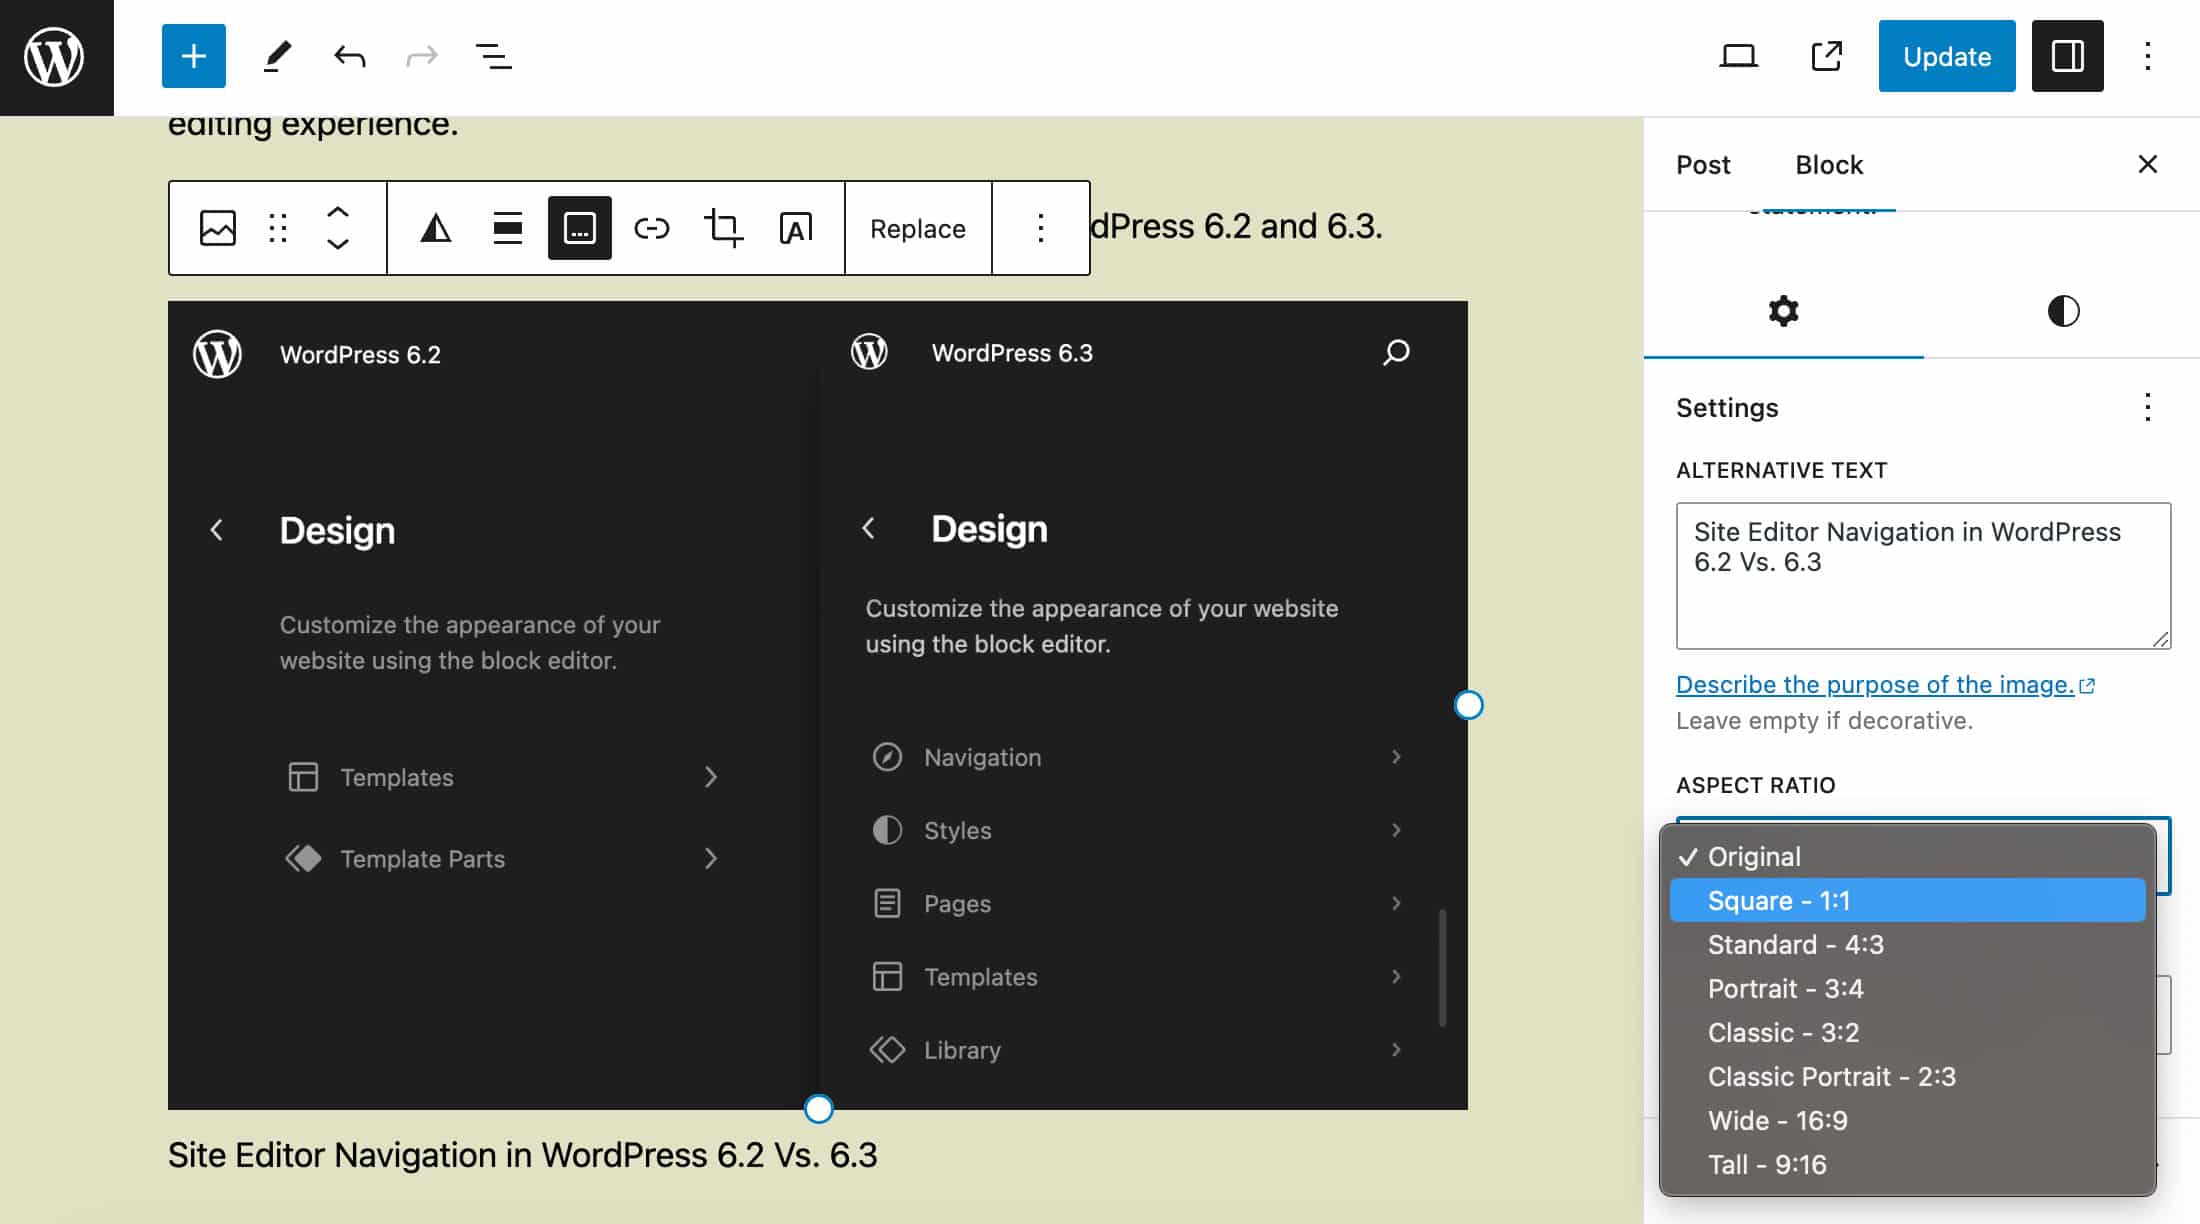
Block patterns also take advantage of the Aspect ratio controls of the Image block. Now, if you set an aspect ratio for an image, it will be preserved when you change the image with another one of different dimensions. This will be particularly useful with block patterns as you don’t need to care about image dimensions anymore when replacing images in block patterns.
For a more in-depth overview of the changes made to the block pattern system, see PRs #51078, #51144, and #50028.
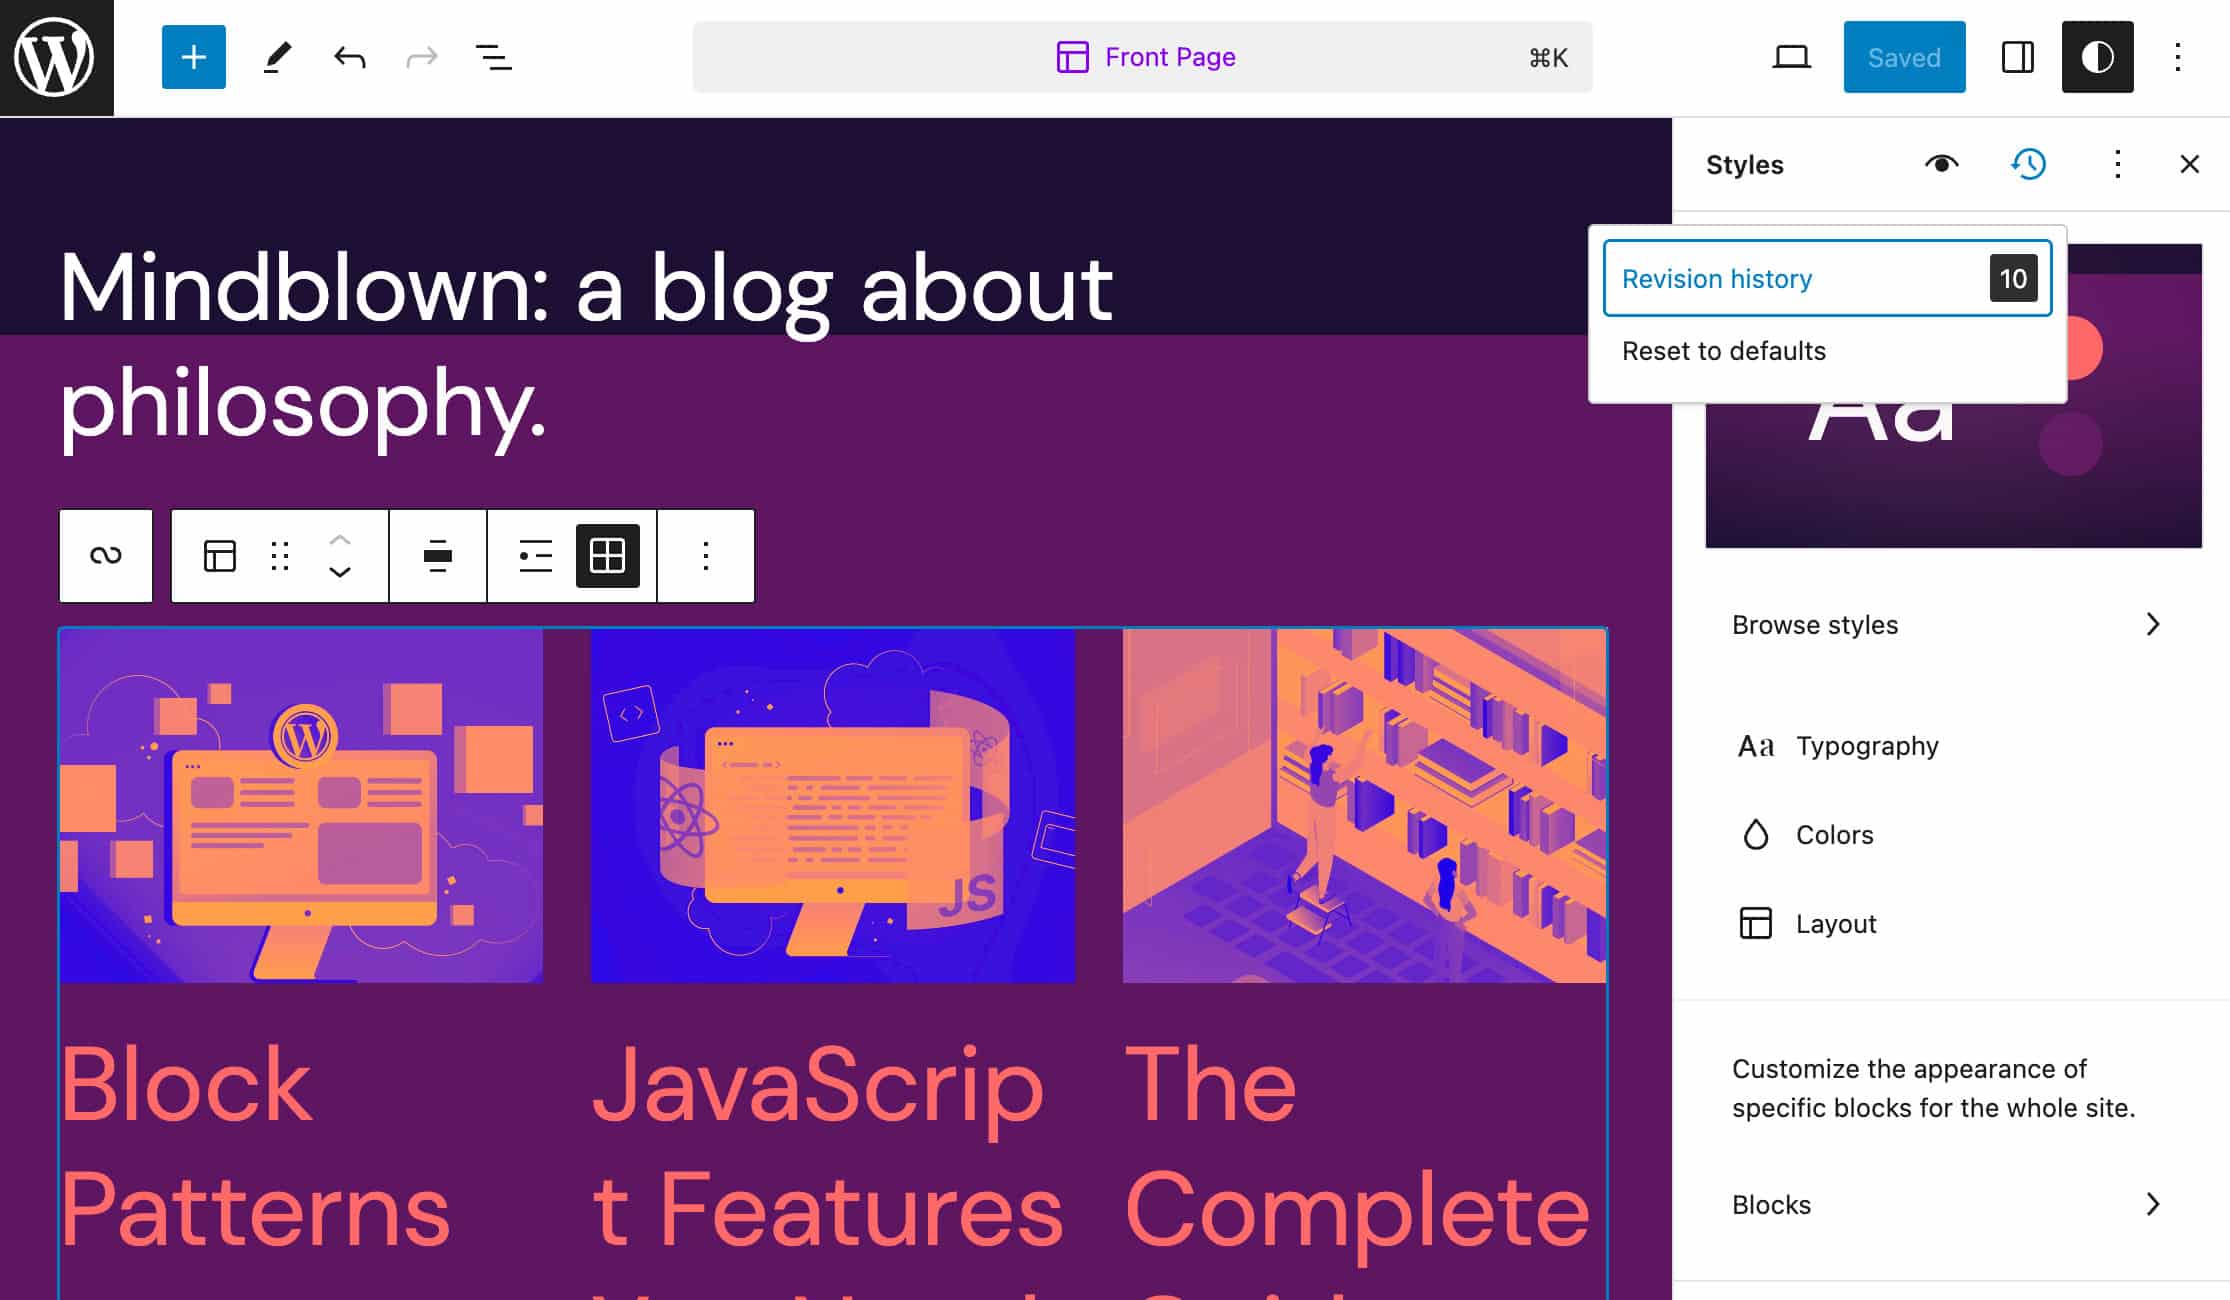
Style Revisions Exposed in the Site Editor
The Site Editor now exposes a revision history allowing you to browse changes and pick one to restore.
To access the Revision history, click on the new Revisions button in the Styles panel.
This panel provides a list of revisions in a timeline. It also provides the name of the author for each revision and the date and time of each revision in a tooltip. You can preview all the revisions and pick the one you want to restore.
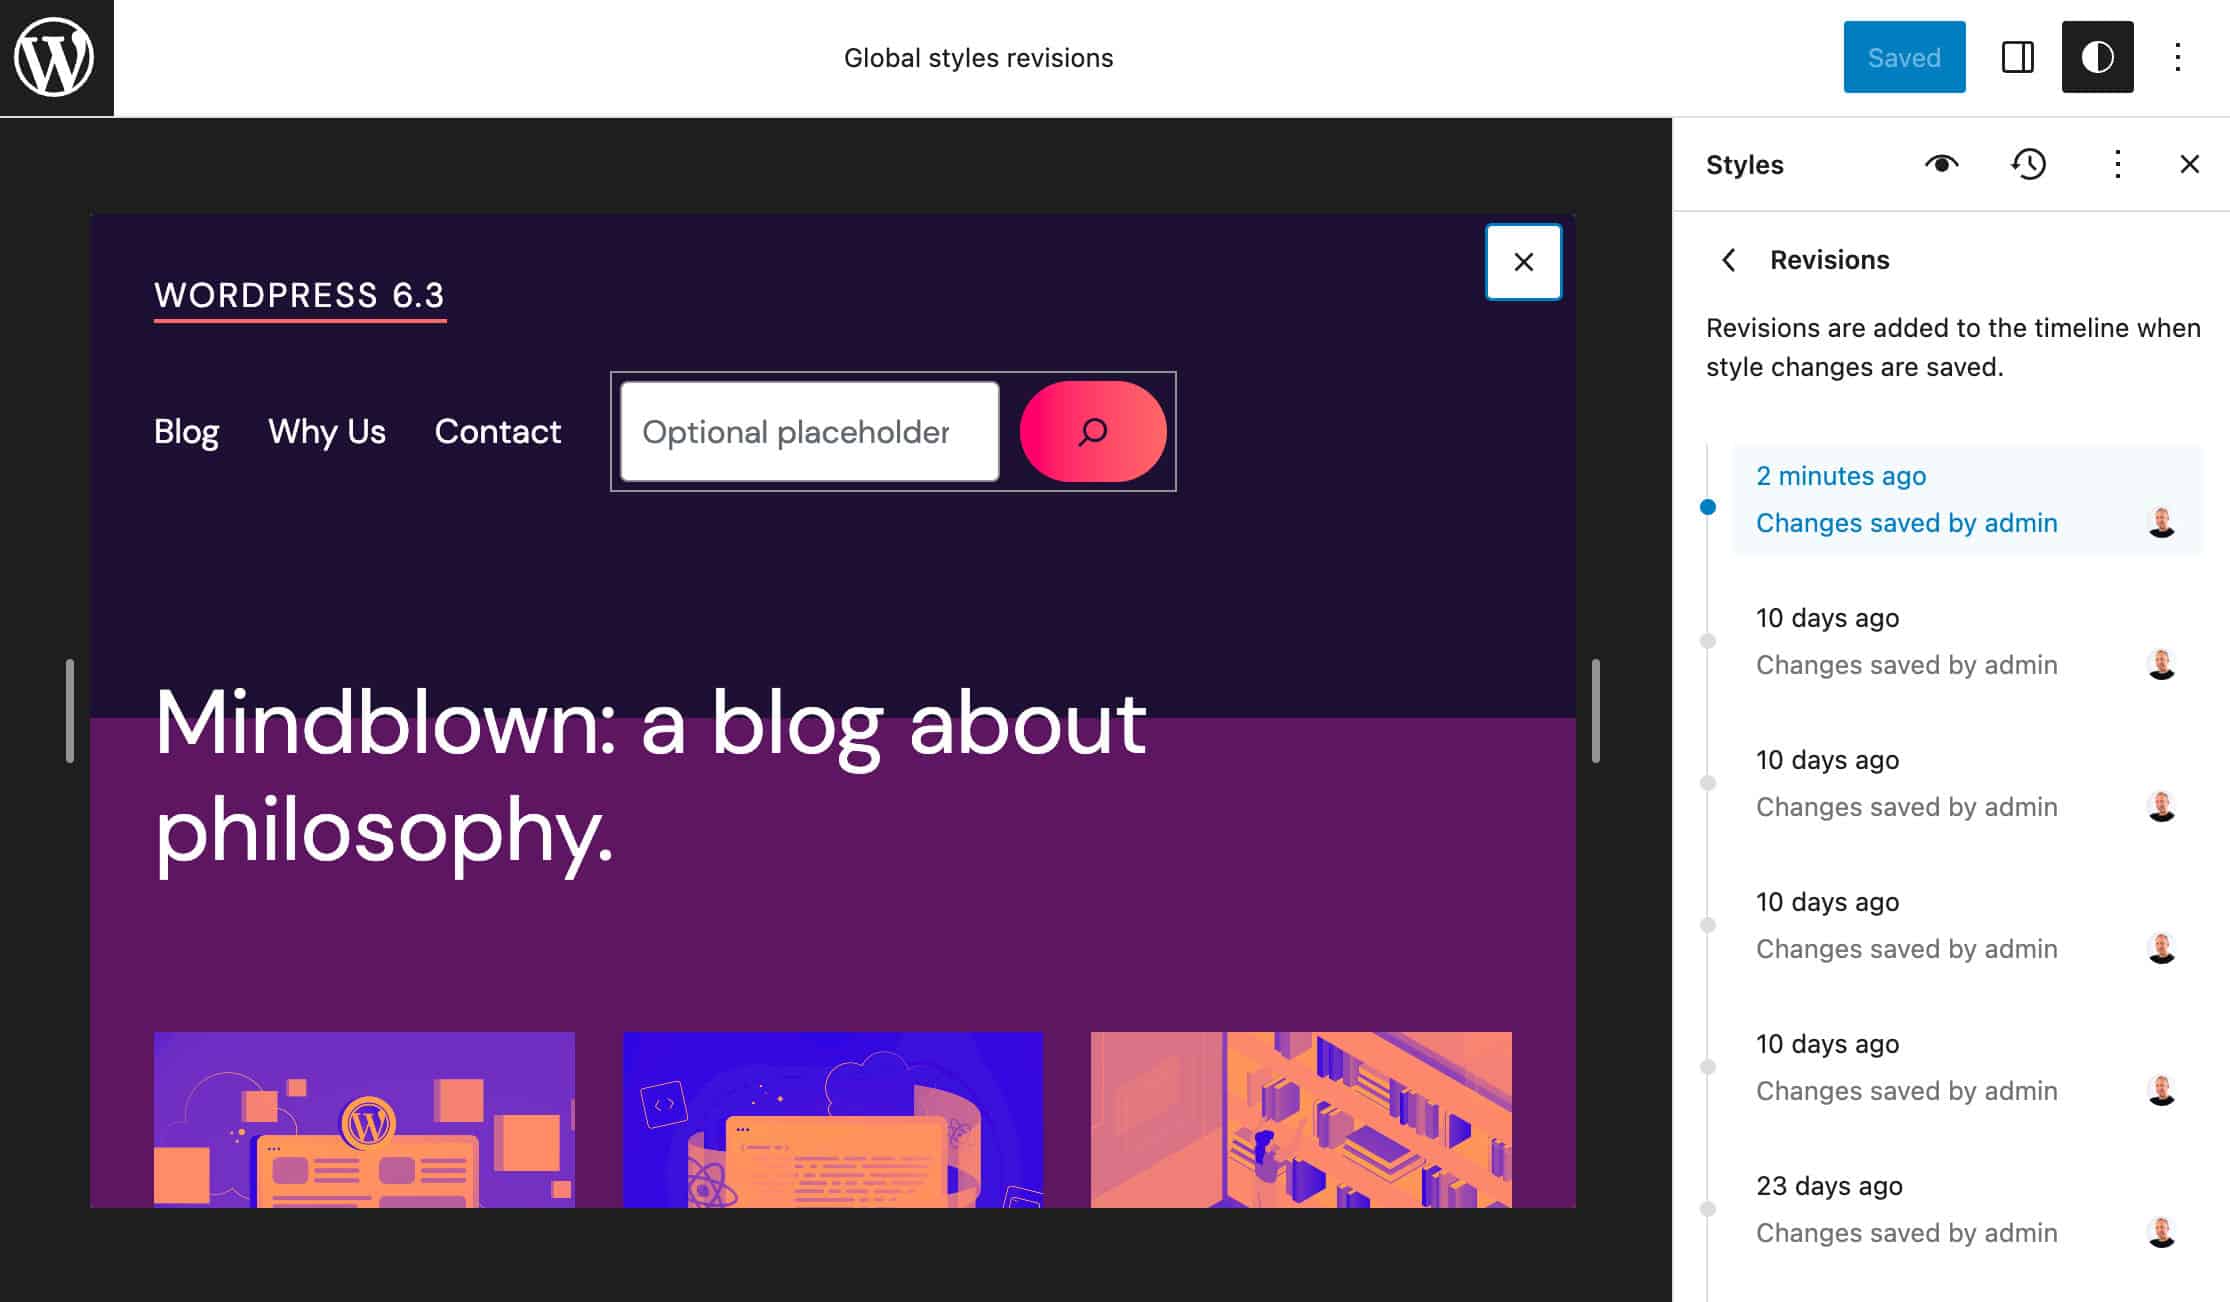
You can navigate through revisions in the Global Styles interface, preview, and restore your content at any point in time.
Revisions development does not stop here. As we move into Phase 3, revisions should be affected by new additions and enhancements that should further improve their usability and unlock new features.
The Command Palette
The Command palette is a new feature that allows you to run frequently used actions, such as jumping to other pages or templates in the editor, using commands.
In the Site Editor, click on the lens icon or hit cmd + k (ctrl + k on Windows and Linux). This launches the Command palette.
When you start typing a command, the Command palette suggests a variety of commands for you to choose from. This provides a quick way to perform tasks or reach specific areas of the Site Editor.

The first implementation of this feature brings a quick search feature and a few actions such as navigating the site editor, creating a new post/page, toggling UI elements, resetting or deleting a template or a template part, and even more. More commands should be added in future iterations.
The new tool unlocks endless use cases. For example, the command palette might be required to show design options for specific posts or pages.
You can also register your custom commands thanks to the new Command Palette API to render, register, and unregister commands.
There are different ways to register commands depending on which type of command you are registering.
- Static Commands: Developers can register custom static commands using the
wp.data.dispatch( wp.commands.store ).registerCommandaction or thewp.data.useCommandReact hook. - Dynamic commands: These commands are included in the command list depending on the search term entered by the user in the command palette input field or when a command is only available when some conditions are met.
- Contextual commands: These commands get priority in specific contexts, meaning that they appear automatically in the right context (for example when you are editing a template). The Reset template and Delete template commands are examples of contextual commands. At the moment, two contexts have been implemented:
- site-editor: This context is set when you are navigating the site editor
- site-editor-edit: This context is set when you are editing something (template, template part, or page) in the editor
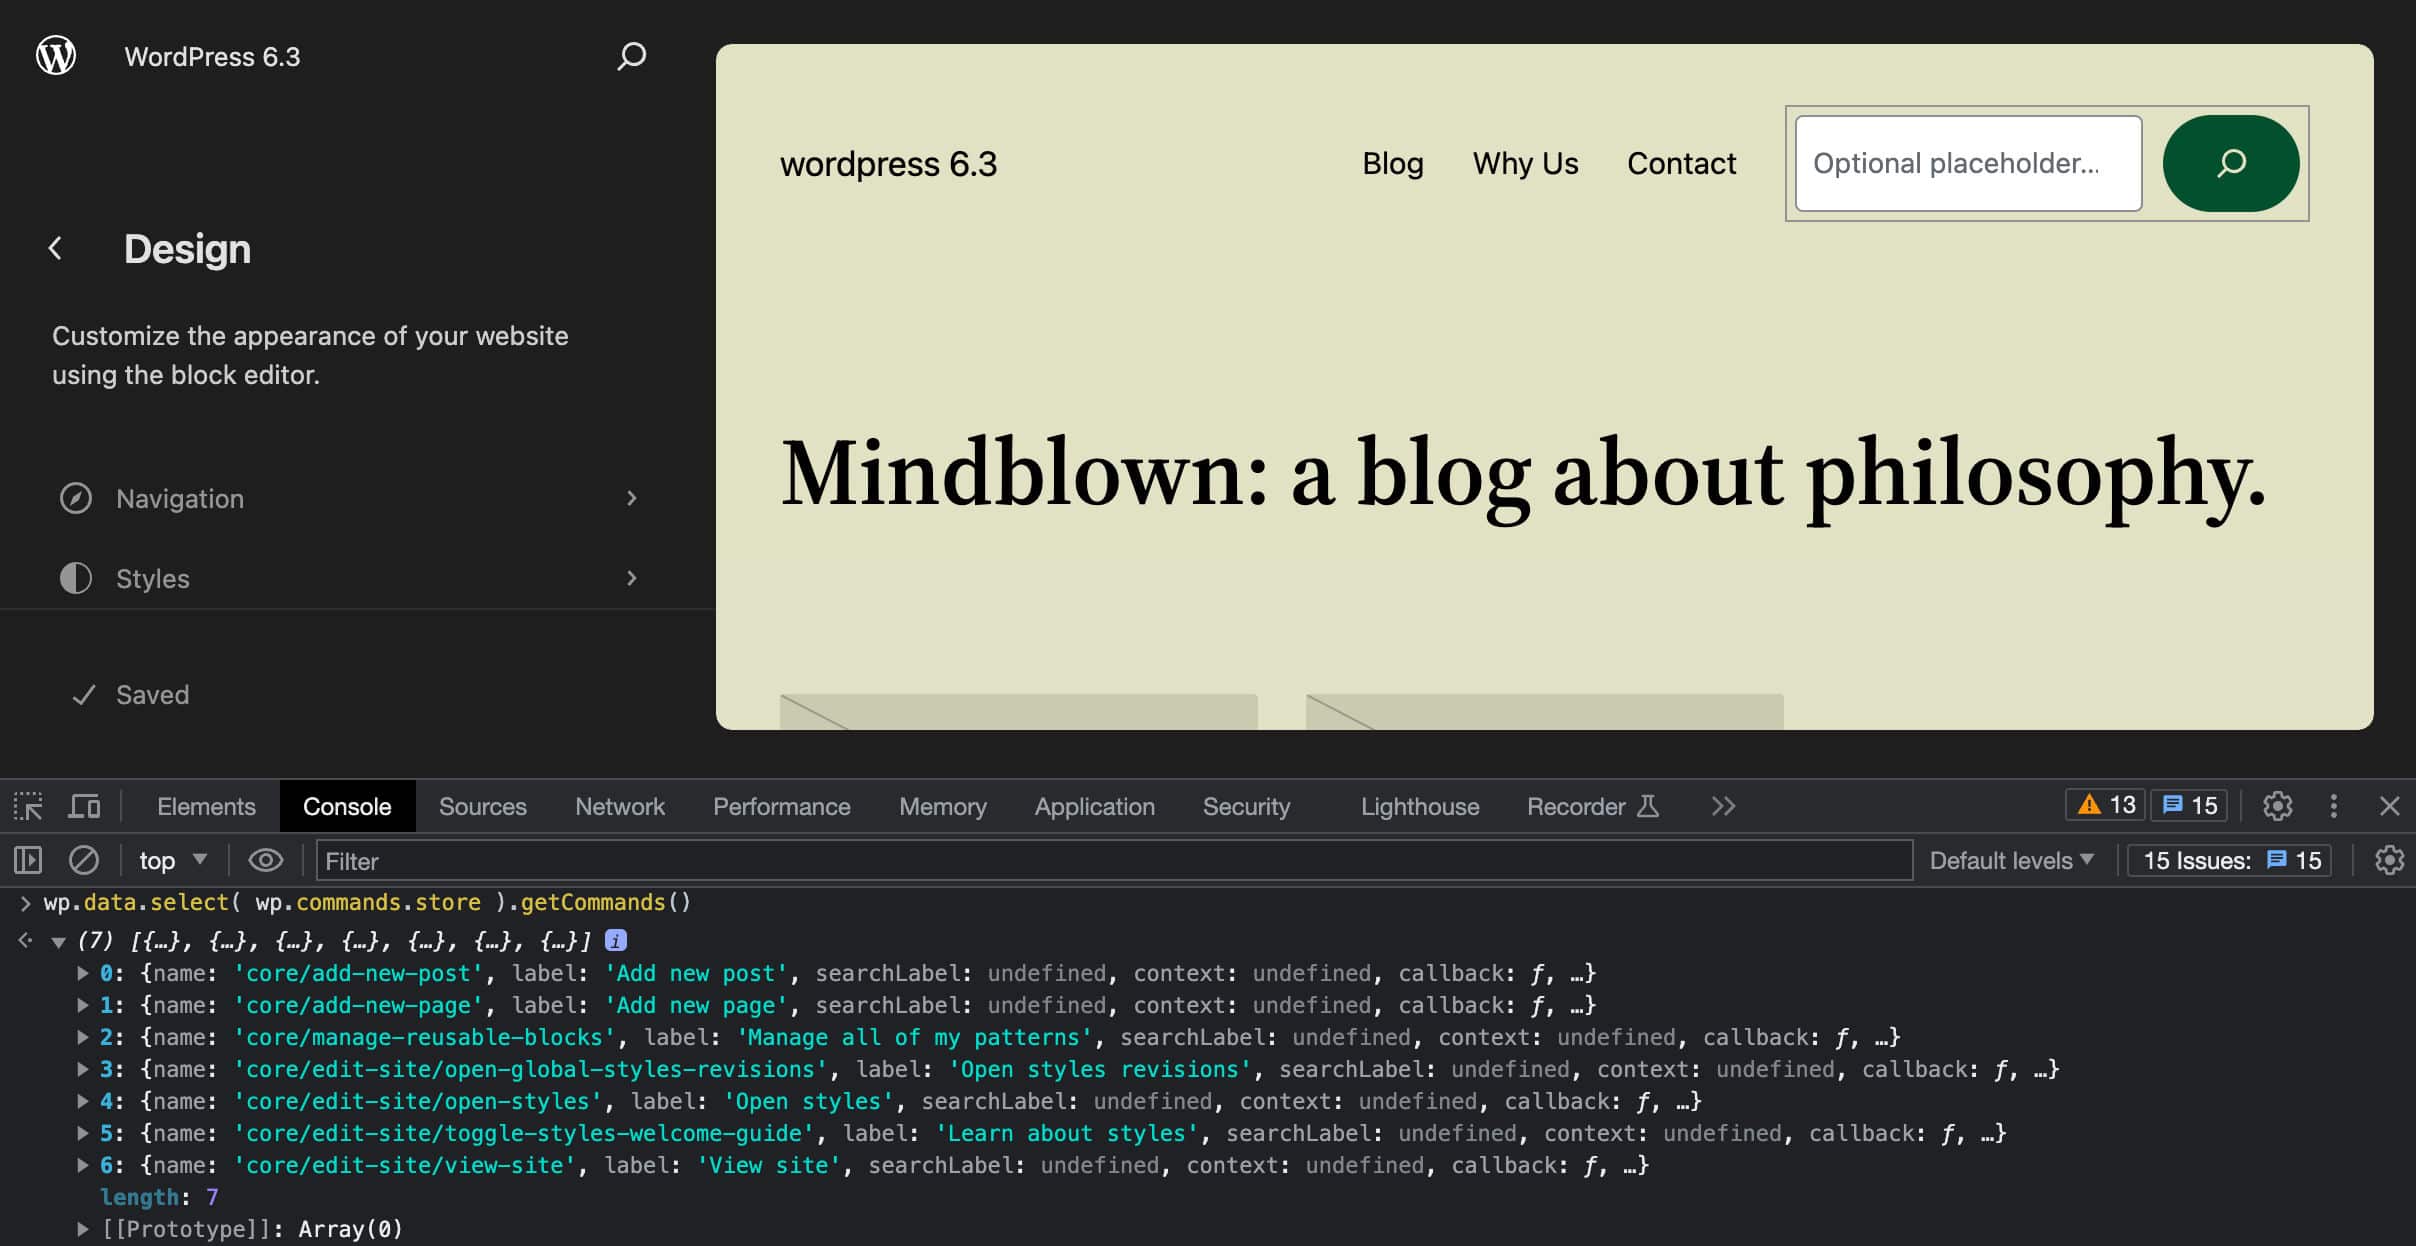
You can get the list of the available commands running wp.data.select( wp.commands.store ).getCommands() in the browser’s console.
Initially available in Post and Site editors, the Command palette should be extended to the whole admin in the future.
For a developer preview of the Command Palette, check out the Request for callback.
Additional Features and Improvements to the Site Editor
In addition to the features and improvements discussed in the previous sections, WordPress 6.3 brings us:
Theme Preview in the Site Editor
Starting with 6.3, a new theme_preview parameter allows every block theme to be loaded in the Site Editor and previewed before activation.

To preview a block theme, navigate to the Appearance > Themes screen and hover over any block theme. You should see a Live Preview button above each block theme. Simply click on this button to launch the theme preview in the Site Editor. For non-block themes, the Live Preview button launches the theme Customizer.
Loading State Improvements
With WordPress 6.3, the editor’s loading state has been improved to prevent the user from interacting with the editor before it is fully loaded.

Distraction Free Mode
WordPress 6.3 introduces a Distraction Free editing mode to the site editor. That’s the same feature available in the post editor since WordPress 6.2
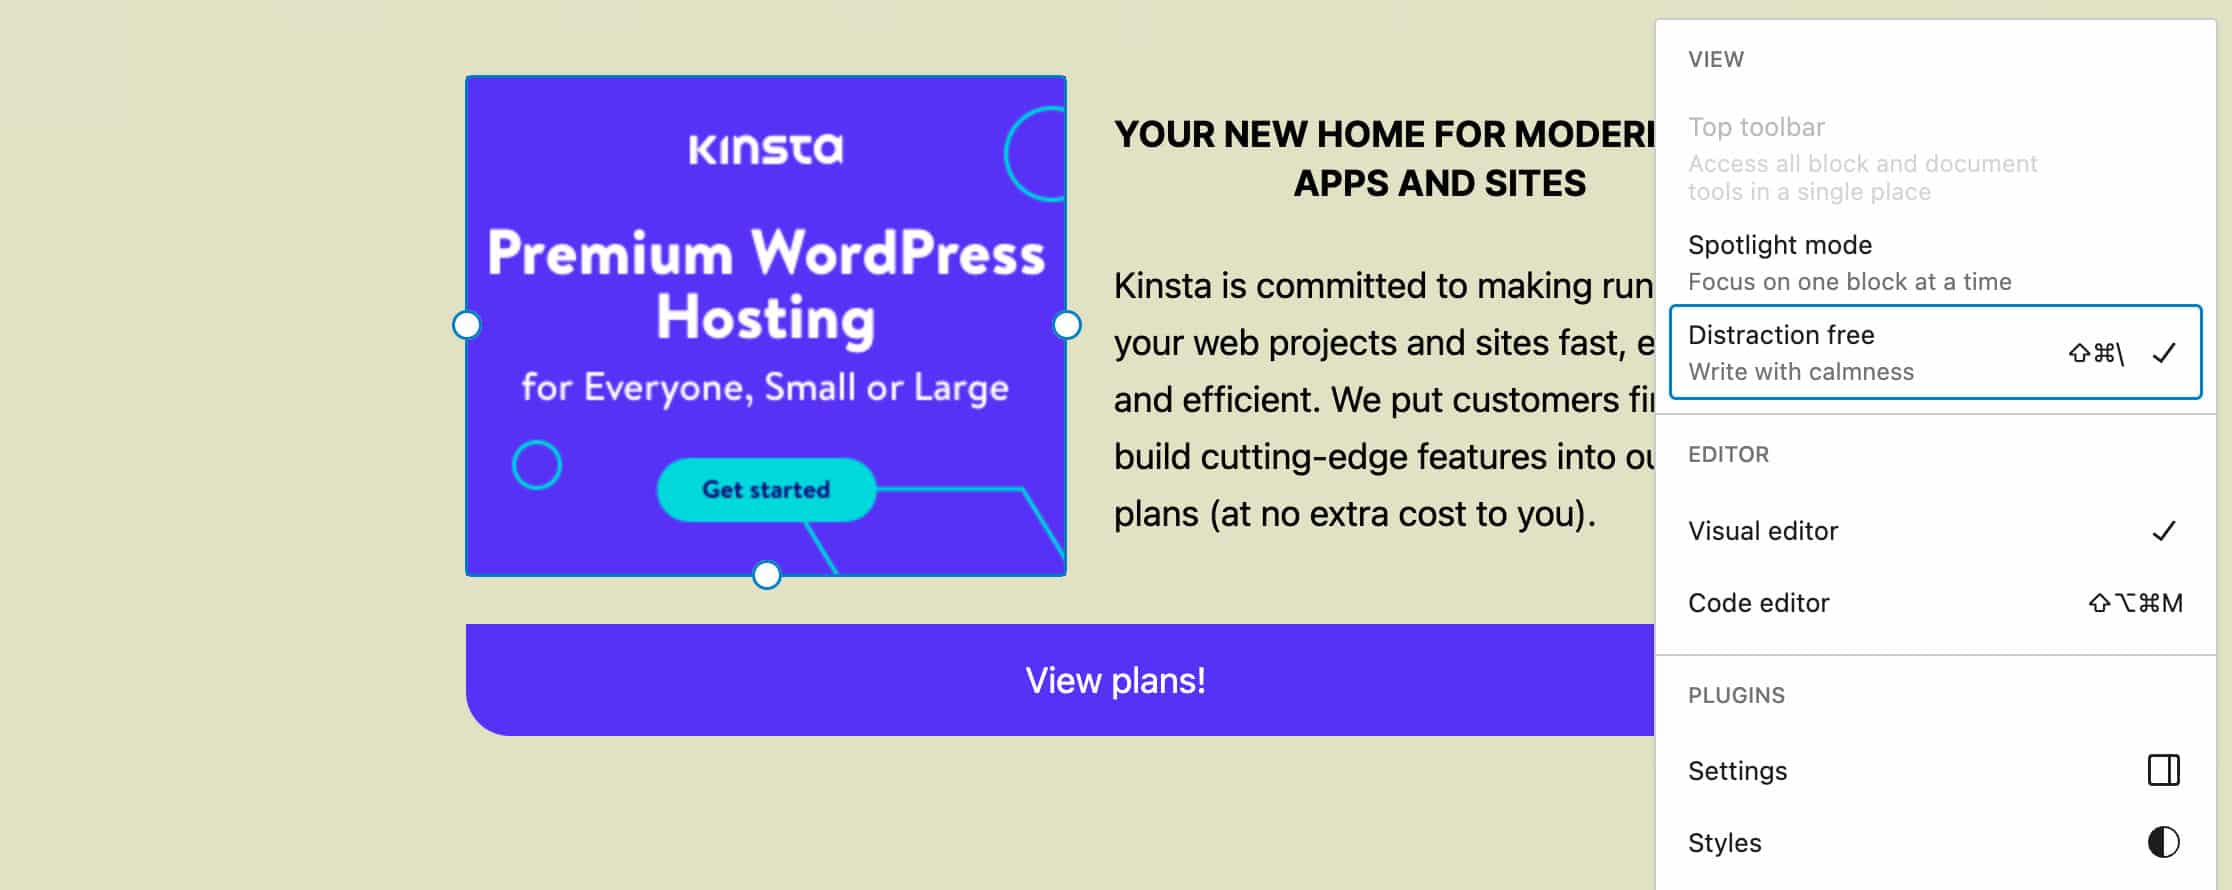
You can activate this feature in the options panel of the Site editor. Once Distraction Free mode has been enabled, sidebars and toolbars disappear, letting you free to focus on your edits.
Additional UI Improvements
- A new
<ViewLink>component now displays a button for opening any published post type in a new window. This is a small but useful feature that allows you to view the current post type without having to search for the link in the settings sidebar (PR #50260) - Template descriptions have been improved to better explain what exactly each template does. This should help users to pick the right template to customize in the Site Editor.
- Previously, Duotone filter settings were only available in the block toolbar. With 6.3, Duotone controls are now available via the settings sidebar (PR #49838)
- Before WordPress 6.3 large fonts didn’t scale enough on small screens. Now, fluid typography scales smoothly thanks to a logarithmic scale factor used to calculate a minimum font size for small screens (PR #49707)
New Blocks and Improved Design Tools
WordPress 6.3 also delivers two useful blocks that should make lots of content writers happy.
New Footnotes Block
WordPress 6.3 also brings us a super useful Footnotes block.
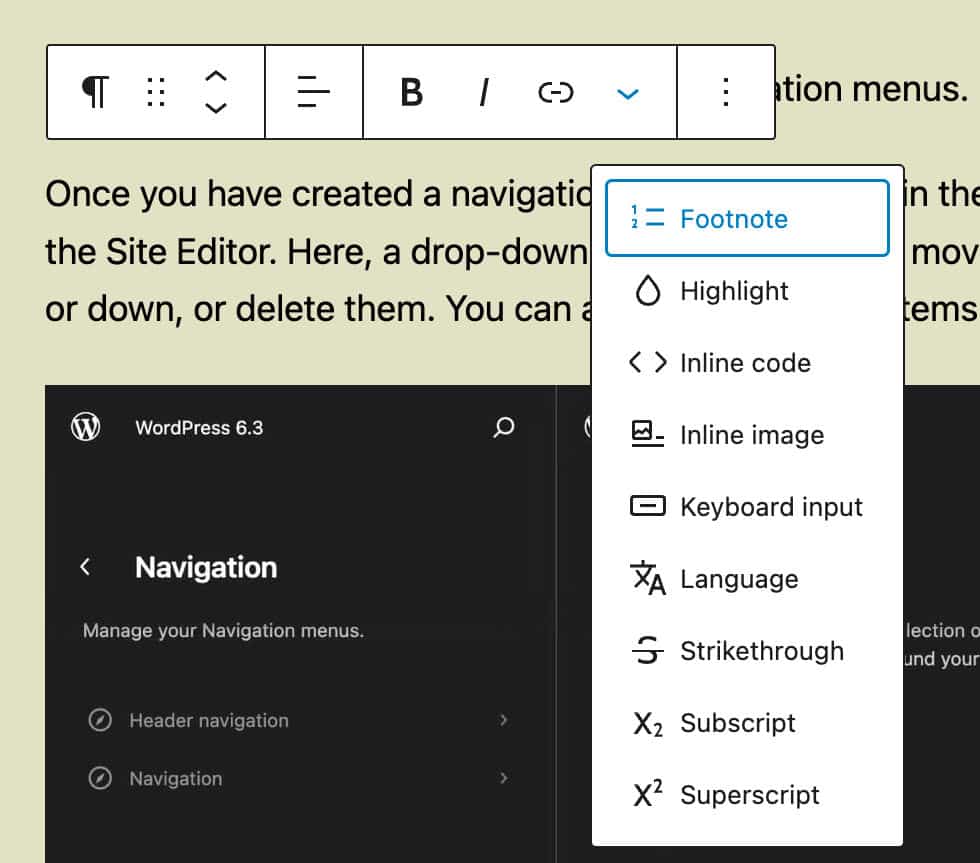
With this great addition, adding a footnote to a text block (paragraph, heading, and lists) requires just a couple of clicks. Place the cursor where you want to add the link and click on the Footnote button available in the block context menu. This will add a footnote at the bottom of the page.
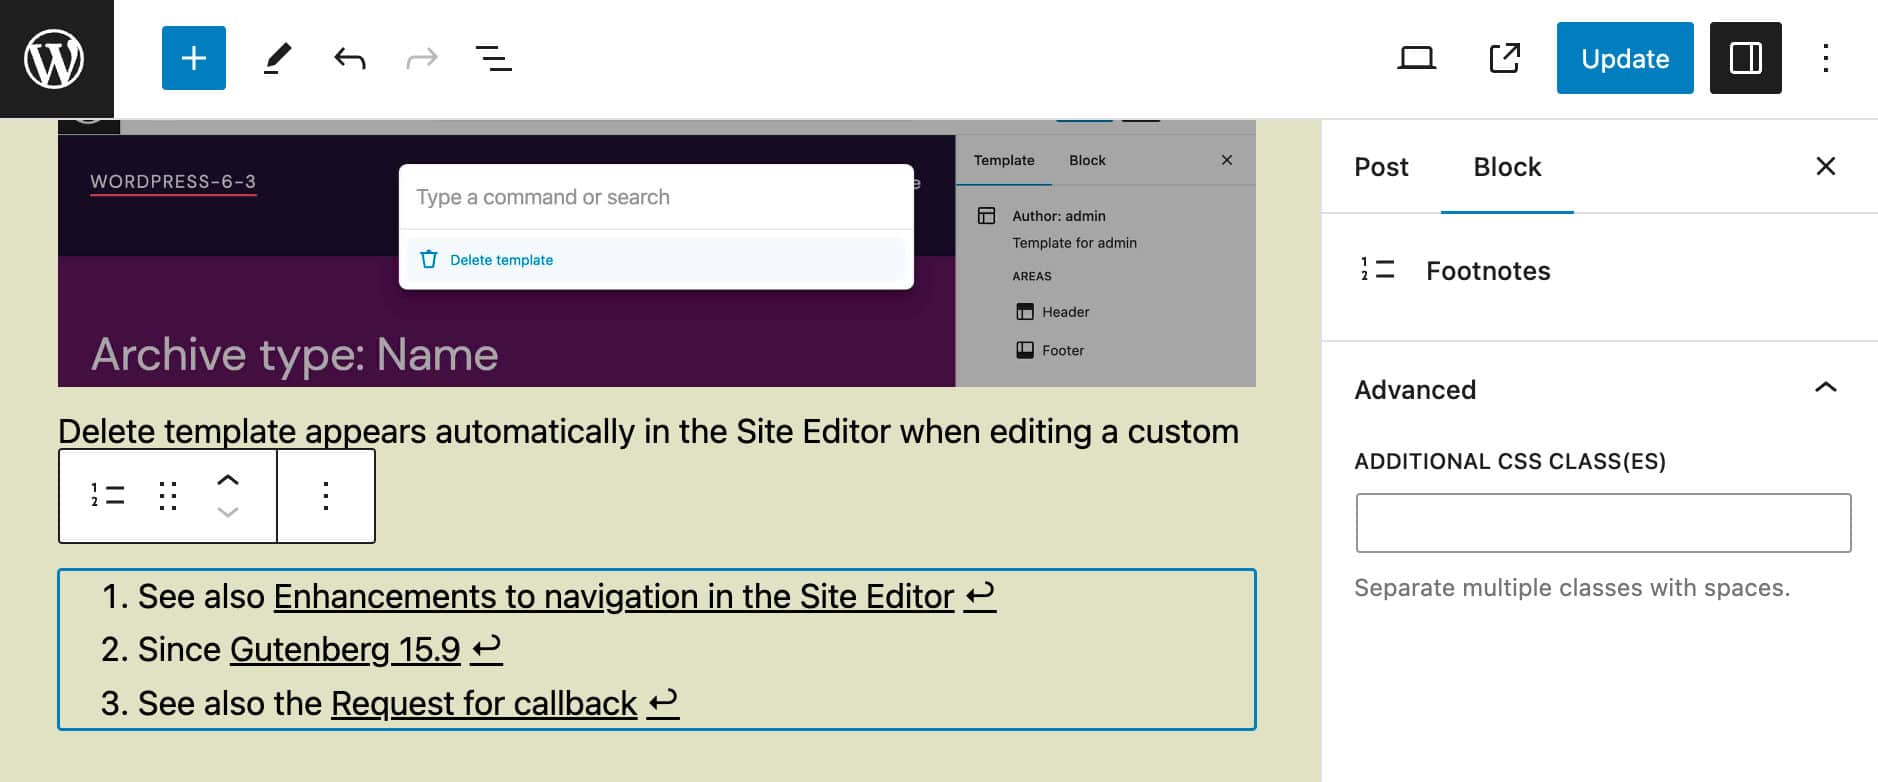
The Footnotes block automatically adds, removes, and reorders your footnotes as you edit your text and this is extremely useful, especially with long-form articles.
New Details Block
Now you can hide a piece of content until the reader is ready to read your FAQ, watch your video, or listen to your great podcast thanks to the new Details block.
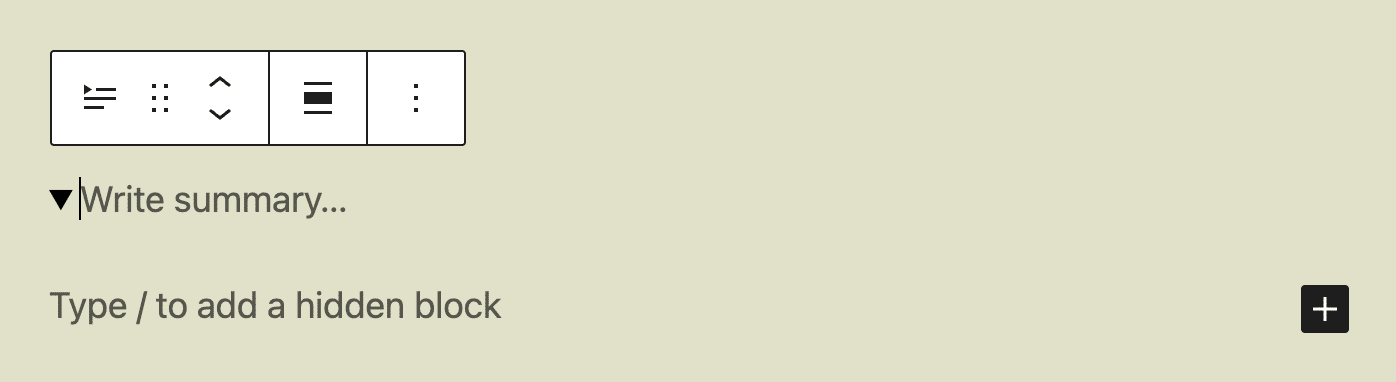
The new block consists of two separate elements: summary and hidden content. By default, the content is hidden but you can change the setting in the block settings sidebar.
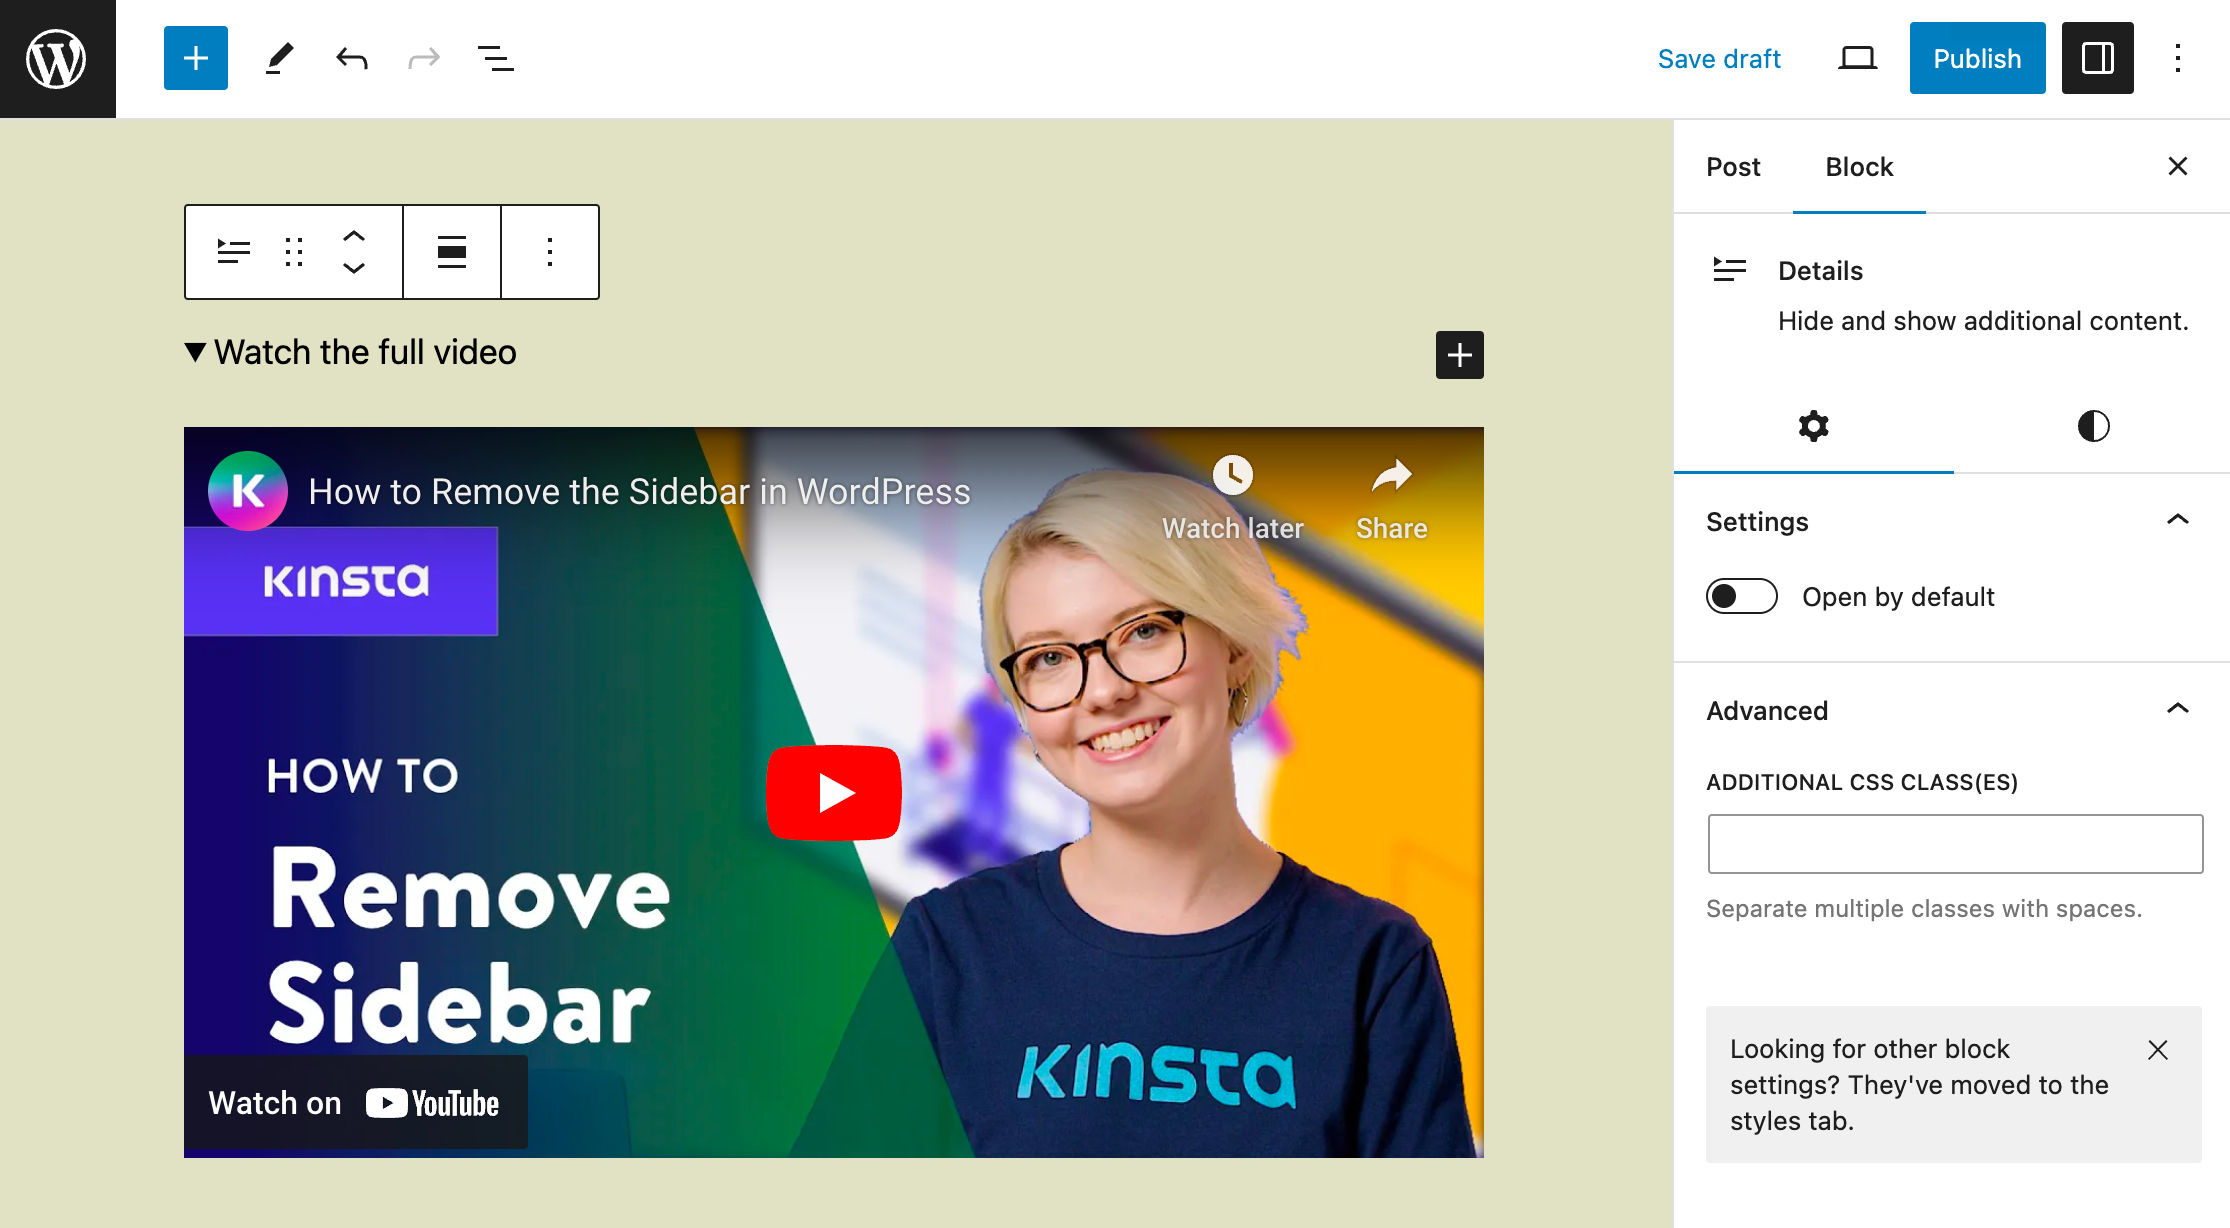
The block uses a details element with a rich text summary and a div containing the hidden element (see also PR #45055).
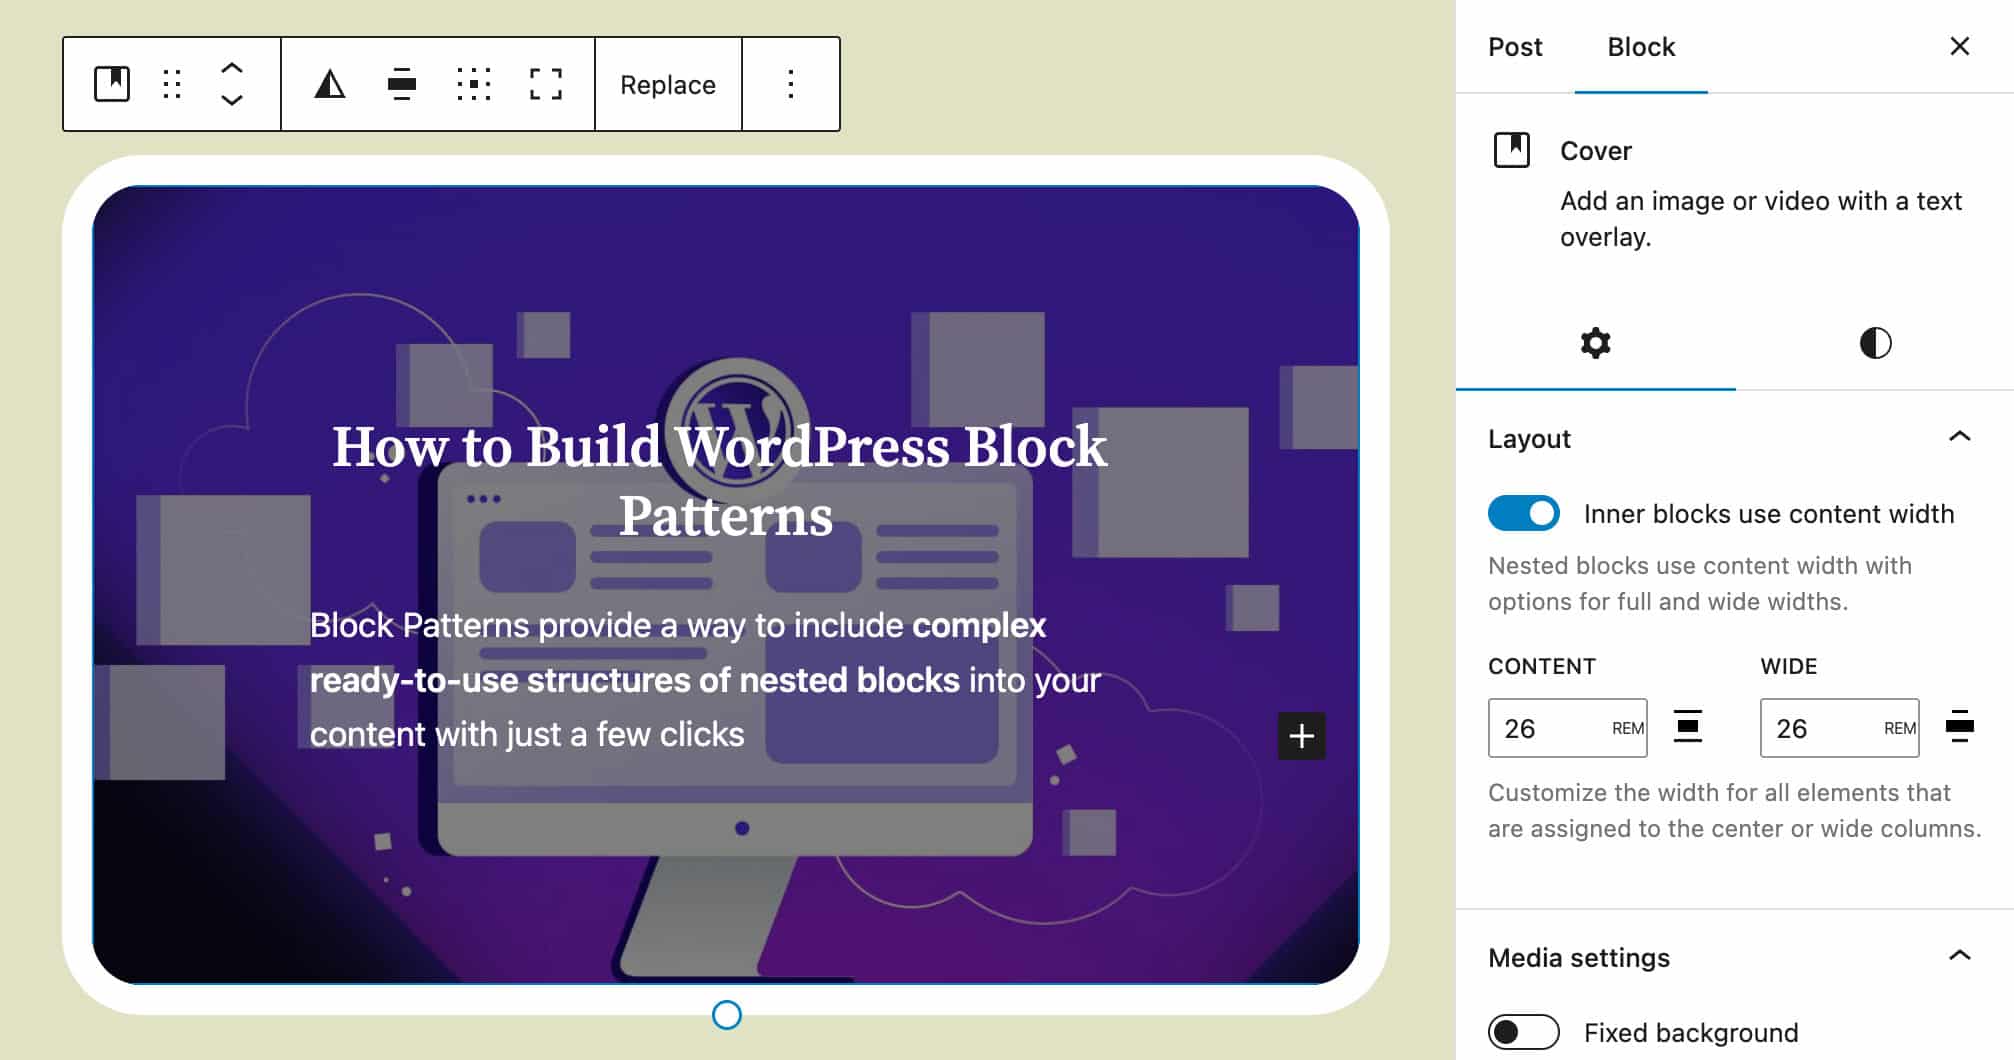
Cover Block Enhancements
The Cover Block has been enhanced with a couple of design features that make it easier to use and unlock more possibilities for customization.
First, the Cover Block now supports the text color design tool. Thanks to this addition, users and theme authors can change the color for all inner blocks by simply setting the text color on the Cover block. Also, it makes it easier to handle transforms from the Media & Text block as text colors now are smoothly passed to the resulting blocks.
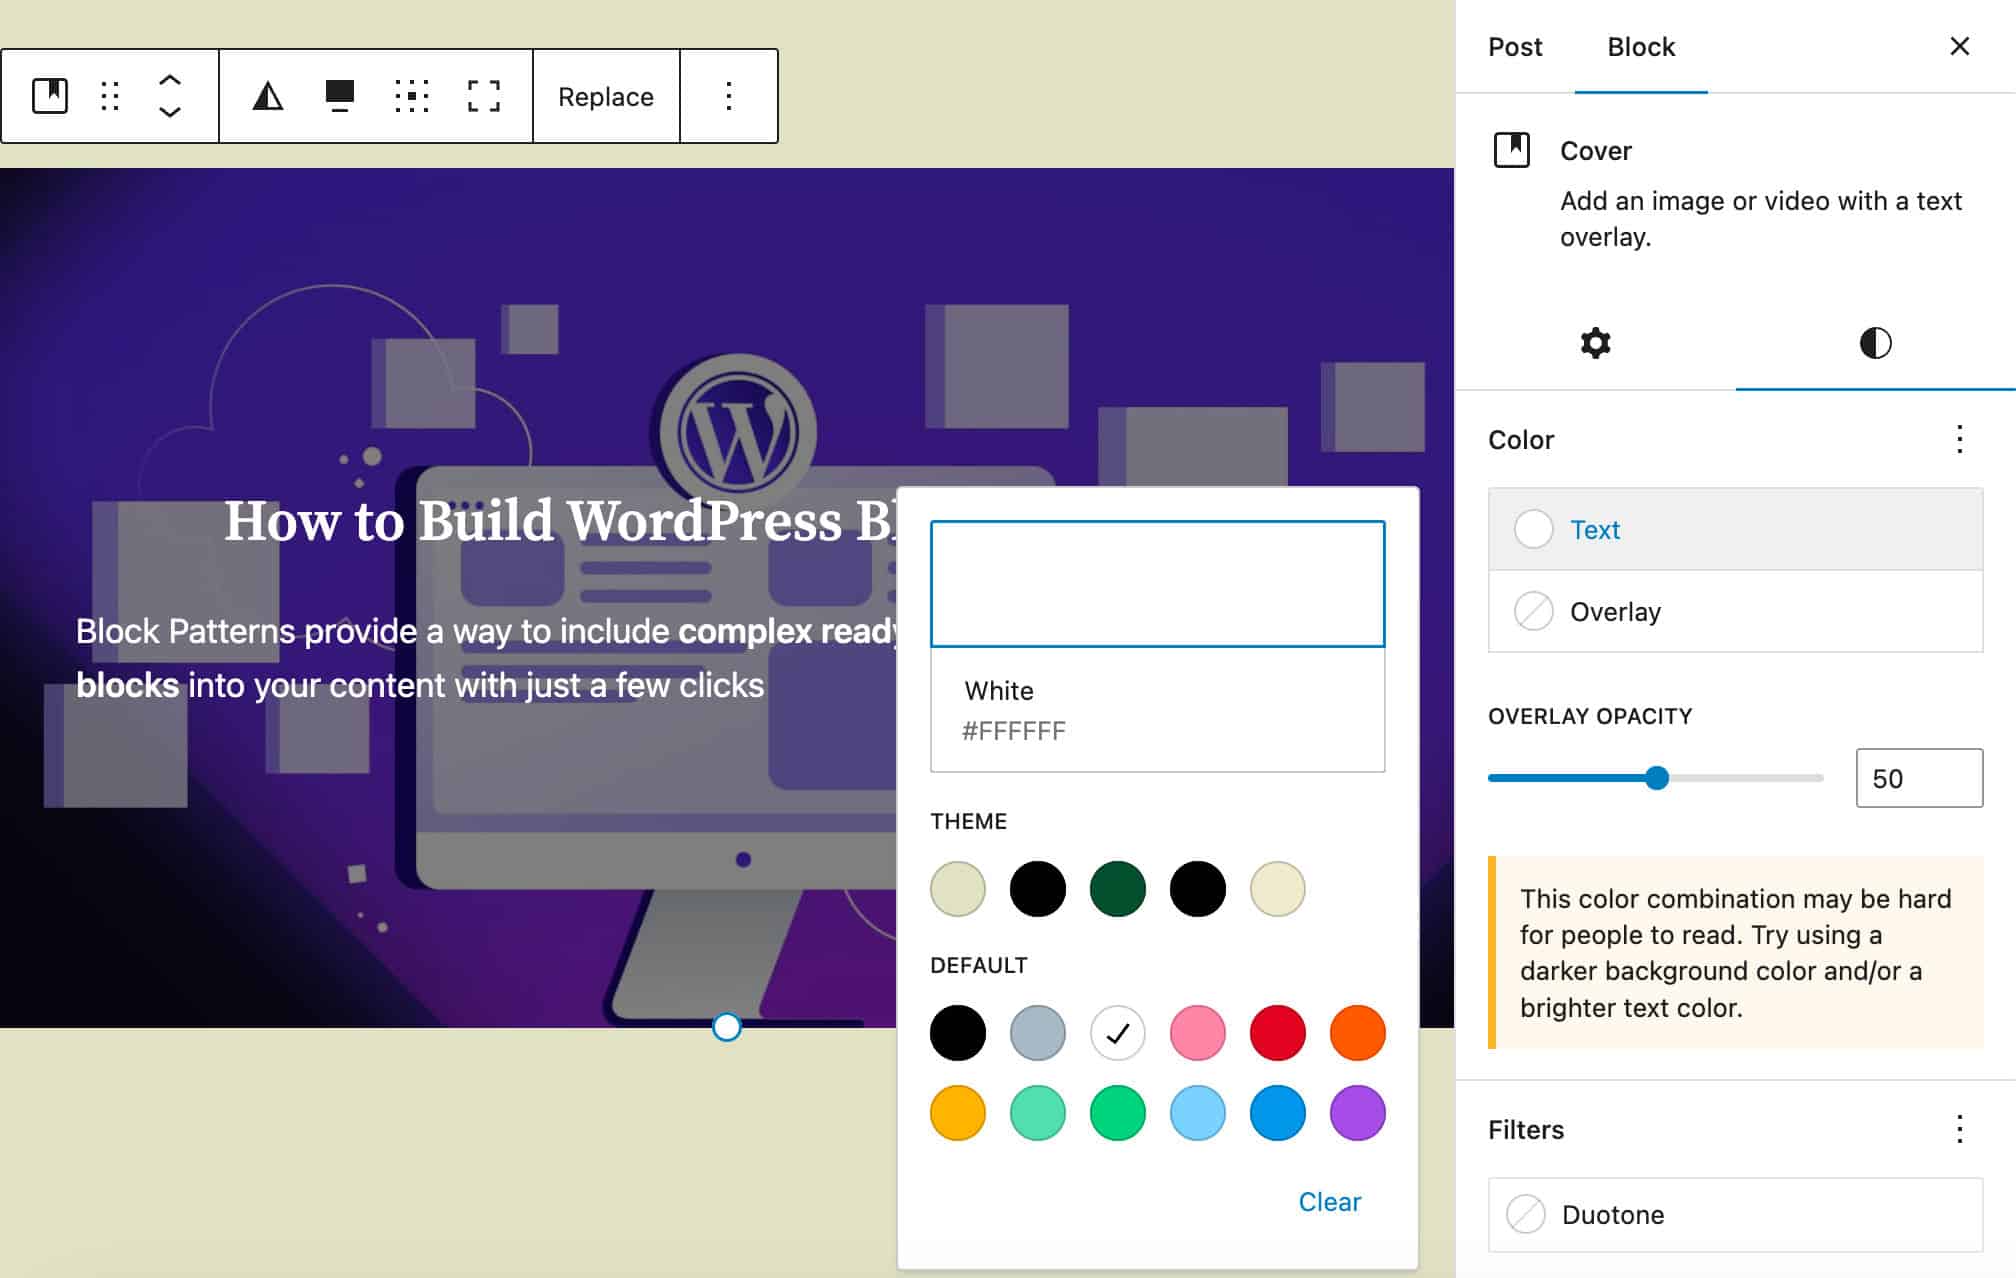
Another addition to the Cover block coming with WordPress 6.3 is the support for all border-related design tools. This addition should reduce the need for custom block styling.

WordPress 6.3 also adds support for constrained/flow layout to the Cover block that now can be handled as for the Group block. This change adds consistency to layout handling and definitely should make it easier for both users and theme developers to make their customizations.
However, theme developers should run a few tests on their existing themes as the block layout system may override custom implementations.
Enhanced Duotone Filter
A few changes improve the way we use the duotone filter.
First, you can now set a duotone filter globally from the Site Editor’s Style panel. Previously you could only apply duotone filters globally from the theme.json.
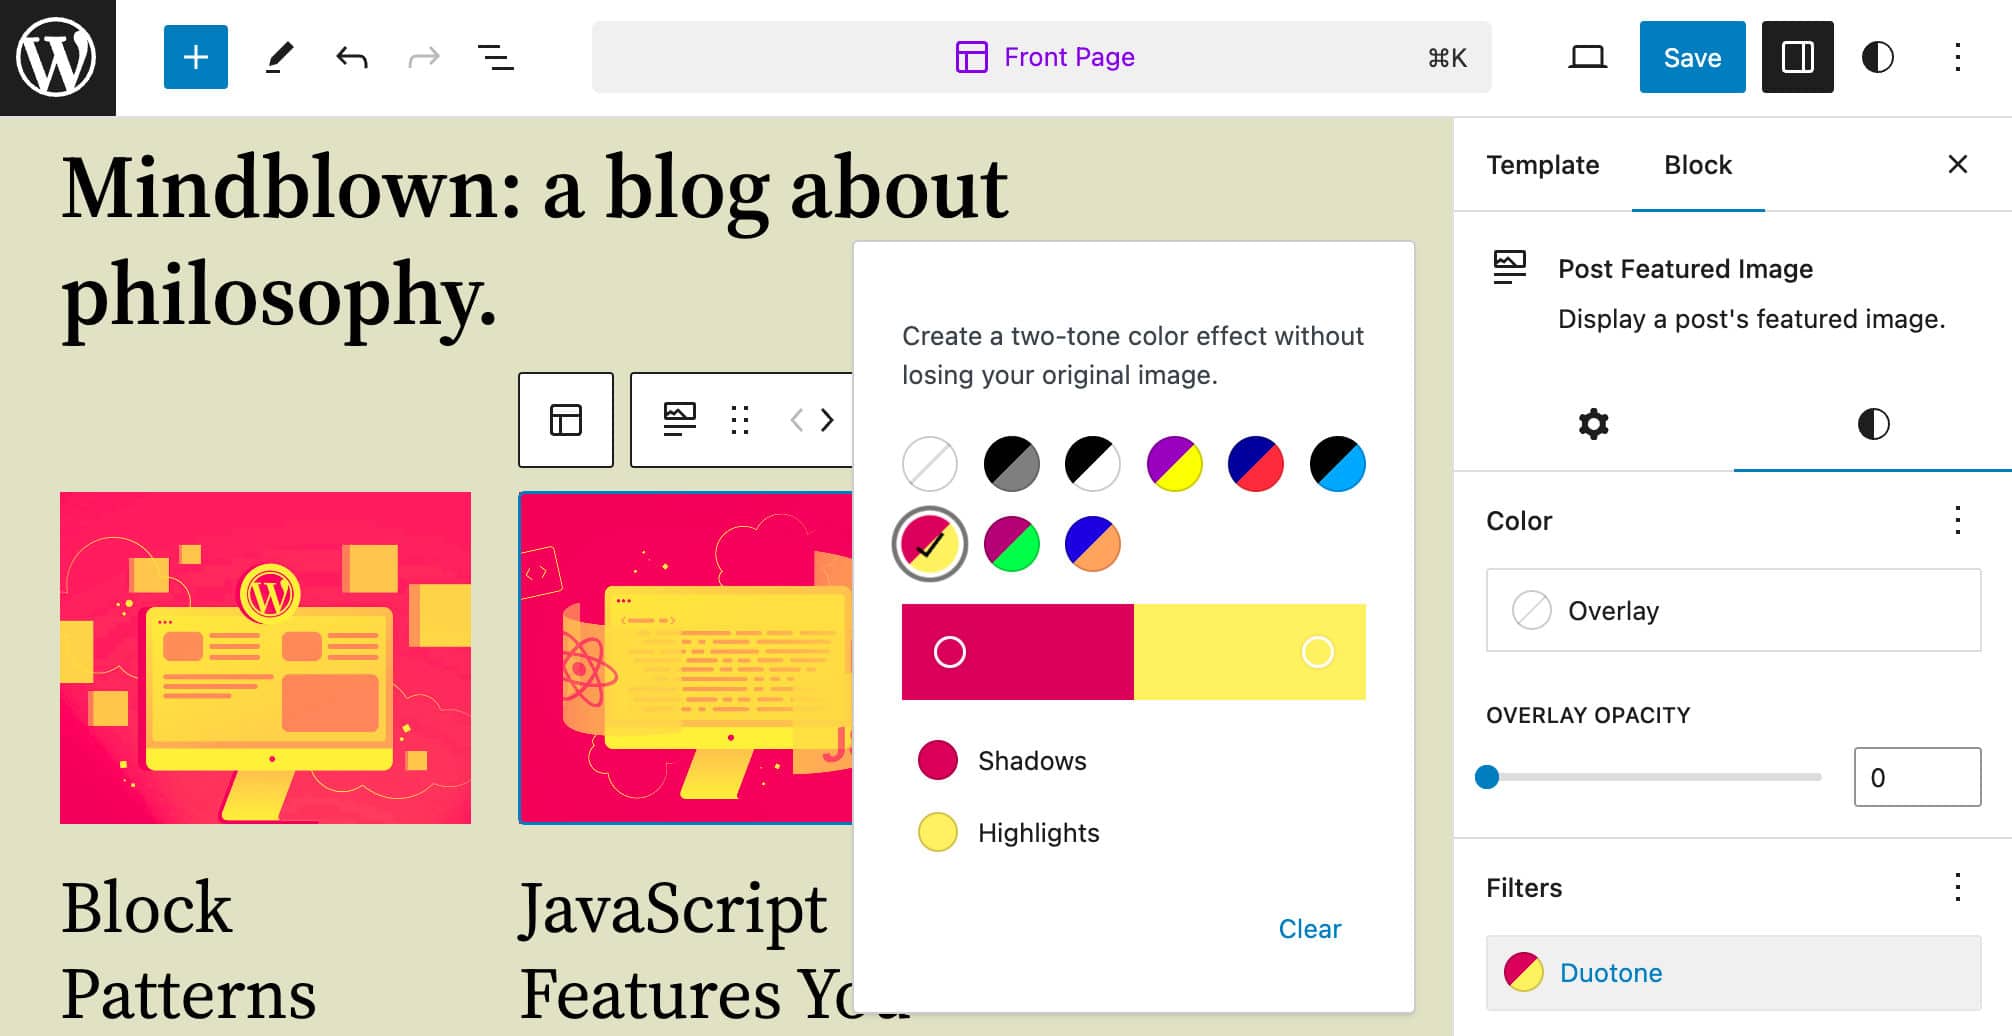
This is possible because duotone values are now set using color slugs instead of color values. This also means that you can set duotone values once and apply them regardless of the current theme or theme variation as long as it uses the same slug.
Lastly, for those who are more tech-savvy, Duotone styles are now generated using the WordPress Style Engine and get stored with block supports CSS instead of being inlined.
Additional Improvements
- The Button block now supports border color, style, and width (PR #44574)
- Excerpt length control added to the Post Excerpt block (PR #44964)
- You can now control the aspect ratio of the Post Featured Image block (PR #47854)
- The Global Styles interface now includes controls for color and typography for the Caption element (PR #49141)
- A Post Modified Date variation has been added to the Post Date block. It’s useful if you want to quickly add the post modified date instead of the publish date (PR #49111)
- The Site Logo can now be replaced from the sidebar (PR #49992)
Performance Enhancements and Changes for Developers
WordPress 6.3 also brings many changes and new features meant for improving site performance and developer workflows. Among the many additions, we picked the following:
Dropped Support for PHP 5
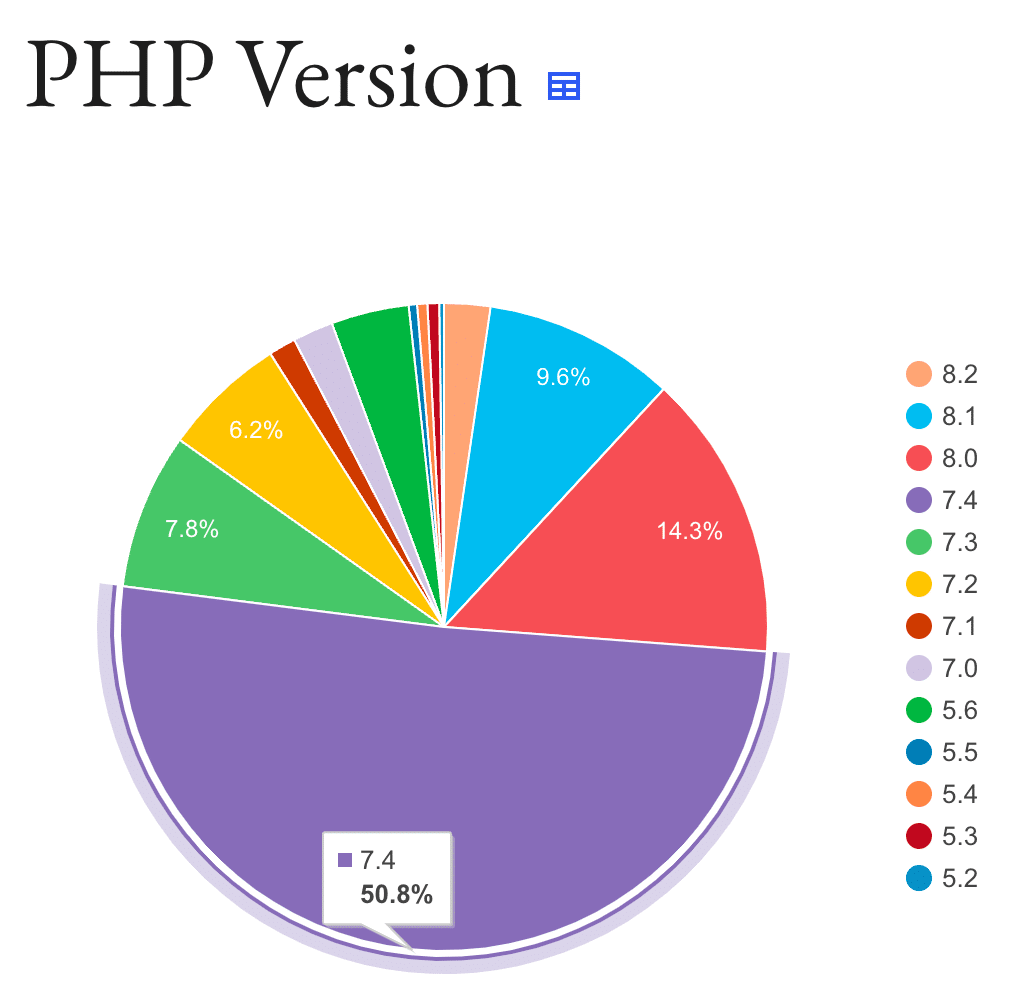
Starting with WordPress 6.3, PHP 5 will not be supported anymore. The new minimum supported version will be PHP 7.0.0. The recommended version of PHP is 7.4 or greater. 7.4 is also the most used version with 50.8% of WordPress websites.
This is important not only for developers but for all WordPress users as it improves your website security and performance.
This is also the reason why Kinsta hosting only allows supported versions of PHP. We regularly run our performance benchmarks of the supported versions of PHP to check the performance improvements coming with newer versions.
Performance Enhancements in Image Loading
As of WordPress 6.3, the fetchpriority attribute with a value of "high" is assigned to the image to determine whether it is the LCP (Largest Contentful Pain) image, whereas the Largest Contentful Pain is a metric that reports the render time of the largest element within the viewport.
The fetchpriority attribute instructs the browser to prioritize this image, even before the layout has been computed.
Another improvement is the automatic handling of lazy loading of images with the loading attribute. This attribute was first introduced in WordPress 5.5, then it was improved with WordPress 5.9 to omit the loading="lazy" attribute for the first content image (see Lazy Loading Performance Improvements in WordPress 5.9). Now, with WordPress 6.3, all residual issues should have been fixed, leading to good performance improvements.
Both fetchpriority and loading attributes are now controlled by the new function wp_get_loading_optimization_attributes(). This function returns an associative array of attributes to optimize loading performance. Currently, possible attributes returned by this function are:
loadingwith a value of"lazy"fetchprioritywith a value of"high"
Note that no element should have both attributes as they are mutually exclusive. In case an element should contain both attributes, a warning will be triggered.
For a more in-depth overview of the wp_get_loading_optimization_attributes() function and fetchpriority and loading attributes with examples of usage, see Image performance enhancements in WordPress 6.3.
Support for HTML 5 async and defer Attributes
async and defer are two HTML 5 attributes that instruct the browser to download JavaScript without pausing HTML parsing.
There is a key difference between the two attributes:
- Scripts with the
asyncattribute get executed asynchronously as soon as they’re loaded. Once the script is loaded, the browser pauses the parsing of the HTML and executes the script. - Scripts with the
deferattribute get executed only when the page parsing has been completed.
Starting with WordPress 6.3, you can now register scripts with async and defer attributes using the $in_footer boolean parameter of the wp_register_script() or wp_enqueue_script() functions (see also How to Enqueue your Assets in WordPress).
This parameter has been overloaded and now accepts a new $args array parameter allowing you to specify a loading strategy for your scripts.
Here is an example of how to define a defer strategy in the PHP file of a plugin using wp_register_script (the code would be the same with wp_enqueue_script):
wp_register_script(
	'custom-script',
	plugins_url( '/js/custom-script.js' , __FILE__ ),
	array(),
	'1.0.0',
	array(
		'strategy' => 'defer'
	)
);
Backward compatibility is granted, so you can continue to instruct WordPress to load your script in the footer:
wp_register_script(
	'custom-script',
	plugins_url( '/js/custom-script.js' , __FILE__ ),
	array(),
	'1.0.0',
	array(
		'in_footer' => true,
		'strategy' => 'defer'
	)
);
Thanks to the new implementations, it is now possible to prevent a script from being loaded in an unexpected order in the script dependency tree, which was not possible with the tools available before WordPress 6.3. For a more detailed overview of the changes to the Scripts API, with additional examples and technical details, check Simon Dowdles’ dev note.
Development Mode
WordPress 6.3 introduces a new development mode developers can enable using a new WP_DEVELOPMENT_MODE constant. This new constant is recommended for any development site and its value depends on the kind of development going on.
WP_DEVELOPMENT_MODE can take one of the following possible values:
core– Used to indicate that a website is used as a core development environment.plugin– Used for plugin development.theme– Used for theme development.all– This is used to indicate that a website is used for all three types of development.- An empty string is the default and indicates that the website is not used as a development environment.
WP_DEVELOPMENT_MODE should only be used in development installations. It’s not relevant in production.
The development mode affects some low-level aspects of WordPress behavior. At the time of this writing, the only difference concerns the caching of the theme.json file, which is bypassed when WP_DEVELOPMENT_MODE is set on 'theme'.
WP_DEVELOPMENT_MODE works differently from WP_DEBUG and WP_ENVIRONMENT_TYPE constants usually used in development as WP_DEBUG and WP_ENVIRONMENT_TYPE don’t affect WordPress behavior in any way. You would probably use WP_DEVELOPMENT_MODE when WP_ENVIRONMENT_TYPE is either 'development' or 'local', as development should never happen on live websites.
You can enable development mode this way:
define( 'WP_DEVELOPMENT_MODE', 'theme' );WordPress 6.3 also introduces a new wp_in_development_mode() function that allows you to check if your website is in dev mode. The new function also allows checking the type of development currently on, thanks to a $mode parameter whose possible values are 'core', 'plugin', and 'theme':
if ( wp_in_development_mode( 'theme' ) ) { ... }You can also check the current value of WP_DEVELOPMENT_MODE in the Info panel of the Site Health tool.
Additional Changes for Developers
- Theme developers can now use the
template_typesproperty to assign one or more template types when registering a template pattern to include it in the modal overlay that appears when a user creates a new template. - The
get_pages()function has been updated and now usesWP_Queryinternally. - The
WP_User_Queryclass has been significantly improved, specifically with the implementation of query caching. - Several improvements have been implemented in the Cache API.
- The Edit site link now loads the current template instead of the editor’s home page.
- A new Block Selectors API allows to configure multiple CSS selectors for blocks to use in global styles.
- Social Icons applied colors now dynamically update based on theme.json and Global Styles
- Further updates touched on internationalization (I18N) and layout support.
Summary
With WordPress 6.3, we get to the end of Phase 2: Customization of the Gutenberg development roadmap. This new release brings us significant improvements in the editing experience, including new editing features within the site editor, a new and more flexible block pattern system, new blocks, better performance, improvements to accessibility and internationalization, and much more.
With the next version of WordPress, expected in November 2023, we enter Phase 3: Collaboration, whose main goal is to bring advanced collaboration capabilities to the editor.
If you’d like to test and/or contribute to WordPress, our free local WordPress development suite DevKinsta is what you should use.
Now, over to you: Have you tested WordPress 6.3 in your development environment yet? What features coming with 6.3 do you like the most? Share your thoughts in the comments below.

Carlo is a passionate lover of webdesign and front-end development. He has been playing with WordPress for more than 20 years, also in collaboration with Italian and European universities and educational institutions. He has written hundreds of articles and guides about WordPress, published both on Italian and international websites, as well as on printed magazines. You can find him on LinkedIn.

