
We talk a lot about how your WordPress website’s security is not a set-and-forget task. It needs constant and vigilant monitoring from you, and the job can be daunting.
In situations where you have to monitor the security of multiple websites, the Kinsta API can be one of your key tools. This is especially true where you manage a number of unconnected sites. In these situations, you’ll want the automation and visibility the API can give you.
In this post, we’ll explore using the Kinsta API for better security. The main focus will be blocking IPs and monitoring their effects using the various endpoints available. First, though, we should consider the difficult task of site security management.
The challenges of managing your website’s security
As the most popular content management system (CMS) on the planet, WordPress is a prime target for hackers and malicious actors. Because of this, WordPress is hot on its core security.
While the numbers look good on paper – around three percent of sites have some kind of infection or blocklisted resources – this doesn’t mean you should relax. In fact, there are plenty of threats to consider when it comes to your WordPress website:
- Brute force attacks
- SQL injection
- Cross-site scripting (XSS)
- Malware infections
- Distributed Denial of Service (DDoS) attacks
Given the complex array of attacks, managing the security of a single WordPress site can be challenging enough. However, when you’re responsible for multiple sites, that complexity and scope multiplies. A network of sites will always need a present and proactive approach to security monitoring. This is even harder if you manage a batch of sites without any connection.
As such, an efficient and effective way to monitor and secure every site you look after will have mega value. Kinsta can provide this to every customer.
How the Kinsta API can enhance your site’s security
Regardless of the plan you’re on, every Kinsta customer has access to the full Kinsta API. This powerful tool lets you interact with your sites in plenty of programmatic ways. Many different endpoints are available that ‘hook into’ aspects of our hosting, which means you have a sturdy way to handle security for all your sites.
The Kinsta API lets you automate various security-related tasks, and there are lots of relevant endpoints:
- Within the Site Tools, you can fetch and update IPs on your blocklist.
- There’s an endpoint to look at and manage your site’s error and access logs.
- You can grab analytics from each of your sites thanks to a handful of endpoints that fetch metrics on performance.
While you can find these tools within the MyKinsta dashboard, there are lots of reasons why we offer a programmatic option, too. In many ways, the Kinsta API gives you several advantages over the dashboard:
- Automation. You’re able to automate security tasks by writing scripts or using third-party tools. This can save time and reduce manual errors.
- Bulk operations. The API lets you carry out security tasks on multiple sites at once. If you’re part of an agency or you develop WordPress websites for a living, this aspect will be useful.
- Integration. If you already use a suite of security tools you like, the Kinsta API will let you integrate them into your setup. This allows you to transform your security provision into something unique for your site.
Enough talk, though – let’s get into the nuts and bolts of using the Kinsta API to work with IP addresses. We’ll start with simple tasks and look at advanced applications later.
Implementing IP restrictions with the Kinsta API
One of the most straightforward ways to bolster your site’s security is through IP restriction. This lets you cut the head off the snake and stop access to your site altogether. The main benefit here is brute force attack mitigation.
While the MyKinsta dashboard lets you work with your blocklist, the Kinsta API has greater flexibility if you need it. Let’s consider a scenario where you’re a WordPress agency managing multiple client sites on one of our Kinsta Agency plans.
Using the Kinsta API to restrict IP addresses
First, you should have a list of IP addresses you want to restrict. Our documentation has a few methods for this, such as using analytics to root out addresses, making lots of uncached requests in a short time span.
From here, you can begin to use the Kinsta API to restrict them. First off, you should use the Environments endpoint to fetch a list of sites. This will include both your live and staging sites:
const siteId = 'YOUR_site_id_PARAMETER';

const resp = await fetch(
  `https://api.kinsta.com/v2/sites/${siteId}/environments`,
  {
    method: 'GET',
    headers: {
      Authorization: 'Bearer <YOUR_TOKEN_HERE>'
    }
  }
);

const data = await resp.text();
console.log(data);
Next, you can use the Denied IPs endpoint to make a GET request that returns your current blocklist in JSON format. The response will include an array of blocked IP objects:
{
- "environment": [
"id": "abc123",
"ip-list": [
"192.168.1.1",
]
    }
}
The associated PUT request will let you add an IP to your blocklist, for which you’ll need to specify the environment ID:
const resp = await fetch(
  `https://api.kinsta.com/v2/sites/tools/denied-ips`,
  {
    method: 'PUT',
    headers: {
      'Content-Type': 'application/json',
      Authorization: 'Bearer <YOUR_TOKEN_HERE>'
    },
    body: JSON.stringify({
      environment_id: '54fb80af-576c-4fdc-ba4f-b596c83f15a1',
      ip_list: ['127.0.0.1']
    })
  }
);

const data = await resp.json();
console.log(data);
A successful addition will return a 200 response code, along with result: null within a JSON file. You could further automate the entire process with a script or tool in order to run it whenever you have to update the blocklist again.
Monitoring website activity with the Kinsta API
Implementing preventive security measures such as IP restrictions is excellent, but it’s also crucial to monitor your site’s activity for potential security threats. You can look out for a number of key indicators for each of your sites:
- Unusual traffic patterns or volume spikes
- The frequency of any failed login attempts
- General suspicious user behavior
- Inconsistent site performance or unusual downtime patterns.
The MyKinsta dashboard can send you real-time notifications and alerts on many aspects of your site. This can help you step into action when there’s a potential security issue.
The Kinsta API has several endpoints that let you retrieve and look over your site’s logs and more. You’ll also be able to set up automated monitoring and alerting systems if you wish that’s unique to your needs.
Finding malicious activity with site logs and metrics
Let’s consider a scenario where your agency needs to monitor suspicious activity on an individual client site. There are a few approaches you can take for proactive monitoring where you don’t have a notification as a starting point.
Again, you’ll need to fetch your list of environments, as the endpoints require an ID. Once you have this, you can take a look at the logs endpoint. The request has two required fields:
file_nameaccepts a string containing theerror,access, orkinsta-cache-perflogs.lineslets you specify the number of lines the request returns from the log, which must be under 20,000.
This can help you figure out whether there is a reason for concern. The deeper insights, thanks to the metrics endpoint, can help fill in the blanks. The metrics you choose to look at will depend on the specific situation.
For instance, you can check bandwidth to ensure you aren’t being hit with a coordinated attack on a site. The query parameters let you set a timeframe start and end point, as well as an interval time. The JSON return gives you bandwidth details for the specific site:
{
  "app": {
    "id": "54fb80af-576c-4fdc-ba4f-b596c83f15a1",
    "display_name": "my-app",
    "metrics": {
      "timeframe": {
        "start": "1679587045511",
        "end": "1679587045511"
      },
      "bandwidth": [
        {
          "time": "1679587045511",
          "value": "value"
        }
…
There are plenty of other metrics available, such as the number of HTTP requests per minute and the average response time. Your job is to look at these metrics and the data within the logs to identify any suspicious activity or potential security threats.
If you need visualization, this is where the Kinsta APM can come in handy:
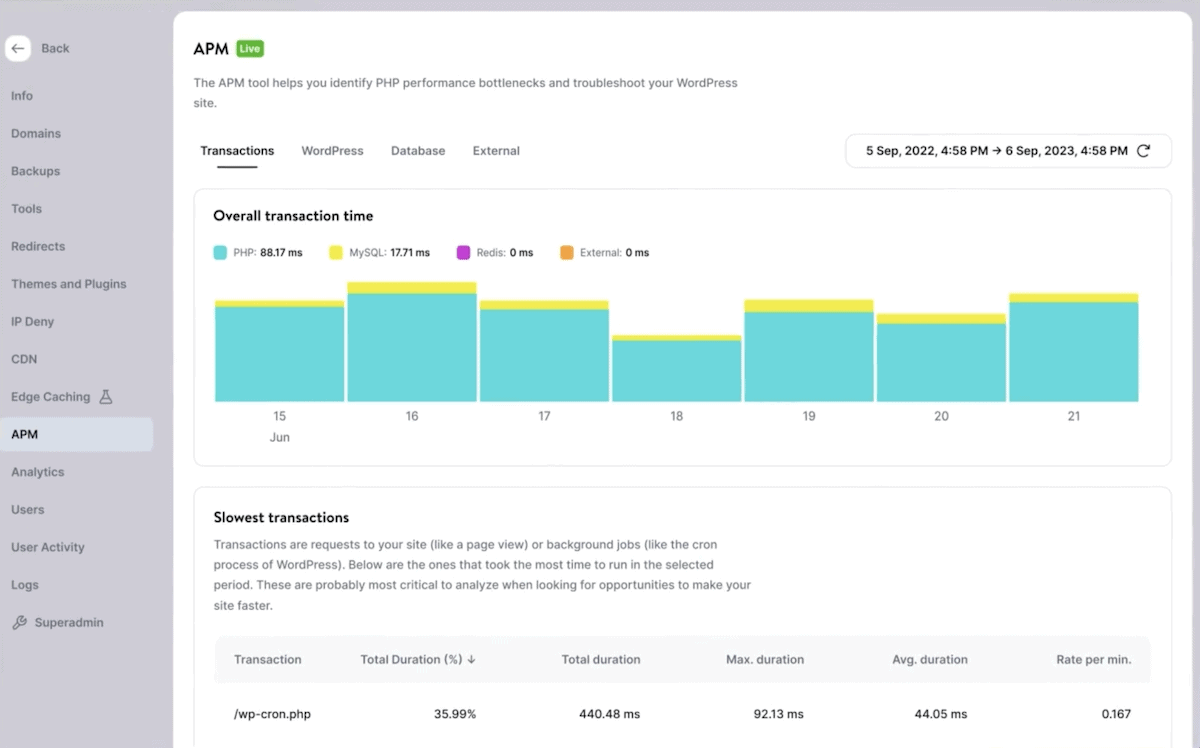
Combining all of Kinsta’s tools—the API, MyKinsta dashboard, and APM—you can detect and respond to potential security issues quickly and minimize the risk of permanent damage to your site and its reputation.
Automating security escalation using the Kinsta API and MyKinsta
Automating your security workflow can give your responses more efficiency and mobilization. While proactive monitoring is the ideal way to keep your sites secure, sometimes a reactive approach is necessary.
This is another area where automated notifications come in handy. Once you receive a notification from Kinsta, you can spring into action to resolve the issue. However, unlike other security tasks, the Kinsta API isn’t part of the triage this time.
Instead, MyKinsta will be your guide. The Kinsta documentation covers the site monitoring notifications at your disposal. There are plenty available, such as site downtime, DNS errors, and much more.
At the point you identify a threat on your site, you can then call on the Kinsta API to handle the malicious users. This could be adding IPs to a block list or checking on the backups you have in place in case the worst happens.
There are a couple of GET requests to help you discover what backups there are. If you’re missing one, you can make a POST request to begin a manual backup. It will only require the environment ID and a name for the backup:
const envId = 'YOUR_env_id_PARAMETER';
const resp = await fetch(
  `https://api.kinsta.com/v2/sites/environments/${envId}/manual-backups`,
  {
    method: 'POST',
    headers: {
      'Content-Type': 'application/json',
      Authorization: 'Bearer <YOUR_TOKEN_HERE>'
    },
    body: JSON.stringify({
      tag: 'my-awesome-backup'
    })
  }
);

const data = await resp.json();
console.log(data);
The Kinsta API will also let you restore a backup. In fact, you could conceive a strategy that retrieves your site logs, assesses your metrics, makes a backup given your specific parameters and rules, blocks incoming malicious IPs, and then restores a backup at a point where the attacks calm down.
Continuously monitor the site’s activity and iterate on your security process based on the insights gained from the Kinsta API and MyKinsta.
By automating your security escalation process, you can respond to threats more quickly and minimize the potential impact of security incidents on your site.
Good practices for implementing API-driven security measures
Whenever you use an API, you’re exposing aspects of your site to the open web. Because of this, it’s imperative to follow some typical and accepted practices to ensure the security and integrity of your site and data.
There are a few key guidelines to keep in mind here. First and foremost, you should always use secure authentication methods whenever you access an API. This could be an API key, OAuth tokens, or something else. Kinsta provides an API key authentication endpoint for this purpose:
const resp = await fetch(
  `https://api.kinsta.com/v2/validate`,
  {
    method: 'GET',
    headers: {
      Authorization: 'Bearer <YOUR_TOKEN_HERE>'
    }
  }
);

const data = await resp.text();
console.log(data);
Remember that you shouldn’t expose your API credentials in client-side code or public version control repositories. This is where you would need to look into what your programming language of choice offers. For instance, Python calls from a constants.py module, and PHP uses OpenSSL and other modules to protect sensitive information.
There are a couple of other important considerations to make, too:
- Data handling. When you retrieve sensitive data through the Kinsta API, ensure you handle and store that data in a secure way. You’ll also want to follow accepted practices for data encryption, access control, and compliance with any privacy regulations.
- Regular testing and updating. Your testing process should be continuous, and this is something you can achieve with the Kinsta API, too. These constant and continuous tests and updates ensure your site and its security remain effective against evolving threats.
Finally, following the principle of least privilege is near-mandatory when you set up any level of access for your team or third-party services. In a nutshell, only grant the minimum level of access each user or service requires to perform tasks. What’s more, review and revoke any unnecessary permissions on a regular basis.
Reporting on IP restrictions and activity monitoring
For client site security management, it’s great practice – and as good as crucial – to provide regular and transparent reporting on how effective your strategy is. Your clients deserve to stay in the loop about the steps you’re taking to protect their sites and the results of your efforts. This helps to build trust and demonstrate the value of what you offer.
As such, you’ll want to ensure the reports you deliver give as much information to your clients as possible. Kinsta can let you pull from a range of metrics and insights for each individual site:
- The number of blocked IP addresses.
- Trends in suspicious activity, such as failed login attempts or unusual traffic patterns.
- Your site performance and uptime metrics. These can be indicative of potential security issues.
Of course, you have much more available. Even so, it’s important to present these insights in the best way for your clients. Here are a few tips on what to include:
- The actions you’ve taken in response to identified threats, such as site backups or security patches.
- Use data visualization tools to present clear, accessible, and understandable information on a site’s security. Graphs, charts, and dashboards can help your clients get up to speed on the current security provision, and whether your efforts are effective.
- You should look to provide context and explanations for the data you present. It’s a mistake to assume that your clients will have a deep technical understanding of security concepts. Instead, use plain language and provide examples to help them grasp the significance and gravitas of the metrics and trends you’re reporting on.
Overall, offer transparency about any challenges or limitations you encounter with the site’s security. For difficult threats or issues, it’s a sound idea to be upfront about it and explain what you’re doing to improve.
This is where offering recommendations for further security improvements can be helpful. These will come from your insights and analysis. For instance, it could include suggestions for additional security measures, such as implementing two-factor authentication or updating outdated plugins.
Summary
The Kinsta API has plenty of scope for a multitude of site tasks. When it comes to security, though, it’s a winning way to keep your site and users safe. It lets you automate tasks such as retrieving logs, checking for unusual activity, and blocking IPs automatically.
We like the compelling and powerful approach of hooking the API up with other apps and tools. This way, you can have a complete programmatic method of securing your site. Coupled with the visualization options through the Kinsta APM, your site can remain safe for a long time to come.
How would you like to use the Kinsta API to manage your site’s security? Please share your thoughts and insights in the comments section below!


Leave a Reply