Although Google Chrome is often reliable, it’s not completely immune to errors. As you’re browsing the internet, you may see a loading error with an “Aw, Snap!” message. This appears instead of the web page you wanted to see.
Fortunately, you can quickly and easily fix the Aw Snap Chrome error. Often, this will go away when you simply reload the page or clear your browser cache. However, there are also more advanced solutions you can try if the issue persists.
In this post, we’ll give you an overview of the “Aw, Snap!” error and its main causes. Then, we’ll show you eight straightforward methods for fixing this problem. Let’s get started!
Check Out Our Video Guide To Fixing the “Aw, Snap!” Error in Chrome
What Is the “Aw, Snap!” Error? (Plus What Causes It)
Currently, Google Chrome makes up 77 percent of the desktop browser market share. This makes it the most popular channel for surfing the web:
As you’re using Chrome, you may experience loading errors. One of the most common messages is the “Aw, Snap!” error:
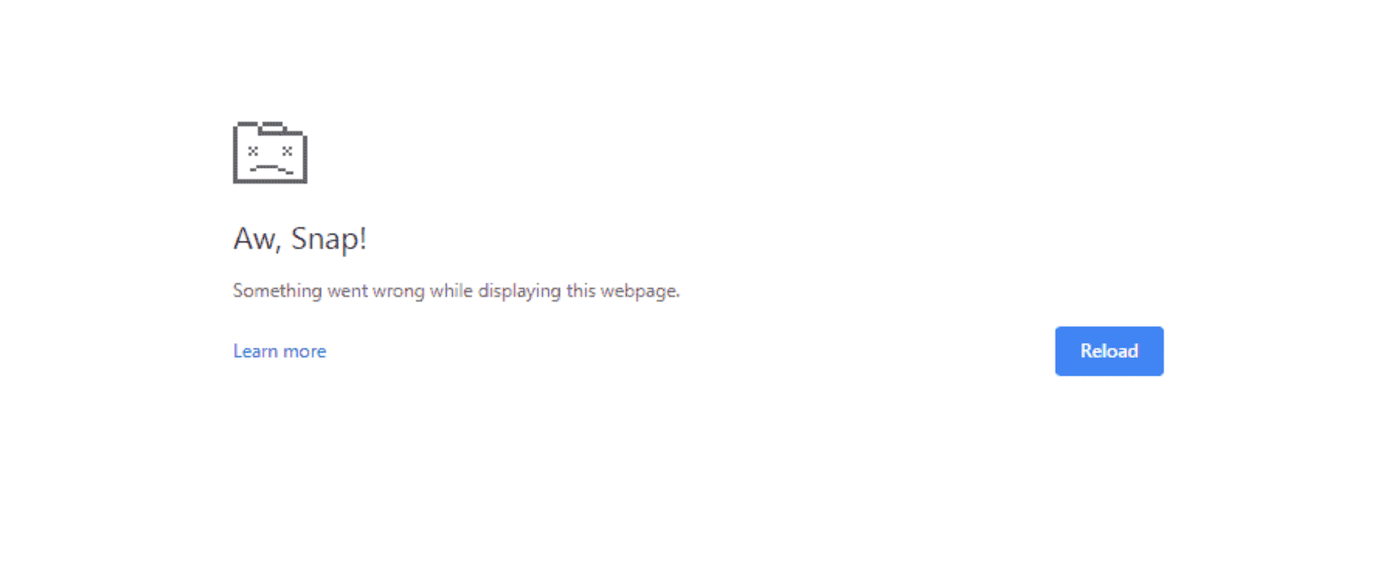
This error code will stop you from continuing to browse online content. When it happens, a Chrome page will load slowly or not open at all.
Since the “Aw, Snap!” message is a generic error, it can have a variety of causes. Sometimes, Google Chrome encounters a one-time loading problem that can be solved by simply re-loading the page.
In other cases, your device may run out of available memory. If you have too many tabs or applications open, Chrome can have difficulty loading a new web page.
Here are some additional reasons why you might see the “Aw, Snap!” error:
- Corrupt browser data
- Faulty extensions
- Malware
- Unstable internet connection
Since there are so many potential causes, you may become overwhelmed when this error happens. However, you shouldn’t worry too much, as this is a common problem for Chrome users, and you can easily troubleshoot and identify what went wrong.
How To Fix the “Aw, Snap!” Error in Chrome (8 Methods)
Once you experience the Aw Snap Chrome error, it can be frustrating to deal with. To help you resume browsing normally, let’s discuss some effective ways to fix this problem!
1. Reload the Page
When Chrome produces an “Aw, Snap!” message, it likely encountered a problem during the loading process. Before you try more advanced troubleshooting methods, start by simply reloading the page. If it was a temporary glitch, this can potentially remove the error.
On a desktop device, simply find the refresh icon in the upper left-hand corner:

You can also use some keyboard shortcuts depending on your operating system:
- Windows and Linux: F5 or Ctrl + R
- Mac: Command + R
If you’re using a mobile device like a phone or tablet, the refresh process will look a little different. In the Chrome app, select the three-dot icon and hit Reload:
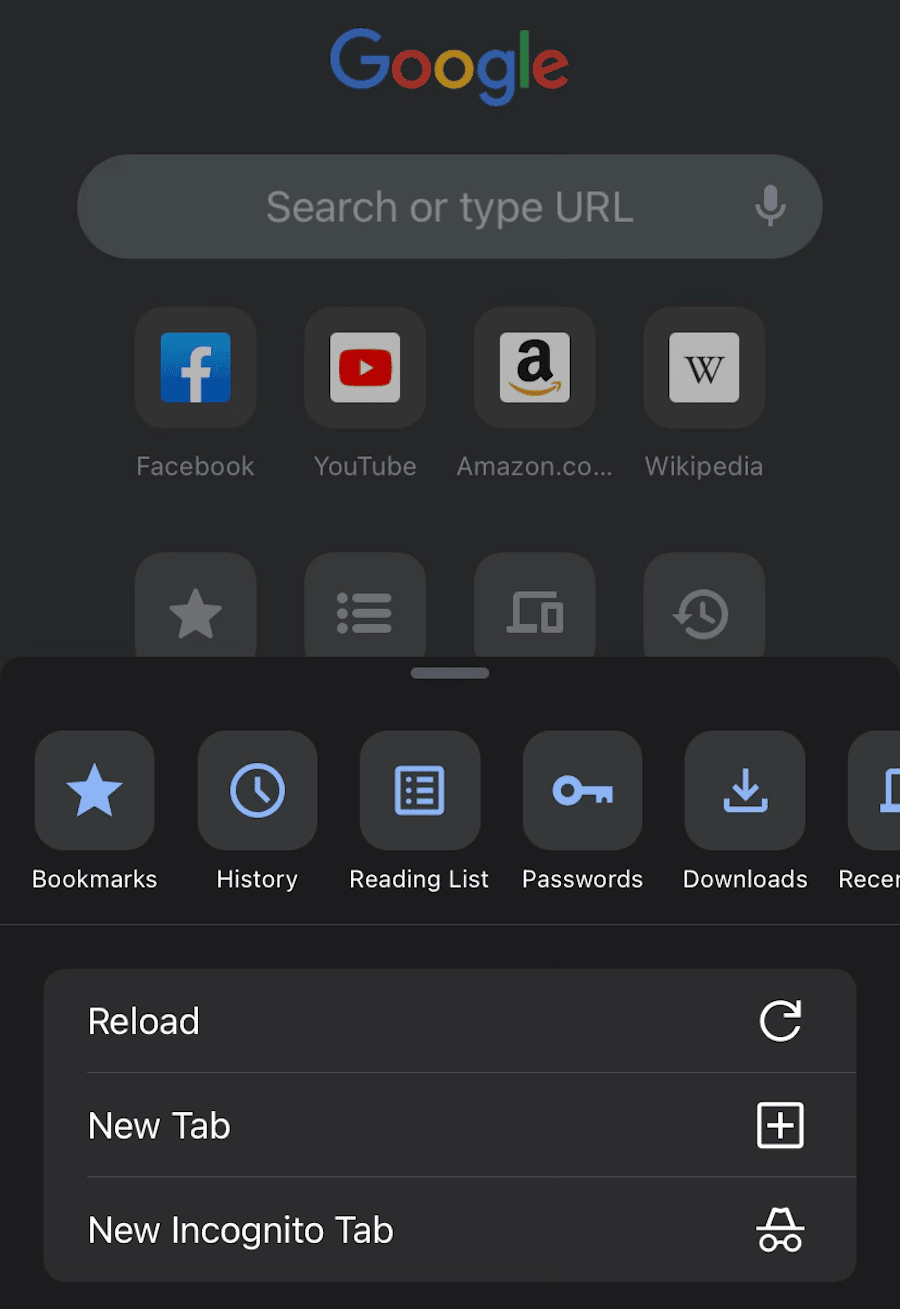
In many cases, this will resolve the error. However, if you still see the “Aw, Snap!” message, it’s time to try alternative methods.
2. Check for an Unstable Internet Connection
Another possible reason for the Aw Snap Chrome error is a poor internet connection. If your computer or mobile device isn’t properly connected to Wi-Fi or a wired network, Chrome will have trouble loading any online content.
First, try putting your device in airplane mode for a few seconds. This will disconnect it from any networks. Then, turn it off and reload the page.
If the problem persists, we’d recommend removing unnecessary operations. For example, you should disable any downloads, streaming, and gaming that are taking up unnecessary bandwidth.
You may also be using a Virtual Private Network (VPN). Although this helps you browse more securely, it could cause the Aw Snap Chrome error. To successfully reload the page, try disabling your VPN.
On the other hand, your device might not be connected to the internet. If you’re using Wi-Fi, reset the entire router. For a poor cellular connection, you’ll have to find a location with better service.
3. Clear Your Browser Cache
When you visit a website for the first time, your browser has to request the site’s data from its server. To avoid repeating this process every time you return, your browser will save this data in a cache. This can result in a faster loading time for return visits.
Although cached data has its benefits, it can also result in loading problems. If the cache is corrupted, this could be the reason for the “Aw, Snap!” error message.
For the next troubleshooting step, Google recommends clearing your browser cache. To do this, find the three-dot icon in the upper right corner. Then, click on More Tools > Clear Browsing Data:
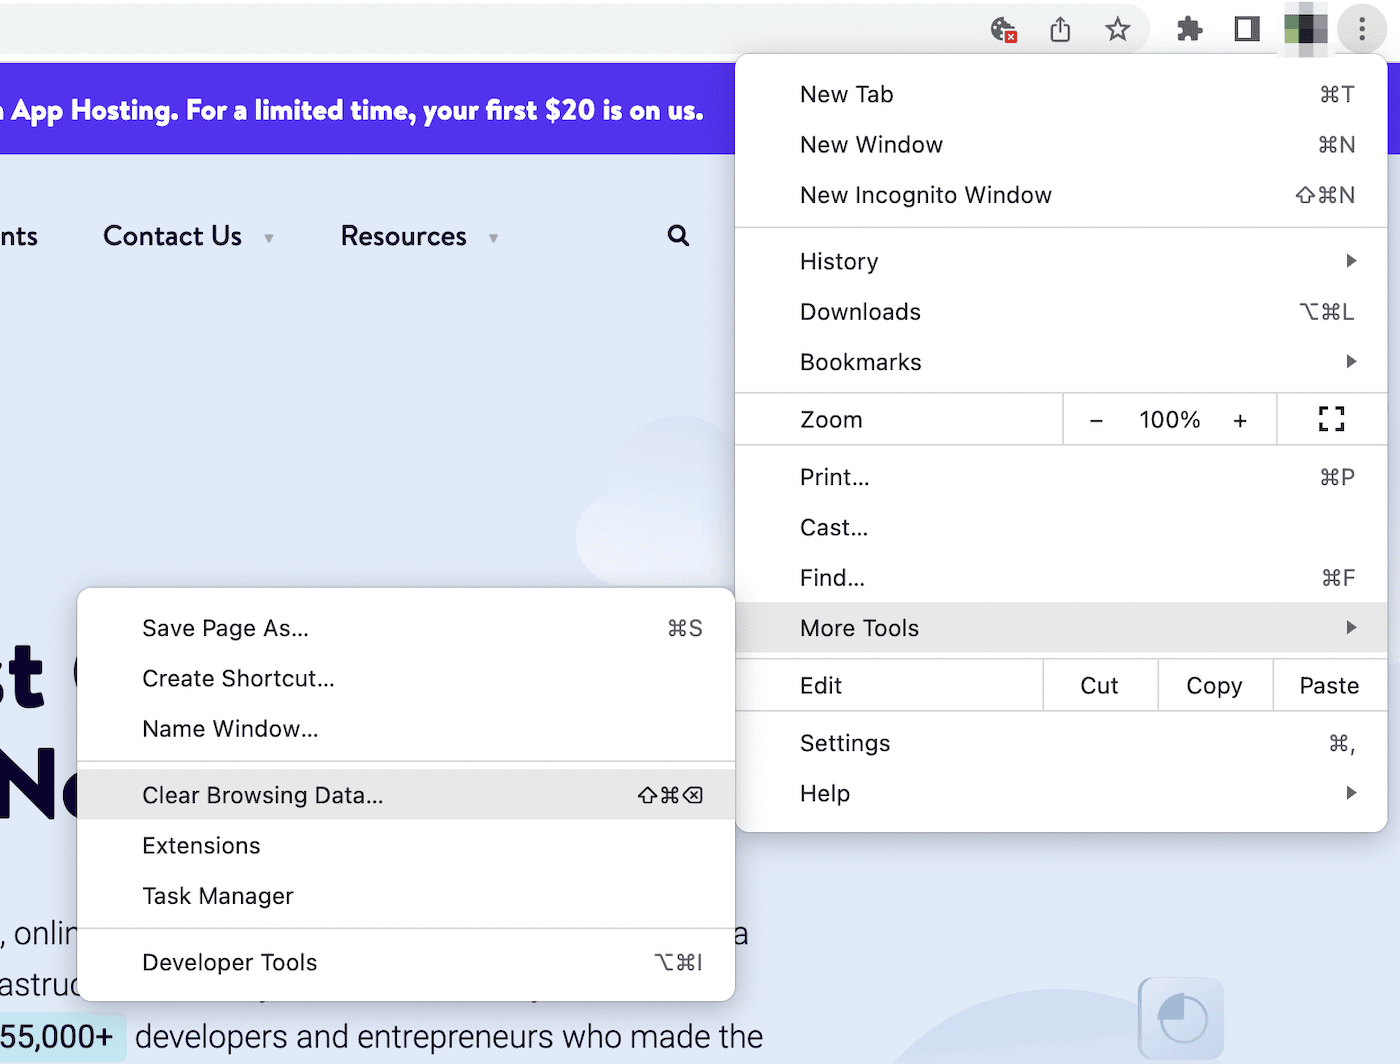
This will open a pop-up window where you can customize what information is cleared. Under the Basic tab, be sure to select Cached images and files:
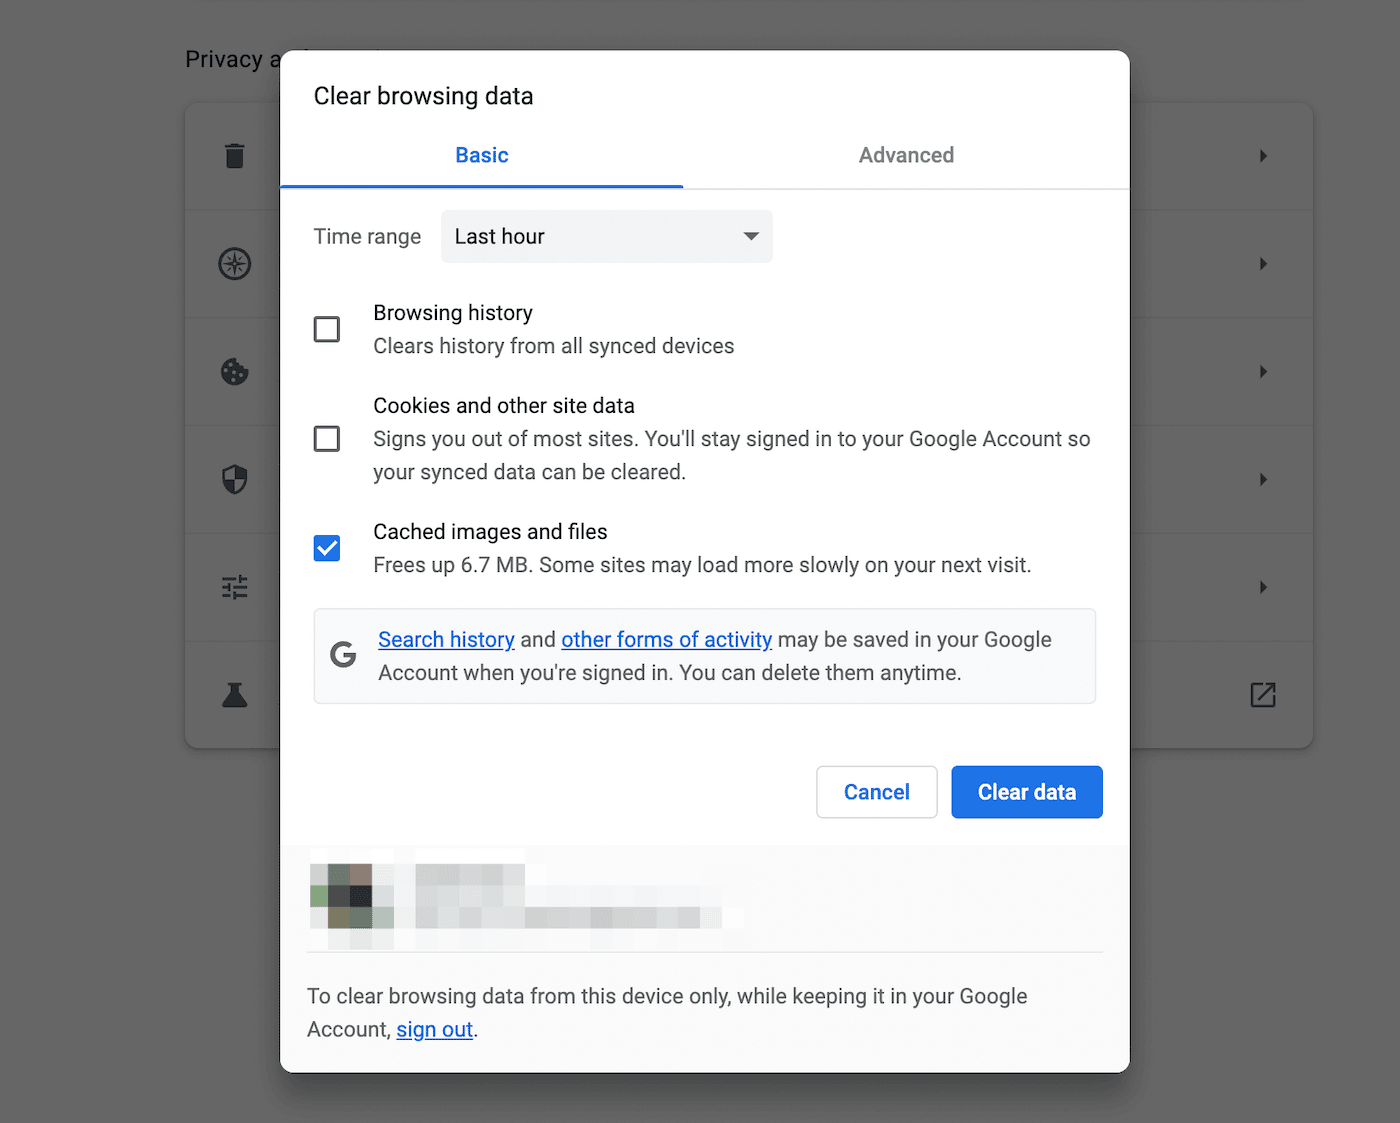
After you hit Clear data, try to reload the website you were attempting to reach. If it loads, you’ll know that there was a problem with your cached data.
To prevent this from happening again, navigate to Privacy and security > Cookies and other site data. On this page, feel free to block third-party cookies. You can also choose to clear cookies after you close a window:
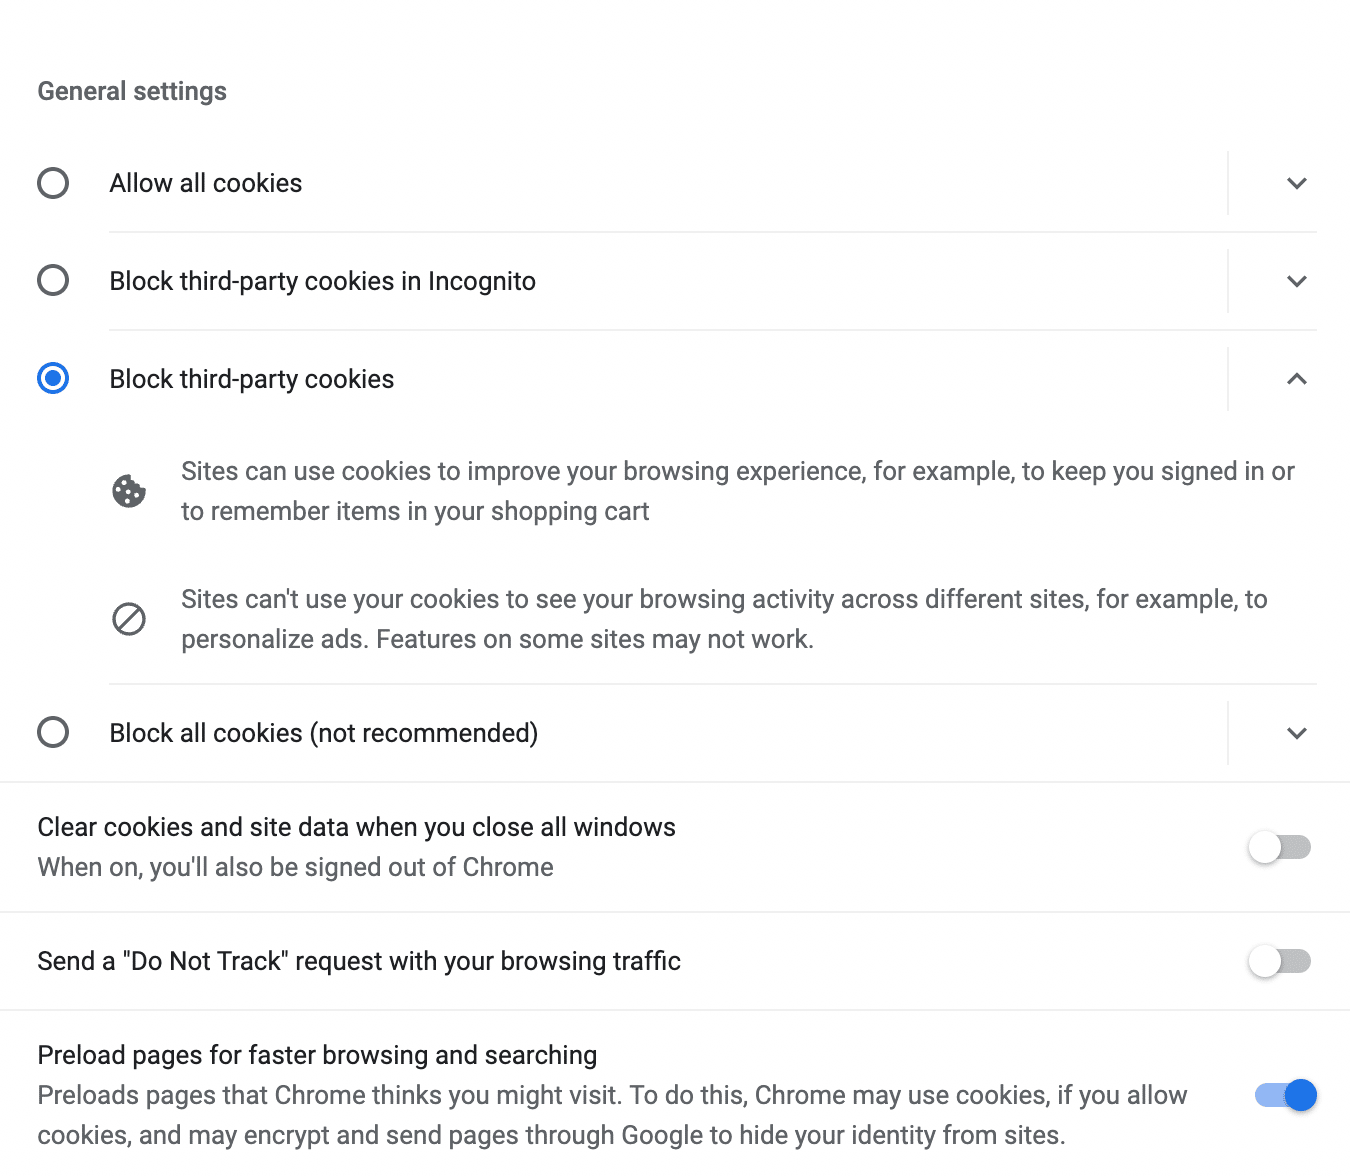
This can essentially automate the cookie removal process. However, keep in mind that without cookies, you may have a slower browsing experience.
4. Open an Incognito Tab
If you don’t want to completely clear your browser cache, you can simply open the page in incognito mode. This is a private browser that prevents Chrome from saving any cookies, site data, form entries, or browsing history.
All you’ll need to do is open the Chrome menu again and click on New Incognito Window:
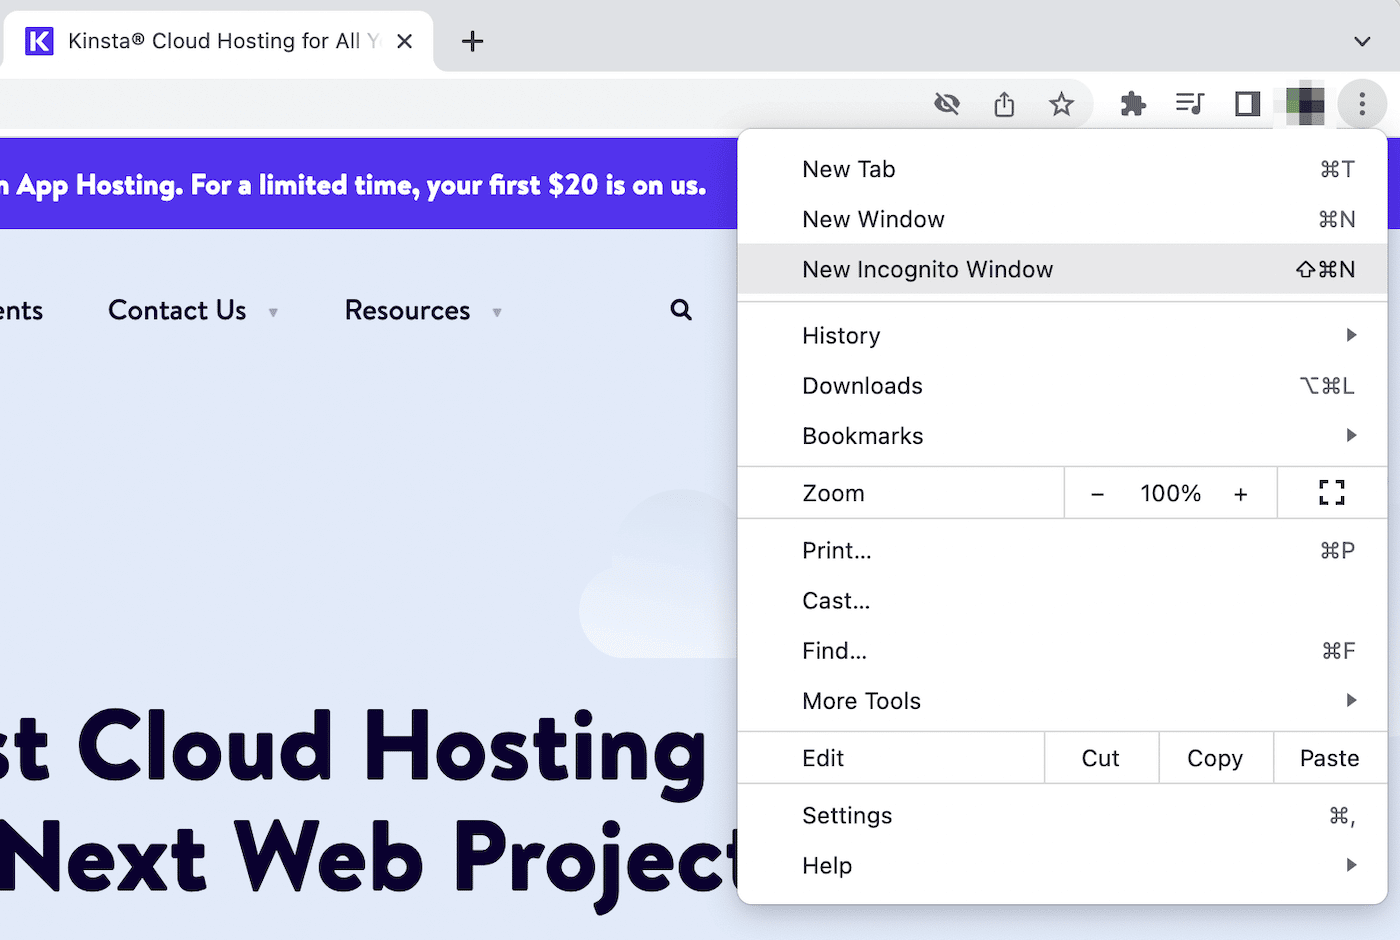
Alternatively, here are some shortcuts for this process:
- Windows: Control + Shift + N
- Mac: Command + Shift + N
When you’re using the Chrome mobile app, this will be under New Incognito Tab:
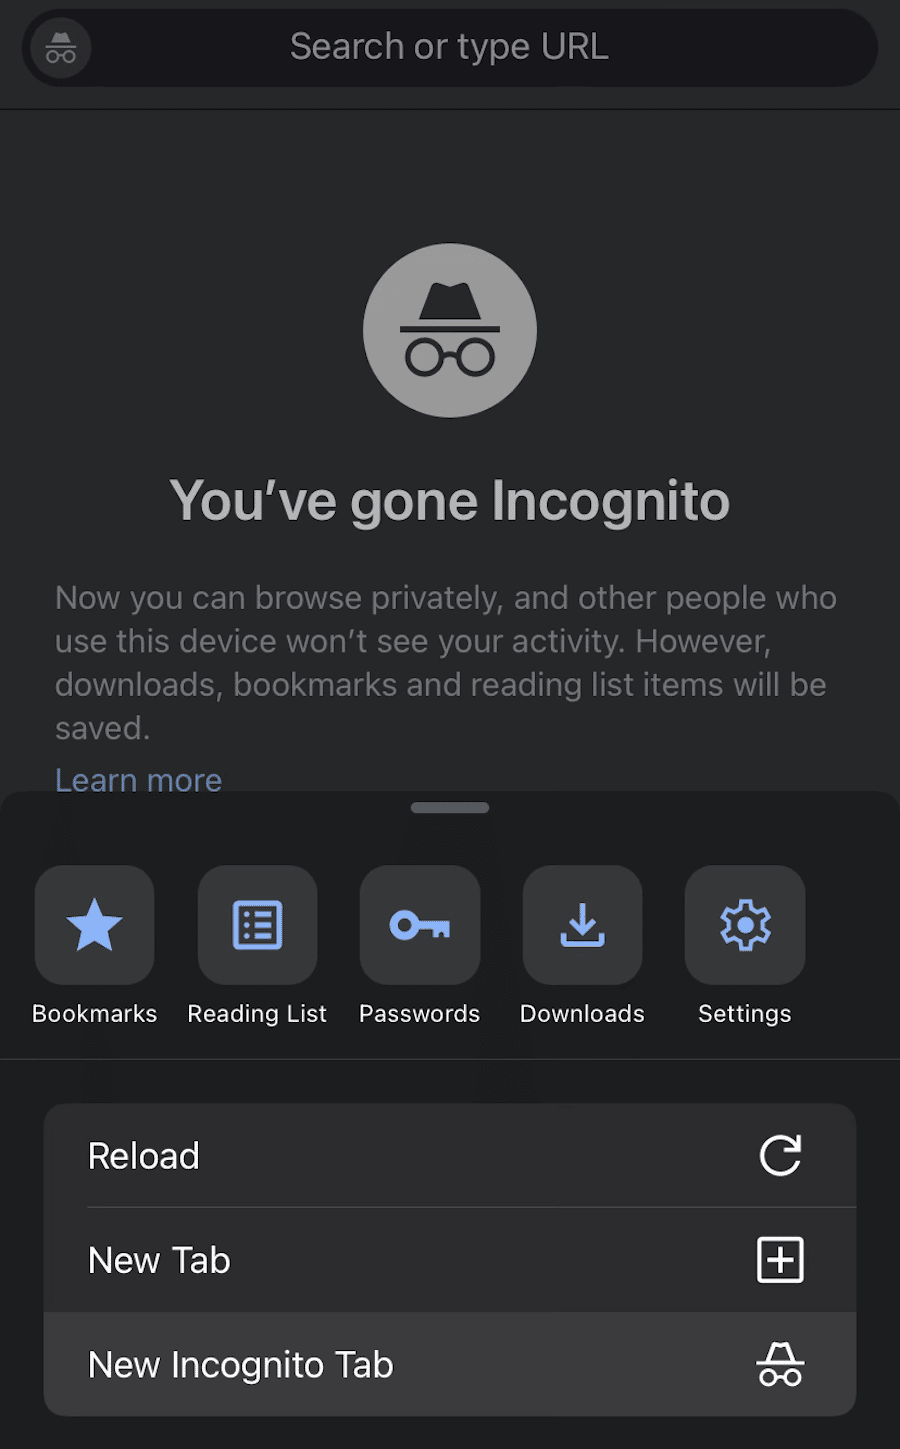
In the new window, enter the URL for the web page you were trying to visit. If it loads properly, the issue lies in your cache or browser extensions. Since Incognito mode temporarily disables these features, it can allow you to work around the “Aw, Snap!” error.
5. Disable Extensions
As you’re using Google Chrome, you may install different extensions to improve your productivity and automate necessary tasks. Since these contain third-party software, they can sometimes be poorly coded. That means some browser extensions could conflict with Chrome, causing the “Aw, Snap!” error.
To disable your extensions, click on More Tools. Then, select Extensions:
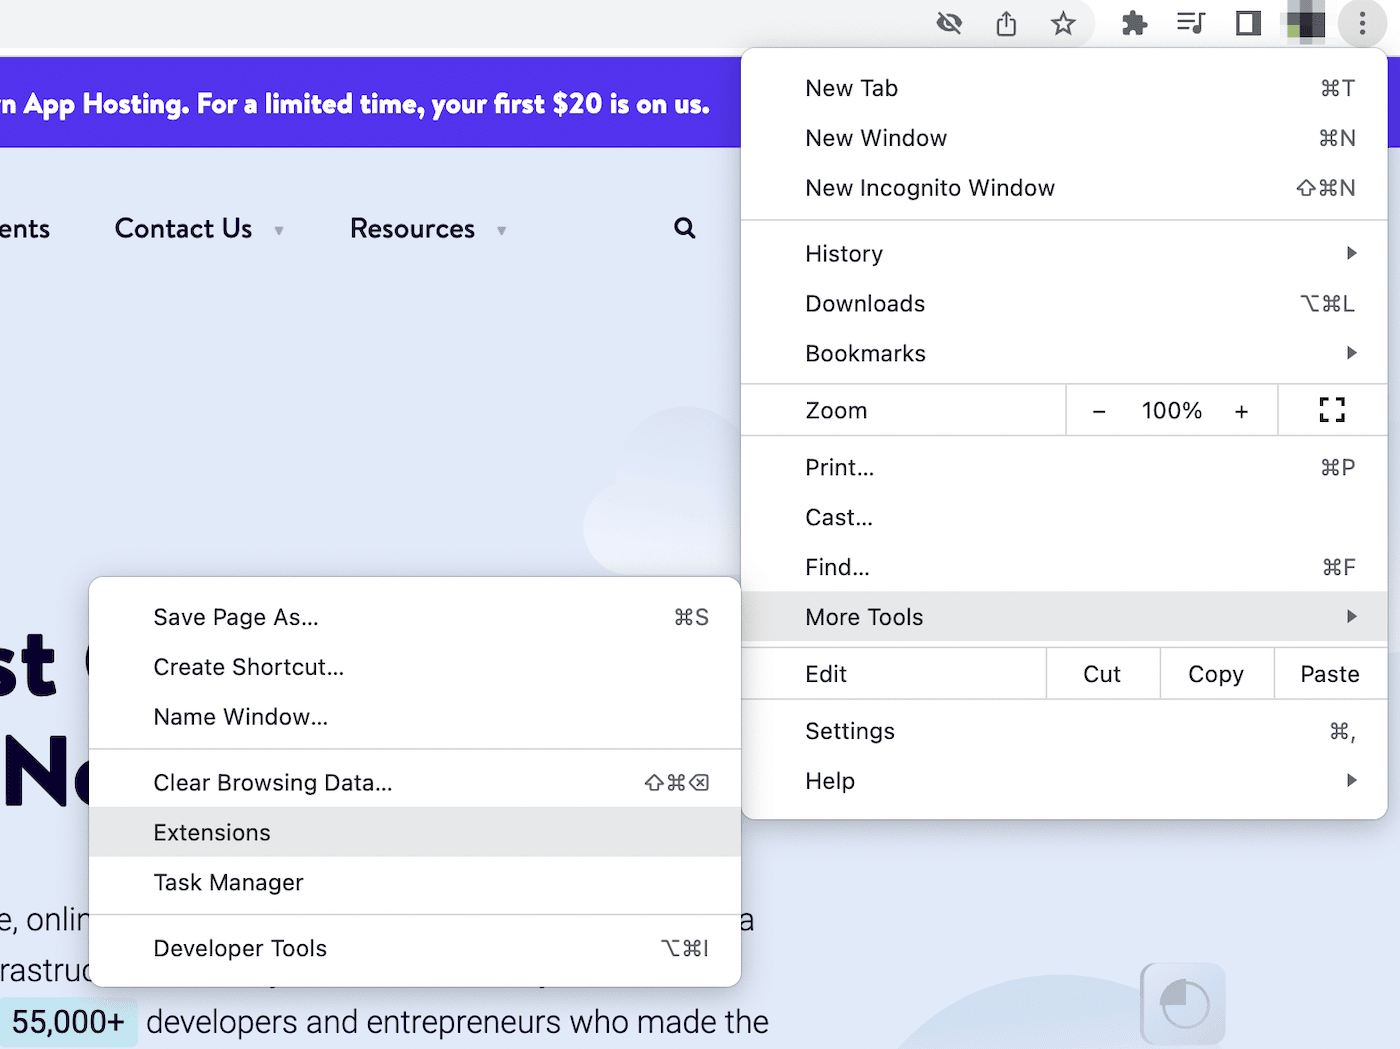
This will open a list of your active Chrome extensions. Using the toggle switches, you can turn off each one:

After this, reload the Chrome page. If it fully renders, you’ll know that one of these extensions was responsible for the error.
In this case, go back to your extensions page and enable them one by one. After you turn on an extension, hit Reload.
Whenever the error occurs again, note which extension you just activated. Then, you can remove this software altogether.
6. Update Google Chrome
As a regular Chrome user, you likely already know that it performs automatic software updates. However, you may be unknowingly working with an older version without realizing it. If your browser doesn’t get consistent performance and security updates, it could have more crashes, glitches, or loading problems.
If you’re not sure whether you need to update Chrome, it’s fairly easy to check your current version. You’ll simply need to open the Chrome Settings:
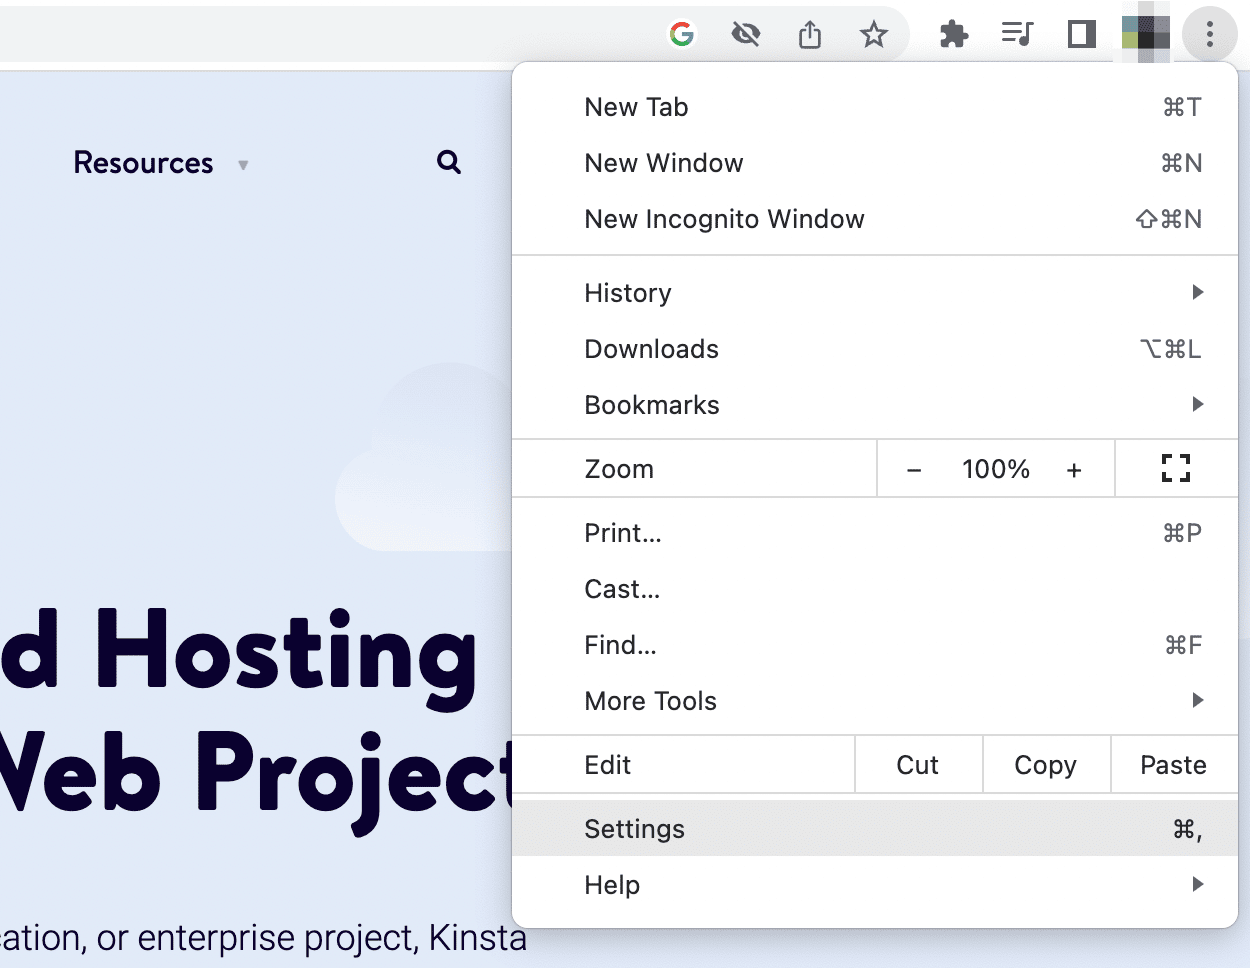
After you click on About Chrome, it will check that your software is up-to-date. If there are any new versions available, be sure to install them:
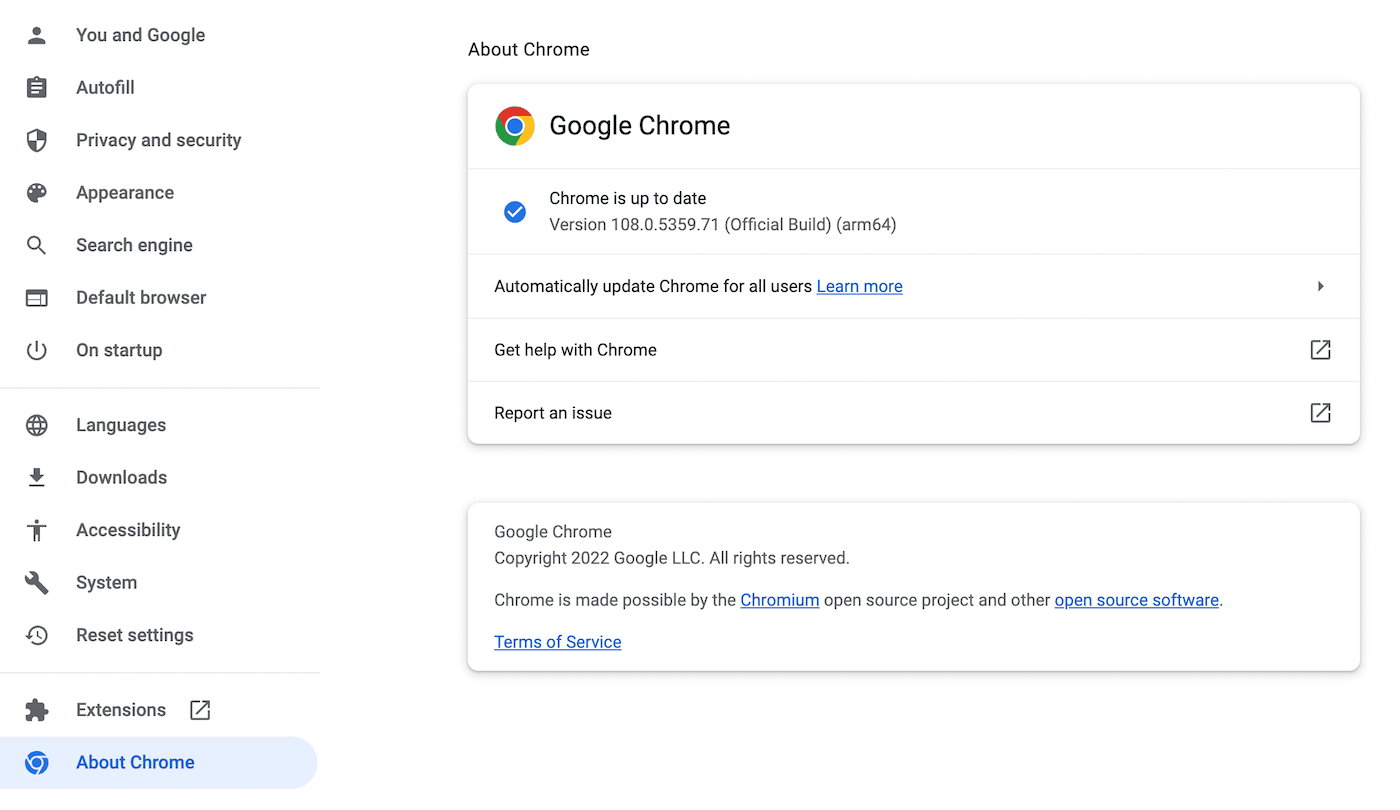
If you’re still unable to make online searches, your software likely wasn’t the problem. When you see a persisting error, continue to the next method!
7. Restart Your Device
Even after extensive troubleshooting, you might not be able to find the root cause of the “Aw, Snap!” error. If this happens, you can try restarting both Google Chrome and your personal device. This also shuts down any running program or app that might create an incompatibility issue.
To begin, completely close the Chrome app. Then, reopen it and enter the target URL again. Sometimes, this will refresh Chrome and enable you to view the content.
Alternatively, your device could need a simple refresh. To fix the error, turn off your computer, phone, or tablet.
No matter your operating system, you can usually power down your computer in the main menu. For example, Macs have Restart and Shut Down buttons in the Apple menu:
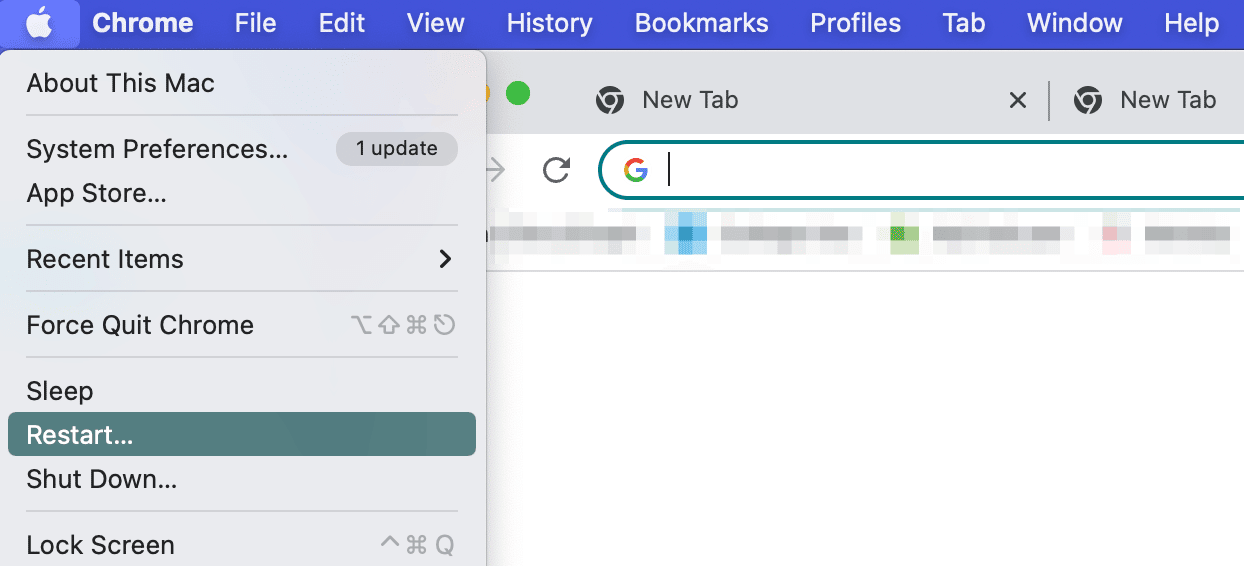
For Android phones, you’ll need to hold down the power button. Similarly, iPhones require you to press down both the volume and side button.
After you’ve turned off your device, turn it back on. If Chrome loads successfully, it could have been a short-term glitch.
8. Find and Remove Malware
In more severe cases, the Aw Snap Chrome error could be a result of malware on your device. Although this can be frightening, here are some of the main warning signs of a security vulnerability:
- Strange advertisements and pop-up windows
- Unauthorized changes to the browser
- Slow loading speeds
- Reappearing extensions or toolbars
- Redirects to unfamiliar pages
- Anti-virus software alerts
If you need to remove malware from a Windows computer, Chrome has a built-in cleanup tool. To find this, go to Settings > Advanced > Reset and clean up > Clean up computer:
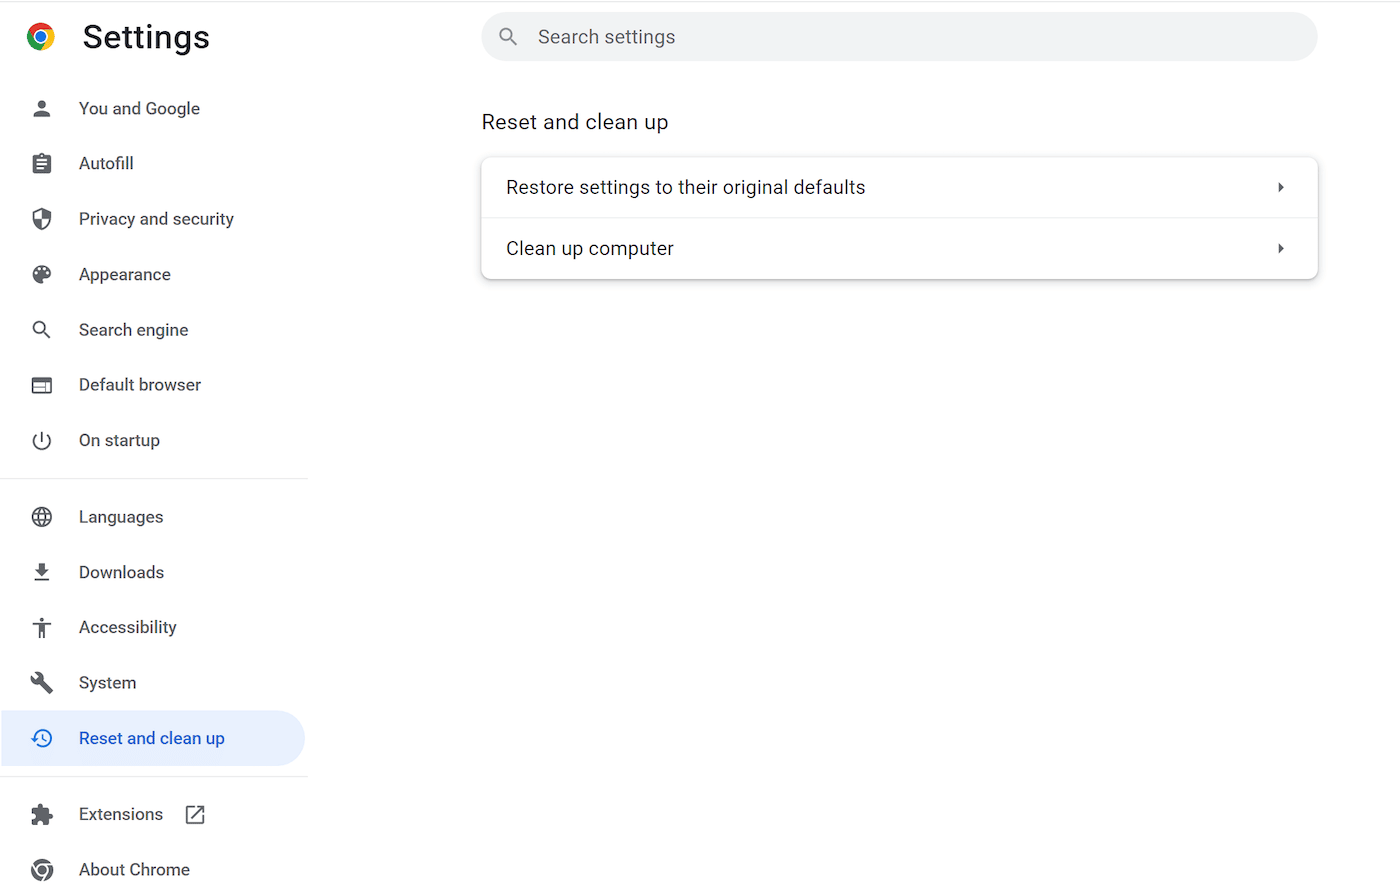
Then, click on Find so that Chrome can scan for malware. Once it alerts you about unwanted software, hit Remove.
On a Mac, you can search through your installed programs for unfamiliar software. Once you find a suspicious application, right-click on it and select Move to Trash:
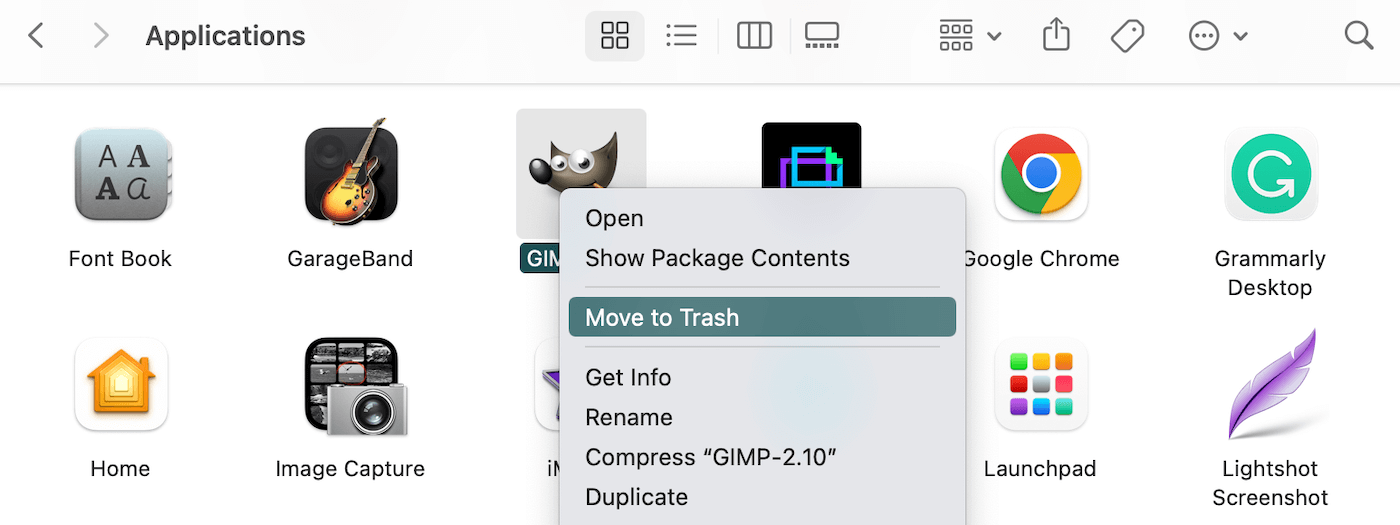
As a last resort, consider resetting Chrome to its default configuration. On the Settings page, click on the Reset Settings tab:
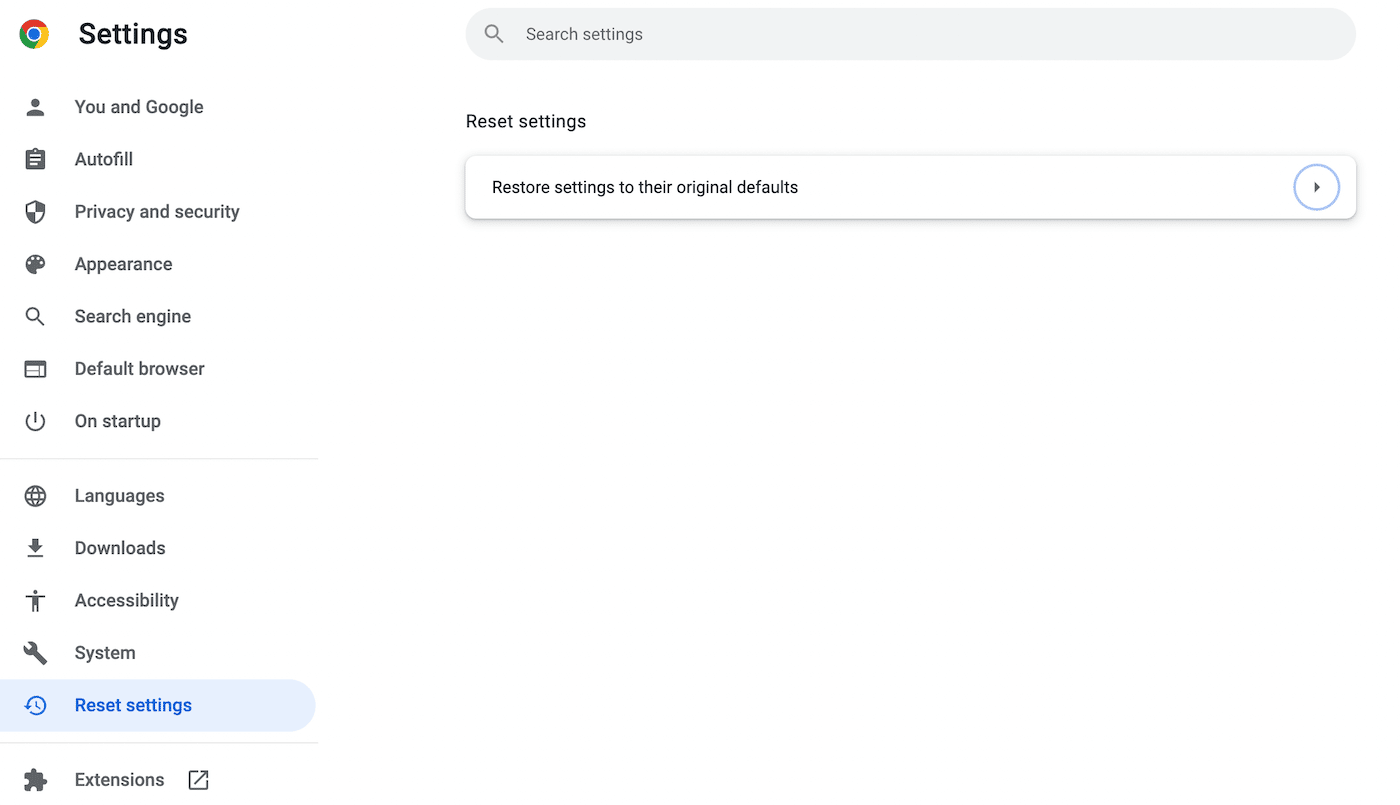
Finally, hit Restore settings to their original defaults. You’ll have to confirm this action in the pop-up window:
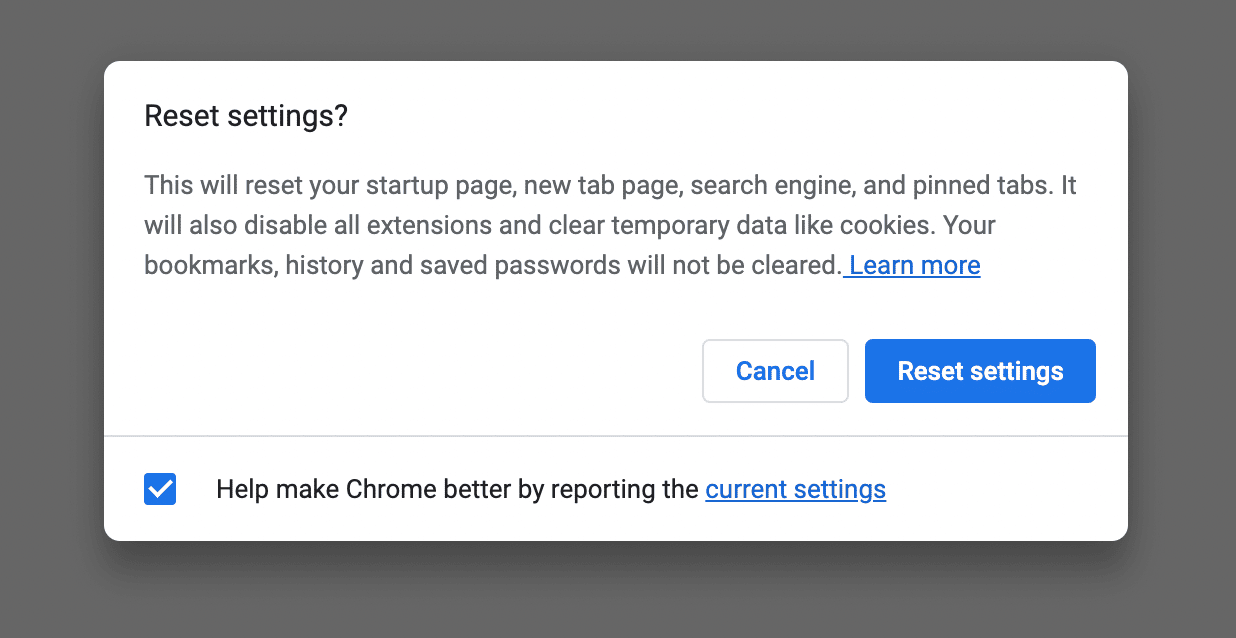
Now Chrome should be functioning normally again!
Summary
When you’re searching through online content, you may unexpectedly find a Chrome error message labeled “Aw, Snap!” If you have a poor internet connection, corrupt cache data, or incompatible extensions, this error could prevent you from browsing normally.
Some simple solutions for the Aw Snap Chrome error are reloading the page, checking your internet connection, and opening a private browser. If none of those strategies resolves the problem, you can try clearing your browser cache, disabling extensions, or updating Google Chrome.
As a website owner, you’ll want to make sure anyone can easily access your content. With a Kinsta hosting plan, built-in performance monitoring can keep your website online and working properly!


