Need to undo changes in WordPress? Made a mistake and want to roll your content back to an earlier version?
In this article, we’ll show you how to undo in WordPress using a core feature called revisions, and its associated feature, autosaves.
Revisions and autosaves are basically a snapshot in time of your post, page, or custom post type that make it easy to roll back changes when needed.
In this article, we’ll start by showing you how to undo in WordPress using revisions. Then, after we’ve covered the how-to part, we’ll explain a little more about how revisions and autosaves work, and some tips for using them effectively. And if you’ve made a huge mistake, there are always snapshots.
- How to Undo in WordPress Using Revisions
- More About WordPress Revisions and Autosaves
- Why We Recommend Limiting Revisions in WordPress
- Last Resort – Restore a Snapshot (Backup)
How to Undo in WordPress Using Revisions
We’re starting with the “how to” part because we understand that you might be in a stressful situation and want your work back ASAP. However, once you’ve fixed things, we encourage you to read through the whole post because there are some important performance considerations for using WordPress revisions.
Step 1: Open Revisions Interface
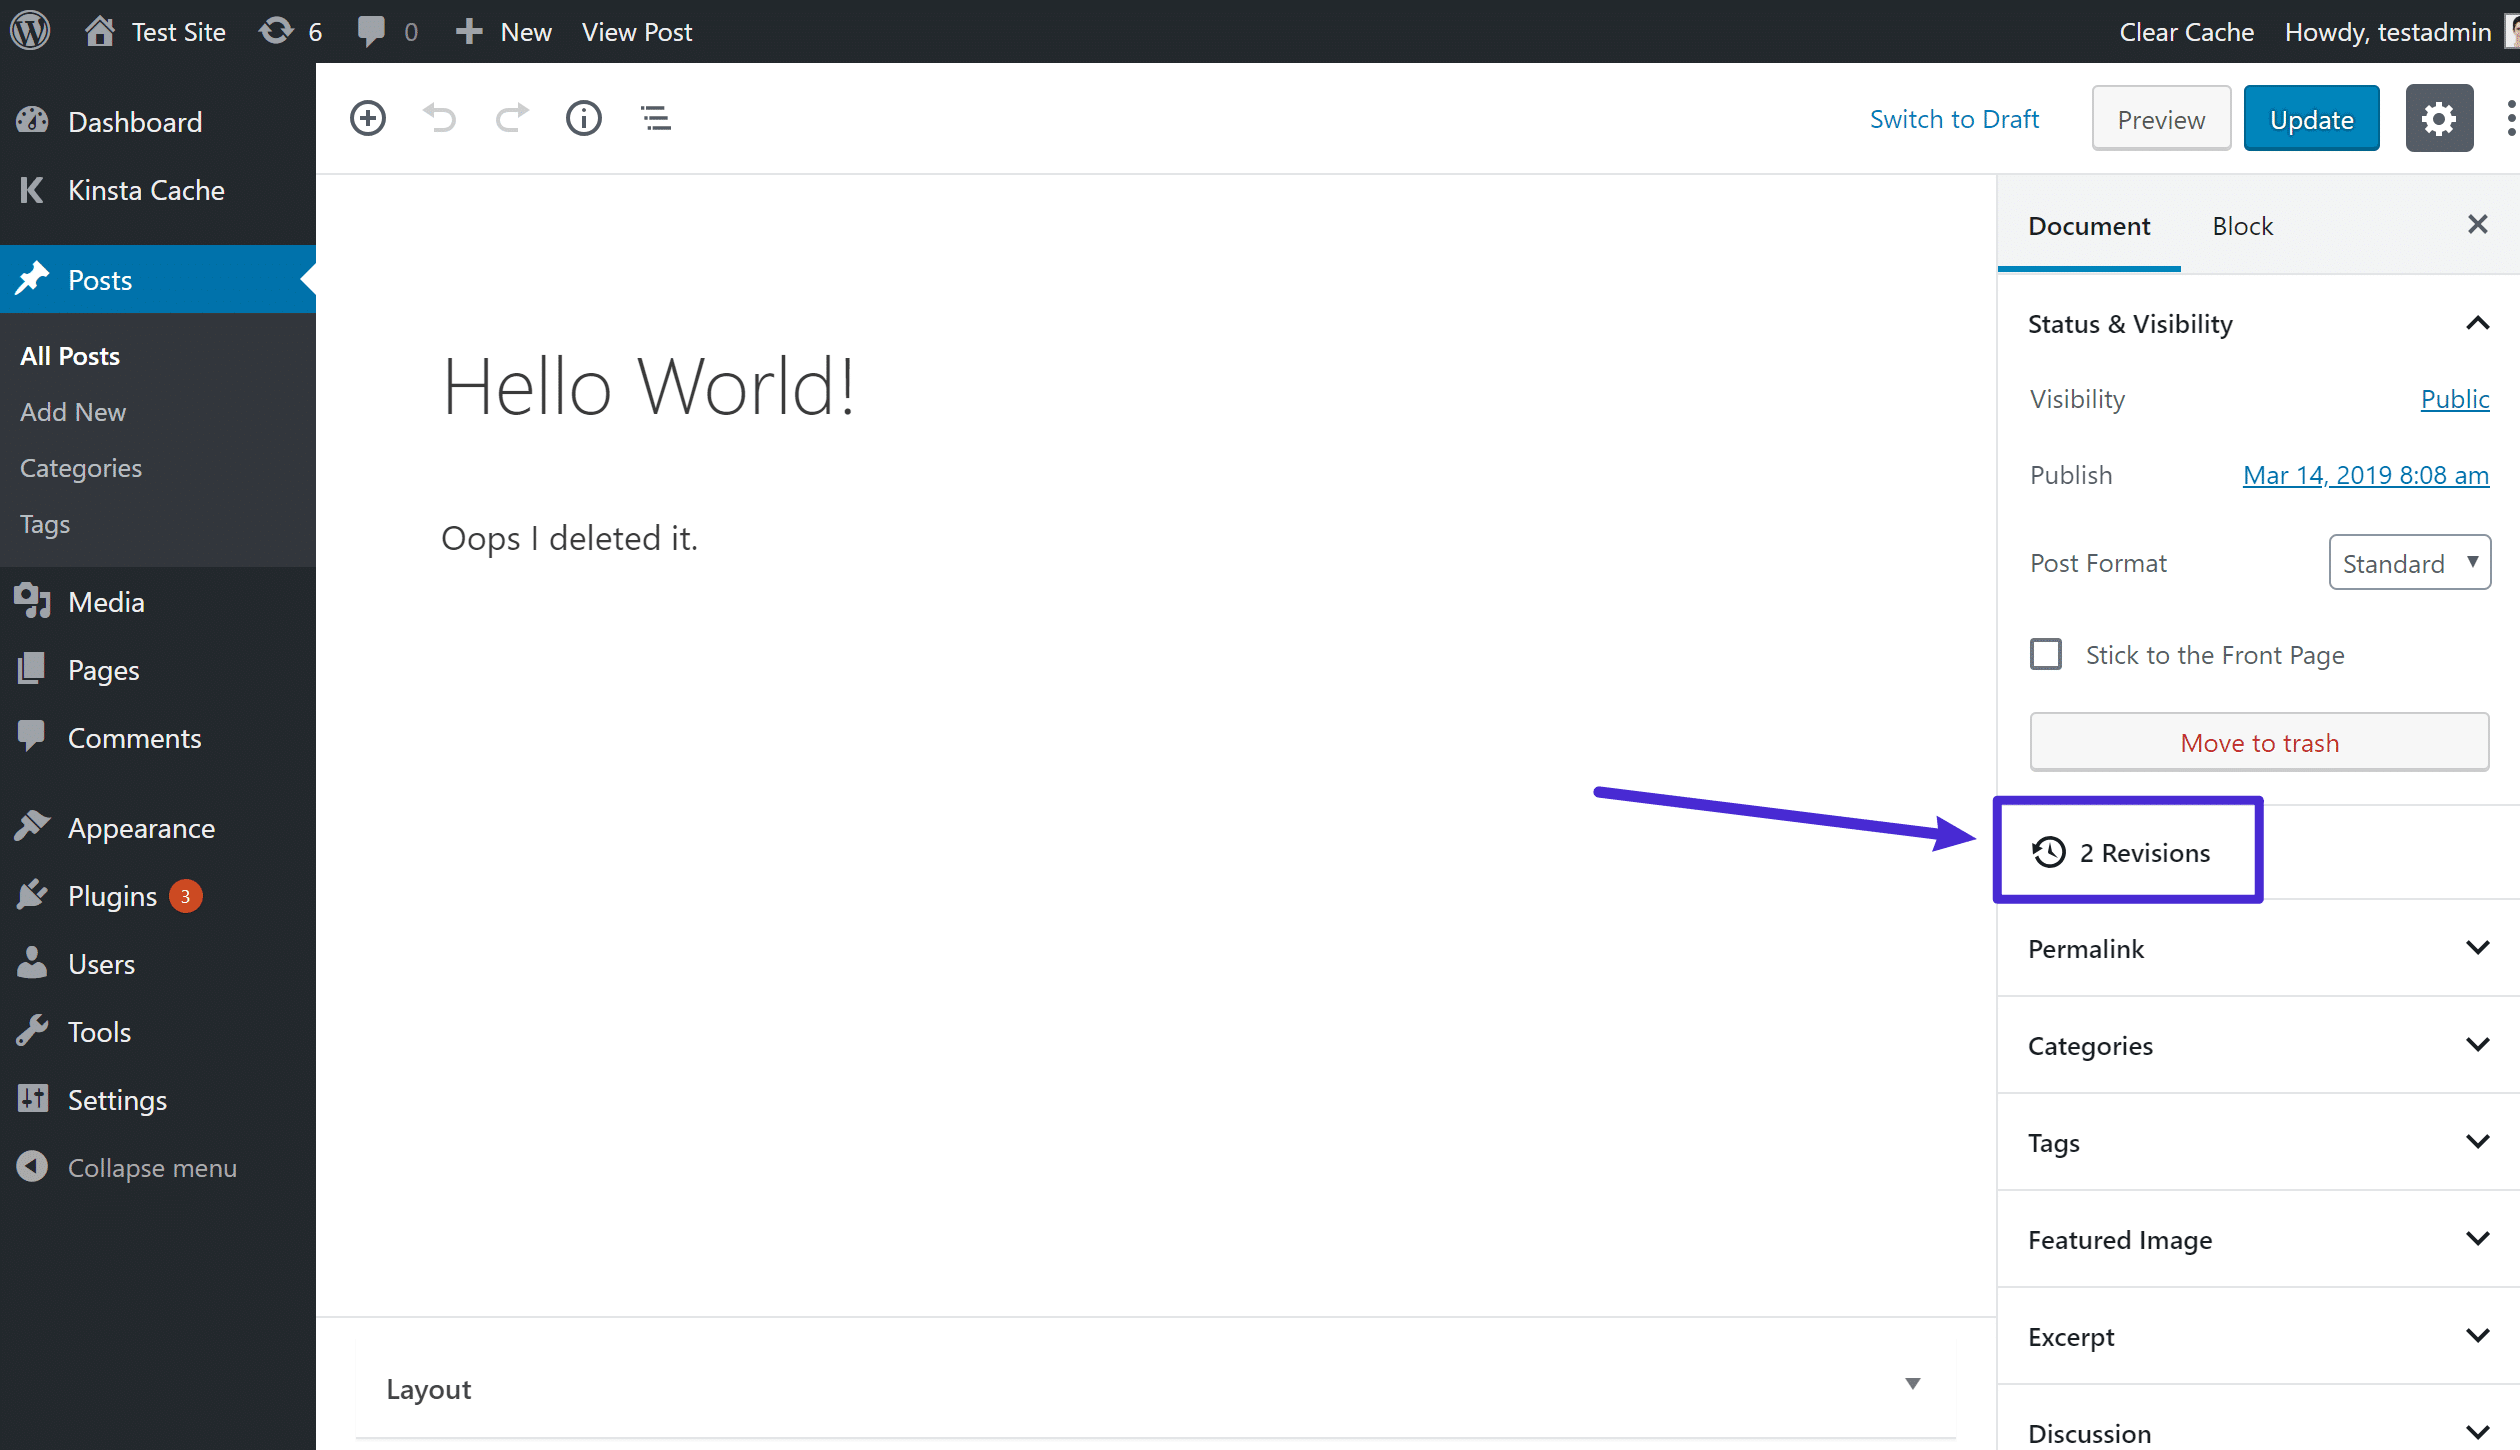
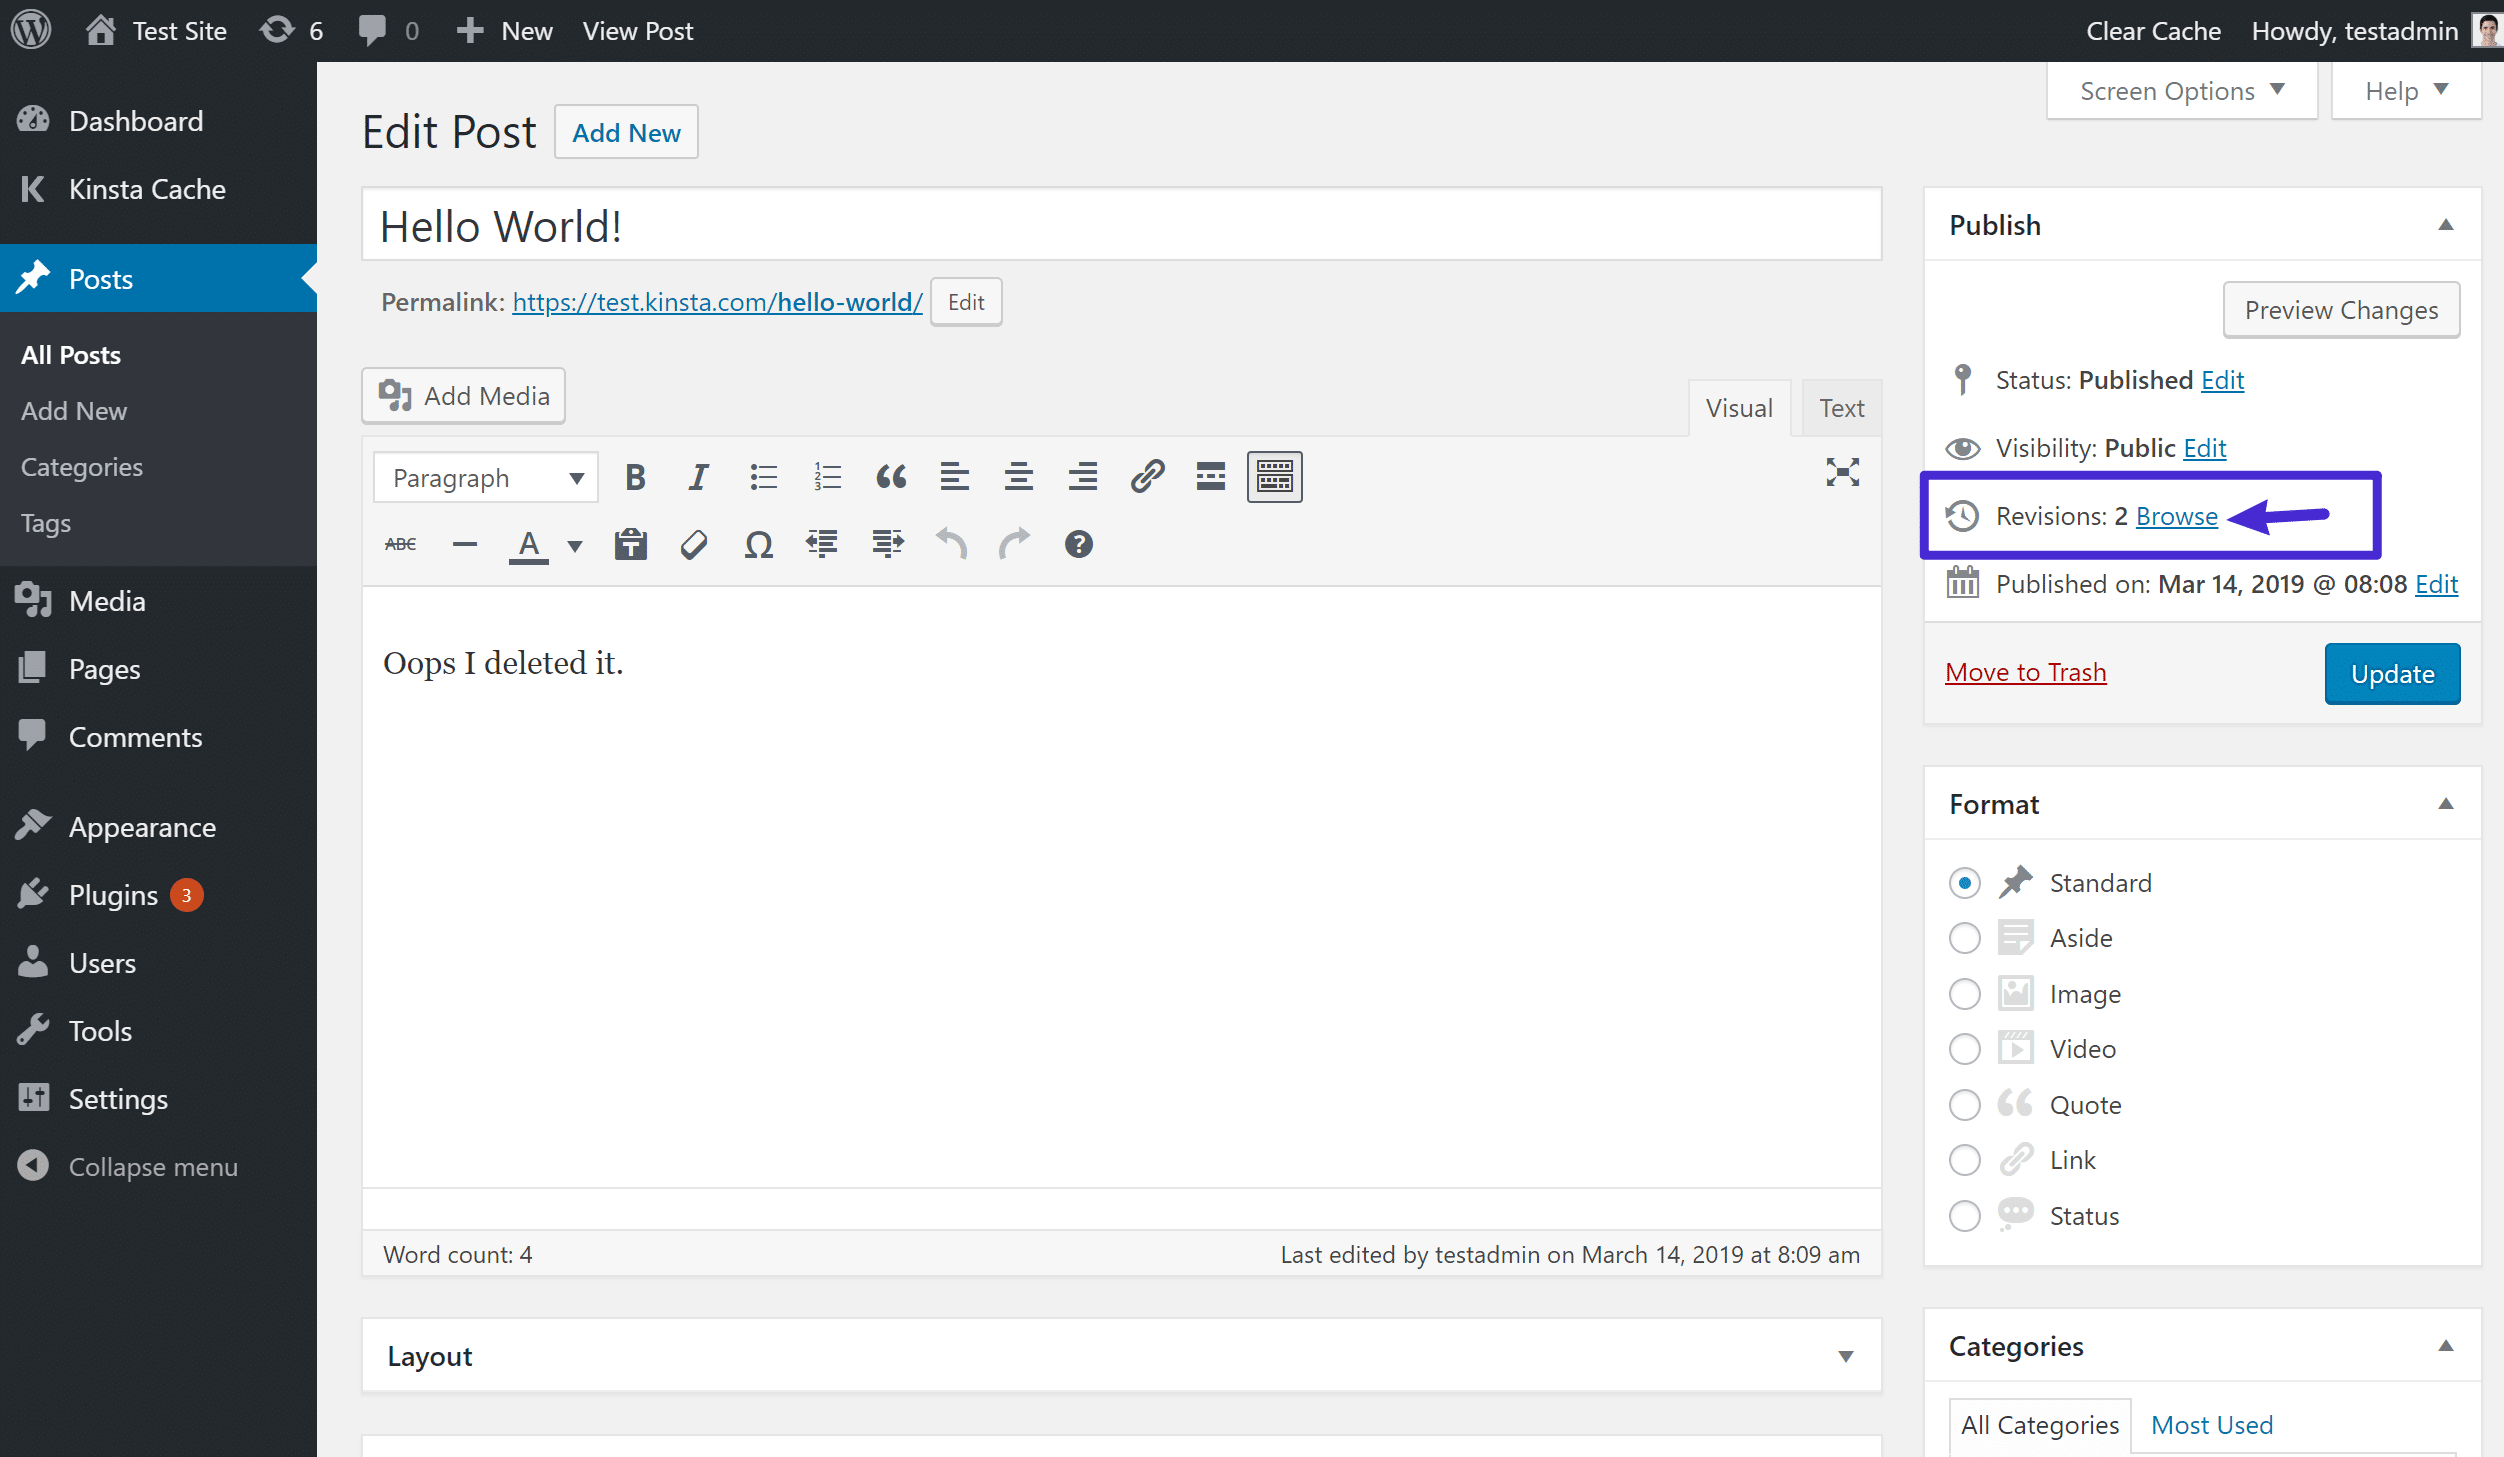
To access the revisions feature, look for the Revisions link in the sidebar of the WordPress editor.
Here’s where it’s located in the new block editor (Gutenberg):
And here’s where you’ll find it in the Classic editor:
No matter how you open the revisions interface, it will look the same.
Step 2: Choose Revision To Restore
Here’s what the revisions interface looks like:
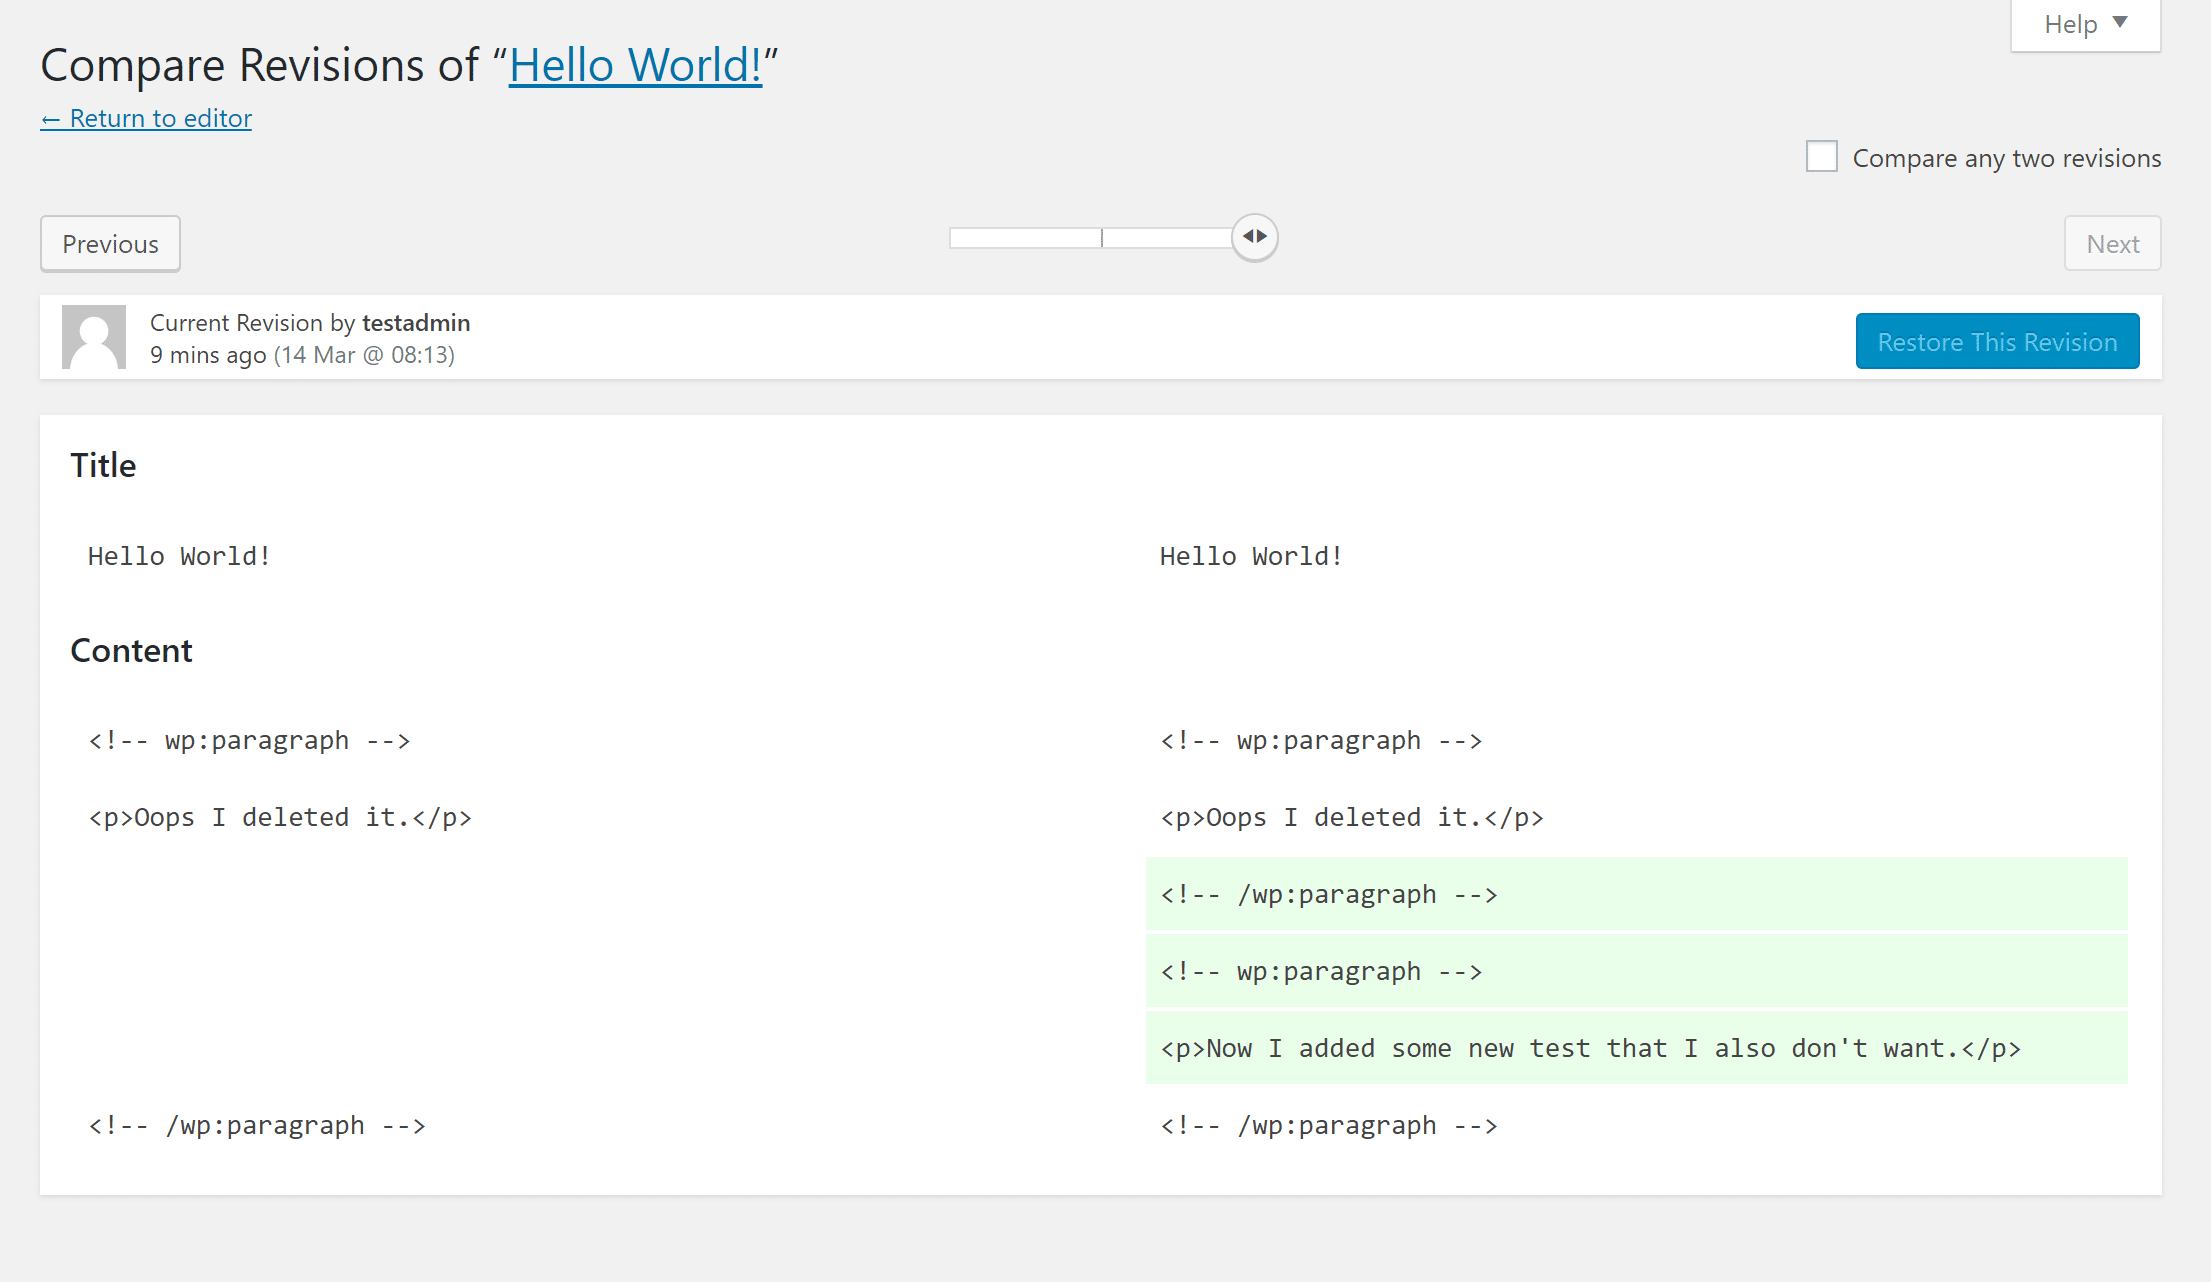
There are a few things going on here. First, you can use the slider at the top to select different revisions.
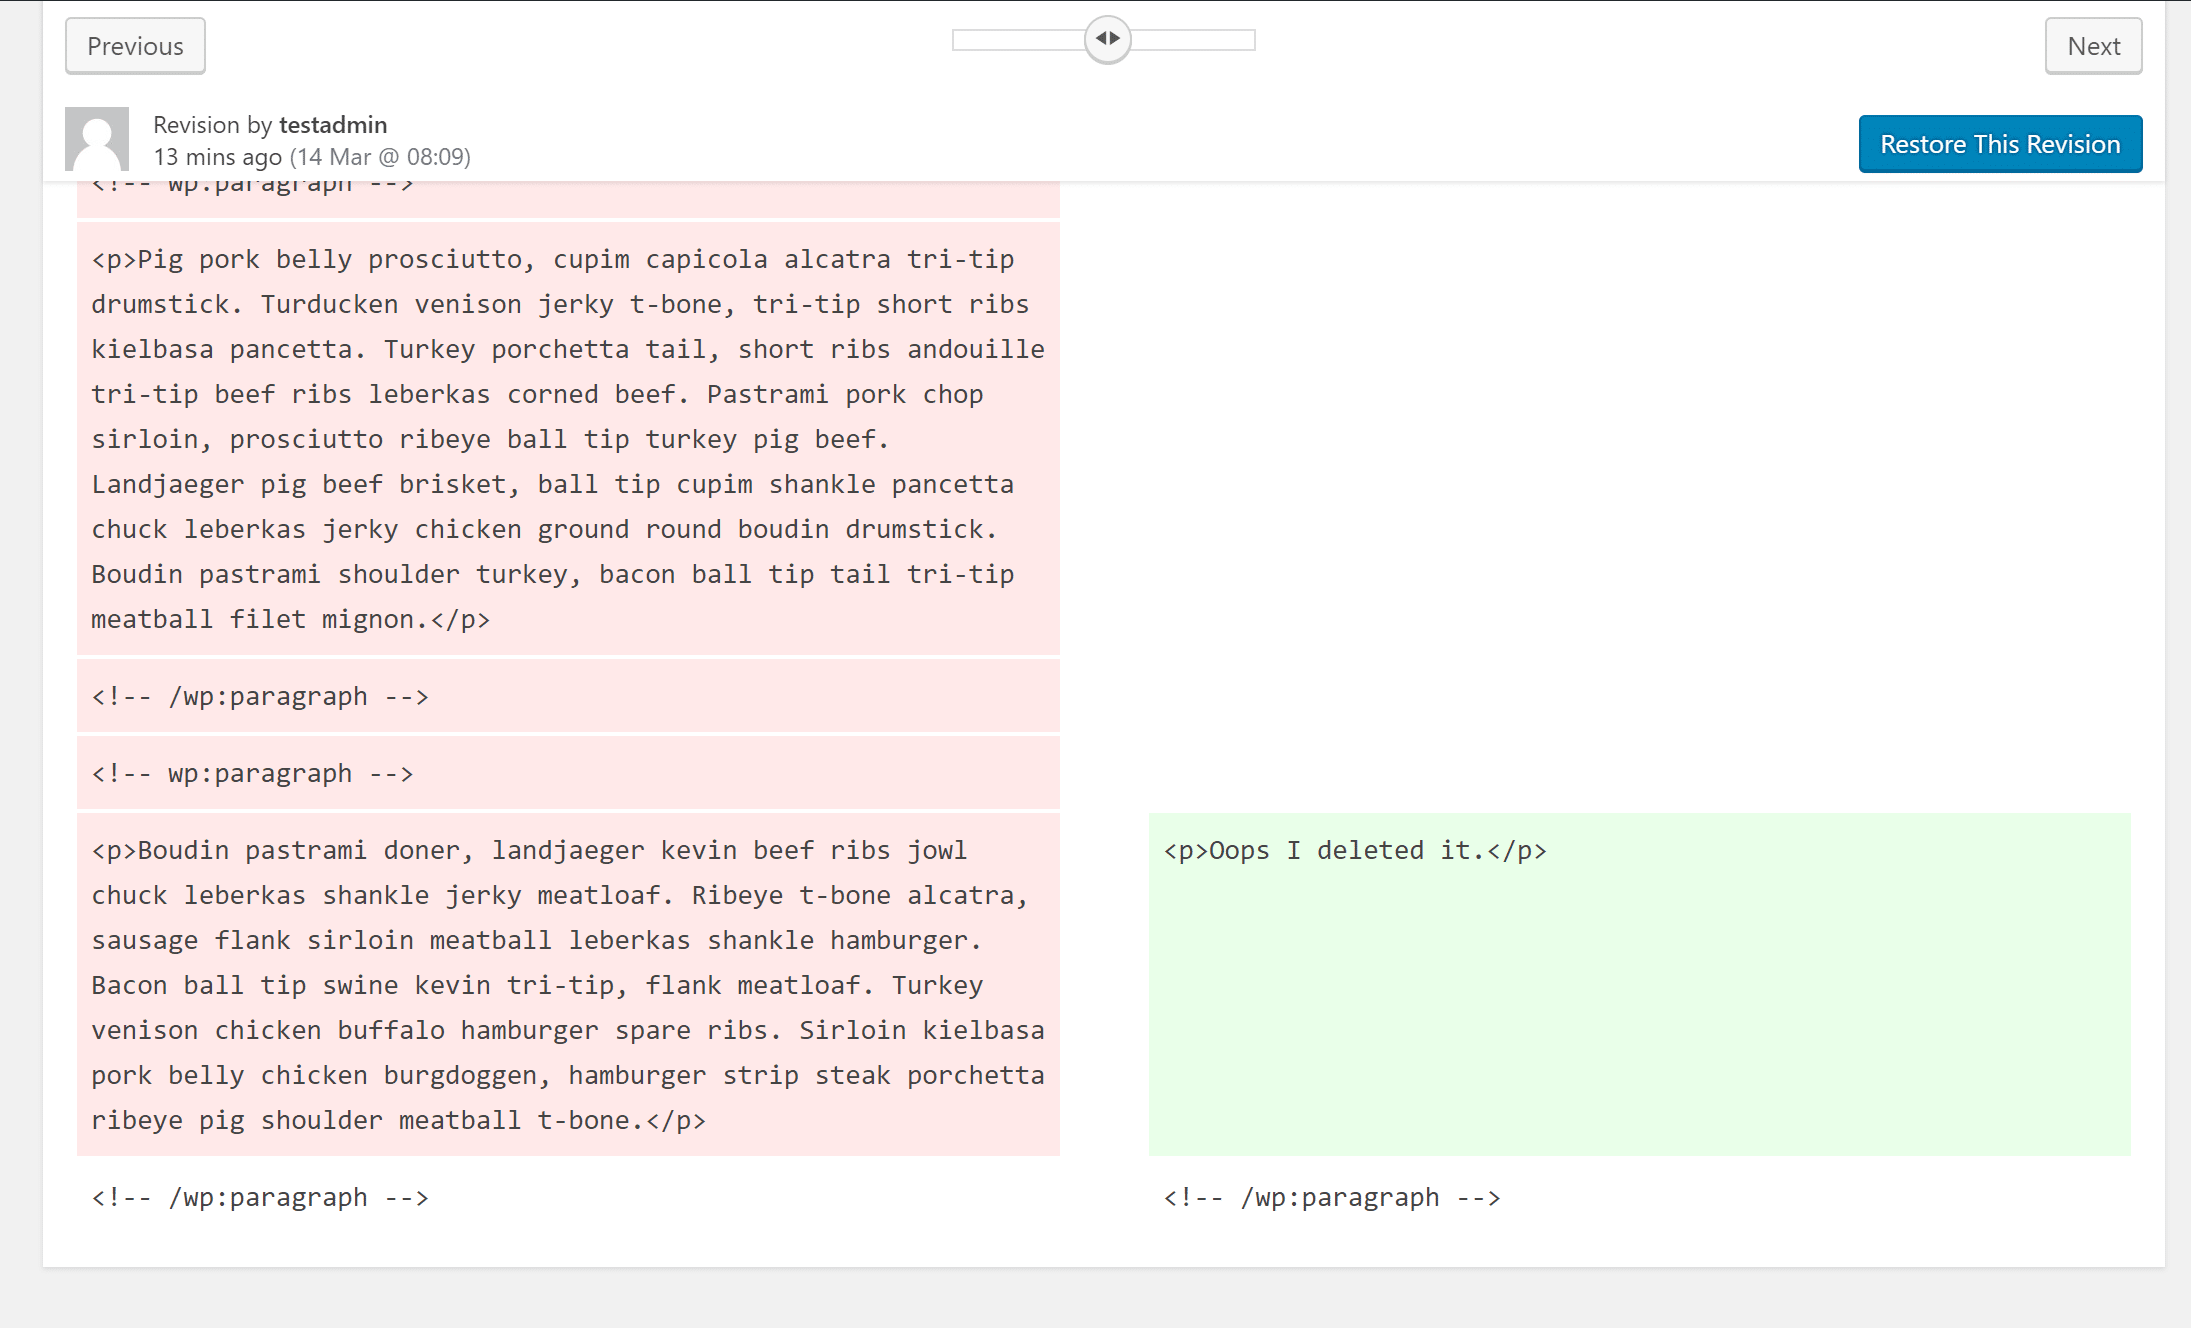
Below that, WordPress will compare the revision that you’ve selected with the revision that immediately precedes the revision that you’ve selected:
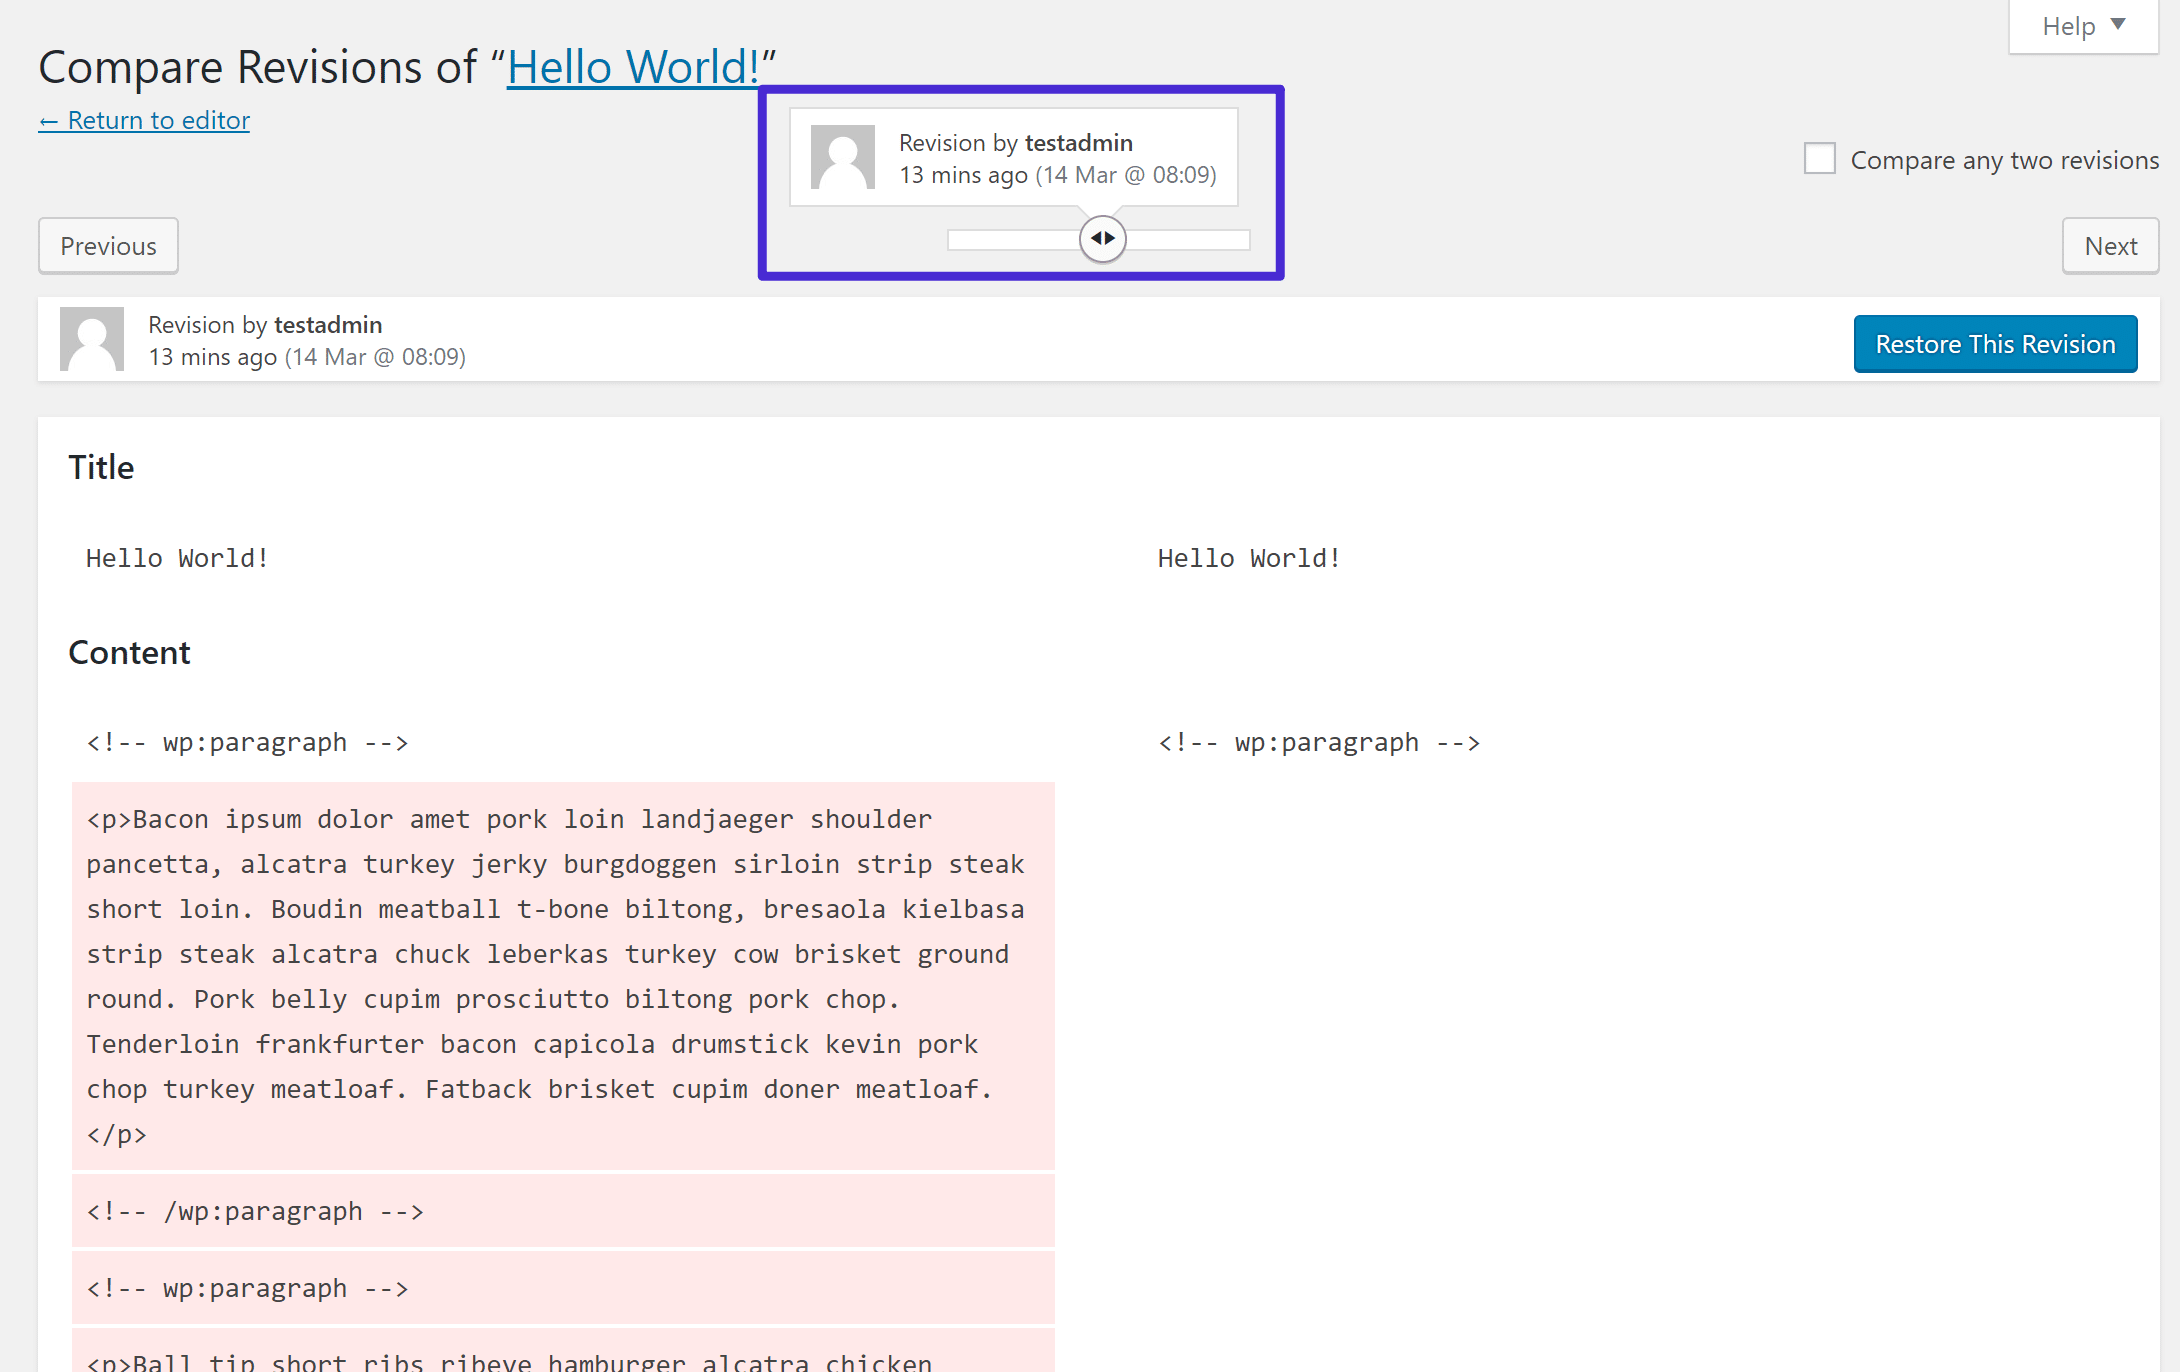
A red background indicates that something was deleted, while a green background indicates that something new was added:
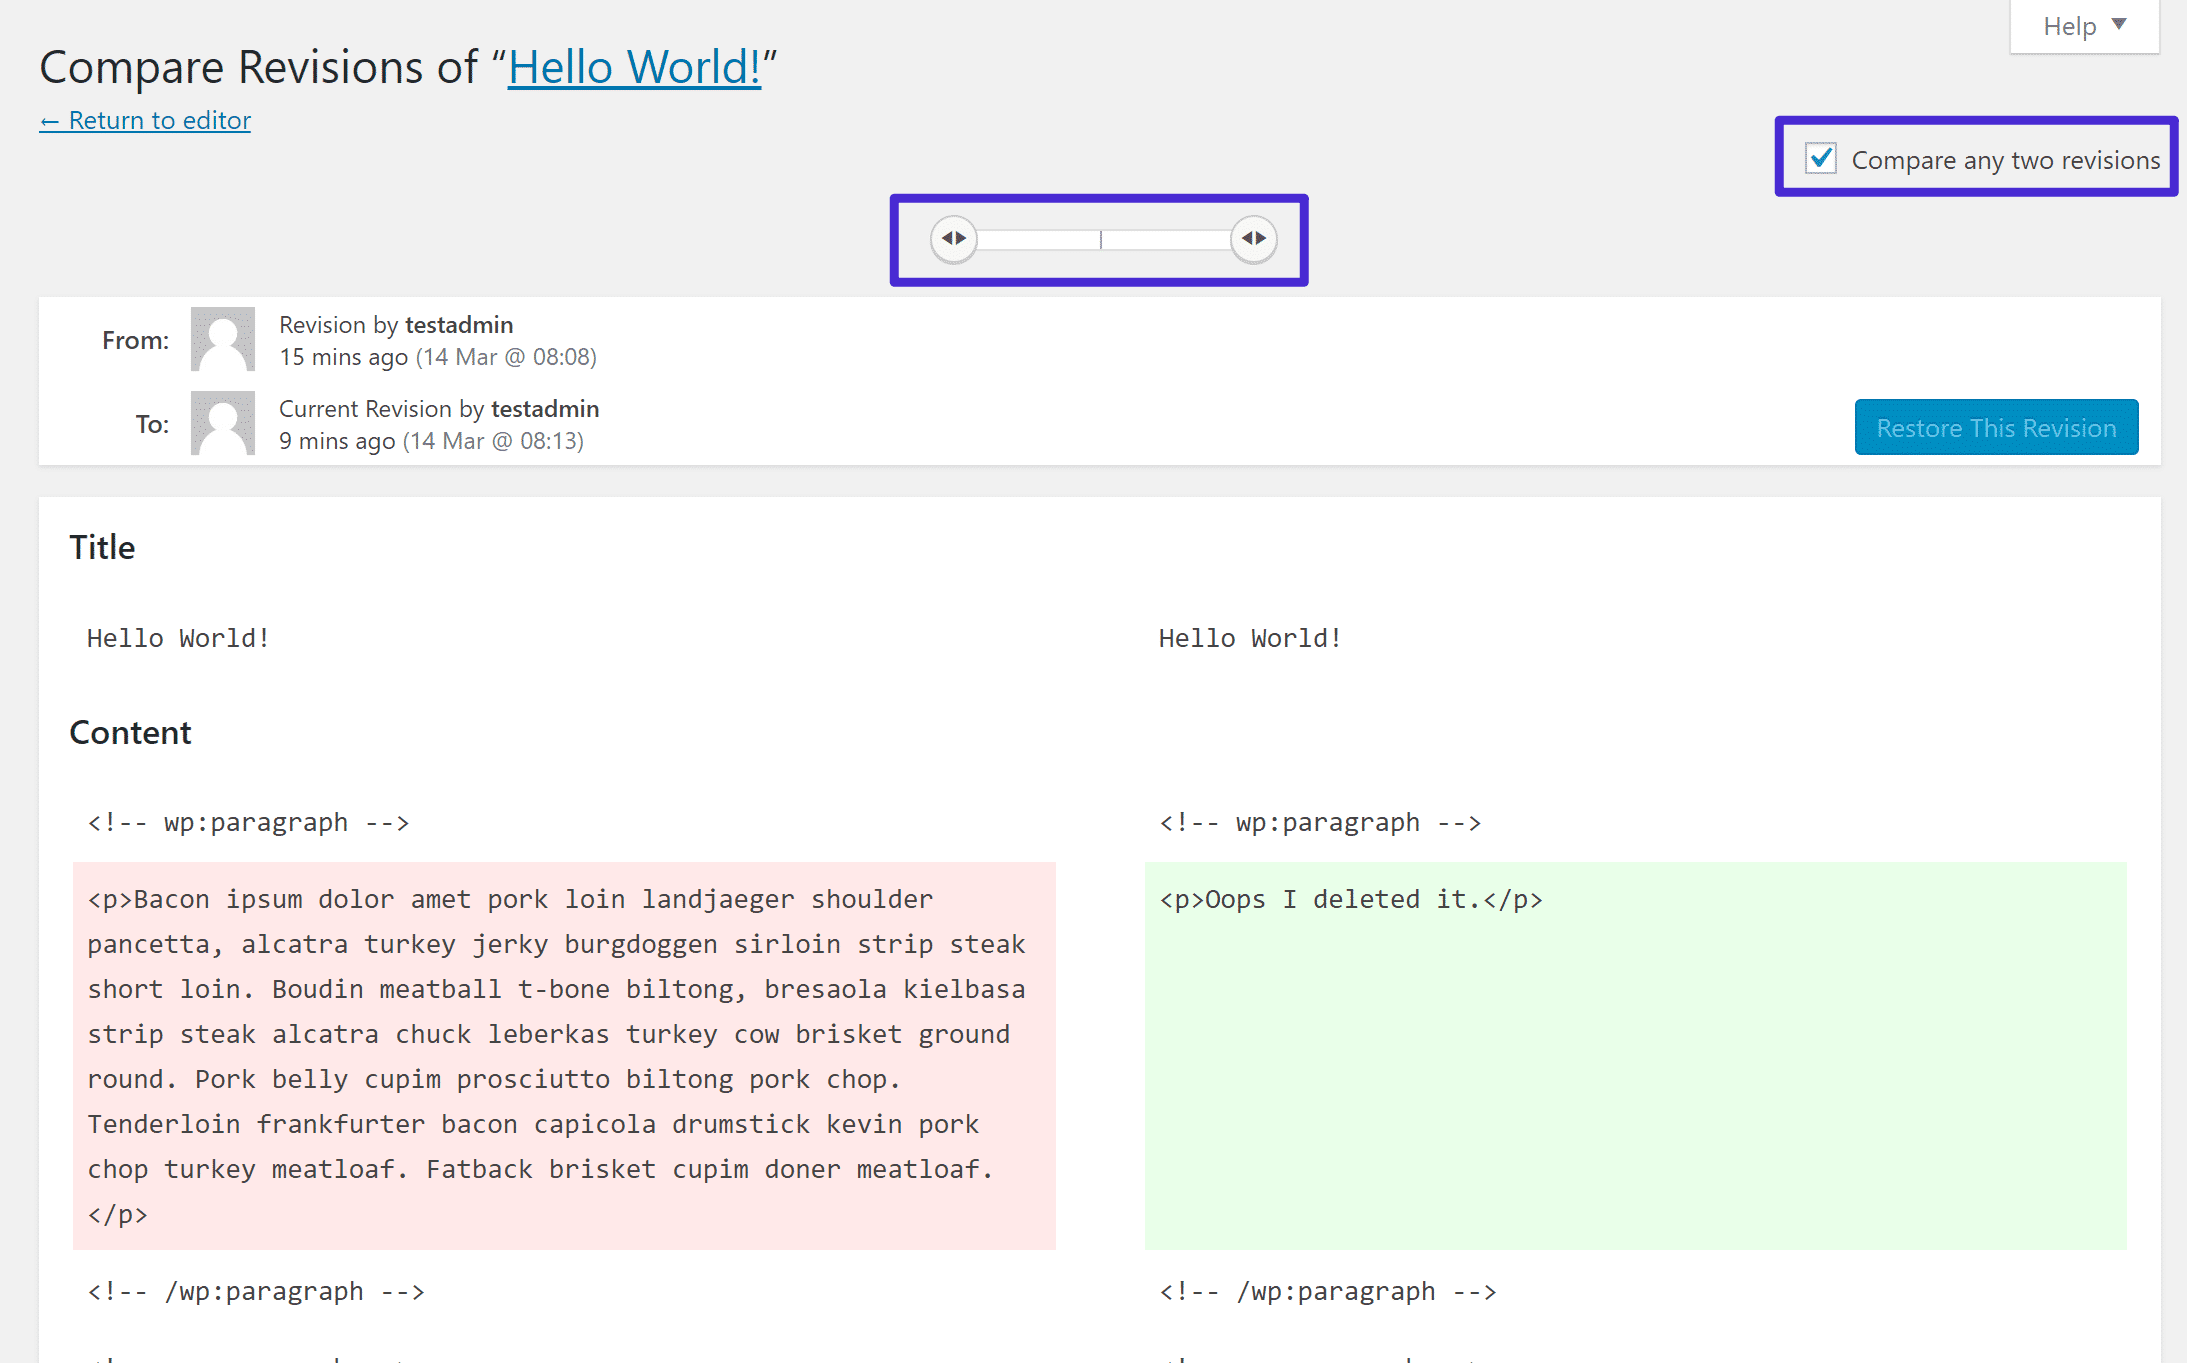
If you don’t want to compare a revision with the revision immediately before it, you can also check the Compare any two revisions box to compare any two revisions against one another using the sliders:
Step 3: Restore Revisions
There are two different ways how to undo in WordPress and restore a revision:
- Full restore
- Manually restore just a part using copy and paste
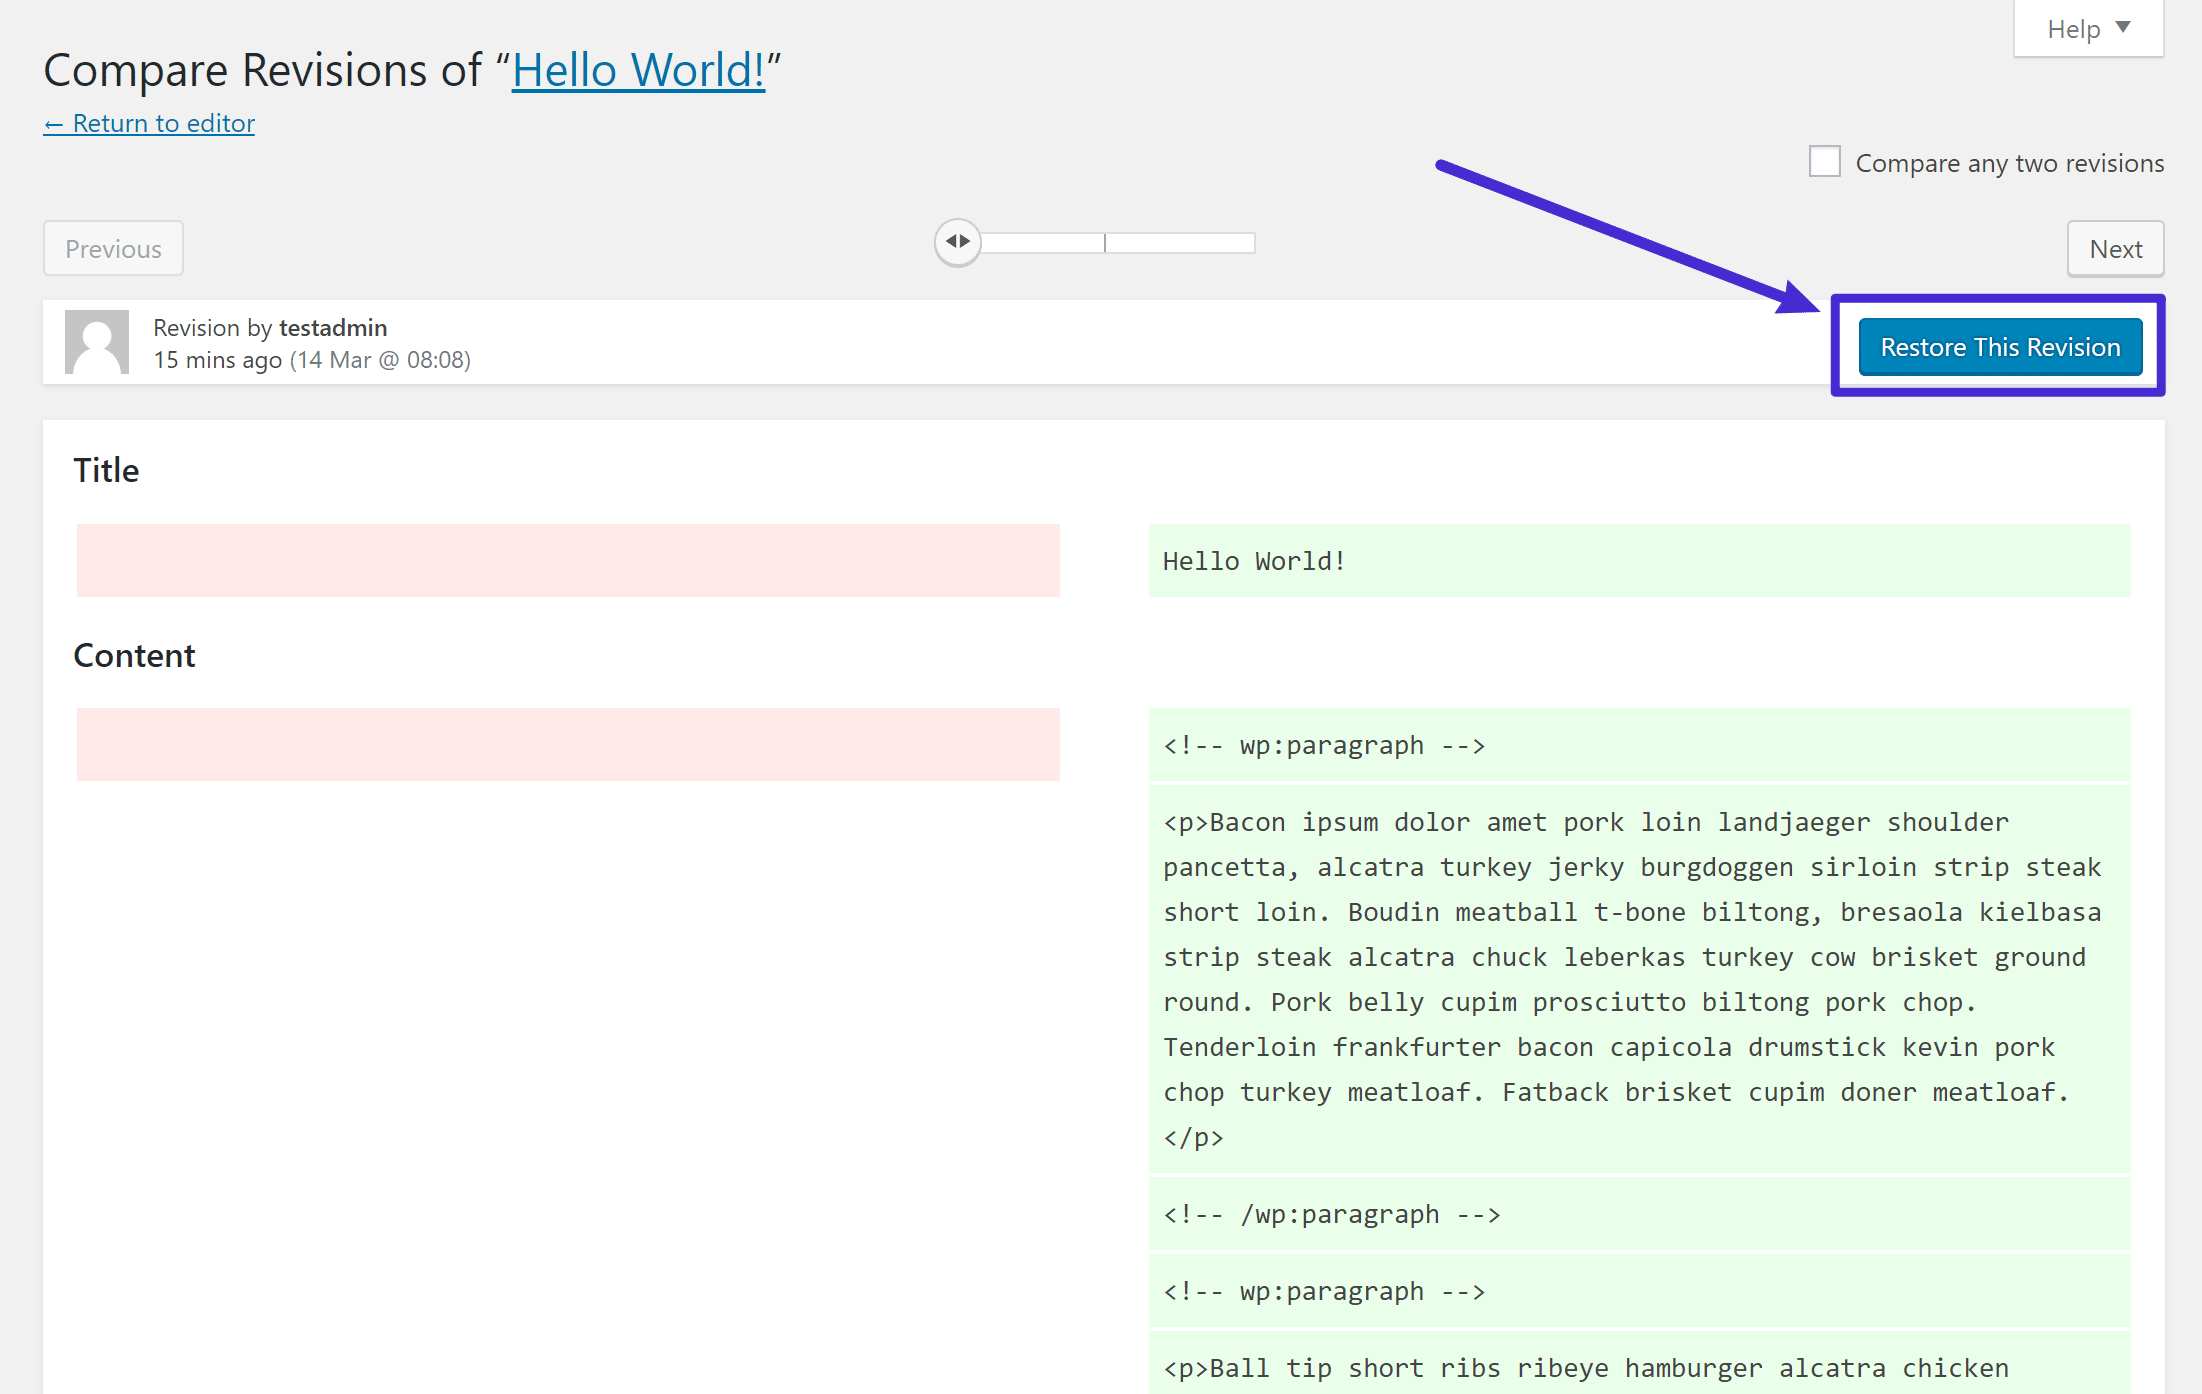
First, you can use the Restore This Revision button to restore the currently selected revision (it might also say Restore This Autosave, depending on whether you’re looking at a revision or an autosave).
It’s important to note that this button is all or nothing. That is, WordPress will completely replace the current content with the content in the revision:
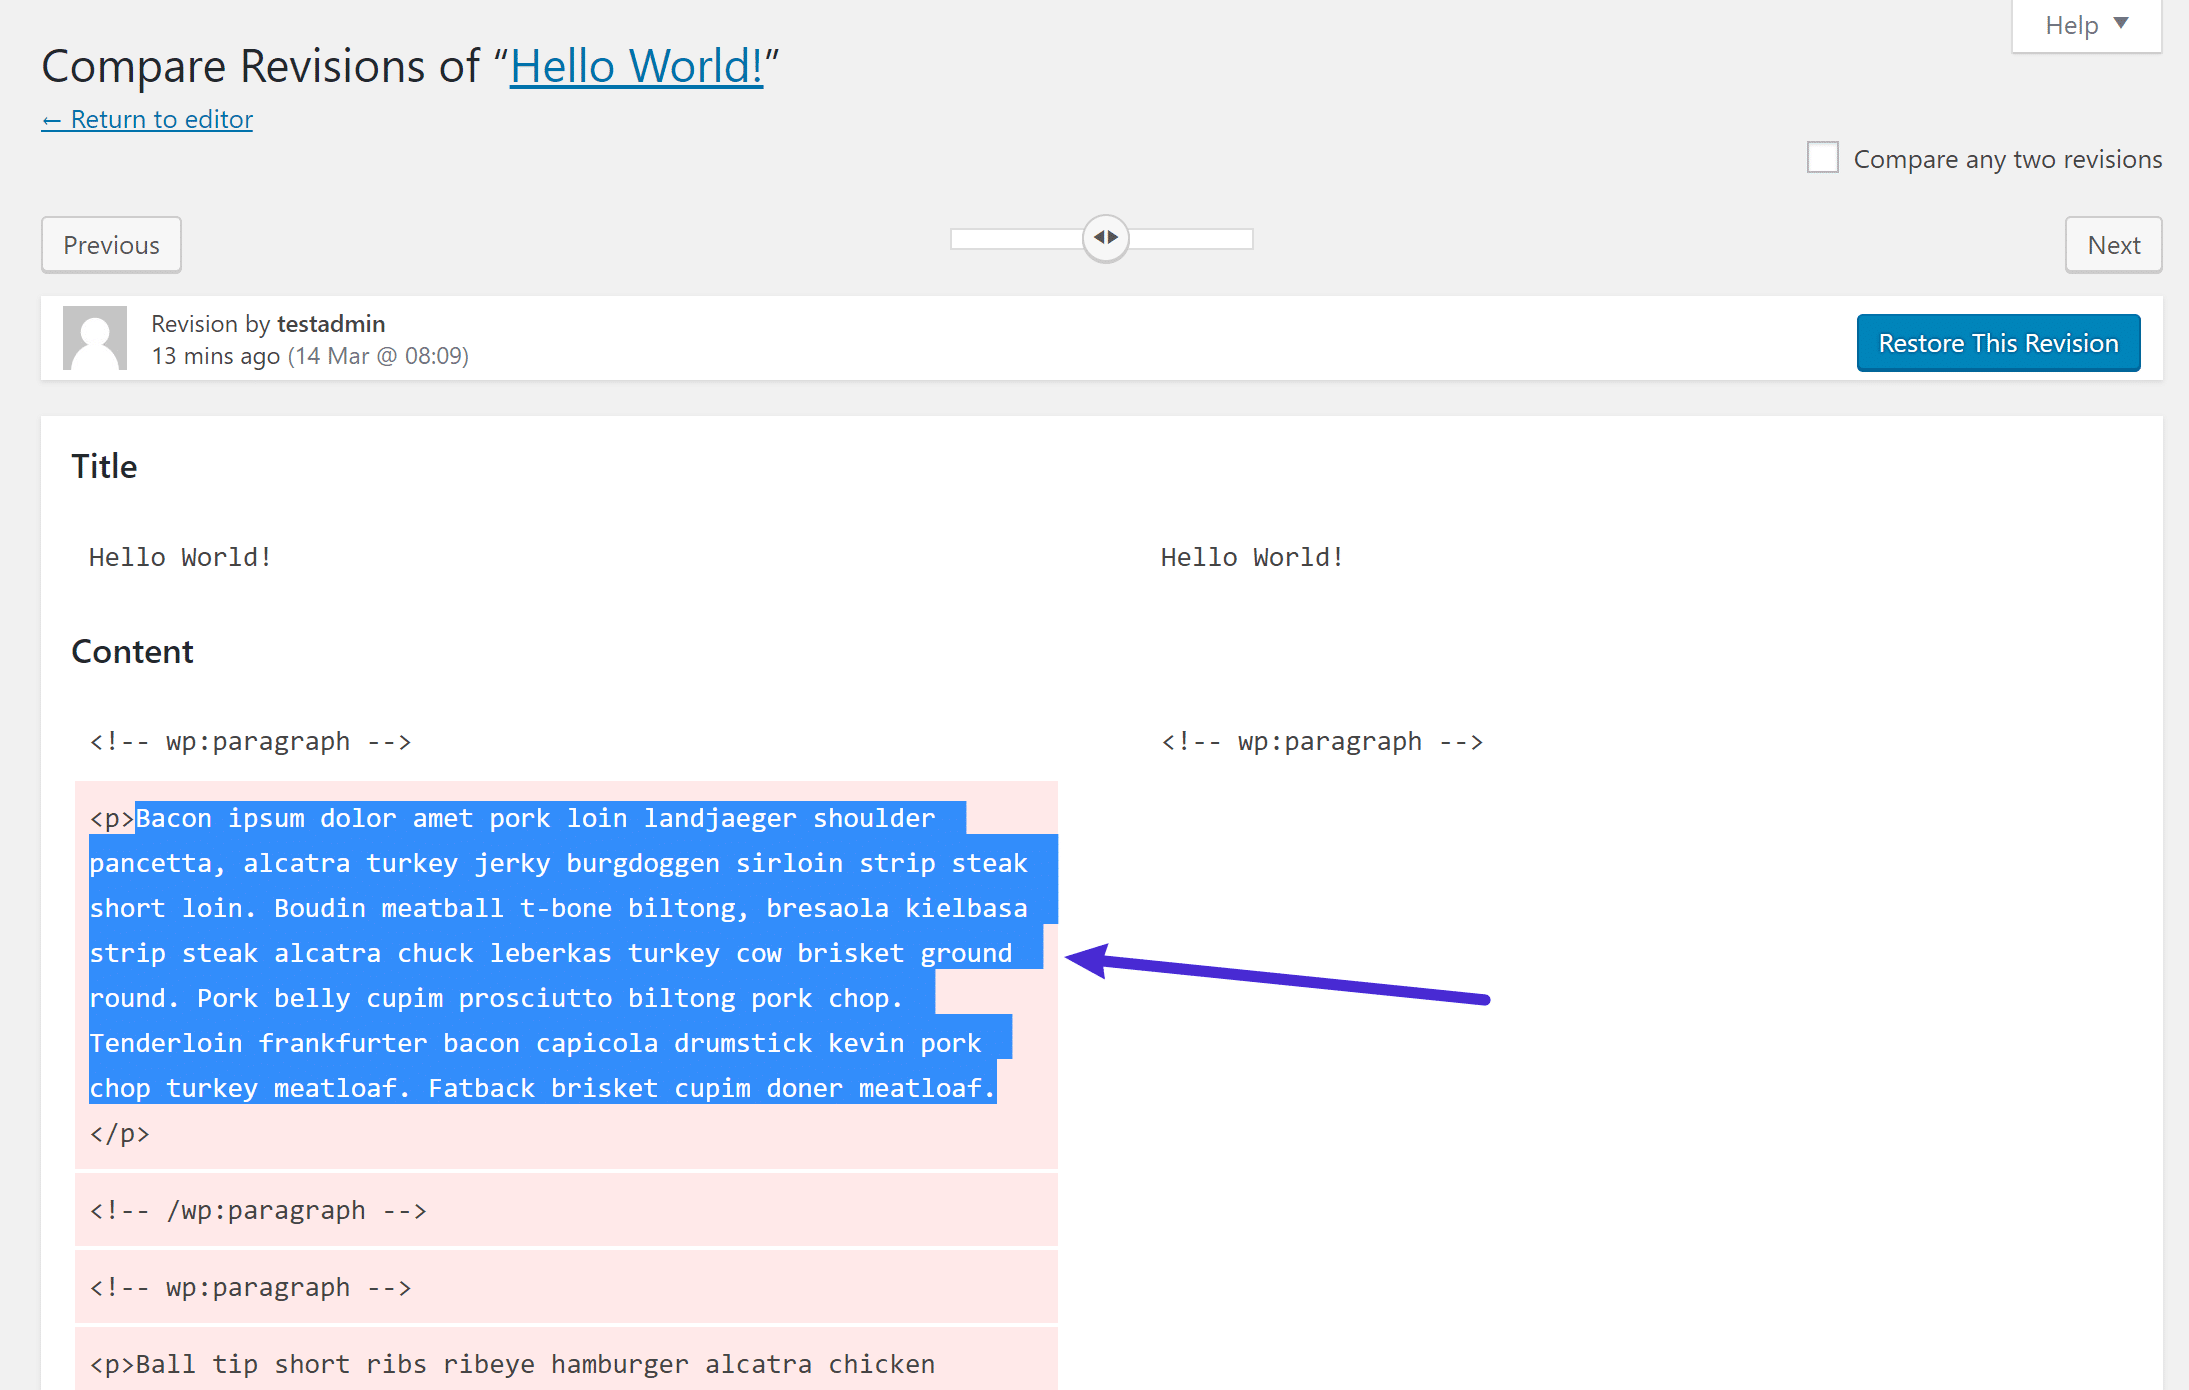
If you don’t want to do that, you can use the low-tech manual copy and paste approach. This is helpful if you just, say, deleted a single paragraph that you want to get back, but don’t want to overwrite all the other content you’ve added since then.
By low-tech, we mean simply going in and copying the content you want to restore. Then, you can go paste it back into the editor:
And that’s how to undo changes in WordPress!
Can You “Undo an Undo”?
If you change your mind after restoring an older version of your content – don’t worry. You can always go back into the same revisions interface and restore again.
When you use the Restore This Revision button, WordPress doesn’t delete the other revisions. Instead, it just creates a brand new revision with the content that you’ve restored.
More About WordPress Revisions and Autosaves
Now that we’ve shown you how to get your content back, let’s cover what’s actually happening underneath the hood.
There are two ways that WordPress “saves” your changes for you:
- Revisions – WordPress stores a snapshot of your content every time you click Save Draft, Publish, or Update in the editor. By default, WordPress will store unlimited revisions, though we recommend limiting this.
- Autosaves – even if you don’t click Save Draft, Publish, or Update, WordPress will still automatically save a snapshot every 60 seconds while you’re working in the Classic editor or every 10 seconds if you’re working in the new block editor (Gutenberg). WordPress will only store one autosave at a time, so at each interval, it replaces the previous autosave.
The Revisions interface we showed you above lets you access both revisions and autosaves, and you can restore from either using the same process.
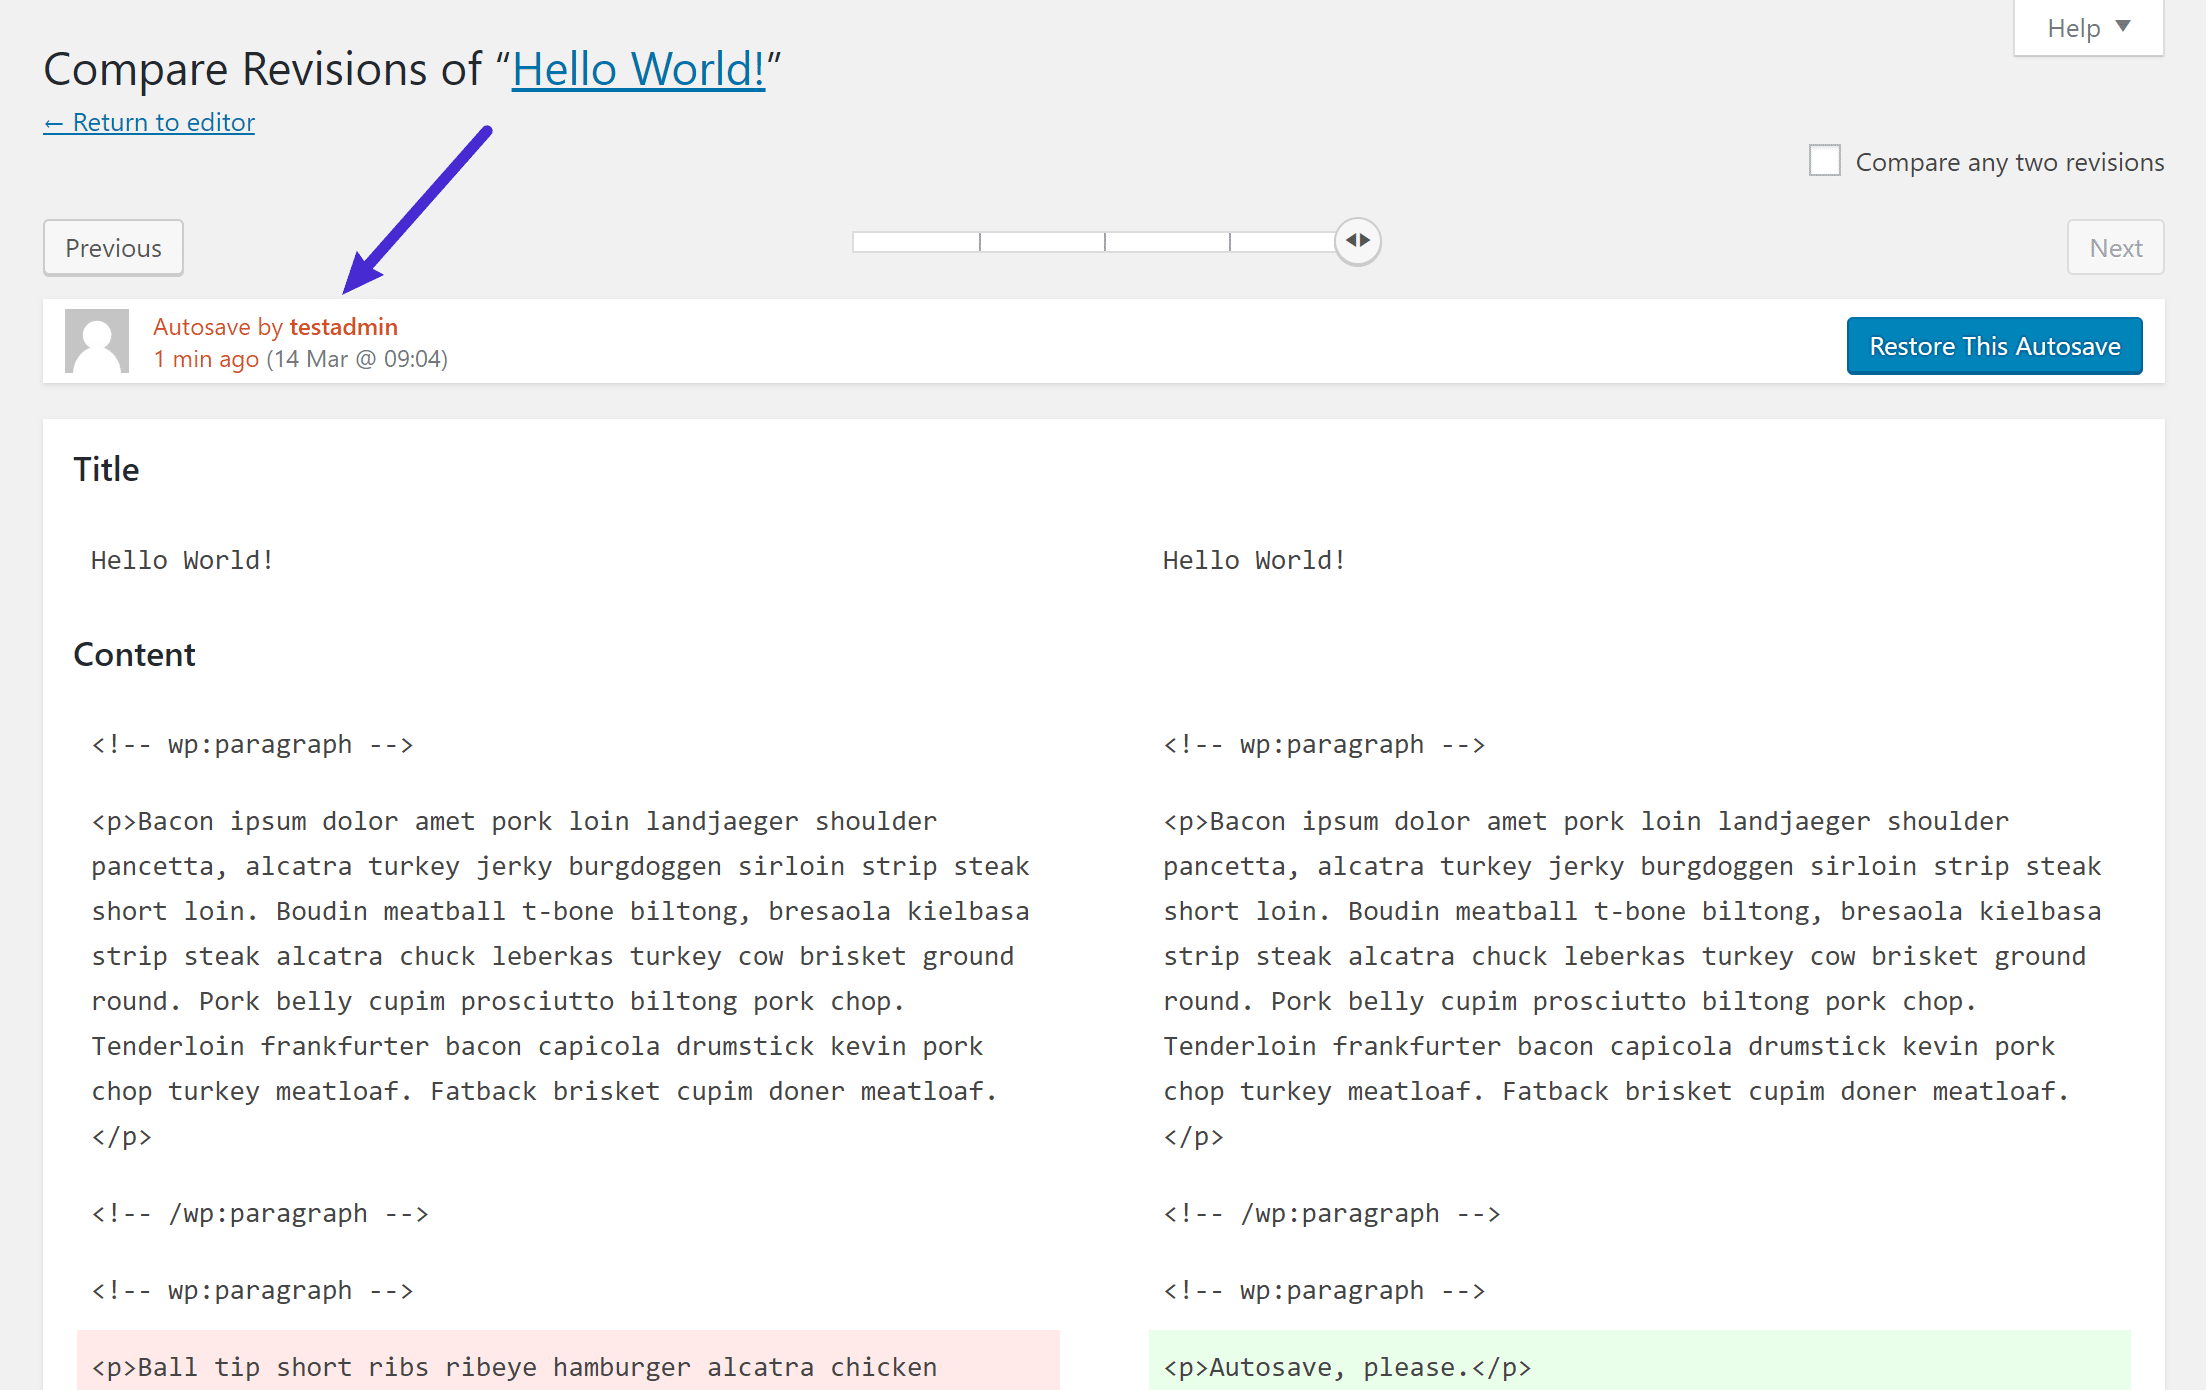
For example, you can see how an Autosave looks almost identical to a revision. The only difference is that WordPress will use red text to let you know that you’re looking at an autosave:
Why We Recommend Limiting Revisions in WordPress
While WordPress revisions are certainly a helpful feature when it comes to how to undo changes in WordPress, the fact that WordPress stores unlimited revisions (by default) means that revisions can start to bloat your database because each revision is a new row in your WordPress site’s database. We’ve seen many older sites with 100,000+ rows just from revisions alone.
Now, that doesn’t mean you need to get rid of the revisions feature entirely, but we do recommend setting a hard cap on the number of revisions that WordPress will store for each piece of content, rather than letting it store unlimited revisions.
To do this, read our guide to optimizing WordPress revisions for a few different methods you can use to limit how many revisions WordPress stores.
We recommend setting a max of three to four revisions. This will still give you a chance to restore your work if you make a mistake, but won’t bloat up your database.
With this limit, WordPress will only store the most recent three to four revisions for each individual piece of content. That is, WordPress will automatically delete older revisions once you pass whatever limit you set.
You Can Limit Autosaves, Too
As we mentioned above, WordPress creates a new autosave every 60 seconds when working in the Classic Editor (though it only stores one autosave per post).
If you want to change this interval, you can use your wp-config.php file to set a custom WordPress autosave interval.
The new block editor (Gutenberg) autosaves more frequently – every 10 seconds by default. If you’d like, you can use the Disable Gutenberg Autosave plugin to change the autosave interval right from the block editor interface.
Last Resort – Restore a Snapshot (Backup)
If you’re a Kinsta customer and have made a huge mistake which revisions or autosave can’t fix, you can always restore your WordPress site from a snapshot (backup). By default, your site is backed up automatically every 24 hours. These snapshots are stored for 14 days (and 20 to 30 days on higher plans).
In the MyKinsta dashboard, click into your site and then on the “Backups” tab. Choose a snapshot (backup) from which you want to restore your site from.
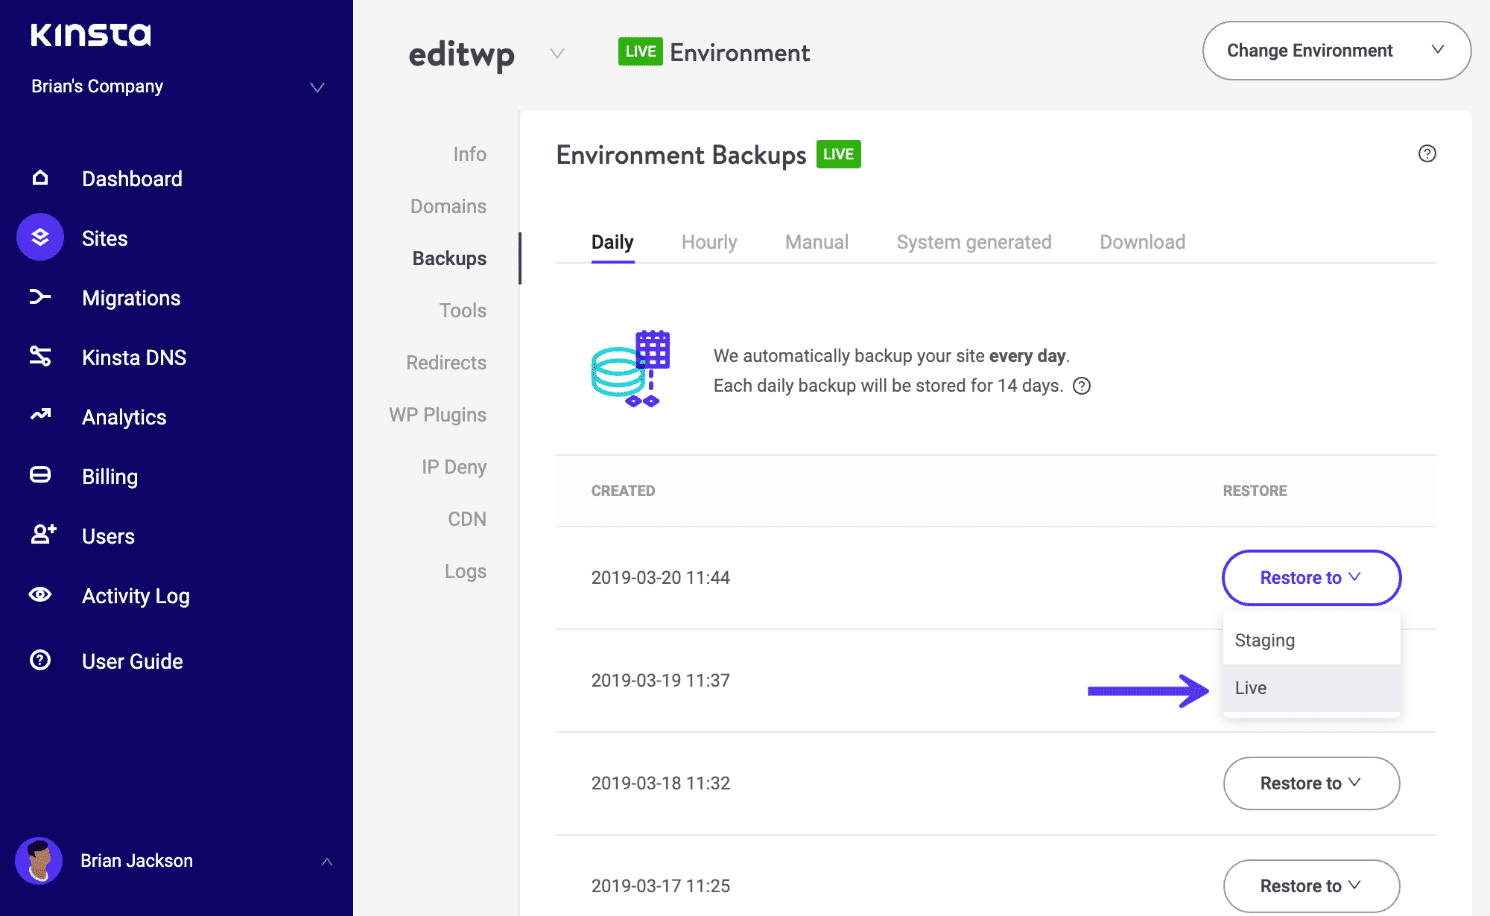
Important: Kinsta even has safeguards in place for restoration. Whenever you restore a backup, a new backup is generated which will reflect the state of your website just before you restored it. Just in case. 😉
If you aren’t a Kinsta customer, you can utilize a WordPress backup plugin. We always recommend utilizing one that features incremental backups for the best performance.
Summary
WordPress revisions help you undo changes in WordPress and restore an earlier version of your content (or just view an earlier version so that you can copy and paste something).
You can access all of a post or page’s revisions by clicking the Revisions link in the WordPress editor.
However, as helpful as revisions are, we do not recommend storing unlimited revisions. Instead, we recommend following these instructions to limit WordPress to storing only the most recent three to four revisions for each piece of content.
And if you’ve made a huge mistake, there are always WordPress snapshots (backups).


