
WordPress custom post types are powerful features. They’re what elevates WordPress from a humble blogging tool to a content management system, and give you the all-important flexibility you need to create a bespoke website.
But they can cause confusion: what are WordPress custom post types exactly? How do they differ from standard posts and pages? How do you create them? And once you have created a custom post type, how do you add to it, display it on your site, and how is it stored by WordPress?
In this article, I’ll show you exactly how WordPress custom post types work. I’ll compare them to the post types you might be more familiar with, teach you how to create them, and show you how to use theme template files to display them in your site.
Let’s get started!
What Are Custom Post Types in WordPress?
It’s probably easier to explain what custom post types in WordPress are by explaining a broader concept: post types.
Post types are ways of categorizing different types of content in WordPress. I’m assuming you’re already familiar with the two most common post types: posts and pages. But what you might not know is that WordPress also comes bundled with a few other post types.
Post Types That Come Bundled with WordPress
WordPress comes with seven post types:
- Posts
- Pages
- Attachments
- Revisions
- Navigation Menus
- Custom CSS
- Changesets
Chances are you’ve never heard of changesets and you may use custom CSS in your site, but it hasn’t occurred to you that these might be post types.
For most WordPress users and developers, the only post types you need to concern yourself with are the first five: posts, pages, attachments, revisions, and navigation menus.
Let’s take a look at each of those post types so we can understand more about them.
WordPress Post Types: Posts
The “post” is the post type you’ll use the most in WordPress. Posts are dynamic content: designed to be updated regularly. You can add categories and tags to them, meaning that they’ll be displayed in multiple archive pages, and they’ll also show up on your home page or your blog page as well. Usually, your posts will make up the bulk of the content on your site.
Note: In WordPress, “post” means two things. In the database, a post is a post of any post type, so it will include pages, attachments, and everything else. When most of us talk about posts, we mean the posts in our blog, which belong to the “post” post type.
WordPress Post Types: Pages
If you already have a WordPress site, pages are the other content type you’ll be familiar with. They’re static content, designed to stick around longer than posts and to provide information on the kinds of things that don’t change so often. Good examples are your contact details or the “about us” page on a business website.
Pages can’t have categories or tags and aren’t designed to be displayed on archive pages. Instead, visitors will access them via your navigation menu.
Note: In internet lingo, a page can mean any kind of page on your website. When the internet first developed, it consisted solely of static content that had to be coded directly by writing HTML. So a “webpage” can be any kind of page on your site, including a static page in WordPress terms, an archive page, or a post. In this article, when I refer to pages, I’ll mean the page in WordPress terms, i.e. a static page. Sometimes I’ll refer to archive pages, but they aren’t pages in the sense that you create a page to store them. WordPress does that for you.
WordPress Post Types: Attachments
An attachment is a media item that’s been uploaded to your site. In the WordPress database, this isn’t the media file itself, but the data relating to it. So, each attachment will have a unique ID and metadata such as its title, description, ALT text, and more.
Each attachment also has its own attachment page with a unique URL. You can find the URL for this via the media editing screen for that attachment:

Attachments can be any kind of upload: images, videos, pdf files, and more. You can access and edit them via the Media item in the WordPress admin menu, or you can upload them directly to posts/pages when you’re editing them. Any attachment you upload to a post will then be available to edit and view via the Media menu.
WordPress Post Types: Revisions
Now we’re getting on to the slightly more obscure post types.
Every time you save a new version of a post, page, attachment, or indeed any custom post type, WordPress will create a revision to reflect that version of the post (or page, etc.).
You can view the revisions to any post or page in your site by going to its relevant editing screen and opening the Document tab on the right-hand side. Here you will see a notification telling you how many revisions this post has. Below you can see a screenshot of a post I’m editing that currently has five revisions.

If you aren’t using the Gutenberg editor, you can access revisions by scrolling to the bottom of the editing screen and finding a list of them here:

If you click on the Revisions box, you’ll be taken to a screen displaying your latest two versions of your post. From here you can review the revisions and revert to an earlier version of the post.
WordPress will create a lot of revisions for your site over time, meaning that the database will be full of them (here’s Kinsta’s guide on how to handle revisions for faster performance)! But revisions are a post type just like any other, and they’re stored in the same way – more of which shortly.
WordPress Post Types: Navigation Menus
Navigation menus, or more precisely, the items in your navigation menus, are also a post type.
Each item in your navigation menu is stored as an item in the database. Thanks to its metadata, WordPress knows this is a navigation menu item, exactly where in the navigation menu it should appear, and where it links to.
You can’t edit navigation menu items the same way you would other post types. Instead, you edit them via the Customizer or the Menus screen.
WordPress Post Types: Custom CSS
If you add custom CSS via the Customizer, your work will be saved using this custom post type. A new post (of the “custom CSS” post type) will be saved for custom CSS relating to each theme in your site, and WordPress will only use the one for the currently active theme.
WordPress Post Types: Changesets
Changesets are a bit like revisions, but instead of applying to posts, they apply to the Customizer. When you make a change using the Customizer, it will be saved as a changeset, in a similar way to a draft.
Now that we’ve worked through the whole spectrum of WordPress post types, let’s move on to find out more about WordPress custom post types.
The Difference Between a Post and a Custom Post Type
Let’s recap quickly: a post can be one of two things.
A post type is a type of post (in the broader sense) that a given item of content belongs to. And a “post” is a post type, as is “page”, “attachment” or any custom post type you register (I know, it’s confusing but I’ll dig deeper in a minute).
On the other hand, your custom post type isn’t a type of “post” in the sense of a blog post. It’s a type of post in the sense of all posts (of all post types) that are stored in the database.
WordPress Custom Post Types: Common Uses
So now we know what a custom post type is. But when might you need to use one? The answer is whenever you want to add content to your site that doesn’t fit into one of the built-in post types.
Some common examples of custom post types are:
- Products for an ecommerce site.
- Portfolio items or projects for a portfolio site.
- Maps for a mapping site.
- Events for a bookings site.
These are some of the most common use cases, but they’re by no means the only ones. My advice when deciding whether to use a custom post type for any new kind of content is to ask yourself this question:
Do I want to display my new content in the main blog page or as a static page, or do I want to be able to show it on a separate archive page?
In some cases, using a category to separate out your new content might be enough: maybe you’re running a blog and want to include case studies that you can display on their own page (using a “Case Study” category that you create) and also show in the main blog. But if you want to keep your new content separate from your blog posts, then it makes sense to create a custom post type for it.
How Post Types are Stored by WordPress
Posts of a custom post type are stored in the same way as standard posts (and pages etc.) are stored. Let’s take a look at this in more detail.
Your WordPress site has a number of database tables to store content and settings. The minimum number of tables is 12, but your site may have more if it’s running Multisite or if you have a plugin installed that adds more tables.

In the screenshot above, you can see that there are two tables which look as if they might have something to do with posts: wp_posts and wp_postmeta.
The wp_posts table stores all of the content of your posts, of all post types. So it doesn’t matter if we’re talking about a blog post, a page, a revision, an attachment, or a custom post type: they’ll all be stored in this wp_posts table.
WordPress knows what post type each post is because it will have a value in the post_type field in the wp_posts table. That value will correspond to the name of the post type. So when you add a new blog post, WordPress will add a post to the wp_posts table, with the post_type of “post.” And if you register a custom post type called “product,” for example, every new product you create will generate a line in the wp_posts table with “product” as the value in the post_type field.
The wp_postmeta table is for storing metadata about your posts. It has four fields:
- meta_id: the id of this item in the wp_postmeta table.
- post_id: the post that this item of metadata corresponds to. A post can have multiple lines in the wp_postmeta table.
- meta_key: the key for this particular type of metadata. For example, for a static page, one potential key might be page_template, which would note which page template is being used.
- meta_value: the value for the field. If a page (to use this example again) is using the default page template, the meta_value here would be ‘default’.
So the kinds of metadata stored for a given post will be different depending on what kind of post type it is.
You don’t need to worry about which data is stored in wp_posts and which is stored in wp_postmeta: but it’s useful to understand that all post types are stored in the same place, as that means WordPress can work with them all in much the same way.
How Custom Post Types Interact with Custom Taxonomies and Custom Fields
Before we move on to looking at how you would register a custom post type in WordPress, let’s identify how a custom post type will interact with other custom content types, namely custom taxonomies, and custom fields.
Custom Taxonomies
Taxonomies in WordPress are used to categorize posts of any post type. For standard posts, the two taxonomies used are categories and tags.
When you register your custom post type, you can choose to assign any existing taxonomy or taxonomies to it. You can add the “category” taxonomy to it when you register the taxonomy. I’ll show you how to do this shortly when I demonstrate the technique for creating a custom post type.
Alternatively, you can create completely new taxonomies for your custom post type, which is also a common approach.
So, for example, if you’re creating a “product” post type for an ecommerce site, you might create a “department” taxonomy to sort your products into departments in your store.
If you’re creating an “event” post type, you might create a taxonomy of “event type”, which could specify whether this is a concert, a poetry reading, or a comedy night.
The taxonomies you create are up to you and will depend on the way you want to sort and display your posts from your custom post type.
Custom Fields
Another custom content type you have in WordPress is custom fields, also known as post metadata. Custom fields are additional metadata you can add to any post as long as the post type supports them. When you register a custom post type, you can include custom field support with this line:
supports => array( ‘custom-fields’ );This is passed as an array so that you can add support for multiple options.
So if you want to add metadata to your custom post type, such as sizes or colors in a clothing store with the “product” post type, you’d use a custom field to do this.
Custom fields are different from custom taxonomies because you wouldn’t use them to output an archive page.
Here’s an example for a clothing store. You would have an archive page for each example of a “department” taxonomy, e.g. “Women’s”, “Men’s” etc. Imagine you also have a custom field called “Size”. You wouldn’t create an archive page for each size, as it’s not something your customers would expect to see.
Follow this rule to help you determine whether you need to use a custom taxonomy or a custom field to add more data to your post: will you need to display it in an archive page?
I’ll show you how to output archive pages for your custom post type and custom taxonomies later.
How to Add a Custom Post Type with a Plugin
So you know what custom post types are and you know you need one for your site: how do you add it?
There are two ways: by using a plugin, and by coding it manually. Let’s start with the plugin route.
There are two types of plugins you can use to register a custom post type: the first will register a custom post type in order to add functionality that comes with the plugin, and the second will provide you with an interface you can use to create your own post type.
The first example includes a variety of plugins including ecommerce plugins, event plugins, and more. Let’s start with one of the most popular WordPress plugins, WooCommerce.
How to Use WooCommerce to Register Custom Post Types
WooCommerce is an example of a plugin that registers a custom post type in order to work. In this case, it’s the “product” post type.

WooCommerce also registers some custom taxonomies and custom fields for you to organize your store, including product categories and product tags. These are different from the categories and tags you’d use for your blog posts.
How to Use the Events Calendar Plugin to Register Custom Post Types
The Events Calendar plugin is another plugin that uses a custom post type. In this case, it’s the “event” post type.

The plugin adds a taxonomy which is unique to events: ”event category”. It applies normal tags to events as well, so you can use the same tags you use for your blog posts.
How to Use WP Google Maps to Register Custom Post Types
Just like WooCommerce and The Events Calendar, WP Google Maps is a WordPress map plugin that registers a custom post type for your maps.

The “map” post type works differently from the product or event post type in the previous plugin because you wouldn’t display an archive page of all your maps: instead, the plugin gives you a shortcode for each map you create, that you embed into a post or page in your site. But although you can’t view maps in the same way you would some other post types, it’s still a post type.
How to Use the Custom Post Type UI Plugin
If you want to register your own custom post type instead of one that’s part of the wider functionality provided by a plugin such as WooCommerce, you can use a plugin that provides you with an interface designed to make it easy to register a custom post type.
One such plugin is the Custom Post Type UI plugin.

This plugin lets you register your own custom post types using the admin screens, without having to write any code.
It gives you a set of screens that let you add all of the elements of registering a post type that you would add in when using the register_post_type() function. To add a new post type with the plugin, go to CPT IU > Add/Edit Post Types.
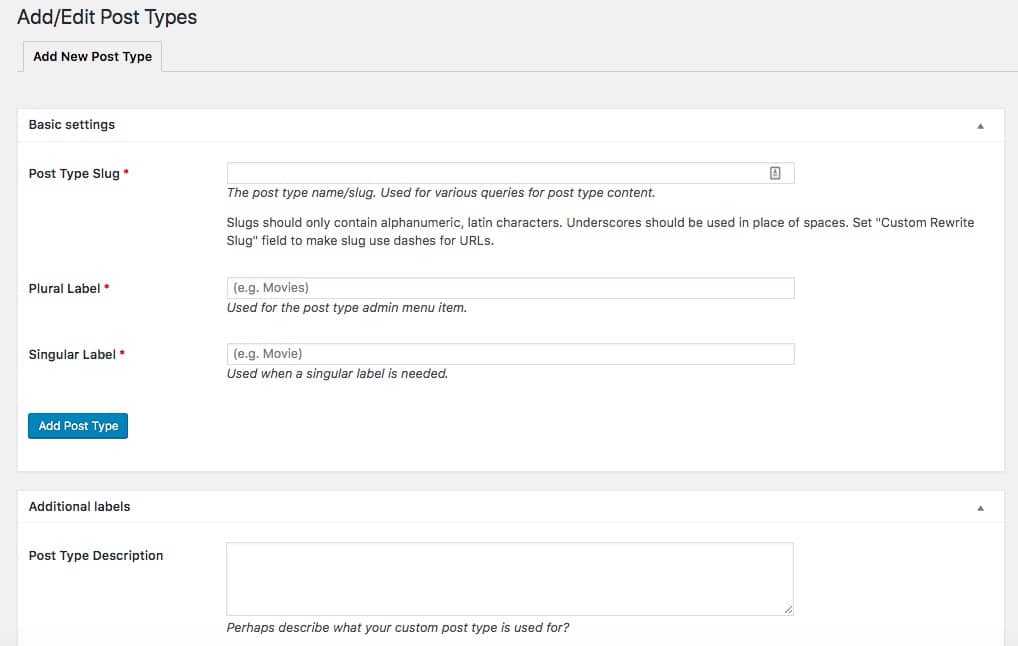
From here, you can add a new post type or edit any existing ones you’ve registered.
You can edit the settings for the post type or you can leave them at the default settings. You can find full documentation on all of the settings and options for a post type in the WordPress Codex.

You can also use the plugin to register a custom taxonomy and to assign that to your new post type or to any existing post type. And when you use the plugin to register a post type, you can assign any existing taxonomies to it as you do so.
Another option is JetEngine by Crocoblock, which lets you create and manage custom post types and taxonomies without writing code. Unlike CPT UI, it also helps you display and query that content using dynamic listings, filters, and relationships. This is useful if you need more control over how custom post type content is displayed on the front end, not just how it’s registered.
How to Use the Pods Plugin to Register Custom Post Types
The Pods plugin is another plugin that gives you an interface designed to let you register a custom post type without writing code.
Pods also lets you extend your existing post types. So you can add extra fields to an existing post type or taxonomy, and edit their settings.

The Pods plugin uses a post type (‘pod’) to store all of your customizations, and also lets you register your own post types a bit like the Custom Post Type UI plugin, but with an interface that’s designed to walk you through the process. This means that the plugin can make the process easier, but it adds a lot more code to your site (and data to your database) than if you coded the post type yourself.
Alternatively, if you’d rather not install a plugin to manage the process of registering your post type, you can code it yourself.
How to Register Your Own Custom Post Type in WordPress
If you’re comfortable writing code, you could take advantage of the register_post_type() function to register your custom post type. This is the most efficient way to do it.
Best practices tell us to put code for a custom post type in a plugin, rather than in your theme. This is because if you should change your theme in the future, you won’t want to lose the post type and all the posts you’ve created with that post type. It also means that if you update your theme in the future, you won’t lose your post type.
Let’s work through the steps to register your own custom post type in WordPress.
Creating Your Plugin
The first step is to create your plugin. In the wp-content/plugins folder of your development or staging site (not your live site yet), add a folder for your plugin. Inside that folder, add a PHP file. I’m calling mine kinsta-register-posttype.php.
Tip: I always like to create a plugin inside a folder instead of just adding a plugin file to the wp-content/plugins folder. That way, if I need to add more files to my plugin, such as include files, scripts or styles, I already have a folder ready to hold them.
Now in your new php file, add the opening commented out text for your plugin:
<?php
/*
Plugin Name: Register Custom Post Types
Plugin URI: http://rachelmccollin.com
Description: Plugin to register the book post type
Version: 1.0
Author: Rachel McCollin
Author URI:http://rachelmccollin.com
Textdomain: kinsta
License: GPLv2
*/
This tells WordPress (and the user) some key information about the plugin:
- What it’s called
- Where you can find more information
- What it does
- The version number
- Who developed it, and where you can find out more about them
- The text domain for internationalization
- The license, which should always be GPL.
So your plugin is now set up and if you want, you can activate it in the admin screens. It won’t do anything yet if you do.
Setting up the Function for Your Post Type
Now let’s start creating the function to register your post type. In my example, I’m going to create a post type called “book”, as this is for an imaginary book reviews site. What you use will obviously be different and depend on what you’re using your custom post type for.
Below the commented out text, add this:
function kinsta_register_post_type() {

}
add_action( 'init', 'kinsta_register_post_type' );
This function will contain all of the code for your custom post type. You might want to change its name to add a prefix of your own instead of kinsta_. It’s good practice to use a prefix on all of your functions so that you don’t clash with the name of any function provided by your theme or the other plugins you’re running.
The rest of the code will be added inside the braces of that function.
Defining the Labels for Your Custom Post Type
Now it’s time to define the labels for your custom post type, Inside those curly braces, add this:
$labels = array(
 'name' => __( ‘Books’, ‘kinsta’ ),
 'singular_name' => __( 'Book', ‘kinsta’ ),
 'add_new' => __( 'New Book', ‘kinsta’ ),
 'add_new_item' => __( 'Add New Book', ‘kinsta’ ),
 'edit_item' => __( 'Edit Book', ‘kinsta’ ),
 'new_item' => __( 'New Book', ‘kinsta’ ),
 'view_item' => __( 'View Books', ‘kinsta’ ),
 'search_items' => __( 'Search Books', ‘kinsta’ ),
 'not_found' =>  __( 'No Books Found', ‘kinsta’ ),
 'not_found_in_trash' => __( 'No Books found in Trash', ‘kinsta’ ),
);
You’ll need to change yours if your custom post type isn’t ‘book’. There are more labels you can use, but I find that the ones above tend to be sufficient for my needs.
Note that I’m using internationalization in my labels so they will be translated to the local language for users.
Defining the Arguments for Your Custom Post Type
The next step is to define the arguments, one of which will be that array of labels we already added.
Below the labels and still inside those braces, add this:
$args = array(
 'labels' => $labels,
 'has_archive' => true,
 'public' => true,
 'hierarchical' => false,
 'supports' => array(
  'title',
  'editor',
  'excerpt',
  'custom-fields',
  'thumbnail',
  'page-attributes'
 ),
 'taxonomies' => 'category',
 'rewrite'   => array( 'slug' => 'book' ),
 ‘show_in_rest’ => true
);
Let’s take a look at what all of these do.
- The labels argument is the array of labels we already defined.
'has_archive' => trueenables a post type archive for the custom post type. This defaults to false so I like to override it and give myself the option of using a post type archive (which I’ll show you how to use shortly).'public' => trueenables the post type to be included in search results and in custom queries. Again, the default is false and this is something I like to override.- The ‘hierarchical’ value will depend on how you want to use your custom post type. If you set this to true, then the post type will behave like pages, with a hierarchy possible and parent and child posts of any post of your post type. If you set it to false, it’ll behave like posts, without a hierarchy.
- The ‘supports’ array defines a number of features of post types that you can have this post type support. I like to ensure that features such as featured images and custom fields are turned on.
- The ‘taxonomies’ argument defines the existing taxonomies that apply to this post type. Here I’m using the ‘category’ taxonomy. If you want to use a custom taxonomy instead and haven’t registered it yet, just skip this line and then register the taxonomy to the post type. If you’ve already registered a custom taxonomy, you can add it to the post using this line.
- I’m using the ‘rewrite’ argument because I’m going to give the taxonomy a name that’s different from what I want to use for its slug. I’ll explain this in more detail shortly.
‘show_in_rest’ => trueensures that the post type is available to the REST API and the Gutenberg interface. It defaults to false which makes no sense to me – I want all my post types to use the same editing interface!
So those are all the arguments set. But we haven’t actually registered the post type yet. Time to fix that.
Adding the register_post_type() Function
The final step is to pull all of this together into the register_post_type() function.
Below your arguments, and still inside the braces, add this:
register_post_type( ‘kinsta_book', $args );This registers the ‘kinsta_book’ post type, with the arguments we’ve already defined.
Now you might find it easier to understand why I used the ‘rewrite’ argument before. I like to add a prefix to the names of my post types, so I can be sure they won’t clash with any post types added by any third party plugins, but I don’t want the prefix to be made public.
By default, when WordPress displays an example of your post type, it will use the post type’s name in the URL. So my book called ‘My Wonderful Book’ would have a url of mysite.com/kinsta_book/my-wonderful-book. I don’t want that, so I use that ‘rewrite’ argument to change the URL to mysite.com/book/my-wonderful-book. Looks a lot better, huh?
Now save your file and activate your plugin in the WordPress admin. You’ll find that a new post type has appeared in the admin menu.

The post type is now registered and ready for you to use on your site. Take some time to add some posts to it (posts of your custom post type remember, not blog posts – WordPress can get confusing sometimes!) and then we’ll look at how you can display your posts from your custom post type on the front end of your site.
How to Display WordPress Custom Post Types in Your Site
Most custom post types you add to your site will work like posts, which means they’re designed to be displayed in archive pages. Maybe you’re using a custom taxonomy to display them, or maybe you’ve added the “category” taxonomy like I have.
Alternatively, if you’ve used a plugin like WooCommerce that adds custom post types in order to add specific functionality to your site, then that plugin might add some specific pages (like the “Shop2 page) designed to output your custom post type.
The four options you have for displaying custom post types are:
- Displaying the individual post (i.e. the book, in my example)
- Displaying the full post type archive, with all of the books listed.
- Displaying a custom taxonomy archive, using a taxonomy you’ve registered for your custom post type.
- Integrating posts from the custom post type (e.g. books) into the archive for an existing taxonomy such as ‘category’, or into the main blog page.
Let’s take a look at each of these in turn.
Warning! If at any point in this process you can’t access the archives or individual posts for your custom post type, its because WordPress hasn’t yet written the permalinks for them. To fix this, go to Settings > Permalinks and just click the Save Changes button. This will tell WordPress to check for any new post types and create the URLs for them.
Displaying the Post Type Archive
The first option you have is to create an archive page of all the posts in your custom post type archive.
If you defined ‘has_archive’ as true when you were registering the post type, WordPress will automatically generate an archive page for your post type. You can add this to your navigation menu using the Customizer.
Adding Your Post Type Archive to the Menu
Open the Customizer and select the Menus option. Select your main menu and click the Add items button to add extra items to your menu.

Select your post type from the options that appear and click not he downwards arrow to the right of its name. This will display al list that includes each of the posts you’ve added, plus an option which in my case is called All Books. Click on that and it will be added to your menu.
If you then click on that item in the menu, you can edit the label. I prefer not to call mine “All Books”, but just “Books” instead.

Note that you can only do this via the Customizer – it isn’t possible in the Menus screen. So make sure you use the Customizer to add your custom post type archive to your menu.
Customizing the Post Type Archive
WordPress will use the template hierarchy to identify which template file in your theme to use to display the custom post type archive.

If your theme has an archive.php file, it will use that, and if it doesn’t, it will use index.php.
If you want to edit the way that the custom post type archive is output, then you can create a template file for your custom post type archive.
For a specific custom post type, you need to create a template file called archive-$posttype.php, where $posttype is the name of your post type. So for my books post type, I’d create a file called archive-kinsta_book.php.
The easiest way to create this file is by making a duplicate of the archive.php file in your theme. Rename it and edit it so it displays your post type archive the way you want to.
Displaying Single Posts
Single posts created using a custom post type will also be shown using the first relevant template file that’s found in the template hierarchy.
You can go a bit further with single posts than you can with archives: not only can you create a template file for the post type (single-$posttype.php), but you can also create a file for a specific post of that post type using the slug for that post (single-$postype-slug.php).
So if I added Great Expectations to my book reviews site, I could create a file for all book reviews called single-kinsta_book.php, or I could create a target file for that book called single-kinsta_book-great-expectations.php. If I didn’t create either of those files, WordPress would default to using single.php or (if that didn’t exist) singular.php or index.php.
Adding Custom Post Types to the Main Blog Page
By default, your main blog page will only include the ‘post’ post type. But what if you also wanted to include your custom post type on that page, mixed up with the blog posts?
You can do this by using the pre_get_posts hook in WordPress.
In your plugin where you registered the post type, add this:
<?php
function kinsta_books_on_blog_page() {

 if ( $query->is_home() && $query->is_main_query() ) {
  $query->set( ‘post_type', array( ‘post’, ‘kinsta_book’ );
 }

}
add_action( 'pre_get_posts', 'kinsta_books_on_blog_page' ); ?>
This checks that we’re on the ‘home’ page (which is the blog page, even if that isn’t the front page of your site) and that the main query is running (because you don’t want to do this in a widget, for example). If so, it adds both posts and books to the query.
Note that you have to include the ‘post’ post type in the array as well as the new post type.
Summary
WordPress custom post types are the feature that elevates it from a simple blogging platform to a true content management system. They let you create complex, bespoke sites that can act as stores, reference hubs, media sites, or anything you’re in need of.
You can add custom post types to your WordPress site in one of three ways. You can use a plugin such as WooCommerce that registers a custom post type related to the functionality of the plugin. You can use a plugin like CPT UI or Pods to add your own custom post types. Or you can write your own plugin and use the register_post_type() function to register the post type using code. Whichever method you use, you’ll be able to get much more from your WordPress site.

Rachel McCollin has been helping people build websites with WordPress since 2010. She's a huge fan of self-hosted WordPress and wants to help as many people as possible create an awesome website with it.

