Did you just try to access your site only to be hit by some message telling you something is “Forbidden” or that you don’t have permission to access something on your site? If so, you’ve likely run into the 403 Forbidden error.
Seeing an error on your site can be frustrating and deflating, which is why we’ve created this detailed guide to help you fix the 403 Forbidden error and get your site functioning again as quickly as possible.
Let’s get started without any further introduction because we’re sure you just want to fix your site!
| Error Code | 403 |
| Error Type | Client-side error |
| Error Variations | Forbidden – You don’t have permission to access / on this server 403 – Forbidden: Access is denied Error 403 – Forbidden 403 – Forbidden Error – You are not allowed to access this address 403 Forbidden – nginx |
| Error Causes | Corrupt .htaccess file Incorrect file permissions Incorrect DNS configuration (e.g., outdated IP address records) Malware infections Hotlink protection issues Content Delivery Network (CDN) conflicts WordPress plugin conflicts Server-level security settings |
What is the 403 Forbidden Error?
The 403 Forbidden error indicates that the server understands the request but can’t provide additional access. This means that the web page you’re trying to open in your browser is a resource that you’re not allowed to access.
Like many other common errors, the 403 Forbidden error is an HTTP status code that a web server uses to communicate with your web browser.
Quick background on HTTP status codes – whenever you connect to a website with your browser, the web server responds with something called an HTTP header. This usually happens behind the scenes because everything is working normally (that’s a 200 status code, in case you were wondering).
However, if something goes wrong, the server will respond back with a different numbered HTTP status code. While these numbers are frustrating to encounter, they’re actually quite important because they help you diagnose exactly what’s going wrong on your site.
The 403 Forbidden error means that your web server understands the request that the client (i.e. your browser) is making, but the server will not fulfill it.
In more human-friendly terms, it basically means that your server knows exactly what you want to do, it just won’t let you do it because you don’t have the proper permissions for some reason. It’s kind of like you’re trying to get into a private event, but your name got accidentally removed from the guestlist for some reason.
Prefer to watch the video version?
What Causes the 403 Forbidden Error?
The two most likely causes of the 403 Forbidden Error are:
- Corrupt .htaccess file
- Incorrect file permissions
However, other issues can also trigger this error:
- Incorrect DNS configuration (e.g., outdated IP address records)
- Missing index page
- Malware infections
- Hotlink protection issues
- Content Delivery Network (CDN) conflicts
- WordPress plugin conflicts
- Server-level security settings
By the way, there are other HTTP status codes that indicate different types of issues. We’ve also written guides on how to fix:
How to Fix a 403 Forbidden Error?
To help you fix the 403 Forbidden Error on your site, we’ll cover eleven separate troubleshooting steps in detail:
1. Refresh the Page and Double Check the Address
Sometimes the simplest solutions are the only ones capable of solving complex problems.
So try to refresh the page you are not able to access. The 403 error is often temporary, so maybe you’ll get lucky.
We also recommend checking that the URL is spelled correctly. If the address you are trying to access is a directory and not a web page, there is a chance that you will encounter a 403 error. (example: www.kinsta.com/wp-content/uploads/2023/05/)
2. Clear Your Browser Cache
Another very handy solution is to clear your browser’s cache.
Cache is very useful to help us see a website faster, but sometimes some mismatch can happen between the real version of a page and its cached version.
Check below some tips on how to clear cache in various browsers:
- How to Force Refresh a Single Page for All Browsers
- How to Clear Browser Cache for Google Chrome
- How to Clear Browser Cache for Mozilla Firefox
- How to Clear Browser Cache for Safari
- How to Clear Browser Cache for Internet Explorer
- How to Clear Browser Cache for Microsoft Edge
- How to Clear Browser Cache for Opera
3. Modify Your File Permissions
Each folder and file on your site’s server has its own unique file permissions that control who can:
- Read – see the data in the file/view the contents of a folder.
- Write – modify the file/add or delete files inside a folder
- Execute – run the file and/or execute it as a script/access a folder and perform functions and commands.
These permissions are indicated by a 3-digit number, with each digit indicating the level of permission for each of the 3 categories above.
Normally, these permissions just “work” for your site.
However, if something gets messed up with the file permissions at your site, it can cause the 403 Forbidden error.
To view and modify your site’s file permissions, you’ll need to connect via FTP/SFTP. Here’s how to use SFTP if you’re hosting at Kinsta.
For the screenshots in the tutorial below, we’ll be using the free FileZilla FTP program.
The basic principles will apply to any FTP program, though – you’ll just need to apply them to a different interface.
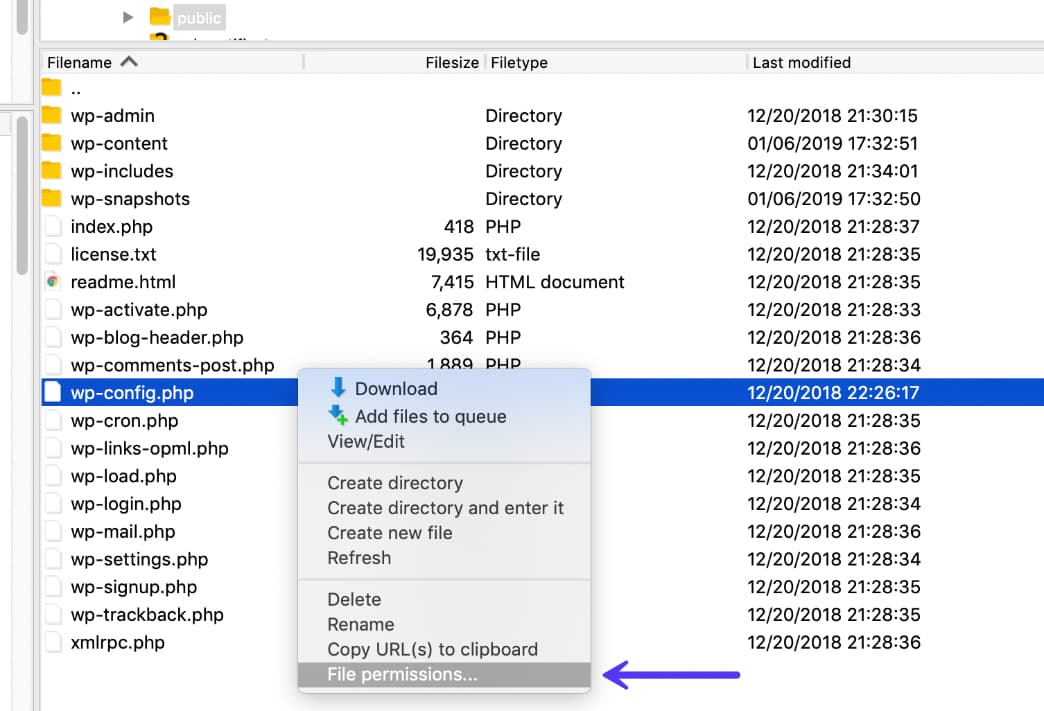
Once you’re connected to your server, you can view a file or folder’s permissions by right-clicking on it:
Of course, manually checking the permissions for each file or folder isn’t really an option.
Instead, you can automatically apply file permissions to all the files or folders inside of a folder.
According to the WordPress Codex, the ideal file permissions for WordPress are:
- Files – 644 or 640
- Directories – 755 or 750
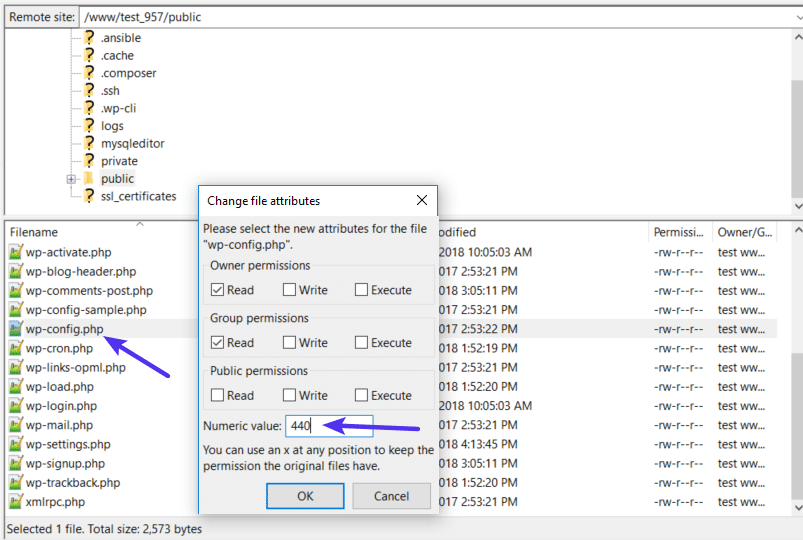
One exception is that your wp-config.php file should be 440 or 400.
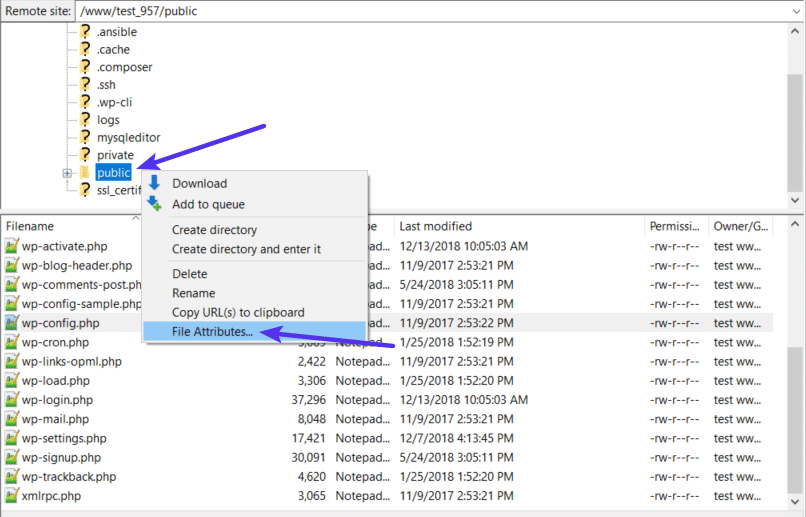
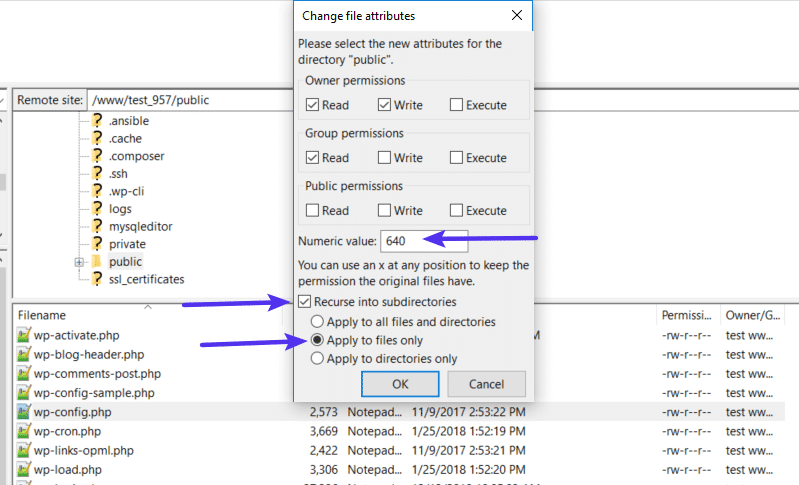
To set these permissions, right-click on the folder that contains your site (the folder name is public at Kinsta). Then, choose File Attributes:
Enter 755 or 750 in the Numeric value box. Then, choose Recurse into subdirectories and Apply to directories only:
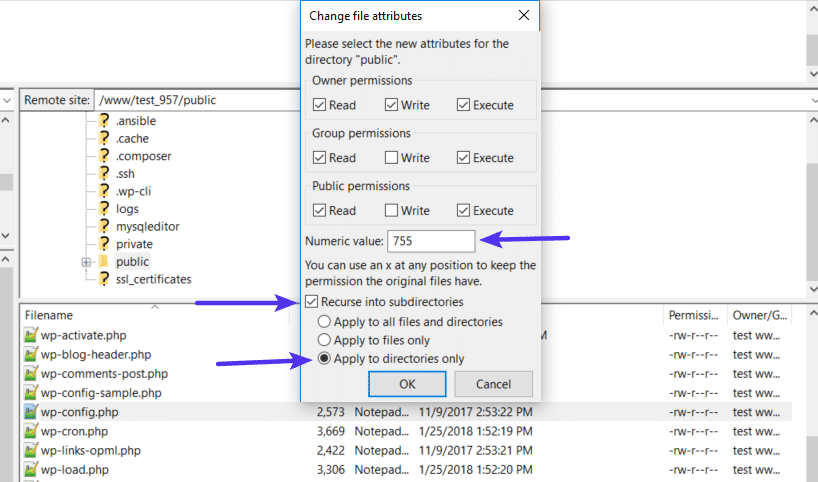
Once you’ve applied the correct permissions for directories, you’ll repeat the process for files. Only this time:
- Enter 644 or 640 in the Numeric value box
- Choose Recurse into subdirectories
- Choose Apply to files only
To finish the process, you just need to manually adjust the permissions for your wp-config.php file to make them 440 or 400:
If file permissions issues were causing the 403 Forbidden Error, your site should now start working again.
4. Delete and Restore the .htaccess File
Kinsta uses the NGINX web server, so this potential issue doesn’t apply if you’re hosting your site at Kinsta because Kinsta sites do not have a .htaccess file.
However, if you’re hosting elsewhere and your host uses the Apache web server, one common cause of the 403 Forbidden error is a problem in your site’s .htaccess file.
The .htaccess file is a basic configuration file used by the Apache web server. You can use it to set up redirects, restrict access to all or some of your site, etc.
Because it’s so powerful, even if a little mistake can cause a big issue, like the 403 Forbidden error.
Rather than trying to troubleshoot the .htaccess file itself, a simpler solution is to just force WordPress to generate a new, clean .htaccess file.
To do that:
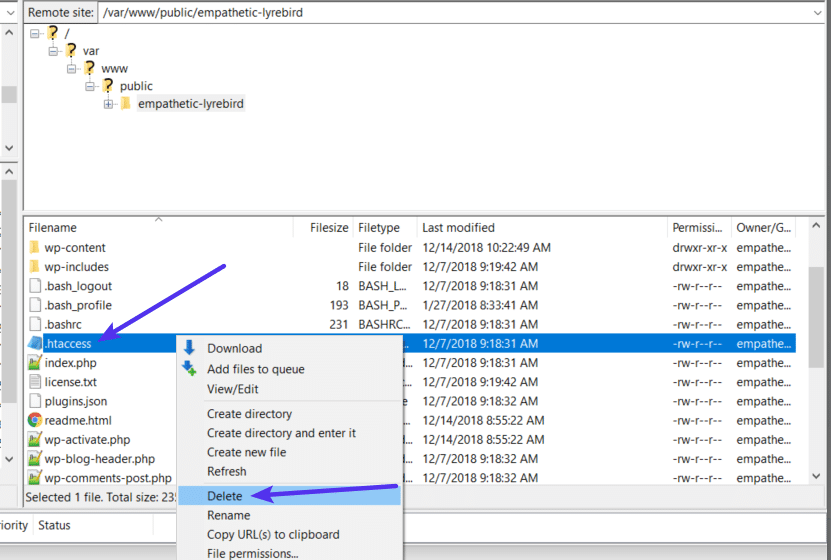
- Connect to your server via FTP
- Find the
.htaccessfile in your root folder - Download a copy of the file to your computer (it’s always a good idea to have a backup just in case)
- Delete the
.htaccessfile from your server after you have a safe backup copy on your local computer
Now, you should be able to access your WordPress site if your .htaccess file was the issue.
To force WordPress to generate a new, clean .htaccess file:
- Go to Settings → Permalinks in your dashboard
- Click Save Changes at the bottom of the page (you do not need to make any changes – just click the button)
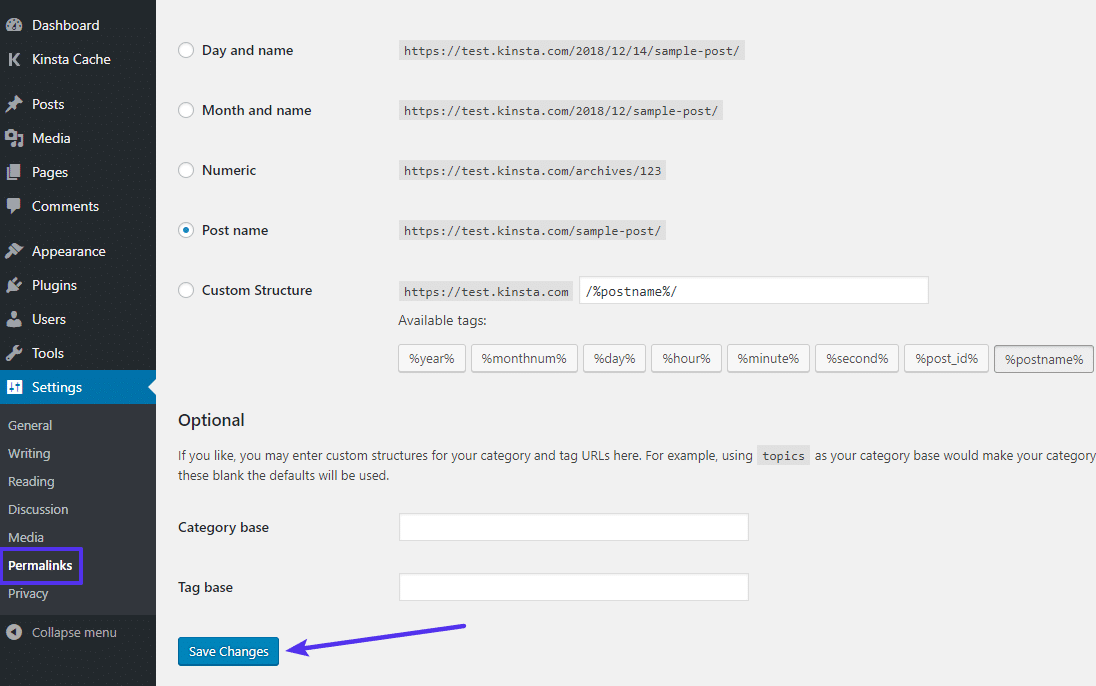
And that’s it – WordPress will now generate a new .htaccess file for you.
5. Deactivate and then Reactivate Your Plugins
If neither your site’s file permissions nor .htaccess file are the problems, the next place to look is your WordPress plugins. It could be a bug in a plugin or a compatibility issue between different plugins.
No matter what the issue is, the easiest way to find the problematic plugin is with a little trial and error. Specifically, you’ll need to deactivate all of your plugins and then reactivate them one by one until you find the culprit.
If you can still access your dashboard, you can perform this process from the normal Plugins area.
If you cannot access your dashboard, you’ll instead need to connect to your WordPress site’s server via FTP/SFTP (here’s how to connect via SFTP at Kinsta).
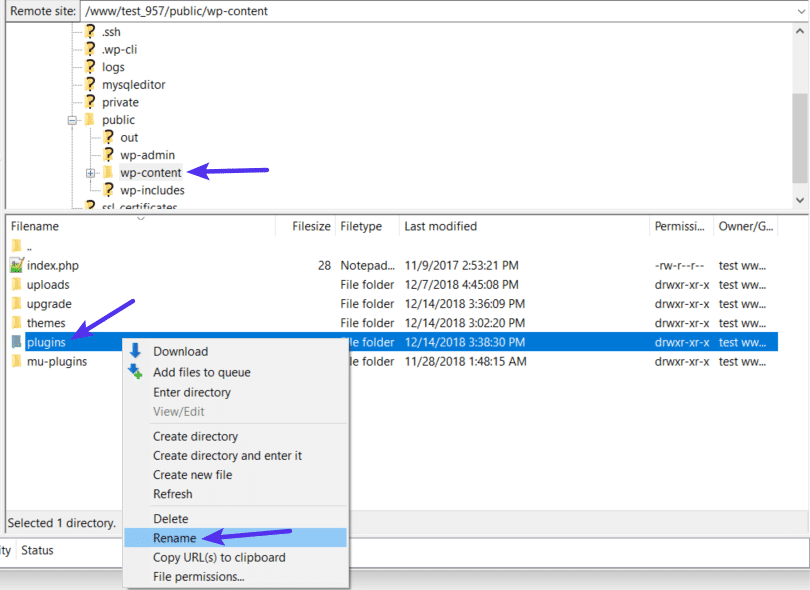
Once you’re connected to your server via FTP:
- Browse to the wp-content folder
- Find the plugins folder inside of the wp-content folder
- Right-click on the plugins folder and choose Rename
- Change the name of the folder. You can name it anything different, but we recommend something like plugins-disabled to make it easy to remember.
By renaming the folder, you’ve effectively disabled all the plugins at your site.
Now, try accessing your site again. If your site is working, you know that one of your plugins is causing the 403 Forbidden error.
To find the culprit, reactivate your plugins one-by-one until you find which plugin is causing the issue.
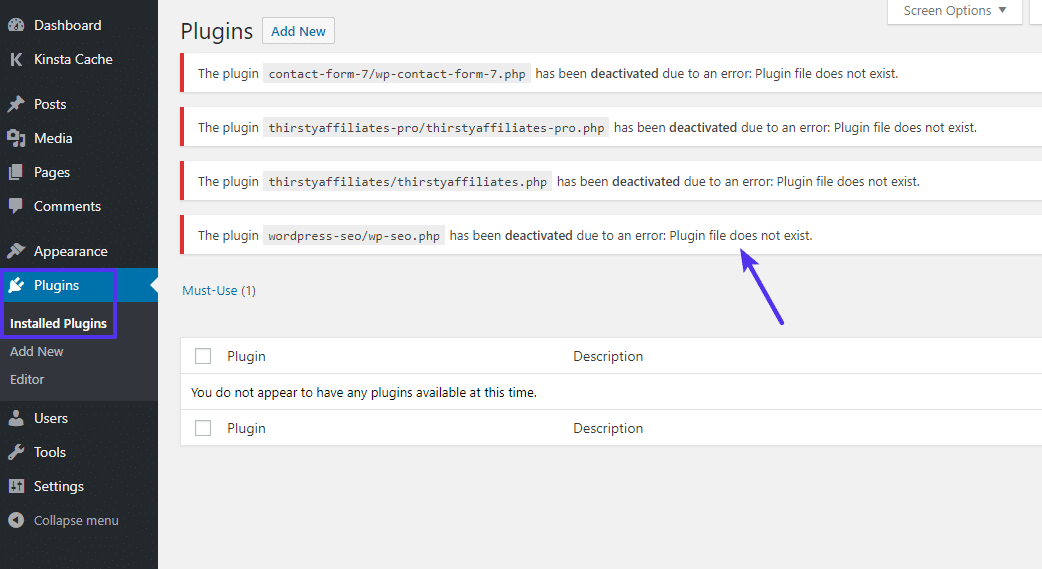
After changing the file name of the plugins folder, you should see a number of errors that say plugin file does not exist when you go to the Plugins area on your site:
To fix this issue and regain the ability to manage your plugins, use your FTP program to change the name of the folder back to plugins. So, if you renamed it to plugins-disabled, just change it back to plugins.
Once you do that, you’ll see the full list of all your plugins again. Only now, they’ll all be deactivated:
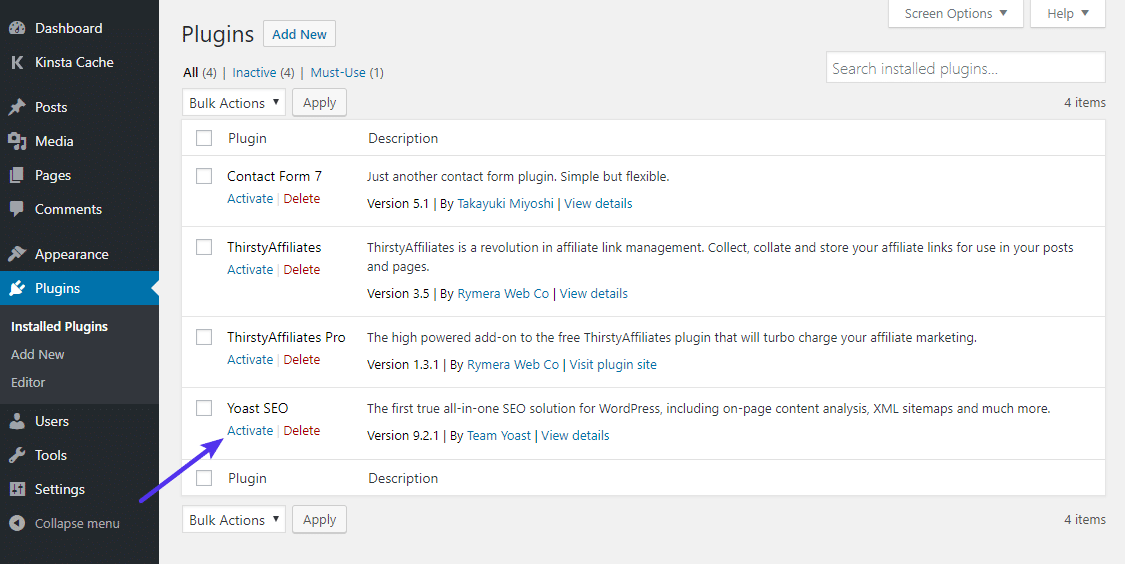
Use the Activate button to reactivate them one-by-one.
Once you find the plugin that’s causing the issue, you can either reach out to the plugin’s developer for help or choose an alternate plugin that accomplishes the same thing.
6. Deactivate CDN Temporarily
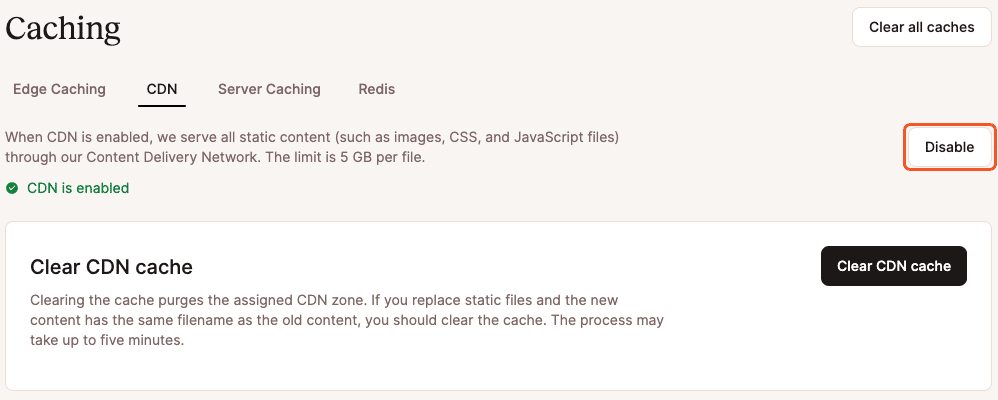
If you’re getting 403 forbidden errors on your assets (images, JavaScript, CSS), it could be a problem with your content delivery network (CDN).
In this case, we recommend temporarily disabling your CDN and then checking your site to see if the issue is resolved. If you’re a Kinsta client, click through to your WordPress site within the MyKinsta dashboard, select Caching in the sidebar menu, then the CDN tab. You can click the Disable button to turn off CDN caching:
7. Check to See If Hotlink Protection Is Misconfigured
Hotlinking is when someone adds an image to their site, but the hosted link is still pointed to someone else’s site. To prevent this, some will set up what is called “hotlink protection” with their host or CDN provider.
When hotlink protection is enabled, it will typically return a 403 forbidden error. This is normal. However, if you’re seeing a 403 forbidden error on something you shouldn’t be, check to make sure hotlink protection is configured properly.
8. Disconnect From Your VPN
Another simple tip, but that can solve this problem.
Some sites block VPN users, which may be why the 403 Forbidden message is showing up for you.
To verify this, disconnect from the VPN and try connecting to the site in another way. Or try switching to a different server provided by your VPN service.
9. Run a Malware Scan
Some malware infections can modify your .htaccess file, continually reintroducing corrupted rules. To scan your website:
- Use security plugins like Wordfence or Sucuri to scan for malware.
- Remove any infected files and restore clean backups if necessary.
10. Reach Out to Your Hosting Provider
If none of the above solutions worked for you, then we recommend reaching out to your hosting provider. They can most likely help you pinpoint the issue and get you back up and running. If you’re a Kinsta client, open up a support ticket with our team. We are available 24/7.
11. Use the Sitechecker Website Crawler Tool
The Sitechecker Website SEO Checker is able to provide you with a detailed SEO audit report by providing solutions and checkers for your website. There is a website crawler, a site monitoring tool, and a rank tracker amongst other built-in tools.
It’s important to constantly monitor your pages for 403 errors, and you can do this with Sitechecker. You can check your website not only for 403 errors but also for all other errors.
403 Forbidden Error Variations
Like many other HTTP status codes, there are a lot of different variations for how this error code presents itself.
Here are some common variations that you might come across:
- “Forbidden – You don’t have permission to access / on this server”
- “403 – Forbidden: Access is denied”
- “Error 403 – Forbidden”
- “403 – Forbidden Error – You are not allowed to access this address”
- “403 Forbidden – nginx”
- “HTTP Error 403 – Forbidden – You do not have permission to access the document or program you requested”
- “403 Forbidden – Access to this resource on the server is denied”
- “403. That’s an error. Your client does not have permission to get URL / from this server”
- “You are not authorized to view this page”
- “It appears you don’t have permission to access this page.”
If you’re on an Nginx server, it will look like this below. Basically, if you see any mention of “forbidden” or “not allowed to access,” you’re probably dealing with a 403 Forbidden error.
Summary
The 403 Forbidden error means that your server is working, but you no longer have permission to view all or some of your site for some reason.
The two most likely causes of this error are issues with your site’s file permissions or .htaccess file. Beyond that, some plugin issues might also cause the 403 Forbidden error. Or it could be that something is misconfigured with hotlink protection or your CDN.
By following the troubleshooting steps in this guide, you should be able to get your site back to working in no time.

Brian has a huge passion for WordPress, has been using it for over a decade, and even develops a couple of premium plugins. Brian enjoys blogging, movies, and hiking. Connect with Brian on Twitter.