This is a post for all of you WordPress developers out there!
Today we’ll explain how to use and integrate Bedrock and Trellis at Kinsta.
If you haven’t heard of these two tools before, we’ll also introduce them and hopefully help to explain why you’d want to use them over a traditional setup.
Bedrock and Trellis
Both Bedrock and Trellis exist to make it easier to develop, maintain, and deploy WordPress sites.
- Bedrock offers an alternative way to manage your WordPress installation with an improved folder structure, modern development tools, and improved security.
- Trellis works with Bedrock to create development environments with Vagrant along with one-command deploys.
The main reason to use Bedrock is to get proper dependency and package management for a WordPress project. You may already be familiar with npm for JavaScript or Bundler for Ruby. PHP is no different, and its equivalent is Composer.
While using a package manager is common, it’s less common for WordPress itself since WordPress already has its own concept for plugins. Bedrock integrates Composer to manage plugins, themes, and even WordPress core itself as dependencies.
Trellis is a tool to easily create development and production servers to host WordPress sites. It’s specifically created to work with Bedrock-based sites as well. Trellis’ default use case is to use it to develop with Vagrant and in production as well to get parity between those two environments.
This post explains a slightly different use case: Trellis for your development server and Kinsta for your production (and/or staging) server.
Why use Kinsta over a Trellis provisioned VPS? Because sometimes you want to pay someone else to manage the server instead of doing it yourself (especially if you have a lot of clients). Kinsta also makes scaling easier without having to deal with multiple servers, load balancers, and cloud uploads.
A lot of WordPress hosts aren’t very developer-friendly and don’t offer SSH access and Composer or WP-CLI integration which are requirements to use Trellis and Bedrock. Thankfully, Kinsta offers SSH access on all of their hosting plans, from Single 35k to WP 60 and beyond, which makes all this possible. They can also modify the root path for proper functionality.
Bedrock vs Regular WordPress
You might be wondering why you would use Bedrock over a traditional WordPress install. The reason is that Bedrock is built specifically with the modern web developer in mind:
- Environment-specific configuration files, stored outside of the public web root
- Environment variables to separate config from code in a single
.envfile - Enhanced security by limiting access to non-web files along with bcrypt hashed passwords
- Custom wp-content directory named
app - Composer for managing WordPress, plugins, themes, and other PHP dependencies
.gitignorethat excludes WordPress core, plugins, and uploads
Raspberry Pi, Snopes, JetBlue, and more, trust Bedrock to power their WordPress sites.
Let’s take a look at the two folder structures side-by-side:
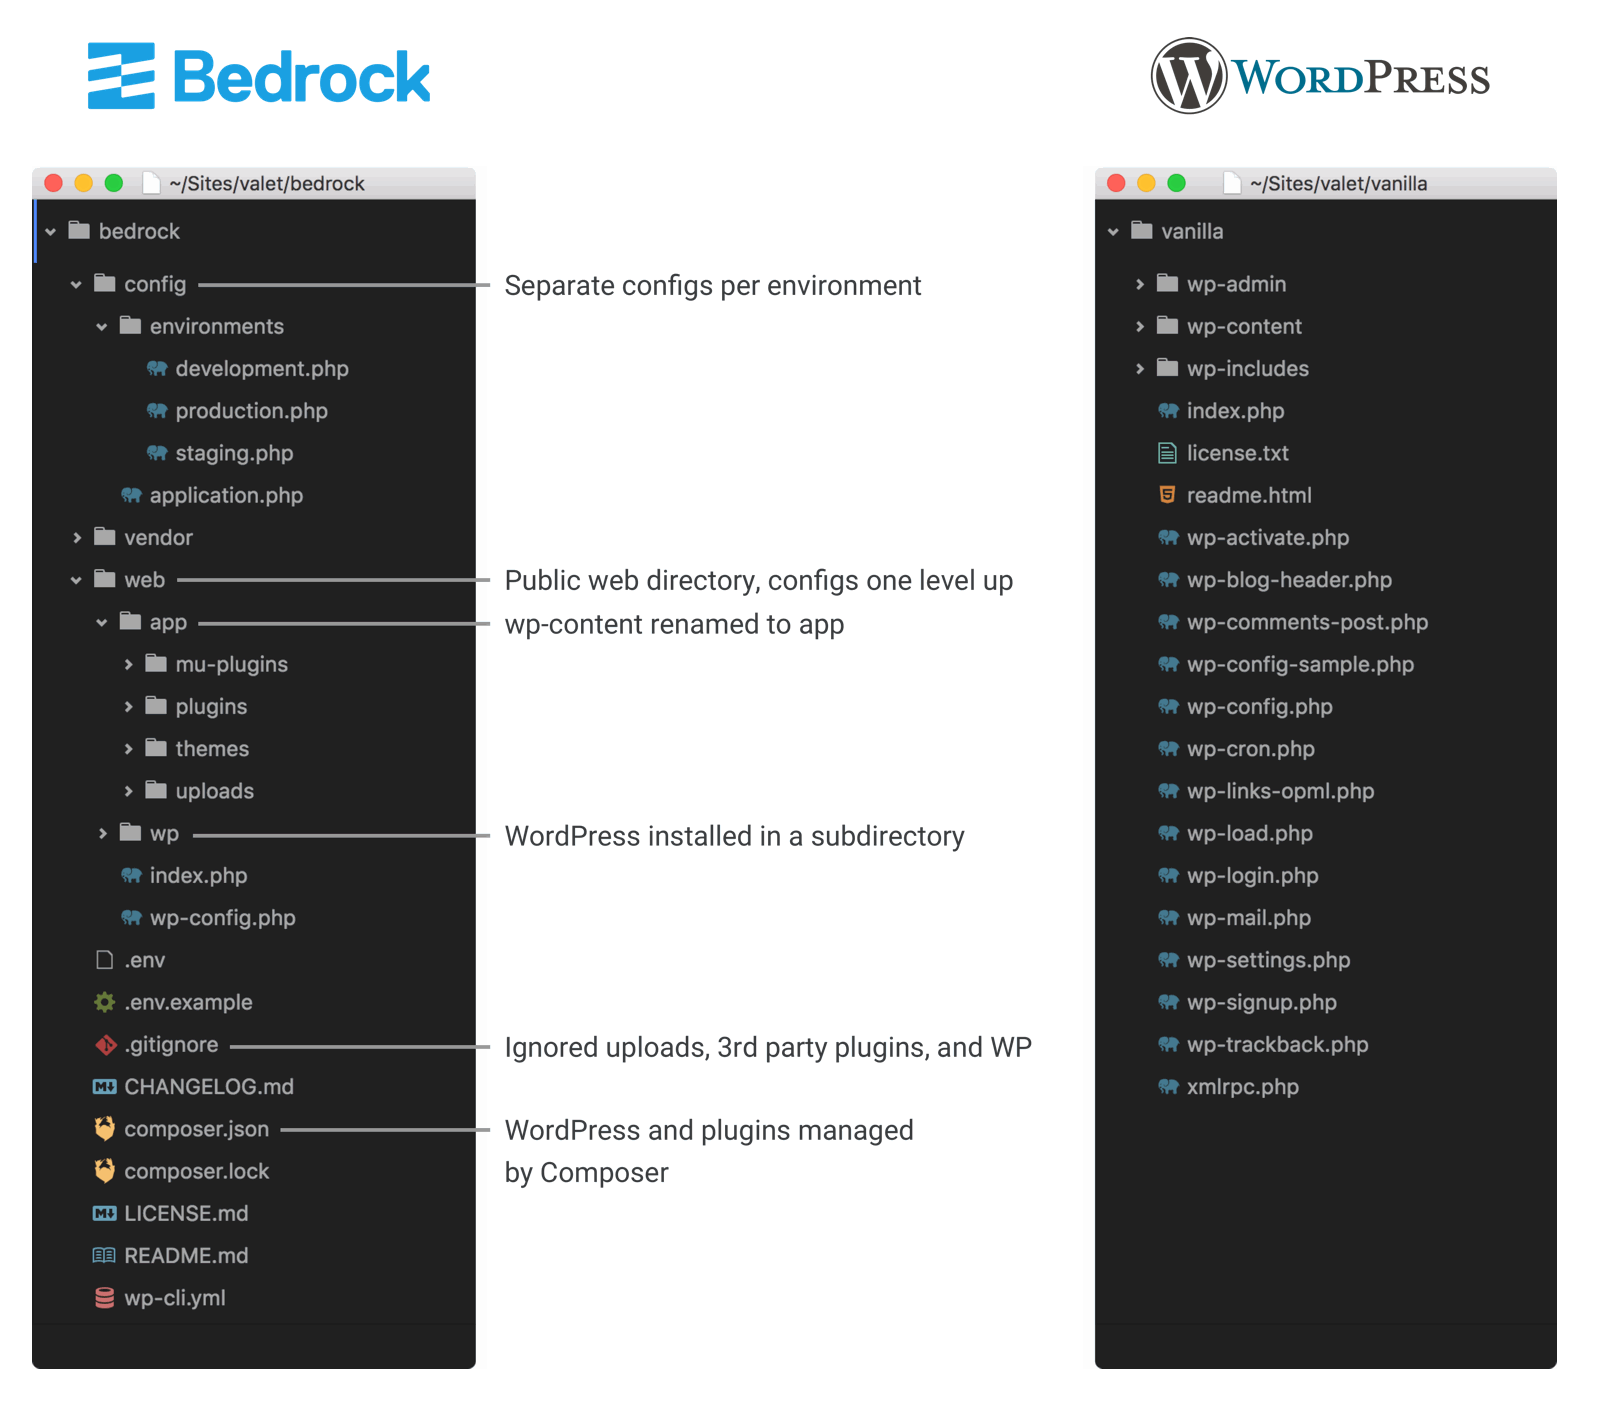
Bedrock takes installing WordPress into a subdirectory to the next level. Much of the philosophy behind Bedrock is inspired by the Twelve-Factor App methodology including the WordPress specific version.
Configuring Trellis for Kinsta
First, make sure your public SSH keys are added to the MyKinsta dashboard.
Trellis can deploy to Kinsta with just a few updates. Since Kinsta provides everything from the web server standpoint, provisioning your staging and production environments do not apply.
The one-command deploys in Trellis work with Kinsta with a little configuration. Once configured, you’ll be able to deploy your WordPress sites by running the deploy playbook in Trellis:
ansible-playbook deploy.yml -e env=staging -e site=example.com --limit=kinsta_stagingBring up your MyKinsta dashboard and navigate to the WordPress site that you’re setting up with Bedrock and Trellis, along with your code editor opened to the trellis directory in your project.
First edit trellis/ansible.cfg to add the following to [defaults] at the top:
forks = 3
host_key_checking = False
Staging Configuration
Make sure that trellis/group_vars/staging/wordpress_sites.yml is configured with the proper canonical for your staging site:
wordpress_sites:
  example.com:
    site_hosts:
      - canonical: staging-example.kinsta.com
Then open up trellis/group_vars/staging/main.yml and add the following to the end of the file:
project_root: /www/example_123/public
www_root: /www/example_123/public
web_user: example
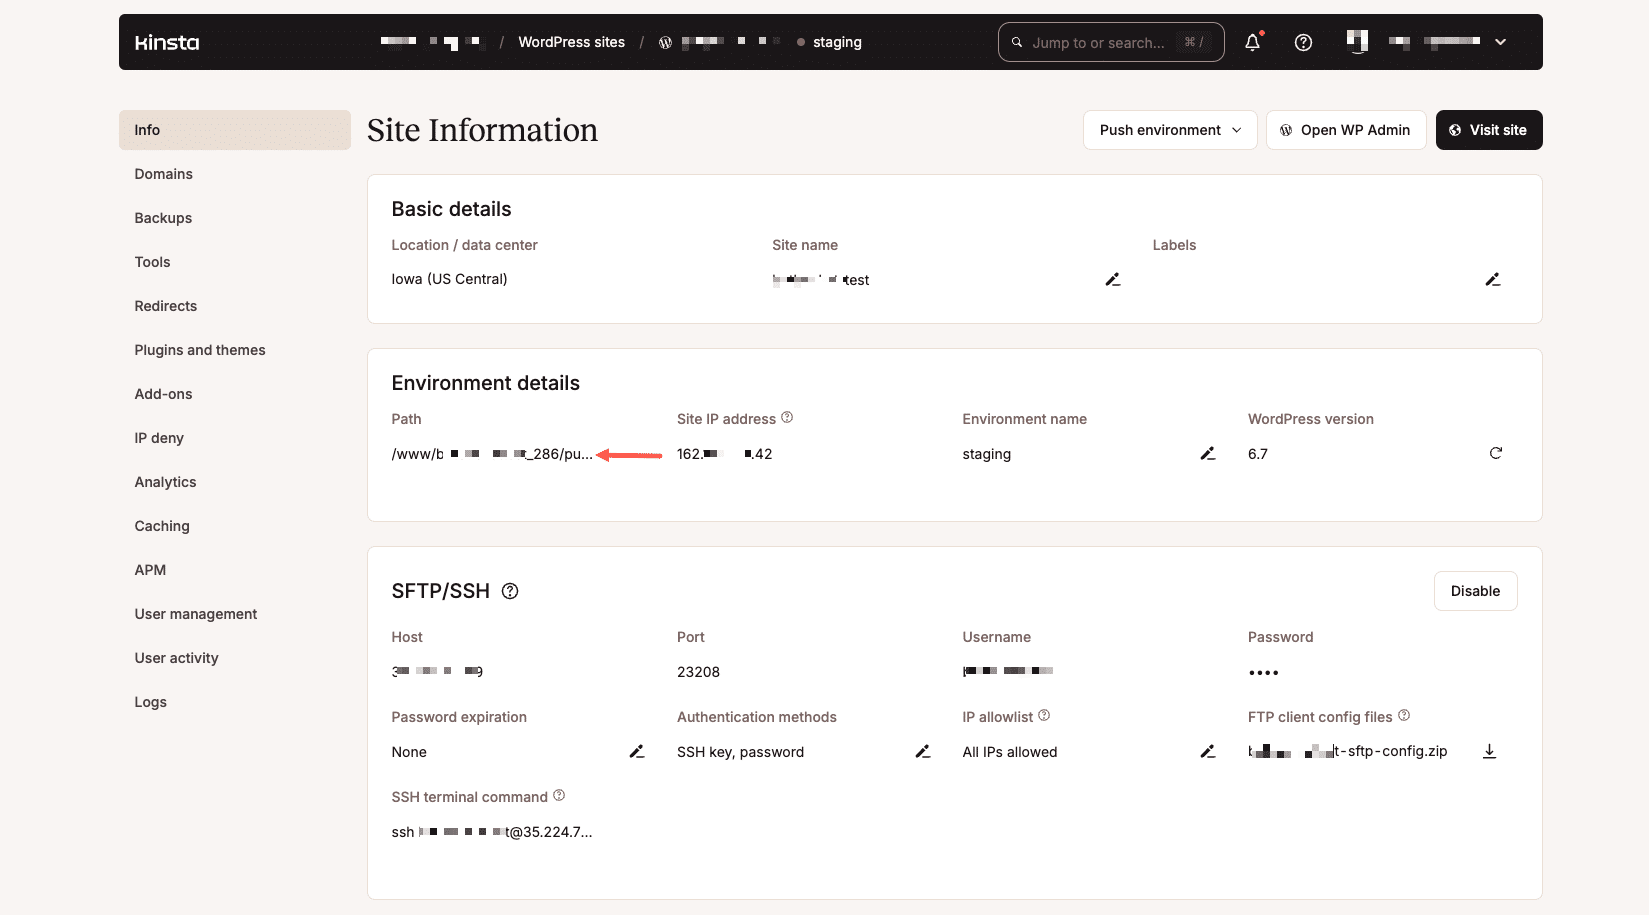
web_group: www-dataReplace the project_root and www_root paths with the correct path provided in the MyKinsta dashboard for your Kinsta staging environment.
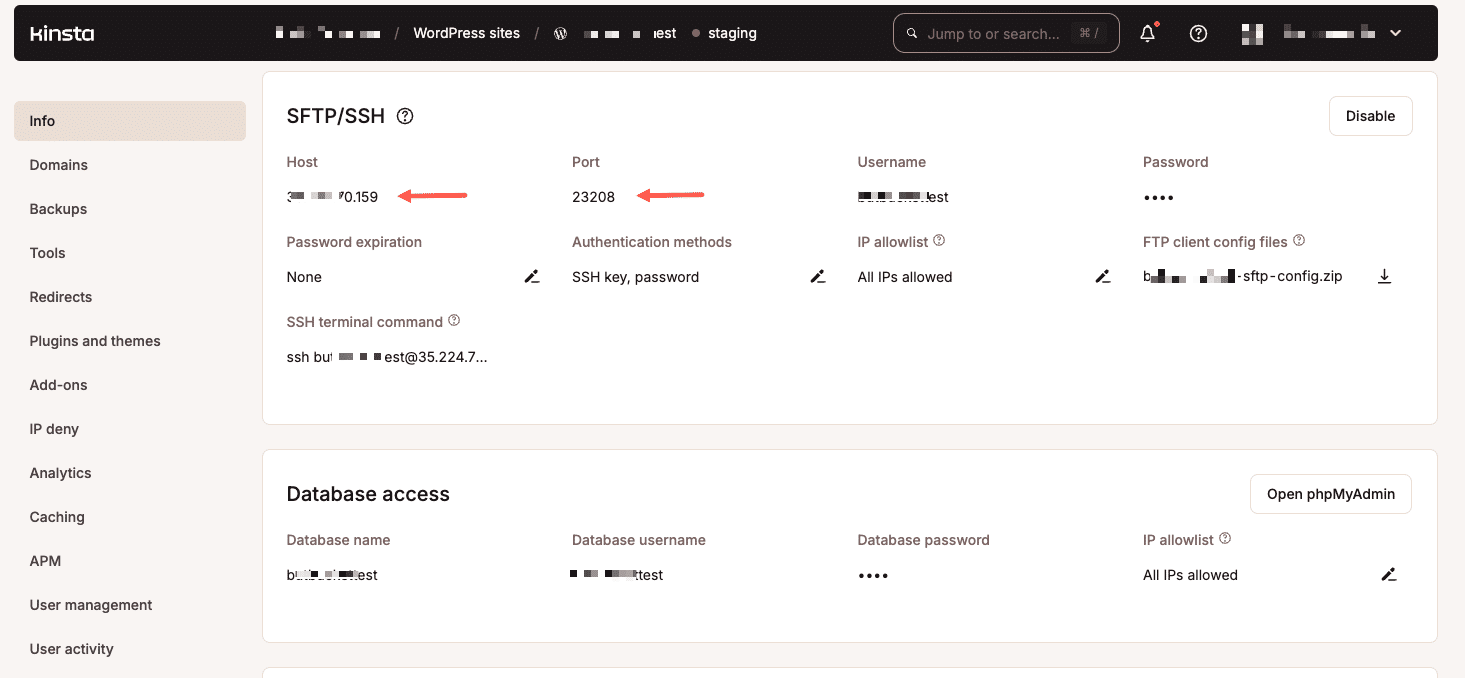
Next, open trellis/group_vars/staging/vault.yml for editing by running ansible-vault edit group_vars/staging/vault.yml.
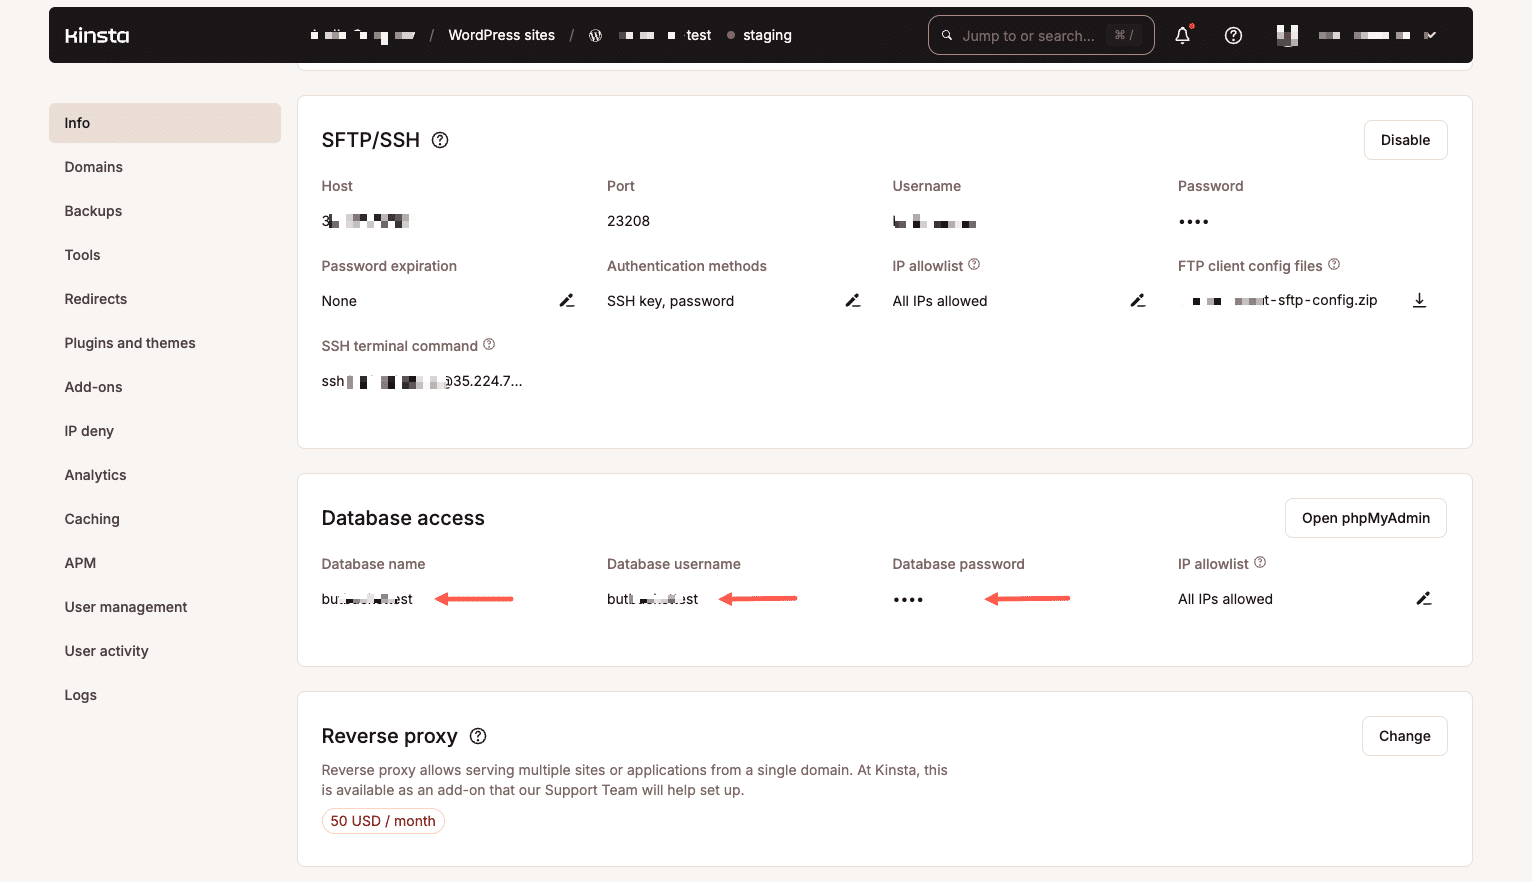
We need to add db_user, db_name, and db_password to env. You can find the values for these on the main info screen for your site in the MyKinsta dashboard.
vault_wordpress_sites:
  example.com:
    env:
      db_user: "example"
      db_name: "example"
      db_password: "xxxxxxxxxxxxxxx"
      # Generate your keys here: https://roots.io/salts.html
      auth_key: ""
      secure_auth_key: ""
      logged_in_key: ""
      nonce_key: ""
      auth_salt: ""
      secure_auth_salt: ""
      logged_in_salt: ""
      nonce_salt: ""
Finally, open trellis/hosts/staging and replace the contents with:
kinsta_staging ansible_host=104.154.94.123 ansible_ssh_port=12345 ansible_ssh_extra_args='-o StrictHostKeyChecking=no'

[web]
kinsta_staging

[staging]
kinsta_staging
Make sure that the host and SSH port match what is listed in the MyKinsta dashboard.
Production Configuration
Now, let’s repeat the same process above for the production environment. Make sure to toggle to your “live” environment in the MyKinsta dashboard.
Open up trellis/group_vars/production/main.yml and add the following to the end of the file:
project_root: /www/example_123/public
www_root: /www/example_123/public
web_user: example
web_group: www-data
Be sure to replace the project_root and www_root paths with the correct path provided in the MyKinsta dashboard for your live environment.
Next, open trellis/group_vars/production/vault.yml for editing by running ansible-vault edit group_vars/production/vault.yml:
vault_wordpress_sites:
  example.com:
    env:
      db_user: "example"
      db_name: "example"
      db_password: "xxxxxxxxxxxxxxx"
      # Generate your keys here: https://roots.io/salts.html
      auth_key: ""
      secure_auth_key: ""
      logged_in_key: ""
      nonce_key: ""
      auth_salt: ""
      secure_auth_salt: ""
      logged_in_salt: ""
      nonce_salt: ""
Finally, open trellis/hosts/production and replace the contents with:
kinsta_production ansible_host=104.154.94.123 ansible_ssh_port=12345 ansible_ssh_extra_args='-o StrictHostKeyChecking=no'

[web]
kinsta_production

[production]
kinsta_production
Modifying the Deploy Tasks
Trellis deploys try to reload php-fpm, which we need to remove from attempting to run on Kinsta’s servers. We also need to trigger the clearing of Kinsta’s cache on a deploy.
Open trellis/roles/deploy/hooks/finalize-after.yml and scroll to the bottom. Remove the last task for Reload php-fpmand add the following:
- name: Clear Kinsta cache
  uri:
    url: "{{ site_env.wp_home }}/ask-support-rep/"
    method: GET
Replace ask-support-rep above after asking a Kinsta support rep for the URL to clearing the cache on your site.
Optional: Install Composer Dependencies
If you’re getting a screen that tells you to run ‘Composer Install,’ add the following right before the “Clear Kinsta cache” code above:
- name: Install Composer dependencies
composer:
command: install
working_dir: >/www/example123/public/final-path
The /final-path might vary based on your Bedrock/Trellis settings.
Adding kinsta-mu-plugins to Bedrock
Bedrock sites come with mu-plugins installed automatically, but, you’ll need to install the Kinsta MU plugin by bringing in the kinsta-mu-plugins package. This plugin (which is installed by default when you create a WordPress site through MyKinsta) handles things such as full page caching and the Kinsta CDN integration.
Open site/composer.json and add the following within the repositories array:
{
  "type": "package",
  "package": {
    "name": "kinsta/kinsta-mu-plugins",
    "type": "wordpress-muplugin",
    "version": "2.3.3",
    "dist": {
      "url": "https://kinsta.com/kinsta-tools/kinsta-mu-plugins.zip",
      "type": "zip"
    }
  }
}
Then run the following from your Bedrock/site directory (or specify kinsta/kinsta-mu plugins as a requirement in your composer.json file:
composer require kinsta/kinsta-mu-plugins:2.3.3The following constants may be required to fix issues with CDN paths and shared plugin asset URLs. Add the following code to your site’s configuration file (bedrock/config/application.php in Bedrock sites):
/**
 * Kinsta CDN fix for Bedrock
 */
define('KINSTA_CDN_USERDIRS', 'app');

/**
 * Fix Kinsta MU Plugins URL path with Bedrock
 */
$mu_plugins_url = Config::get('WP_CONTENT_URL') . '/mu-plugins';
define('KINSTAMU_CUSTOM_MUPLUGIN_URL', "{$mu_plugins_url}/kinsta-mu-plugins");
For more information, including how to update the plugin, check out our guide for the Kinsta MU plugin.
Final Steps
The last thing you need to do is inform Kinsta of what to set the document root to. Hop on MyKinsta and ask the support team for your document root be updated to public/current/web.
If you didn’t already get the clear cache URL earlier, also ask your support rep for this, and make sure that trellis/roles/deploy/hooks/finalize-after.yml is updated with the correct URL to clear Kinsta’s cache on a successful deploy.
Once this change has been made you’ll be able to deploy to both your staging and production environments with a single line:
# Deploy staging
ansible-playbook deploy.yml -e env=staging -e site=example.com --limit=kinsta_staging

# Deploy production
ansible-playbook deploy.yml -e env=production -e site=example.com --limit=kinsta_production
Better yet… setup a continuous integration service, such as CircleCI, to automatically run the deploy for you when you commit to either staging or master!

Ben Word is a web developer and interaction designer. He is the founder of Roots, an open-source organization that creates tools to help WordPress developers build better sites.