
If you need to encrypt PHP code in your application then a very popular choice is ionCube which has been designed to integrate well with both small and enterprise-level applications.
Typically, PHP source code is first passed through the ionCube encoder before an application has been distributed. This protects the code from being human-readable or from being edited.
However, by default, encrypted PHP source code cannot be executed directly on the server. It needs to be decrypted before the PHP engine can process it.
This is where the ionCube loader comes in.
Introduction
First released in 2002, it’s a PHP extension that decrypts (previously encrypted) code on-the-fly and prepares it for execution along with the rest of the PHP application.
It’s all about security. If a PHP application contains proprietary code/algorithms, or software licensing features are required, then using ionCube is an ideal solution to protect your source code.
To encode PHP files you first need to purchase the ionCube encoder. There’s also an online version of the encoder available which includes support for encrypting PHP code for free for testing purposes (more on this below).
As for the ionCube loader, this is free for anyone to download and install on their server. There are various different versions of ionCube loader available, each one designed for a specific system (Linux, Windows, macOS etc.), and 32-bit or 64-bit architectures.
Once downloaded you’ll need to install the version of ionCube loader that matches the PHP version running on your server as each available download contains multiple versions of the ionCube loader for all the different versions of PHP.
If you’re not sure about what version you need to download and install then don’t worry we’ll be covering this in detail shortly.
Just as a side note if you’re using HHVM (HipHop Virtual Machine) to process PHP then you need to be aware that ionCube loader doesn’t support HHVM.
However, this is mostly a moot point since HHVM ended support for PHP as of version v3.30. So this is only relevant if you’re using an older version of HHVM. If you are still using HHVM and need to encrypt PHP files with ionCube then you’ll have to switch to a more standard PHP engine that supports ionCube.
Preparing for Installation
In order to complete the manual installation of ionCube loader it’s a good idea to first be comfortable with common terminal commands. If you’re already familiar with the terminal then feel free to skip to the next section.
In this guide we reference the following terminal commands:
- cat – Output contents of a file to the terminal.
- cd – Change the current working directory.
- cp – Copy one or more files.
- echo – Output a message to the terminal.
- grep – Powerful text based search.
- head – Output the beginning few lines of a file(s).
- ls – List files and directories.
- mkdir – Create a new directory.
- nano – Compact text editor inside the terminal window.
- ssh – Create a new remote SSH connection.
- tar – Extract files from an archive.
- wget – Download files via HTTP.
Understanding what these terminal commands do and how to use them will make the ionCube loader installation process much easier. Click on the links for more detailed information about each command.
Enabling ionCube Loader in MyKinsta
If you’re a Kinsta customer, you can enable ionCube loader in MyKinsta. To enable ionCube loader, go to Sites > sitename > Tools. Scroll down to the ionCube Loader option and click the Enable button.
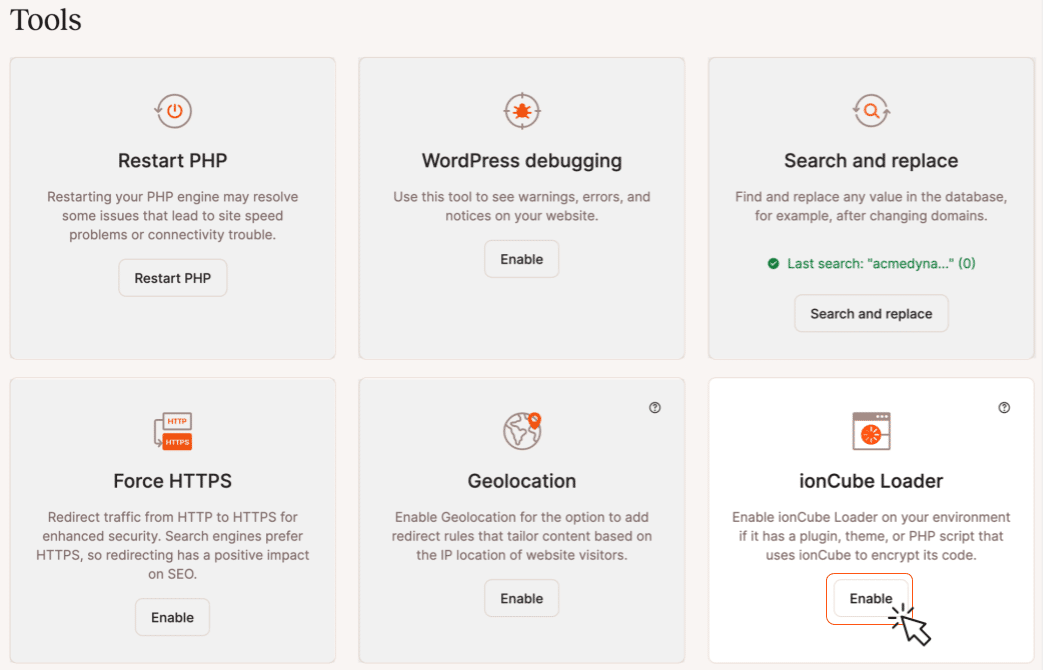
The ionCube tool is free for Kinsta customers and can be installed on any plan.
If you’re not a Kinsta client, we’ll walk you through below how to manually install ionCube loader on a VPS. Make sure you have full SSH access and are comfortable executing terminal commands.
Manual Installation of ionCube Loader
There’s a specific set of steps required to complete the installation of ionCube loader manually on your server. This process may vary slightly depending on your exact server setup but as long as you’re running a Linux-based server, then the differences should be minimal.
During the installation process we’ll be covering each of the following steps in detail:
- Connect to Your Site Remotely Via SSH.
- Download and Extract the ionCube Loader PHP Extension.
- Copying the ionCube Loader .SO File.
- Configuration and Server Reboot.
- Verifying ionCube Loader Installation
- Testing the ionCube Installation
- Check Error Logs for Installation Issues
Connect to Your Site Remotely Via SSH
Before we can download and begin the installation of ionCube loader we need to establish a secure remote connection to the server via SSH (Secure Shell). This has become the standard method to interact with a server via the command line and we’ll make extensive during the installation process of the ionCube loader PHP extension.
To open a new SSH connection you’ll need to have the following information to hand, which has to be entered every time you log in:
- Hostname
- Port number
- Username
- Password
It’s a good idea to look up this information and make a note of it ahead of time. Usually, this information can be found in your server cPanel or dashboard like MyKinsta. Your host will be able to help if you can’t find the information you’re looking for.
You can also connect to your remote server using SSH keys. This method is generally considered a more secure way to connect via SSH. Your server should support both methods.
If you want to use SSH keys instead of entering the username/password combination each time you login then take a look at this comprehensive guide for more information.
If you’re on macOS, or Linux, operating systems then the built-in terminal will be fine for SSH access. If you’re on Windows however you’ll need to use an SSH client such as PuTTY as this feature isn’t available in by default.

We’ll be using the macOS terminal throughout the rest of this guide. To connect to your server via SSH you’ll need the following details:
- Username
- Hostname
- Port number
- Password (SFTP)
The SSH terminal command takes the form:
ssh username@hostname -p portnumberThe port number is usually 22 but it may be different for your specific server. e.g. There may be different port numbers used for shared and dedicated servers so check with your hosting provider if you’re not sure before you attempt to connect.
Once the ssh command has been entered, you’ll be prompted for a password after which the remote SSH connection is complete and you have direct access to the server.

Download and Extract the ionCube Loader PHP Extension
There are different versions of the ionCube loader available for download. These are listed by platform and release date to make it easier to choose the right version relevant to your particular system.

You can choose to subscribe to ionCube loader updates to make sure you keep your loader extension up-to-date with the latest version.
To find out which loader version is the correct one for your server we can use the PHP command which displays detailed PHP configuration data.
[phpinfo()](https://www.php.net/manual/en/function.phpinfo.php)To use this PHP function to output the required data complete the following steps:
- Connect to your server via SSH.
- Create a PHP file.
- Add the
phpinfo()function. - Save the file inside the root website folder
- Display in a browser.
- Search the document for ionCube references.
- Delete the file when done.
This is quite a bit of work to just display the server PHP configuration data. Fortunately, there’s an easier way to do this via the terminal.
Running the php -i command will serve the same response from the PHP CLI engine as phpinfo() does. However, we only want the first few lines outputted as this contains the relevant information about the server environment PHP is running.
This can be done with:
php -i | head -n 5which will output the following information:

As you can see, our particular server is Linux-based and the x86_64 refers to a 64-bit system. So the ionCube loader we should download is the Linux 64 bits tar.gz archive. Make sure you download the ionCube loader archive relevant to your system.
The ionCube loader archive should be downloaded to a temporary folder so let’s create one now before we do anything else:
cd /tmp
mkdir ioncube
cd ioncube/
To actually download the ionCube archive use the wget command.
wget
https://downloads.ioncube.com/loader_downloads/ioncube_loaders_lin_x86-64.tar.gz
This downloads the ionCube loader package into the temporary folder and outputs the download progress until it completes.

Once the archive has successfully downloaded, extract it into the same /tmp folder with:
tar xvfz ioncube_loaders_lin_x86-64.tar.gz

This extracts all the archived files into a new ioncube folder. List them out with ls ioncube:

As you can see, there are multiple individual ionCube loader files with the extension .so. Each filename contains a different number which refers to the PHP version running on your server, so it’s important that you install the correct one.
Earlier, we ran the command php -i | head -n 5 to get the server OS information. The first couple of lines of output also give us the PHP version which in our case was 7.2.22.
To quickly determine which ionCube loader file we should use, list out only the files that contain _7 to make it easier to see only the files were interested in.
We can do this by piping the output from ls into grep to filter the list of files:
ls ioncube | grep _7which results in:

The closest match to our version of PHP is ioncube_loader_lin_7.2.so. There is another matched file called ioncube_loader_lin_7.2_ts.so but we can ignore this as it’s the thread-safe version that is not relevant to our particular server setup.
Incidentally, in case you were wondering, .so files are a type of library file which stands for ‘shared object’. These are somewhat similar to DLL (Dynamic Link Library) files which you may be familiar with if you’re a Windows user.
Copying the ionCube Loader .SO File
To complete installation of the ionCube loader we just need to copy the ioncube_loader_lin_7.2.so file to the PHP extensions folder.
To find out the location of the extensions folder enter the following terminal command:
php -i | grep extension_dirWhich returns a string containing the required information.
extension_dir => /opt/cpanel/ea-php72/root/usr/lib64/php/modules => /opt/cpanel/ea-php72/root/usr/lib64/php/modulesDon’t forget that this will likely be unique for your own server. Now we know the destination folder we can copy the ionCube loader file.
sudo cp /tmp/ioncube/ioncube/ioncube_loader_lin_7.2.so /opt/cpanel/ea-php72/root/usr/lib64/php/modules
Right now the ionCube loader is in the correct location but we need to let PHP know that the extension is available and where it’s installed.
We can do this by editing the main php.ini configuration file and adding a new zend_extension entry specifying the path to ioncube_loader_lin_7.2.so.
However, php.ini is quite cumbersome to edit via the terminal but we can get around this by taking advantage of the fact that PHP supports using custom configuration files.
The only caveat is that these must be located in a specific directory which we can determine by entering:
php -i | grep 'additional .ini files'
We now have all the information to create our custom configuration file and add it to the correct location.
bash -c 'echo "zend_extension=/opt/cpanel/ea-php72/root/usr/lib64/php/modules/ioncube_loader_lin_7.2.so" > /opt/cpanel/ea-php72/root/etc/php.d/00-ioncube.ini'
Note that our custom .ini file has been prefixed with 00 which is a way to load it before other PHP configuration files to ensure it runs without conflicting with other custom configuration files.
Configuration and Server Reboot
The ionCube loader PHP extension should now be installed correctly. Before we can use it, though, we need to do a bit of housekeeping.
After installation it’s important to do the following:
- Reload the server
- Restart the PHP engine
- Clear the site cache
The server can be reloaded via the command line but the exact command will vary for different server setups. Since we’re running Nginx on our server we used:
sudo /etc/init.d/nginx reloadPHP can be restarted directly from cPanel or dashboard. It will usually take several seconds to restart PHP and a popup notification will be displayed when complete.
The last thing you should do is to clear the site cache to ensure you’re seeing the most recent changes made to the server configuration.
Once these final steps have been completed, ionCube loader should now be installed and configured correctly on your server, ready to decrypt PHP encoded files.
Verifying ionCube Loader Installation
To verify if ionCube loader is installed and configured correctly, there are a couple of things you can do.
Firstly, use php -i
If ionCube loader is installed then the details will show up in the output.
However, this outputs a huge chunk of data to the terminal that you have to then scroll through manually to look for ionCube references. In fact, the output from php -i is typically over 1000 lines of text.
You can use the php -i | wc -l terminal command to see the exact number of outputted lines.
It really isn’t viable to search through the terminal output manually so we can instead pipe the output from php -i directly into the grep command and only return the information we’re interested in.
To do this, enter the following in a terminal window (that’s still connected to your web server via SSH):
php -i | grep ioncube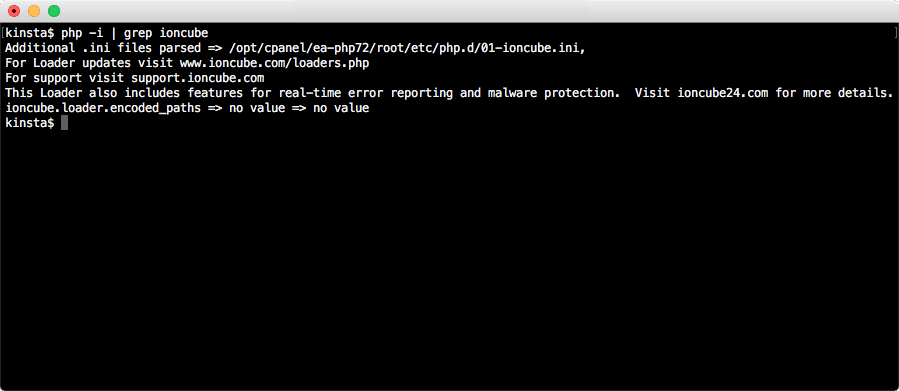
If you see references to ionCube loader then installation has been successful.
You can also access information about ionCube loader via the php -v terminal command. This will display the specific version of ionCube loader if installed.

If you don’t see any output relating to ionCube via php -i or php -v then something may have gone wrong with the installation. In which case you can try redoing some (or all) of the installation steps as needed to see if it remedies the issue.
If the problem persists then contact your host who’ll be able to provide you with the appropriate actions needed.
Another recommended way would be to create a phpinfo page, load it, and search for “ioncube”. This way you’ll know whether the ionCube is successfully installed and at what version.
Testing the ionCube Installation
As well as simply verifying that ionCube loader appears to be installed, it’s also worthwhile performing a live test to make sure the extension is working as expected before using it on production files.
Let’s do that now by encoding a PHP file and testing whether it executes properly when uploaded to the server. One of the simplest ways to encode PHP code is to use the online encoder.

Before you upload files to be encoded you’ll need to register for a free ionCube account. Click the Login menu item and follow the onscreen prompts to create an account.
Once logged in you’ll have access to the encoder upload page.

Normally there’s a fee for encoding PHP files for production code but it’s free for testing purposes.
Any encoded test files will only be actively decoded via the ionCube decoder PHP extension for up to 8 hours, after which they’ll expire and won’t be decoded. But this is more than enough time to test everything is working as it should.
Create a test PHP file and upload it to the online encoder. Make sure that the Test encoding box is checked.
The uploaded file is then automatically placed in a queue to be encoded. If this process is successful, after just a few seconds you’ll see a page showing the results along with a Download link to access the encoded file.

When you download the file you’ll notice that it’s been appended with the current timestamp to differentiate it from the original file.
For example, our original filename ioncuber-loader-test.php was encoded and then made available for download as ioncuber-loader-test-encoded-190924-100632.php.
You can include any valid PHP code you like in the test file. For our test PHP file, we added a simple function that returns a number to be displayed along with a message.
<?php

function mySecretFunction() {
  return '42';
}

echo "<h1>ionCube Loader Test Page</h1>";
echo "<p>Output of encoded function: " . mySecretFunction() .
"</p>";
By comparison, after this was run through the encoder the downloaded file contained the following:
<?php //0059b
// 10.2 72
//
// IONCUBE ONLINE ENCODER EVALUATION
// THIS FILE IS LICENSED TO BE USED FOR ENCODER TESTING
// PURPOSES ONLY AND SHOULD NOT BE DISTRIBUTED
//
if(!extension_loaded('ionCube Loader')){$__oc=strtolower(substr(php_uname(),0,3));$__ln='ioncube_loader_'.$__oc.'_'.substr(phpversion(),0,3).(($__oc=='win')?'.dll':'.so');if(function_exists('dl')){@dl($__ln);}if(function_exists('_il_exec')){return _il_exec();}$__ln='/ioncube/'.$__ln;$__oid=$__id=realpath(ini_get('extension_dir'));$__here=dirname(__FILE__);if(strlen($__id)>1&&$__id[1]==':'){$__id=str_replace('\\','/',substr($__id,2));$__here=str_replace('\\','/',substr($__here,2));}$__rd=str_repeat('/..',substr_count($__id,'/')).$__here.'/';$__i=strlen($__rd);while($__i--){if($__rd[$__i]=='/'){$__lp=substr($__rd,0,$__i).$__ln;if(file_exists($__oid.$__lp)){$__ln=$__lp;break;}}}if(function_exists('dl')){@dl($__ln);}}else{die('The file '.__FILE__." is corrupted.\n");}if(function_exists('_il_exec')){return _il_exec();}echo("Site error: the ".(php_sapi_name()=='cli'?'ionCube':'ionCube')." PHP Loader needs to be installed. This is a widely used PHP extension for running ionCube protected PHP code, website security and malware blocking.\n\nPlease visit ".(php_sapi_name()=='cli'?'get-loader.ioncube.com':'get-loader.ioncube.com')." for install assistance.\n\n");exit(199);

?>
HR+cPrb0lpjMgGF/p2/rAXWaVsF5lgbOo0LYkBQu2sZ7cHDIXwoQ+LPTtnDTw0hOl5Yfp7CvmV5c
bV90201GkQl3Lr5trbc0XXBJxV+hFqwsyPhXemDwQ37Lf0HHckqLWF5yXiIoErSIQzS8RbI1n49R
e2kRxmrwA+P2WbIZabhhXUPGZcn91NmJyW4qKz3xynZh+nvarORpi8tXqwPA3QUY7QZtwABJQs3U
lLpo3+X9sowLMgzttHBNNcGOZ73HVSgZ9eUtTRCeaswT4geKbT2qa0LgL8vhtl7RuymBklX1Rm0Q
1Aete/XaFhX6YG+B66t6nXBisZ5+P1O3YomFuW+rhbMbT1w3lk+MY+Ri5SCnRuvMig8ZWkchG3wX
XMpoGoP2uWectVSOROY+vmaGD+WTFjEFyw1C93T5qU4If5Ql/AdXA7s+ISvH8D5rqKSheLfnBQ2d
yx5yu5FEMrJwLA9g2g3xf2OSV5X1+1DmkRVEvY0tcukjjYVCcvbDKSBQpigXvYiTHAouI5ANmYbR
pMURAoAO9gUSm3Bul7HZdaQRwH2Fyp3na3hWGiSTdp5EXEDMTKRWtiB5nPPQ3MmVO6F2Er62h3Ov
N0oR6uCDj/y11u3Re6BQ2laN2k9m9ylnsMYketpe+OOMaoA6+n1yVpYWkBra+vr+Veh9+oQkXQBP
ZG4bUtd+4UIWW057ZMkKS4+2S3dSDHjcU/Op9ZSp2VFpSOlaqssNgA9WMGP0b8xhbTOPx6FqgY09
/WnmQyto9goSeIfAcc1braP74ILD9DLwVRG1aXHIC6WGhPYzafs+gut8DHebHUzSPj3JYu9t6/w2
1Nnuc5Dso5SnAa8v2AabXUvZBpQrYTf8tY1L0zL8sqTIvTlv/tRCpsu4hrwFg7hqx+6OsXaWiLwY
xtfwBfCbGS1a/c2+OhUujEllco6gB1KoekhLv9xVj70cRWRgnf+nSCcCc2bFjk4+VtJh+07M9CRO
vqaTu78gagPGMVFYebH5AvOLOKn8Ao1A1lX+GdiD0mLr8BAQ2jrZx1i8wZ0ILNuKRFWvFnYK4Bjg
SYImW2oc6Mg/u50B/Y+mjAeIbpUfm+Ksetd5n2sFetQt831K3u891bKBPw8AzqtGzhLjihFhORCG
BIwx+aA8AvUMeR4Uuk/FdyxATCqly93/crGkCwUQWrvPY5hA9KvtmOFvYPUVpuFZKS5BPzUySat3
ChtDQpr7H7N9phQvoSZ7pTBOGoyfVDTn1abQVMYQXbrW+yee+wBnGiUpGpR3MgkUPHKX/N36+P8o
Ld5obAtVtNjgiQjcYwI6KkrNmH22sqHlILAnR7yUn0==
This is completely unrecognizable from the original source code so the encoder has done its job!
The important question now is: will the installed ionCube decoder extension be able to analyze the file and decode it so that it can be executed as normal PHP code?
To find out, we uploaded both PHP files to the server and viewed them in the browser. First up is the original file containing the raw PHP code.

The page is displayed as expected. Now for the encoded PHP file.

This displays exactly the same so the ionCube decoder extension is verified as installed and working correctly.
Check Error Logs for Installation Issues
One final thing you can do to verify installation has been successful is to view the server error logs and look for recent entries relating to the ionCube installation.
If you see anything similar to the following in the error log then you’ll need to contact your host so they can look into it further:
PHP Fatal error: The file
/www/sitename_xxx/public/wp-content/themes/theme-name/functions.php was encoded by the ionCube Encoder for PHP 5.6 and cannot run under PHP 7.1
The steps required to access the error logs will vary from host to host so it’s best to check first if you’re not sure where they’re located.
Kinsta customers can view error logs in their MyKinsta dashboard.
Summary
By now, hopefully, you’ll have the ionCube Loader PHP extension installed and working on your server. Let’s take a moment to recap what we did.
We learned that the ionCube loader is a PHP extension with a dedicated purpose which is to decrypt previously encrypted PHP files on-the-fly, as and when they’re requested by the server.
To do this, the loader needs to be installed correctly via a series of terminal commands when connected to the server using an SSH connection.
Once you establish a secure connection to your server, you can begin the ionCube loader extension installation process which can be broken down into a series of steps:
- Download the correct ionCube loader archive into a temporary folder on your server.
- Extract the downloaded archive. Select the appropriate .so ionCube loader file from the numerous extracted files that matches the installed version of PHP.
- Copy the ionCube loader .so file to the PHP extensions folder. This will be a fixed location unique to your particular PHP installation.
- Enable the ionCube loader in PHP by editing the main php.ini file or creating a custom .ini file. Add a new
zend_extensionpointing to the location of the installed ionCube loader file. - To actually start processing encrypted PHP files the server needs to be reloaded, and the PHP engine restarted. The exact process for doing this will differ from server to server. Sometimes it’s also necessary to clear the site cache too.
- Verify the ionCube installation has been successful via the terminal by using the
php -iandphp -vcommands. - The final step is to do a live test to make sure the ionCube loader is working as expected. You can use the online encoder to encrypt PHP files for free as long as it’s just for testing purposes.
If anything goes wrong during the installation process, or just for peace of mind, you can also check the server logs for any errors that may have occurred.
Now’s your turn: what’s your experience with ionCube Loader? Let us know in the comments!

David Gwyer is a WordPress developer at WPGoplugins, JavaScript programmer, and technical writer with 20+ years industry experience. His current development work is focused on creating engaging blocks for the exciting new WordPress Editor. Connect with David on Twitter

