
Jira is a popular project management tool that helps you keep track of tasks within a project. However, when working on a large project, your Jira dashboard can become cluttered as the number of tasks and team members increases.
To address this concern, you can use the Jira REST API to generate a simplified To-Do List application that displays your assigned tasks and their deadlines. The API lets you programmatically interact with Jira to create, retrieve, update, and delete issues and access user data and project details.
This tutorial walks you through developing a to-do list application with Node.js as the server to fetch issues from your Jira account and a React application to display them. You also learn how to host both the frontend and server to Kinsta.
Prerequisites
To follow along, you need:
- Node.js and Node Package Manager (npm) installed on your development machine.
- A Jira account for accessing tasks.
- A solid understanding of Node.js and React.
How To Build the Backend With Node.js and Express
Express is a popular Node.js framework that provides a streamlined environment for building server-side applications. Express simplifies the handling of routes and facilitates interactions with external resources, such as APIs, databases, and frontend applications.
Follow the steps below to set up the server:
- Create a new directory and navigate to it. Then, initialize Node.js by running the command below:
npm init -yThis command creates a package.json file with the default settings at the root of your app’s folder.
- Next, install all the necessary dependencies for your project by running the following command:
npm install express dotenv axiosThe command above installs the following:
- Once the installation is successful, create a .env file in the root of your project and add the
PORTnumber:PORT=3000This is the port number the server listens to. You can change it to a port of your choice.
- Create an index.js file in your project’s root folder and add the following code to import Express, create an instance of an Express application, and start your server:
const express = require('express'); require('dotenv').config() const app = express(); const PORT = process.env.PORT; // Define routes here app.listen(PORT, () => { console.log(`Server is running on port ${PORT}`); }); - Finally, in your package.json file, add a script to start your server:
"scripts": {
   "start": "node index"
  },
Now, you can run the start script in your terminal:
npm run startThis command starts your server. You should see the following text logged in the terminal:
Server is running on port 3000With the server up and running, you can now configure your Jira app.
How To Configure a Jira App
To use the Jira REST API, you need to authenticate a user account with your Jira site. The to-do app API you build uses basic authentication with an Atlassian account email address and API token.
Here’s how to set it up:
- Create a Jira account or log in if you have one.
- Navigate to the security section of your Atlassian profile and click Create API token.
- In the dialog that appears, enter a Label for your token (e.g., “jira-todo-list”) and click Create.
- Copy the token to your clipboard.
- Finally, store the API Token in your .env file:
JIRA_API_TOKEN="your-api-token"Now, you can access the Jira API using basic authentication.
Set Up Routes To Fetch Issues From Jira
Now that you have configured a Jira application. Let’s set up routes to fetch issues from Jira in your Node.js server.
To initiate a request to the Jira API, you must use the Jira API token you saved in the .env file. Retrieve the API token using process.env and assign it to a variable named JIRA_API_TOKEN in your index.js file:
const JIRA_API_TOKEN = process.env.JIRA_API_TOKENNow, you need to define the endpoint URL for your API request. This URL contains your Jira domain and a Jira Query Language (JQL) statement. The Jira domain refers to the URL for your Jira organization and looks like org.atlassian.net, where org is your organization’s name. JQL, on the other hand, is a query language for interacting with issues in Jira.
Start by adding the Jira domain to the .env file:
JIRA_DOMAIN="your-jira-domain"You also need to store your Jira email to the .env file as it would be used for authorization when making a request to Jira:
JIRA_EMAIL="your-jira-email"Next, add both environment variables and construct the endpoint URL using the domain and the following JQL statement. This query filters issues with “In progress” or “To do” statuses for the logged-in user and then orders them by status:
const jiraDomain = process.env.JIRA_DOMAIN;
const email= process.env.JIRA_EMAIL;

const jql = "status%20in%20(%22In%20progress%22%2C%20%22To%20do%22)%20OR%20assignee%20%3D%20currentUser()%20order%20by%20status";

const apiUrl = `https://${jiraDomain}/rest/api/3/search?jql=${jql}`;
Before creating a route, also import Axios into your index.js file:
const axios = require("axios")You can now create a route make a GET request to the Jira API and return the issues. In index.js add the following code:
app.get('/issues/all', async (req, res) => {
  })
Now, use the axios.get method to make a GET request to the Jira REST API. You create the Authorization header by base64-encoding your Jira email and API token:
const response = await axios.get(apiUrl, {
        headers: {
        Authorization: `Basic ${Buffer.from(
          `${email}:${JIRA_API_TOKEN}`
        ).toString("base64")}`,
        Accept: "application/json",
      },
    });
Await the response from the Jira API and save it in a variable. The response contains a property called issues, which holds an array of issue objects:
const data = await response.json();
const { issues } = data;
Next, iterate over the issues array, extract only the relevant information about the to-do items, and return it in JSON response:
let cleanedIssues = [];
issues.forEach((issue) => {
      const issueData = {
        id: issue.id,
        projectName: issue.fields.project.name,
        status: issue.fields.status.name,
        deadline: issue.fields.duedate,
      };
      cleanedIssues.push(issueData);
});
res.status(200).json({ issues: cleanedIssues });
If you make a request to http://localhost:3000/issues/all, you should receive a JSON object containing the issues:
curl localhost:3000/issues/allYou can even take this further by using a provider like SendGrid and a cron job to send daily emails containing your assigned tasks.
Host Your Node.js Application on Kinsta
Before hosting your application on Kinsta, enable Cross-Origin Resource Sharing (CORS) to prevent an access-control-allow-origin error since you host the backend and the frontend on different domains. To do this:
- Install the cors npm package by running this command in your terminal:
npm install cors - Then, import the package in index.js.
const cors = require('cors') - Next, configure CORS as middleware to enable it for every incoming request. Add the following code at the top of your index.js file:
app.use(cors());You can now send HTTP requests to your server from a different domain without encountering CORS errors.
Next, push your code to a preferred Git provider (Bitbucket, GitHub, or GitLab) and follow the steps below to host it:
- Log in or create an account to view your MyKinsta dashboard.
- Authorize Kinsta with your Git provider.
- Click Applications on the left sidebar, then click Add application.
- Select the repository and the branch you wish to deploy from.
- Assign a unique name to your app and choose a data center location.
- Add the environment variables. There’s no need to add the PORT as an environment variable, as Kinsta handles it automatically. Check the boxes next to Available during runtime and Available during build process:

Kinsta app environment variables. - Review other information (you can leave the default values) and click Create application.
Your server is now successfully deployed to Kinsta. On the left-hand menu, click Domains and copy the primary domain. This is your server’s URL endpoint.
Create a React Application to Display the Issues
Next, you use React to build your app’s frontend and CSS to style it. Follow the steps below to create a React project with Vite:
- Scaffold a new React project named
jira-todo:npx create-vite jira-todo --template react - Navigate to the project directory and install the necessary dependencies:
npm install - Start the development server:
npm run dev
Fetch Issues From the Server
- Clear the contents in App.jsx and add the following code:
function App() {

  return (
    <div className="App">
      <h1>What's on my list today?</h1>
      {/* Display issues */}

   </div>
 );
}

export default App;- Before you start fetching the issues, store the server URL from Kinsta in a .env file at the root of your app’s folder:
VITE_SERVER_BASE_URL="your-hosted-url"- Get the URL in App.jsx by adding the following line at the top of the file:
const SERVER_BASE_URL=import.meta.env.VITE_SERVER_BASE_URL- In your component, create an async function named
fetchDataand make a GET request to the/issues/allendpoint on the Express server. Once you receive a response, parse it as JSON and store the data in a state value nameddata:
import { useCallback, useEffect, useState } from "react";

function App() {
  const SERVER_BASE_URL=import.meta.env.VITE_SERVER_BASE_URL

  const [data, setData] = useState([]);
  const fetchData = useCallback(async () => {
    try {
      const response = await fetch(`${SERVER_BASE_URL}/issues/all`);
      if (!response.ok) {
        throw new Error('Network response was not ok');
     }
      const data = await response.json();
      	setData(data.issues);
    } catch (error) {
      console.error('Error fetching data:', error);
  }
     },[SERVER_BASE_URL]);

  useEffect(() => {
    // Fetch data when the component mounts
    fetchData();
     },[fetchData]);

  return (
    <div className="App">
        <h1>What's on my list today?</h1>

    </div>
  );
}

export default App;
Note that you use the useEffect hook to execute the fetchData function when the component mounts.
Render the Issues From Jira in the Browser
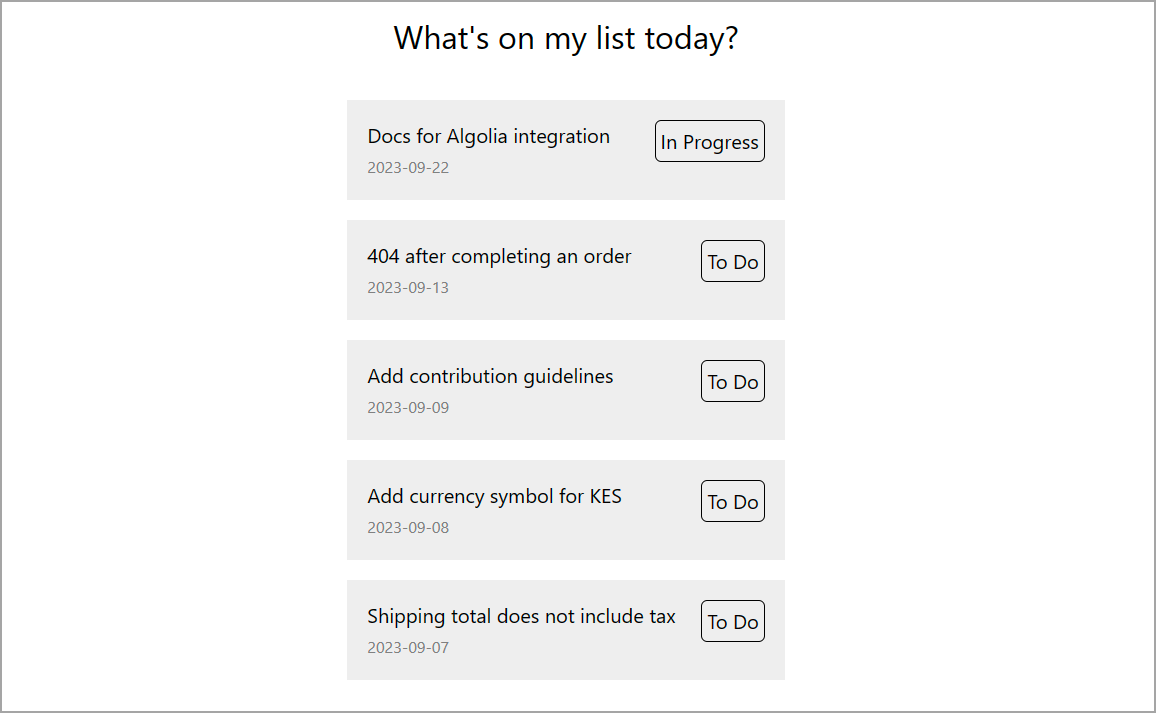
- Now, you can modify the return statement of your component to iterate over the issues and list them in the browser:
return (
  <div>
    <h1>What's on my list today?</h1>
    <section>
      	{data && data.map(issue => {
      	return <div className="issues" key={issue.id}>
        <div>
         <div>{issue.summary}</div>
          <small>{issue.deadline}</small>
        </div>
        <div>
          <div> className="status">{issue.status}</div>
        </div>
      </div>
    })}
    </section>
  </div>
);- To style this application, add the following CSS code to App.css:
h1 {
    text-align: center;
  font-size: 1.6rem;
  margin-top: 1rem;
}
section {
  display: flex;
  flex-direction: column;
 justify-content: center;
  align-items: center;
  margin-top: 2rem;
 }

 .issues {
  display: flex;
  min-width: 350px;
  justify-content: space-between;
  padding: 1rem;
  background-color: #eee;
  margin-bottom: 1rem;
}

 small {
  color: gray;
}

.status-btn {
  padding: 4px;
  border: 1px solid #000;
  border-radius: 5px;
}- Then, import App.css in index.js to apply the styles:
import './App.css'Now, when you start your application, you should see a list of tasks assigned to you with their status and deadline in your browser:
Deploy Your React Application on Kinsta
To keep things simple, use Kinsta’s Static Site Hosting to deploy the application. Kinsta’s Static Site Hosting helps build your sites into a static site and deploys the static files ensuring swift content delivery and minimal downtime.
Create a repository on GitHub to push your source code. Once your repo is ready, follow these steps to deploy your static site to Kinsta:
- Log in or create an account to view your MyKinsta dashboard.
- Authorize Kinsta with your Git provider.
- Click Static Sites on the left sidebar, then click Add site.
- Select the repository and the branch you wish to deploy from.
- Assign a unique name to your site.
- MyKinsta detects the build settings for this React project automatically. You see the following settings prefilled:
- Build command:
npm run build - Node version:
18.16.0 - Publish directory:
dist
- Build command:
- Add the URL of your server as an environment variable using
VITE_SERVER_BASE_URL. - Finally, click Create site.
And that’s it! You now have a deployed site within a few seconds. A link is provided to access the deployed version of your site. If you navigate to your site’s domain, you see a list of Jira issues. You can later add your custom domain and SSL certificate if you wish.
As an alternative to Static Site Hosting, you can opt for deploying your static site with Kinsta’s Application Hosting, which provides greater hosting flexibility, a wider range of benefits, and access to more robust features. For example, scalability, customized deployment using a Dockerfile, and comprehensive analytics encompassing real-time and historical data.
Summary
In this guide, you learned how to create an Express app to retrieve assigned Jira issues using the Jira REST API. Additionally, you connected a React frontend application to your Express application to display these issues in the browser.
This app is a rudimentary demonstration of what you can achieve with Jira REST API. You can enhance your app with functionality that lets you mark completed tasks, perform advanced filtering, and much more.
Also, with Kinsta, you can host both your server and the site in one dashboard using our various services. Check out Kinsta’s robust, flexible web hosting for all your applications.


